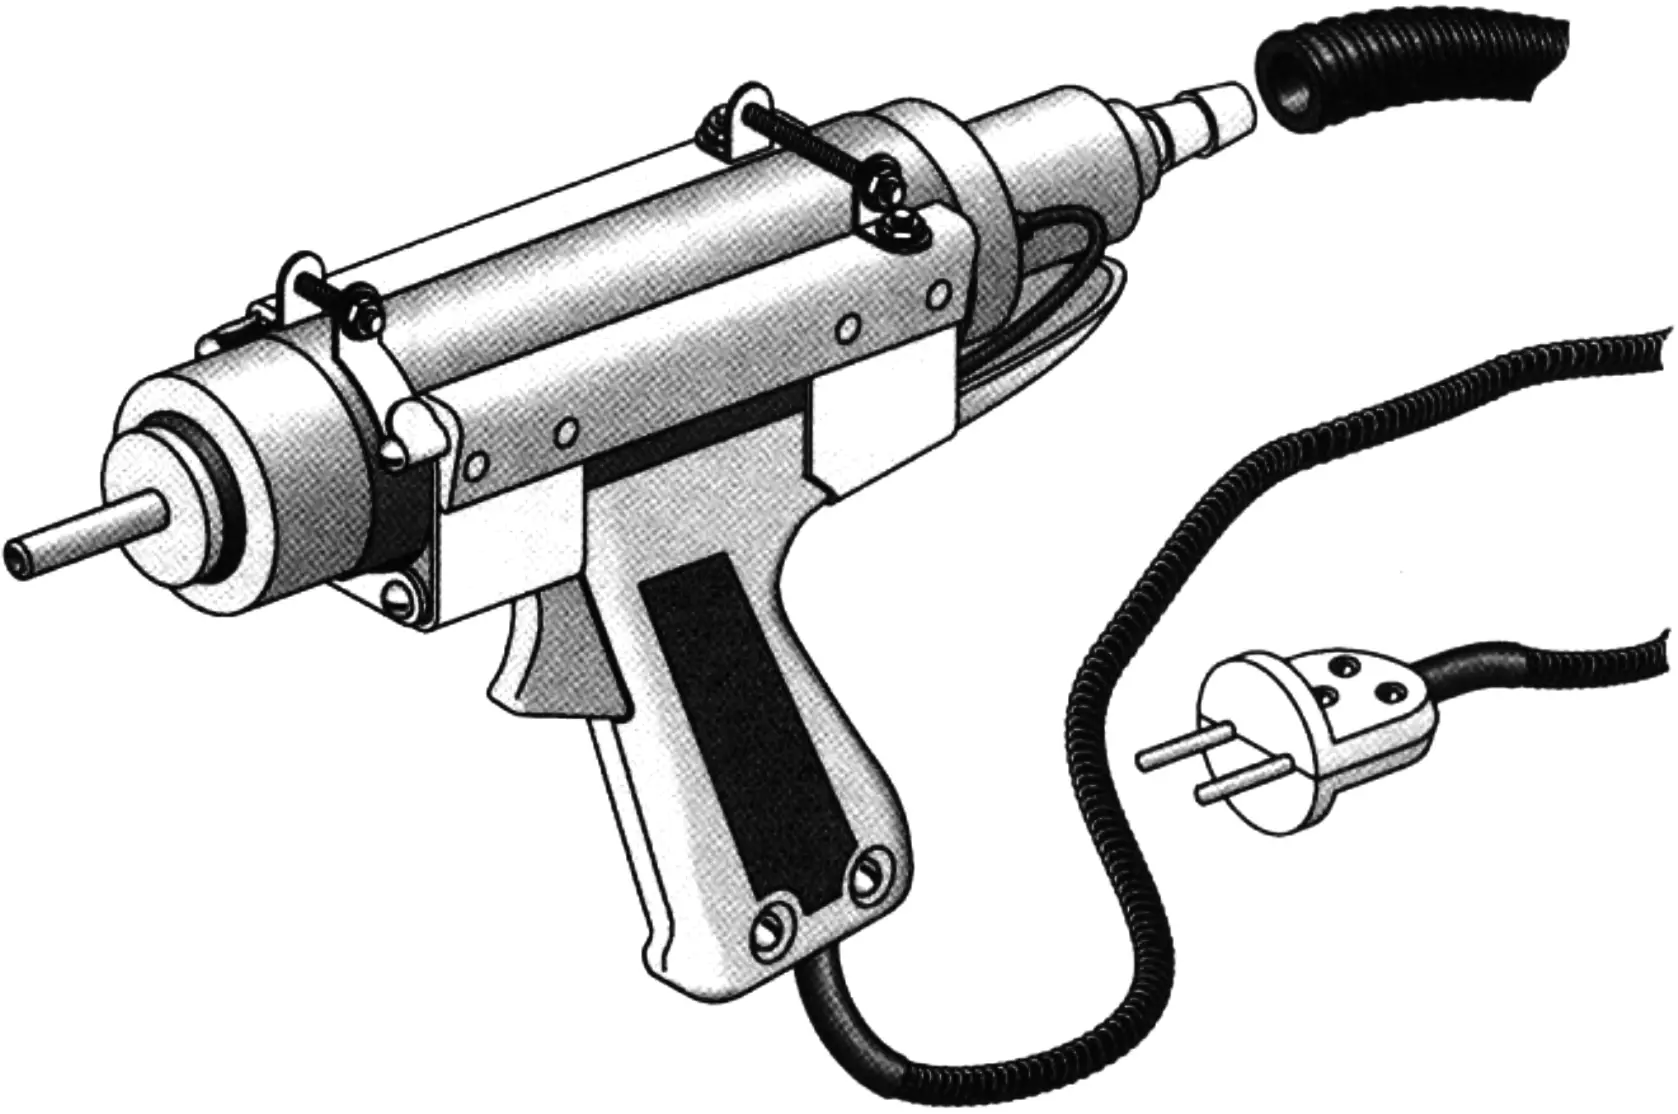
I offer home craftsmen (and not only them) a tool for welding plastics. However, it can also be used for a wide range of technical creativity tasks — for example, to blow solder off dismantled electronic boards. After all, the temperature of the air coming out of the nozzle tube will reach 300°C, and it will take only 5 — 8 minutes to heat up.
The device (Fig. 1) is assembled in the form of a gun — the most convenient shape for work. And its base for me was an old pulse soldering iron (PCI-100 GOST 721969), from which the entire working part was removed, except for the switch (22) located in the handle (21).
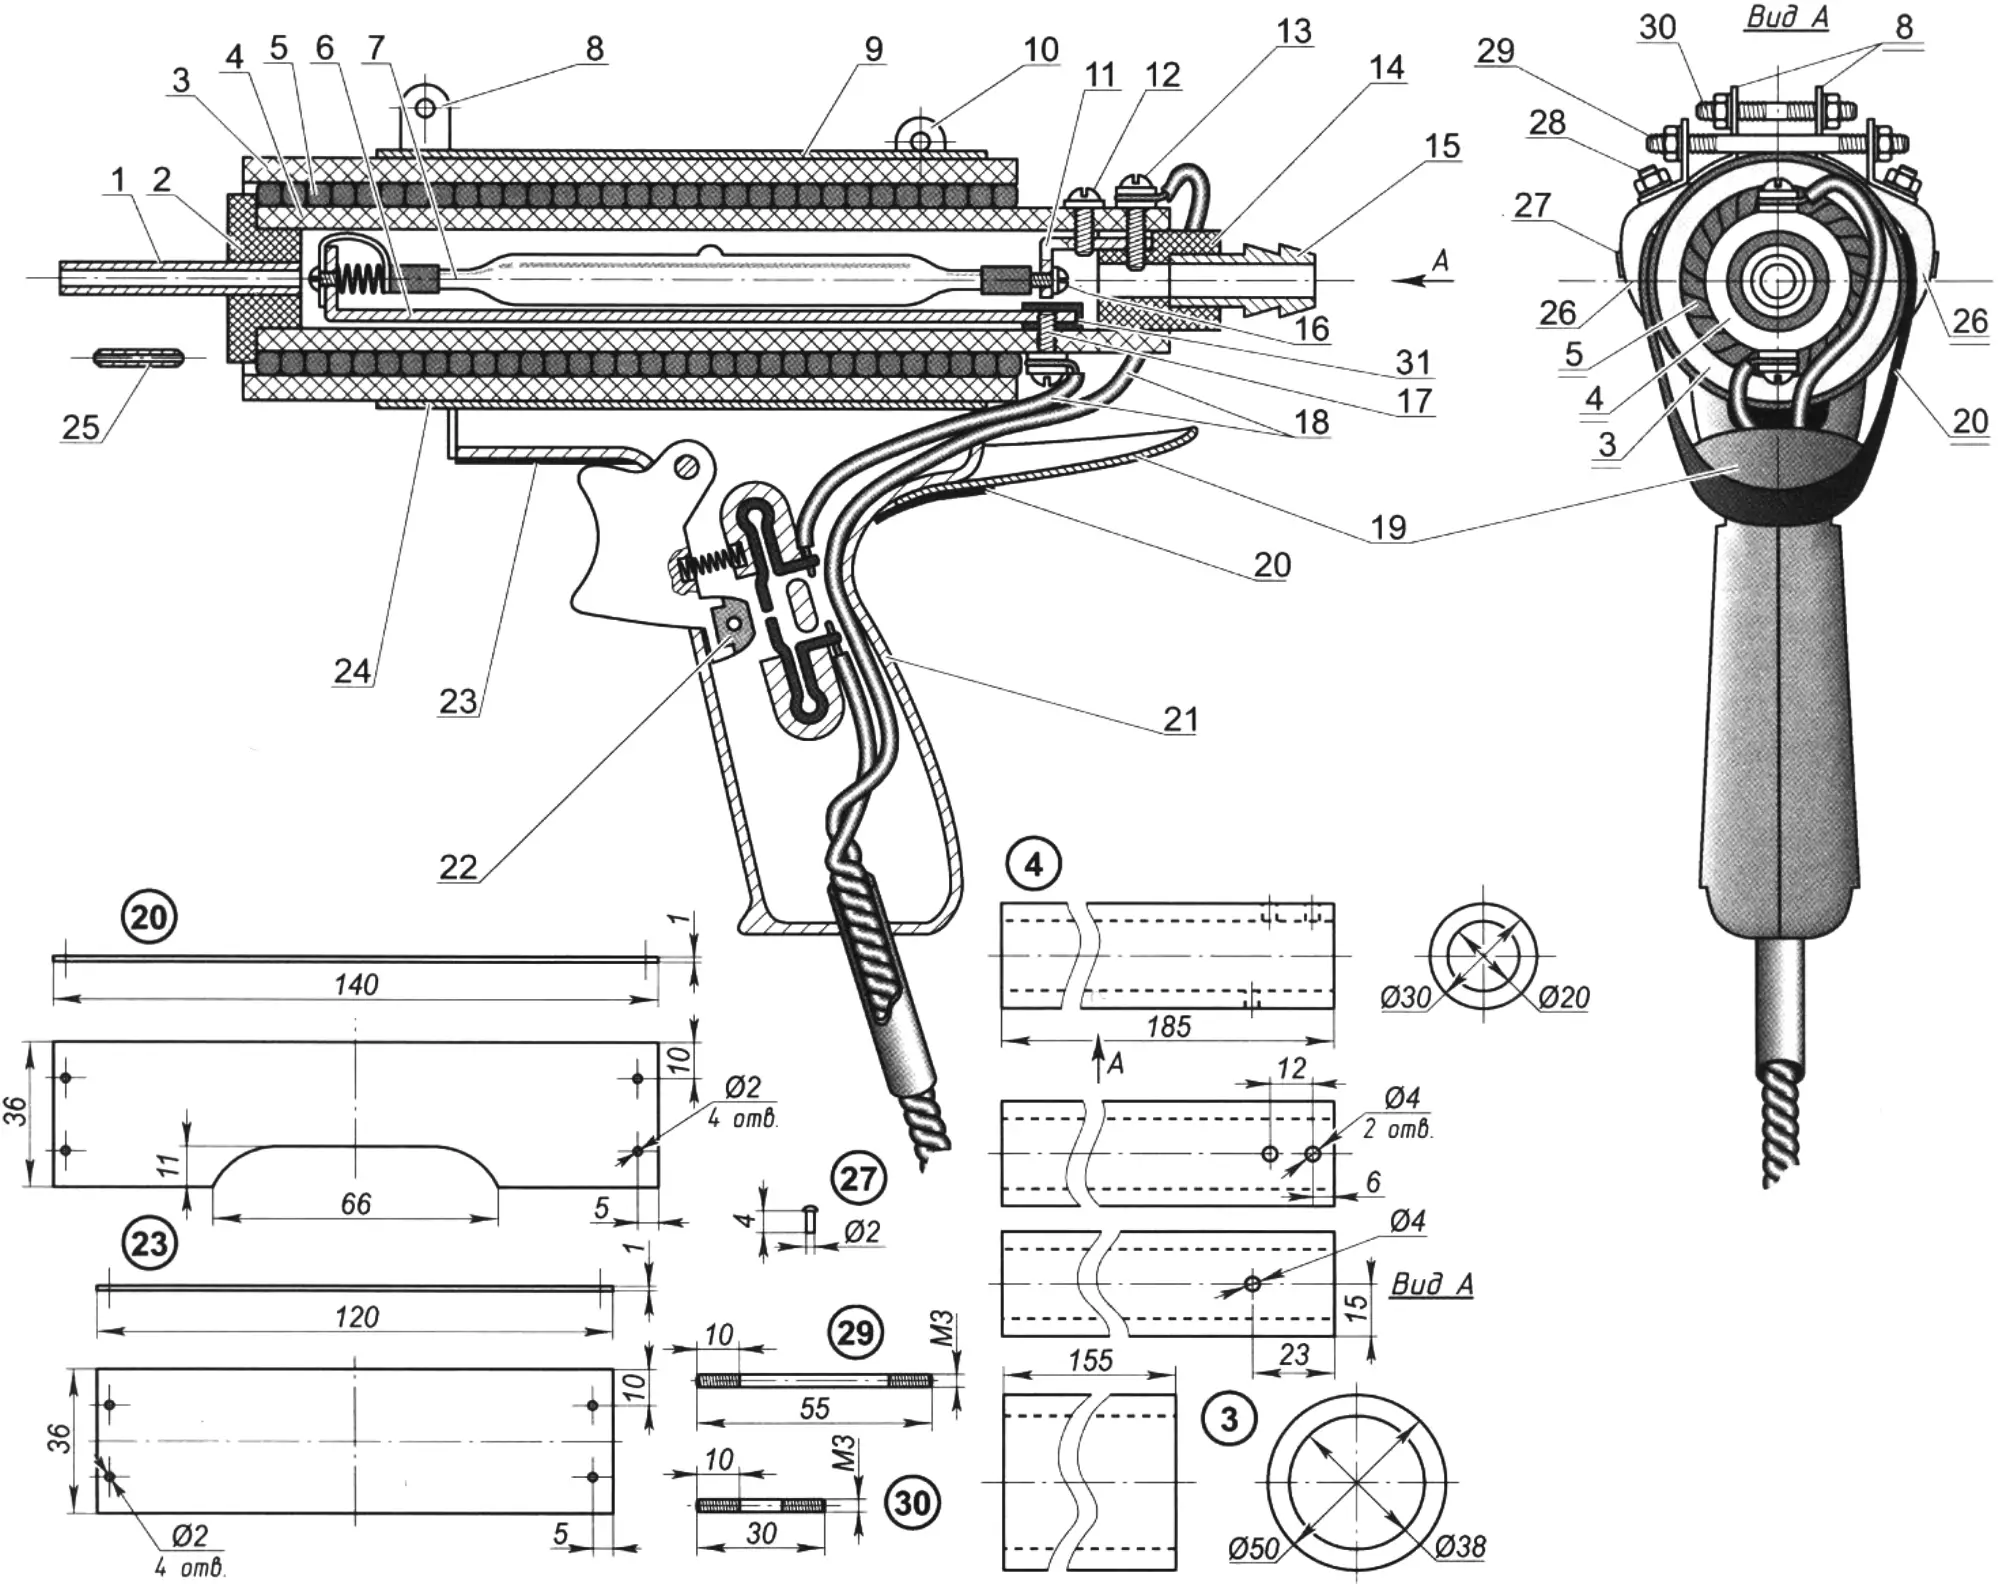
The empty metal body of the soldering iron is cut lengthwise with a metal hacksaw (horizontally), and the separated upper part is cut lengthwise in half again. To the resulting two halves (26), two clamping bands (20 and 23) made of thin (1 mm) fluoroplastic are attached with aluminum rivets (27) through drilled holes 2 mm in diameter; these bands will serve to fasten the new working part of the device — that is, the outer ceramic tube (3) 50 mm in diameter — to the handle (21). For the same purpose, holes for clamping angles (10) are drilled on top of the mentioned soldering iron body halves (26), in their rear part. And on the front side of these halves there are already ready threaded holes, into which the screws of the clamping plates (8) are fastened, previously bent as shown in the figure. The fastening is tightened with studs and nuts (29, 30). But first, the heater body of the device (3) must be wrapped with heat-insulating tapes (9, 24) made of the same fluoroplastic as the clamping bands. Before assembling the device, a flexible electric cable (18) rated for a current of up to 5 A must be introduced into the handle in advance and connected to the switch, and the ends brought outside for connection to the heating part.
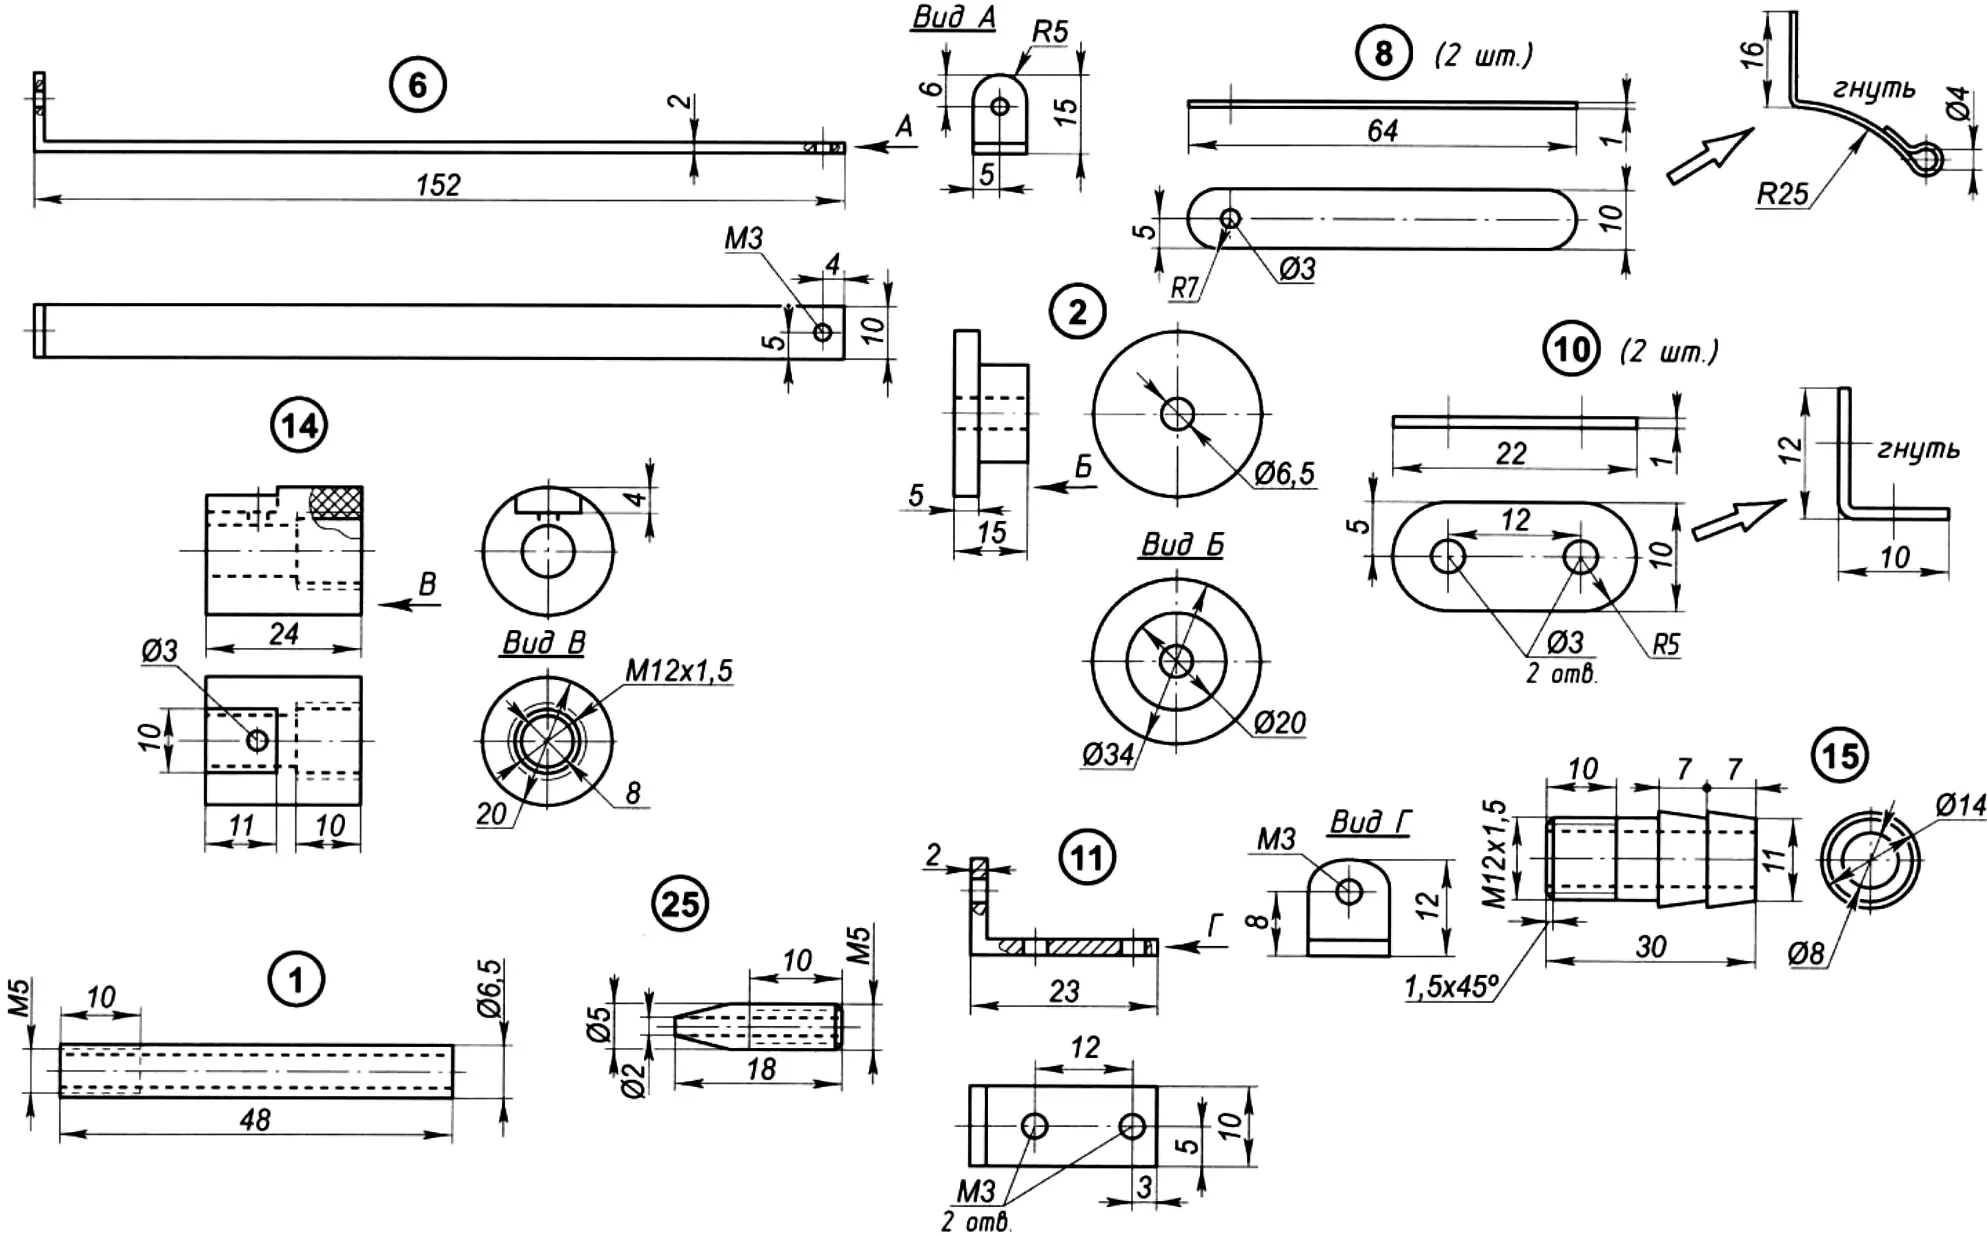
1 — nozzle (copper tube 6.5x4x48); 2 — bushing (ceramic or electroporcelain); 3 — body (ceramic tube 50x38x155); 4 — heater jacket (ceramic or electroporcelain tube 30x20x185); 5 — thermal insulation (asbestos cord Ø5, length about 5000); 6 — bracket
The basis of the device is, of course, its working part, namely the heating element (7), which is a quartz halogen incandescent lamp (for example, KT220-500-1 from a “Foton” photo illuminator). Its surface heats up to 470°C. It is placed in a tubular ceramic jacket (4). For better heat transfer, the inside of its tube can be carefully lined (using PF-14 glue) with aluminum wrapping foil, carefully smoothed out. Only the place where the lamp is installed directly should be lined, without going beyond the rear base.
Inside the jacket, for installing the lamp, a bracket (6) is mounted with a contact assembly in the front part, consisting of a spring plate, a spring, and a screw. The end of the strip is secured with a screw (17), which also serves as a current-carrying element. Above it, a small angled bracket (11) is attached, which is the second contact. On the drawing, between these two contacts, where they are close together, a thin fluoroplastic gasket (31) installed above the screw (17) can be seen; but this place can simply be coated with heat-resistant varnish or PF-14 glue).
After the lamp has been installed, it remains to mount the ceramic bushing (2) and the copper “soldering” tube — the nozzle (1) — at the front of the body; they are fastened with heat-resistant PF-14 glue. A thermal and electrical insulating paste made of a mixture of talc and liquid glass (office glue) can also be used. It is better to make the bushing rim of a slightly larger diameter — not 30, but 32 mm — then you will get a collar that will serve as an additional stop for the asbestos cord packing (5) if it loosens.
It is better to wind the asbestos cord, which serves as the main thermal insulation, before installing the lamp and the contact strips. It is laid tightly over the entire surface of the heater jacket (4), without reaching the holes for the screws. Then the body — the ceramic tube (3) — is put on, and only after that the strips and the lamp are installed.
The rear adapter bushing (14) for the vacuum cleaner hose is also made of fluoroplastic, but it can also be made of textolite, since this part almost does not heat up, being under a constant flow of cold air. It is fixed with a screw (13), which also serves as the second current-carrying element.
The fitting (15) is made of an aluminum alloy. And the adapter to the vacuum cleaner with the same fitting for the second version of the device (Fig. 2, 6) is made to fit the cone of an aluminum tube put onto the vacuum cleaner hose; it is inserted inside this tube and held there by air pressure.
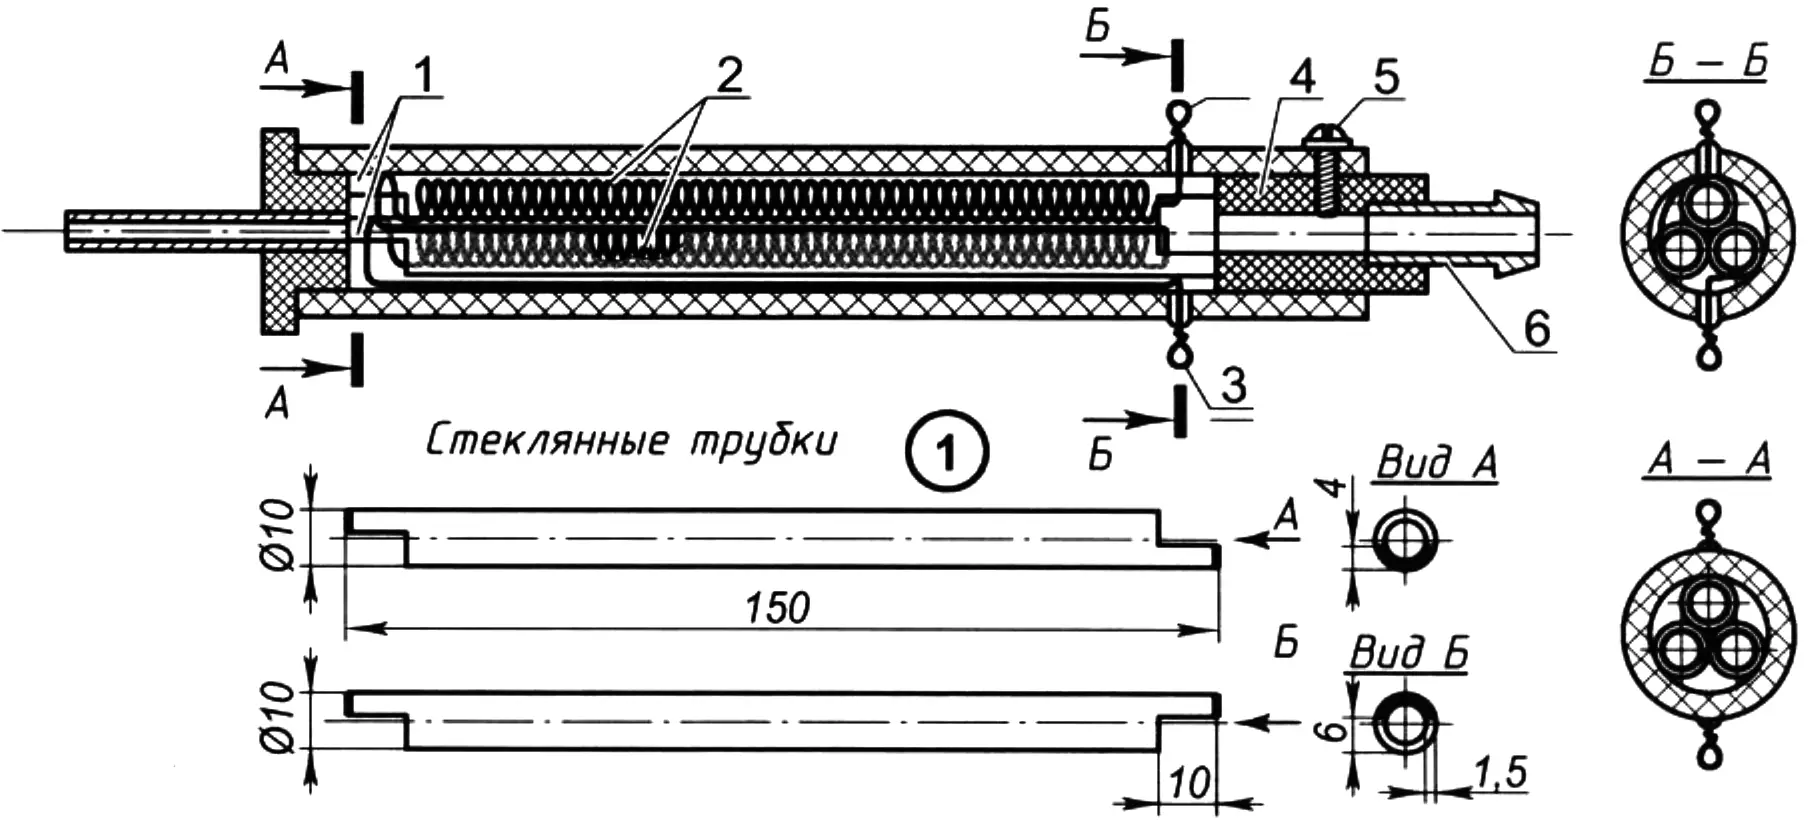
1 — glass tubes (3 pcs.); 2 — coil (nichrome wire); 3 — coil contacts; 4 — adapter; 5 — adapter locking screw; 6 — fitting
Instead of a halogen lamp, you can use the second version of the device (Fig. 2), where the heating element with a power of 600 to 1000 W consists of nichrome wire (2) 0.5 mm in diameter and three glass tubes (1), which are cut at both ends with steps for free air passage. Since nichrome, when heated, contacts oxygen, oxidizes, and burns out, it is advisable to coat the finished coil before installation with PF-14 glue, heat-resistant varnish, or the already known paste.
You can do without tubes altogether by stringing short ceramic insulators onto the coil, which are sold in hardware stores together with coils for hot plates or irons; or even do without them if you thickly coat all the bends of the coil with paste, thereby insulating it.
The operating principle of the welding device is as follows. First, on the vacuum cleaner (if there is no separate compressor), the hose is switched from the suction port to the outlet. Before turning on the lamp, the vacuum cleaner (or compressor) is turned on. The pressure should be low, about 0.2 kg/cm²: the stronger the air pressure, the lower its temperature at the nozzle outlet. After that, by pressing the trigger, the welding gun is turned on, first until the required temperature is reached. And later, thanks to the thermal inertia of the heated ceramics, the lamp is switched on for a short time, maintaining the required temperature. (Attention! Do not turn on the device without air supply!)
Thick plastic sheets are best welded with a filler rod of a similar material. Linoleum joints are joined well: the edges do not char, which inevitably happens when working with a contact heater. Polyethylene also welds quite well, and the seam can be of any configuration.
“Modelist-Konstruktor” No. 4’2010, A. NAZAROV
Recommend to read
 LIFT DRUM
In the GDR skiing designed the lift with a drum on which is wound a pull cable. To do the same, you will need a moped engine with a working volume of 50 cm3, its exhaust transmission... SKI-VODOCHODY: ANOTHER OPTION
In the "M-K" №4 for the year 1989 was published an article devoted to the ski-Vodochody... I Read it and wished I still had not written to the editor, not shared with the readers of...
