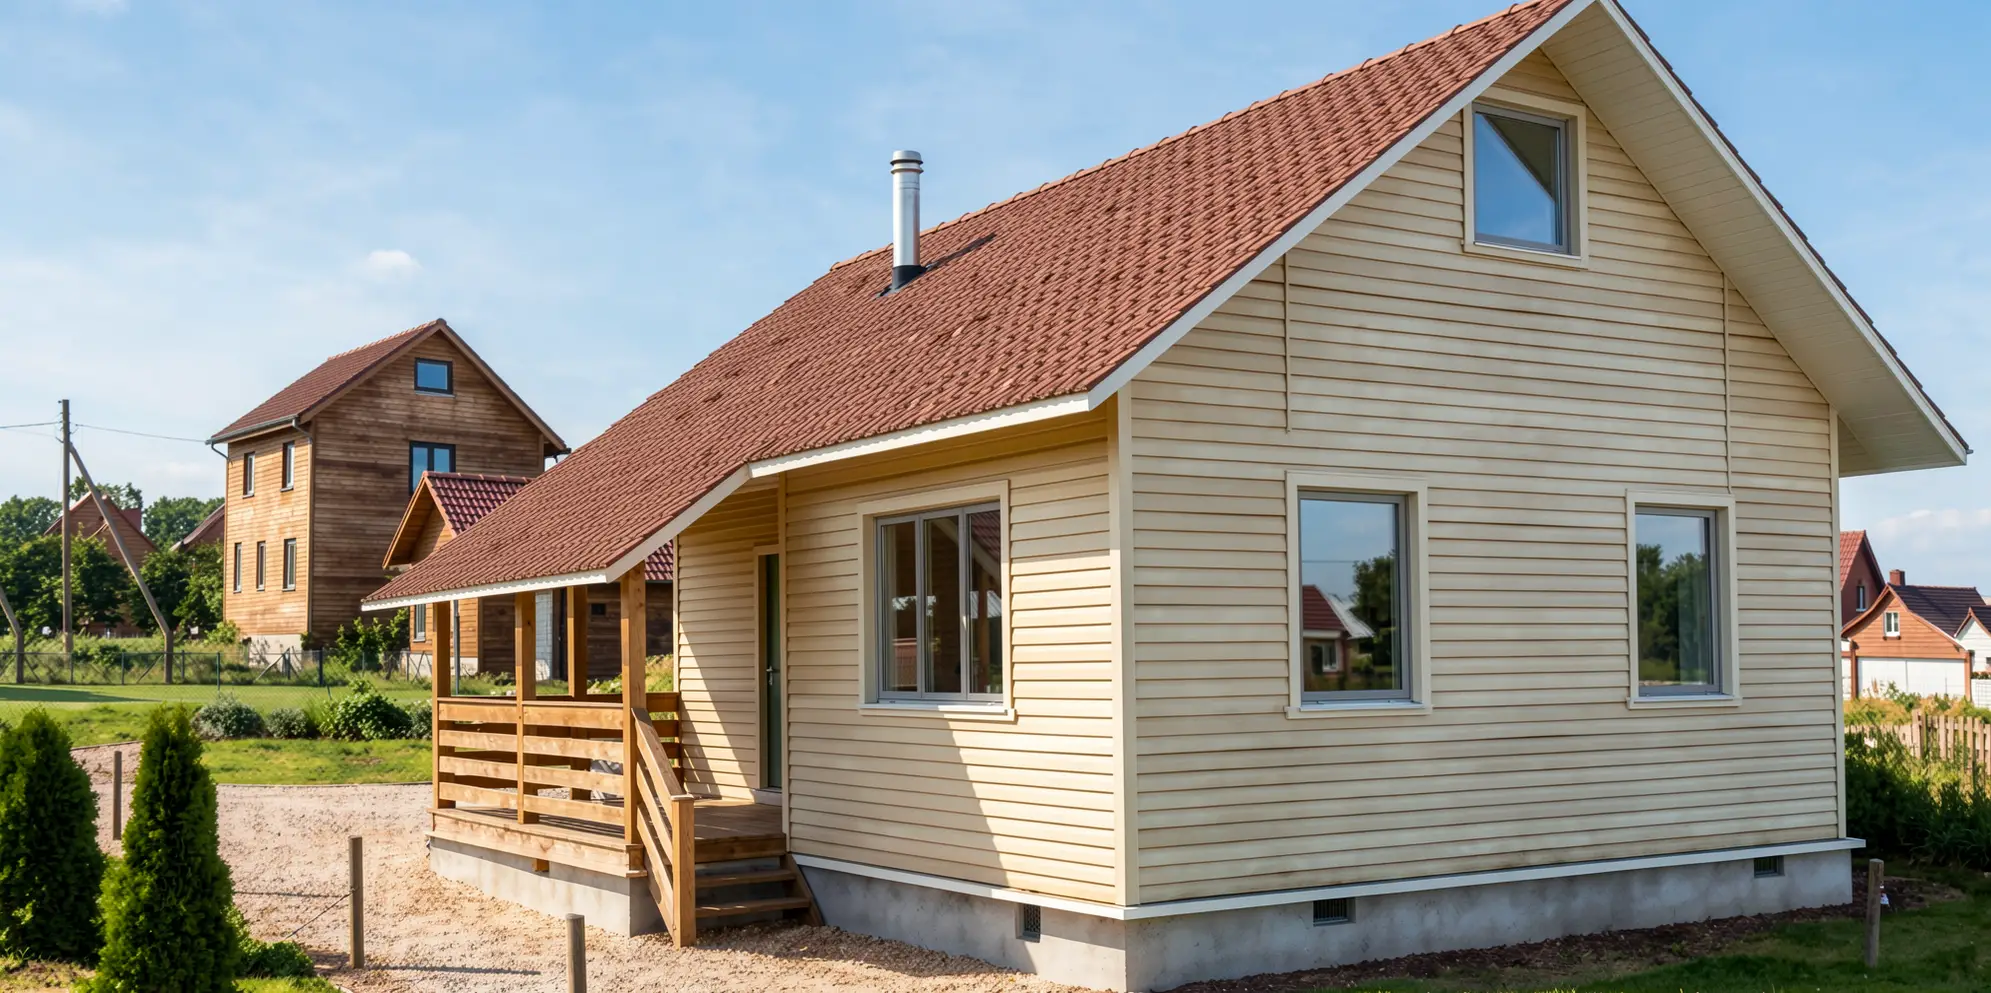
On his own land, the owner erected a two-storey shell of a “Canadian” house on a strip foundation. The adjacent plot had long been for sale. At last it found a new owner, who invited a surveyor for an accurate layout of the plot. During that procedure it turned out that the neighbour had built a house half a metre from the boundary and thus violated the existing rules. The new owner remained adamant. The case went to court. The court’s decision was natural: move the building one metre away from the fence. The reader can imagine what it means to relocate a house together with its foundation.
Rules for locating a dwelling house and utility buildings
Look at Figure 1. According to the regional building regulations (RSN 70-88), this is an approximate layout of buildings on a plot.
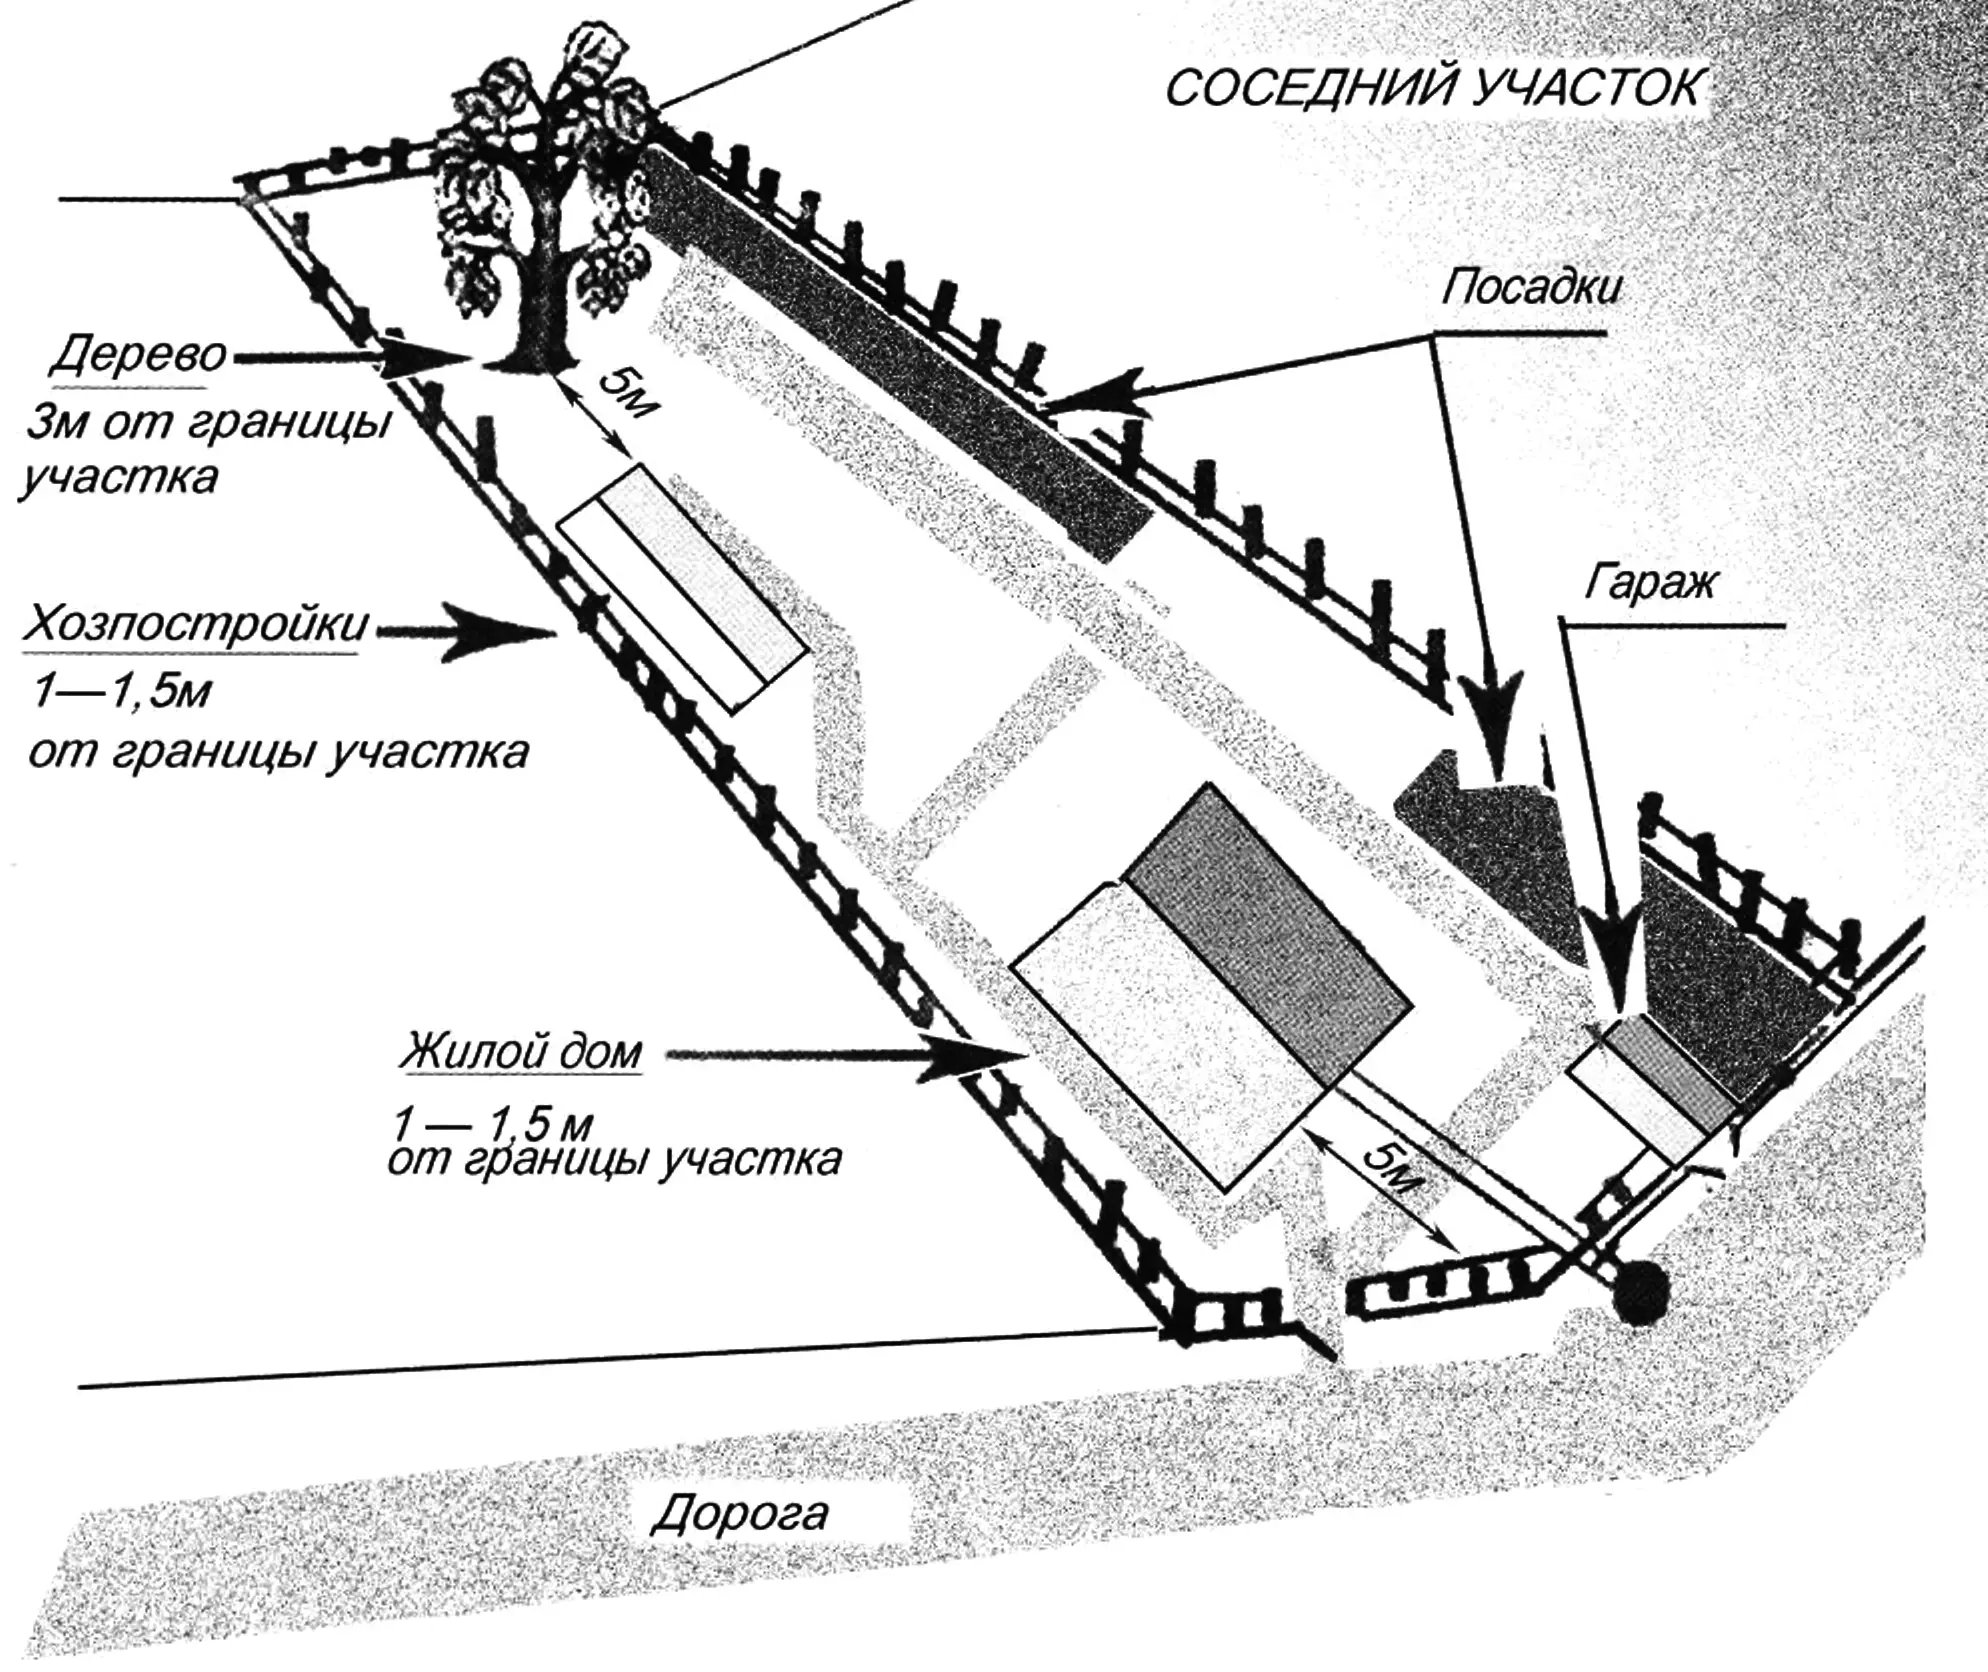
A dwelling house is placed with a setback of at least 5 m from the red line and the road, and at least 3 m from the street. In town planning, the red line is a conventional boundary separating the roadway of a street, drive, thoroughfare or square from the built-up area.
For fire safety, the distance between dwelling houses on neighbouring plots must be from 6 to 15 m, depending on the fire-resistance rating of the buildings. The document recommends, for ease of repair, placing the building offset toward one of the side boundaries of the plot, but the distance from the fence to the wall may not be less than 1 — 1.5 m. Most likely, the owner will have to follow the general street development pattern, taking into account the location of neighbouring buildings.
Utility buildings are preferably placed deeper in the plot and must meet the same setback requirements from the boundaries as a dwelling house. They may be built either freestanding or attached to the house. The street-side fencing of the plot must be shown in the overall construction project. If you want the garage doors to face the street directly, you must allow for the red line of the road and under no circumstances go beyond it. On a household plot, an unsewered latrine of the closet type is permitted. A cesspit with mandatory waterproofing should be arranged on its northern side.
The height of a building for keeping livestock and poultry must be at least 2.4 m (from floor to ceiling). It is even permitted to attach it to the house — provided that at least three utility rooms are placed between the walls of the dwelling and that structure.
There are also specific rules for planting vegetation. Trees must stand 5 m from the outer walls of buildings and structures, 3 m from the neighbouring plot boundary, 1.5 — 2 m from underground utilities, and 4 m from lighting masts and poles. Shrubs are planted 1.5 m from buildings and 1 m from the plot boundary.
Minimum requirements for a dwelling house
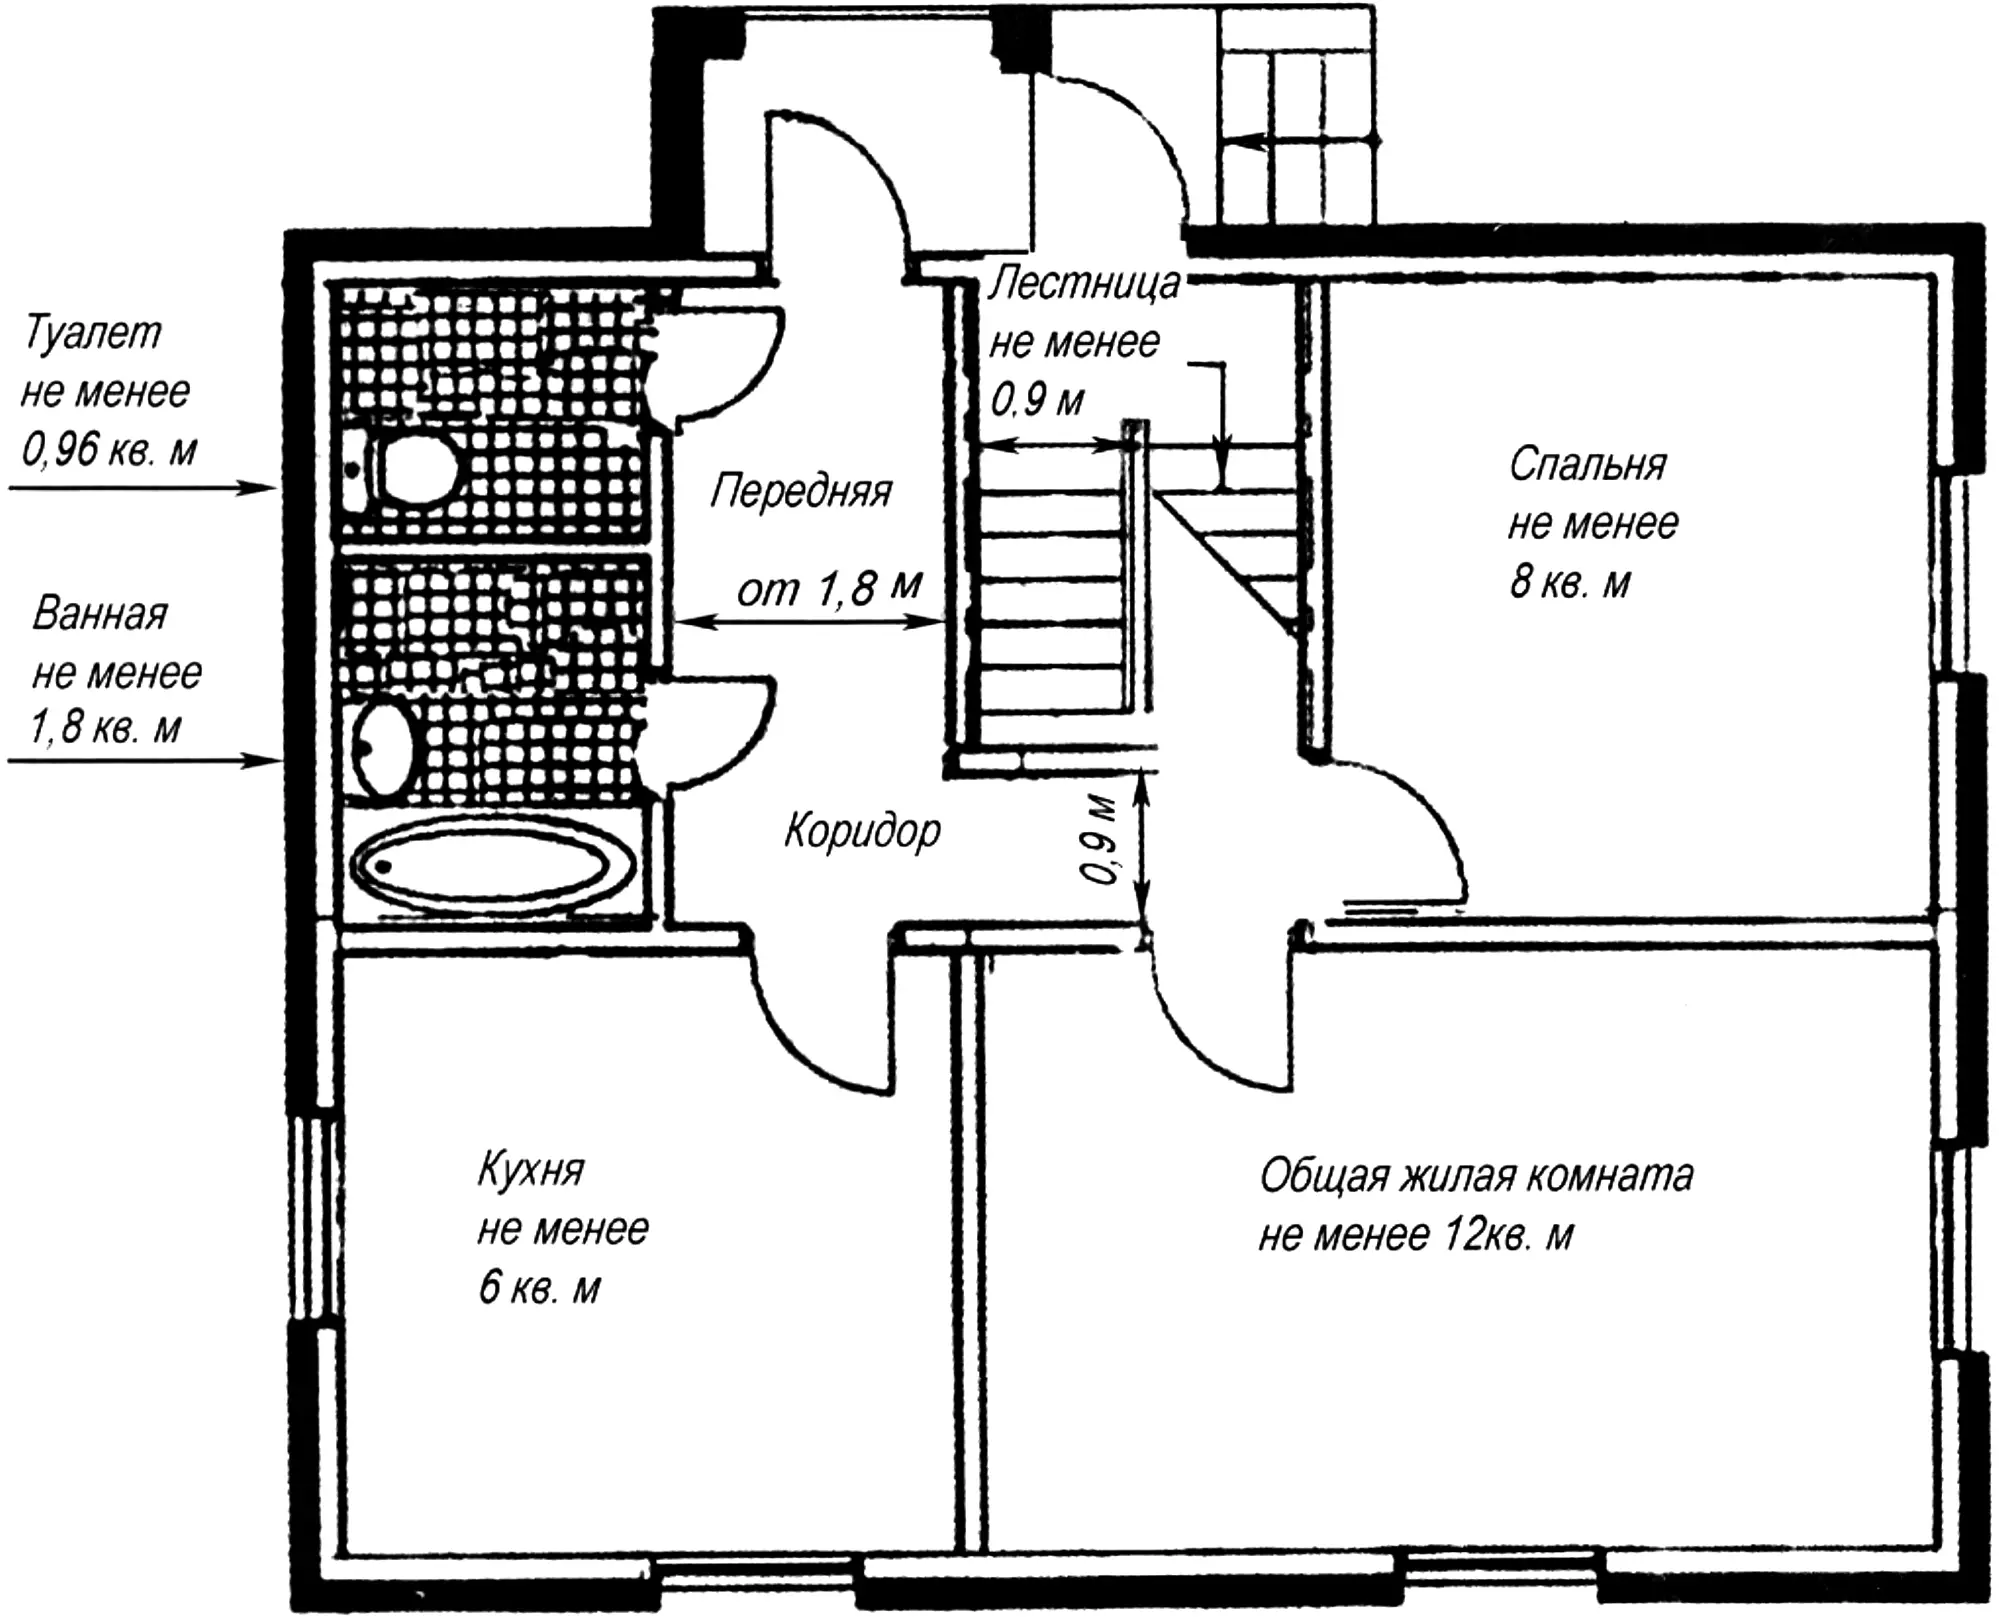
If a developer carefully studies RSN 70-88, the building codes and recommendations of SNiR 31-02-2001 and SNiP 2.08.01-89, they will learn much of interest about limits on room areas and ceiling heights. Note the floor plan of the dwelling house shown in Figure 2.
A house whose rooms are smaller than the minimum allowed (SNiP 31-02-2001) may simply not be registered with the Bureau of Technical Inventory.
The area of a common living room must be at least 12 m2, a bedroom — at least 8 m2, a kitchen — from 6 m2, a bathroom — at least 1.8 m2, and the smallest toilet — 0.96 m2. The authors of the building regulations set this minimum not on a whim, but based on sanitary and hygienic standards and the dimensional standards of furniture, appliances and fixtures. It should be noted that rooms in attic storeys may be smaller. There it is permitted to place a bedroom with a minimum area of 7 m2. There is no upper limit on room sizes. As they say, build palace halls if you wish.
All passages and stairways in a dwelling house also have minimum standards. Thus, the width of a stair to the upper floor must be at least 0.9 m, corridors — at least 0.9 m, and the entrance hall — at least 1.8 m. There are also minimum limits on storey height from floor to ceiling (SNiP 2.08.01-89). If it is less than 2.5 m, and in an attic less than 2.3 m, the building may be declared unfit for permanent residence.
The number of storeys in a house is usually determined by the number of above-ground floors (including the attic floor). If a developer decides to have a basement or cellar storey, they should know that living rooms are not allowed there. That storey may be equated with above-ground ones if the top of its floor slab is at least 2 m above the planned ground level. If a basement or cellar space is to be used for utility purposes, its height from floor to ceiling must be at least 2 m.
The basement and ground floors of a dwelling house may be used for a garage. But then their walls and floors must be made of non-combustible materials. If windows of other rooms are located above the garage doors, a canopy at least 0.6 m long is required.
A developer often does not know the exact total floor area of their house (it is determined under SNiP 2.08.01-89). Practice shows that some BTI engineers make mistakes when calculating square metres. It should be understood that an unjustified overstatement of figures leads to a higher property tax and higher utility charges.
The floor area of a dwelling is determined as the sum of the areas of all rooms on all floors. Sometimes a homeowner disputes balconies and loggias with the BTI. One should know: their area is also counted, as are the sizes of stairwells at the level of the corresponding floor. But the areas of attics, utility crawl spaces and unheated utility rooms in a basement or cellar storey are not included in the total floor area of the house.
Room sizes on the floors are calculated within the internal walls and partitions. Skirting-board projections do not matter. When determining the area of an attic room, only the part where the sloping ceiling is 1.6 m high is counted, and a factor of 0.7 is used to calculate the area of the zone with a lower ceiling height.
Engineering utilities
The house has been built and all regulations observed. It is time to deal with engineering utilities and install the necessary fixtures and equipment. To understand the intricacies of placing the building’s “life arteries”, one should turn to five regulatory documents: SNiP 2.04.03-85, SNiP 2.04.05-91, the Electrical Installation Code (PUE), SNiP 2.04.08-87 and SNiP 31-02-2001. Figure 3 shows some parts of the external engineering utilities. They should be studied carefully.
Sewerage
It must comply with SNiP 2.04.03-85. If the sewer networks are installed incorrectly, the developer faces regular clogging of the pipes with wastewater and the need to clear them constantly. Under the standards, daily sewerage flow per person is about 200 litres. The smallest diameter of an external sewer pipe must be 150 mm, with a slope toward the common collector of at least 8%. The minimum burial depth in the ground must be 0.3 m.
Where there is no centralised street sewerage, filter wells and trenches may be built, with a septic tank (an industrial treatment unit) placed ahead of them without fail. The base of artificial filters must be 1 m above the groundwater level. Internal water-supply piping is permitted only if a sewerage system is present.
Heating and ventilation are arranged in accordance with SNiP 2.04.05-91. To calculate the correct number of heating appliances for satisfactory heating of the house rooms, the developer should consult specialists. The technical specifications of such devices usually state power in watts or kilowatts. It is considered that the heat flow from the appliances must be at least 10 W per 1 m2 of floor area.
In an individual dwelling house, water is usually used as the main heat-transfer medium. Using electricity for heating is allowed only when cheaper energy sources are unavailable, and different tariffs then apply. If the dwelling consumes 50 kW or more, automatic regulation of the heat flow should be provided. As a rule, radiators and convectors are placed under window openings. They must not be located in vestibules with external doors: this risks freezing of the system.
Attention should be paid to the prohibition on using ventilation ducts to remove combustion products from a boiler or water heater. The room containing the heating boiler must have a window with an area of at least 0.03 m2 per 1 m3 of internal volume. When a solid-fuel boiler is used, a fuel store may be arranged on the ground, basement or cellar floor. In bathrooms and toilets of an individual house that have no external windows, duct ventilation must be installed without fail.
Under SNiP 2.04.03-85, insolation — that is, sunlight — must be taken into account in the completed house. The owner will not want to burn lights in broad daylight and feel a lack of oxygen without ventilation. Therefore, the ratio of total window area to floor area in a room must be at least 1:8, but not more than 1:5.5. When roof windows are used, a ratio of 1:10 is allowed.
Gas supply
It is carried out under SNiP 2.04.08-87. If an experienced developer decides to install engineering networks themselves, that is not forbidden. The exception is gas utilities: very strict requirements apply to them. Only a specialised organisation is entitled to lay such pipes and connect the corresponding appliances. Gas is not to be trifled with!
These utilities may be brought into the house only from the boiler-room or kitchen side. If an older building has a heating stove, pipes may be brought into a living room provided that a shut-off device is placed outside. But under no circumstances should a gas pipeline be laid through the foundation or under it. If a pipe runs along the outer wall of the house, its nominal diameter must not exceed 50 mm.
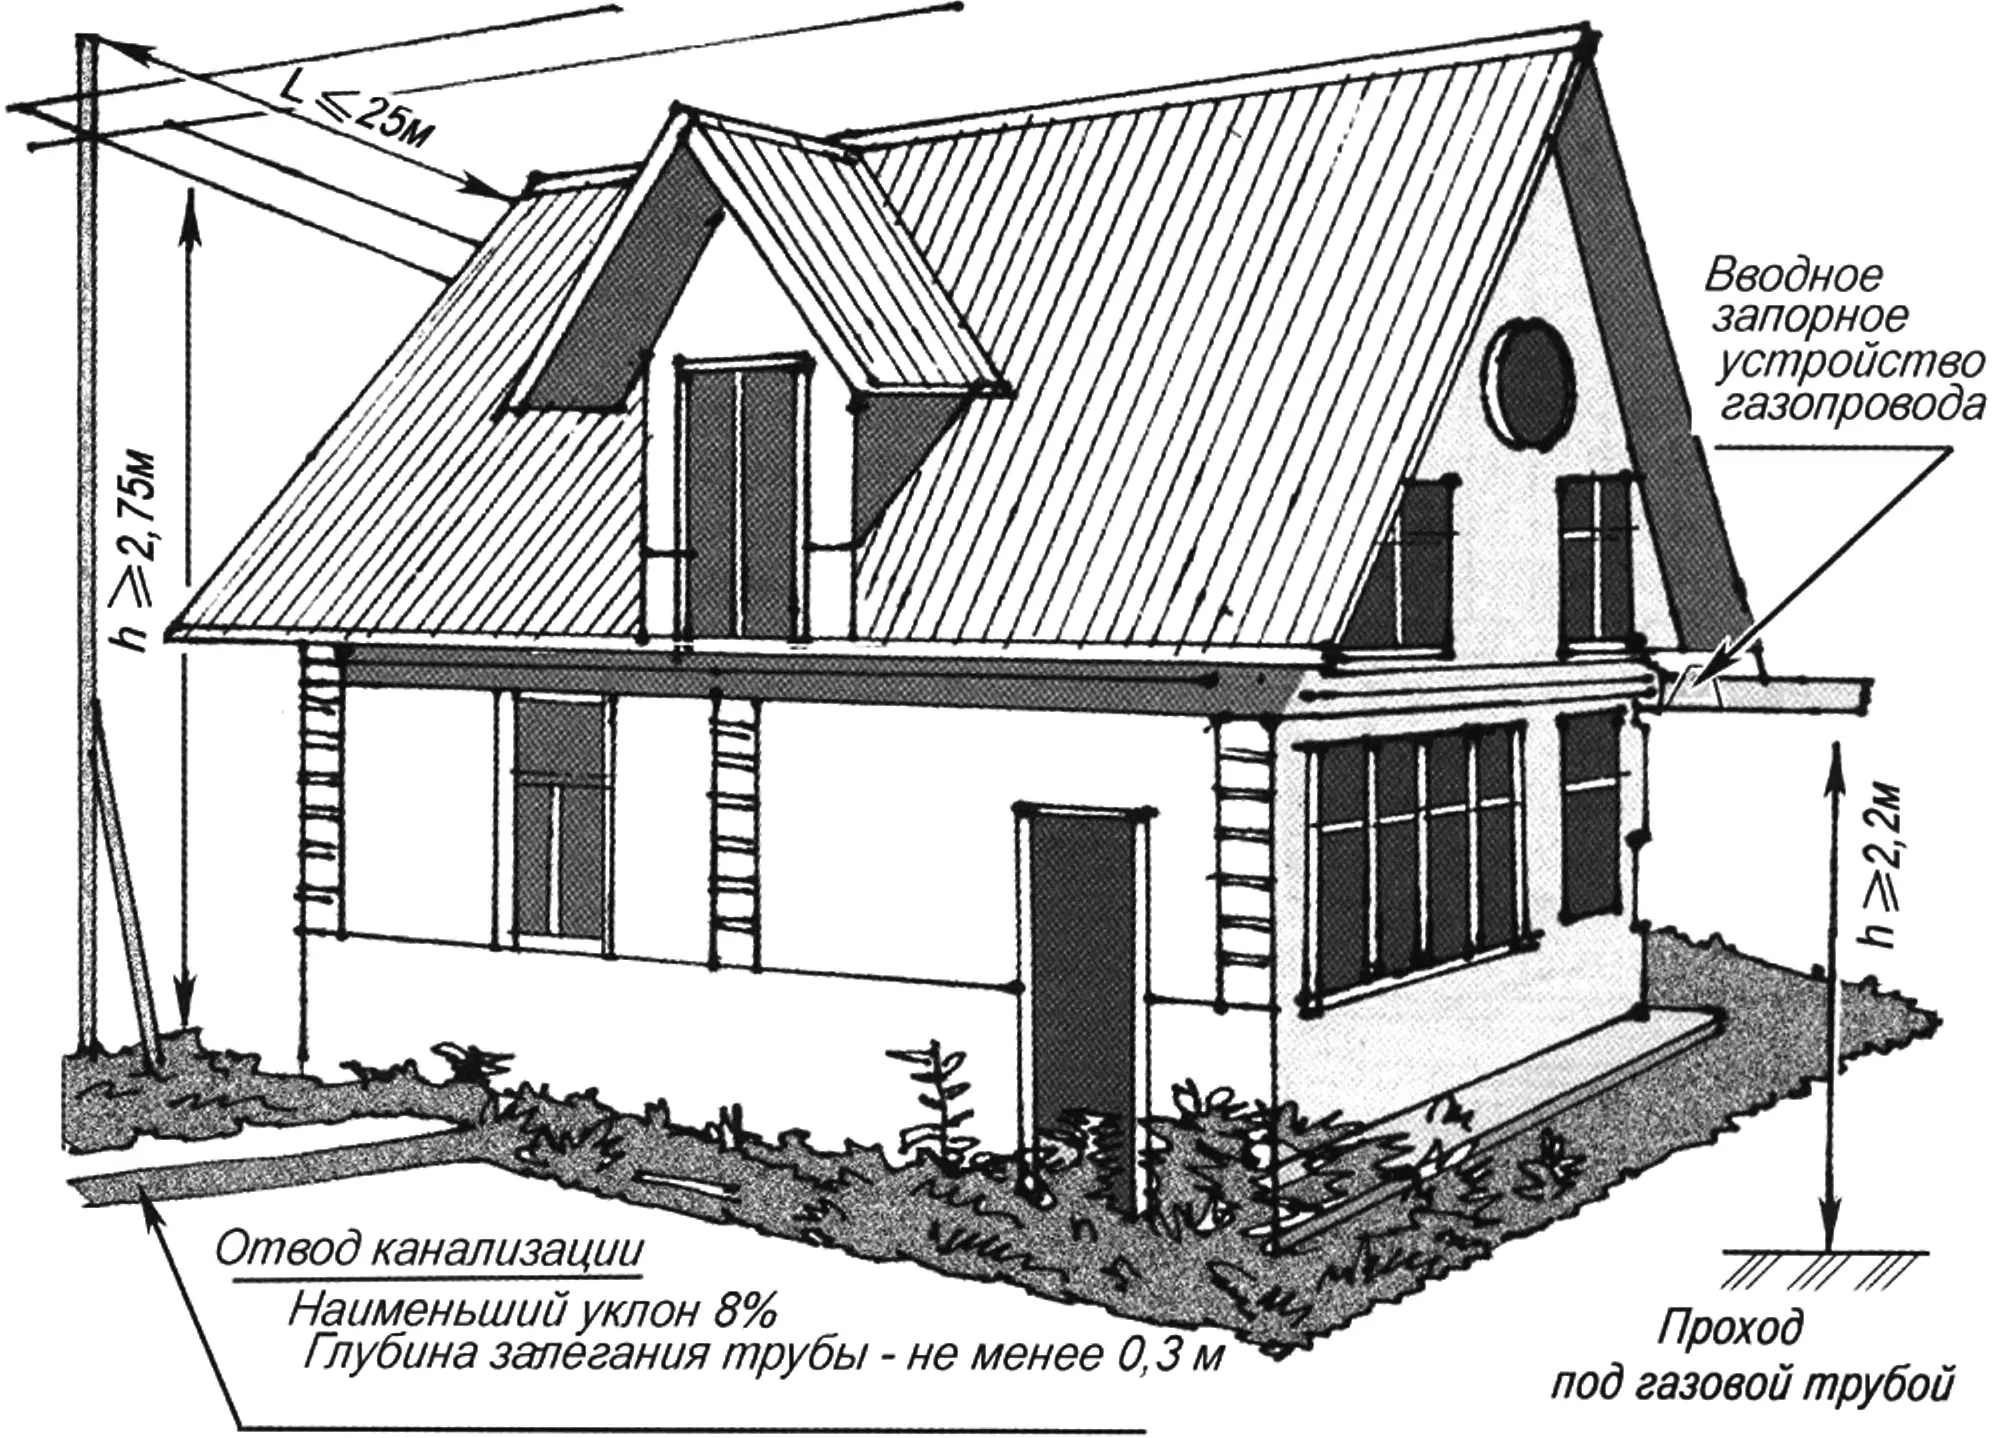
Detachable pipeline joints under window openings and balconies are not permitted. In general, all joints must be welded; threaded joints are allowed only where shut-off valves and appliances are installed. If a gas pipe is designed to run above pedestrian paths, it must be fixed at a height of at least 2.2 m above the ground.
No more than two heating appliances may be installed in one room. It is strictly forbidden to install a gas water heater in a bathroom, otherwise the developer may end up with a real “gas chamber”. The room for a gas boiler and water heater must be at least 2 m high. One appliance may be installed in a room of at least 7.5 m3, and two appliances — in a room of at least 13.5 m3.
Electricity supply
It is installed in accordance with the Electrical Installation Code (PUE).
In low-rise settlements, overhead power lines are mainly used. If a line pole stands near the plot, it must not block the entrance and driveway into the yard.
Wires from the street pole to the point of entry into the dwelling house must be run at a height of at least 2.75 m above the ground, and if the branch is taken from a street used by motor traffic, the height must be 6 m. The length of the branch from the main line to the dwelling house must not exceed 25 m. Otherwise an additional support is required. Branch wires must have weatherproof insulation, and the distance between the phase and neutral wires must be at least 0.2 m.
All places where wires touch the building surface and pass through walls must be non-combustible and reliably insulated, and the outer end of the pipe at the entry point must face downward (to prevent precipitation from entering). It is strictly forbidden to throw electrical wiring over the roof of the house. It must be inaccessible from balconies and from the building’s windows.
The smallest building
At a dacha, a rural homestead or a garden plot there is a building one cannot do without. This is an ordinary toilet. Unfortunately, few people know how to install a toilet correctly so that it not only meets the owners’ needs but also complies with sanitary rules, does not harm the environment, and is reliable and durable. That is what this section is about.
There are certain sanitary rules that should be taken into account when building and operating a toilet in a village.
First, a toilet must not be placed less than 25 — 30 m from wells or water-intake boreholes, and on a sloping plot — not upslope of the well. Otherwise there is no guarantee that wastewater will not enter drinking water.
Second, a toilet must not be a source of unpleasant odours. Therefore, on the one hand, it is desirable to take into account the prevailing wind rose in the area, and on the other — it must be kept clean and tidy.
Third, groundwater must not be polluted by wastewater that then poisons nearby bodies of water. Consequently, toilet cesspits must be reliably sealed, and all other waste must be disposed of before burial.
Before building a toilet, one should determine the groundwater depth on the plot. If it is less than two metres, a powder-closet type toilet must be built. And at a depth of more than 2.5 m, a loft-closet type toilet or a latrine with a cesspit is permitted.
Now directly about building toilets.
The simplest to build and operate is a powder closet (Fig. 4). It may be placed near the house or under the same roof with it. Such a toilet has no traditional cesspit. It is replaced by a metal waterproof container installed directly under the seat. When this container is full, its contents are poured into a compost pit. The owner chooses the latrine dimensions, but they are usually at least 1.0×1.4×2.2 m.
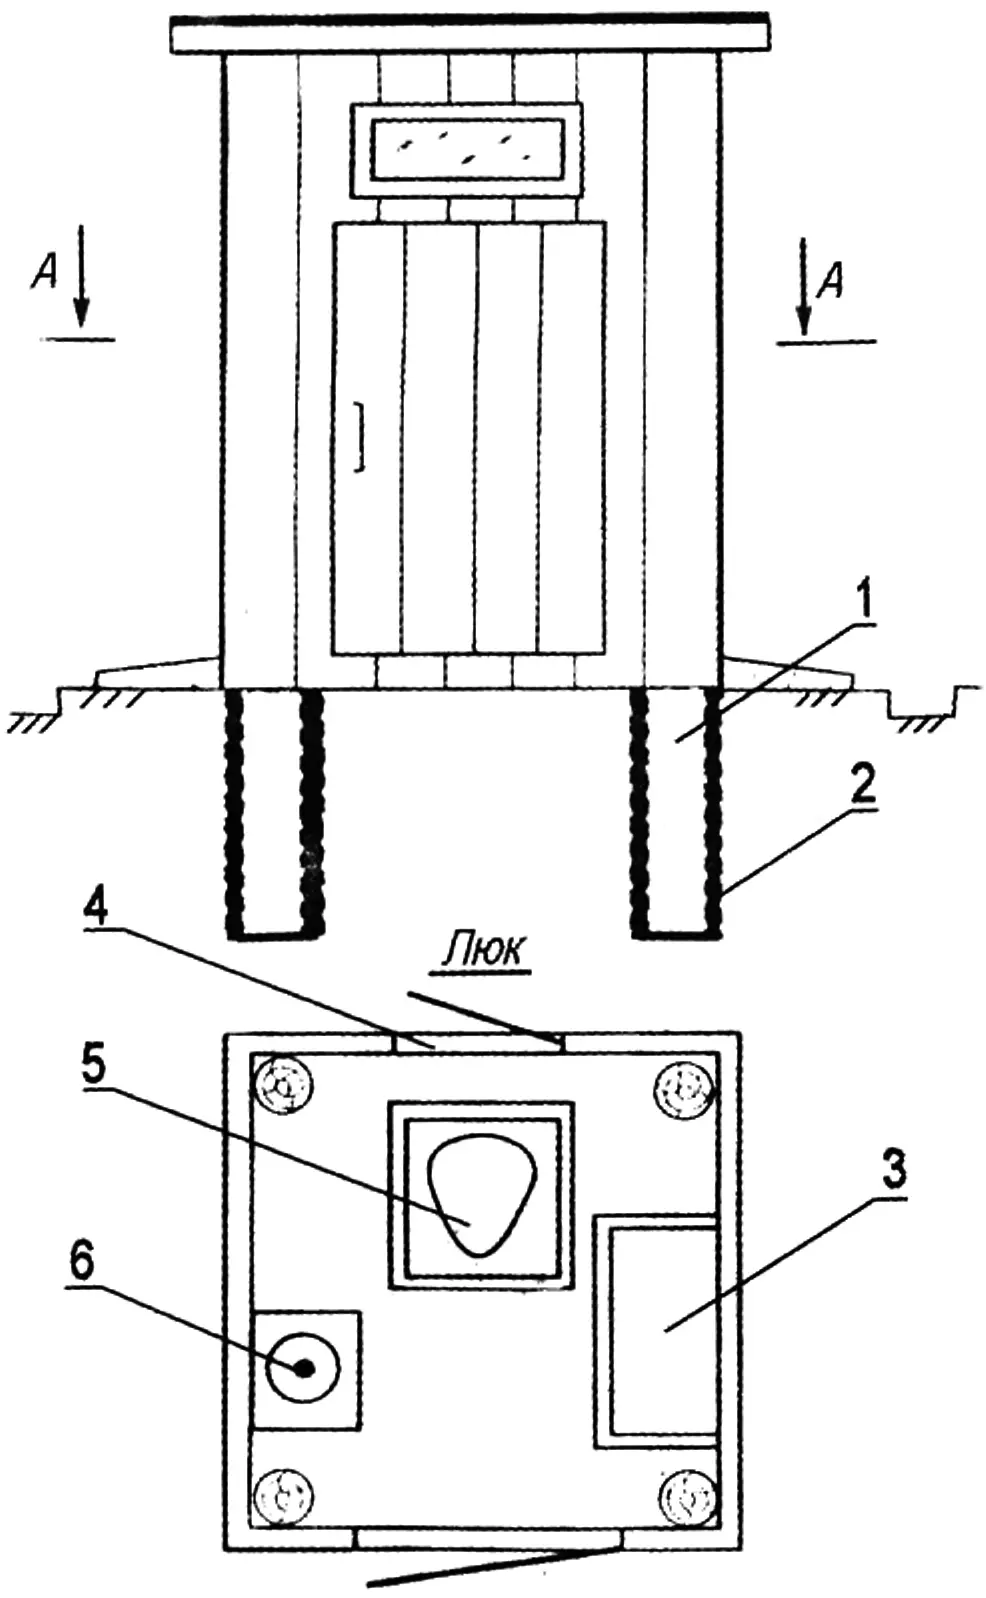
1 — support post; 2 — asbestos-cement pipe; 3 — box with fill; 4 — hatch for waste removal; 5 — seat; 6 — washbasin
When building such a toilet, four wooden support posts are prepared first, with their lower parts coated with bitumen mastic. Then four asbestos-cement pipes, previously coated outside with bitumen mastic, are set into the ground to a depth of 70 — 90 cm. The pipes are one-third filled with cement-sand mortar, and the support posts are set into them. The toilet cladding is made of tightly fitted boards. Two openings are made in the rear wall: an upper ventilation window covered with mesh, and a lower one for removing the waste container. The roof is usually mono-pitch and made of any roofing material (roofing iron, slate, etc.).
Inside the toilet a seat with an opening, a washbasin with a sink and bucket, and a wooden box with fill are installed. Sawdust, ash, peat or their mixture with dry soil is usually used as the fill. Waste is sprinkled with it — that is, “powdered” (hence the name of the toilet). Powdering is done after every visit to the toilet. This prevents flies from breeding, removes unpleasant odour, and later produces a full-value fertiliser.
Studying all the above regulatory documents will help you avoid many mistakes when building an individual dwelling house.
Permits and documents
Local permitting authorities are guided by the procedure for developing and approving design documentation and by the republican building codes RSN 70-88 for individual construction. These determine the correctness of plot development and the layout of the dwelling house and utility buildings. Here one should carefully consider what else you plan to build. After the construction plan is approved, objects not included in it are treated as erected without authorisation and are subject to demolition or additional approval.
As practice shows, many owners get ahead of events and start building their house without waiting for the full set of permits. As a result, serious blunders often occur that leave the developer clutching their head. Let us dwell on the main points.
To begin with, let us turn to the Code of Practice for design and construction SP 11-111-99. After reading this document, you will know what papers are required to start work on an individual plot.
One must be patient, because the paperwork and approval process can drag on. The very first step is to write an application for a building permit. It should be accompanied by the local administration head’s resolution on granting a land plot for individual housing construction, a lease or purchase-and-sale agreement, as well as the master plan and plot passport, an act on the field establishment of its boundary and the setting-out of buildings, red lines and building axes.
On the basis of this package of documents, the head of the administration issues a resolution permitting construction. Then a passport of the private dwelling house project is drawn up, which must include the following materials:
— the administration’s resolution permitting construction;
— a document certifying the developer’s right to the land plot;
— an extract from the master plan of the relevant town-planning documentation;
— a site plan;
— technical conditions (TU) for connection to engineering networks with a diagram;
— floor plans, elevations, sections;
— an act on the field establishment of the land-plot boundaries and the setting-out of buildings (with a stake-out diagram).
A separate folder is used for the design of an individual private house. It includes the following materials:
— a site plan (M 1:500) showing the location of the construction project in relation to nearby settlements, sources and external networks of power, heat and water supply, structures and sewer networks;
— a topographic survey of the plot with the adjacent part of the street (M 1:500);
— a master plan of the plot with vertical grading and tying the design to the terrain (M 1:200, 1:1000);
— a plan of the basement (crawl space, basement storey);
— floor plans (M 1:100, 1:50);
— main and side elevations of the buildings (M 1:50, 1:100);
— characteristic sections (M 1:100, 1:50);
— plans of floors and roofs of non-repeating storeys (M 1:100);
— a plan of the roof truss system (M 1:100);
— a roof plan (M 1:100, 1:200);
— a foundation plan (M 1:100, 1:50);
— foundation sections, characteristic architectural and structural joints and details (M 1:10, 1:20);
— a general explanatory note and technical and economic indicators;
— cost estimates and financial considerations for the construction;
— drawings of engineering services (as per the design brief).
“Modelist-Konstruktor” No. 3’2010, V. GORBLYUK
Recommend to read
 “WASHEE-WASHEE” ON THE SIDEWALK
In Moscow in the yard of the house № 11 on the 2nd Schukinskaya travel can often see the most incredible car designs, which are operated by boys and girls. And the amazing thing is that... CONVENIENT SOLDERING IRON
The soldering iron is any homebrew. But those who have to deal with modern electro - and radio equipment, this tool is something special. And the requirements for it are quite hard: with...
