BABY-HERO

LITTLE HEROWhen working with metal often must bend, to stamp, to pull from sheet materials of different parts, figure out, puncture, cut them all kinds of holes. Such operations are performed with a press and set of dies. However, the study of the hydraulic press, commonly used for this purpose, has drawbacks: it is impossible to work with sheet material wider than 80 mm, it has no reverse enhanced speed, and the speed of movement of the piston is small. In addition to fixing tools special tools.

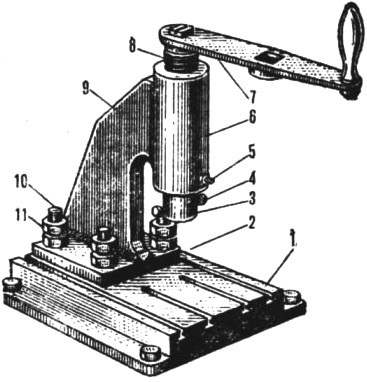
The proposed cantilevered screw press (Fig. 1) with a maximum force of three tons is devoid of these drawbacks. Details press can be made on lathe and milling machines even in the training workshop. However, the main difficulties are connected not with making parts and welding. Thus, the Assembly consisting of the console flange and housing, you must first put the bait — tack welding on a wooden jig, and then to cook short stitches alternately on both sides, thereby reducing the welding deformation. But no matter how carefully nor was carried out this operation, the local deformation of the structure is not excluded. That’s why the hole Ø 40 mm in the case you first need to pierce Ø 36 mm and after welding node of the counterbore to the nominal diameter, Navitel welded construction on frame with screw Acme thread. Without removing the node from the mandrel, face piercing holes and the plane of the flange, mating with the frame.
The upper part of the press is collected in the following order. In the hole of the quill put a ball Ø of 21.43 mm, taken from a failed bearing, then there is inserted the shank of the power screw and connect it with quill four retaining screws М8Х8, the configuration is identical to the guide screw (Fig. 1). The retaining screws need to return the quill to the top position. The ball transmits the force from the shank of the power screw on the tailstock. If the called ball diameter will be, you can use the other, but a diameter of not less than 17 mm. In this case, reduce the depth of the socket in the tailstock or increase the length of the shank of the power screw. And you can use just the round gasket from a sheet of brass, the total thickness of which is equal to the difference of the diameters are calculated and used balls.
 
Fig. 1. General view of the press
 
Fig. 1. General view of the press:
 
1 — frame (St. 3), 2 — flange (PT. 3), 3 — pinol (St. 3), and 4 — M8 screw attachment tool (2 PCs.), 5 — guide screw М8Х25 (St. 3), 6 — housing (Article. 3), 7 — arm (CT. 3), 8 — power screw (PT. 45), 9 — console (Art. 3), 10 — pin M16 (St. 45, 4-piece), 11 — Ganka and M16 lock nut (8 PCs.), 12 — ball.

 
The power screw with the tailstock lubricate with grease or machine oil, is inserted into the housing from below and screwed into the thread. Now in the side hole in the housing screw guide screw and counter it with the nut. The screw end is in the longitudinal groove of the movable sleeve and prevent its rotation when moving up and down.
 
Then the upper part of the press is attached to the frame. In the threaded holes of the screw studs and put them on the flange. By the way, if necessary the working height of the press can be increased, if the flange to enclose the strip with a thickness of 15 mm, repeating its shape.
The press should be attached to workbench by bolts or screws (in the corners of the frame there are four holes). When the power screw is rotated with the handle made out of several parts (Fig. 2). Using a particular key lever, you can create on the instrument, fixed in a quill, the pressure of various sizes.
 
Fig. 2. Arm
 
Fig. 2. Arm:
 
1 — shoulder, 2 — key, 3 — horn, 4 — puck.

 
Fig. 3. Details of the fixtures for bending of profiles
 
Fig. 3. Details of the fixtures for bending profiles:
 
1 — punch (St. 3), 2 — the matrix (PT. 3), 3 — stop (PT. 3), 4 — mounting bolt (Art. 45, 2 pieces), 5 — the adjusting screw (PT. 45, 2 pieces).

 
One of the applied tools — fixture for bending profiles shown in figure 3. The basis of it is a pair of punch matrix. The punch is welded from two parts and is screwed in the axial hole of the quill. The matrix is fixed just below the plug mounting bolts and nuts. The head bolts thus inserted into the slots of the frame.
 
For ease of installation on the matrix blanks made limiter. His holes are inserted and lightly clench — just not had the rods of the adjusting screws, which are screwed then narrow screwdriver into the threaded holes of the matrix, which allows you to set the lip of the limiter at one of its three grooves. This and set the position of the blanks on the matrix. Using the tool can be bent from sheet metal, brass or aluminium angles, channels, z profiles without further processing. These profiles are widely used in the circles of automotive, shipbuilding and railway modelling, so the press is a big help to young modelers and designers.
 
G. TIMOSHECHKIN, head of the society of Astrakhan obsut

Recommend to read

  • “ELECTROPICA” FOR MY GRANDSON“ELECTROPICA” FOR MY GRANDSON
    When my grandson Grisha began to grow and stopped paying attention to previously favorite toys-rattles, the home began to notice that he started to show interest in different instruments...
  • DOOR KOLESNICADOOR KOLESNICA
    If the hall is small and you have a large family, it is convenient to place numerous shoes will help you that's such an unusual kolesnica on the front door. It is a door hung on wooden...