BRAZING WITH PROPANE

BRAZING WITH PROPANESoldering metal tin solder — one of the most common but, unfortunately, the connection is not too strong. A more reliable seal provide so-called “hard” solders — silver-copper or copper-zinc. Most often, when brazing use a gasoline blowtorch. However, they should be treated skillfully: the lamp is unsafe in the fire relation, smokes when running, the flame is poorly adjusted.

 
It is much easier to work with propanebutane burner. Connected the hose to the tank from a portable gas stove, it is a great heater. The invaluable advantages of this burner — always ready to work, quick heating of the parts to the melting temperature of the solder.
 
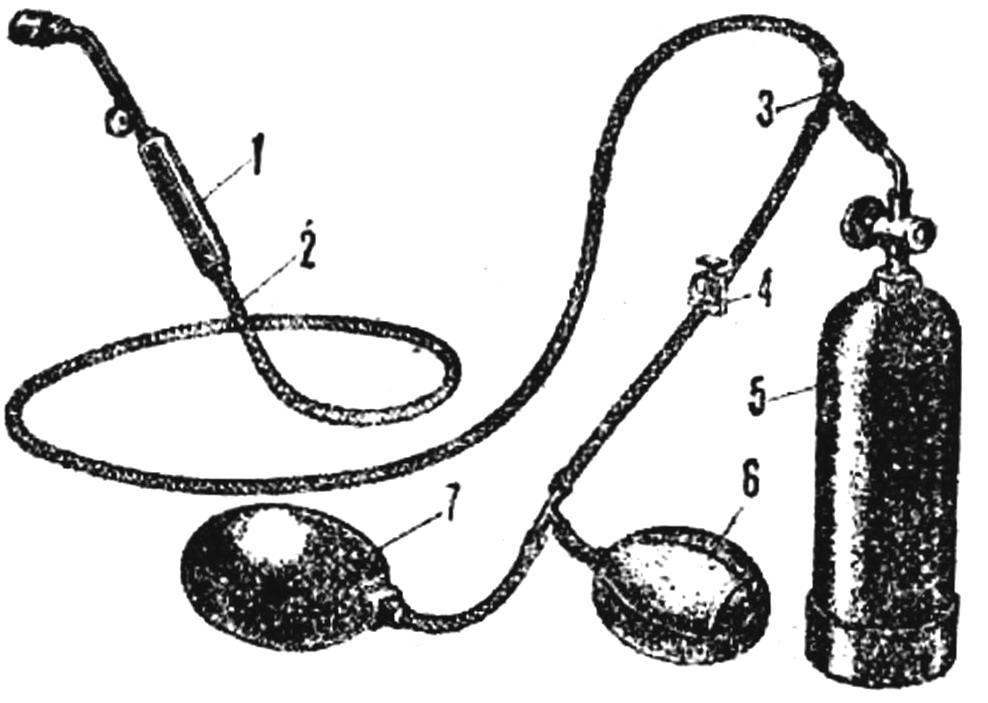
External view of the device shown in figure 1. For this, you will need a copper or brass tube with an outer diameter of 12,8 and 6 mm (wall thickness — 1 mm). The burner tip machined “stainless steel” or from any other heat-resistant steel and pressed on the inlet pipe. Inside is another Central tube with soldered to it a collar with a nozzle — orifice Ø 1 mm.
 
In the cavity of the handpiece is a grid — steel disc with twelve holes Ø 1 mm-Central hole Ø 4 mm under the nozzle.
 
The valve is a screw with M4 thread, cylindrical head which has an outer diameter of 12-15 mm. to Use it would on its outer (cylindrical) surface to bear a triangular needle file a shallow risks. Next to the lead pipe solder brazing tide, which is drilled hole Ø 3.2 mm for thread M4, passing through the inlet and through the feed tube. When tapping keep on mind that to go deeper with a tap in the feed tube should not be, or you but will provide complete overlap of the holes in it wrapped with the M4 screw.
The valve operates as follows: when it rotates counterclockwise flow of the combustible mixture splits, and part of it enters into the annular gap between supply and the Central tubes; next, it passes through the mesh of the burner tip, forming a wide flame.
 
The burner Assembly is simple — all of the contained parts are joined, as shown in the drawings, and the joints propisyvayutsya tin. The handle is birch two bars connected by epoxy glue and processed together.
 
To boost burners you’ll need a rubber pump-used to fill air inflatable boats, the receiver — it can be done from the camera’s volleyball or basketball, and five feet of rubber tubing can be purchased in almost any pharmacy. In addition, copper pipes with outer Ø 8 mm solder two tee — they are necessary to connect the pump, receiver, burner and gas cylinder. To last you need to purchase a regular valve, which regulates the flow of gas. The air supply is changed by a simple medical clamp.
 
Fig. 1. Principal dimensions of components of the propane burner
 
Fig. 1. Principal dimensions of components of the propane burner:
 
1 — tip 2 — feed tube, 3 — control valve, 4 — crank, 5 — inlet tube.

 
Fig. 2. The burner tip
 
Fig. 2. The tip of the burner:
 
1 — tip 2 — feed tube, 3 — Central tube, 4 — nozzle, 5 — mesh.

 
Fig. 3. The valve
 
Fig. 3. The valve:
 
1 feeding tube 2 — inlet tube 3 — wheel, 4 — screw M4, 5 — tide.

 
Fig. 4. Troyanova burner and additional equipment
 
Fig. 4. Troyanova burner and additional equipment:
 
1 — burner, 2 — rubber hose, 3 — tee 4 — medical clamp, 5 — gas cylinder with standard valve, 6 — receiver, 7 — rubber pump.

 
Fig. 5. Forms of torches propane torch.
 
Fig. 5. Forms of torches propane torch.
 
To burner can work in several modes. So, with a minimum flow of air and gas flame is obtained in the form of fine needle — it is helpful in soldering small parts, such as jewelry. If you increase the flow of air and gas is formed droning average power torch — in this case the valve needs to pass part of the combustible mixture through the mesh tip. Finally, upon further increasing the air supply and fully open the adjusting valve burner gives a powerful roaring flame.
 
Keep in mind: flames yellow indicates that the boost air is insufficient, light blue pegasuses flame is a sign of excessive supply air.
In conclusion, a few practical tips for working hard solders.
 
Preparation of the flux. The most common flux used is borax. The pre-Laika is the following. Sprinkle the powder in a small glass bottle and add the water — it should completely cover the crystals. Then heat the vial in a water bath — part of the borax goes into solution, the part will remain at the bottom. With the gradual cooling of the borax to crystallize. Crush the crystals with a wooden daddy and the flux is ready for use.
 
Preparation of the solder. One of the most common — silver-copper solder. Take a square of asbestos cardboard, soak it in the water and fingers-offormula something like cups, which will serve as a crucible for melting. Place equal parts of silver and copper, as well as the flux, and placing the crucible on the brick, heat it with a powerful flame. First melt the silver, then it will dissolve copper. Making sure this process was completed, cool the alloy. Solders ready. With his help, work well with parts of steel, copper and brass.
 
Silver best soldering, dumping three parts silver and one part of brass. Of course, such a solder can also be connected to steel, copper and brass.
 
Pike. Parts must be thoroughly cleaned of rust, oxides and dirt. Fix them with wire, soldering flux over and around the future of seam, place a piece of solder. Put details on asbestos and brick and a powerful flame start heating, the flux first dries, then swells, and finally melts, spreading out around the seam. After this is melted and the solder, forming a small ball. Upon further heating (to red heat) the solder wets the parts and spread across the seam. Remains cool to the connector and then sandpaper or a file to clean off from the flux.
 
B. SERGEEV, engineer

Recommend to read

  • HORSES AND TRACTORS IN THE WEHRMACHTHORSES AND TRACTORS IN THE WEHRMACHT
    This is one of the photos since the beginning of the great Patriotic war. Comments can be found in the diaries of the chief of the General staff of the Wehrmacht F. Halder, who noted:...
  • WILL NOT SLIP OFFWILL NOT SLIP OFF
    In the processing plane of the edges of the wooden parts is difficult to adjust so that the tool cannot slip sideways and did not spoil the work. However, the output is very simple:...