
A circular electric saw is a very useful thing in any household. In terms of usefulness, it is probably in second place after an electric drill.
About the design of the electric saw: it couldn’t be simpler. Its basis is a DAO-A type electric motor from a washing machine. The electric motor doesn’t have to be purchased specially; it can be temporarily removed from an existing machine (it’s quite easy to disassemble), while lubricating the bearings. I note that the margin of safety and durability of this unit is quite significant, so its temporary use in an electric saw will not lead to a noticeable reduction in the resource of the washing machine itself.
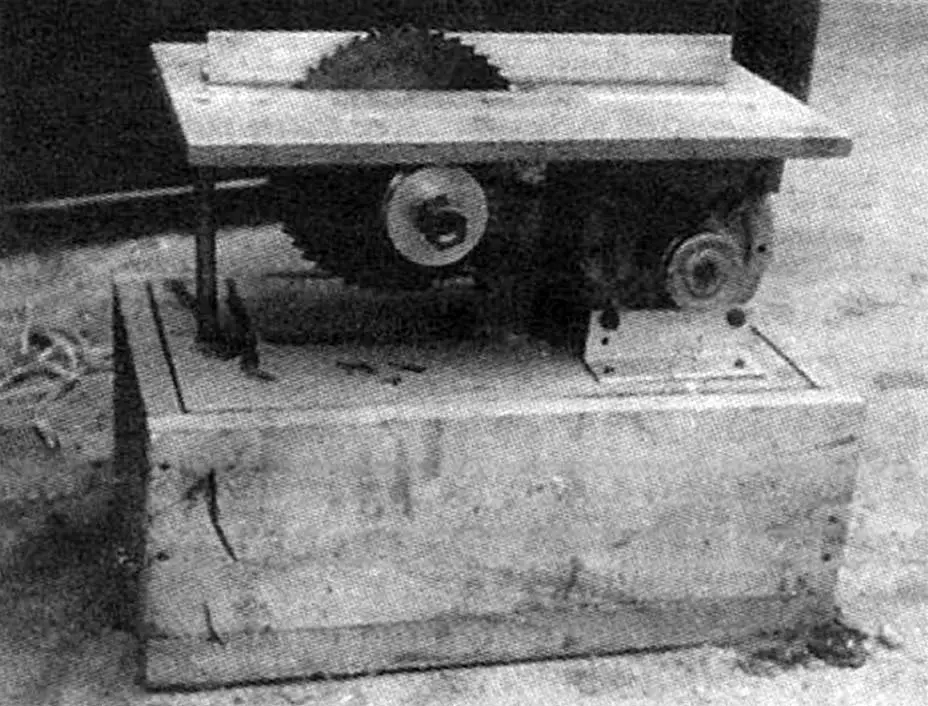
To the electric motor, 50×50 mm angles 140 mm long are attached with its standard tie bolts. To them, M6 bolts with countersunk heads attach: below — a base made of chipboard measuring 600x300x20 mm, and above — a work table of the same size, made of 15 mm thick plywood (can be made of textolite, vinyl plastic, and duralumin). M6 bolts with countersunk heads attach a bearing unit with a shaft to the table from below, on which a saw blade and a belt drive pulley are mounted. For the saw blade, there is a corresponding slot 10 mm wide in the table. The console part of the table and the base are connected by a stand made of a metal rod 20 mm in diameter with axial threaded holes M6 in the ends.
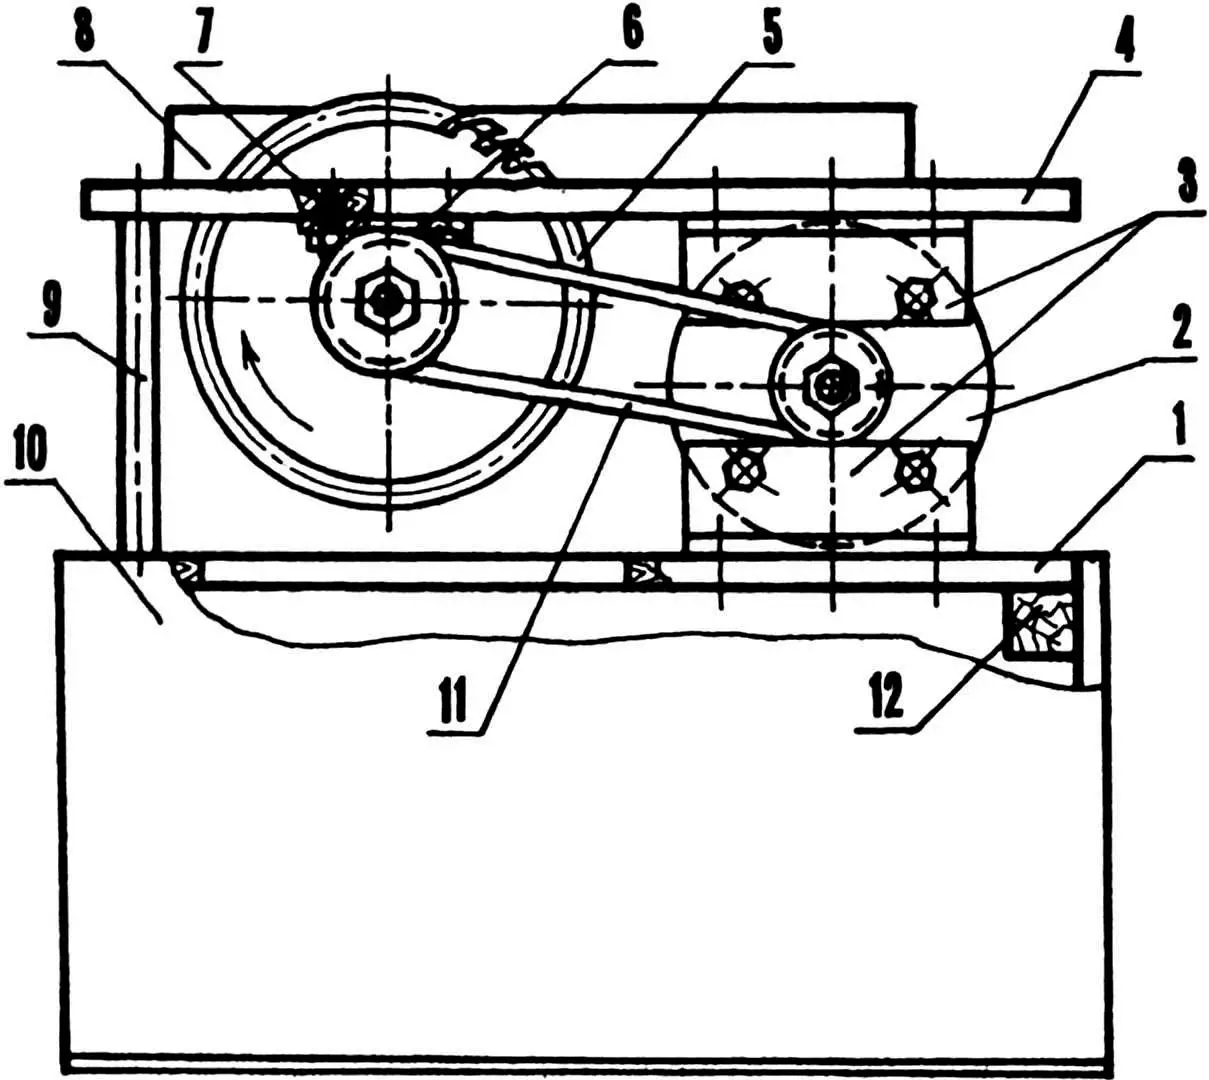
1 — base (chipboard s20); 2 — DAO-A electric motor (from washing machine); 3 — brackets (aluminum angle 50×50, 4 pcs.); 4 — work table (plywood s15); 5 — saw blade (Ø200,s1,6,z = 48); 6 — bearing unit; 7 — M6 bolt (4 pcs.); 8 — guide (aluminum angle 40×40); 9 — stand (St3, rod Ø20); 10 — stand-case (board s25); 11 — V-belt; 12 — support boss (block 40x40x40, 4 pcs.)
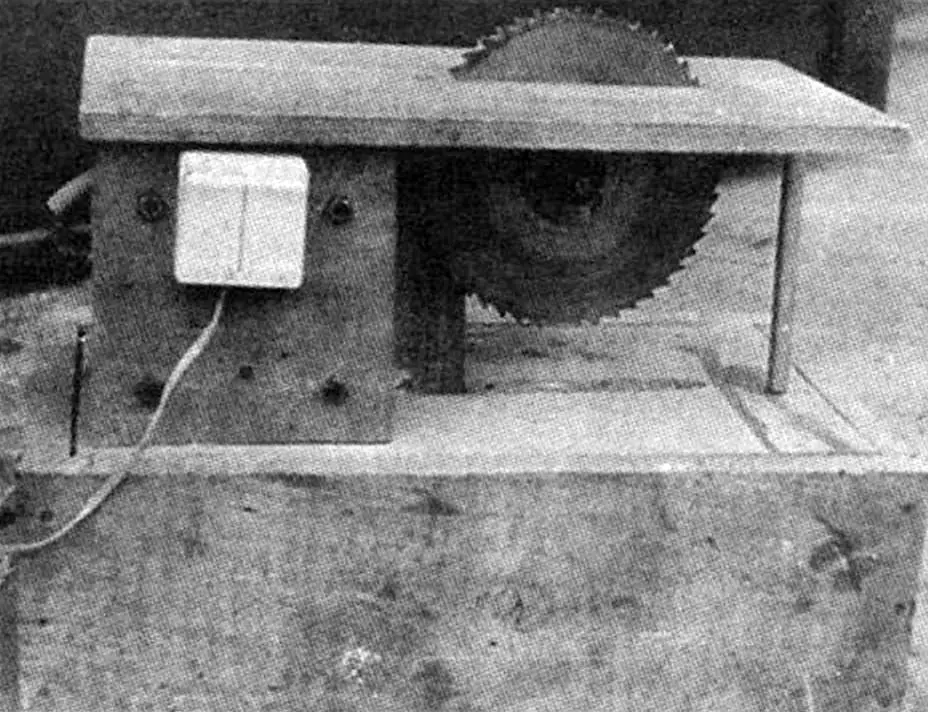
A guide 450 mm long made of duralumin angle 40×40 mm is installed on the table parallel to the saw blade. For its attachment and adjustment of the distance to the blade (within small limits), two transverse slots 30×6 mm are cut in the lower flange of the angle. For wider adjustment of this distance, several pairs of holes from a set of furniture angles are drilled in the table along slots at 25 mm intervals, and threaded bushings from a set of furniture angles are installed in them, to which the guide is attached with M6 screws.
The manufacture of the bearing unit housing, shaft, and clamping bushings for mounting the saw blade was entrusted to a qualified turner, since the safety and reliability of the machine in operation largely depend on the quality of these parts. The housing for bearings 60203 is turned from steel 20, the other parts — from steel 45.
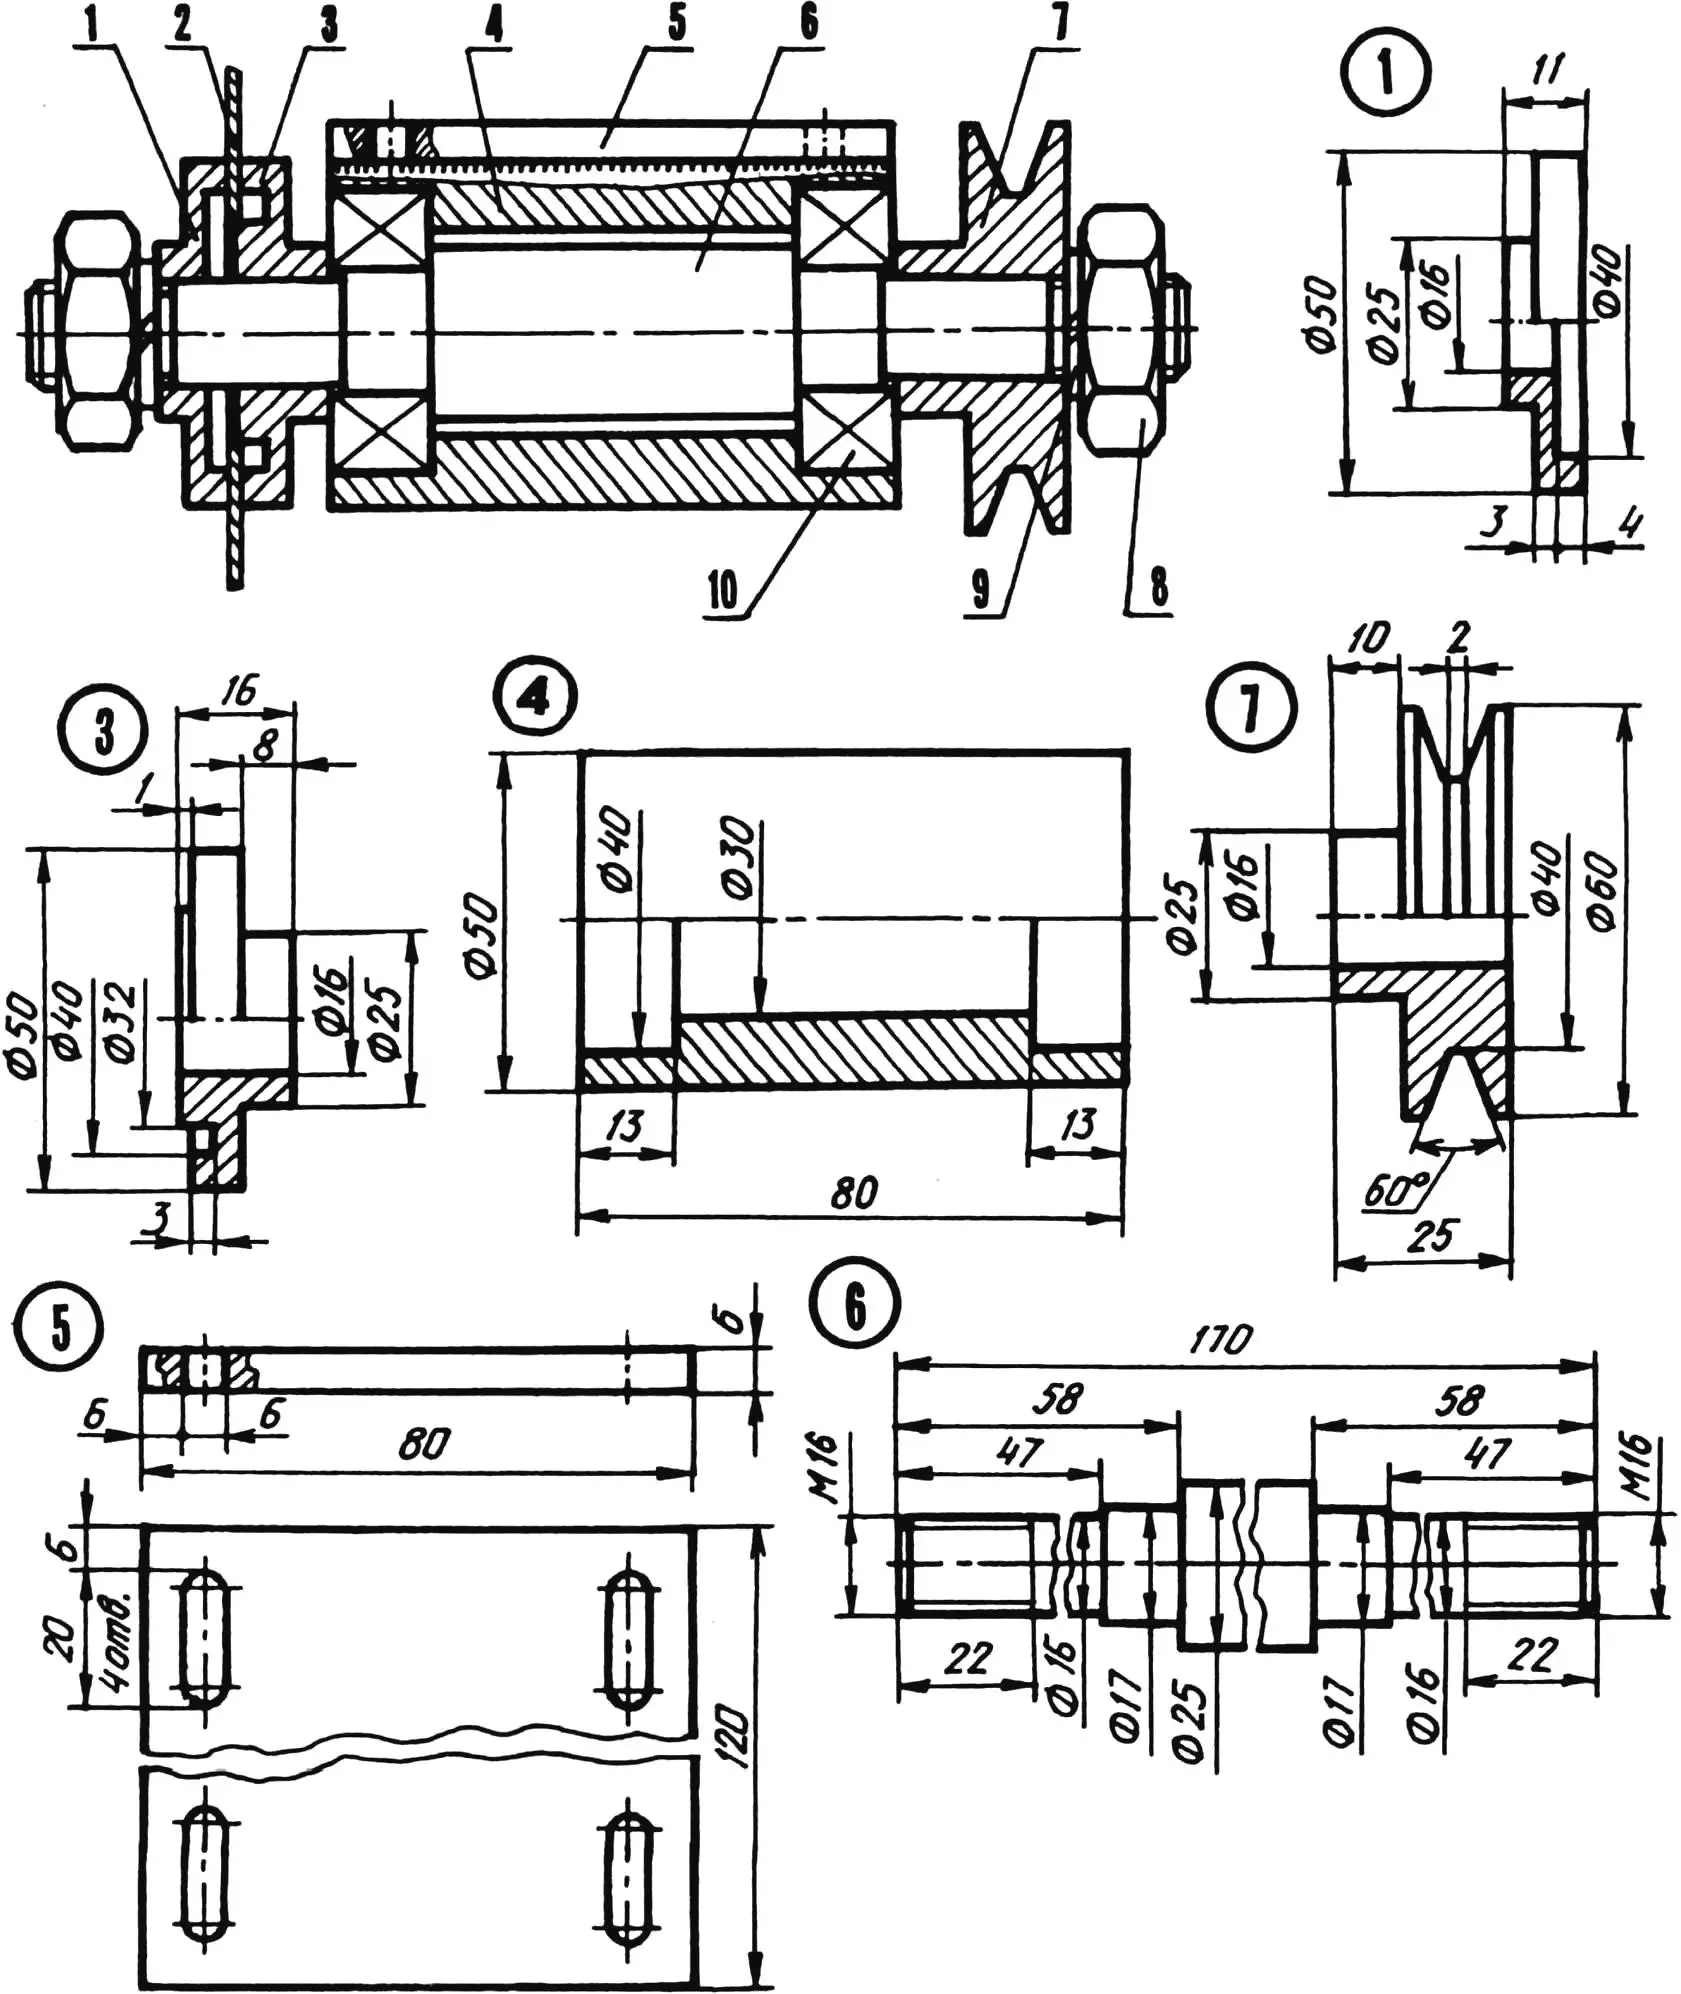
1 — outer clamping bushing (steel 45); 2 — saw blade; 3 — inner clamping bushing (steel 45); 4 — housing (steel 20); 5 — plate (steel sheet s6); 6 — shaft (steel 45); 7 — pulley (aluminum); 8 — M16 nut; 9 — split washer; 10 — bearing 60203
The bearing housing is welded to a steel plate 6 mm thick measuring 120×80 mm. To avoid metal spatter, the bearing seats were thoroughly rubbed with chalk before welding. Threaded holes could be cut directly in the plate and the unit secured with screws, but in our case, longitudinal slots are made in it, and the bearing unit is tightened with bolts and nuts. This provides adjustment of the drive belt tension. (In the first variant, such adjustment could be made by installing spacers of appropriate thickness between the table and the surfaces on which it rests.) Ready-made fasteners are used. The driven pulley is from an old washing machine, but if a ready-made one is not available, it can be turned from an aluminum alloy. The belt has a length of 550 mm; with a shorter length, the use of saw blades 200 mm in diameter will be problematic. All holes in the connected parts are drilled together during preliminary assembly. Before pressing into the housing, the bearings are filled with “Litol-24” grease. When using bearings of other numbers, the dimensional chains of the housing should be corrected.
A removable shield protects the electric motor from sawdust. For sawdust to enter the collection bin (stand-case), a slot measuring 150×70 mm is provided in the base.
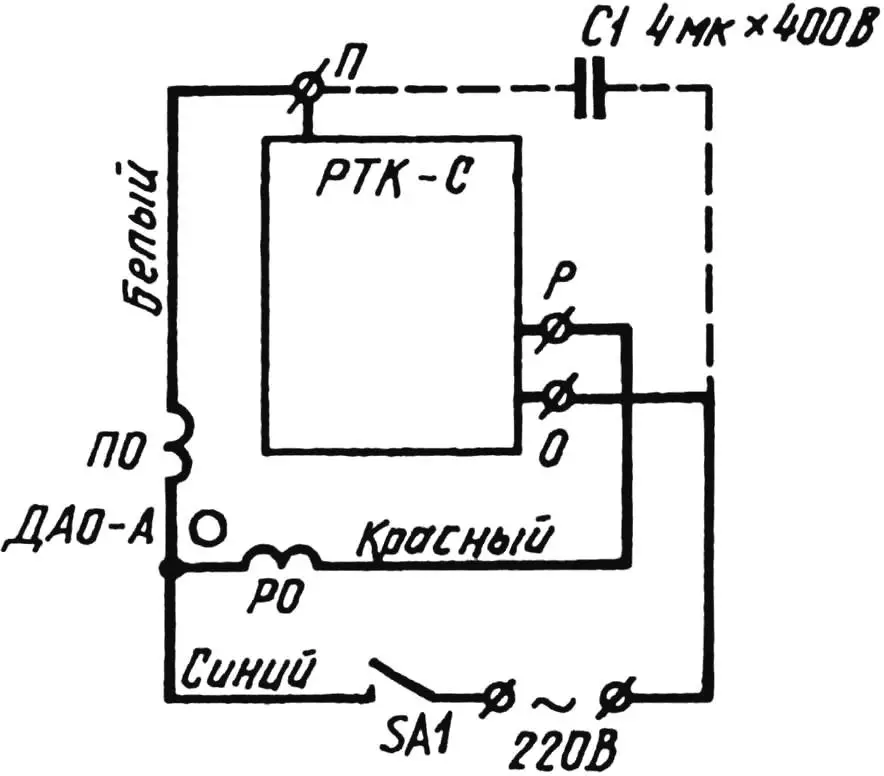
The machine is equipped with a switch that allows instantly de-energizing the motor after work or in an emergency situation. The electrical circuit has a PTK-S type starting relay that disconnects the electric motor in case of overload (when installing the relay, it should be borne in mind that the arrow on its housing during operation should be oriented upward).
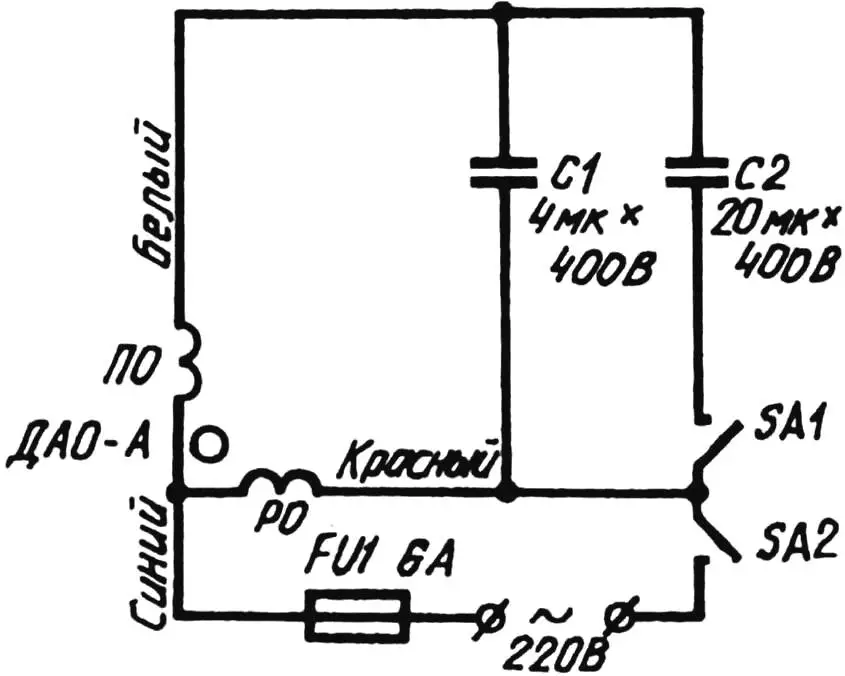
In the absence of a starting relay, a capacitor starting system can be used, for which a modified two-key switch is convenient. Under one key, an elastic element — a piece of foam or sponge rubber measuring 20x10x5 mm — is placed, which ensures its return to the initial position when the pressure stops and disconnects the starting capacitor. The electric motor is started by pressing the START key for the time necessary for the motor to reach operating speed. A flag fixed on this key ensures the activation of the second key, which supplies power to the motor. The released START key returns to its initial position by the elastic element, and the starting capacitor contact opens. At the same time, the STOP key remains on, ensuring the motor operation. The saw stops after pressing the lower edge of the STOP key. When using a capacitor starting system, a fuse rated for about 6 A is necessary in the circuit.
It has been noticed that the motor torque with a working capacitor is noticeably greater. Therefore, even when using the standard system with a starting relay, it is advisable to connect this capacitor to the relay terminals “0” and “P”.
Special attention is paid to the selection of the saw blade. A blade 200 mm in diameter and 1.6 mm thick with 48 teeth is optimal for longitudinal cutting of boards up to 40 mm thick. In general, the motor power does not allow the use of blades of large diameter and thickness. It also makes no sense to purchase blades designed for cross-cutting — a longitudinal saw cuts across the grain quite satisfactorily. When cutting chipboard, the teeth of a regular steel blade “seat” very quickly due to the presence of hard binder in the material. Therefore, for sawing a significant amount of chipboard, it is necessary to get a blade with teeth equipped with carbide plates.
Before work, the electric saw is installed on a stand-box made of birch boards 25 mm thick. Inside, at the corners of the box, wooden bosses measuring 40x40x40 mm are attached, on which the machine base rests. The stand serves as a bin for collecting sawdust, and in the non-working state — as a case, when the saw is turned over and the base is placed with the reverse side on the same bosses.
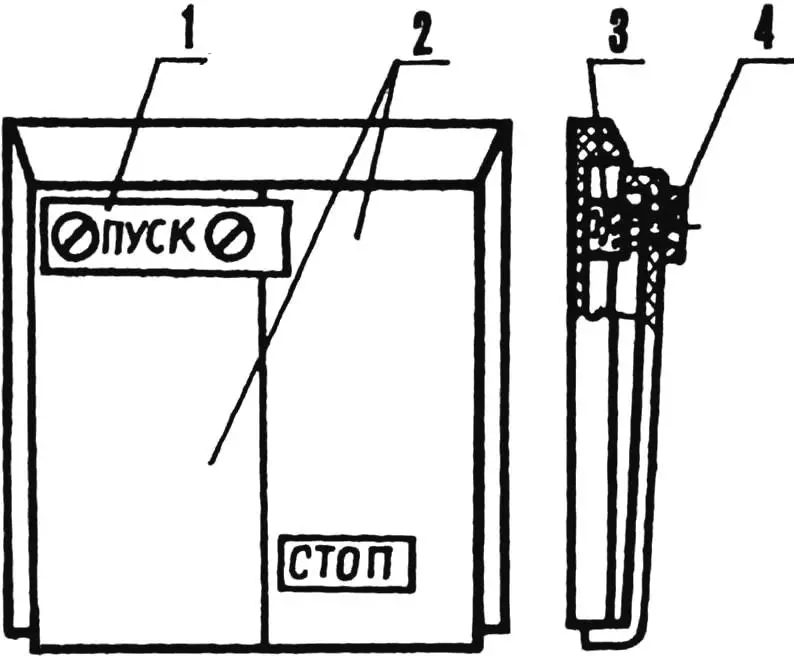
1 — flag; 2 — keys; 3 — elastic element; 4 — M3 bolt (2 pcs.)
For cutting rabbets, an overlay of the required thickness with a slot for the saw blade is made, which is placed on the work table and secured to it with screws. In this case, the guide is also screwed to the overlay with screws.
During operation, motor stoppage due to overload is not excluded. In this case, the motor must be immediately turned off, the load removed, wait a bit, and turn it on again. If the relay contacts stick, you can lightly tap on its housing. The cause of frequent stops without overload is usually the blunting of the cutting edges of the saw teeth, especially if they are made of tool steel. They can be sharpened without removing the blade from the machine, with a personal or velvet file of semicircular or diamond cross-section. The set of the saw teeth to 0.6—0.8 mm is also very important.
For ripping long boards, an auxiliary support with a roller is made, which is taken from the wringer device of a washing machine. The support is attached to a stand of appropriate height at the required distance from the machine.
When working on an electric saw, it is important to observe safety rules: work in protective glasses and mittens, use pushers for feeding short workpieces. Protective guards are not difficult to make, but they are necessary.
A. NIZOVTSEV
Recommend to read
 “SLEEPING BAG” FOR THE ROD
When purchased new telescopic rod and made him some good fishing tours, realized that a fishing rod needs a strong and practical case. On a shelf in the garage had a large piece of... UPDATED TABLE
Many hobbyists and tinkerers have a tabletop lathe woodworking machine STD-120 and its modifications. There are machines and in school workshops. The presence of such equipment allows...
