“HAIRDRYER” FOR WELDING

Offer DIY (and home) is a device for welding plastics. However, it can be used to solve a variety of problems of technical work — for example, to blow away solder from electronic circuit boards dismantled. Because the temperature coming out of the nozzle-tube air reaches 300°C, and warm-up only takes 5 — 8 minutes.

 
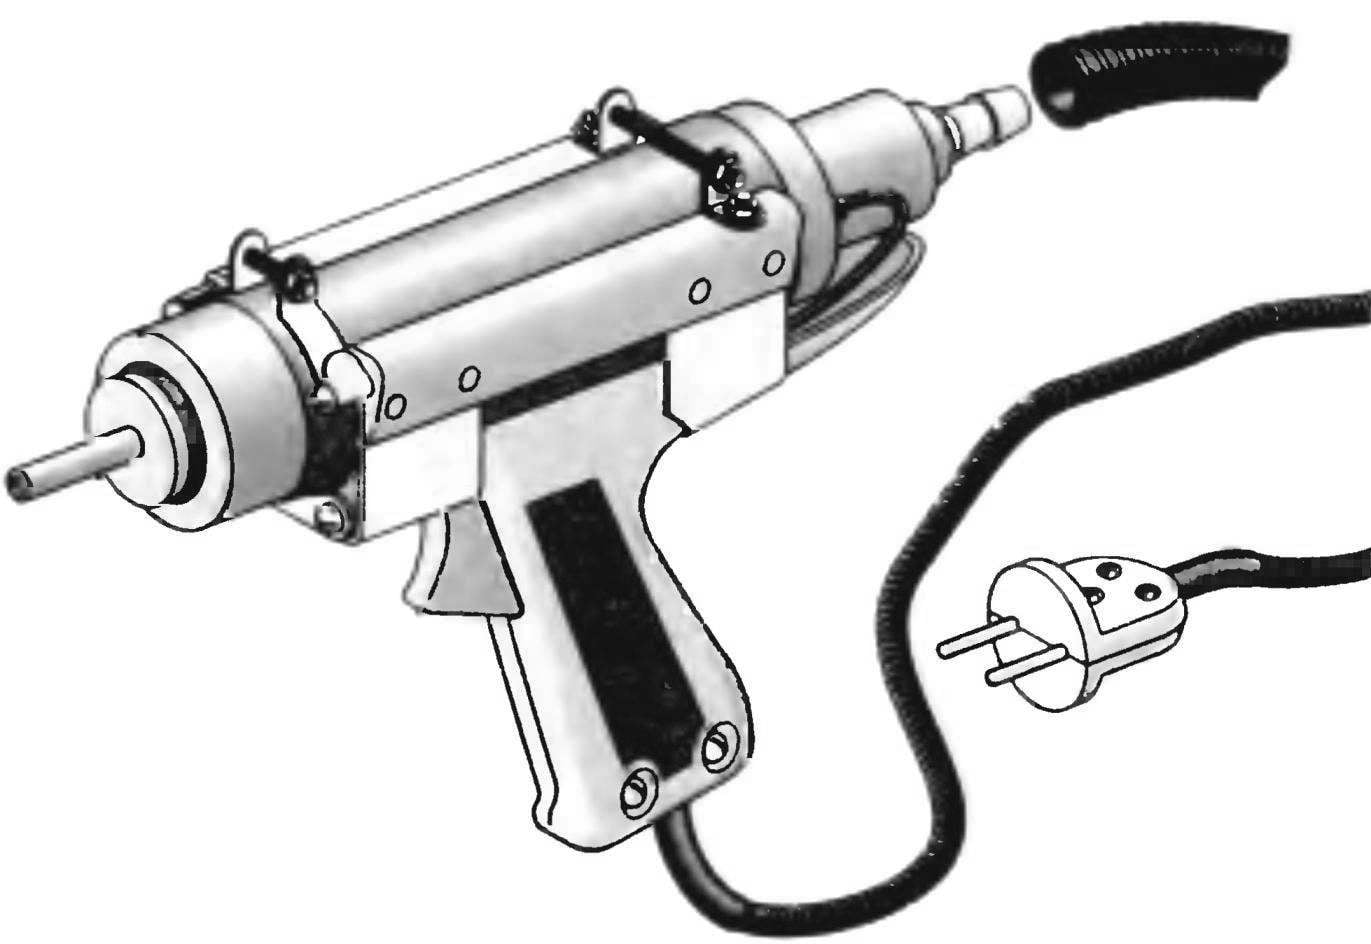
The device (Fig.1) is assembled in a pistol is the easiest to work form. And to him I was old pulse soldering iron (PDH-100 GOST 7219-69). from which removed all the working part, except the switch (22) located in the handle (21).
 
Empty metal shell soldering iron sawn with a hacksaw along (horizontal), and the separated top part in half lengthwise To get two halves (26) using aluminum rivets (27) through the drilled holes of 2 mm diameter joining the two coupling strips (20 and 23) of thin (1 mm) of Teflon, which serve for fastening to the arm (21) of the new working part of the device, that is, the outer ceramic tube (3) with a diameter of 50 mm. for the same purpose from the top to the case halves soldering iron (26), at the back, drilled holes for the clamping parts (10). And in the front halves of these already have the threaded holes where the screws fasten the tie plates (8) pre-bent, as shown in the figure. The contraction is fixed with pins and nuts (29, 30) But first need to impose heating the housing (3) heat insulation strips (9, 24) of the same fluoropolymer that the Velcro ties. Prior to Assembly of the device requested to enter in the handle and connected to the switch flexible cord (18) withstand current up to 5A, and the ends of the output for connection to a heating part.
The heart of the device, of course, is the working part, namely the heating element (7), which is a quartz halogen bulb (such as КТ220-500-1 from photoswitches “Photon”), Its surface is heated to 470°C. It is placed in a tubular ceramic casing (4). For better heat dissipation, the tube inside can be neatly paste (with glue PF-14) aluminum wrapping foil, smoothing it carefully. It is only necessary to paste over the place where the lamp is installed directly without entering the rear cap.
 
Fig. 1.
 
Fig. 1.
 
Fig. 1. “Air” soldering iron:
 
1—nozzle (copper tube 6,5x4x48); 2 – bushing (ceramic or electro-porcelain); 3— housing (ceramic tube 50х38х155); 4 — a casing of a heater (ceramic or electropathology tube 30х20х185); 5 – thermal insulation (asbestos cord Ø5, length approx 5000); 6—bracket (pin steel plank 10x2x167); 7— heater (bulb quartz halogen КГ220-5О0-1); 8 — front tiedown (2); 9 – the top insulating tape (PTFE 125x130x1), 10-rear tiedown area (2); 11 —bracket small (pin steel plank 10x2x35), 12 – mounting screw (МЗх10); 13 — pin screw (and also for fixing adapter, М3х14), 14 — adapter (PTFE) under the fitting and the casing of the heater; 15 — fitting under the discharge hose (aluminum); 16 -thrust adjustment screw (МЗх10); 17— pin screw (and also for fixing the bracket Msgs); 18 is a flexible cord (Ø2. current up to 5A); 19—safety screen (PTFE, 65x60x22x1); 20 – rear ribbon tie (PTFE, 140x36x1), 21 — the handle of the welding device (soldering iron, PDH-100, GOST 7219-69); 22 — Kursovoy switch (soldering, PDH-100, GOST 7219-69); 23 – front ribbon tie (PTFE, 120x36x1); 24 — lower heat insulation tape (PTFE, 125x36x1); 25 attachment to the nozzle (bronze tube for small works); 26 — piece from the body of the soldering iron, 27 aluminum rivet (Ø2×4, 8); 28 — a mounting bolt of the rear binding area (М3х8,2); 29 —pin back tie knot (М3х55); 30 – stud front tie knot (М3х30); 31 — insulation pad (PTFE)


Inside the housing to install the lamp mount bracket (6) with the contact node in the front part, consisting of a spring plate, springs and screws. The end of the strap is fixed by screw (17) serving simultaneously the current-carrying element. Above it is attached a small angle bracket (11), which is the second contact. In the drawing between both of these contacts in their proximity is visible mounted above the screw (17) thin PTFE gasket (31); but is it just gloss heat resistant varnish or adhesive PF-14).
 
After the installation of the lamp remains set in front of the body of the ceramic sleeve (2) and copper “solder” a pipe — nozzle (1), which are bonded with heat-resistant adhesive PF-14. You can use thermoelectrotraining paste of a mixture of talc with liquid glass (office glue). The rim of the sleeve it’s better to make a larger diameter that is 30 to 32 mm — then get the lip which will be an additional emphasis for the packing of asbestos cord (5) in the case of weakening it.
The winding of asbestos cord, serving as the primary insulation. to perform better to install the lamp and contact blocks. Stack it tightly across the surface of the casing of the heater (4), not reaching the screw holes. Then skewer the body — ceramic tube (3) and then proceed to the installation of the trims and lamps.
 
Rear bushing-adapter (14) under the hose from a vacuum cleaner make also of PTFE, but can be from the PCB since this part is almost not heated, because it is constantly blowing cold air. It is fixed with a screw (13), ministering to both the second current-carrying element.
 
Fig. 2. Option heating element
 
Fig. 2. Option heating element:
 
1 — glass tube (3). 2 — spiral (nichrome wire); 3 — contacts of the helix; 4 — adapter, 5 — screw-lock adapter; 6 — fitting
 

Nozzle (15) is made of aluminum alloy. And adapter to the vacuum cleaner with the same fitting for the second variant of the device (Fig.2, 6) made under a cone of aluminum tube, is placed on the hose of a vacuum cleaner; it is inserted inside this tube and held there by air pressure. Instead of the halogen lamp you can use the second variant of the device (Fig.2), where a heating element with a capacity of from 600 to 1000 W consists of nichrome wire (2) with a diameter of 0.5 mm and three glass tubes (1) that are cut from both ends of the ledges for the free passage of air. Since the nichrome wire when heated in contact with oxygen, oxidizes and burns out, it is advisable finished spiral before Assembly to cover the adhesive PF-14, a heat-resistant varnish or known paste.
 
You can do without tubes, strung on a spiral of short ceramic insulators, which are sold in hardware stores along with the spiral for tiles or iron; or even do without them, if densely to coat with paste the curves of the spiral, thereby Seitalieva her. The principle of operation of the welding fixture the following. First, on the vacuum cleaner (if there is no separate compressor) and burn the hose from the suction socket on the output. To turn on the lamp turn on vacuum (or air compressor). The pressure should be small, about 0.2 kg/cm2: the more pressure the air is, the less its temperature at the exit of the nozzle. After this, pressing the trigger activates the welding gun, first to the desired temperature is reached. And further, due to the thermal inertia of the heated ceramic, the lamp will turn on for a short time, maintaining the required temperature. (Attention! Without air device not include!).
 
Thick sheets of plastic welding is better with the additive from the same rod. Well-connected joints in linoleum do not char the edges, which inevitably occurs when working with the contact heater is Well sealed and the polyethylene, the suture can be any configuration.
 
A. NAZAROV

Recommend to read

  • PAINTING THE FRAME, WITHOUT STAINING THE GLASSPAINTING THE FRAME, WITHOUT STAINING THE GLASS
    help here's a basic clamp, cut and bent from aluminium sheet 1.5 mm thick.
  • CHRISTMAS HANDMADECHRISTMAS HANDMADE
    How rapidly time, dear readers! Last night, I think the "Club house masters" invited you to their new year's housewarming party — and now a small anniversary: it was three years old. How...