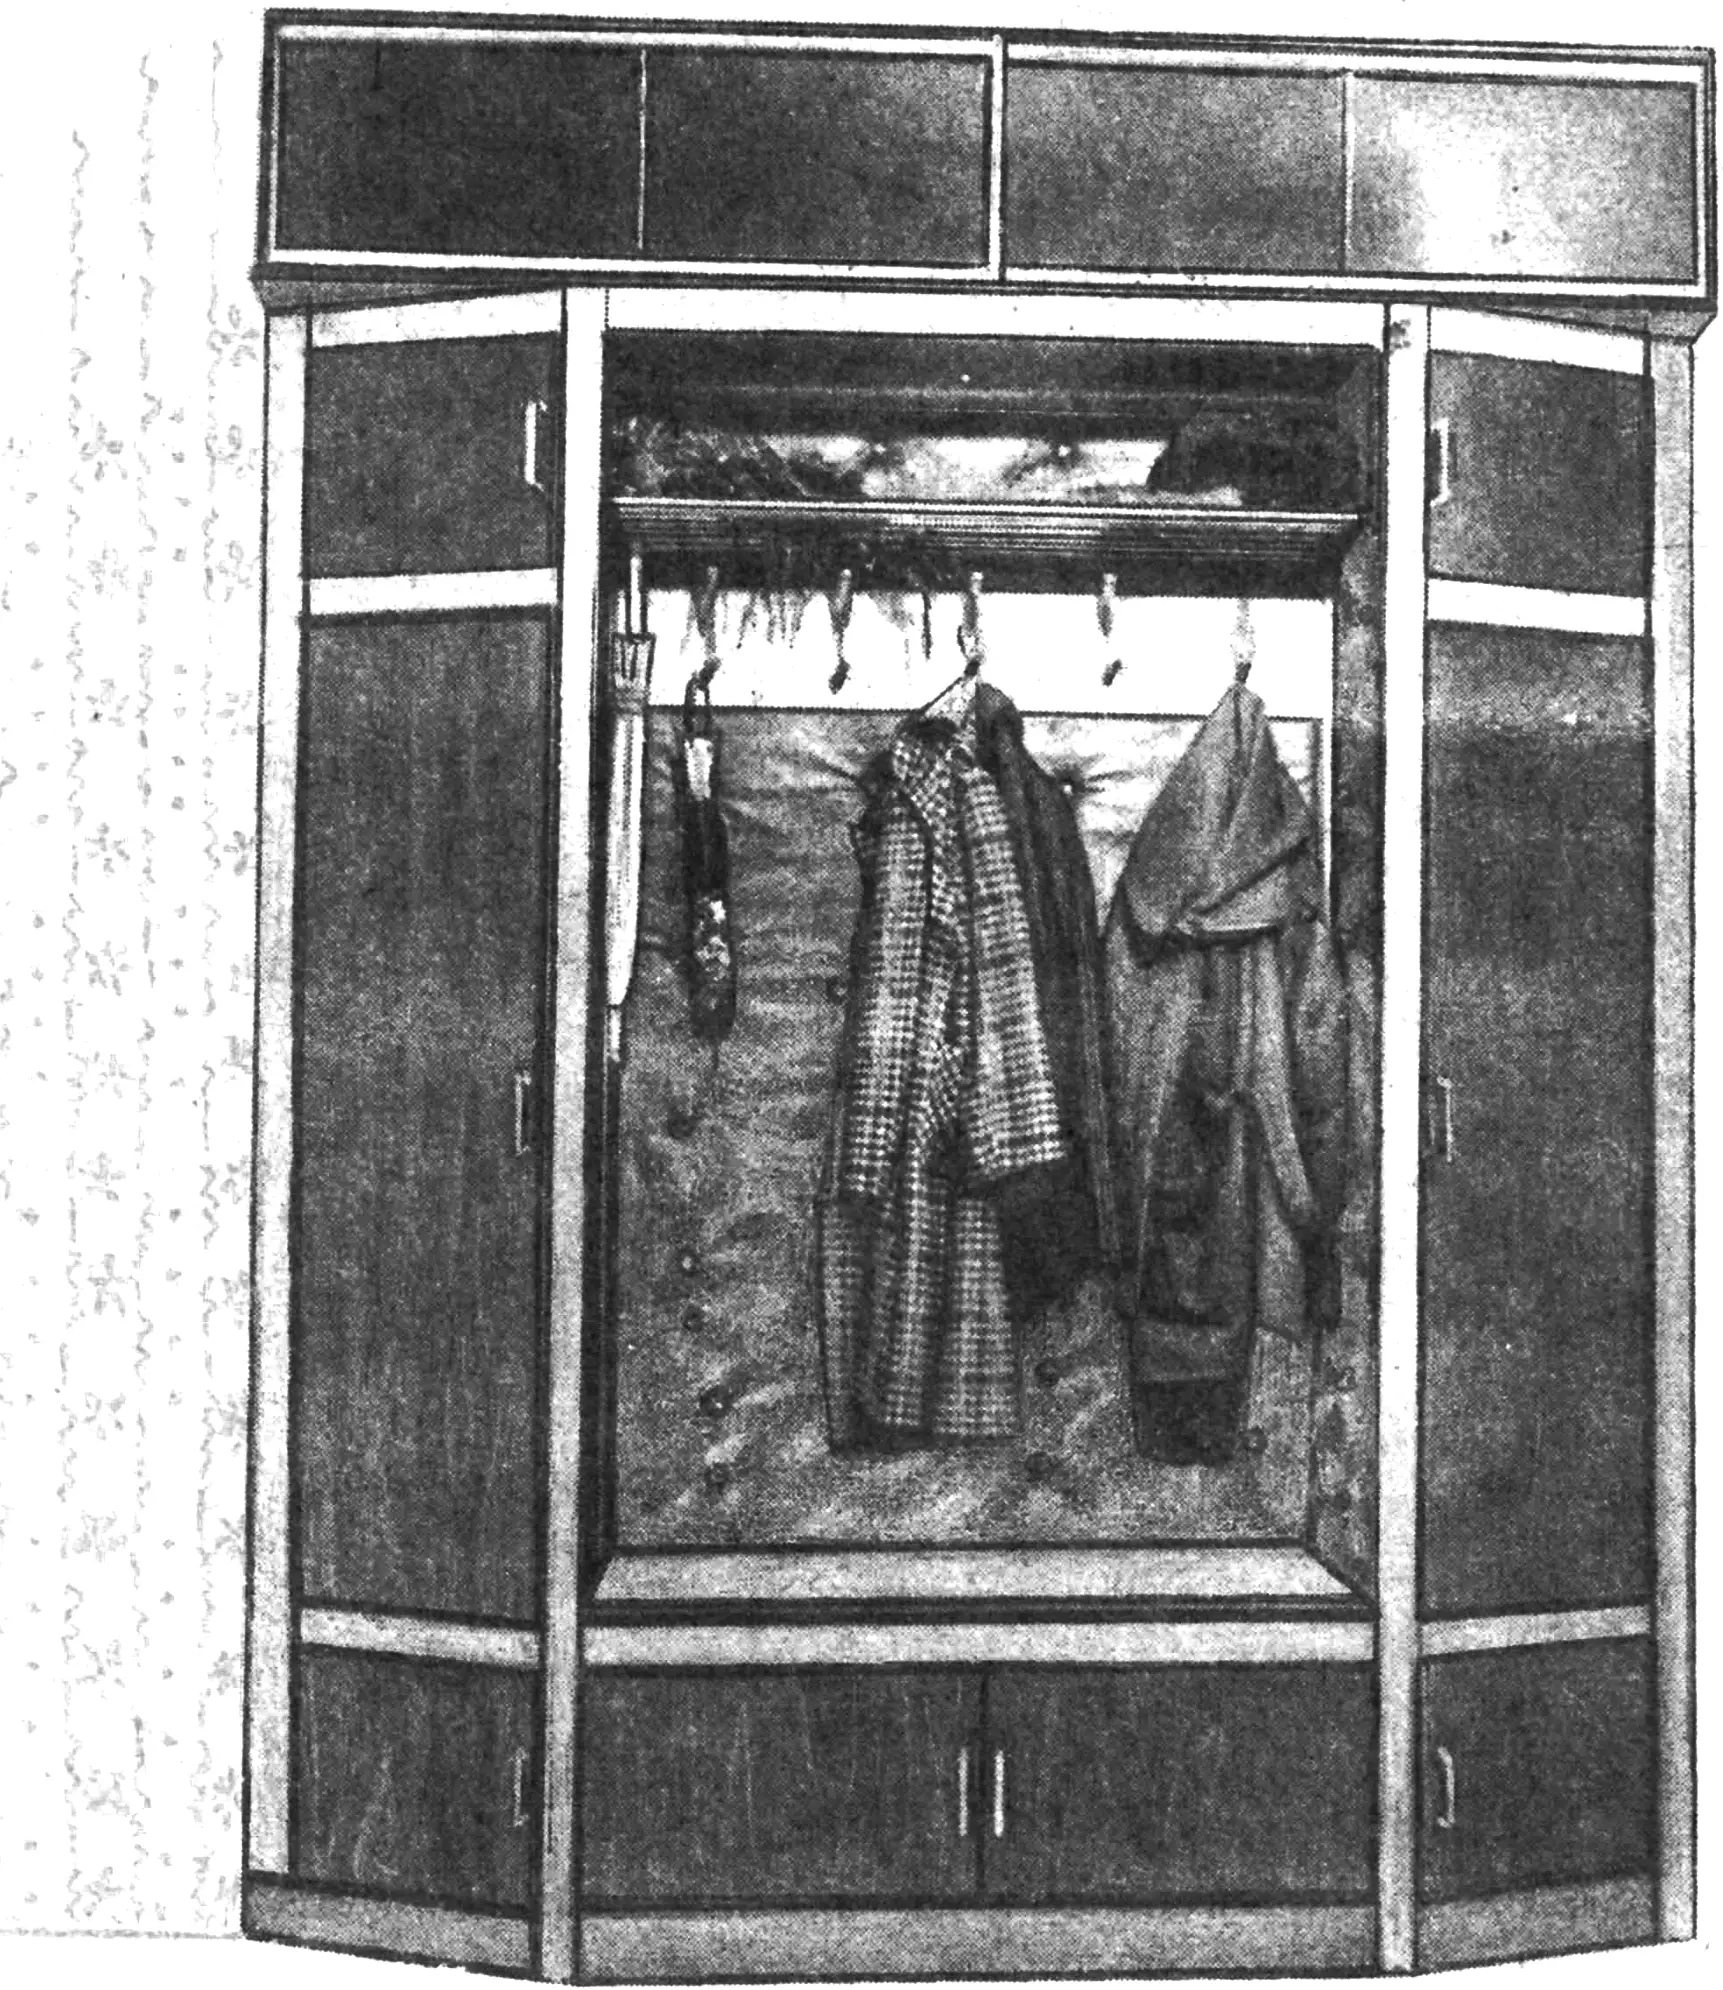
When making a hallway coat rack cabinet, I proceeded from the layout features of an old-built apartment. In my case, in particular, opposite the entrance door there is a door to a storage room, so the cabinet in plan has angled side cuts that allow the doors to open freely.
The dimensions are given for my apartment. Plastic was used to finish the compartment doors. The uprights and frame of the coat rack cabinet are made of ash and coated with hot linseed oil (or furniture varnish). The side panels of the cabinet and the upper cabinet section, and the top and bottom panels of the upper section — are made of plywood, also impregnated with hot linseed oil. It should be borne in mind that the bottom panel of the upper section also serves as the “lid” of the everyday-clothes compartment, so the plywood should be selected, if possible, with an attractive grain, since it is clearly visible from below.
All frame joints are mortise-and-tenon with casein glue. The uprights and frame of the cabinet have longitudinal grooves into which the side and rear panels of the cabinet are inserted during assembly. The grooves were cut on a homemade “Skilled Hands” type machine with a circular saw in two passes.
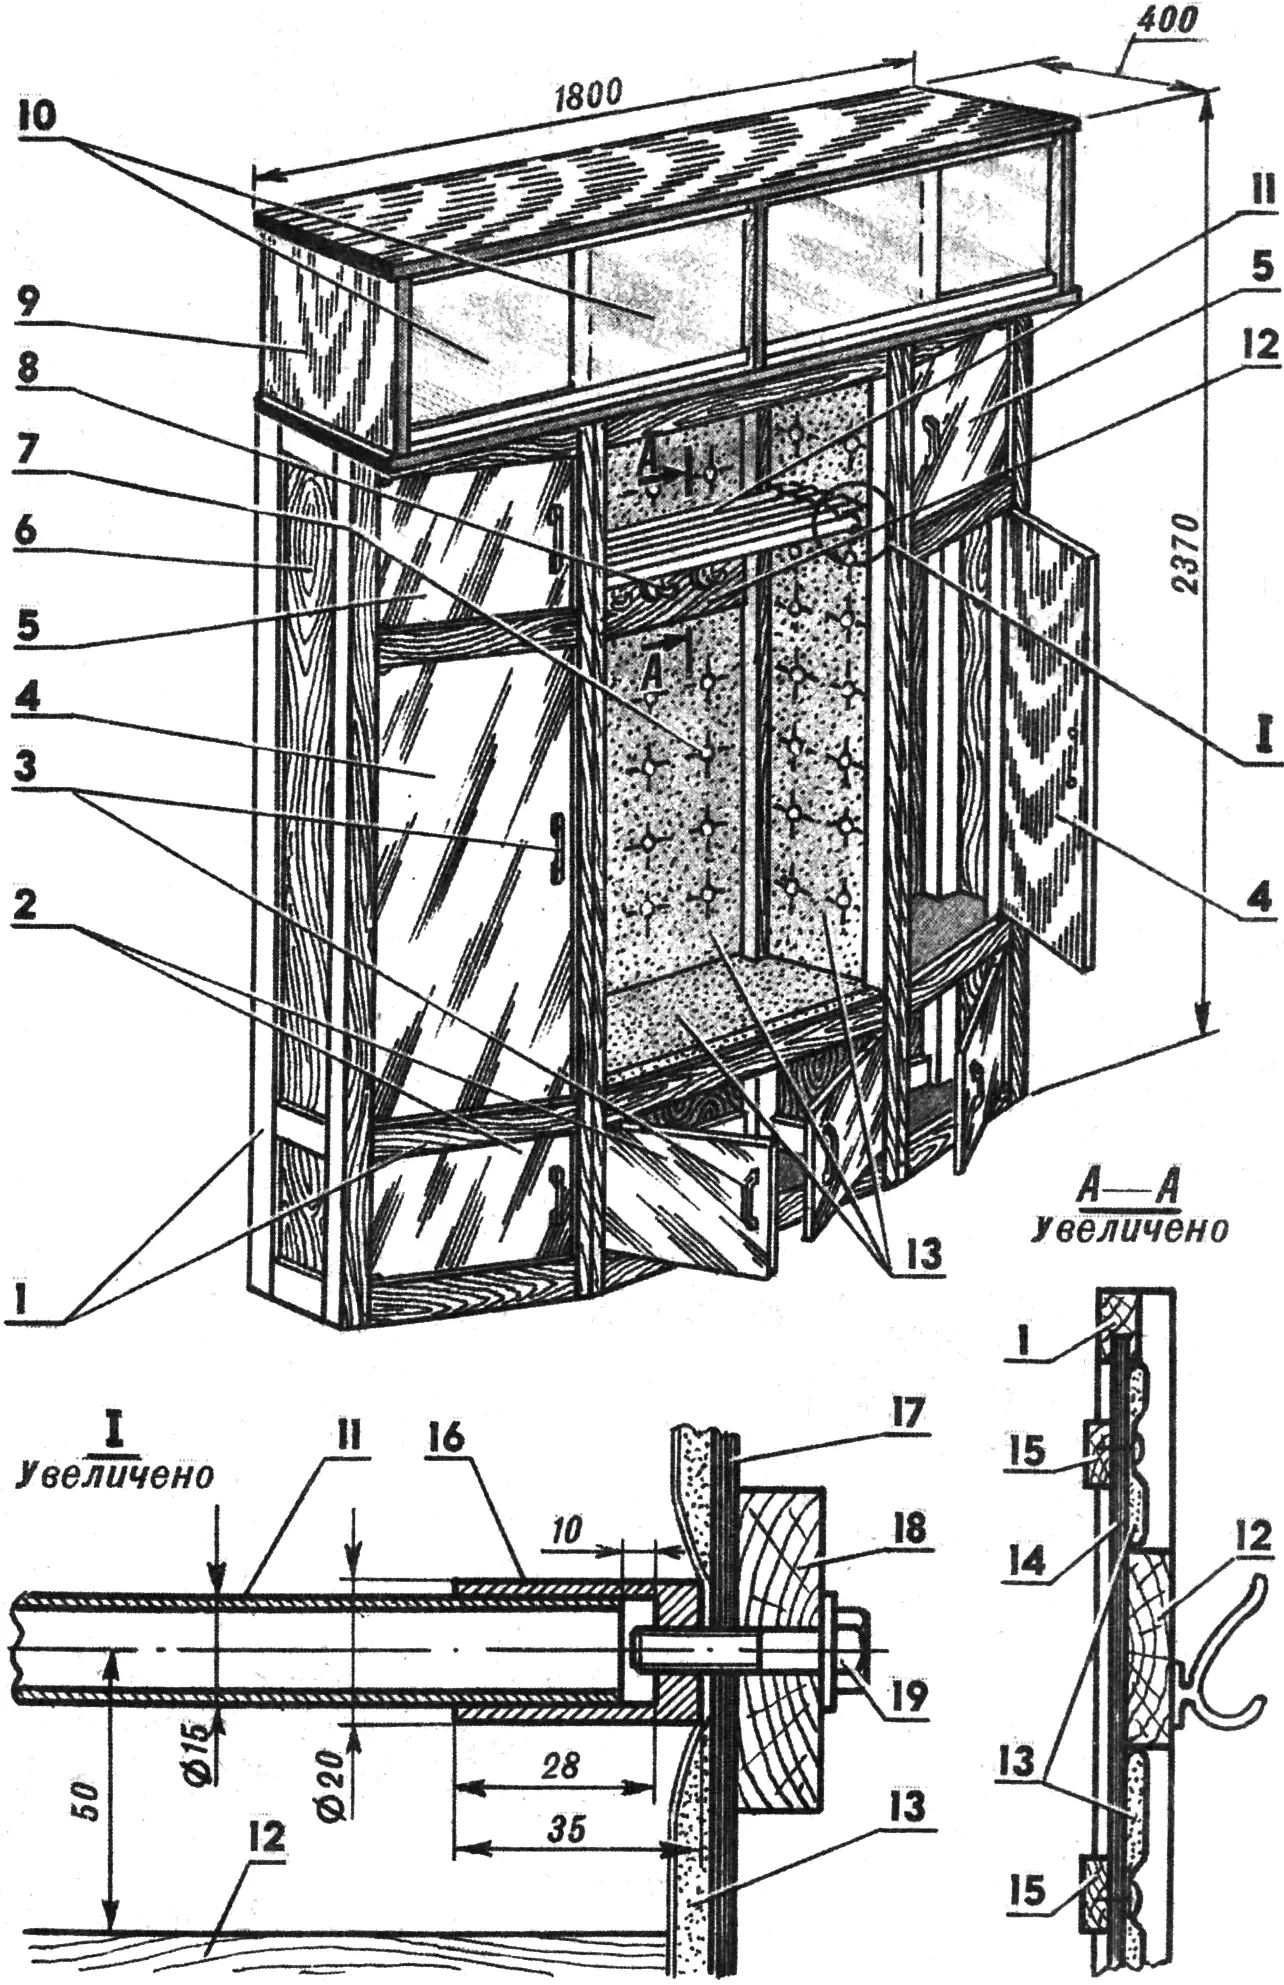
1 — load-bearing frame, 2 — shoe compartment doors, 3 — door handles, 4 — seasonal-clothes compartment doors, 5 — linen compartment doors, 6 — side panel (plywood 3—4 mm thick), 7 — upholstery nails, 8 — hooks for everyday clothes, 9 — upper cabinet section, 10 — sliding glass panels, 11 — hat shelf (brass tubes Ø 15 mm), 12 — board for clothes hooks, 13 — soft upholstery of the everyday-clothes niche, 14 — rear wall of the cabinet, 15 — stiffening ribs of the rear wall, 16 — bushing, 17 — partition, 18 — stiffening rib of the partition, 19 — M6 bolt.
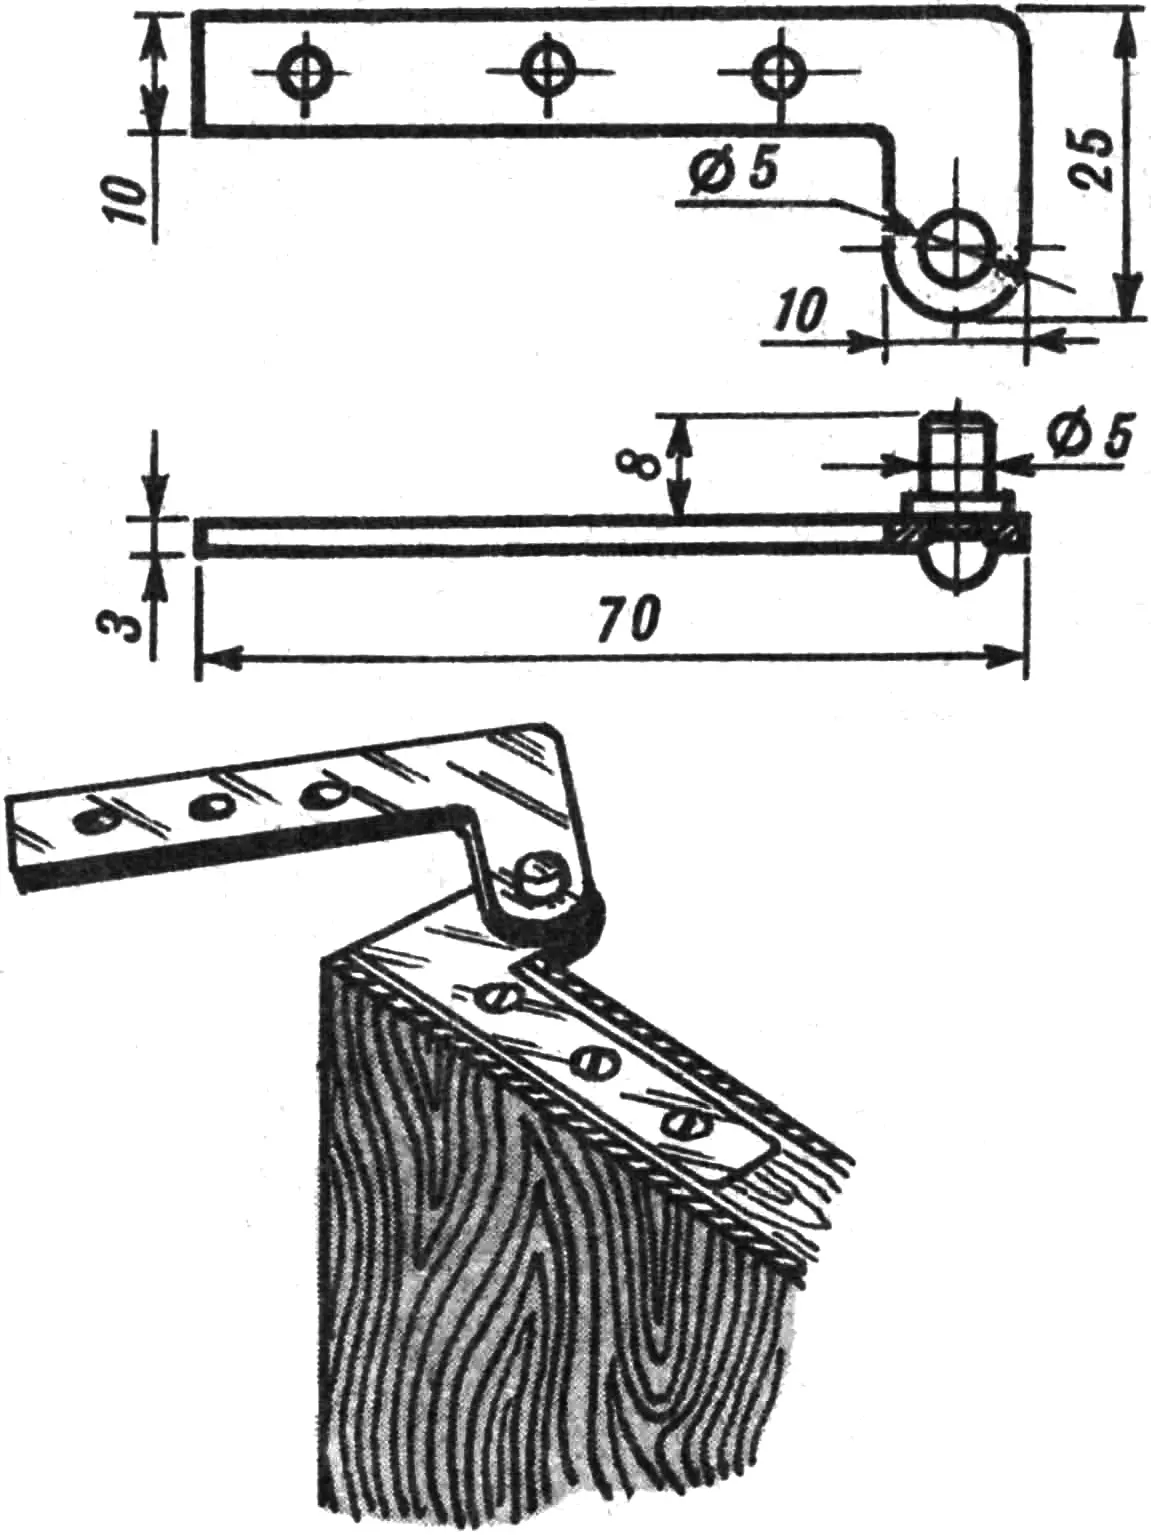
The compartment doors are assembled from thin slats with casein glue, fixed with small nails; on both sides they are faced with plywood and plastic. The door sizes are chosen slightly larger than the corresponding openings, and only after final assembly is precise fitting carried out. When facing, glue is applied with a foam pad to the surfaces of the plastic and plywood in a thin layer; then, over the applied plastic, several layers of paper and a sheet of thick plywood are placed. The resulting package is evenly clamped with clamps and kept under pressure for 24 hours. When tightening the clamps, care must be taken that the plastic does not shift on the door surface, since the adhesive forms a kind of lubricant and the plastic sheet may slip. For this reason it should be prepared approximately one centimeter larger than the door size. Each door is hung on two homemade hinges made from steel plates 3 mm thick and coated with black nitro enamel.
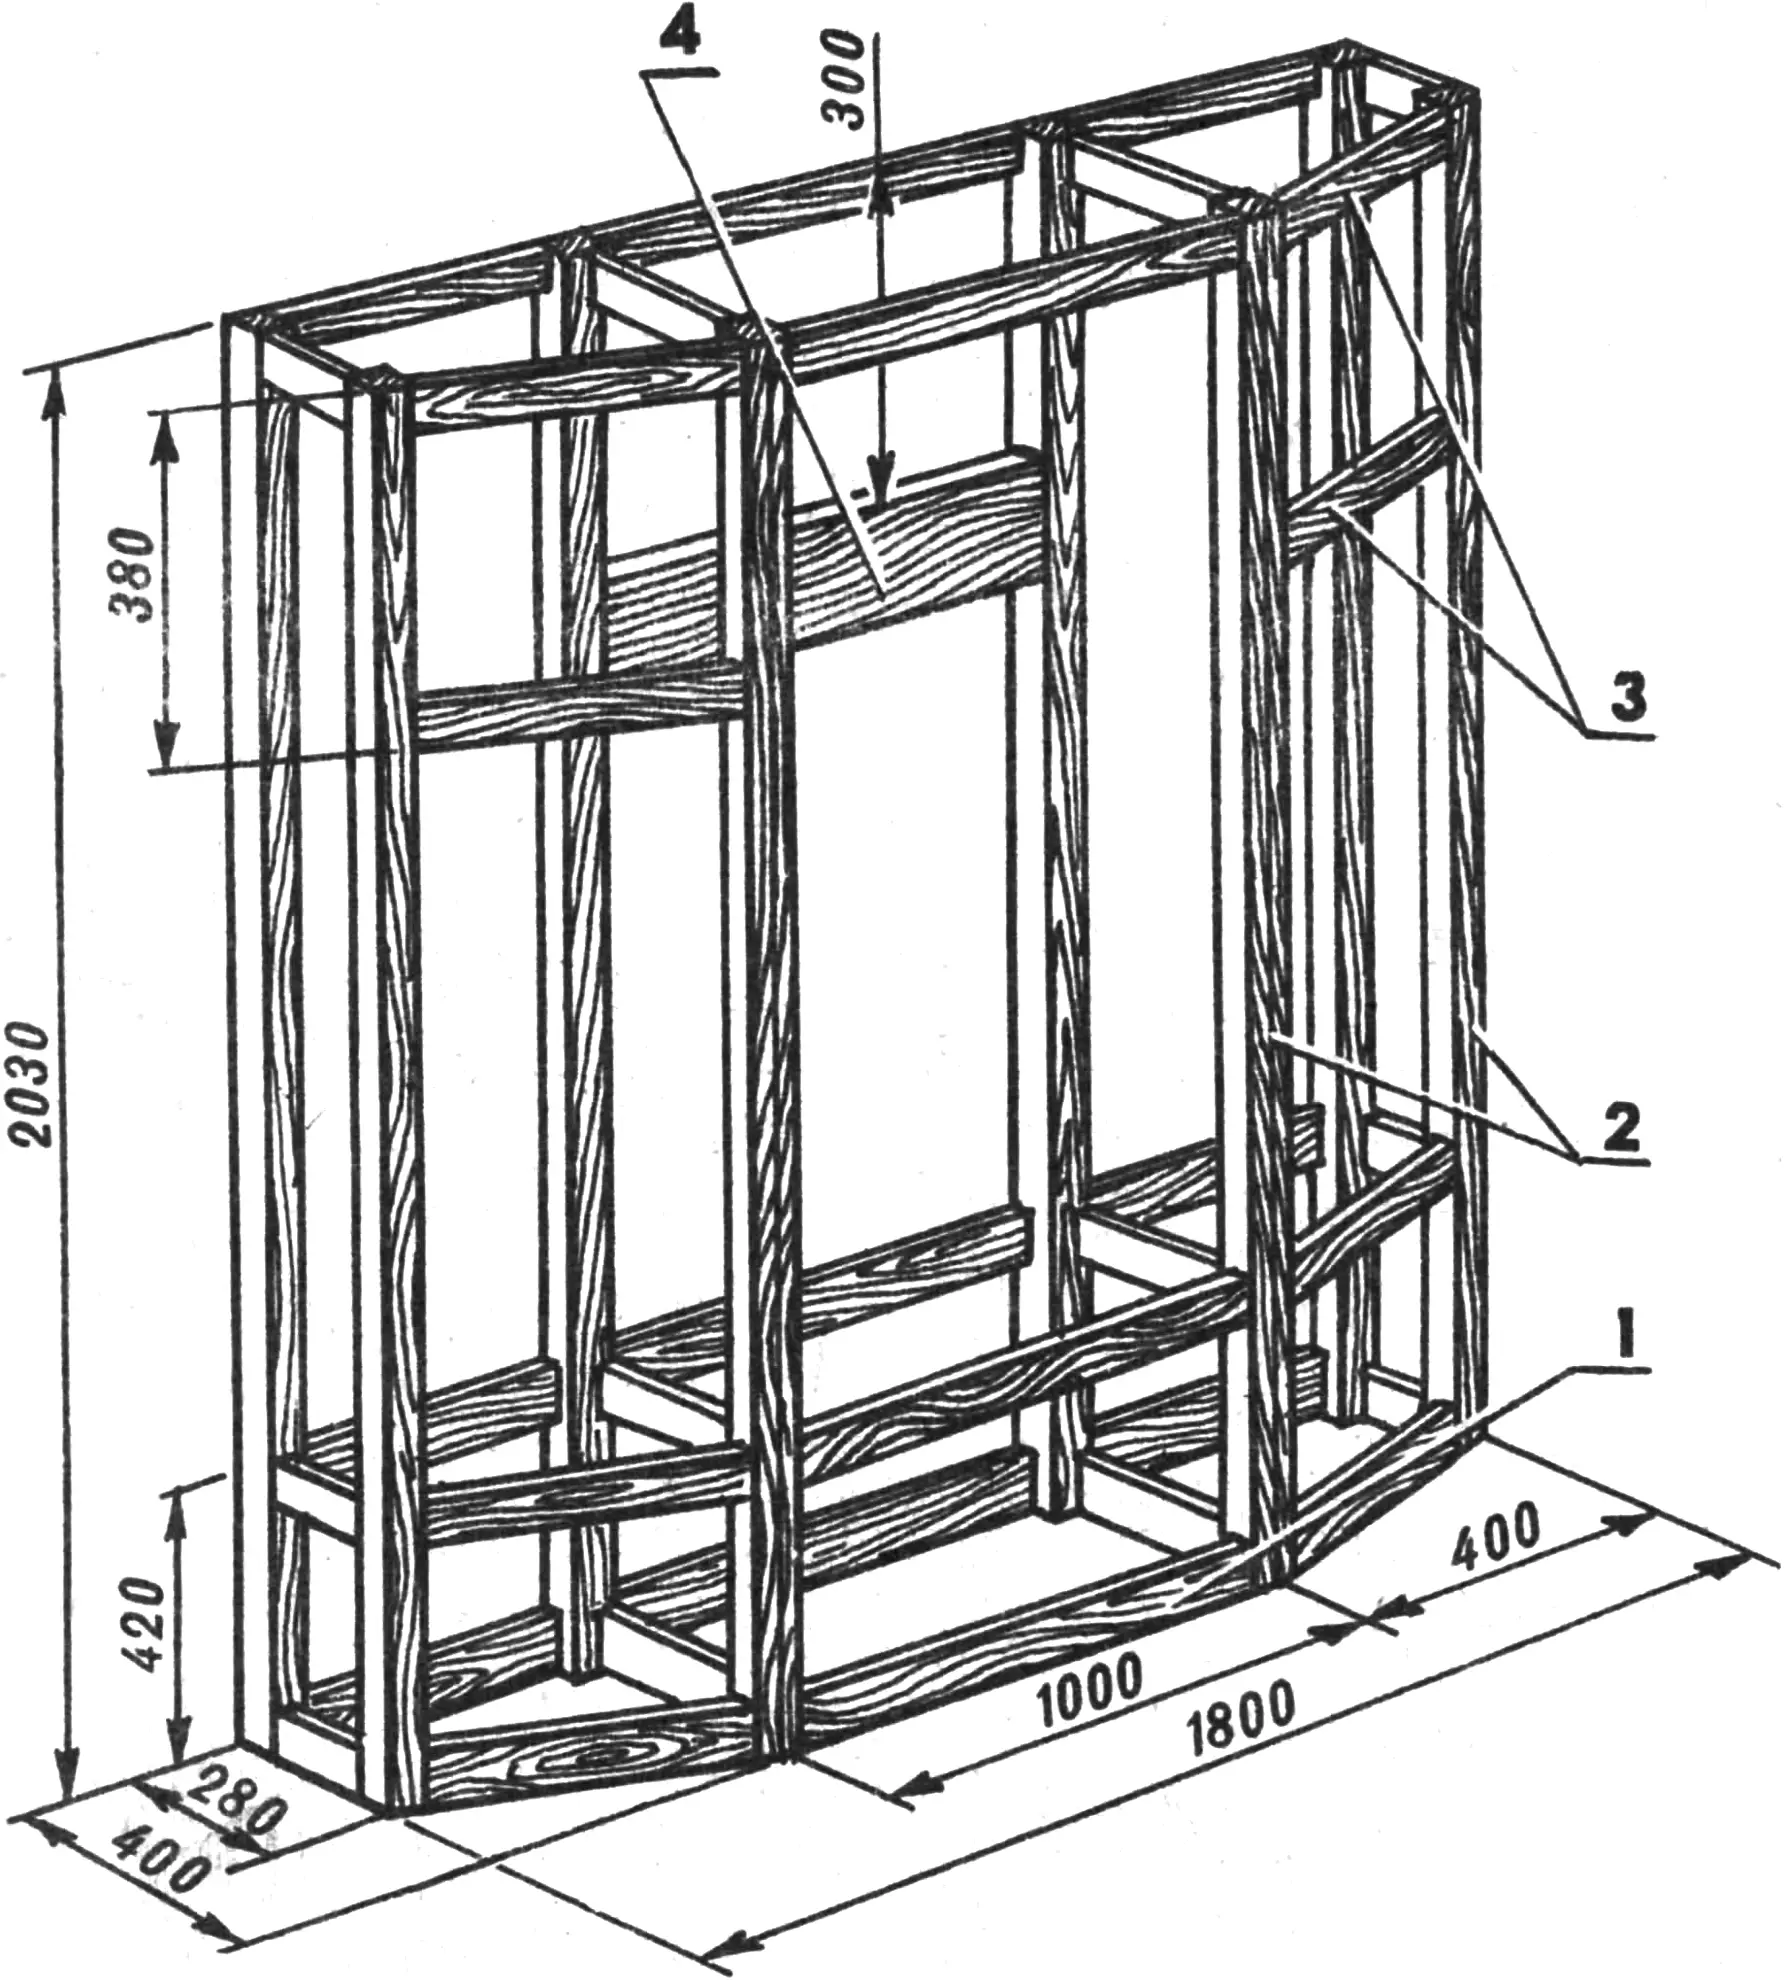
1 — plinth boards, 2 — uprights (timber 50X50 mm), 3 — frame boards 24X50 mm in section, 4 — board for clothes hooks 25X160 mm in section.
The shelves in the compartments and the bottom of the cabinet are made of plywood 7—10 mm thick; they are fastened with steel angle brackets. The strip for clothes hooks is made from a well-planed ash board; it is fitted into the structure with a mortise joint on glue during assembly. The side and rear panels of the everyday-clothes compartment are made of plywood 4 mm thick; during assembly they are inserted into the grooves of the cabinet uprights and frame. On the rear side they have stiffening ribs; the spacing between them is chosen so that furniture nails for fastening the soft upholstery can later be driven into them.
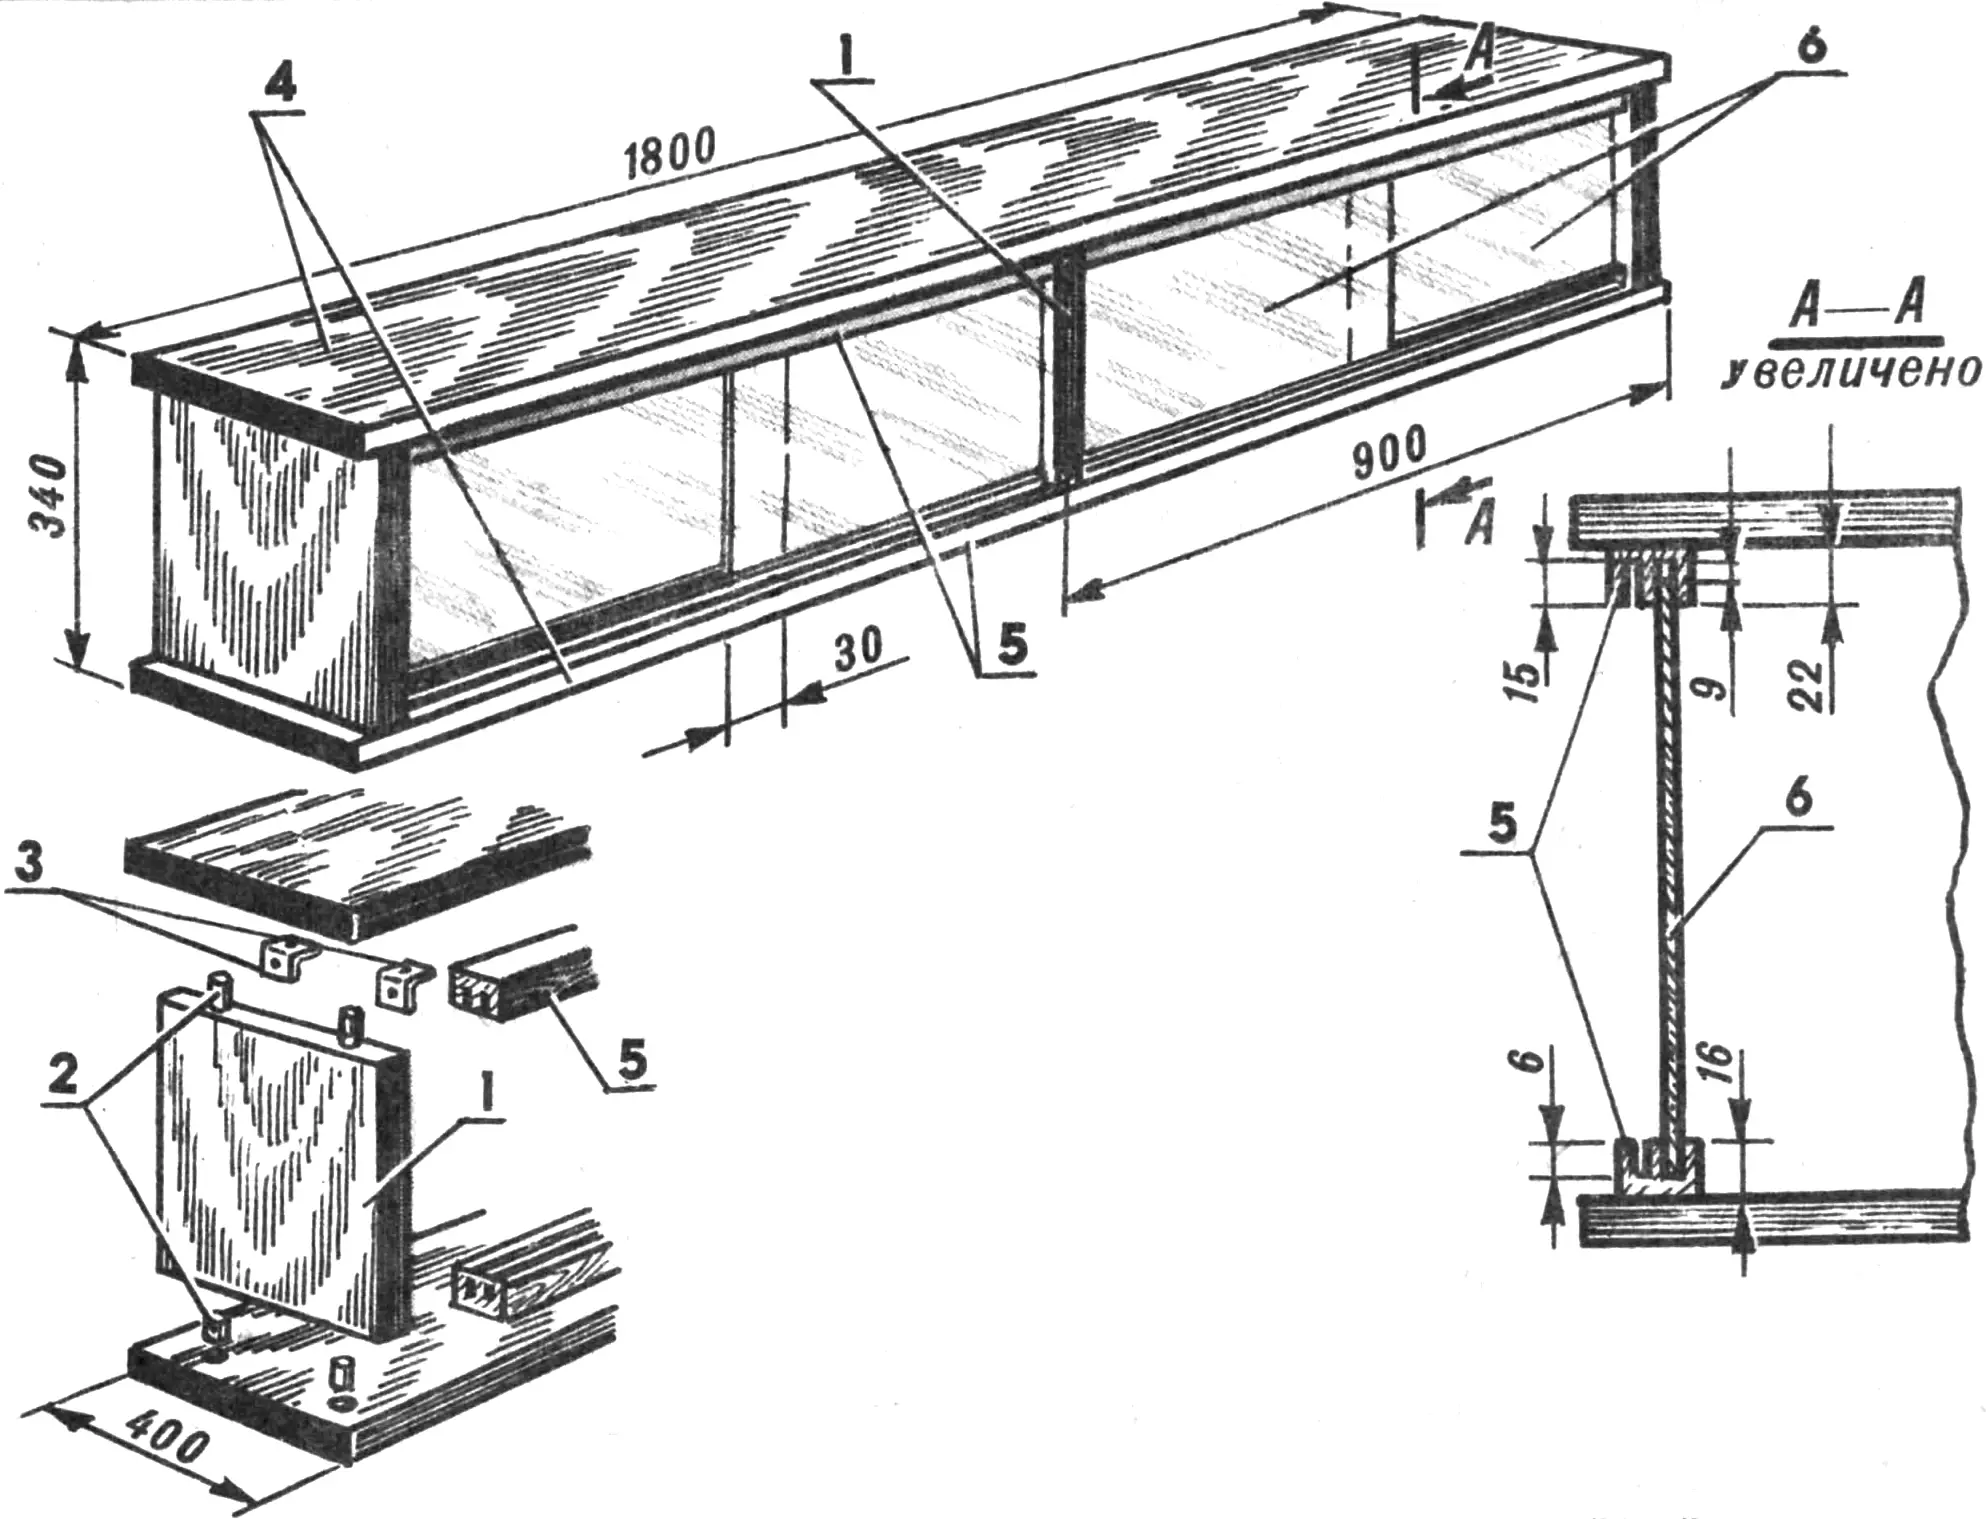
1 — vertical panels, 2 — wooden dowels, 3 — angle brackets, 4 — horizontal panels, 5 — sliding-glass guides, 6 — sliding glass panels.
The upholstery is made as follows. Blanks are cut from plywood 4 mm thick to sizes slightly smaller than the compartment openings (allowing for folding the leather). A sheet of foam 10—20 mm thick is glued onto them.
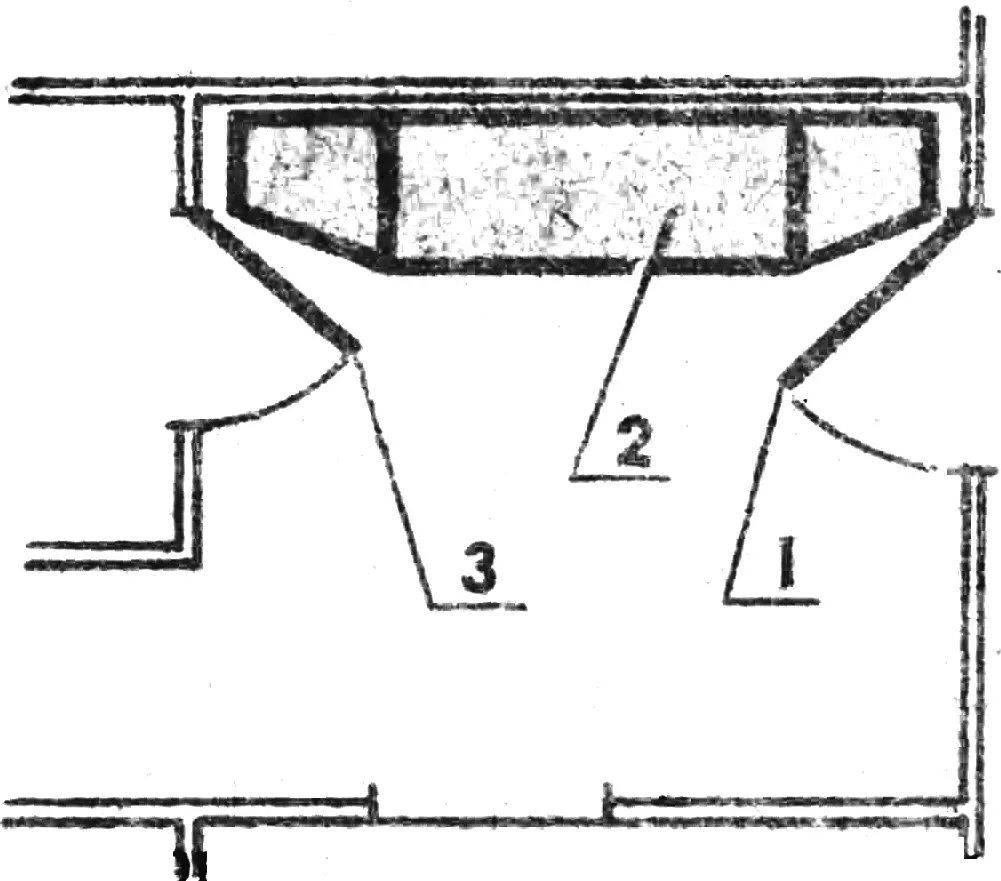
1 — entrance door, 2 — homemade cabinet, 3 — storage-room door.
Ready-made foam mats can be used, or strips can be carefully cut from thick foam. A slight difference in thickness is not a problem, since the covering leather will hide irregularities. Over the glued foam covering, artificial leather or leatherette is stretched, folded under, and glued with glue No. 88 on the reverse side of the plywood sheet. The tension must be even, without wrinkles or folds. The finished soft panels are fastened with furniture nails. Decorative nails can be made by hand. Covered with leather, they will additionally decorate the niche. Brass or copper washers 20—25 mm in diameter serve as the base of the nail heads. With a hammer with a round face they must be given a slightly convex shape (it is better to use a die and punch). A hole is drilled in the center of the heads; the hole is countersunk with a punch, an ordinary nail is inserted and soldered in. Soldering acid is used as flux. A circle is cut from leather, slightly larger in diameter than the nail head. The edge of the circle is cut in a “star” pattern. Glue No. 88 is applied to both surfaces to be bonded, allowed to stand for 15 minutes, after which the circle is placed on the head and carefully wrapped around it with the “star” tabs. To avoid damaging the nail heads, they should not be driven in, but pressed into the holes marked with an awl in the panels.
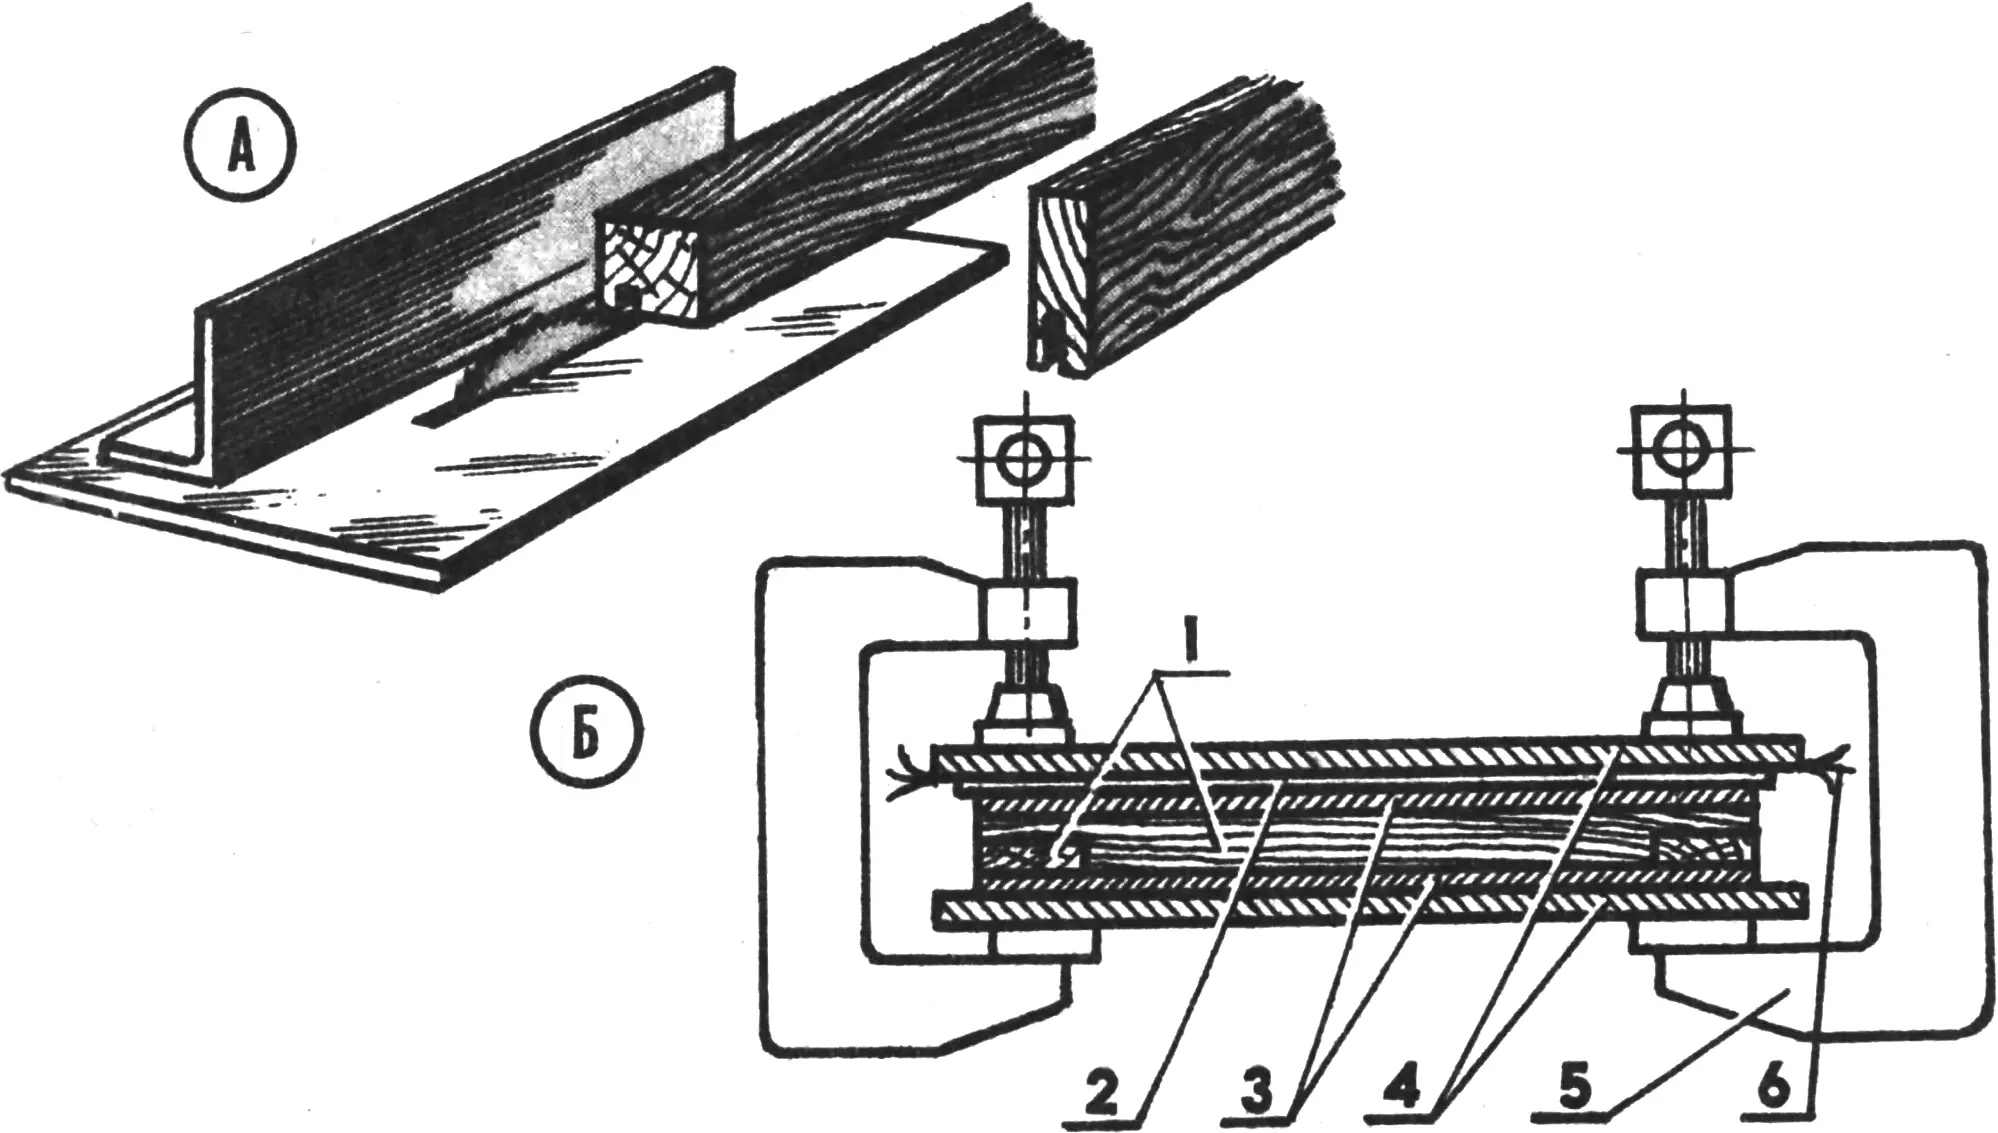
A — cutting grooves for plywood panels and sliding glass; B — gluing a door:
1 — door frame slat 15X40 mm in section, 2 — facing plastic, 3 — door plywood panels, 4 — auxiliary plywood sheets, 5 — clamp, 6 — paper spacer.
The hat shelf consists of six brass tubes 15 mm in diameter. They are fastened with bolts screwed into bushings. The internal depth of the bushings has allowance. With the bushings fitted tightly (to the stop), the width of the tubes is less than the compartment opening, which allows them to be freely inserted into the opening. When the bolts are tightened, the bushings move toward the panels, ensuring firm fixation of the tubes. To prevent the tubes from oxidizing, they should preferably be coated with oil varnish.
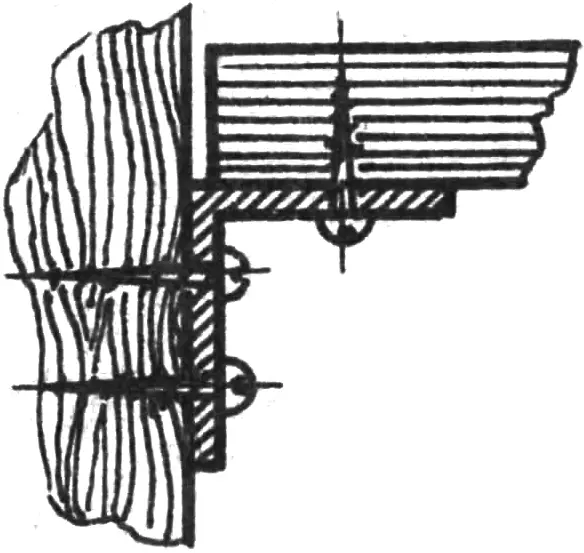
The body of the upper cabinet section consists of three vertical and two horizontal panels, joined on inserted round tenons (dowels) with reinforcement inside by metal angle brackets. The rear wall (of plywood 4 mm thick) is nailed on. Steel angle brackets are also used to fix the upper section to the cabinet. On the front side the upper section is closed by four leaves of 4-mm glass coated on the inside with black enamel. The glass slides along guides made of ash slats with grooves; the depth of the grooves in the upper tracks is greater than in the lower ones so that, by lifting the glass, it can be removed from the frame. The body panels of the upper section are glued from several plywood sheets to a thickness of 18—20 mm with casein glue, using clamps. The end faces of the panels can be covered with filler based on epoxy resin, adding talc and black artists’ oil paint (from a tube) to resin already mixed to the consistency of thick dough. To avoid soiling the face surfaces of the panels, they should be covered with masking tape.
«M-K» 1’91, V. VESELOV
Recommend to read
 The Il-102
After Sukhoi in an unspoken competition to build aircraft of the battlefield joined OKB S. V. Ilyushin. The main difference between the Il-102, su-25 table a second cockpit for the... FORMWORK — STRUBTSINKU
When the need arises to make a concrete column or some other vertical structural element, for fastening the boards of a timbering used a variety of means at hand: wire, nails, all kinds...
