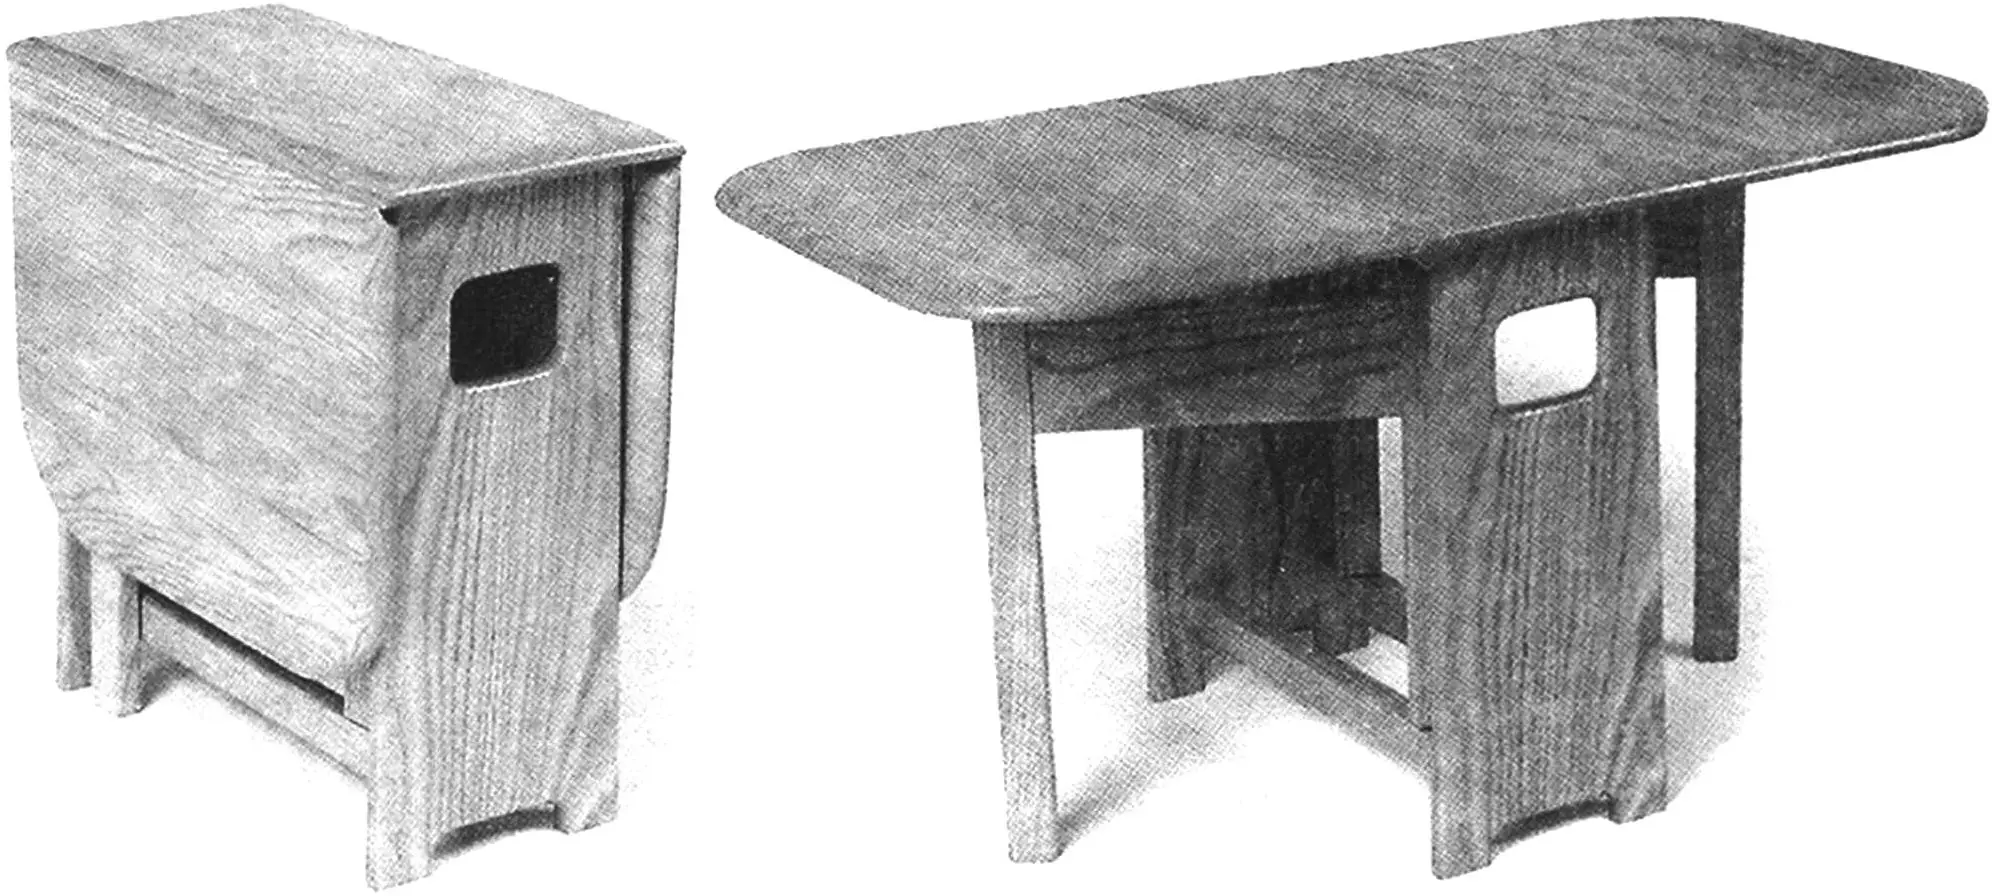
Drop-leaf tables have been known for a long time and they are consistently in demand because they take up little space. But buying a table of the right size in a store is not always possible, so you often have to rely on your own hands and ingenuity.
The proposed table is made of ash. You can use other types of wood, such as cherry or maple, even coniferous, but ash is still the most attractive due to its large texture. It all depends on your tastes and capabilities.
The tabletop consists of a central fixed part and two “wings” hung on hinges, 20 mm thick.
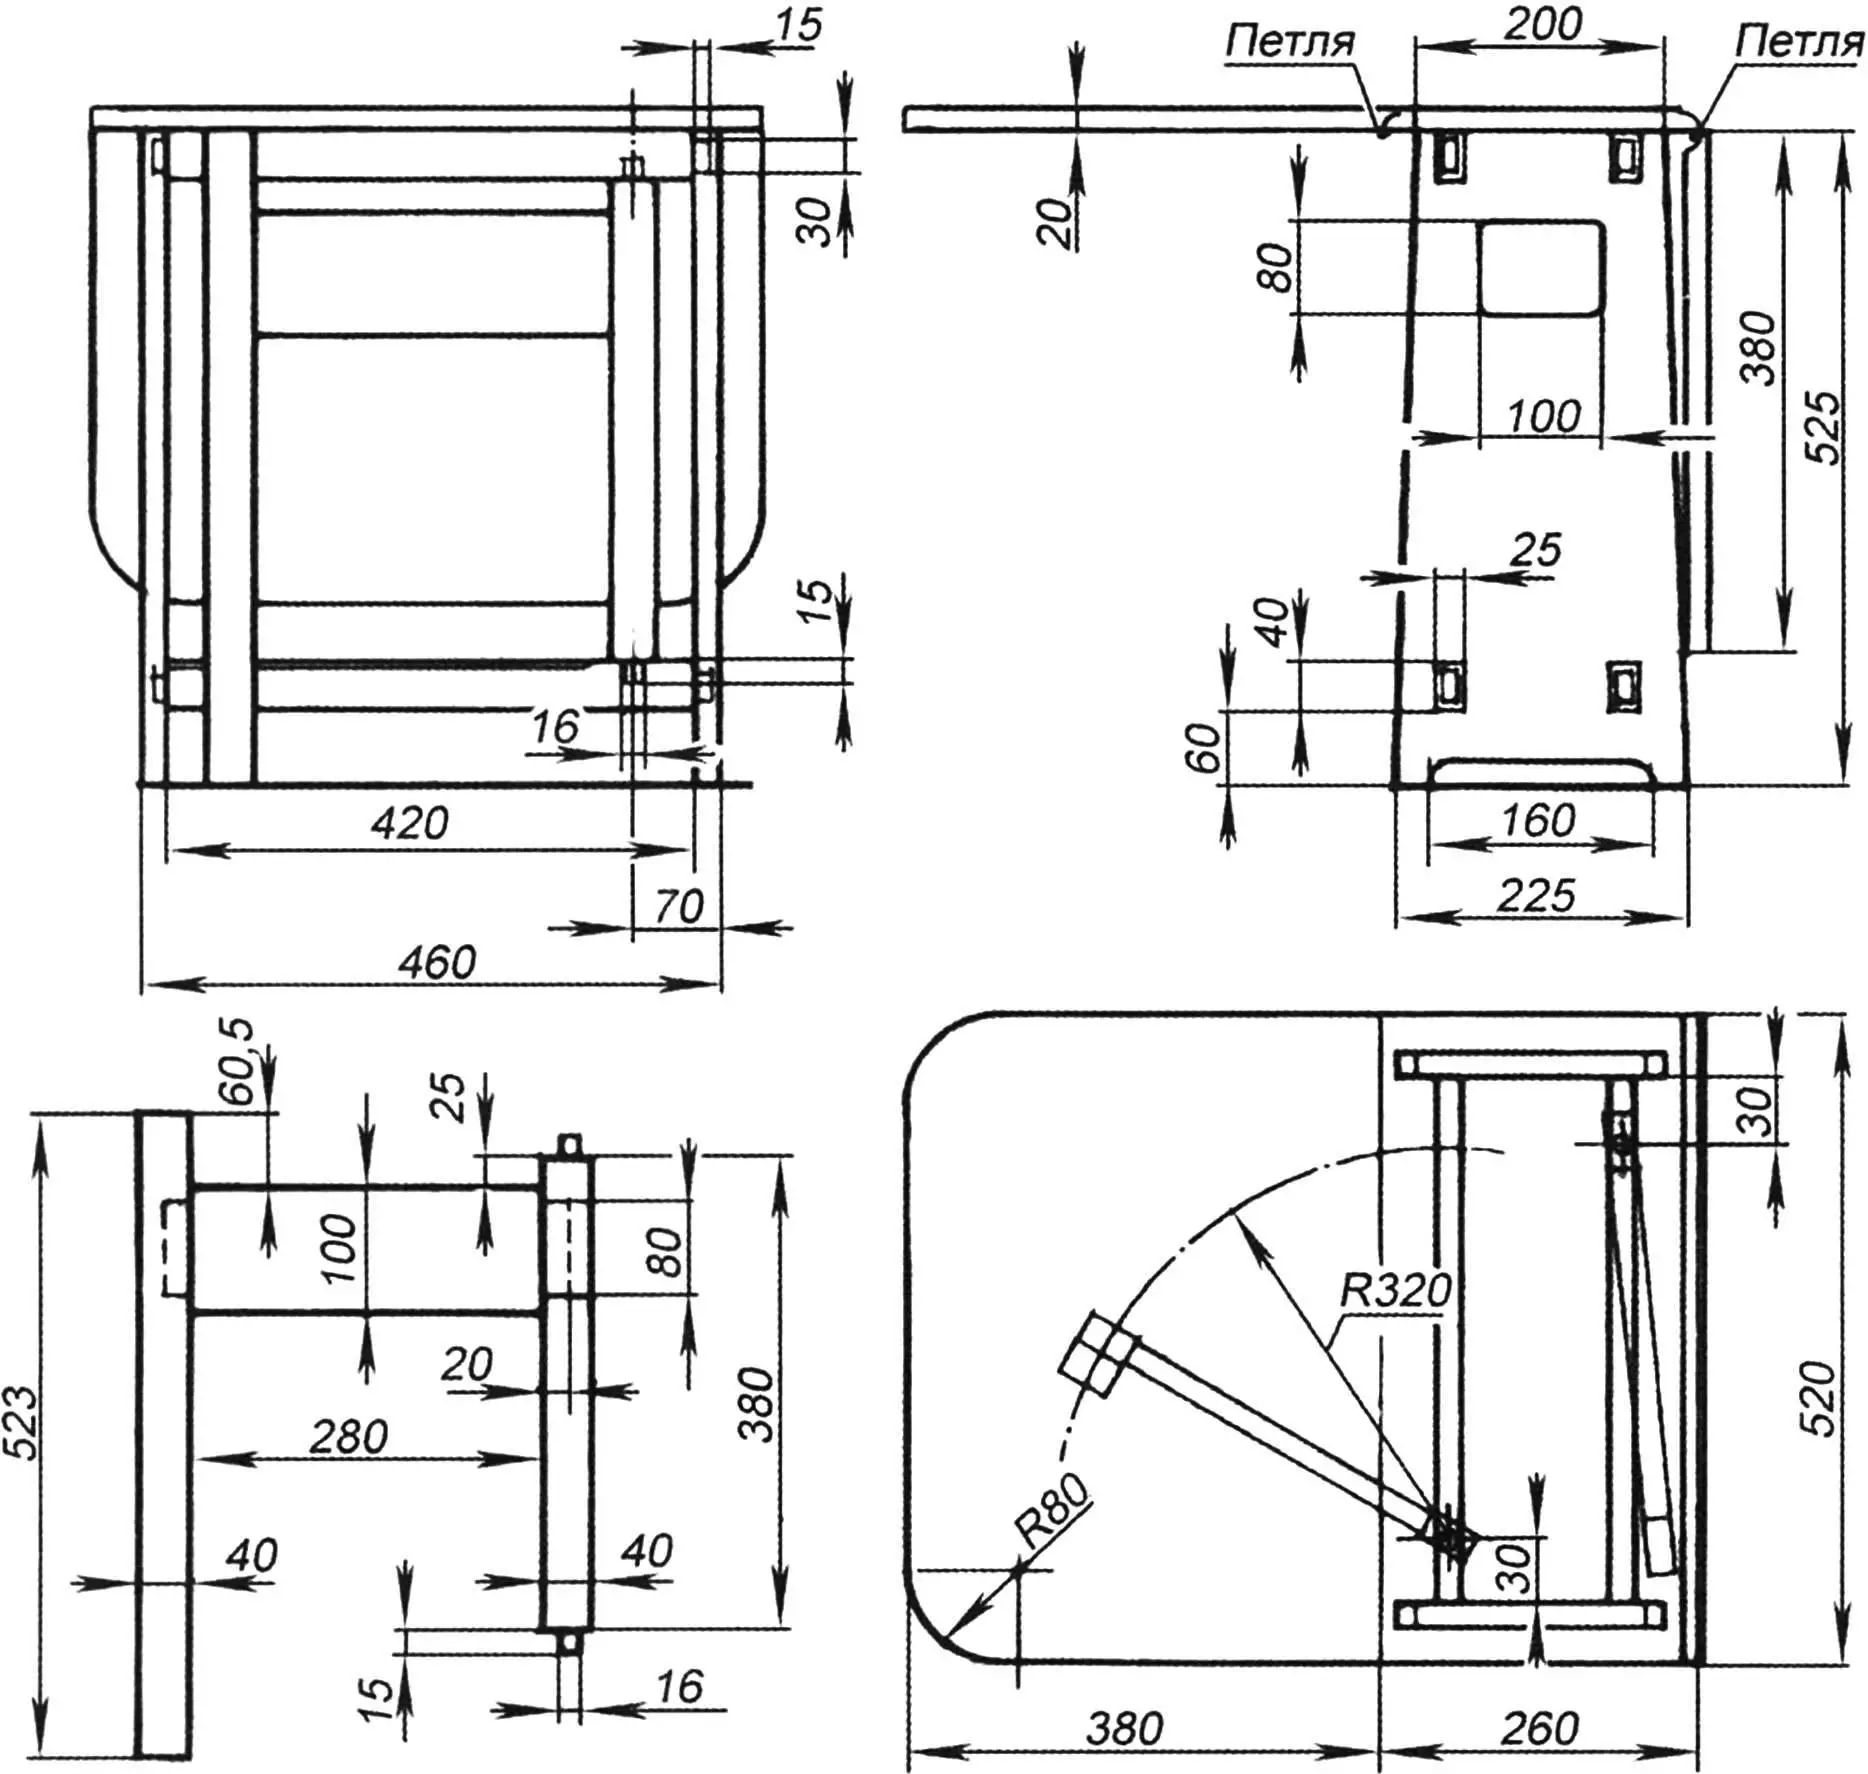
The central part of the tabletop is fixed on two solid side walls, in which windows are cut out, used as handles for carrying the table. For the rigidity of the entire structure, the walls are connected with glue by four crossbars on wide tenons, which is necessary to increase the gluing surface. The folding legs rotate on wooden dowels inserted into holes in the upper and lower crossbars.
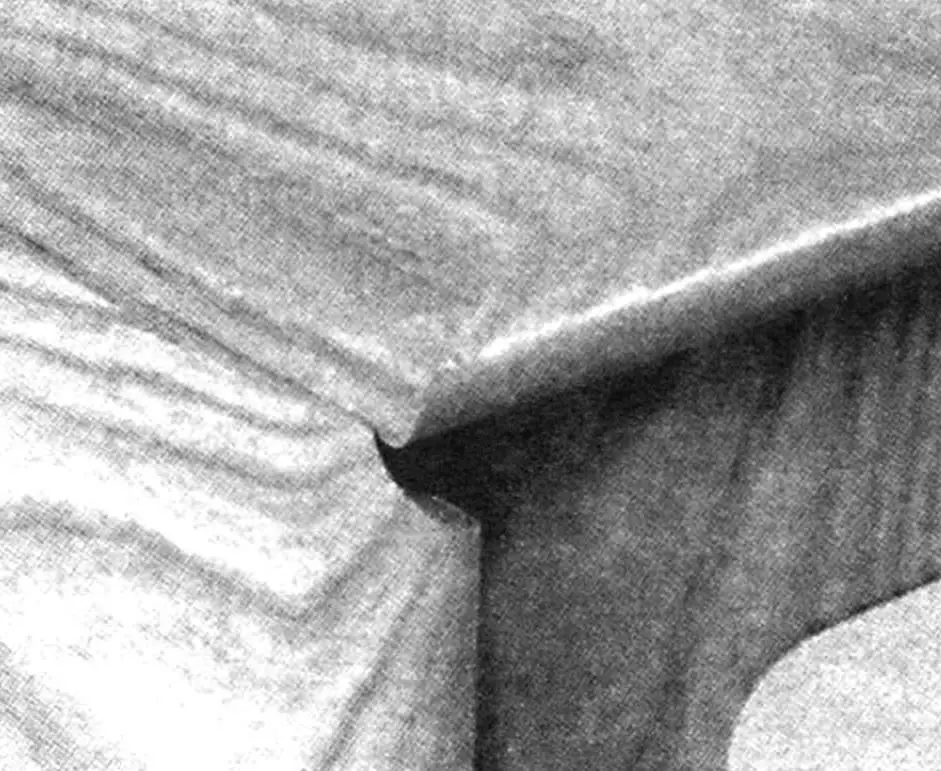
The main feature of the table is the joint of the inner ends of the “wings” and the outer ends of the central part of the tabletop. They are profiled so that when in contact, part of the load from the “wings” is transferred to the central part of the tabletop, unloading the hinges. In this case, you will have to purchase or borrow a mini milling machine from friends.
The basis of any craft is the preparation of source materials. The side panels and the central part of the tabletop can be made from two edge-glued boards 20 mm thick, and the wings from three, but it’s better to make them from one, especially since its width does not exceed 225 mm. If you opt for edge-glued boards, they should be kept until the glue is completely dry, and it’s even better to provide an additional connection with tenons. The thickness of the boards allows this, but the main thing is to accurately mark the holes for the tenons so that no step is formed when joining. Otherwise, additional processing will be required, including scraping.
After preparing the blanks for the side walls, it is necessary to mark them. The grooves for the crossbars (blanks measuring 25x40x450 mm) can be cut by hand, but it’s better with a vertical cutter, but so that their depth does not exceed 15 mm. If you don’t have a cutter at hand, you can use an 8-mm drill and drill out the unnecessary wood and straighten the walls with a chisel.
The windows in the side panels can be made by drilling holes with a diameter of 14-16 mm in their corners. To avoid chipping the wood on the board, it’s better to drill a small-diameter hole along the marking first, and then with a spade bit, but only to the middle. This should be done from both sides of the board. Then you’ll get neat hole edges on both sides of the board. Then we cut out the windows with a jigsaw. You can also do this with a router. Naturally, after each operation, everything should be cleaned with sandpaper.
The outer sides of the side panels are better cut with a band saw and, after removing excess wood, go over their edges with a plane.
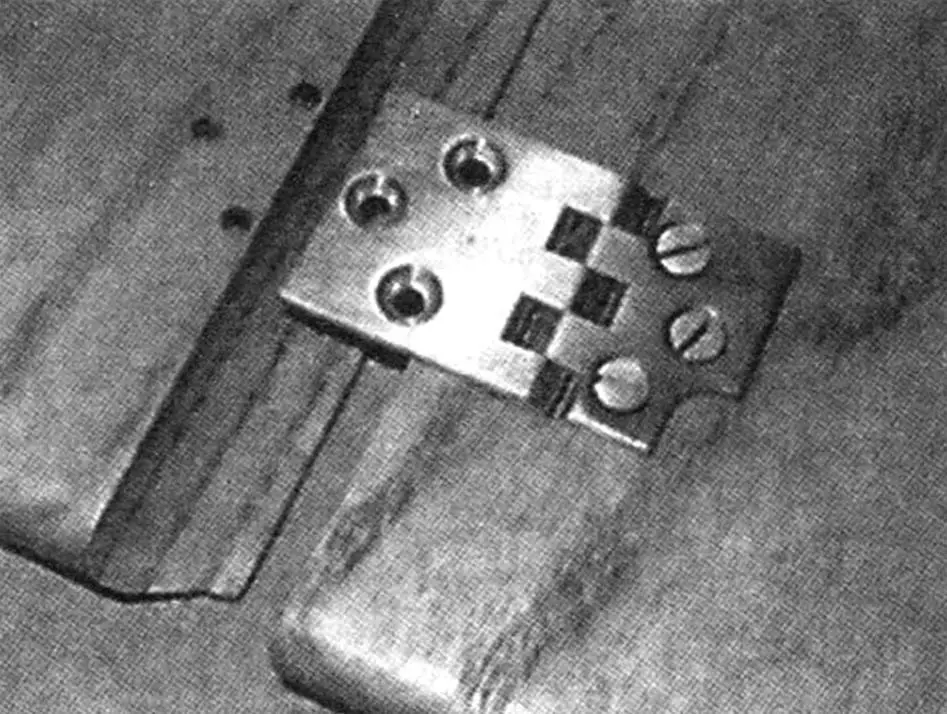
To make the crossbars between the side panels, no special skills are required, it’s enough to accurately follow the drawing. Correctly cut and fitted to the corresponding holes, the tenons will fit tightly into them and after the glue dries will not allow the entire structure to loosen. Since, as a rule, tenons and holes for them are individual, they should be numbered to avoid confusion. The central part of the tabletop will add additional rigidity to the table. It can be fixed with tenons or buttons, as shown in the photo.
Before starting the general assembly, you should drill holes for dowels to a depth of 15 mm in the crossbars for the folding legs and assemble the table “dry”, making the necessary marks with a pencil.
The folding supports consist of a leg (blanks measuring 25x40x523 mm), connected by one wide crossbar to a post (blanks measuring 25x40x380 mm). The legs should be 2 mm shorter than the side panels so they can be freely stowed under the central part of the tabletop. To compensate for the height difference so that the “wings” are horizontal, a metal angle stop with 2-mm walls should be attached to them from below. It will not only eliminate the tilt but also serve as a stop for the folding supports. You can, of course, make a wooden stop in the form of a boss, but that’s more complicated.
In the crossbars connecting the side panels, at a distance of 50 mm from the edge, drill vertical holes for dowels with a 16 mm diameter drill.
Insert dowels into the ends of the posts from both sides so that they protrude 15 mm, and process them with sandpaper, ensuring free rotation in the holes.
In the leg and post, you should cut grooves for the crossbar tenons with a router. However, for this you will have to make an appropriate metal fixture—a jig.
At the ends of the crossbar (blanks measuring 20x100x320 mm), cut tenons for the grooves on the leg and post. You can, of course, do without this by fixing the crossbar with four self-tapping screws. It will be less aesthetic, but simpler.
Assemble the folding supports “dry” and check their compliance with the drawing. Before gluing the parts, go over their edges with a plane or a rounding cutter with a diameter of 12 mm. Only after that can you put all the parts on glue, using clamps. But to avoid damaging the surfaces of the parts, don’t forget about pads under the clamp jaws.
And one more tip: before the general assembly, lubricate the dowels with wax. This will reduce friction in the wooden hinges.
After gluing and cleaning the boards for the tabletop, proceed to the shaped joints of its fixed part and “wings”. For this, you will need a set of matching cutters—one for forming a quadrant and one for a cove. For a tabletop lid 20 mm thick, a quadrant and cove with a radius of 16 mm are suitable. The quadrant is formed on the edges of the fixed lid by processing from the top side.
If possible, install the cutter in the table so that a ruler can be conveniently used as a guide. Adjust the height of the cutter so that a vertical edge 4 mm high is obtained before the start of the quadrant.
At the same time, mill the joint on a pair of scraps—they will be needed as auxiliary blocks when subsequently milling the edges of the tabletop around the entire perimeter.
The cove is formed on the edges of the wings by processing from the lower surfaces. Carefully adjust the height of the cutter and the ruler so as to mill the full radius. Remove most of the excess wood in several passes, and then finely adjust the height of the cutter so that when the cove lies on the quadrant, the surfaces of the central part of the tabletop and the “wings” are in the same plane.
After forming the shaped joint, round the corners of the “wings” with any desired radius. Milling the edges of the tabletop is done with special cutters, and on a router. The cutter is larger than the opening in the machine table, and part of the cutter body must be under its surface, so to install the cutter you need to lower the drive approximately 10 mm. For this, make a ring spacer from plywood. Since you have to mill across the end grain, to avoid tear-out when the cutter exits at the end of the pass, you need to press the auxiliary blocks.
The same cutter used for rounding other parts is used for rounding the lower edge of the lid. Don’t forget to clean the mating parts.
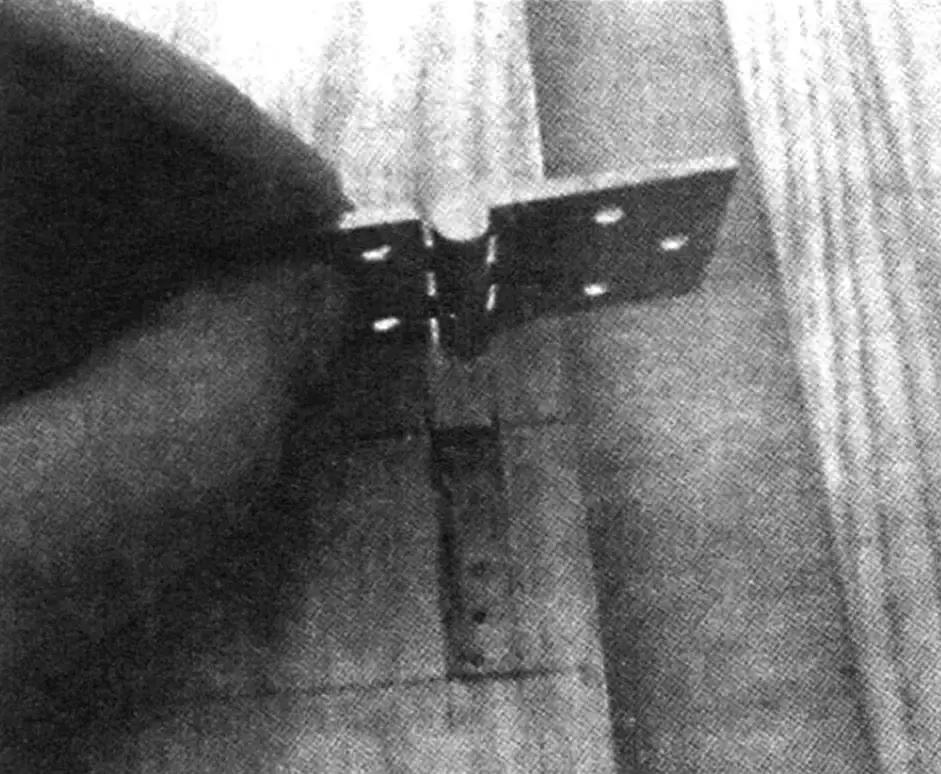
Attach the “wings” to the central part of the tabletop with hinges with one elongated card. Its axis should be at the center of the radius of the cove and quadrant, that is, in this case, at a distance of 16 mm from the edge of the fixed lid. From the fixed lid, the long cards of the open hinges should reach and attach to the wings. For the hinges to work well, they need to be shifted in the direction of the wings by 0.5 – 0.75 mm so that when they lower, the cove moves away from the quadrant and doesn’t catch it.
The hinge pivot should be in the niche of the central part of the tabletop. Due to this, the hinge axis rises slightly above the lower surface of the lid, and when the wings lower, the cove edge is slightly higher than the lower edge of the quadrant. It’s better to try the hinge operation on previously prepared scraps.
Place the three lid sections face down on a flat surface. Mark the position of the four hinges. Cut niches for the pivot and drill pilot holes for the screws. Tap threads with steel screws. In the long card of the hinge, the screws are very close to the edges of the wings, so make sure that the screw shank doesn’t break the bridge between the pilot holes and the edge.
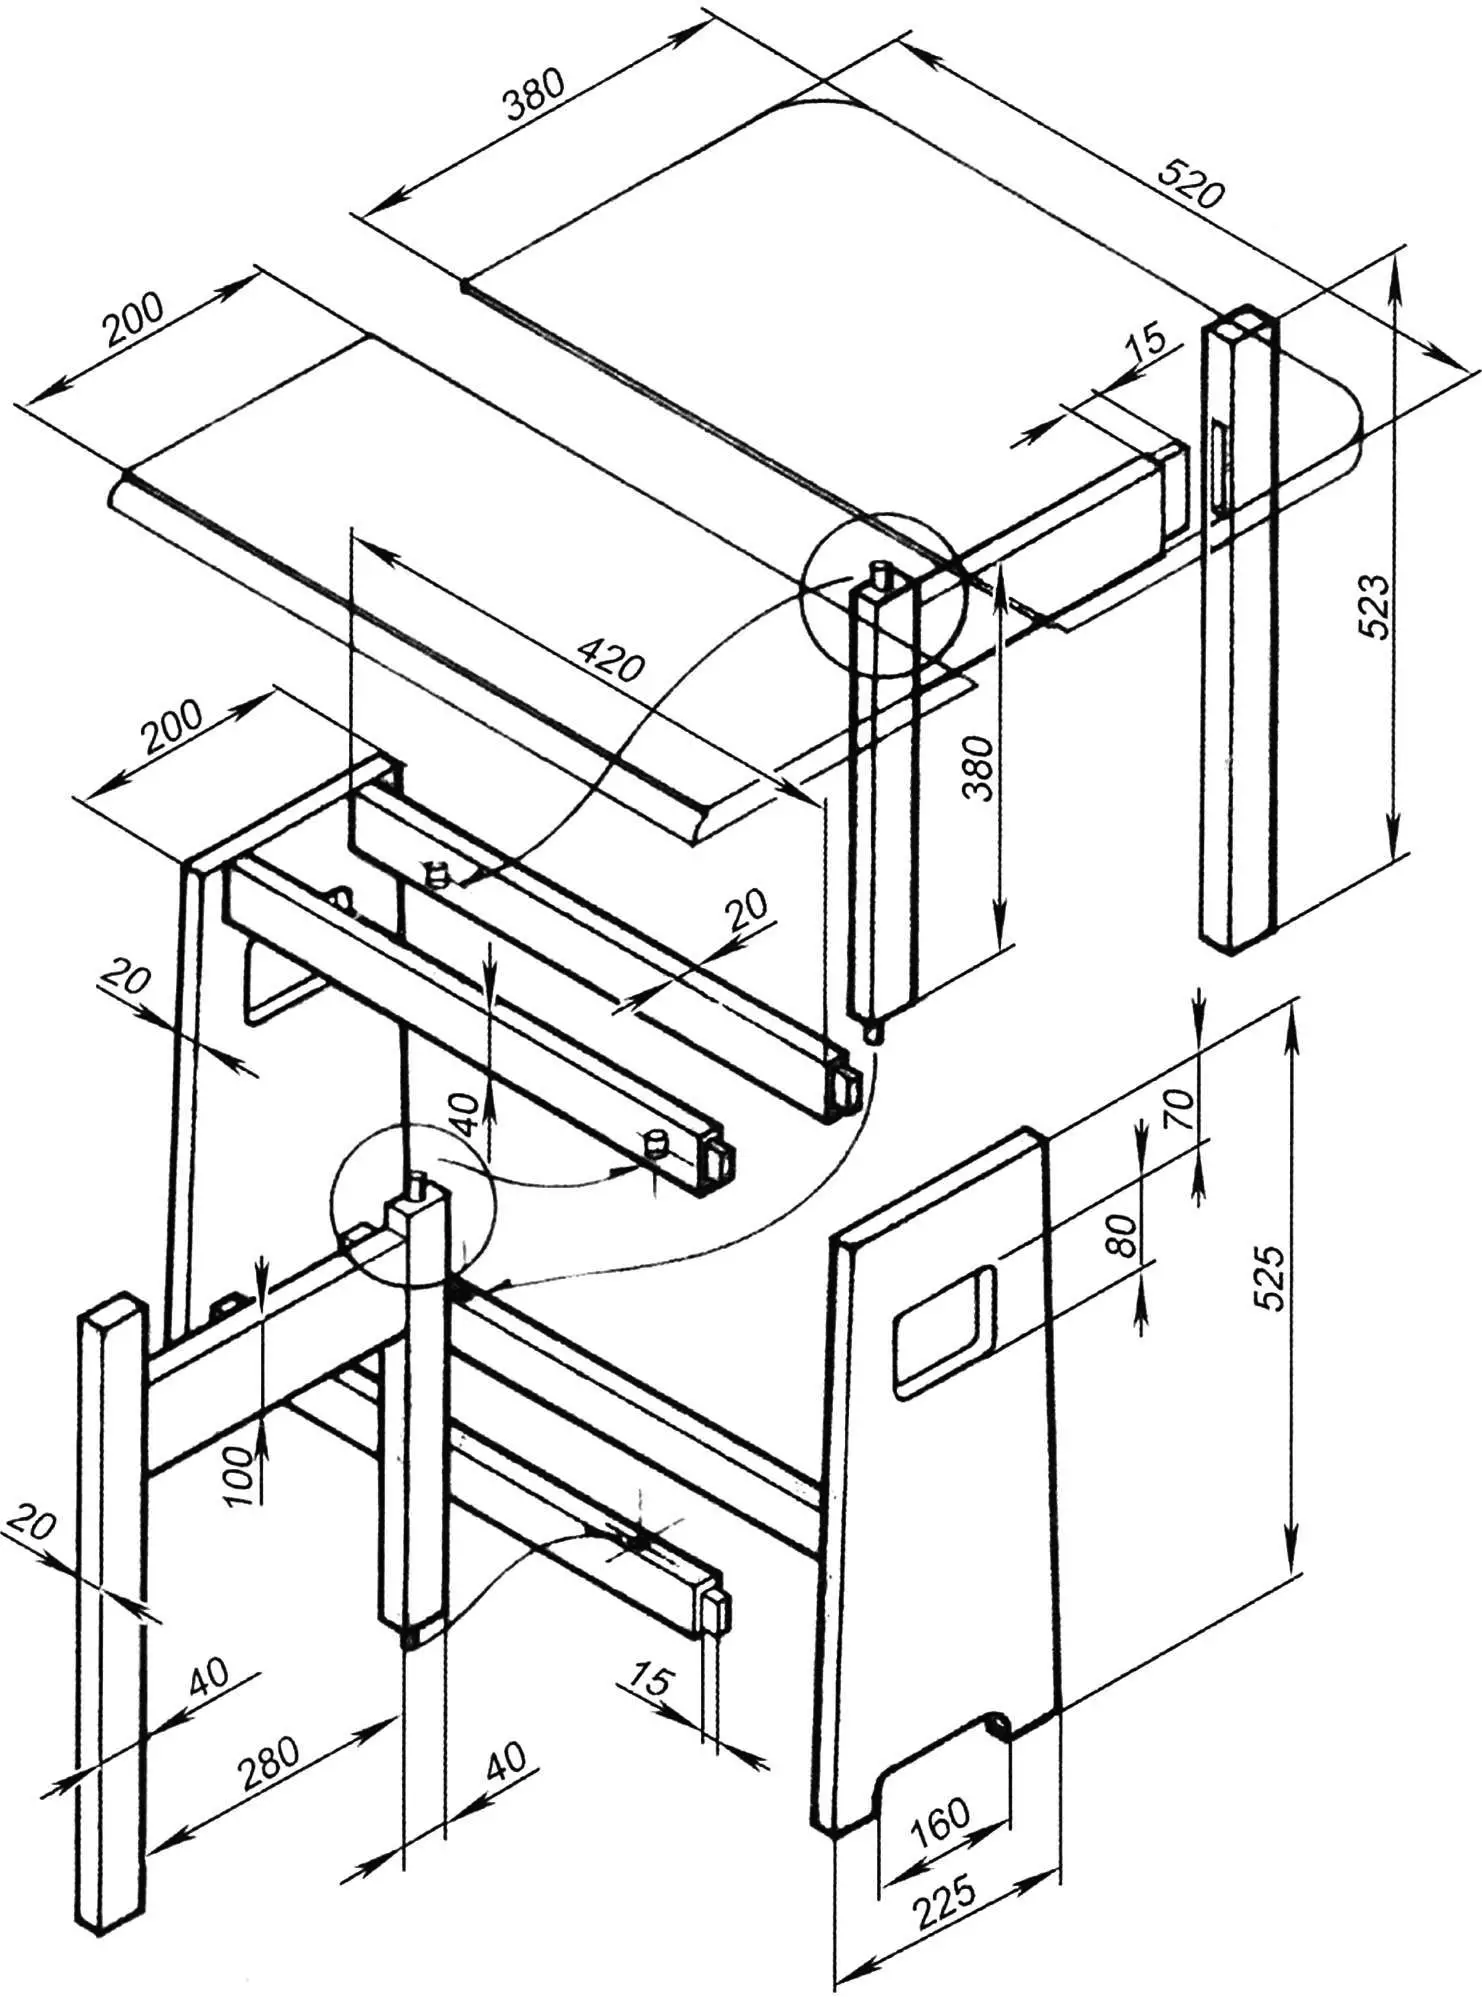
The table lid is attached to the crossbars with four wooden buttons that fit into holes on the inner sides of the upper crossbars. I think this procedure can also be simplified by replacing the buttons with tenons, and it’s more convenient to attach the central section to the side panels.
On the assembled table, lying face down with the wings open, mark the position of the angle stops—leg limiters. Draw a symmetry axis on the lid and rotate the folding support so that the axes of the leg and lid coincide.
Then remove the tabletop and hinges. Cycle, sand, and finish all parts of the tabletop to your taste. After that, finally assemble the table, attaching the hinges with new, this time softer bronze screws.
As you can see, the procedure for making the joint is quite labor-intensive and requires not only additional fixtures but also skills. Therefore, if you don’t have strict requirements for the table, you can do it simpler by abandoning the milling of the ends at the joints of the central section of the tabletop and its “wings”. In this case, ordinary hinges will be sufficient, for which you won’t need to make recesses in the central section of the tabletop, but the “wings” will noticeably protrude beyond its dimensions.
«Modelist-Konstruktor» № 10’2015, based on foreign press materials
Recommend to read
 NOT OUTSIDE, BUT INSIDE
In winter, a suit for window boxes"refrigerators" to store perishable products. It is not very convenient for many reasons: it is necessary to open the Windows; the produce into the... COMPACT GEARBOX — PNEUMATIC
Pneumatic large diameter low pressure tyres are good drivers of all-terrain vehicles in even the harshest of road conditions. But, working with modern highspeed engines, they require...
