If a country house or rural home has a high roof — it’s a sin not to take advantage of such an advantage and not to arrange an attic there: it can serve as an additional bedroom, study, and even a children’s room.
The under-roof space itself can be equipped both during construction and in an old house. The difference is only that in the first case, the stairs to the top can be designed in advance, while in an already existing interior, you have to carve out space for them so that they don’t interfere too much.
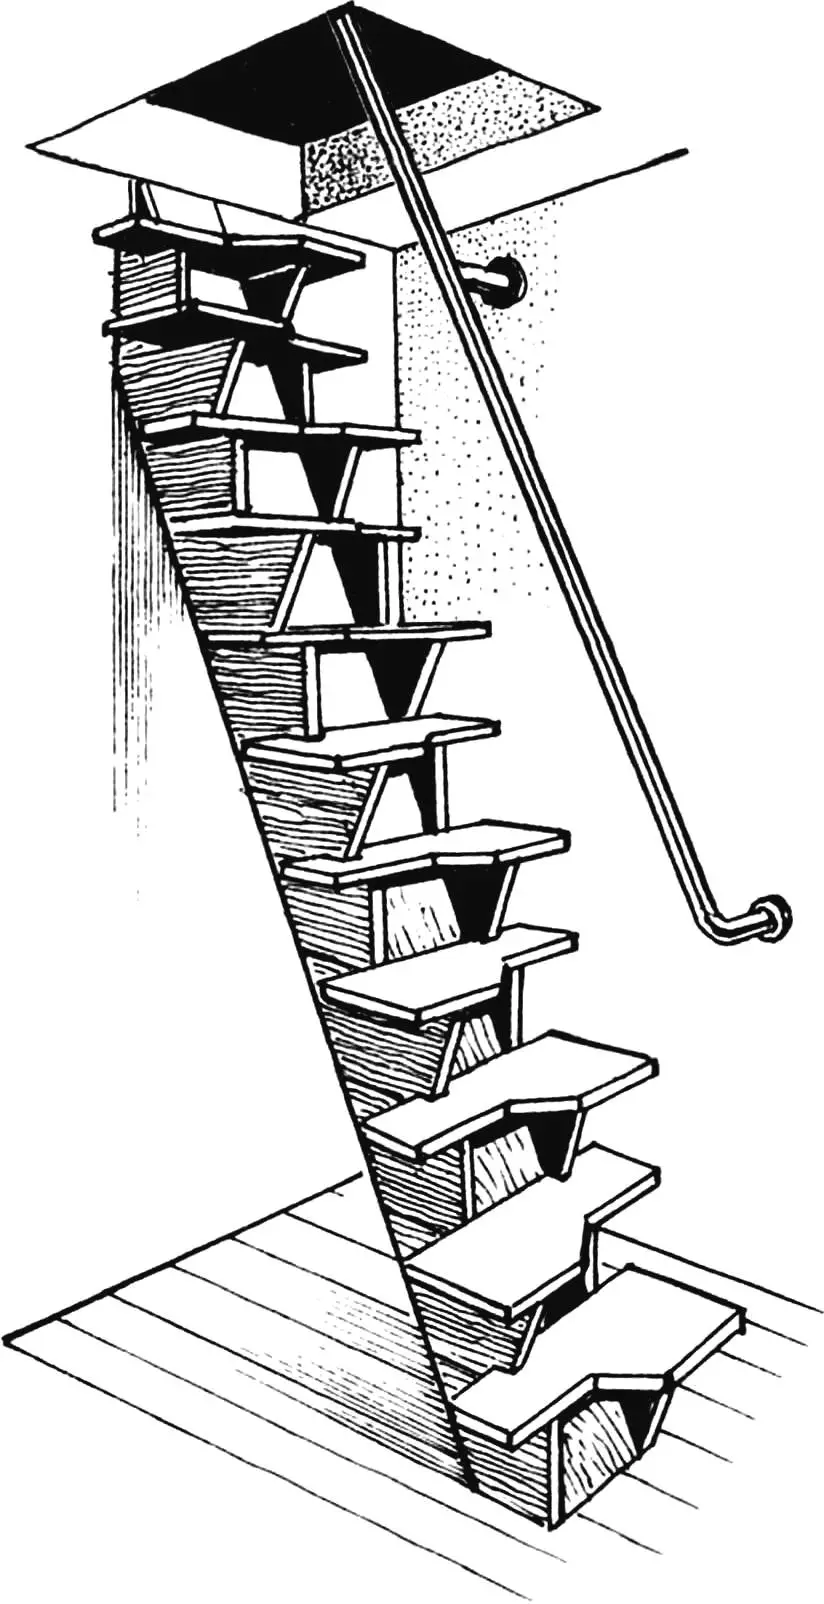
An original economical solution to the problem was proposed by the Bulgarian magazine “Napravi sam” (Do It Yourself): despite the fact that structurally it is a flight staircase, it takes up even less space than some spiral stairs (which are considered the most economical in terms of occupied area).
Design Features
Externally, the economical staircase resembles a ladder, only very narrow. But upon careful examination, fundamental differences are revealed that bring it closer to flight structures with ordinary steps, but strikingly different from them as well. Conventionally, it can be said that the “economy” has absorbed the most advantageous features of both mentioned options.
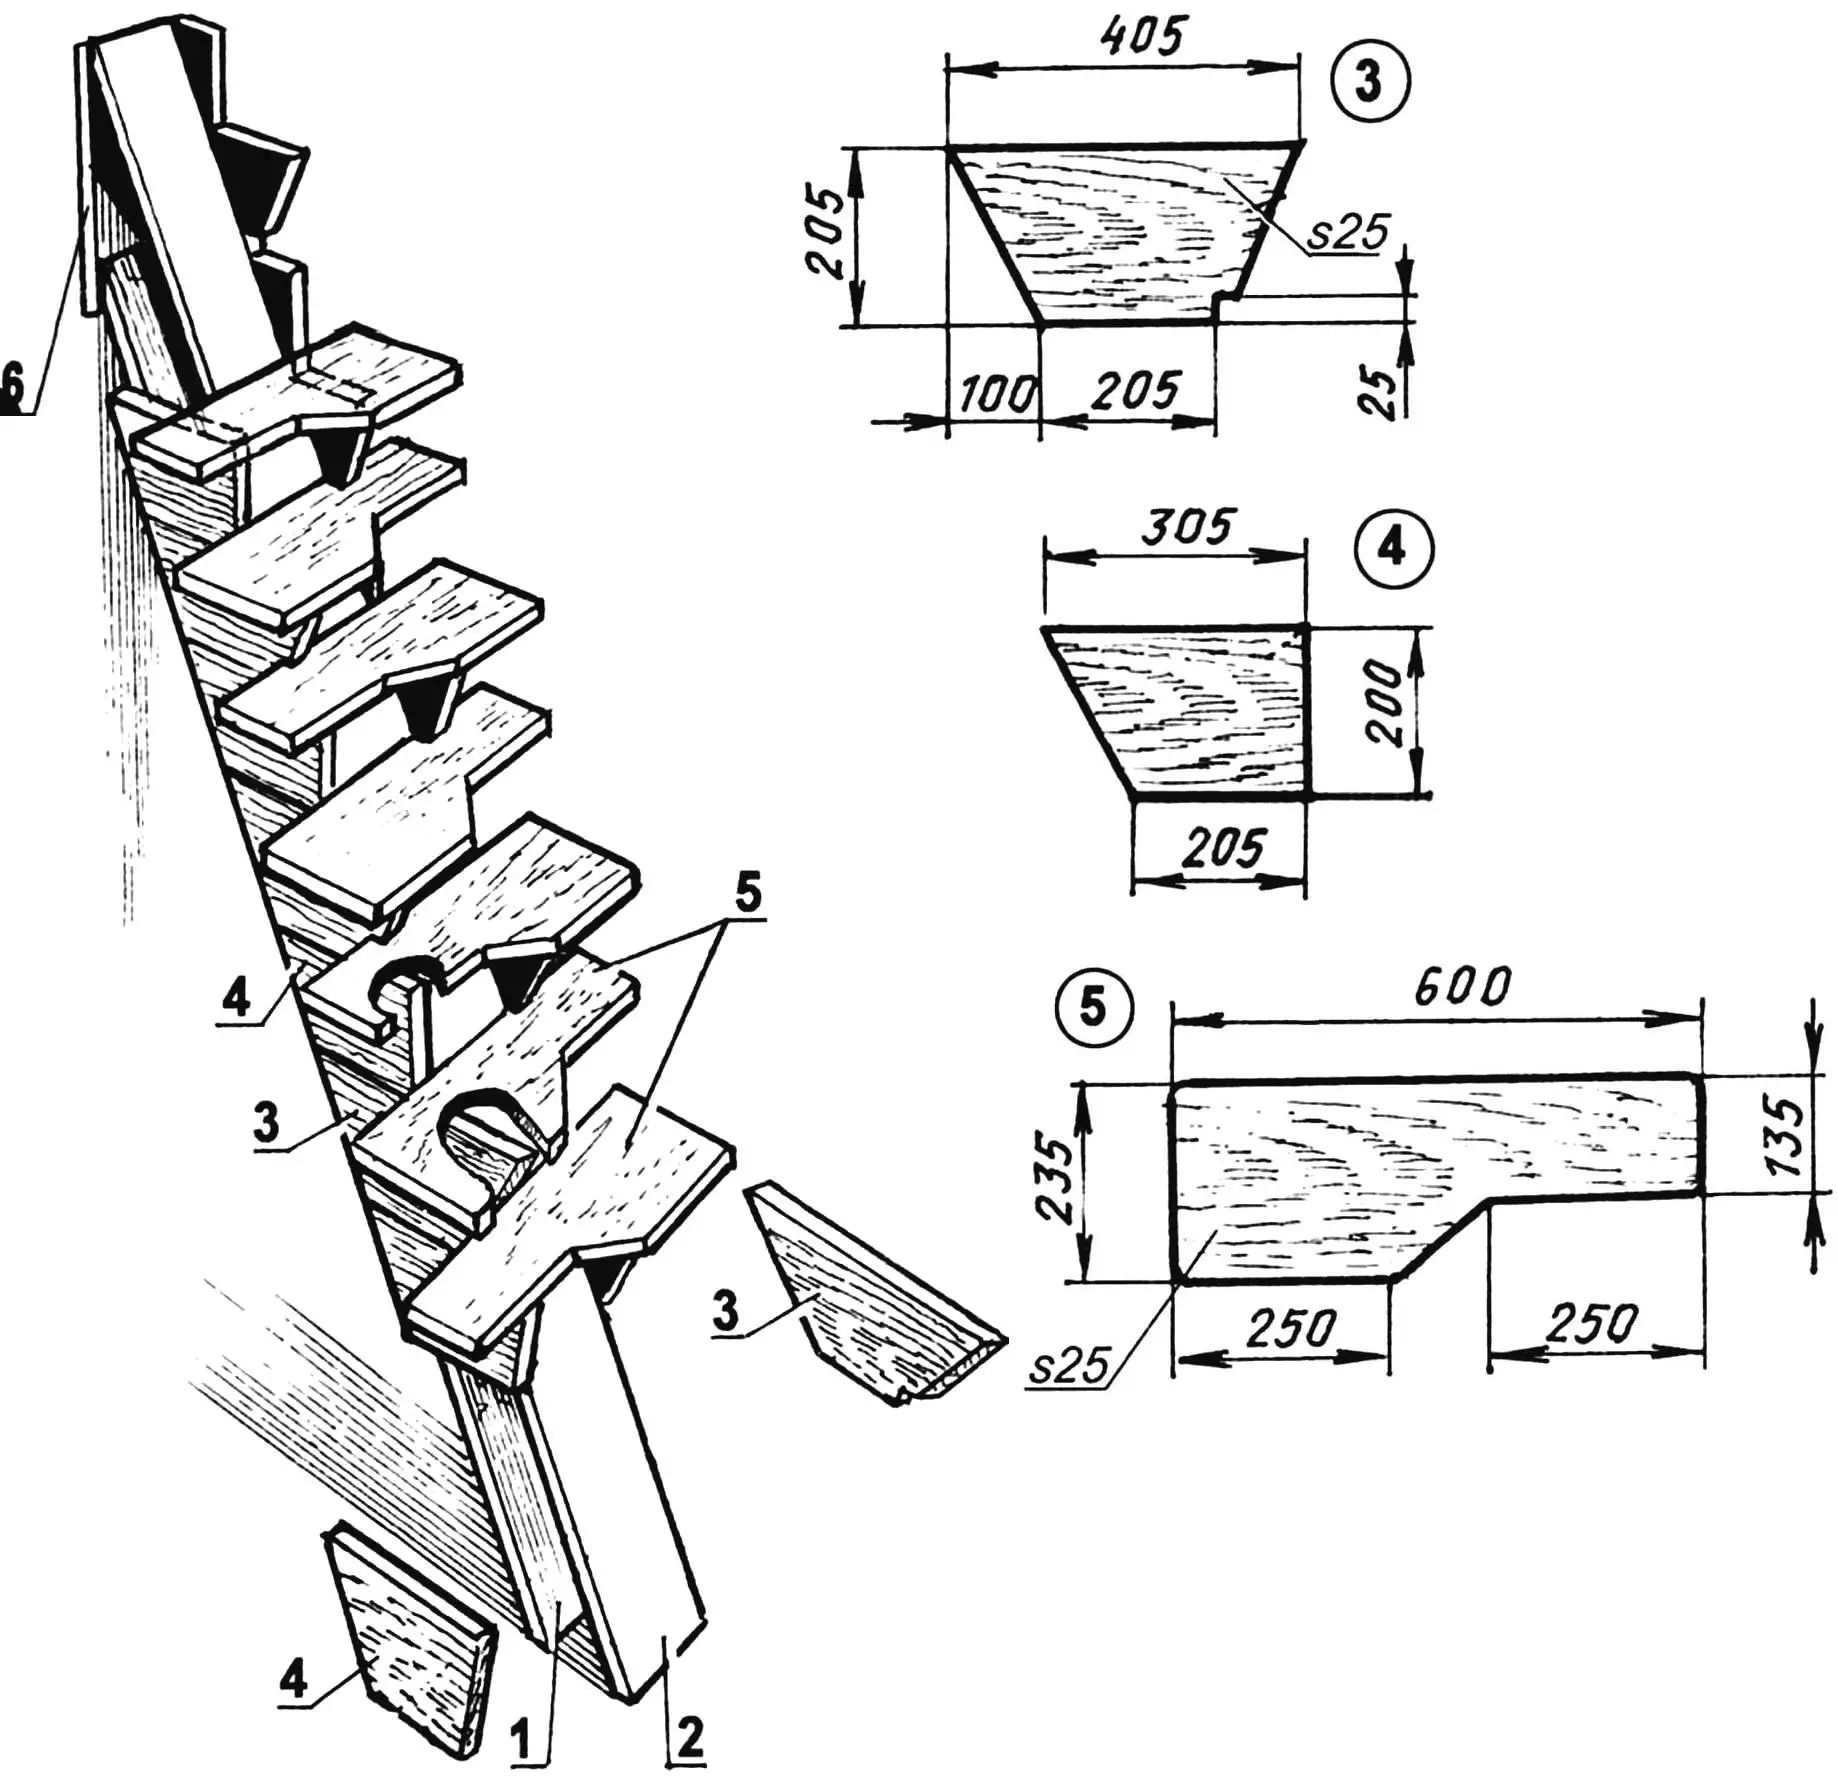
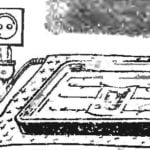
1 — small support; 2 — large support; 3 — trapezoidal riser supporting the wide part of the step; 4 — rectangular riser under the narrow part of the step; 5 — half-steps; 6 — support board
Indeed. Like a ladder, it has two main support parts, but not from beams, but from narrow panels, and they are located not at the edges, but one above the other. Risers are attached to them on the sides, as in flight stairs. However, the steps resting on them also differ from the usual ones: they are of an unusual, half-shaped form — this makes it easier to step on them both up and down even with a large steepness of the “economy” slope.
And one more feature: like a ladder, the unusual staircase does not require special fastening — it is enough to make metal ears in the upper part of the support boards, like hanging shelves, and at the bottom — a stop (for example, a block nailed to the floor) so that it does not slide on the floor. And this means that if necessary, such a staircase can be easily temporarily removed, again similar to a ladder.
To make such a columnar staircase, no special carpentry skills or scarce materials are required. All parts can be made with a simple saw: supports — from boards with a cross-section of 250×40 mm, other elements — from plywood sheets measuring 2000×1250 mm with a thickness of 16 — 20 mm. The length of the supports will be determined by the height from the floor to the hatch (it can be selected from the table provided).
Staircase Construction
As mentioned above, the base of the staircase consists of two inclined boards resting against the wall directly under the hatch. Along their edges, alternating in shape, two types of risers are attached with screws, on which two types of steps will rest and to which they will be attached. More precisely, the shape of the steps is the same — they are just differently oriented when installed.
Structurally, a step is a piece of board, one end of which is cut to half the width. The remaining wide end rests on one type of riser, and the narrow one — on another, which explains the variety of their forms.
| Н | L | h | l |
|---|---|---|---|
| 2400 | 2680 | 1990 | 2230 |
| 2450 | 2740 | 2040 | 2280 |
| 2500 | 2800 | 2090 | 2340 |
| 2600 | 2910 | 2190 | 2450 |
| 2650 | 2960 | 2240 | 2500 |
| 2700 | 3020 | 2290 | 2560 |
| 2750 | 3070 | 2340 | 2620 |
| 2800 | 3130 | 2390 | 2670 |
| 2850 | 3190 | 2440 | 2730 |
| 2900 | 3240 | 2490 | 2780 |
| 2950 | 3300 | 2540 | 2840 |
| 3000 | 3350 | 2590 | 2880 |
What does the cutout on the step give? Given the steepness of the “economy”, the full width of the step would overlap the following one, which would interfere with moving the feet — that’s why its cutout was needed. The wide part is convenient for supporting one foot, and the narrow one does not hinder the movement of the other — the steps alternate, thanks to this it is convenient both to go up and down. For greater safety, a tubular or wooden handrail is attached to the nearby wall.
Blanks
The support panels, which are essentially the frame of the staircase, can be made from a wooden board 40 mm thick and 250 mm wide. The length of both supports is selected according to the table provided. The number of steps, and therefore risers, will depend on it. The latter need to be mentioned especially.
The fact is that, as already mentioned, they have different shapes, since they support different ends of the step: under the wide part — a regular trapezoid, and under the narrow one — a rectangle with one acute angle. Moreover, the trapezoidal riser has a small cutout at the bottom — for the thickness of the step, which it presses from above in its narrow part.
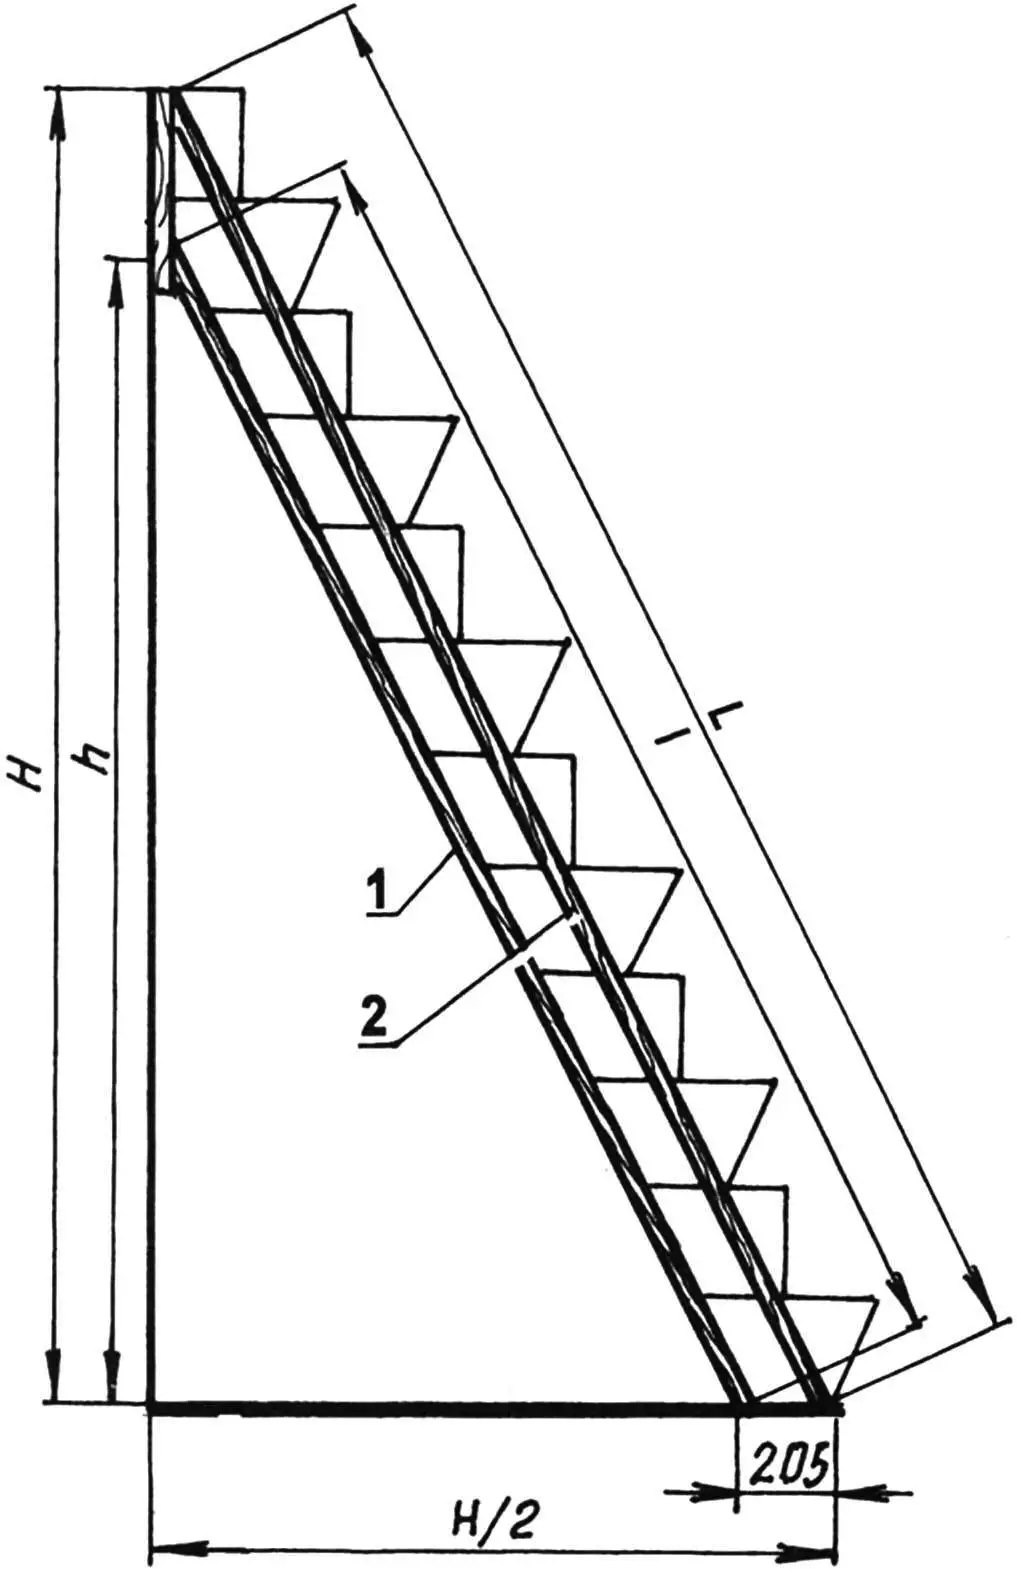
1 — small support; 2 — large support; Н — height to hatch and to large support; h — height to small support; L — length of large support;
l — length of small support
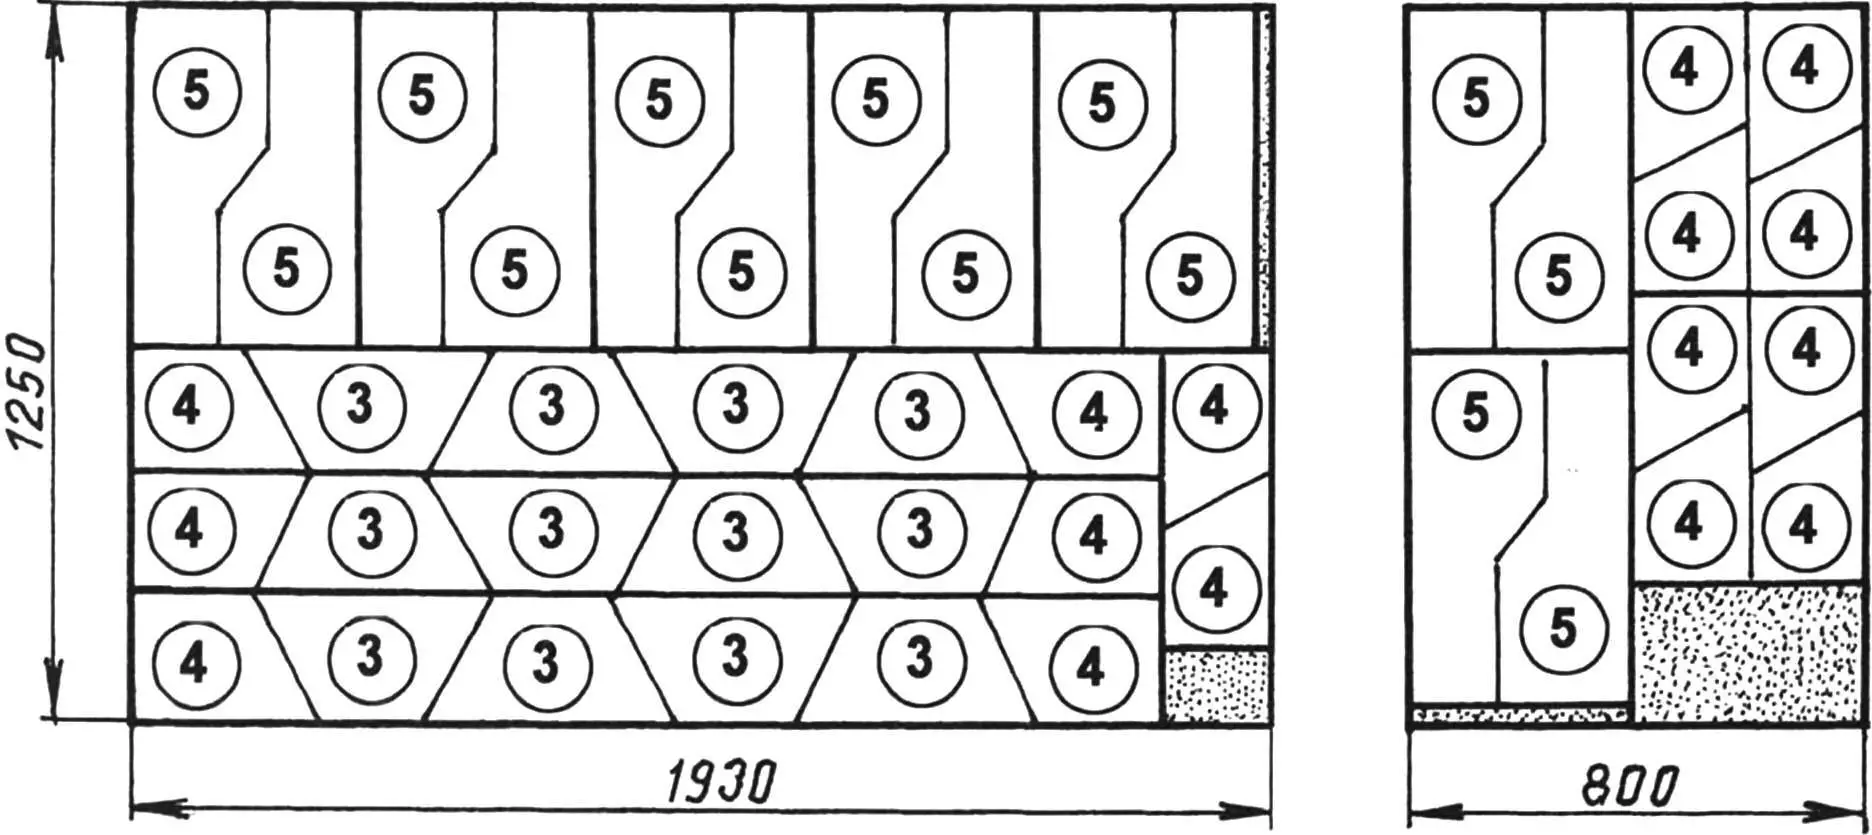
The steps themselves and the risers supporting them can be cut from a single sheet of chipboard or thick plywood, on which marking is applied in advance similar to the diagrams provided here. After cutting the sheet, all parts are carefully processed with sandpaper, and the trapezoidal risers have the mentioned cutout made in one of the lower corners.
Assembly
Since the supports of the staircase are its frame, it is worth starting the assembly of the structure with them. To do this, it is necessary to install both of them simultaneously in the designated place under the hatch, checking from below the gap between them so that it is within 205 mm (while it is not necessary to measure — it is enough to simply apply one of the risers). The mutual position of the supports can be fixed by temporarily nailing connecting strips in two places at the top and bottom.
Now the supports should be carefully laid on their side and cover this side with risers, starting from the bottom and using the rectangular one as the first. Risers should be attached to the supports with furniture screws; to facilitate the operation, you can pre-drill holes for them with a smaller diameter than the screws. Risers are installed close to each other, as if resting on each other, and alternate in shape.
Risers are attached in the same way on the other side of the supports, also starting from the bottom, only now the trapezoidal one should be attached first.
After completing this preparatory work, you can proceed to installing the steps, also starting from the bottom, placing the first step with the narrow end to the left and inserting it into the slot of the trapezoidal riser.
Finishing
The simplest option is to paint it with nitro enamels or oil paints for the floor after additional processing of the structure (with sandpaper). Moreover, it is possible with different ones: the support part, risers and steps separately. (In this case, it is better to perform painting before assembly). Instead of paints, you can use furniture varnish, also varying its light and dark shades.
Since the staircase is steep, so that it is not slippery on the steps, it is advisable to glue strips of carpet or pieces of rubber mat on their wide part. An auxiliary safety element will also be the mentioned handrail attached to a nearby side wall.
B. VLADIMIROV
Recommend to read
 THE ON THE STOVE
In photography, especially in color expression and of the press, higher than usual temperature of applied solutions, and to maintain it constant during the entire time of processing film... REPAIR MOTORCYCLE IGNITION SWITCHES
More than two years have passed since then, as I have installed it on your motorcycle "IZH-Jupiter 4" contactless ignition on the basis of voskhodovskogo generator, switch 262 3734 and a...
