
Whatever you say, the main and most accessible all-season propulsion system for homemade all-terrain vehicles remains the pneumatic tire — a wheel with low-pressure tires.
But for many amateur designers, making wheels for pneumatic vehicles presents certain difficulties. It’s not easy to even decide on their design. Traditional wheels — two rims with beds between them, mounted on a disc or hub through spokes — are complex to manufacture, and their design, as they say, leaves much to be desired.
I went through these difficulties too, but eventually solved this problem. Several people have already used my experience, which suggests that the solution found is quite successful. Therefore, I want to share it through the “Modelist-Konstruktor” magazine with other DIY enthusiasts.
No, I didn’t invent some new wheel. I simply made it from two wheels from a GAZ-66 all-terrain vehicle. Let me clarify right away. Don’t be afraid of their quantity — eight pieces for four pneumatic tires. They can be purchased quite easily and inexpensively. Drivers of “sixty-sixes” try to get rid of standard wheels at the first opportunity due to the high labor intensity during their disassembly-assembly and replace them with more convenient ones, with locking split rings. And in this they are probably right: after all, you need to unscrew-tighten no less than 14 nuts on the disc.
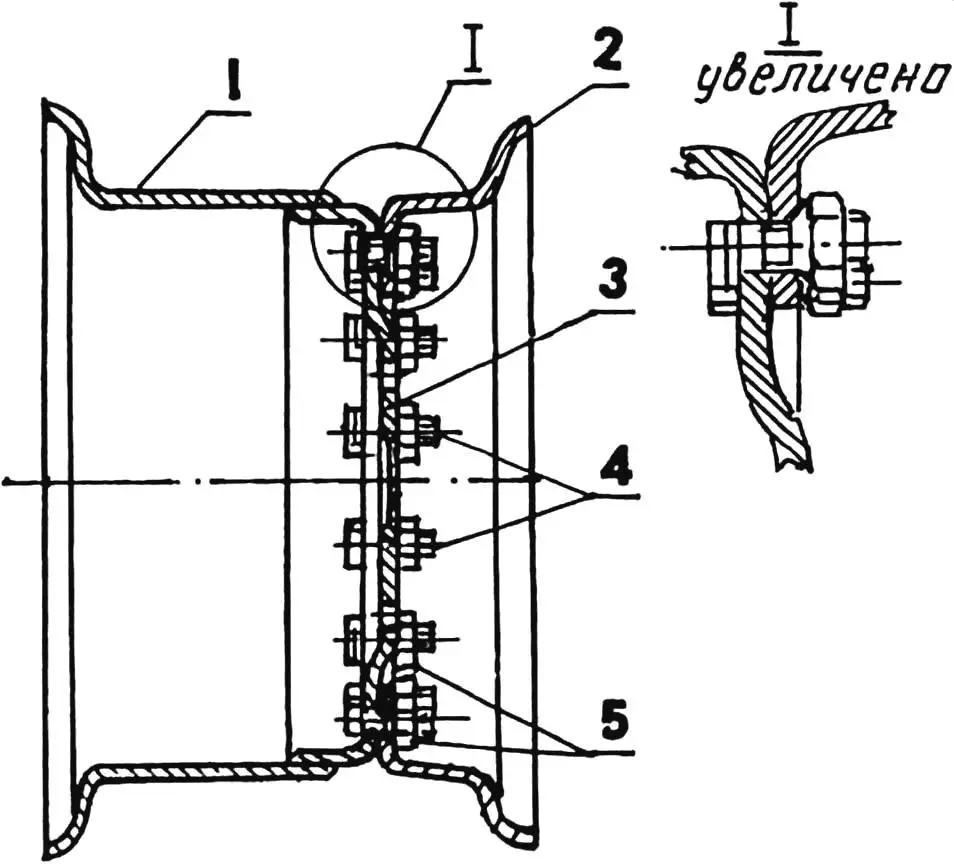
1 — rim; 2 — removable rim; 3 — disc; 4 — M16 bolts (14 pcs.); 5 — conical (centering) M16 nuts (14 pcs.)
The standard wheel of the GAZ-66 vehicle consists of a disc, rim, and removable rim. The disc is welded to the rim; together they form a single part — the wheel. The removable rim is attached to the wheel disc with fourteen special M16 bolts pressed into the disc sockets and conical (centering) nuts.
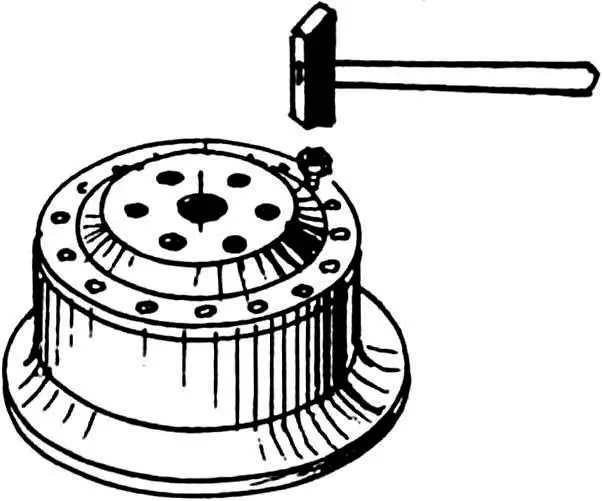
After unscrewing the nuts, I removed the removable rim and set it aside as unnecessary. I screwed the nuts back onto the bolts so that the threaded ends were slightly recessed in them. Then I knocked the bolts out of the sockets with hammer blows on the nuts. I collected the fasteners for further use.
Since the wheel used was intended for a cargo vehicle, to ensure the necessary strength and rigidity, it had a significant thickness of steel stamped parts, and therefore, mass that was excessive for a pneumatic vehicle.
To lighten the wheel, I clamped it to the milling machine table with clamps and used a finger (end) mill with a diameter of 50 mm (you can use a mill up to 70 mm) to cut windows in the rim. To avoid racking my brain with geometry, I positioned the windows between the bolt holes. Thus, there were also fourteen of them. For those who don’t have a milling machine, the wheel can be lightened by drilling many holes. Although such work is very labor-intensive, this may even be a better option — after all, the lightened wheel will retain greater rigidity.
Next, I turned the wheel on a lathe for the same purpose (the machine must be such that it can process workpieces with a radius of 300 mm or more).
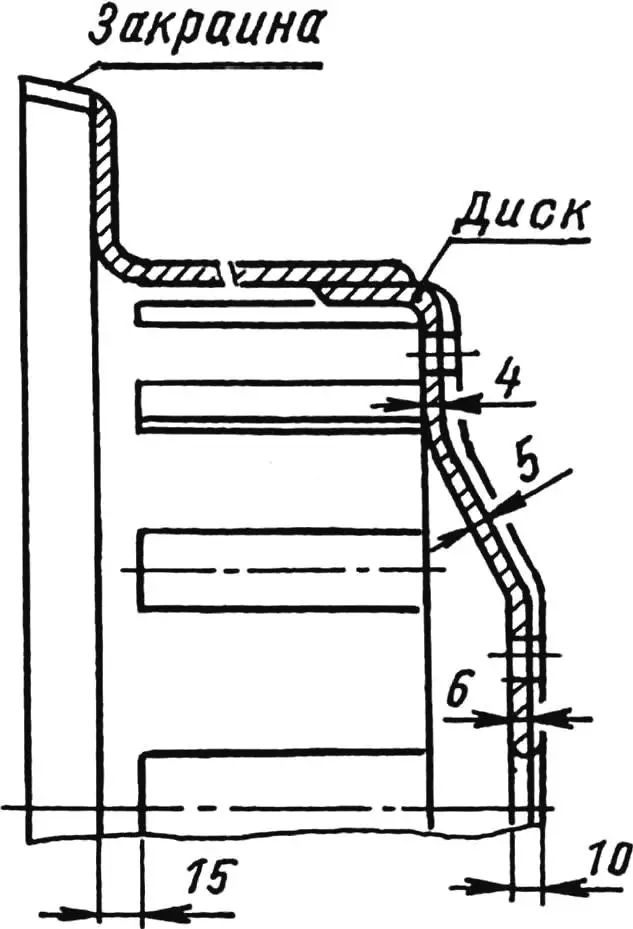
First, I cut off the rim flange (it’s made of 6-mm steel, so the cut ring turned out to be quite heavy).
Then I lightened the wheel disc. It’s stamped from sheet steel 10 mm thick — for a pneumatic vehicle wheel this is excessive. Therefore, I reduced the disc cross-section and made it variable: at the rim — 4 mm, in the middle (conical part) — 5 mm, at the inner part — 6 mm. The tool holder rotation angle when turning the cone was 45 degrees.
As a result, the wheel (I immediately felt it) became almost twice as light.

1 — main rim with disc; 2 — removable rim; 3 — M16 bolt (7 pcs.); 4 — conical (centering) nut (7 pcs.)
I processed the second wheel from GAZ-66 using the same technology, only I also cut out the conical part of the disc together with the inner part as unnecessary, leaving only the flange part: thus I got a removable rim for the pneumatic tire wheel. I made the holes conical — according to the corresponding lower surfaces of the nuts.
Some bolts, knocked out with hammer blows, were slightly deformed — I had to straighten them and re-thread them. I also lightened the bolts themselves by drilling axial holes 8 mm in diameter in them. Moreover, for wheel assembly I used only seven bolts out of fourteen, driving them into the wheel disc through every other socket.

And one more point. To install the wheel on the pneumatic vehicle axle hub, the inner part of its disc must correspond to it. But this correspondence is only possible provided that the hubs are also used from the GAZ-66 vehicle. There are at least three ways out of this situation. First — to modify and adapt the standard wheel disc. Second — to equip the disc with an additional mounting ring with identical holes both for attachment to the disc and for attachment to the hub. Third — to cut out the standard inner part of the disc and weld another one in its place that corresponds to the hub.

I used a tire from a tractor cart for the wheel and lightened it using the technology described in “Modelist-Konstruktor” (No. 12’2000). I chose this tire because it has the same mounting diameter as the manufactured wheel rim — 18″ (457 mm) and great width. True, I still had to slightly modify the tire mounting ring with an “angle grinder” and lubricate it with machine oil — after that it easily “sat” in place.
As a result, I got a wide wheel with a detachable rim (like on a Zaporozhets car or motorized wheelchair), with a wide-profile pneumatic tire.
By weight, it’s no heavier than “classic” homemade wheels for pneumatic vehicles, but its design, of course, is incomparable with the latter — it looks like a factory-made product.
V. BARANOV
Recommend to read
 TWO CHAMFER — TIME
In the processing of flat pieces cut from sheet materials: soft metal, plastic, plexiglass — sharp edges it is desirable to remove or to blunt (to make the chamfer). The simplest tool...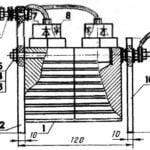 ASSISTANT WELDING
Thank you so much, friend magazine, for the development of welding transformers. Inspired by the publications took a chance and made themselves compact, but quite powerful "svarochnik"...
