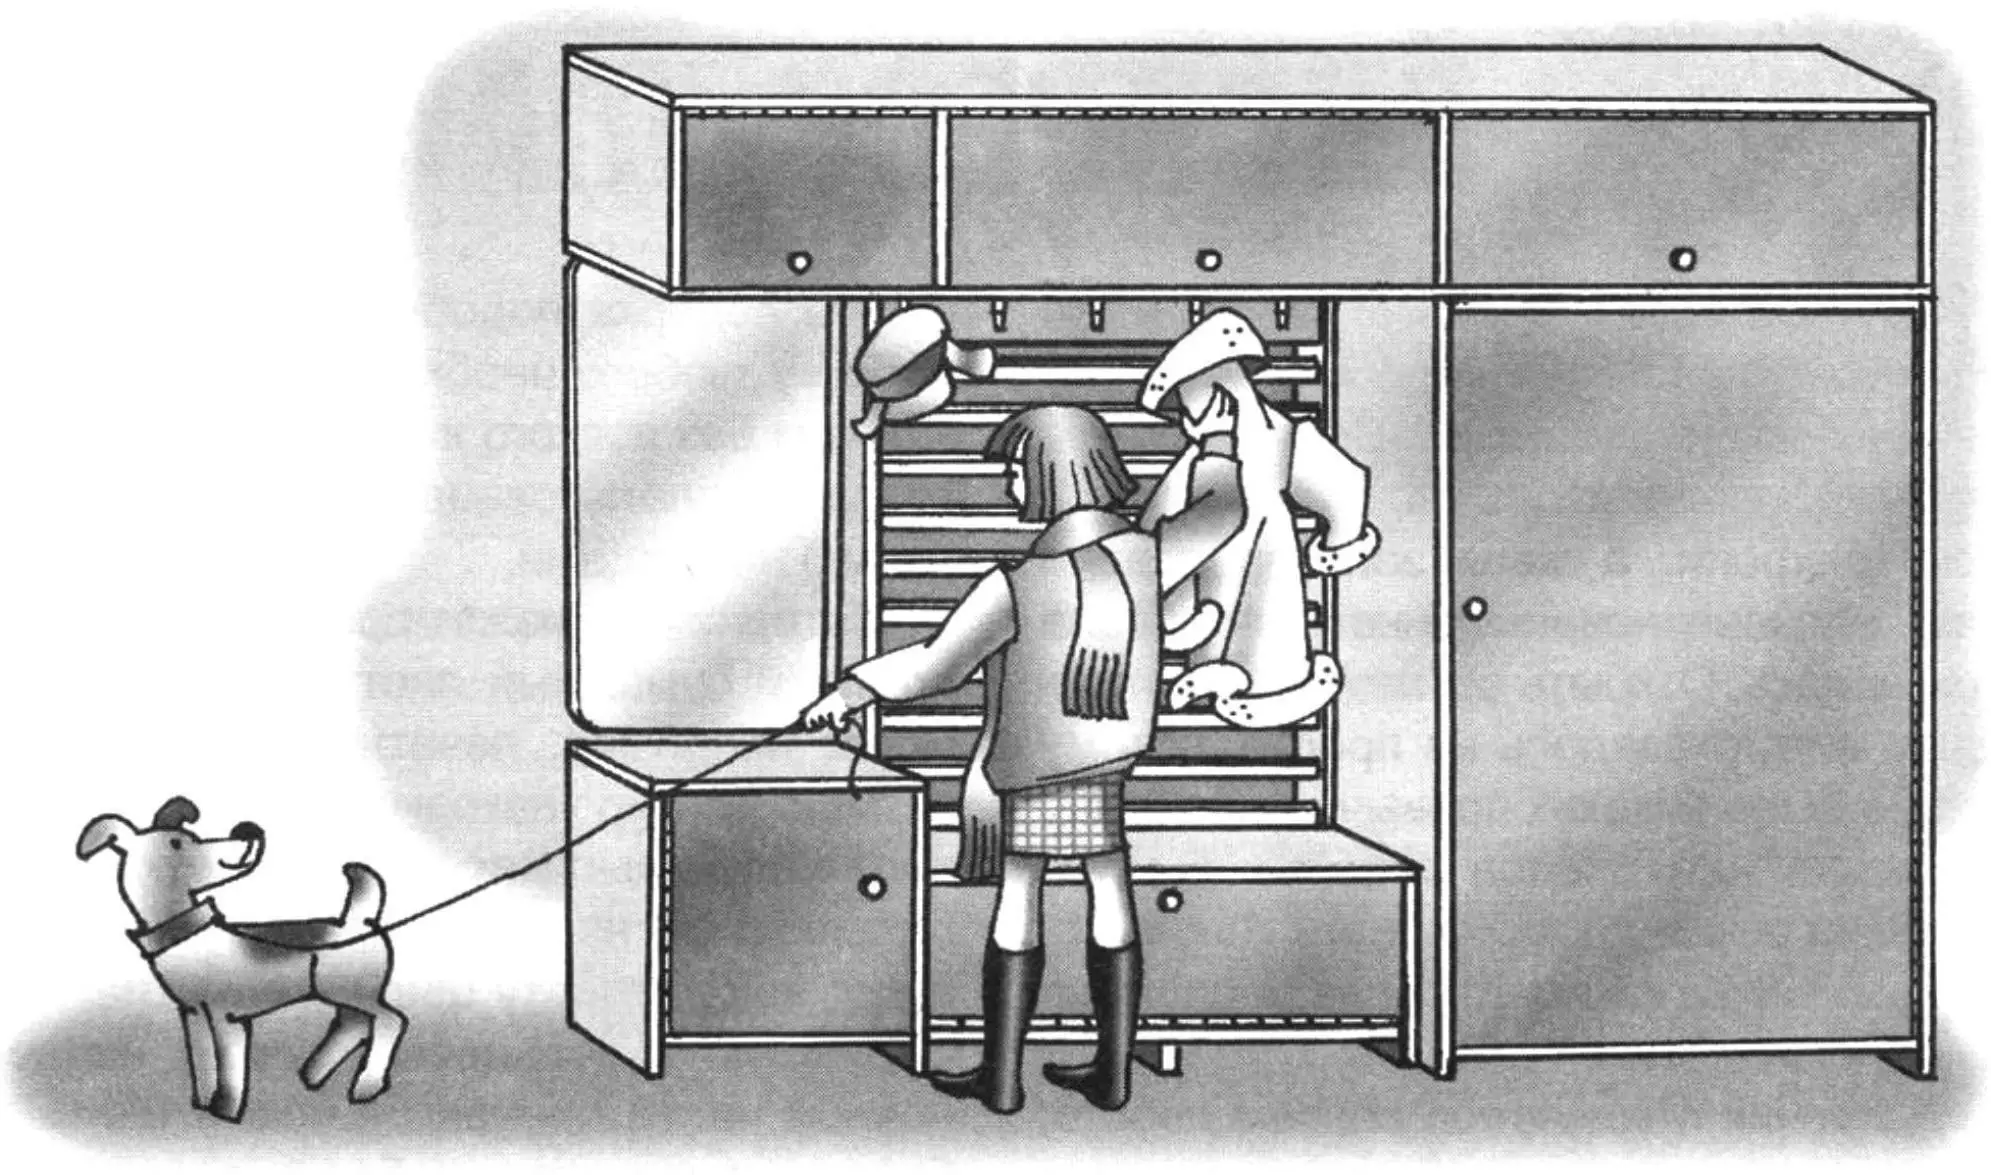
In modern standard apartments, the hallway is usually small, so the furniture placed in it should be multifunctional. A furniture wall unit meets this requirement most fully. It may include a wardrobe for outerwear, a coat rack, a place for shoes, and mini-storage for various items, household and sports equipment. Unfortunately, wall units available for sale do not fit the dimensions of compact hallways, and they are also quite expensive. Materials published by the magazine “Modelist-Konstruktor” help DIY enthusiasts make various furniture designs that match the layout of the room, as well as their imagination, taste, experience, and capabilities.
Following the magazine’s advice, I built a furniture wall unit for the hallway in just a few evenings. Its advantages are simple construction, fast manufacturing, and the ready availability of the materials used. The wall unit is very compact and does not take up much space in the hallway.
Materials
To build the wall unit, the following were needed: 9.2 m2 of particle board (chipboard) 18 mm thick; 3.9 m2 of hardboard (fiberboard) 5 mm thick; 6.7 m2 of synthetic decorative wood-effect film; 17.6 m2 of washable wallpaper; 7 m of piano hinges; 6 decorative door handles, 5 coat hooks, a length of steel pipe 22 mm in diameter; several wooden battens with a cross-section of 1.5×2; 5 m of clothesline; screws; wooden dowels 8 mm in diameter; latex and casein glues. All of this can be bought in hardware stores. The tools are ordinary “home” ones: a handsaw, a plane, a drill, a screwdriver, and a glue brush.
Wall unit sections
The wall unit consists of a wardrobe with a lower compartment for storing a vacuum cleaner and other household items; an open coat rack for everyday outerwear; a three-section overhead storage unit; and a combined cabinet: a under-mirror cabinet for bags and clothing items; and a “shoe cabinet” for shoes and household accessories. The drawer of the under-mirror cabinet serves as storage for gloves, belts, and other small items. A mirror is installed on top, occupying the full height up to the overhead storage. It visually enlarges the hallway and unites the overhead sections and the lower part of the wall unit into a single composition.
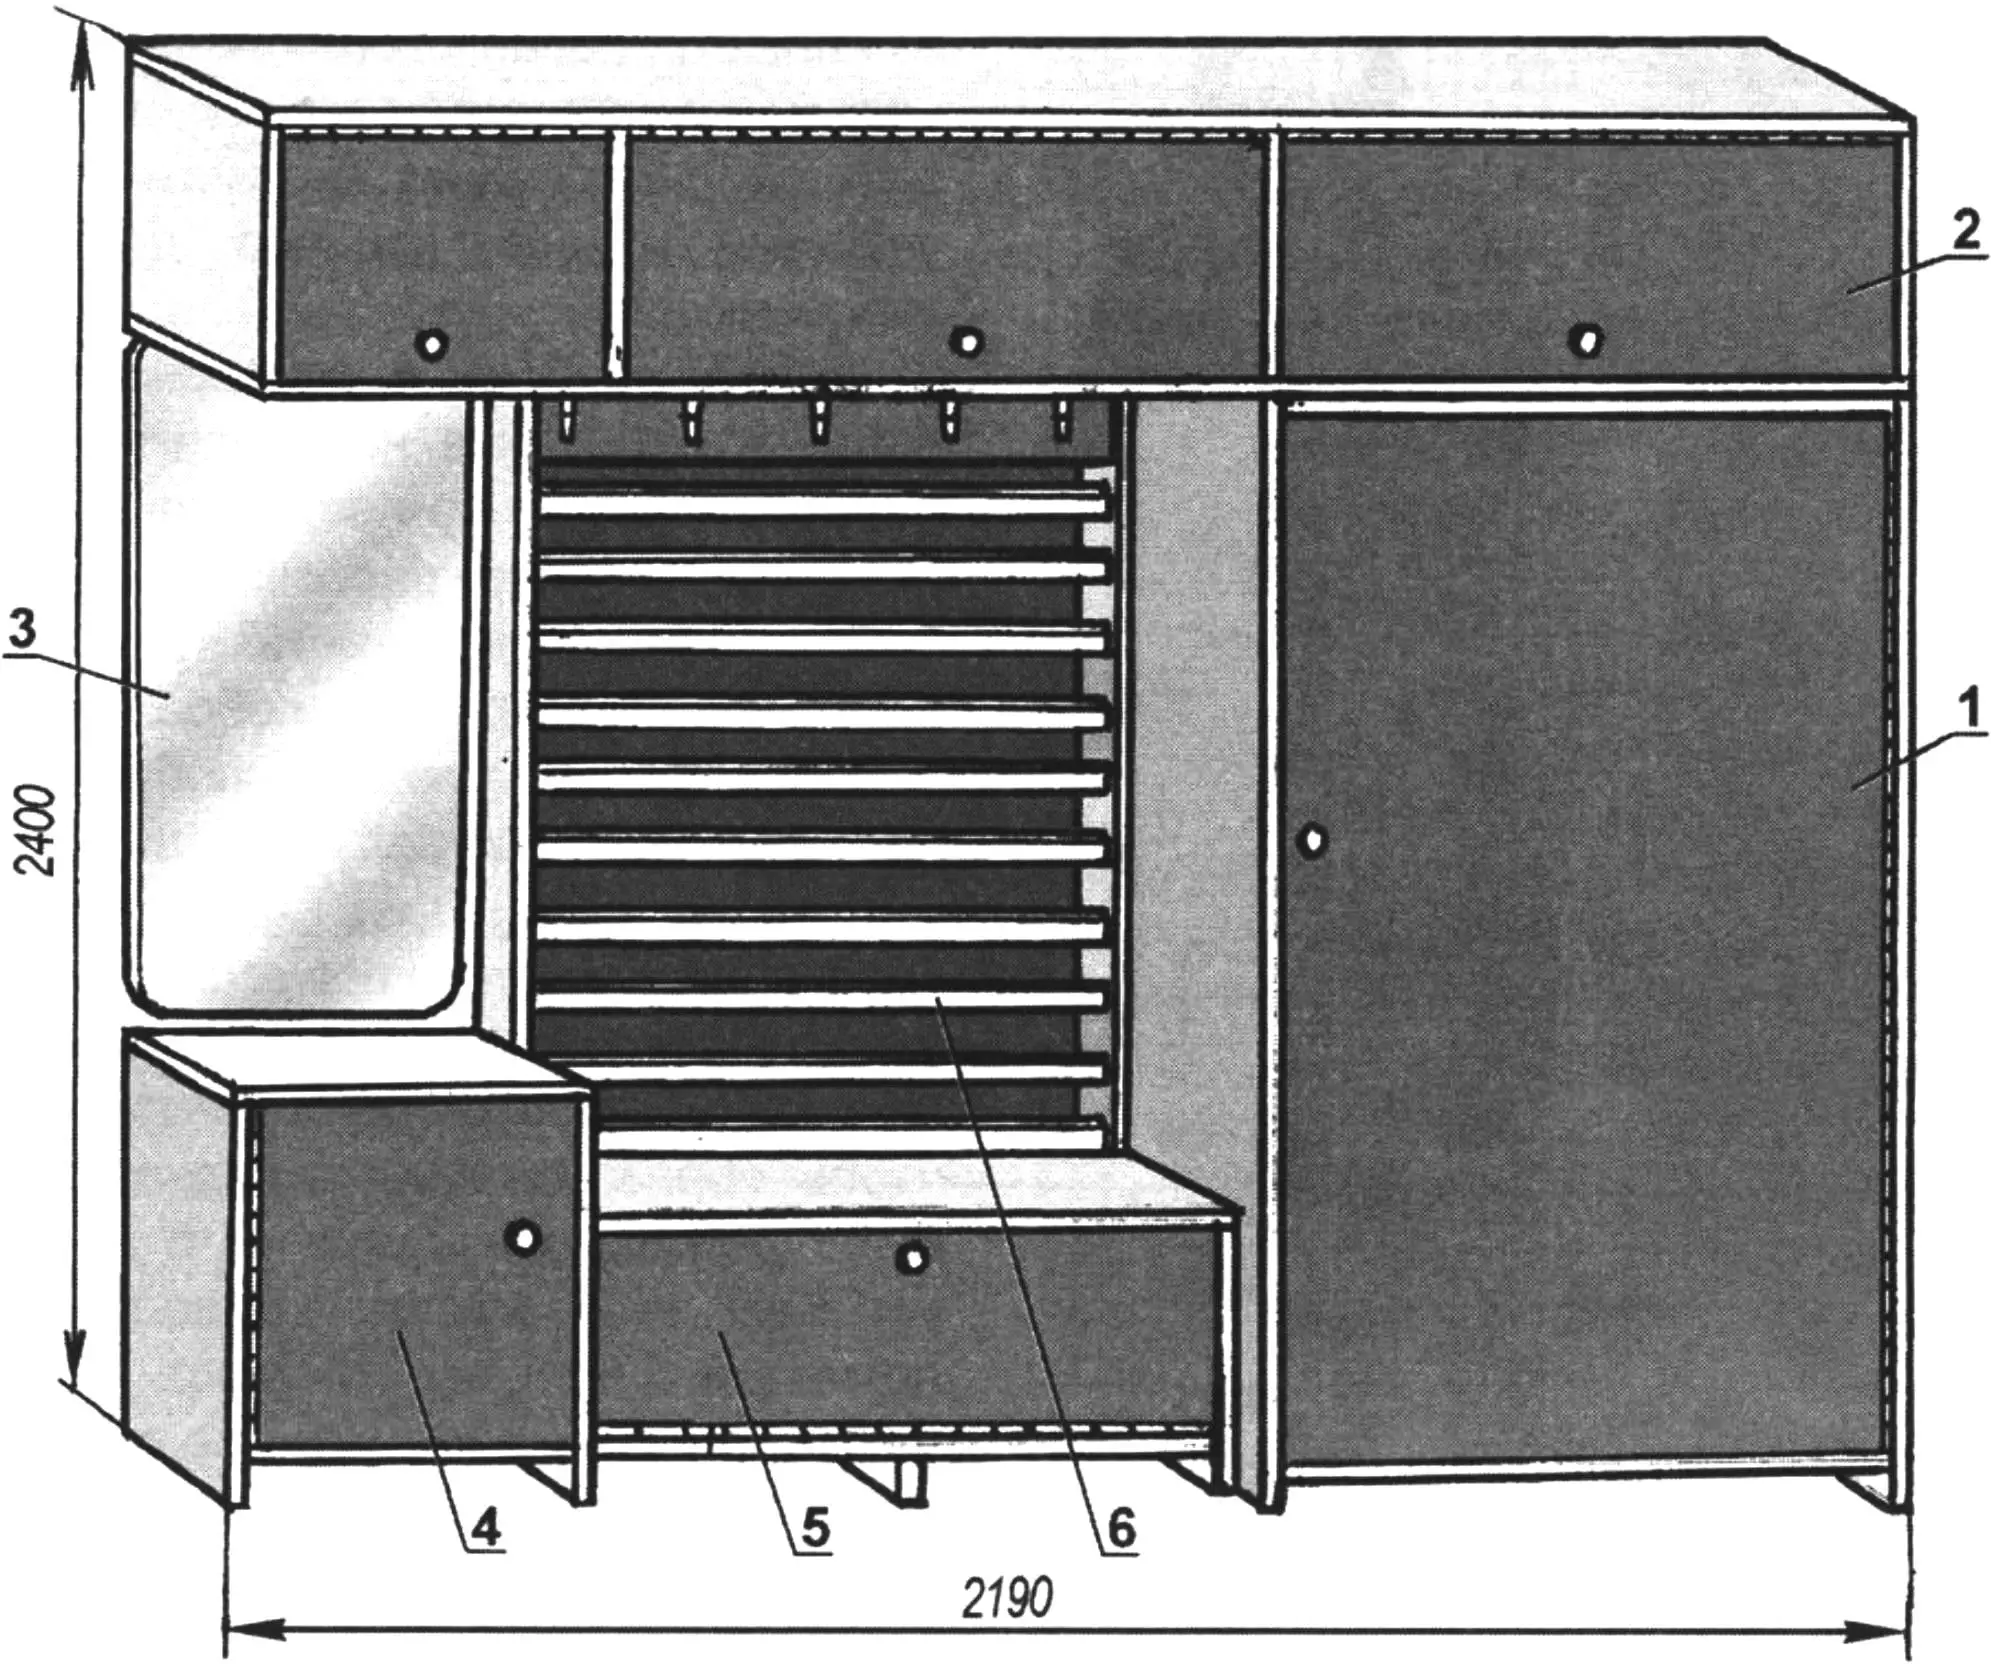
1 — wardrobe for clothes; 2 — overhead storage sections; 3 — mirror; 4 — under-mirror cabinet; 5 — “shoe cabinet”; 6 — coat rack
In the middle part of the wall unit there is an open coat rack. To keep clothes from touching the hallway wall, the wall is separated from the clothes by a “ladder” of wooden bars connected with clothesline and spacer knots (or fixed with small nails). Another option, shown in the drawing, is to fasten these bars to two side board uprights that also support the cantilevered part of the overhead storage. One section of the overhead storage rests on the wardrobe, while its other end is hung from the hallway wall (like kitchen shelves).
The depth of the overhead storage sections is the same as that of the wardrobe. In turn, the wardrobe depth was chosen for convenient storage of clothes while also making economical use of hallway space. Therefore, a distance from the wall of, for example, 360 mm makes it possible to hang outerwear on hangers at a slight angle to the door. The hangers are placed in the wardrobe on a crossbar made from a length of pipe.
The cabinet depth is 60 mm less than that of the wardrobe; this was also done to save hallway space. On the top of the low part of the “shoe cabinet,” which serves as a seat when changing shoes, you can place a soft cushion made of one or two layers of foam rubber covered with fabric matching the wall unit.
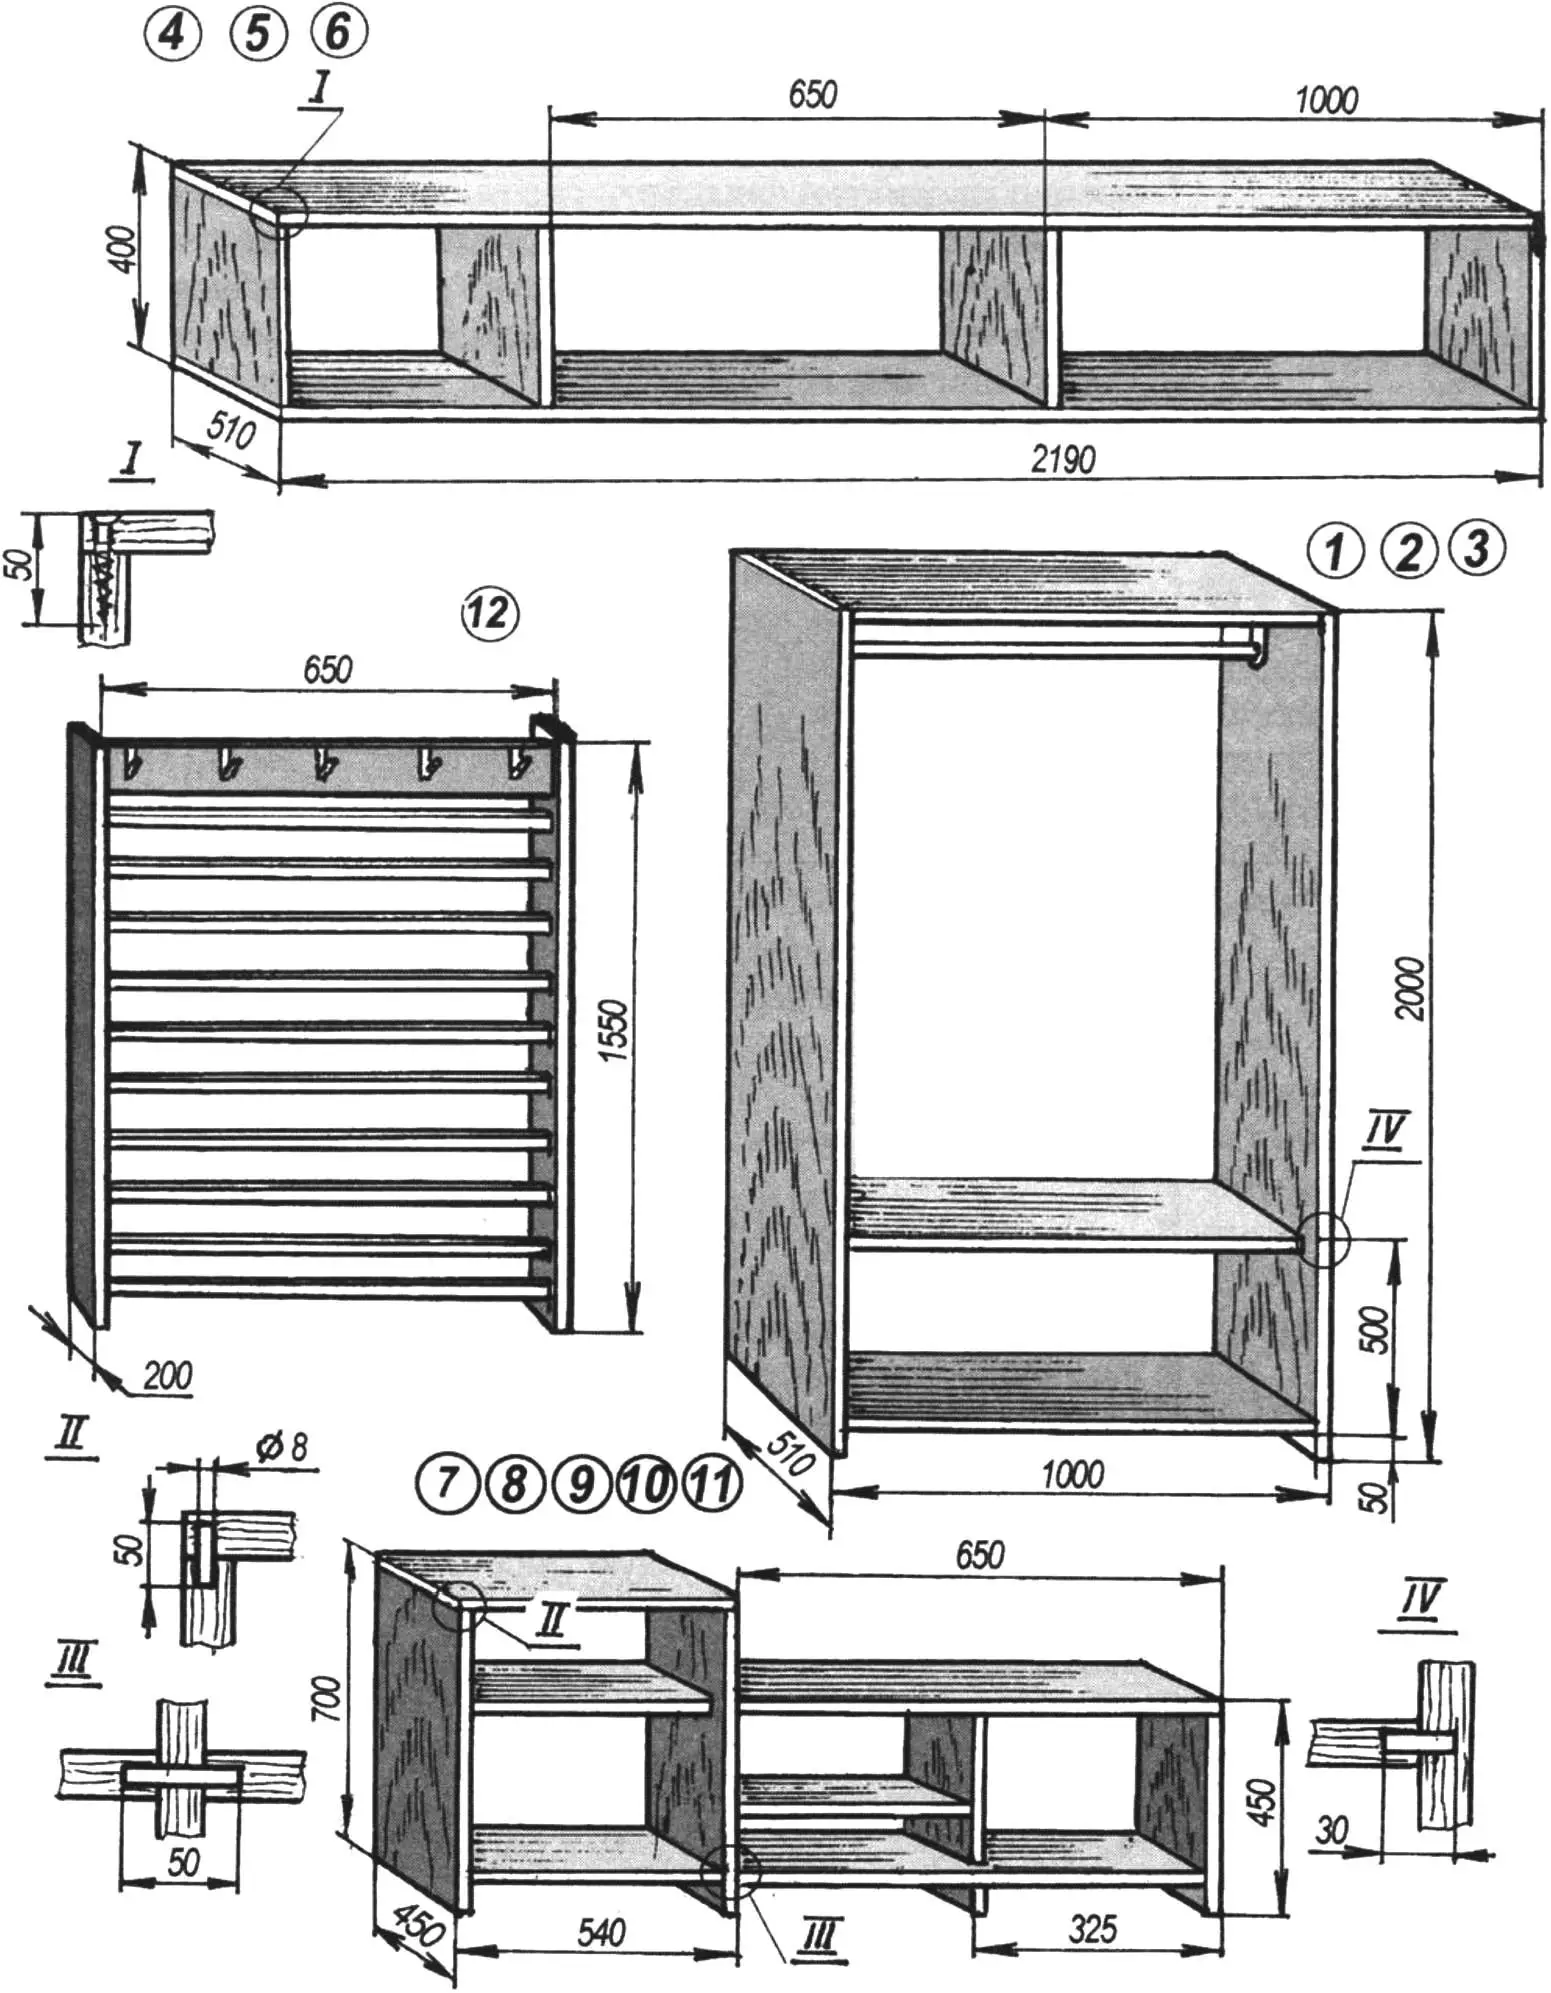
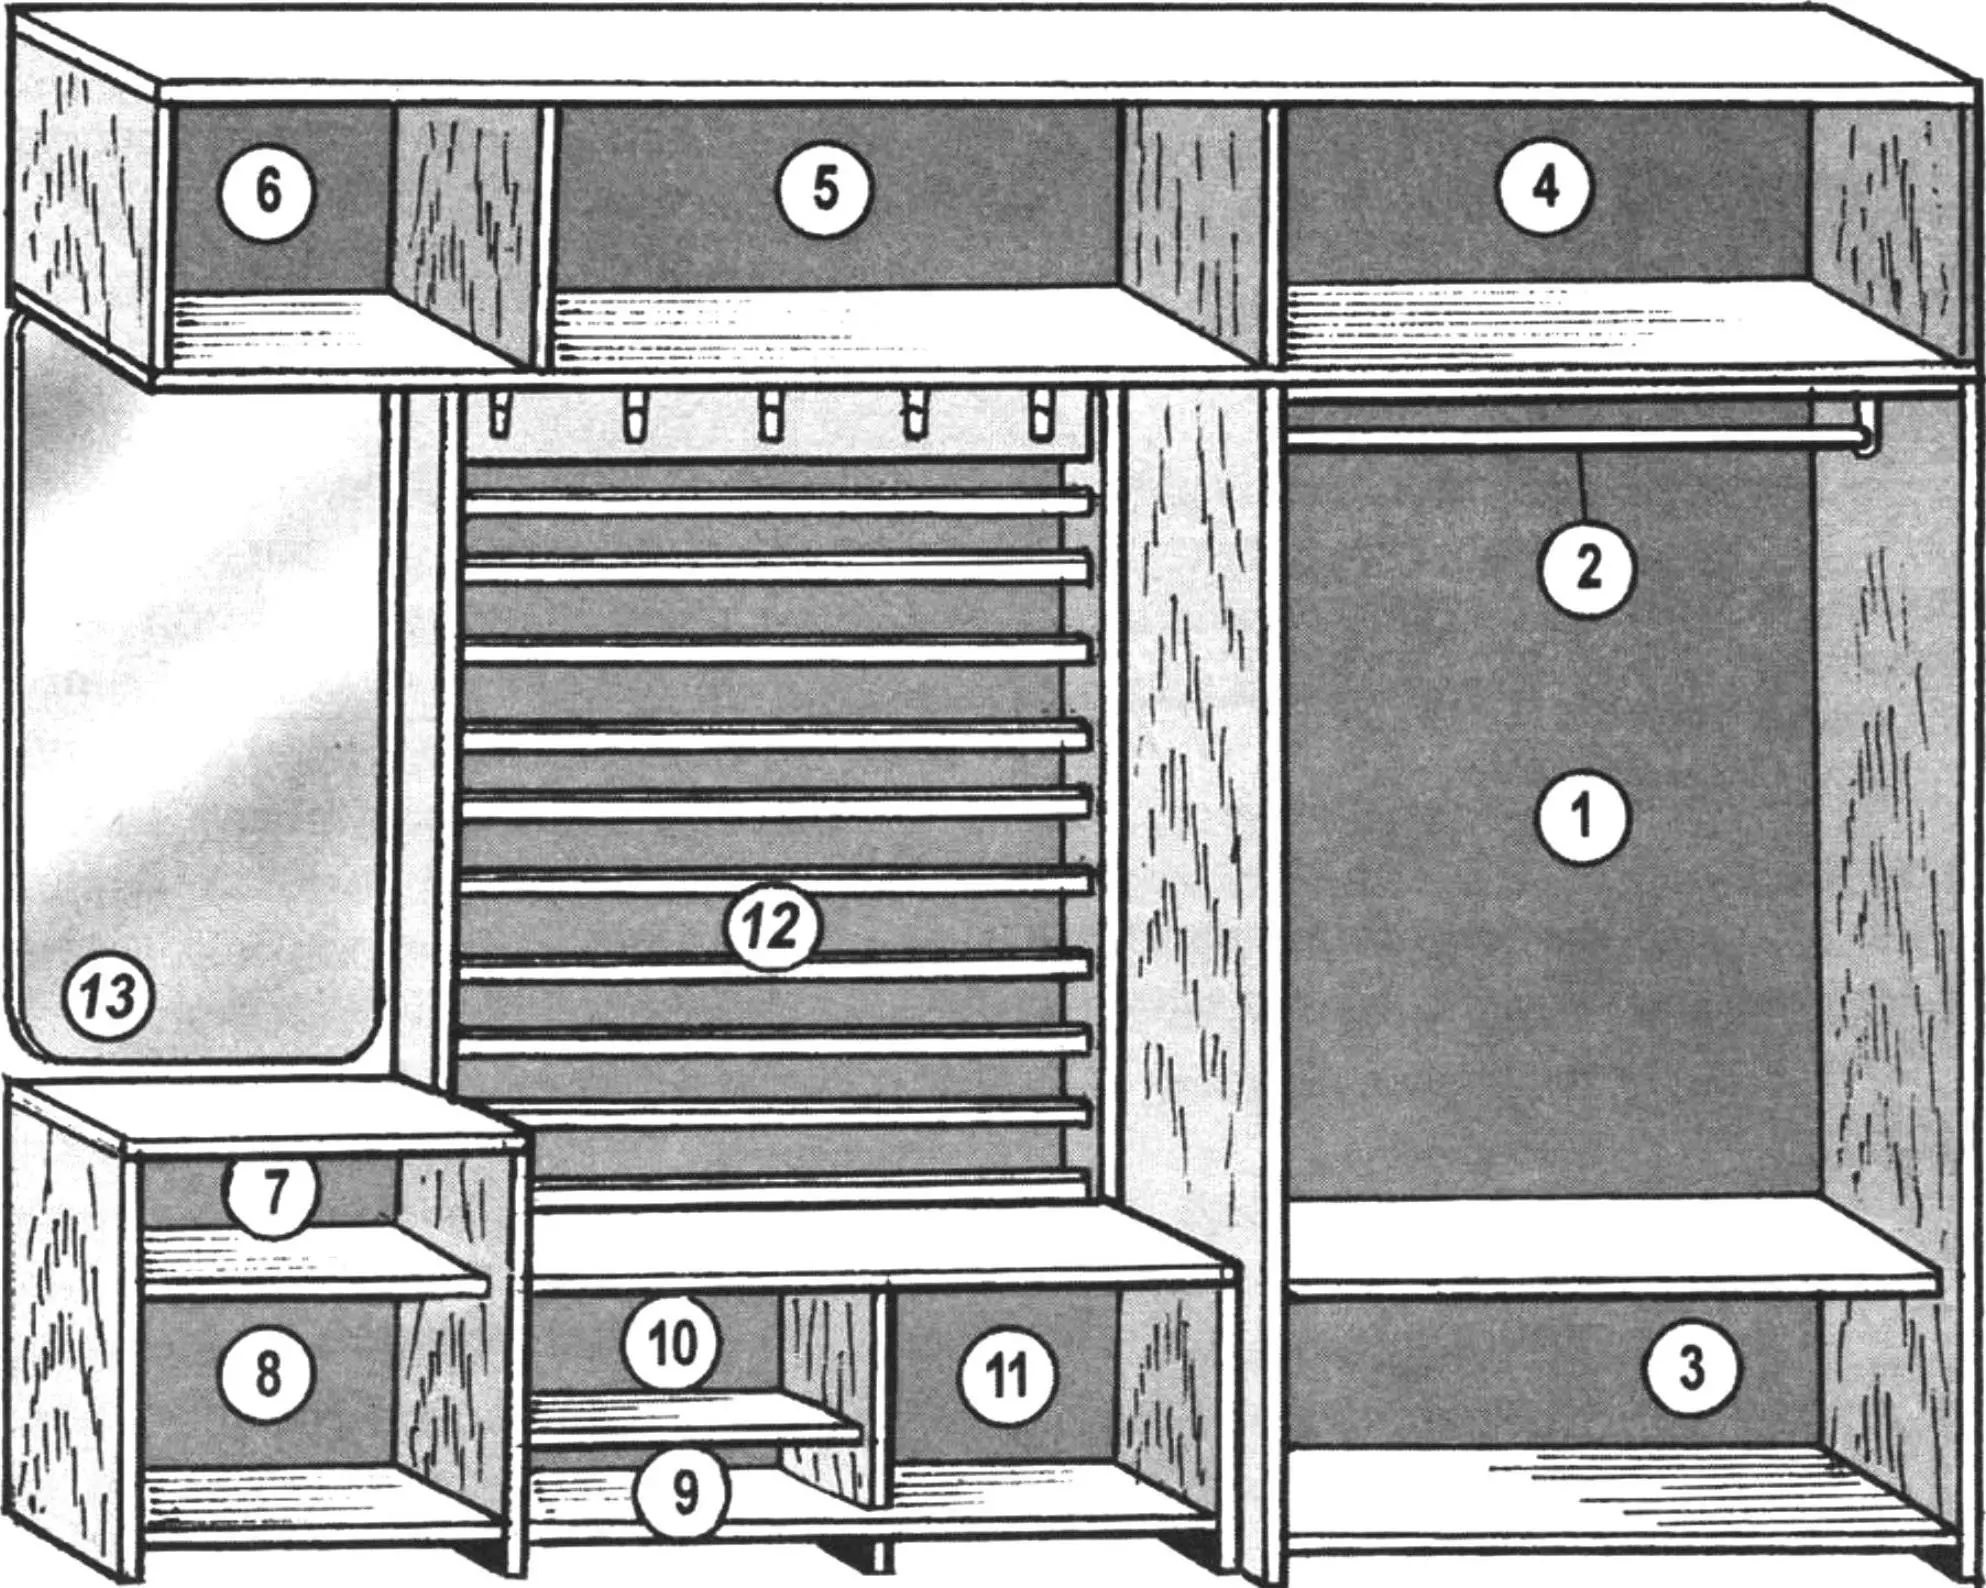
1 — wardrobe section for clothes; 2 — hanger bar; 3 — vacuum cleaner section; 4,5,6 — overhead storage sections; 7 — space for a drawer; 8,9,10,11 — sections for small items and shoes; 12 — coat rack; 13 — mirror
The top, bottom and side panels, partitions, and doors of the wall unit were cut with a handsaw and then trimmed with a plane to finished size. All visible edges of the chipboard parts were covered with strips of synthetic film with an embossed texture that closely imitates light-toned wood. The inner surfaces of the panels were covered with washable wallpaper.
The coat rack with hooks and the bars of its “ladder” were also covered with decorative synthetic film (although they may also be painted with enamel of a suitable color).
Assembly
The panels and partitions were joined with wooden dowels using glue and, where possible, with screws. Dowels were installed at intervals of 50–70 mm; screws were used in joints where they would not be visible after assembly and after installing the furniture wall unit in the hallway.
The overhead storage, wardrobe, and cabinets are assembled separately. The hardboard back panels are fastened with screws or small nails. Although these panels are not load-bearing, they still give the structure rigidity and stability.
The doors are hung on piano hinges. In the closed position they are held by magnetic catches.
Combined door handles made of white plastic and nickel-plated steel harmonize well with the nickel-plated visible parts of the piano hinges and the white plastic coat hooks. Well-chosen hardware that matches the overall color tone of the wall unit, together with careful finishing of the parts, significantly improves the aesthetic appearance of the unit.
“Modelist-Konstruktor” No. 12’2008, S. IVANOV
Recommend to read
 HOMESTEAD LITTLE TRUCK
I am a long-time reader and regular subscriber to the magazine "Modelist-Konstruktor". Over almost forty years, I have not only familiarized myself with machines and mechanisms of amateur... OTK IN THE SCHEME
Every radio Amateur knows how it is sometimes difficult to find in electronic equipment, faulty transistor, especially when there is no instrumentation. From the diagram it is necessary...
