
They come in large and small, foldable and “monolithic”, tabletop and floor-standing – of the most varied designs, but… with one common drawback: they require storage space. We’re talking about ironing boards. Indeed, such a necessary item for every family’s household – and so archaic, “clumsy”: where to put it away when all the laundry is in order? True, modern ironing devices have appeared, keeping, so to speak, in step with the age of scientific and technical progress: electric units in which instead of an iron there is a heating panel, and the role of the board is performed by a cylindrical roller. But this structure is even more difficult to accommodate in an apartment so that it doesn’t disrupt the interior.
As for traditional ironing boards, even the most portable variants – for example, hung on the wall – are not very convenient: the board’s upholstery collects dust, and a cover won’t save it. You’ll agree that such a thing will clutter even a utility room.
Since with almost any ironing board design it is usually used in combination with a table and, as a rule, in the kitchen, it is quite natural that the thoughts of home rationalizers turned to searching in this direction: can’t we combine the inseparable pair so that, complementing each other, they would simultaneously eliminate the inconveniences and shortcomings of traditional solutions?
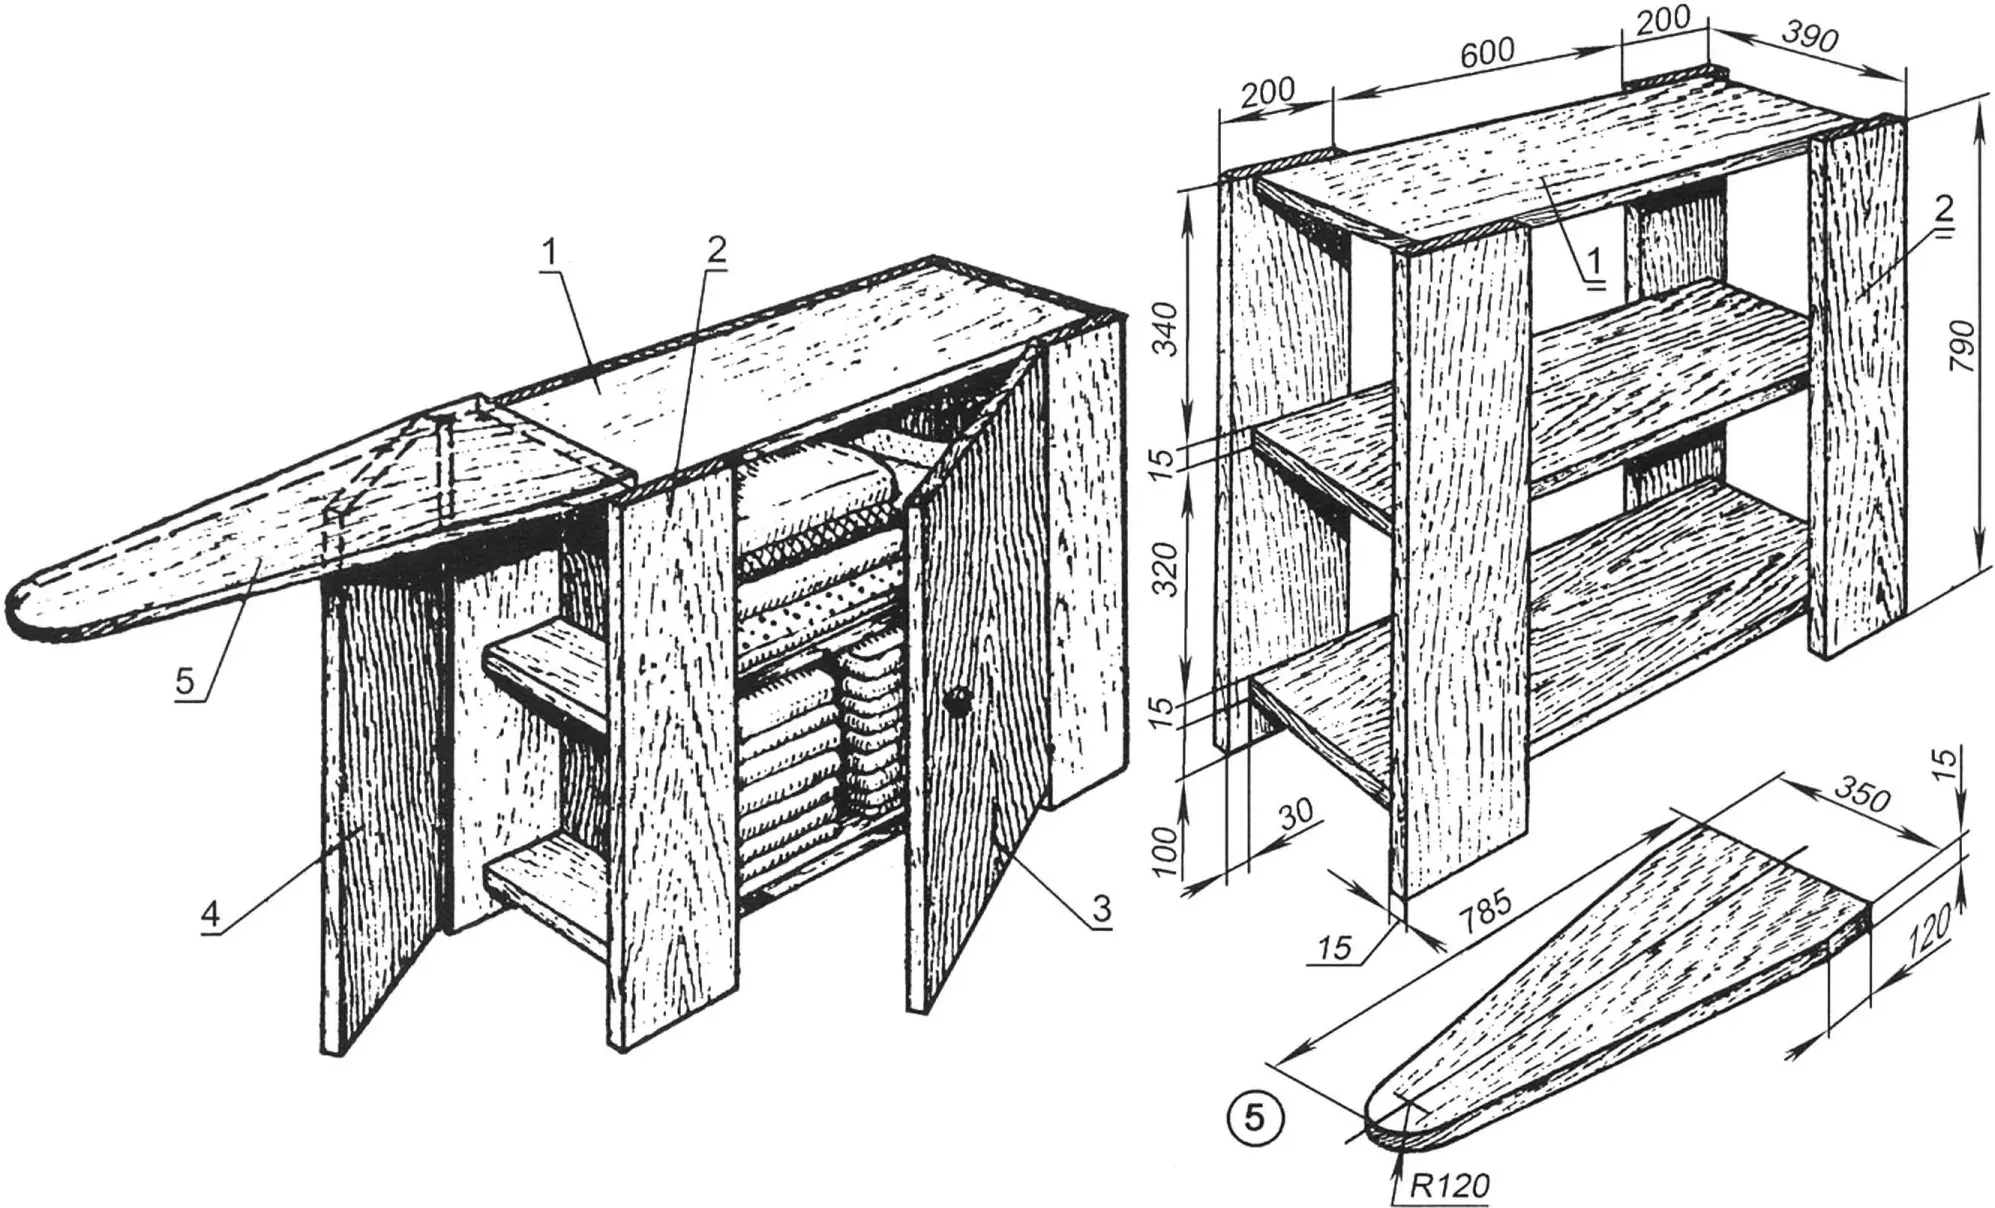
1 – table top and two cabinet shelves; 2 – leg panels; 3 – cabinet door; 4 – nightstand door; 5 – ironing board
Below we present two variants of answers to the set task. Both are brought together by the very approach to the problem – the construction is a combined item: a kitchen table that, when unfolded, reveals a conveniently stored ironing board inside it. Since industry doesn’t produce anything like this, there’s only one solution – make it yourself. Especially since the design of both “combi-tables” is quite simple.
In the first variant, such a table is a whole set, as it hides not only the board but also two nightstands, as well as a linen cabinet. It can store products, jars of pickles and jams, kitchen utensils – pots, pans; it will be convenient to keep here the ever-increasing number of various mechanized devices produced by industry to facilitate kitchen operations.
The “combi-table” is assembled from flat elements, simplifying their manufacture and assembly. The material can be chipboard, plywood 10-15 mm thick, or smoothly planed thin boards assembled on casein, woodworking, or epoxy glue with edges so that they form a single panel, similar to drawing boards available for sale.
In the proposed variant, eleven such blank panels will be needed. Four of them will serve as table legs, two – perform the role of end nightstand doors, one – the side cabinet door, behind it two shelves and the same table top. The eleventh will become the actual ironing board.
The construction allows for unifying parts, which simplifies their preparation. The leg panels (item 2) will be the same – 15x200x790 mm. The table top and both shelves (item 1) can also be the same size. The same applies to four textolite small panels of internal partitions – 15x325x360 mm, forming the end nightstands and side cabinet. Both nightstand doors (item 4) will have dimensions of 15x350x790 mm, and the cabinet door (item 3) – 15x595x700 mm, there can be two of them, on both sides of the table.
The ironing board is made from a blank panel measuring 790x360x150 mm.
Table assembly can be done on tenons with casein or woodworking glue, as well as on screws with epoxy glue. Painting is performed after a 24-hour holding period of the assembled table or before assembly – separately for each panel. Elements are carefully processed with sandpaper and scraper, polished and painted with enamels, preferably waterproof – pentaphthalic or glyphthalic. If the panels have their own pleasant wood texture, cover them with varnish: this will emphasize and advantageously enhance the natural pattern of the wooden surface.
The doors and ironing board are hung on furniture or piano hinges (not shown in the drawing). The board is pre-upholstered with cotton (linen) fabric with cloth or felt padding to improve ironing qualities. A metal plate on an asbestos pad for the iron can be attached to the widest part of the board.
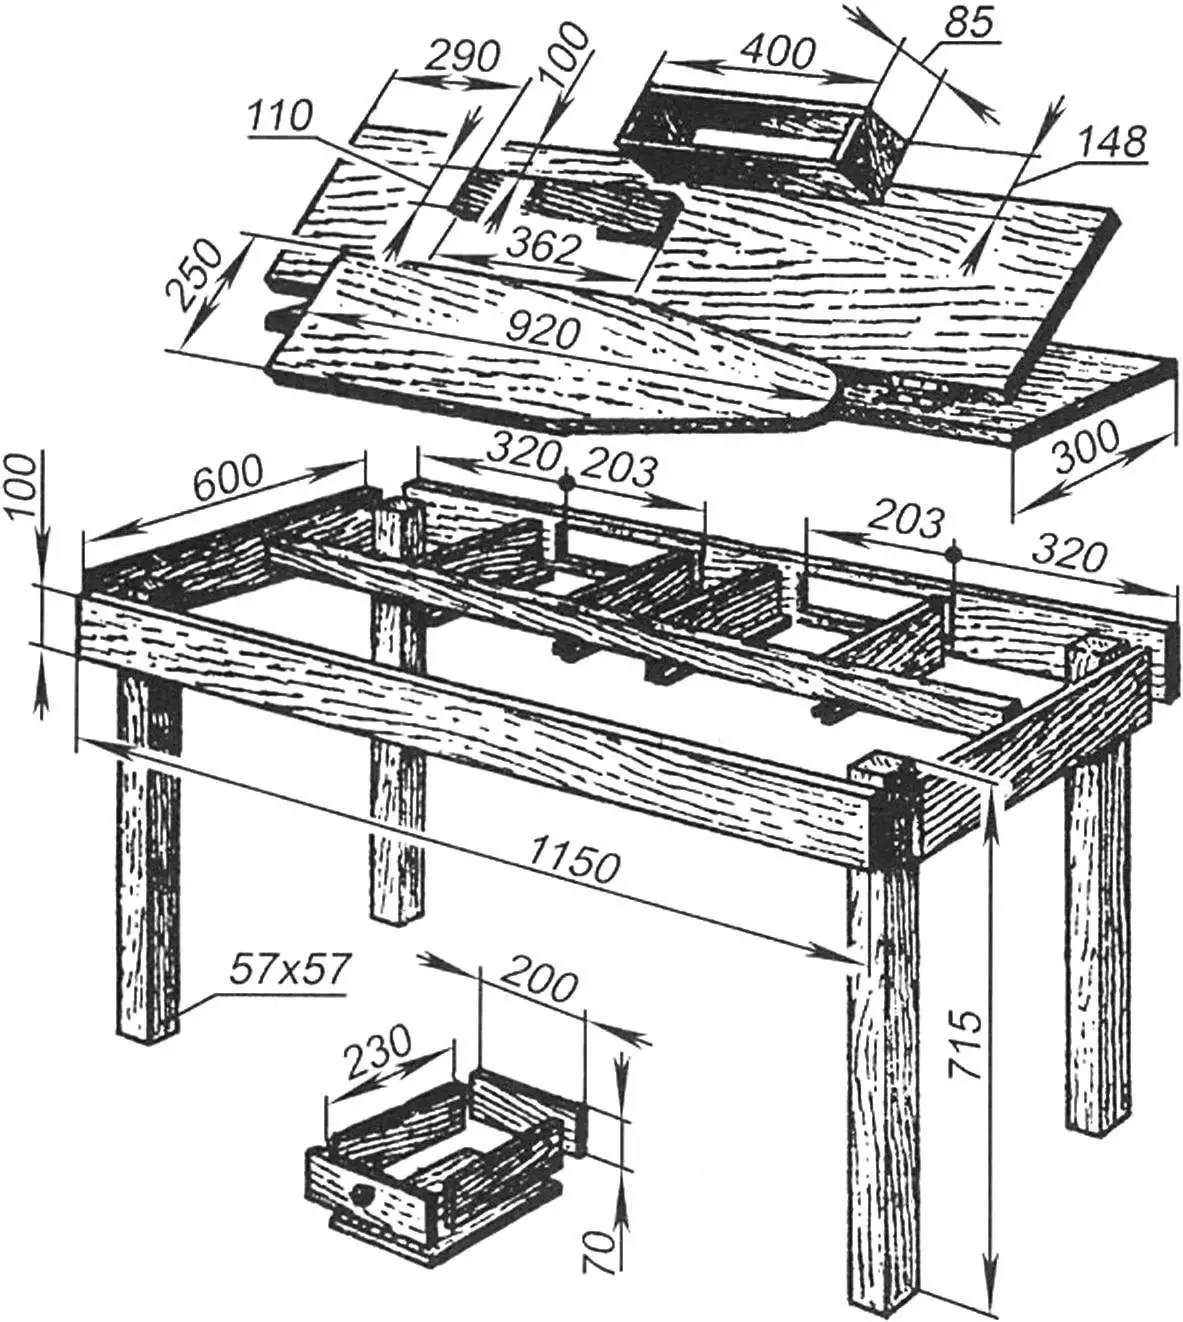
The second variant of the “ironing” table is designed for a medium-sized kitchen, its dimensions are 720x600x1150 mm. Here the board is built into the rising half of the folding tabletop: just flip the lid – and you can iron. Under the other half there are two pull-out drawers for various household items: threads with needles and scissors, tableware or tools can be stored here. Such a combined table can easily be obtained from ordinary folding ones for the kitchen available for sale. It won’t even need anything changed, just strengthen a bracket box and board on one of the folding halves.
However, you can also remake an old dining table that has become unnecessary among the new set. If the dimensions don’t suit you, use its parts and assemble one as shown in the drawing. In this case, all external surfaces, if they are heavily worn, are better to re-scrape and cover with furniture varnish in 2-3 layers. Instead of varnish, you can use nitro enamels – preferably bright, contrasting colors, coordinating them with the coloring of surrounding objects.
Table assembly begins with the frame and legs on screws with glue or epoxy resin. Then the long crossbar of the frame is installed, to it and to the side with windows small crossbars with runners for drawers are attached. The latter can be assembled from plywood of suitable thickness. The ironing board device is clear from the drawing. First, the bracket box with a bottom is assembled, which is then attached to the table top with screws (or on tenons with glue). After this, the board is also installed on the bracket with screws and covered with cloth or white linen fabric on a pad of cloth or thin felt. The edge should be trimmed with braid for decorative purposes, using furniture or simply small nails.
Now turn on the iron – you can iron.
«Modelist-Konstruktor» No. 9’2012
Recommend to read
 VASE-IMPROMPTU
Now on sale a lot of different liquids, for example mineral water in large plastic bottles, including a beautiful corrugated walls not only round but also square shapes. If they do ask... HONDA S2000
Scale model 1:18. Honda S2000 — the car rear-wheel drive front-engined and rear wheel drive Roadster with equal weight distribution on front and rear axle, manufactured by Honda....
