KITCHEN – IN THE CORNER

KITCHEN IN THE CORNERInaccessible part of kitchen table will be within reach if the shelves are in it to make a semi-circular and rotating.
Such a kitchen table-Cabinet you will not find in stores. It solved the problem of using the part which is obscured by the closely standing nearby object. This is achieved through an original rotating bunk shelf: each tier is independent and turning half slides out of the Cabinet and being retracted back comes one wing in the area of “dead” space.
 
Applied in this table and another item that is not Mature industry: the seat is covered not with plastic, ceramic or tile, and not afraid of hot.
 
To make table will not require scarce materials, and to do it in 2-3 days. The figures show a General view of the cabinets and their main components; the material from which they are made, listed in the table. Dimensions of the table are determined depending on available space. The rear corner of the dead zone has a cutout as it’s tailored to a projecting angle of a decorative fence passing near the walls of the pipes. If your kitchen is such a ledge no, it’s easier.
Fig. 1. The table-stand.
Fig. 1. The Cabinet table is:
1 — front panel (dead space), 2 — drawer, 3 — shelf swivel top, 4 — bottom shelf swivel, 5 — axis.
 
Enclosure cabinets
 
Most of its parts are collected in the nodes using plug-in round thorns on glue (carpentry, casein, PVA). Dock first sidewall with the bottom and top, align perpendicular to the installation planes and the equality of the diagonals of the resulting boxes. Then hung the back wall and the bottom of the front ground Board. It must be stressed that with the installation of the rear wall of the design gets final hardness, and thereafter, no correction is impossible.
 
The narrow panel under the ledge of the corner of the kitchen can be screwed with screws to the small sidewall and support the rear rack. The front Desk made up of two bars. It carries a complex load: gives additional support to the top, two horizontal guide slides extendable drawer, front panel and door. Set strut Assembly with horizontal bars on the spines, inserted with adhesive into the through hole of the tops and bottoms. The same is attached and the guide Board of the drawer.
 
Assembly of all parts of the hull will be safer if the mating surface pre-lubricated with glue and allow to dry.
 
Fig. 2. The body of the table.
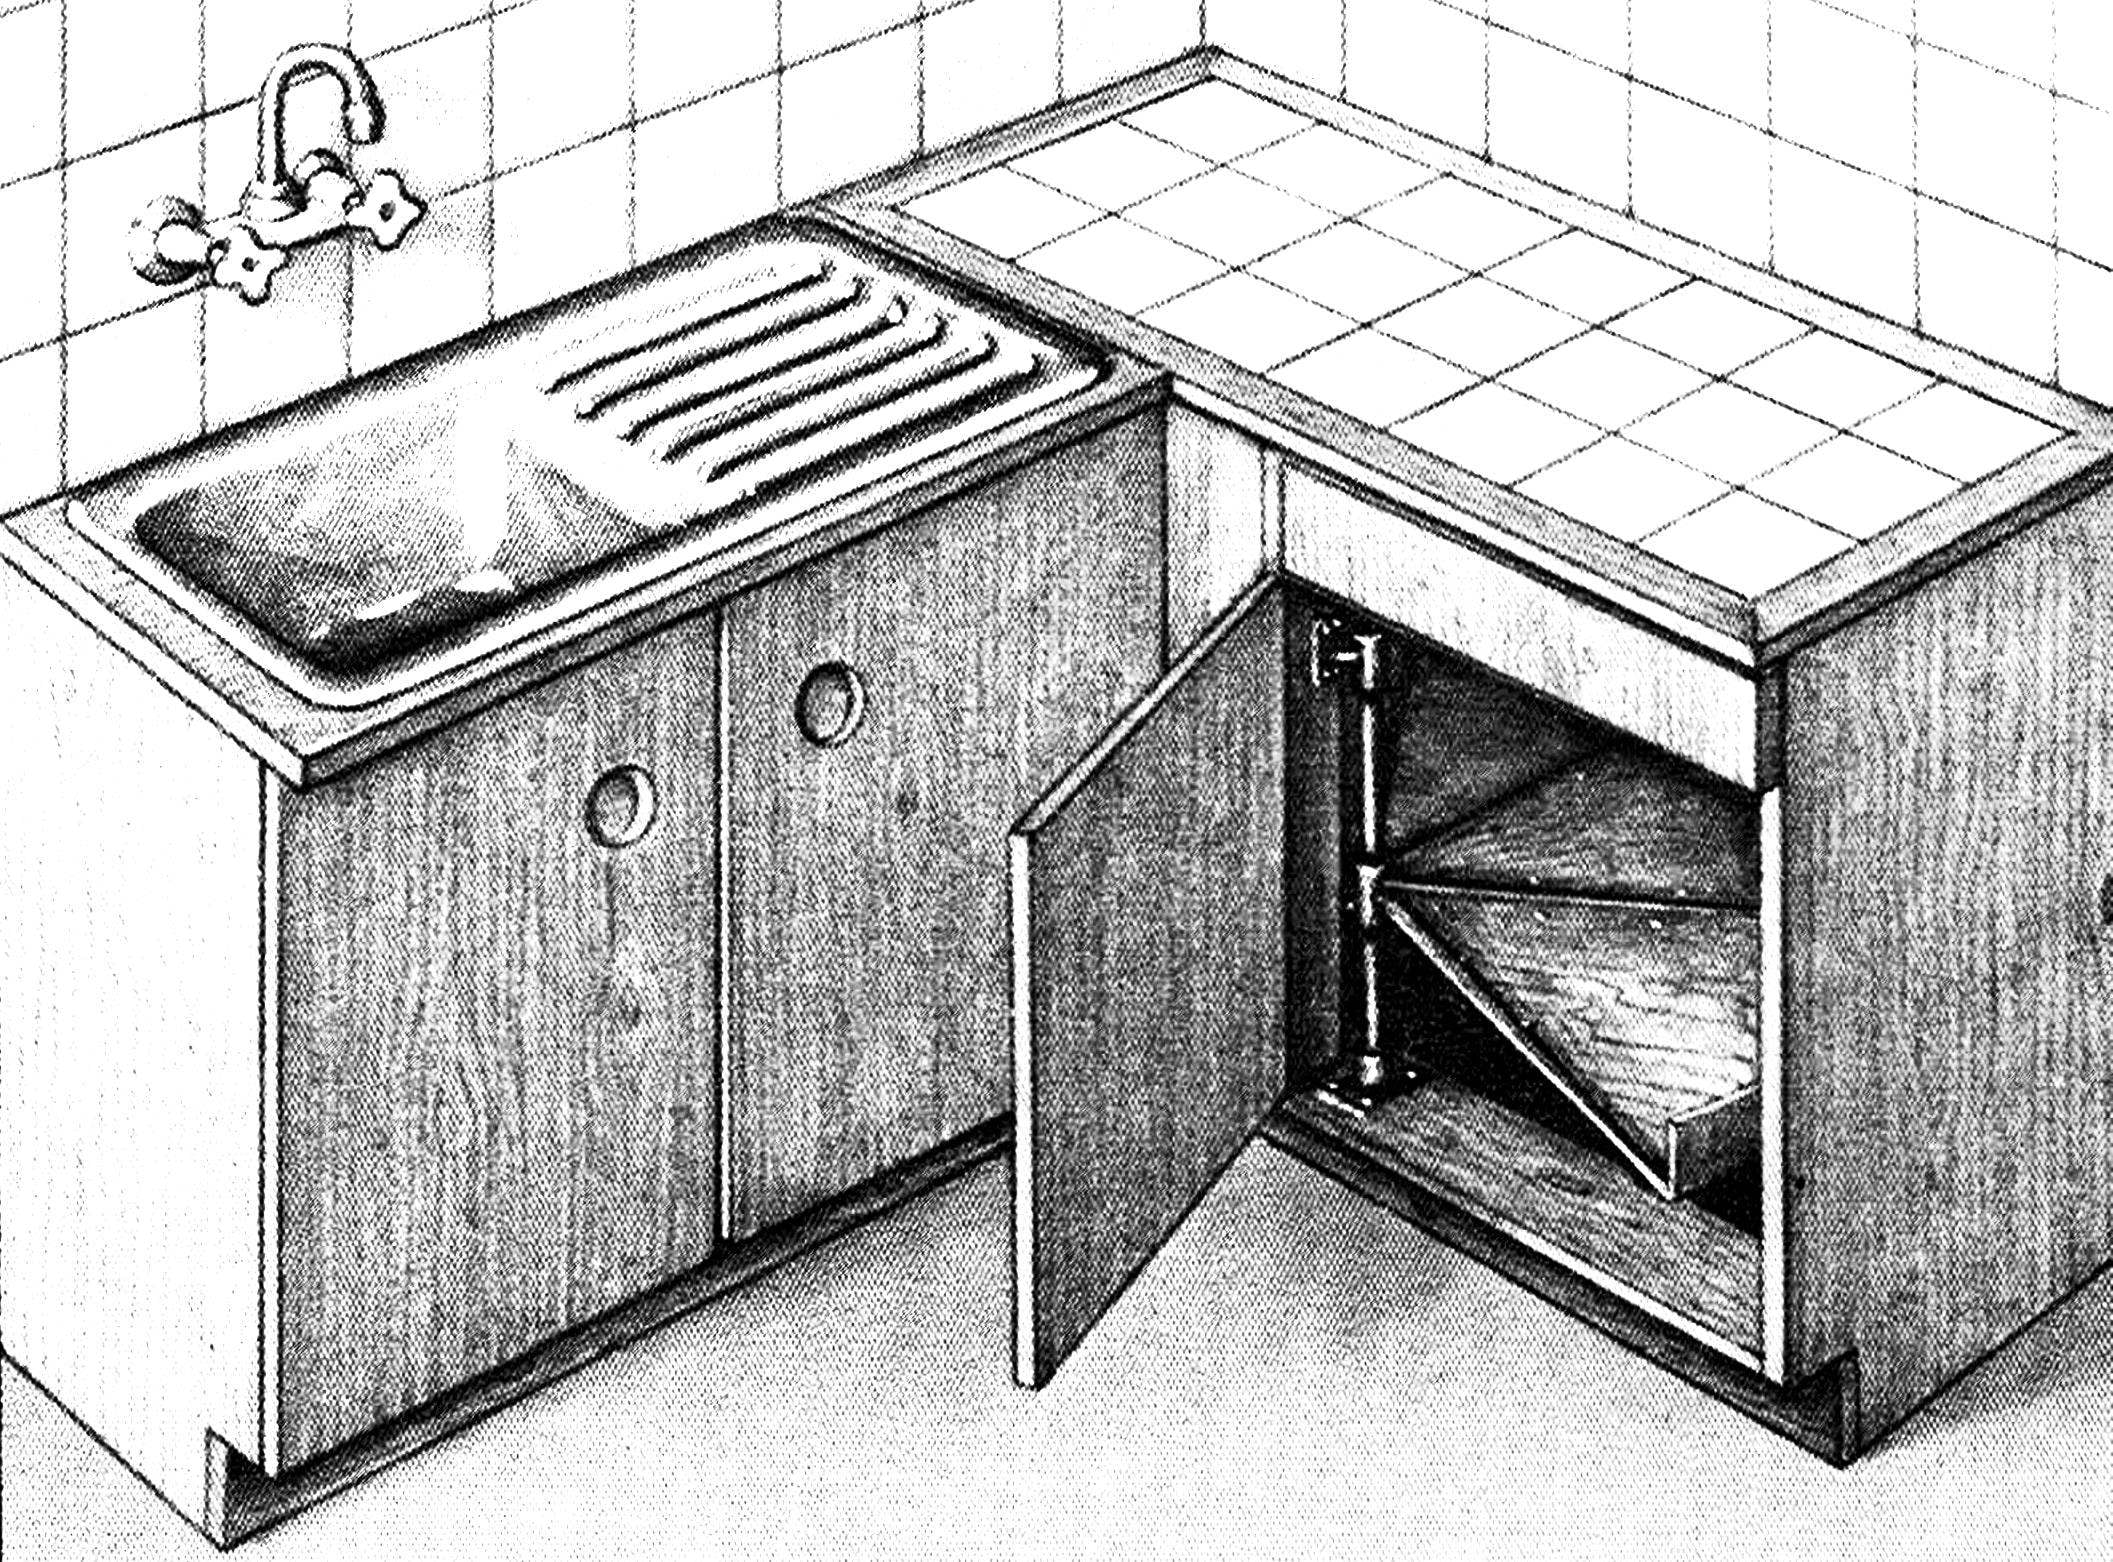
Fig. 2. The body of the table:
1 — front panel, 2 — rail frame, 3 — ceramic tile, 4 — counter, 5 — panel projection 6 — additional stand, 7 — a guide box 8 is a support bar box 9 — additional leg, 10 — support rails drawer, 11, 21 — side panel, 12 back wall, 13, 20 — base plate sidewall, the 14 — door 15 — a flange (thrust bearing), 16, 17 rack, 18 — underbody, 19 — ground Board. A — the top corner of the table.
 
The front panel also gives the structure rigidity. From mating with her she connects with a round plug-in thorns. The exception is the worktop: it is wider than the box, so it can be attached only to the upper edge of the panel, but also spikes that pass through the tabletop. Given that the front panel is covered neighbouring fitment of the kitchen and not visible, the rest of the spikes may also pass through without stopping them for simplification.
 
Side table fulfill the role of the support legs. They are made from wood laminate, because this material is afraid of water, the bottom sidewalls attached to the support bracket. Under the additional pillar is set and additional leg — cut out of the same bar that was used for the rack itself.
 
Countertop edging frame of Reiki, which rises above the surface to the thickness of the tiles. The groove in the rail may be selected using a circular saw or a special cutter. The frame is mounted on the table top with glue. And Reiki with top be sure to cinch the clamps until the glue hardens.
For stickers on the countertop tiles will suit any mastic designed for this purpose. Between the tiles provided by the gaps to the thickness of a match. These joints are then carefully filled with epoxy.
 
Shelves
 
Outset that the design of the rotary mechanism was dictated by the desire to make it as easy as possible and from materials used cutting water pipes corner profile, plywood.
 
The axis of the rotating shelves of a steel rod or pipe; the lower end it enters the hole of the bearing — flange on the bottom; the upper end is fixed by a screw sleeve bracket attached to the rack.
 
Fig. 3. The rotary mechanism and its design.
Fig. 3. The rotary mechanism and its circuit:
1 — the bottom cabinets, 2 — flange bearing, 3 — corner frame, 4 — brace frame, 5 — shelf, 6 — socket frame, 7 — support sleeve, 8 — barrier 9 — axis, 10 — bushing bracket, 11 — bracket, 12 corner bracket. A shelf on the frame (bottom view); B — rotary frame assy — lower swivel; D — upper swivel with a support bushing (bottom) and mounting bracket (top).
 
Fig. 4. Drawer.
Fig. 4. Drawer:
1 — front plate, 2 — groove for the bottom, 3 — bottom, 4 — side, 5 — back Board.
 
Each shelf is fan-shaped frame formed of angles welded to the sleeve from scrap pipe, the inner diameter of which is slightly larger than the diameter of the axial tube. The second frame is based on the same sleeve — bearing, fixed on the axis of the clamping screws: this allows you to change the distance between the shelves in height depending on mounted objects. To the corners of the frame actually mounted shelf made of plywood, which is a sector slightly more than the right of a semicircle. On the outer side of the flange is desirable to make a protecting barrier (plastic, tin) to set her items do not fall inside the table.
 
Drawer
It is the most common: two sides and back Board are connected by a cutout in Paldiski or tongue; front Board above them, attached with spikes. All four walls of the box at the lower edge of the selected saw a groove under the bottom of the plywood sheet. First collected on the glue side with a back Board, then into the groove retracts the bottom and installed the front plate so that the bottom and entered into its groove.
 
Body parts.
 
Final finish of the Cabinet depends on the other furnishings of the kitchen: external surface painted with enamel of the same color as the rest of the furniture; frame edging can be processed by stain or just carefully polished with emery cloth and varnished; a ground Board it is better to paint in a dark color, even black.
 
G. BARANSKI, Bulgaria

Recommend to read

  • WITH IRON — ON APIARYWITH IRON — ON APIARY
    Going to put the hives in your apiary improvised electronic thermostat — you will not regret. Because it is simple, in General, the device will create for bee colonies conditions,...
  • FULL KVADRFULL KVADR
    Introducing the ATV, our constant author S. Pletneva from the city of ocher, Perm territory. Once they built the machine indicative of the increased level of development and skills of...