A few words about the pipe. Its cross-section (preferably square) should be 1/7—1/10 of the cross section of the front opening (throat) of the fireplace (in our case, the pipe has a cross section of 200 X200 mm) — this will ensure good traction. It is also desirable that the length of the pipe was more than 6 m (hence the problematic construction of fireplaces on the upper floors). If the pipe comes out near the crest of the roof, it must rise at least 500 mm above it, and if close to the roof overhang, at least 1200-1500 mm above the tile. In the literature recommend a heat insulation pipe for best traction. But experience shows that without it, even at an unfavorable location of the pipe on the outside wall of the house wood burns perfectly, without the slightest sign of smoke in the room. It is important that the inside of the brick chimney had a smooth surface — say, was thoroughly plastered.
THE MANUFACTURER OF THE FURNACE . The only complex operation here — it is cutting of sheet metal thickness-Noah 8 mm. But such a material will allow to exploit the body for a long period of time, taking into account corrosion of the metal.
R and S. 3. The formwork and reinforcement for concrete pad .
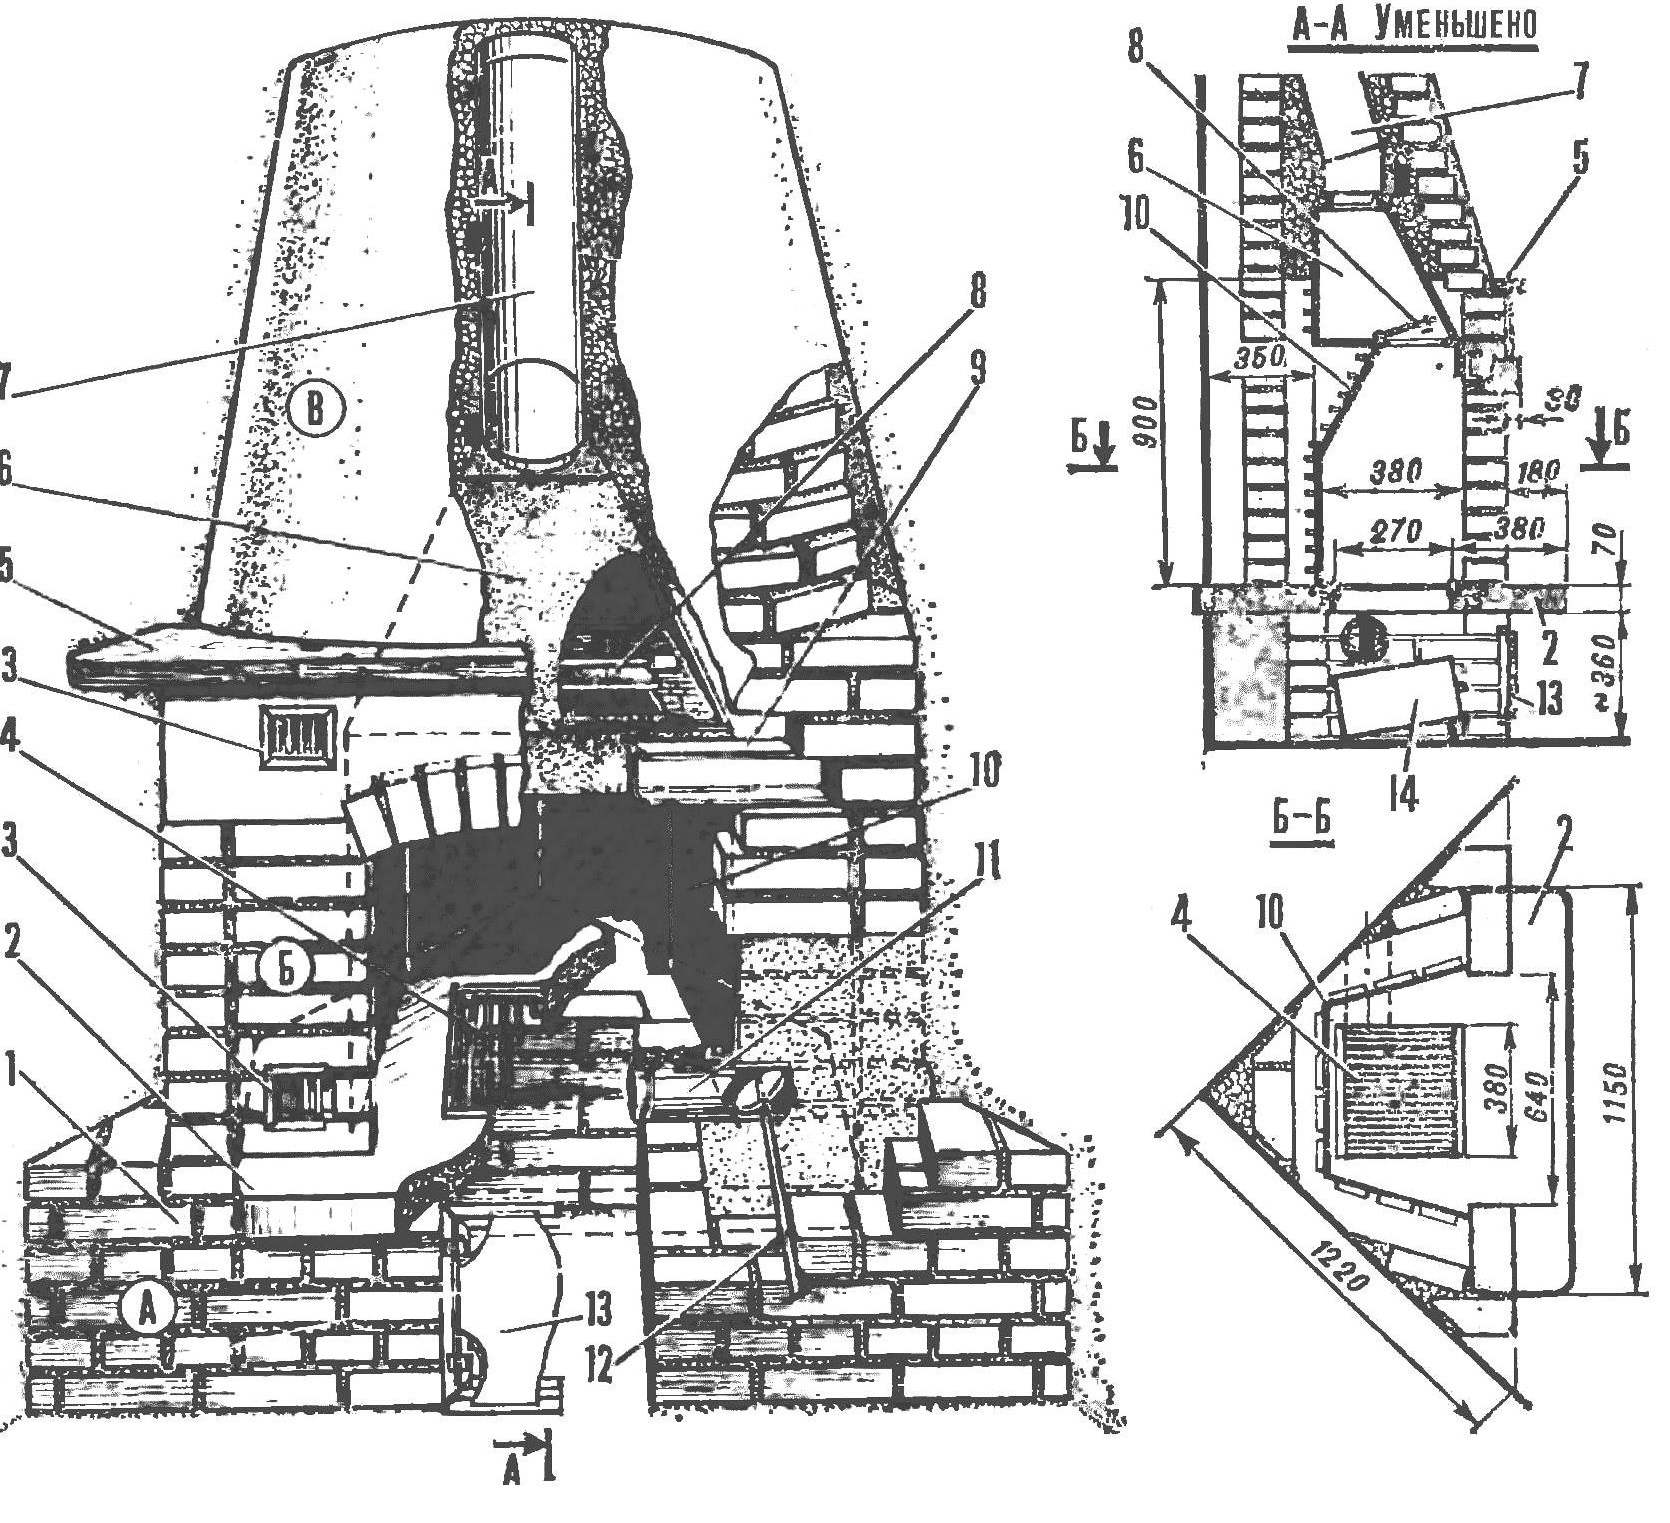
The furnace consists of two chambers: combustion and smoke. Between them is the shutter, it closed when the fireplace is not heated — came out warm air. At the rear edge of the flap is welded cut a reinforcing rod
d 16 mm, which serves as the hinge. Their ends it comes in two tubes with a length of 40 mm each: they are welded to the plate on both sides of the flap and play the role of the bushings of the hinge. Opens and closes the valve side of the combustion chamber when the fireplace is not lit. For convenience to the underside of the flap is welded handle — l-shaped rod.
Horizontal section of the combustion chamber is trapezoidal; this increases heat transfer to the room. To increase the heat transfer surface on the outside of the housing walls welded to the ribs, then the whole construction is several times covered with high temperature resistant varnish.
FOUNDATION . In our case, the fireplace built on a concrete pillow, based on the number of bricks laid directly on the floor. For marking on both walls from the corner measured along the 122 cm: these places are hammered two nails and tensioned twine. Determined by its mean and outlines the contours of the cavity, where there will be a box of ashes. The laying starts from the cavity to the walls. In the first row of bricks are placed on length and width (in sand-lime mortar: 1 part lime to 2.5 parts sand). The front wall has a thickness of 2 bricks, and the walls enclosing cavity for the ashes of one brick. For masonry bricks are selected without defects on the front surface. Between the bricks fit the rail section 1 X 1 cm for the decoration of seams. Between every two neighboring in the row of bricks is placed a short rail with a length of 7 cm After laying of the bricks, the joints between them filled with thick sand-lime mortar.
After laying the third row is pipe-ducting (good thin-walled, galvanized, type of drainage). At a distance of 250 mm from the front edge drilled two diametrically located holes d 6.5 mm — for axis damper. The last is cut from a sheet of 1 mm thickness and fixed to the axis by two screws M4. In places where there should be drilled holes, axis, slightly flattened; that it can freely rotate, the clutch axis passes through the tube with inner ø 8 mm.
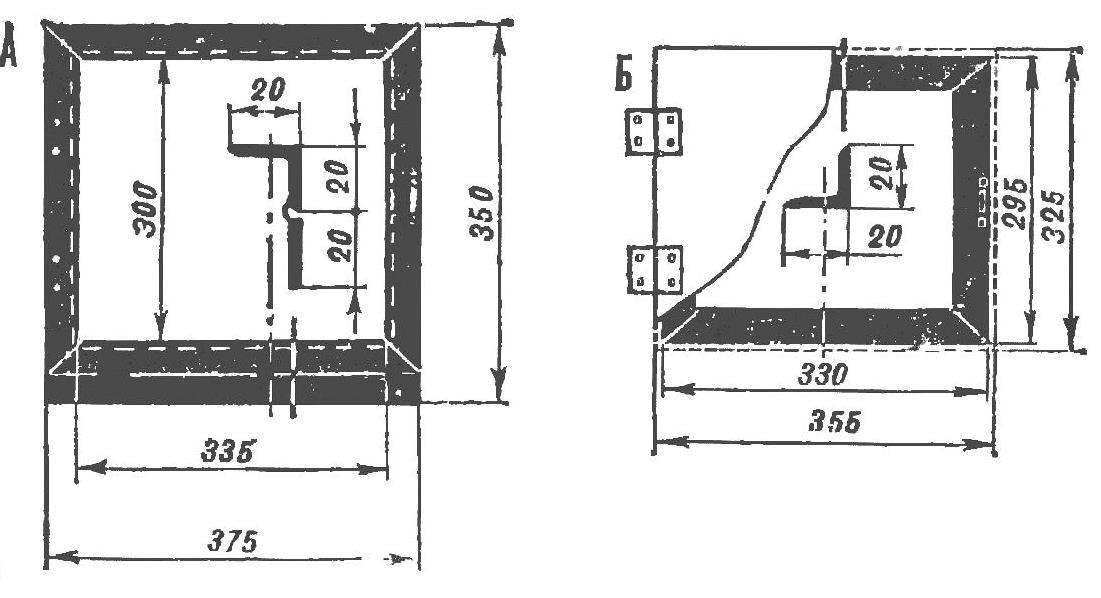
Fig. 4. The metal insert and its elements :
1 — Botovo-wall 2 — back wall 3 — inclined part of the rear wall, 4 — front visor, 5 — the bottom of the smoke box, 6 — damper, 7 — rear wall cone smoke box, 8 — the side wall of the cone 9 is the front wall of the cone 10 — cover of the smoke box, 11 — pipe coupling.
After the fifth row of bricks, molded concrete pad. She laid on the brick wall above the cavities which are previously filled with expanded clay or boiler slag. The hole above the cavity for the collection of ash wooden crown is closed and shielded wooden asicom. Protruding part of the cushion is poured into the well-fortified and aligned with the formwork, with the use of rebar steel rods to get the rounded corners, they are issued with a tin. It is desirable that part of the cushion adjacent to the furnace was made of refractory concrete. It can be prepared by the following recipe (based on 1 kg of concrete): Portland cement (grade 350) — 320 g; chamotte flour with grain size 0 — 1 mm — 100 g; refractory fraction with a grain size of 0-2 mm—240 g; refractory fraction with a grain size of 2-5 mm-340 g; water to obtain the required density.
You can use regular composition, but then the bottom of the furnace is laid with refractory bricks. However, experience has shown that, since a large part of the combustion chamber located above the metal grate and heating on concrete is not transmitted directly, in a pinch you can do without the cladding.
To the front surface of the cushion is smooth, shuttering Board should be carefully planed, and the concrete mixture during the laying of the well sealed by repeatedly tapping on the boards of the formwork.
The first seven days after placing the pillow wet concrete supported: moistened with water and covered with wet rags. The pillow should harden at least for two weeks, but after that, until the expiry of one month should not be at work to step on her projecting part.
Grate furnace is made up of 17 of the reinforcing rods ø 16 mm and a length of 260 mm, are welded at the same distance to two steel angles 25 x 25 mm with a length of 380 mm.
When making the basis of valid options. So, the holes for suction of cold air can be added above the concrete pillow, and directly above the floor where air is the coldest. In this case, it is necessary to provide a channels that would have tied the hole with a cavity under the metal housing.
THE MIDDLE PART . It is laid out according to the already described technology suture of masonry. As can be seen from the figure, the refractory (white) bricks are placed along the length, and the two extreme columns are laid out from a glossy ceramic bricks laid across. N also Closes the space between the walls of the room and face the fireplace. In the second row of refractory bricks is necessary to leave two holes the size of 100X80 mm, through which cold air will enter the cavity around the metal housing. The inner walls are placed out of the regular bricks (even broken), while between the walls and the metal shell are indented, forming a cavity width of 10 cm air layer.
Fig. 5. Decorative Board (shelf)
The last, eighth brick, shortened to 4-5 cm to get a ledge that will form the bricks of the arch. Instead of a reinforced concrete beam that could carry the brickwork on the top of the fireplace, use the channel No. 8 (80X40 mm). It is placed on the bricks (see Fig.) and prepariruetsya to the front strap metal housing.
For masonry flue arches required a wooden template. He cobble together of the two carved in the form of an arc of boards, fastened together with cross boards and covered on top of the tin stripe. The template is based on the stacked columns of bricks.
The arch is made of 11 bricks with a length of about 6-7 cm, with a clean, free of defects surface. They fit the pattern and using wooden wedges are set at an equal distance from each other, and the space behind them is filled with concrete mixture which is poured and channel, and the part already laid bricks of the front brickwork of the fireplace. Concrete is made from gravel, sand and cement in the ratio 3:4:1. It is important to check that the person-
Vai’s side of the bricks for the arch were in the same plane.
Approximately 24 hours are placed two rows of bricks, which are subsequently plastered. Shows the top two holes size 115 X X80 mm for the air outlet.
THE UPPER PART . In our case it is framed as part of a truncated cone and made of brick. This is perhaps the simplest and most successful option that does not require scarce materials.
Interesting is the decision when the upper part is made in the form of suspension of the panel from a steel angle and a copper sheet with a decorative surface treatment. Then, instead of located in the brickwork of the upper vents on the panel would be the lattice-blinds, and heating is involved and tin chimney.
But back to the option of brick. Before you continue’ masonry cavity around the metal enclosure must be closed on top, at the height of one brick above the top ventilation holes. In this case, several pieces of sheet tin primatyvajutsja welded to dymosbornik camera metal housing and filled with concrete layer 5 — 7 cm (expanded clay sand, cement in the ratio of 4:3:1). Expanded clay can be replaced by boiler slag — the main thing to concrete that will be used, and further, had insulating properties.
It is important to determine the contour of the final part of the brickwork at the junction with the ceiling. Since the metal case will interfere, have to do it “by eye”, outlining on the ceiling tied to a string and pencil arc with the center in the corner, and the radius will depend on the location of the hole for the pipe. Note that visually it is a great slope of masonry.
Fig. 6. Fire conditions :
A — the minimum distance from hearth to combustible elements of the structure (beams, wooden veneer) B — connection of the fireplace to a combustible wall 1 — insulating aggregate (slag, keramzit), 2 — brick walls, In — floor protection in front of the fireplace (tile, marble, metal), insulation from the fireplace plank floor: 1 — reinforced concrete 2 — asbestos layer; D is the location of the decorative Board regarding the opening of the hearth.
Before completing masonry, it is necessary to connect dymosbornik the camera with the pipe. For this purpose the ribs dymosbornik camera frame is welded from a steel angle 25X25 mm, on which is mounted connecting part, connected with the pipe hole through the intermediate cylindrical spacer. Now you can even satisfy your impatience and light the fireplace. Guaranteed to burn will be fine.
Masonry the sloping top of the fireplace is simple. The location of the bricks shown, and the slope is controlled by a straight bar which at one end rests in the first row of bricks, and the other traces the outline of the arc held on the ceiling. At the same time is placed and the internal space of broken bricks, and about tin chimney poured slag with a layer of 5-6 cm ensure durability fireplace: if over the years, the pipe will rust away, instead it will be the channel of concrete.
PLASTERER? FIREPLACE . This applies to the top of the fireplace, the section above the refractory bricks and the two side edges between the middle part and the walls of the room. Use lime-cement mortar of slaked lime, cement grade 350 and sand in the ratio of 5:1: 18. The solution was overlaid evenly with a trowel (trowel), smoothed with a trowel and podavlivaya strap with straight edge (rule). After skhvatyvaniya the basic layer of plaster is applied and rubbed spankings nakryvochnyj a layer thickness of about 3 mm. In closing the inclined part of the fire spraying plaster, and the section above the refractory bricks and the two side strips should be filled by gypsum. Wetting is done with a solution of white cement and marble chips of size grits in the ratio of 1 : 1. The mortar is applied with a whisk, which lightly hit a thick wooden stick. Depending on the quality of the plaster putty it covered the plane can be painted. This is followed by finishing work.
G. BARANSKI
Recommend to read “Aquaglide-5” The wig was created with the support of the "Arctic tergovernmental company" in Nizhny Novgorod. "Aquaglide-5" performed by the classical scheme of the aircraft with low-aspect-ratio... PURITY ENSURED Two pins on the sides of garbage cans and old plastic bags of suitable size and you will greatly simplify the operation of cleaning and the bucket will remain clean. 
 Although the fireplace does not relate to the effective heating, it will always be a welcome element in any interior: whether to compare heating radiator with a cozy warm fire? Therefore, for most, of course, the question is not whether to have a fireplace or not, and where and how to embed.