Then, in the process, you can do “dry cleaning” blurred or covered with fungus pages.
Ink stain appears so. Under the stained sheet, place a blotting paper. The stain moisten 20% solution of hydrogen peroxide, and then cover the page with absorbent paper. Put the cargo and allow to dry the sheet. Nice ink displays and oxalic or citric acid, diluted with alcohol (in proportion 1:4).
Sometimes from dampness and accidentally caught in the book metal objects on the pages there is a rust. A spot removed two solutions: first, alkali sulfide, and then oxalic acid. In order to remove the paper a greasy spot, you will need turpentine and alcohol. Put stained the page between two sheets of blotting paper and heat the spot with a hot iron. Dip brush in hot turpentine (cold acts bad) and move it across the stain from both sides of the still warm sheet. Again heat the sheet, dip a brush in turpentine and retry the operation. Moisten the stain with alcohol. Greasy stains from book pages can be displayed also with gasoline, a weak solution of potash, caustic potassium, different solvents.
Fig. 6. The sizing of the unit notebooks:
1 —cardboard strip; 2 notebooks; 3—brush (with PVA glue); 4—tab; 5—cargo
Fig. 7. Trimming unit:
1—knife-Bong; 2 — wooden brusok; 3—cut the front of the notebooks; 4—the tail part of the block; 5—the root
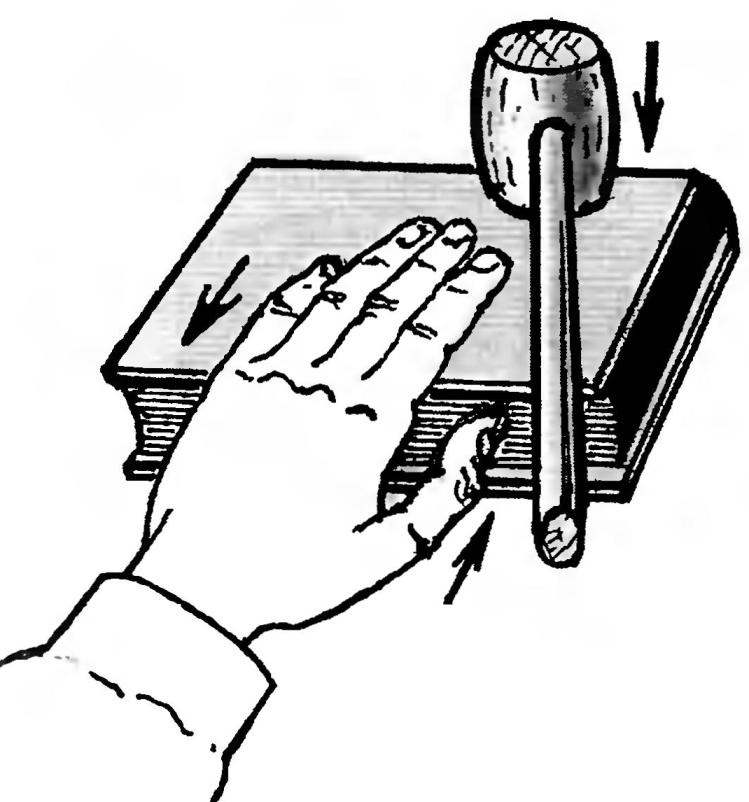
Fig. 8. The punch block with a mallet to round the spine
Fig. 9. Strengthening the spine label gauze; insert kaptelov
Fig. 10. Preparing the unit cover and spine
If the page you found the raids of the black, or greenish yellow means that the book is infected with the spores of fungi. Immediately disinfect it. The paper and binding covers, covered with legerina or calico, treated with 3%-s ‘ solution of formalin, leather bindings — 5% alcoholic solution of thymol. Processing books need to be conducted outside or in a well ventilated area (open the window), with a gauze mask on her face and rubber gloves. Well pressed with a swab, not wiping and not rubbing on the paper disputes, carefully remove the patches of fungus. Cleaned spot treat again, but in a wet clean with a swab. After disinfection, thoroughly dry the pages. Mold is treated with 2 — 3% formalin solution, and then remove the swab dipped in hydrogen peroxide.
So, the leaves are glued, cleaned from stains and dried. The next operation is the preparation of notebooks. Put sheets of books in order, check the numbering and re-fold the notebook in a pile (do not forget to follow a sequence number of signatures). To the first and last notebooks glue the endpapers and get ready for sewing.
In the past books were sewed on the ribbons or cords. We use the more simple method of binding books per unit. Sewing is not inferior in strength to the old way, it requires no special equipment and takes less time.
You’ll need strong white thread (preferably nylon) and a long thin needle. To sew the book start with the recent books and finish first.
In figures 4A and 4B you can see how to put the last notebook on the table (pay attention to page numbering, the last two books), and what position should be occupied by a bookbinder when sewing. For example, try to make more notebooks. The left hand fold the half sheets of notebook up a bit and the right stick in the seam a needle and thread. The left hand slide the needle inside. With that same hand, bring the needle out again and the right hand bring her inside, and so until then, until you stitch the whole seam notebooks. Pass the thread along the seam, so that it is tightly formed by a bend, one end of a length of 5 — 8 cm, Place on a stitched notebook next notebook. Sew it, but now from the other end, and withdrawing the needle in front of the first stitch, tighten thread and tie notebook knot (Fig. 4B). Similarly, sew the third book and moving the needle tail opposite to the stitches sewn notebooks, notebook second link with the third node, shown in figures 4G, 4D and 4E. Tightening the knot, pull the thread straight up. Put on stapled notebook following notebook and continue sewing. As you have probably noticed, the notebooks are attached to each other in the two extreme points — that is enough to make a monolithic block.
Shivaite the book as evenly as possible After each firmware push notebook on the head and don’t forget to pull the thread, gently press the top of the book. The quality of sewing would be good if each notebook is stitched exactly in the notch; all the notebooks in the book is firmly and tightly connected and must lie exactly in the head and the root; the stitches of the thread is not weakened and not torn.
Ready unit (Fig.5) push (align) the spine (a) and head (b) and place it (Fig.6) between the two cardboard 1. Soak with white glue brush 3 (we recommend this glue as the most durable and affordable), good over the spine of the block 4. Put on a piece of cardboard with the load 5 so that the main burden fell on the spine. Let the unit dry out and start pruning front 3 (front edge) and the tail the lower part 4 of the book (Fig.7). Prepare Bindery 1 knife (sharpened on one side), stick, fine sandpaper for the filling knife blade thick and straight plank 2.
The knife must be very sharp, otherwise you will not be able to exactly trim the block. Cutting block start with the front end. Find the book with a narrow sheet, stepping back from the edges 2 — 3mm, draw a pencil on the top front a line parallel to the spine. Tightly push the rail to the block and trim the front. Cut without pressure, often refill the knife. Then cut the tail and, if necessary, and the head of the book. The line crop mark on a square.
Now you have to round to (round) the spine (Fig.8). This operation is simple but requires some explanation. Place the block on the table, in the right hand, take the mallet, and the left clamp the block so that the four fingers pressed at the binder top to bottom, and the fifth — biggest — rested on the front end. Slowly, lightly tap start to tap with mallet on the top edge of the spine. The edge is slightly rounded. Flip the block and villotte similarly, the other side of the spine.
Fig. 11. The design of the book cover
Fig. 12. Bending the edges of the cover
Fig. 13. Pasting the block under the cover
Fig. 14. Finished the book — under pressure
To strengthen the spine, paste on it a strip of starched gauze or bandage (Fig.9), and the top and bottom of the spine and even Kartaly — insertion of coloured strips of fabric and cording within her fold.
For binding caps you’ll need thick cardboard and bookbinding material: calico, lederen, faux leather or fabric, glued inside a thin paper. Of cardboard (Fig. 10) cut out the two side (same cardboard) for book cover and of thick paper — back (intermediate stripes).
The following operation is called scrivanie material (Fig.11). Put on material two aside, between — behind, a strip of paper mark the frame. Leave the material on all sides of the stock for bending the edges and trim the corners as shown in figure 11.
Remove the side and back, apply glue to the material (plus PVA glue in the ratio 1:3) and seal the lid (cover) of the book (Fig. 12). Pay particular attention to the sealing of corners. It remains to insert a block into the cover bookbinding. Figure 13A shows you how to apply the glue (also composite) so that the cover is well glued to the block (b). Glue on its face removed from the old cover, the title, author’s name, picture, place the book between the cardboard and put it under the press (Fig. 14). Dry 10 — 15 hours.
V. FEDOROV
Recommend to read INDOOR JUNGLE GYM-SWING The bar — great sports equipment, a great tool for morning exercise. And is not necessary to arrange it in the yard where it's always going to depend on the weather. Equip it in the room... NTTM — THE VILLAGE THE CAR ROOF. For transportation of bulk cargo: flour for bakeries, cement on construction sites, fertilizers on the field — in recent years increasingly used cars with special... 
 The usual workplace of the bookbinder-professional — large flat table. You can, however, be written or the kitchen table, after putting a sheet of hardboard, plywood or cardboard. Well, when on the table there is a certain order. At the binded books or magazines, tools and materials must be your work place. So.