That’s why interest is an affordable and versatile method of fabrication of the screen on their own directly to the features of your bath. It does not require any special tools (see Fig. 1), and the materials can come even available to you at home or on the construction markets. Basically it will be chipboard panels or moisture-resistant drywall and wood. And in order not to delay the manufacturing process – before you begin, make sure that you have all the necessary tools and materials.
FRAME
The screen panel is mounted on a frame of wooden bars 40×40 mm, located on the edges of the bath and attached to the walls. The pictures show the preparation for work in the case where the bath is located on the corner of the room, but this operation procedure is suitable for any plan.
To start with the plumb line draw a vertical line relating to the corner of the tub. She will mark the location of the first rack frame. To account for the thickness of the bar, make the appropriate indent and draw a second line parallel to the first. Erase the first line.
Fig. 1. Tools and materials for making bath screen
Fig. 2. The layout arrangement of the screen:
A – start; … the end
Fig. 3. Side frame of the frame Assembly. Is also the front frame
Now go to the next corner. Attach a plumb line to the corner of the bath and mark the floor at the appropriate point. Here will be the second strut of the frame. In this place, draw a square with the corner at a given point and with sides of length 2.5 cm so that the square is positioned under the sides of the bath. A similar indentation is required to supply to the thickness of the screen panel and possible cladding (tiles).
It remains to indicate the location of the third pillar of the framework. To do this, first on the wall, draws the plumb, as in the case of the first counter, a vertical line and mark on the floor the resulting point. Now from the corner of the square diagonally opposite the point marked by the plumb line, draw lines to the base lines drawn on the walls. Thus we have completed the layout for the frame of the screen.
You can go to the manufacture of the frame. To do this, take a wooden bruski section 40×40 mm, having the following dimensions. For vertical sections (columns) of frame four bar the length of which is equal to the distance between the bottom surface of the bath rim and the floor. For the horizontal parts of the frame – two bars the length of which is equal to the length of the features carried out on the floor along the long side of the bath minus 120 mm (triple the thickness of the bar); two bars the length of which is equal to the length of the features carried out on the floor along the short side of bath with less 80 mm (double the thickness of the bar).
Fig. 4. The installation of the frames frame:
A – frame screen Assembly
Front panel (DSP)
Side panel (particle Board or drywall)
Fig. 6. Preparation front panel of the screen:
And – manufacture of the window; B – hanging the doors
These blanks will allow you to collect two independent skeleton frame in any sequence. Let’s start with a small. For this purpose model parts (see Fig. 1) assemble a frame of four corresponding bars. Drill holes in the frame which will be attached to the wall at two points. Use the screws and wall plugs suitable for the wall materials (solid or hollow wall, brick, wall block).
We need to raise the bars for the side frame (long side of the bath). Fixing them is the same as for a small frame. Assembled large frame is fixed simultaneously in two places: to the wall, as in the first case, and installed a small frame with screws.
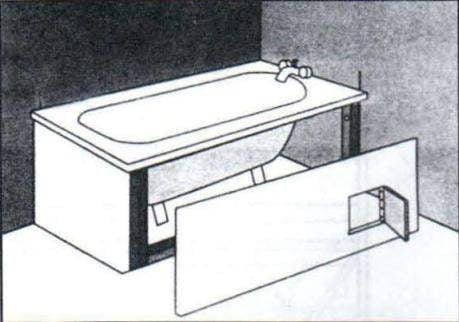
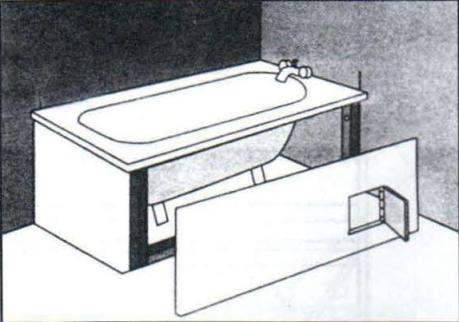
Fig. 7. The installation of the screen panels;
And start facing the screen with tiles
There is another option of their connection. It provides the ability to access under the tub at any time without dismantling frames. To do this, the wall mounted only a small frame and a big set and retained by magnetic latches in two places on the small frame and two on the right wall.
SCREEN
It used two chipboard panels 16 mm thickness or moisture-resistant drywall. A small panel the same size as a small frame. Big bar has the same height as the frame and the front long side. Its length is equal to the length of the frame plus the thickness of the bar plus the thickness of the small panel. Additionally, you must have loop and metal clip for window on the large panel. To provide, using an electric jigsaw will cut out a large panel opening for the viewing window from the location of piping and drainage. Calculate the exact location of the holes depending on the desired facing of screen. Fix the observation window with loops on the end holes and attach the metal clip on the opposite end in order to close it.
And finally – the final stage. Screw the small panel to the side frame. Place a large panel on the intended location and ensure that angles and stability. Secure the panel to the frame.
Complete facing the screen, using the facing materials of their choice.
B. VLADIMIROV
Recommend to read RAINBOW IN LAMP Psychologists have long determined that the health of a person, his emotional state during labor or active vacation influenced by the color of the surrounding objects, walls, floors. For... ON THE WAY TO THE RECORDS In 1988 there was a serious prerequisite to the beginning of work on items for ignition, and primarily on spirals candles glow plugs of internal combustion engines. This was due to the... Scroll back to top
 No matter how nicely it was not decorated the walls and floor of the bathroom – nice picture violates the gaping space beneath the bathtub itself, which is usually installed on legs or anything not covered. Not coincidentally, the industry recently began to put on sale a special panel device – the screen, which is mounted on the side of the bath making it like a single unit. Today, however, the baths themselves and their installation are not the same so that the design of the purchased screen is not always suitable in each case.