SECRETARY OF THE STUDENT

Many original equipment for studying and doing something they demonstrated this year in Moscow at the International exhibition “Technical means in educational process”. Special interest was aroused by the exhibits of the Yugoslav firm. “Slovenia forest”, offering to students a convenient and simple to manufacture desks, tables, cabinets, characterized by versatility and modern design. Some good decisions this furniture was used in the development of published below a small combined wall for the student, which is both a bookcase, a Desk, tool box and work space for making all sorts of crafts, cutting, burning, Assembly of radio equipment, woodcarving and other activities.

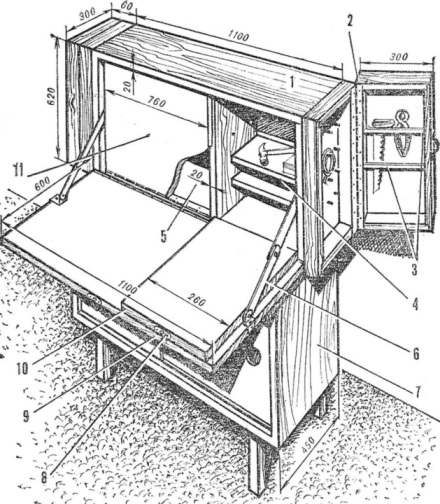
The proposed Cabinet-Secretary is especially convenient for small apartments, Taya, as it allows very economical use of space even in a small room under the area of the student. The removable cover of one of the sections serves as a table for cooking lessons at the same time opens up access to the shelves of notebooks and books. If you omit the cover for the second branch, will receive the working surface on which can be cut, planing, soldering, good on the open shelves of this compartment are placed the tools and the workpiece.

 
Panel left side of the Desk is a door that hides a shallow pencil case for brushes, paints; right — the same box for various tools, wire, duct tape and other things.
Cabinet-Secretary rests on a pedestal in which are stored the larger items such as albums, large or long tools, construction materials and details.
 
Considering that this wall consists of two mutually related but separate structural elements, they are in accordance with specific features of the premises used jointly or separately, that is, including the layout and placement of other furniture secretaire can be hung on the wall and a stand to place on the side next.
 
Fig. 1. Secretary
 
Fig. 1. Secretary:
 
1 — the case of the Secretary Desk, 2 — pencil case, 3 — melting 4 — section tool, section 5 for books, 6 — bracket, countertop, 7 — Cabinet, 8 — latch, 9 — top, 10 — right panel, 11 — left panel.

 
Fig. 2. Diagram of the wall of the student.
 
Fig. 2. Diagram of the wall of the student.
 
For the manufacture of such walls will require readily available materials and components: plywood or chipboard, planks, plywood, metal furniture and piano hinges, latches, metal or plastic u-handles, fasteners (screws, bolts).
 
The body of the Desk consists of two vertical and two horizontal boards that are connected on a plug-in round thorns with glue or screws, with the possible strengthening of the metal corners from the inside, before installing the rear panels of hardboard or plywood.
 
The lower horizontal shield with hinges attached flip cover — table top made of furniture Board or sheet of chipboard. In a horizontal position, keep it located but the sides of the crank arms of narrow steel strip. For fixing them on the top and vertical panels there are metal feet-corners.
Cover the left section and the right operating panel, inner surface covered with a protecting sheet material such as linoleum, can also be attached with hinges.
 
Shelves both branches are executed PZ well-treated boards or chipboard. They don’t have hard mounts, and just rely on recessed in the vertical panels of a wooden or plastic spikes. Holes they bore in pairs at different heights, that allows to change the level of their location.
 
R and p. 3. The main parts of the secretaire
 
R and S. 3. The main parts of the Secretary:
 
1 — plywood wall, 2 — horizontal panels enclosure, 3 vertical shield, 4 — stationary frame, 5 — movable frame, 6 — frame cover, 7 top, 8 — loop 9 — left panel (right panel not shown) 10 — bracket 11 — parts.

 
R and p. 4. The basic details of the cabinets
 
R and S. 4. The basic details of the tables:
 
1 back wall, 2 — shield, horizontal, 3 vertical panels, 4 — area, 5 — hole-stick, 6 — door, 7 — legs, 8, 9 — bars of the stand, 10 — clip connection secretaire with cupboard.

 
Side cupboards-lockers easier to patch on the vertical end shields of the secretaire. For this size the side panels are made of two frames: one attached to the panel, the second closed with a sheet of plywood on a piano hinge to the first, since it will assume the role of a door of the canister. Inside, there are plastic pegs, pins (can be just screws, nails) or narrow strips, depending on the destination. Frame-the door is in the closed position, is held by the magnetic latch; the same furniture or latch fitted to hinged panels.
 
The lower part of the mini-wall — Cabinet — structurally similar to the top: the vehicle’s four panels of the furniture Board — two horizontal and two vertical, United on the spikes, and the inside is still metal corners. Only width of all panels is considerably greater: stand a few extended due to this of the under Secretary, and is an additional support for the flip cover. The rear wall of the cabinets from plywood or hardboard. Inside are shelves made of boards. The face of the Cabinet is closed by two sliding doors from plywood.
Assembled Cabinet rests on a stand with legs formed by the longitudinal and transverse bars embedded vpoldereva in the legs and fastened them with screws on the glue. Thus obtained, the rigid frame can be used independently or fastened with screws to the bottom of cabinets.
 
 
Exterior finish of the Secretary I of all its parts depends on the materials used; in this embodiment, with the furniture boards — trimmed cloth and covered with a light furniture Polish.
 
After the Assembly work and installation of all main parts of the surface of the Desk carefully prosceniums and finally varnished.
V. STRASHNOV, architect

Recommend to read

  • UNDERWATER DIGGERSUNDERWATER DIGGERS
    Upcoming XXV Congress of the CPSU will summarize the implementation of the ninth five-year development plan of national economy and chart a new rollers of Communist construction in our...
  • NEITHER OF PELINCE, NOT A SPECK OF DUSTNEITHER OF PELINCE, NOT A SPECK OF DUST
    To save yourself from cleaning sawdust, dust after drilling in the wall, before beginning work, secure the paper on the sticky tape just below future openings.