And you can go the other way, which offers Hungarian magazine “Earmaster” opening the secret: as simple techniques to achieve the desired result. For example, in the manufacture of coffee table for the Seating area in the apartment or in the country.
Since the main difference from the modern design of the tables in figured legs, with their technologies and start description.
Curly legs don’t have to stick to: they “sculpted” from straight wooden beams section 70×70 mm. As they say sculptors have blanks you need to remove all the excess to give them the desired curved shape. To achieve this will be of simple techniques, available not even a very prepared wizard.
The scale mesh is made of firm cardboard or thin plywood template of the profile of the future bent legs.
The main secret processing bars in the following. All four blanks are added together and any way pulled together into a single unit for simultaneous processing. Top future nadelwald and legs are chopped off with a chisel so that the thickness of the bars in this place was reduced to 43 mm. the Resulting step also nadelyaet blanks in several rows in phases and is handled by the chisel, instead of the sharp edges turned smooth curve in accordance with the template.
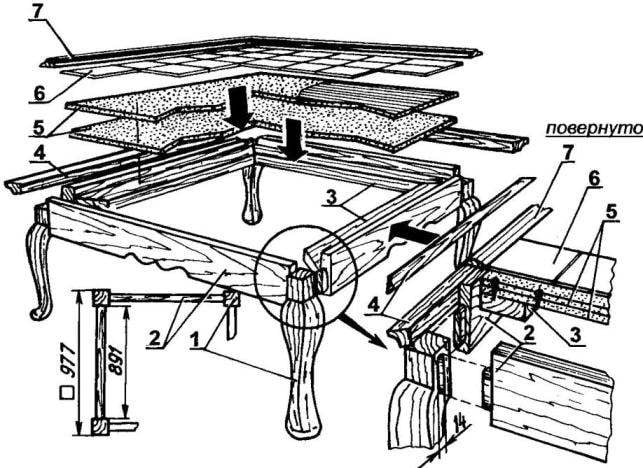
Table-retro:
1 — bent leg; 2 — side podstolny frame; 3 — anchor bars table tops; 4—bars of the frame; 5 — sheets countertops; 6 — tile; 7 — detail of the frame of tile
Pattern feet on the grid
Block legs with nadelmann:
1 template; 2 — stocking feet; 3 — nadpisy the top corner of the legs; 4— nadpisy the lower curve of the legs
Unit legs when cleaning surfaces:
1 — leg; 2 — the rope of ties
Go to the other edge (the bottom of future legs), and, taking approximately 30 mm, again do a number of cuts, the depth of which is specified in the relevant section of the template.
Napylenie parts are also neatly chopped off with a chisel.
Further, the unit of workpieces is released from the coupler, and each of them is placed on the same side, after which the entire unit is tightened again to continue processing. And she repeats the previous operation nadpisywanie and chipping excess material.
The result is a workpiece of the legs, which have two sides of the figure, and two will remain flat. These faces alternately, all four legs again United into a single unit and are pulled together at the top and bottom for finishing plane, a plane & sandpaper.
Processing block plane
Scraping the surface of the bar
Grinding sandpaper
Podstolny frame
After making the legs, you can start harvesting parts exploded of the frame. It can be simple, as in all of the tables under the usual panel Board counter tops, or combined in Association with an unusual multi-layered solution to countertops.
The main side frames made of boards 25 mm thick; they are notched at the grid. To connect with legs at the ends of the sidewalls leave a ship whose form in the legs and made the return grooves. Docking — using glue (carpenter’s, PVA).
On the inner side of the frame to each side with glue and nails to fasten the supporting bars for the elements of the tabletop.
Countertop
As already noted, the top can be easiest in the form of furniture Board. But presented in the figure continues a kind of stylized period furniture. To do this, she runs a multi-layered, with the surface finish of beautiful tiles.
The lower layers of the top sheet of chipboard or plywood 12 mm thick. They are placed on the support bars inside the frame, flush with the top edge of its sidewalls. Outside to the side is also flush with their upper edges are attached to the bars of the frame. And on them — bars of the frame for the tile so that the tiles lay in emphasis to them.
The tiles can be glued or laid “dry”, making it easy for the flooring and possible replacement in the future, if individual tiles become damaged.
Finish
Ceramic table top surface can be plain, smooth or patterned (e.g., simulating a tablecloth).
All the wooden parts, especially the front surface prior to Assembly must be carefully scriped and then polished with sandpaper with decreasing grit sizes.
Depending on the environment wooden surfaces before varnishing to preserve their natural light and use of light furniture Polish. Or “to carve walnut”, pricesnew stain dark and varnish. In both cases, the coating is performed several times with the obligatory intermediate drying and additional polishing with special pastes.
Recommend to read THE BOOTS ON THE RACK… Indeed, I may call it depicts the coupled stand, thanks to which the boots do not stand and hang. The advantage is obvious: the shaft of such fashionable footwear do not crumple, because... CAR AMO F-15 CAR AMO F-15. Scale model 1:25. Car AMO-f 15 (1924-1931) was the development of the Italian truck FIAT-151ter. The first ten cars were collected from 1 to 6 November 1924 and was...
 Antique furnishings you’ll find out soon in a special form and, in the first place, legs. In the old days, Cabinet makers loved to make them curved, not now. At first glance it seems that to make such difficult and not to everyone under force. But do the same people, and without modern mechanization, by hand, simple tools. So, you can try to repeat the techniques of the old masters.