 I want to share the experience of creating bugarcic (for your girlfriend of course). Thought of it as a wedding gift to my fiancee, because I wanted to make something beautiful, unique, comfortable, and, of course, quickly, as pre-wedding chores do not leave time.
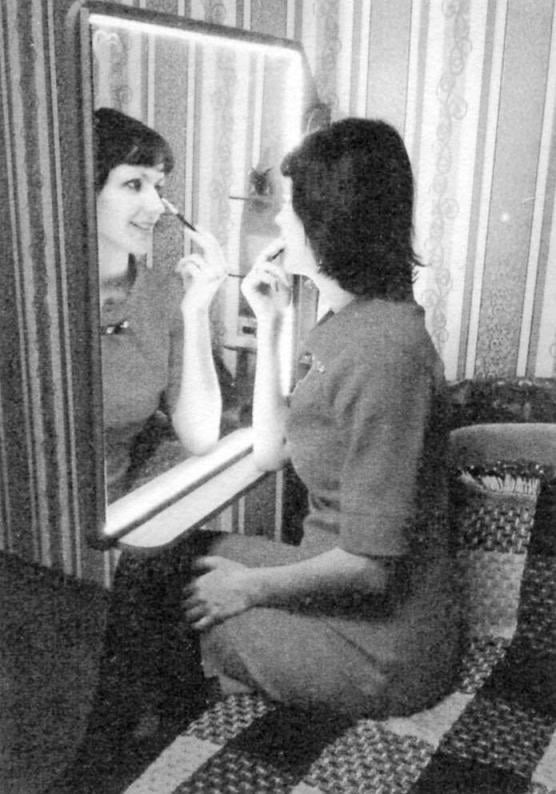
Because the full boudoir in the room was missing, had to come up with such a compact console (see picture). The special feature of this design is that boudoir can be used without getting out of bed, only turning the fold mirror by 90°. The main parts cut out of laminate furniture (“Milan walnut”) laminated edge. It consists of 4 basic parts (A), (B), (C) and (d) + mirror surface (not including a shelf). Side (A) and (B) not only serve to mount shelves, and add rigidity to the entire structure.
The top three shelves of glass thickness 5 – 6 mm with rounded edges and secured with three shelf brackets each. The bottom four shelves form a decorative niches for different small things. For mounting the boudoir to the bed load part (V) is a projection with dimensions of 500×300 mm, which is put behind the headboard and is fastened thereto 10 short screws.

Boudoir in the “standby” position, the mirror is deployed along the wall, led strip — disabled
Side (A) and (B) have a screw-legs, which gives you more to rebuild the emphasis of the whole structure when attaching to the bed. In addition, if necessary, move the bed, so as not to scratch the floor, the legs can twist, and the boudoir as though “hangs” on the bracket to the back of the bed.
To the carrier (C) on the piano hinge is attached to the leaf (D) for a mirror, which together with a mirror is a pretty solid piece that was even comfortable. The fact is that when you turn the fold by 90° (along the bed) the frame (B) together with the headboard slightly bend under the weight of sash (G) and to fix the latter is not required. That is, the leaf remains always in one of two selected positions: either the mirror is deployed along the wall of the boudoir, not used, or the mirror is parallel to the bed-boudoir use. The mirror itself is mounted on double sided tape. It is better (as in the described case) order processed in the furniture workshop (the same engraving, you can choose the mirror) with glass shelves.
The AP (G) has also a small shelf under the mirror for small items and has a perimeter around the mirror, made of slats with beveled edges. The perimeter is used for fixing led strip warm (with the temperature not exceeding 3000K) light. The ribbon is attached with glue “Moment”, as “native” sticky layer did not inspire confidence. For an accurate view of the tape had to be cut into segments for each of the 4 sides of the perimeter. Pieces of tape on the edges of the solder fine stranded wire, the wire hiding behind the corners of the mirror, there is a gap due to the double-sided tape. Get bright shadow-free lighting in a real dressing room.

The design of the boudoir

Wiring diagram led power of led strip
The segments are electrically connected so that they form two parallel branches, which derive a thicker stranded wire on the lower right corner of the perimeter. Next in this corner we drill a diagonal hole with a diameter of 3.5 mm in the sash (G) and through it the power lead (+ and – supply) goes to the upper edge of sash (G). Wire fastened to the edge of the miniature mounting brackets, and mounting of the sash leave a small allowance that the cable strongly do not bend during everyday use of the boudoir. Subsequently, in place of the stock I installed a tiny electric connector, which will facilitate the dismantling of the boudoir in future permutations.
The power supply unit (PSU) I wanted to make miniature: and that is not conspicuous, and was, so to speak, at hand. The best option is to hide it with the switch in the doorway behind the headboard (just above the mounting ledge of the bearing (In). It turned out that the used segment of the tape consumes 1A of current at a voltage of 12 V. in Order not to build the PSU from scratch, it was decided to take two ready (one for the desired voltage and current did not styskal), to connect them in series and further to stabilize, as the LEDs only need a stable power supply. The switching-mode power supply from a computer of candles: БП1 is based on 9 V At 1.5 A; БП2 – 5 V At 1.2 A.
When debugging scheme invented in bridging mode, when enabled only БП1. In this part of the voltage is lost on БП2, and the backlight comes only 7.6 V. In this mode, the ribbon shines in the darkness the dim pearl chain and boudoir transforms into a chic night light!
Make an electrical circuit connected with explanations. Stabilizer -type ROLL – on voltage of 9V and current of 1A. Specially taken for anything less than 12V voltage, for the possibility of its regulation with R1 (more precisely allows to set VOUT). To ROLL not worked to the limit, it is amplified by the transistor VT1 is mounted on the radiator.

Boudoir in the working position: the mirror is deployed along the bed, led light strip included
Board БП1 and БП2 removed from factory buildings and for better cooling added to the standard (size 80x80x26 mm) soldered box with holes. Power keys (PWM circuits) БП1 and БП2 attached additional radiators.
The scheme does not have a mains fuse, as in БП1 and БП2 they already have.
Electrolytic capacitor C1 suppresses flash led strip switching switch.
Want to replicate this design suggest:
1. Look at the design of your bed (perhaps due to the different shape of the back will have to change the mounting protrusion and its height).
2. Look at the girl in a sitting position (and they still love the foot to foot to throw) the fold must not rest against the knees may have to adjust the height of the suspension leaf, and hence the original drawing of the boudoir. It’s also important that the upper part of the mirror was above her head for 5 – 7 cm, or visual lack of space the top makes slouch.
3. Look at the interior of a room: is it possible for a more harmonious look will have to choose a different color and pattern of the laminate.
Good luck and success!
Mikhail LAVRUKHIN, city of Amursk, Khabarovsk Krai


