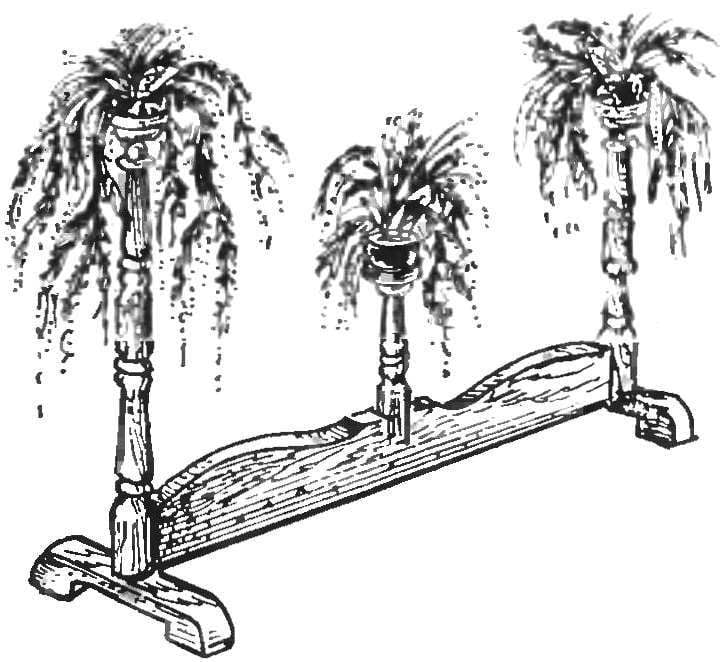
 Most people, especially women, like to decorate your home potted flowers. But their placement is used mainly sills. Although for many plant species, this place is not quite suitable. And to hide such beauty behind the curtains is not very reasonable. Therefore, it is better for the flowers to make a stand, such as the one suggested below.
The material of all parts of the stand — the tree is deciduous (birch, aspen, Linden, etc.) and softwood (e.g. pine).
Podtsvetochniki racks can be of different height. For this purpose they are collected from two parts (1A and 1B) or only one (1A). In addition, the length of the struts can be changed by reducing (or increasing) size 90.
Ring in the design of podtsvetochniki only need to stiffen the sites. If the site is to produce boards of greater thickness, consequently increasing the depth of a blind hole (nest) under a tip, you can do without rings.
In addition to the billets listed in the specifications, will need and materials: abrasive cloth, glue (PVA), solution stains, furniture varnish, screws.
It is clear that for making a stand for flowers will need tools like hand: handsaw, plane, chisel, rasp, drill — feather with a diameter of 20, 36 and 50 mm and a normal — diameter 4 and 5 mm and electrified: an electric drill (preferably drill press) and it would be good — jigsaws. Since the stand has turned parts of wood: racks, platforms, rings, not to do without a lathe (e.g. school STD-120 — see the post about it in the “M-K” № 9, 2005). For turning steel weights will need cutting (although these items it is possible to cut with a hacksaw from a suitable round or hexagonal rod).
For the manufacture of racks (POS. 1A and 16) it is necessary to select five bars section 55×55 mm: three — a length of 440 mm, and two with a length of 410 mm. Long workpiece to grind as per drawing 1A, and those. shorter man — drawing 16. The difference is they have a small — parts 16 in the lower end of the socket, and the part 1A — round tongue and even flatted with two blind holes with a diameter of 8 mm for dowels.

Stand for flowers:
1A — main stand (block 55×55, 3). 1B additional hour (bar 55×55, 2); 2 — deck (Board s40, 3). 3 — leg (timber 60×50, 2); 4 — jumper (Board s30); 5 — thrust ring (Board s20, 3 items); 6 — big Bob (steel, range 36, 4 items); 7 — small weight (steel, round 20, 6 PCs); 8 — screw (L70, 2 pieces); 9 — dowels (Ø 8, L60, 4 PCs.)
Billet rings (POS. 5) are cut from the Board cut the “twenty” with a minimum width of 110 mm with a jigsaw or manual hacksaw. Edge of the workpiece pritachivajut on a lathe at an angle so that one side of the yard turned a circle with a diameter of 100 mm, and on the reverse — a circle with a diameter of 80 mm. then the ring center of drilled hole with a diameter of 20 mm under the tongue. To cut this conical part and a jig saw, setting the blade at an angle of about 35 degrees.
Of the workpiece (POS. 2) are cut also from the segments of boards, but thicker— “sorokovik” and larger not less than 200 mm and also pritachivajut on a lathe: first edge, and then from one end face recess with a circular collar. Bottom pervym drill is performed blind hole under the tongue. Hole depth is slightly greater than the height of the spike.
The stem (POS. 3) is cut from planed timber with a section of 60×50. If the timber just sawn, it is necessary to provide allowances for planing. The jumper (POS. 4) is cut from a length of Board thickness of 30 mm and a width of 90 mm.
The technology of manufacturing the legs and bridge of the same type: the selection of blanks, trimming them to size, handling the curves with a jigsaw, a chisel and a rasp, marking and drilling holes.
After fabrication all parts are sanded with emery cloth.
In both parts below, to improve the stability of the structure, in a pre-prepared holes are inserted steel cylindrical weights. They can carve on a turning metal cutting machines and can be cut from a suitable rod of soft steel
The Assembly of the product begins with the installation of glue-extreme (long) stands on the legs. Then fix the crossbar on the uprights with glue and dowel, and on the legs with screws. Next step is to install glue-medium (short) rack. Then on the top spike of each rack to put on the ring and then to the surface a circle with a diameter of 100 mm and a thorn to stick the stand. Place glue joints should be sanded, and then coating the finished product with stain and dry it. In conclusion, assembled products it would be nice to ulcerate.
V. PUSHKIN, Kaluga


