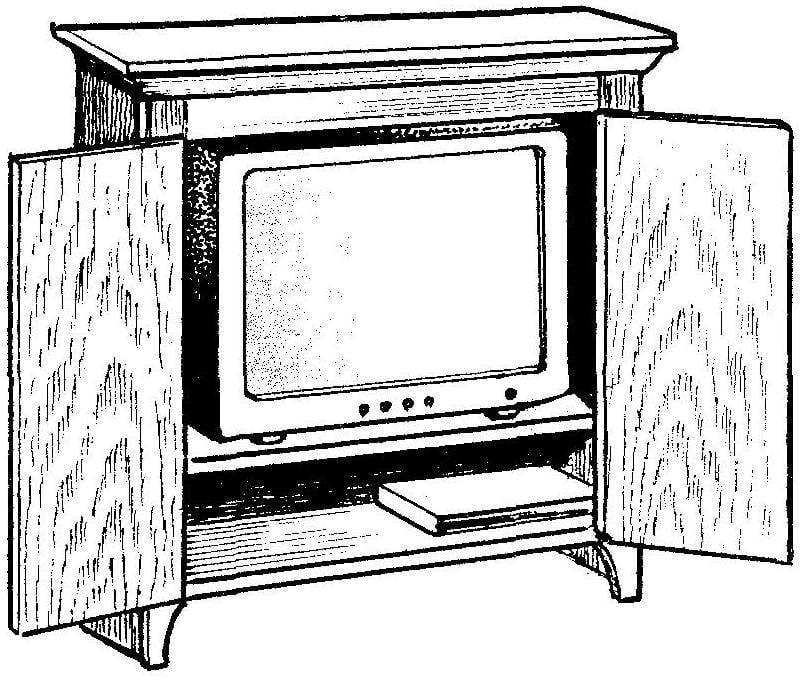
 To protect children from excessive TV in the absence of parents, it is easy to make a special lockable bedside table-wardrobe, in which you can “hide” not only TV but also other equipment, e.g. a VCR. If necessary the doors can be arranged in lock — mortise, slip or hinged.
Simple Cabinet design and available materials make it accessible to manufacturing even by forces not very prepared wizard. This is easy to see, acquainted with the device of the wardrobe, published in the English magazine “the illustrated Mechanics”. Judge for yourself.
Materials
Sheet of chipboard or thick plywood, wooden planks and plain metal hardware for furniture — here practically and everything that you will need someone who will be interested in the considered design.
In stores available ready-made furniture panels, representing the same particle Board covered with veneer, plastic or a solid color. They are very convenient for making home furniture as eliminate labor-intensive processes of finishing workpieces: vyskazyvanie, polishing, impregnation and varnishing, and the skill and thoroughness of which depends on the end result.
The only thing will require details of the finished boards is edge processing workpieces after cutting the panel to desired size. Usually they are finished by gluing strips of veneer with wood, casein glue or PVA. But to simplify the process, these edges can be decorated are also available in special self-adhesive stripes of thin plastic or, at worst, just painted with oil or nitro the right color.
The machining of workpieces it is advisable to perform before they build: then the final finish of the product will only fix minor errors encountered in the process.
Basic details
The Cabinet consists of a body with doors, decorative cover and inner shelves. From similar designs of furniture it is characterized in that it has a solid back wall. Instead of the usual single sheet it is comprised of two separate panels with spaces between them. This is because when the TV is on, — the heating air from the rear of need to have an outlet for venting, and what are the cracks of the rear wall.
The second difference concerns the front side of the Cabinet. In such modern furniture that would be just two doors hung on piano hinges directly on the side panel. But the obverse side of the Cabinet is reminiscent of antique furniture: the doors are mounted on U-shaped frame of the front of the case, consisting of three planks connected by using plug-in round thorns. In the same way the frame is attached to the side panels, between which the rear side panel set backs.

The main elements of the Cabinet:
1 — side panel of the housing (2); 2 — strips of the front frame; 3 — bottom shelf (bottom); 4 — top shelf; 5 — door; 6 — hook; 7 — loop; 8 — cover; 9,13 — curb strap; 10 — strap lining; 11 — spikes (pins); 12 — panel backrest
Retro made and the cover of the Cabinet, which is a smooth bar resting on the sides of the body with which it is connected by the same plug-in round thorns. The signs of antiquity it imparts an ingenious solution to the notched frame edges of the cover. Figuresthe is achieved by using a curb strap… from the floor, usually covering the gap in the joints of the walls with the floor. In the absence of a suitable prepared kerb trims bezels cover may be composite, as shown in the figure. The segments of this bar wrapped around three sides of the lid, and on top of them superimposed, smooth placket, and a rounded outer edge. The latter also performs a decorative and practical function: is a fence that protects from rolling off cover any round objects.
The shelf inside the housing and rear walls are secured to the sidewalls by means of screws (or nails). Other details of the construction illustrated in the drawings and specific comments are not required.
Assembly
It is better to start with the connection of the sidewalls of the hull with shelves — in this case, immediately turns hard construction, which will be easier to work with.
From the harvested strips going front U-shaped frame body (spiked with glue carpenter’s or PVA). It connects on nails with side walls between which are installed in the rear panel of the backrest. They can be attached with screws, nails; if you use push-pins (with glue), then backless is better to install at the start of Assembly, simultaneously with the connection of the side walls with shelves.

Beginning Assembly Cabinet:
the connection of the sidewalls of the hull with shelves (upside down)

The installation of the back panels of the wardrobe
While core elements of the case are aged before the adhesive sets, you can do a cover of the Cabinet. At first, she enclosed a curb strap (or integral), attached to the lid just small nails (without hats). Then there is a pad of smooth strips in the same way, with a small overlap in relation to the curb strap.
Now, the assembled cap need to mount it using false spikes or screws. There is another version of the cover: it is attached to the first side, and then enclosed these items.
Billet doors are hung in last. This can be used as piano hinges, and decorative overhead (such fortochnyh). Handle and lock (or hook) is optional, and the choice of contractor design.


