In any, even equipped with mini-“Kirovtsy”, “Kubots” and other high-class equipment, individual farm, one probably cannot do without manual agricultural tools. Having passed through the centuries, they, in essence, have changed little. And no matter how technical thought struggled, no matter how design pleased, we still have before us a “carrying container with handles and a running wheel” — a wheelbarrow, a “blade tool for digging, scooping, loading and pouring bulk bodies” — a shovel, a “hoe tool” — a hoe…
Our magazine has written more than once about how to create such a necessary arsenal for the garden-vegetable garden (see, for example, No. 4’85, 6’91, 5’92, 7’92, 9’92, 9’93). Today’s thematic selection is based on publications from the Hungarian “Eszermester”. We are sure: the proposed ideas and technical solutions will appeal to our readers. Especially since implementing what you like will be quite within the power of anyone, even a beginner DIYer.
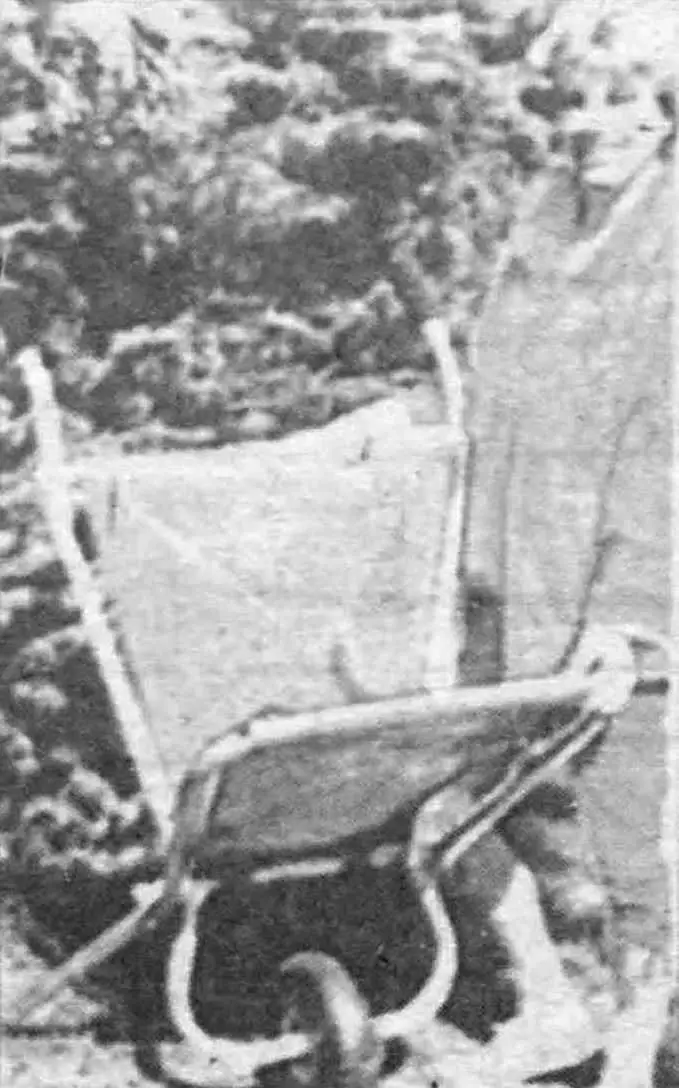
FOLDING WHEELBARROW
There are many folding structures. The same ladies’ umbrella, for example. Or, say, the well-known folding bed. But for a fairly capacious garden-vegetable garden wheelbarrow to pack up like a “book”, or even an “accordion”…
Meanwhile, DIY enthusiasts have developed even such unusual, it would seem, designs. One of the successful variants of capacious, compactly folding wheelbarrows is offered to the attention of readers.
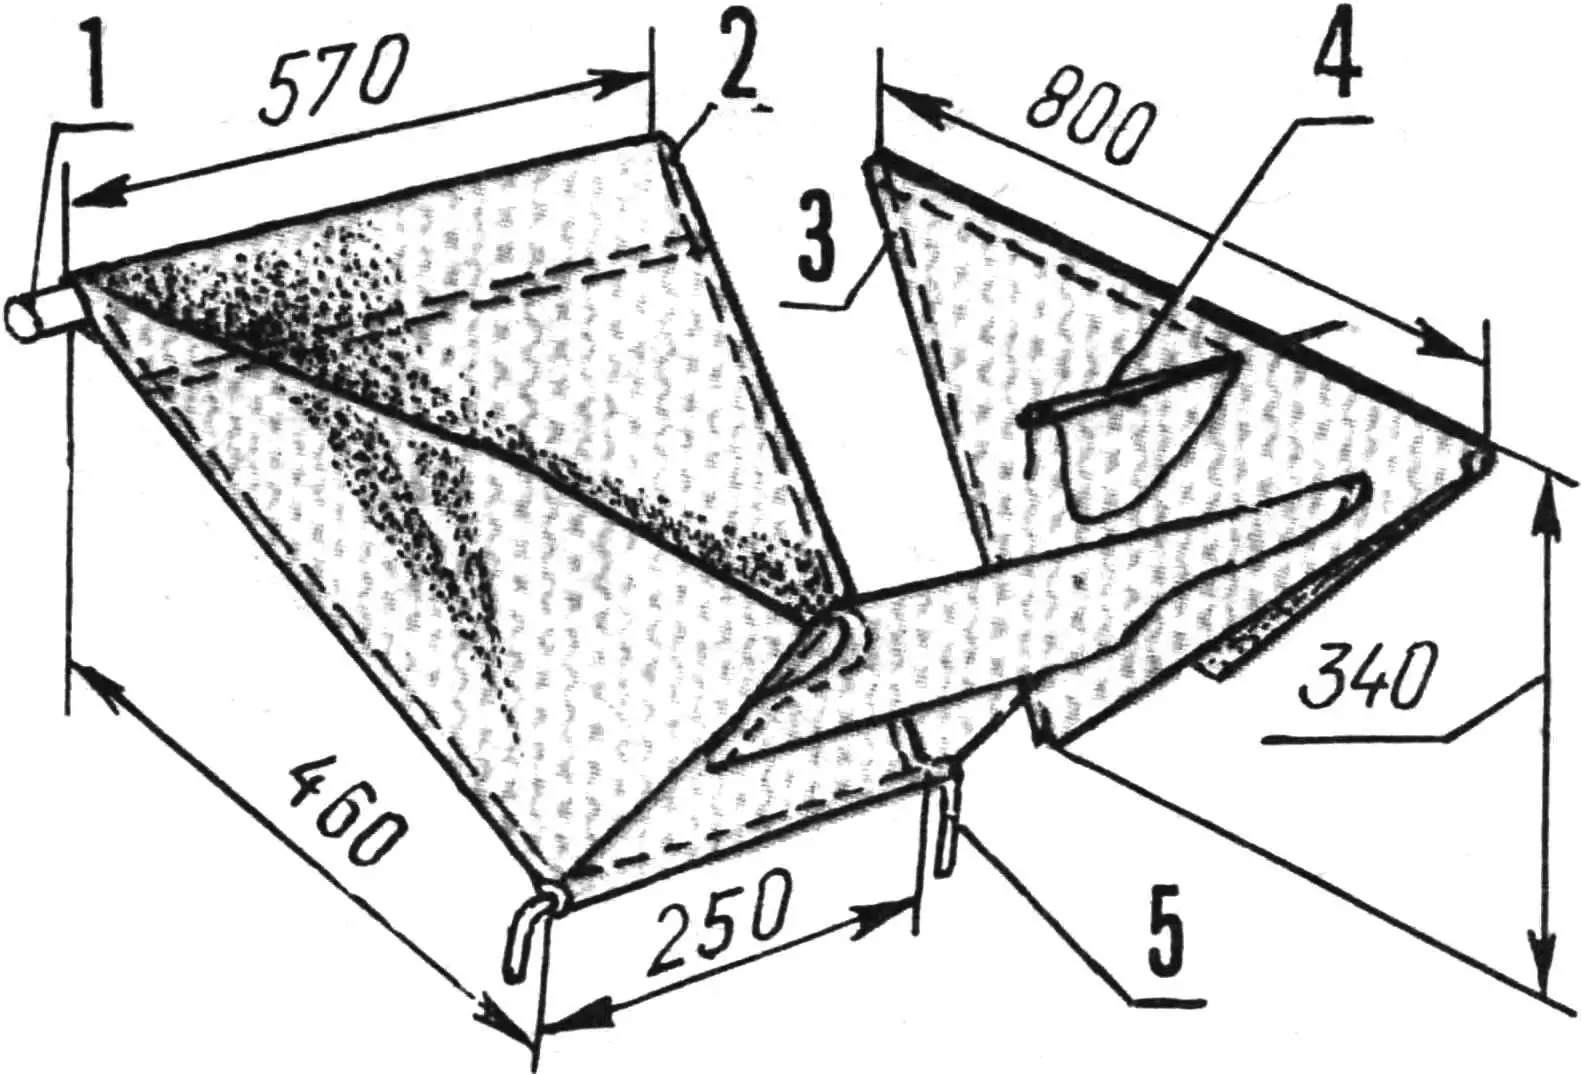
1 — frame crossbar spacer, 2 — fabric back-base (from canvas, development — double trapezoid), 3 — double sidewall (from canvas, etc.), 4 — side stitching with needle and strong thread, 5 — lower stiffening rib (from a 5-mm steel rod segment).
No scarce materials are required to make this, undoubtedly useful, thing. Perhaps pieces of cheap but strong fabric like canvas and segments of steel water-gas pipes with an outer diameter of 20…35 mm. Moreover, instead of the latter, one can limit oneself to duralumin ones — from an old, worn-out folding bed.
Tubular blanks are bent as shown in the figure. The required configuration can be achieved by other methods well known to our DIYers. For example, perform pipe bending by first filling their internal cavity with river sand. Or — with water followed by exposure to frost, so that the ice formed inside prevents improper crumpling, or even breakage of the walls of the blanks.
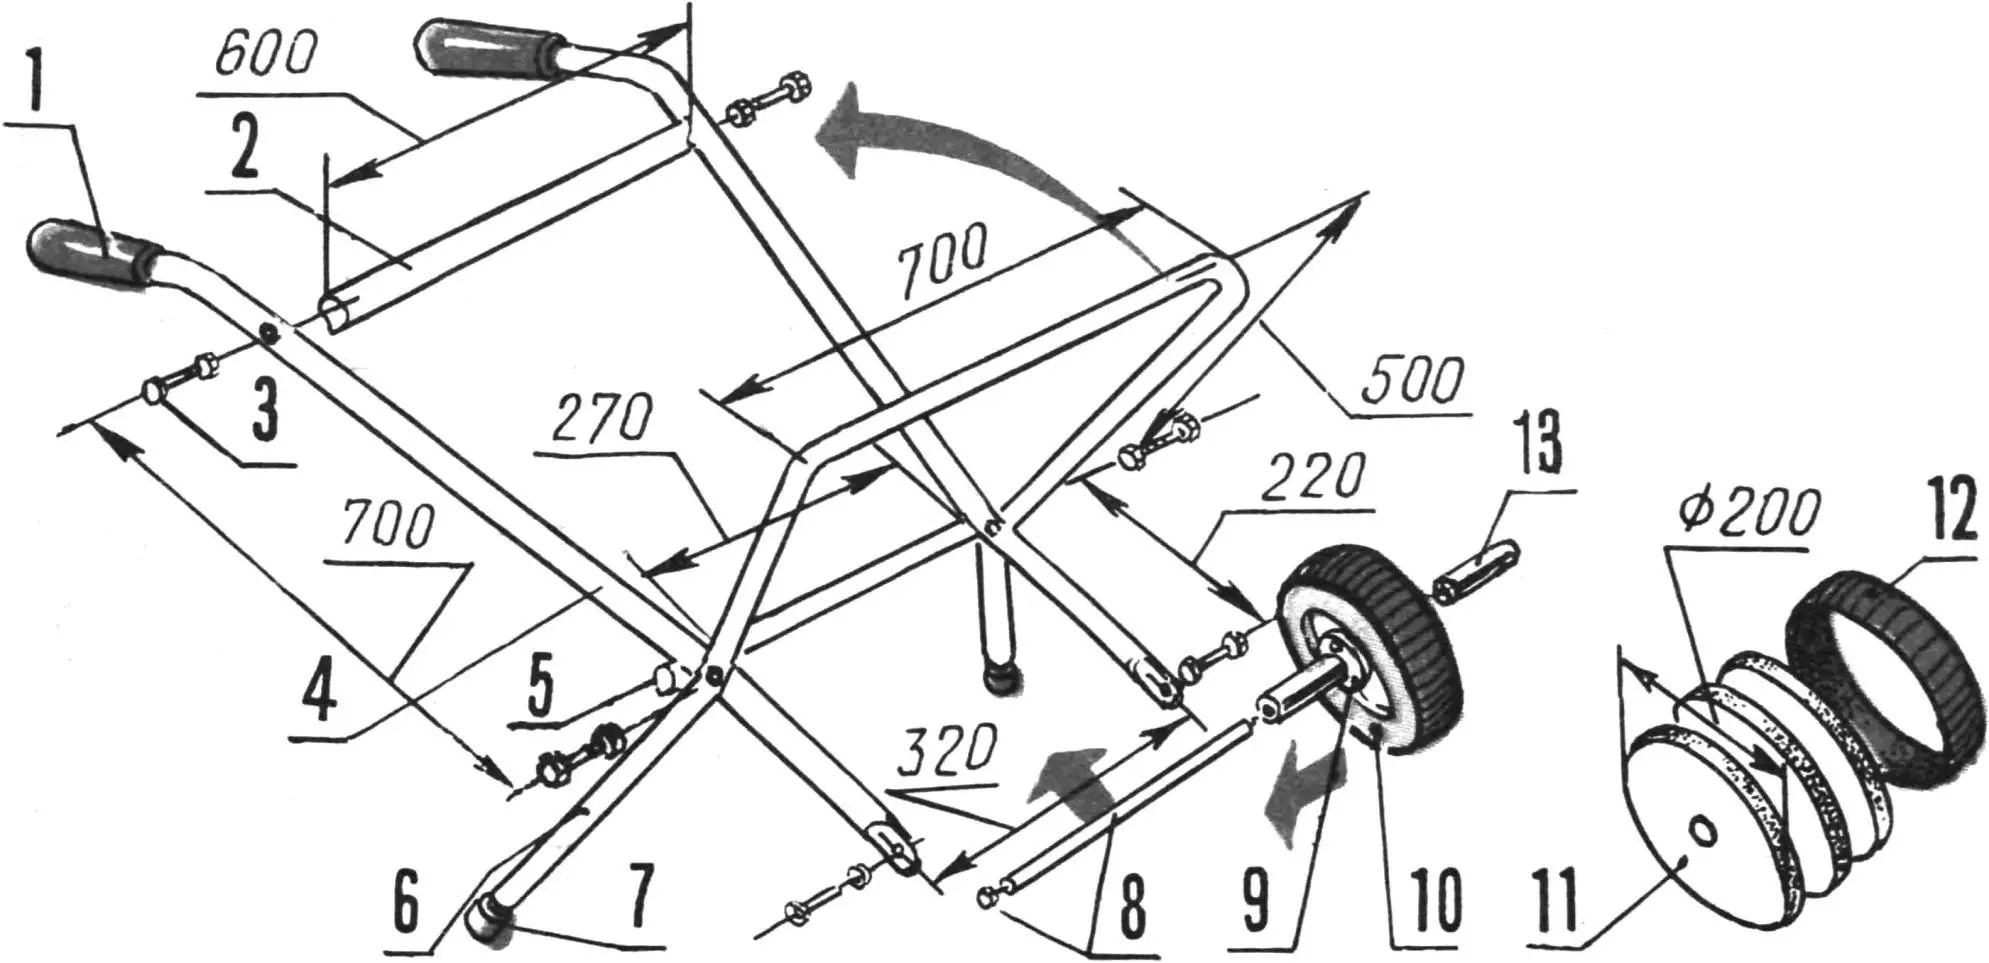
1 — handle (from 110-mm segment of rubber tube of suitable diameter, 2 pcs.), 2— spacer crossbar (from segment of 27×2.75 water-gas pipe, with mounting — M10 — plugs at the ends, 3— M10 bolt with washer (6 pcs.), 4— longeron (from segment of 27×2.75 water-gas pipe, with flattened lower end and holes Ø 10.2 mm at the mounting location, 2 pcs.), 5— stop crossbar (from segment of 27×2.75, water-gas pipe), 6— swivel U-shaped base (from segment of 27×2.75, water-gas pipe), 7— plastic plug (2 pcs.), 8— axle with two mounting end holes M10 and washers at the ends (from segment of metal — ST5 — rod Ø 21.5 mm), 9 — crimping washer (dimensions at installation location, 2-mm St3, 2 pcs.), 10 — tension rubber tire (from segment of bicycle wheel tire), 11 — wheel disc (20-mm plywood, 3 pcs.), 12 — metal rim (60-mm segment of 205×2.5 pipe), 13— limiter bushing (130-mm segment of 27×2.75; water-gas pipe, 2 pcs.).
The task is significantly simplified when using parts of the tubular frame from a folding bed. In essence, these are already ready bent parts for our wheelbarrow.
The assembly itself, as practice shows, usually does not cause any particular difficulties for anyone. Connections are standard threaded. The required strength of fastening the longerons with the spacer crossbar is achieved by using tightly driven plugs, in the center of which holes M10 are prudently made.

The wheel unit can be taken ready-made — from decommissioned agricultural machinery. Some successfully adapt a wheel from a children’s scooter, mini-bicycle and similar worn-out home “clockwork mechanics” to the wheelbarrow design. However, a homemade one also looks good and works reliably: with a composite disc, metal rim and “rubber” from a piece of bicycle tire. Tightly pulled together by crimping washers with four M6 bolted connections (the latter are conventionally not indicated as a separate item in the figure), it rotates freely on the axle. And the play is “taken up” by limiters installed on the sides.
The cutting of the covering material (canvas, for example) is so simple that it is also not shown as a separate development in the illustrations. As for the technology of making a fabric body, it is presented with sufficient clarity, I think, in the figures.
“BLADE” GETS UPDATED
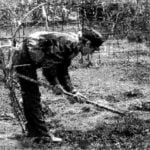
Cultivating thoroughly turfed land with an ordinary spade shovel is a pleasure, as they say, below average. However, things will quickly go smoothly if you equip this “blade tool” with a screw-on corner knife (see fig.). And make the spade blade itself perforated by drilling 8…10 holes with a diameter of approximately 20 mm in it.
A knife sharpened in a special way (at an angle of 25 degrees) allows combining turf cutting with grinding weed roots and loosening the soil, and the “air lubrication” formed due to the holes prevents wet earth from sticking to the spade blade.
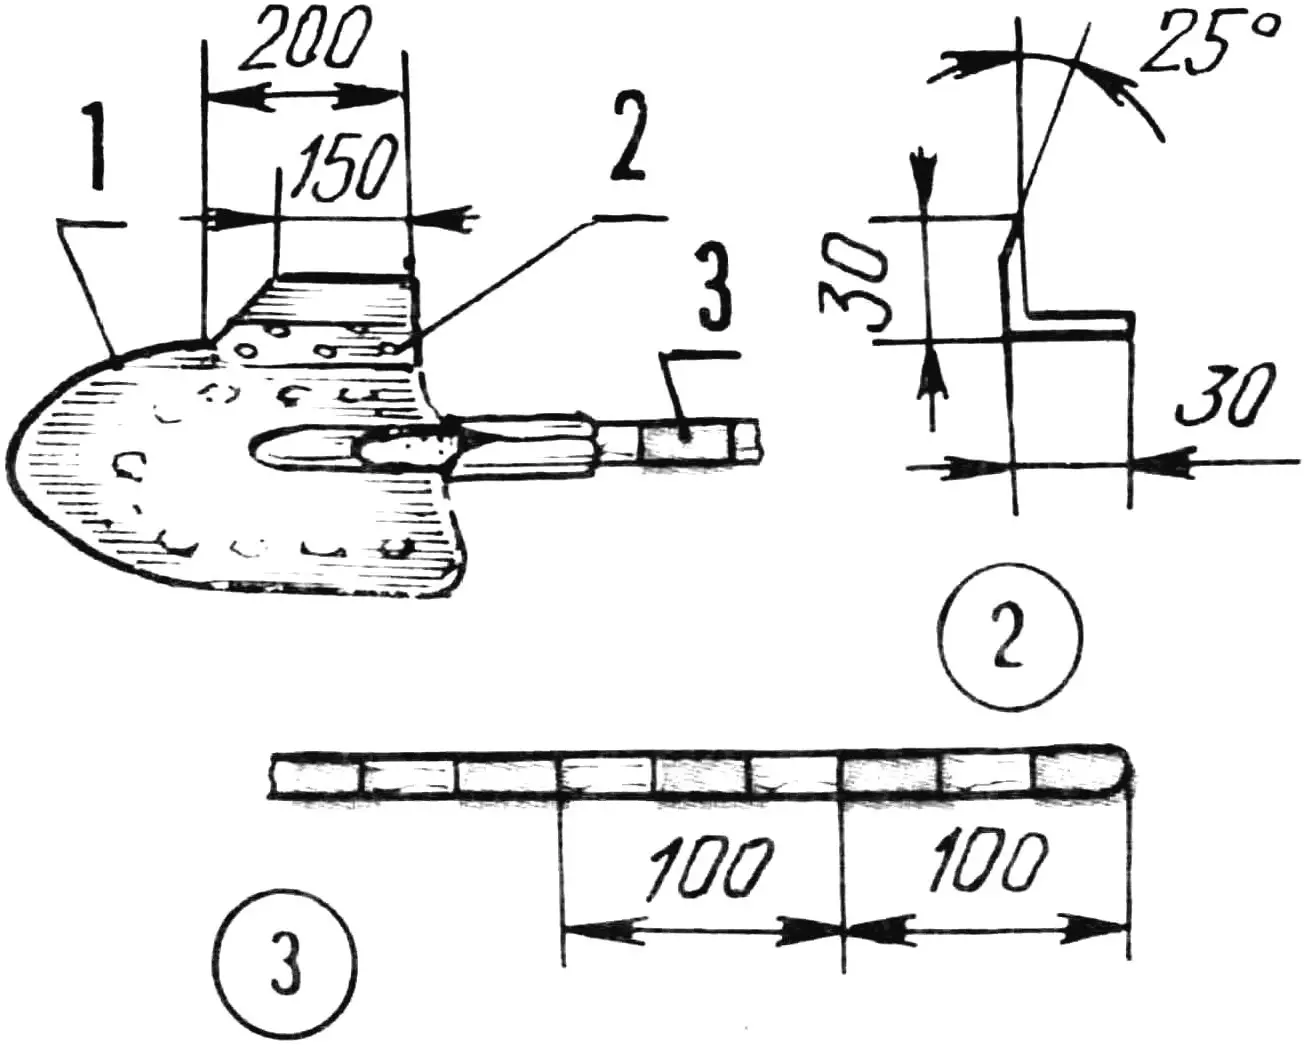
1 — spade blade with nine holes Ø 20 mm made in it, 2— screw-on steel angle turf cutter, 3 — handle, which has also become a convenient “ruler”.
It is desirable to slightly increase the length of the handle — there will be more opportunities to change the position of the hands during work. And that means — less fatigue from monotonous work will be felt. The surface of the handle should be thoroughly “sanded” with sandpaper followed by charring with a blowtorch, so as not to rub calluses on your hands in the future. Well, if you also apply markings in the form of 100-mm alternating stripes with charring, then such a shovel can be used to perform the simplest measuring work. For example, when planting trees, laying out beds.
FROM A BROKEN HACKSAW
The hoe that comes from it has additional capabilities not inherent in a “factory” one. It will be enough to simply turn this homemade tool around the handle by 180 degrees, and you have in your hands — an original cultivator with a toothed cutting part. The sharpness of sharpening here is needed not only and not so much for easy cutting of weeds, but for “sliding” entry into the ground. Weedy plants are then pulled out by the roots, and the soil is well loosened.
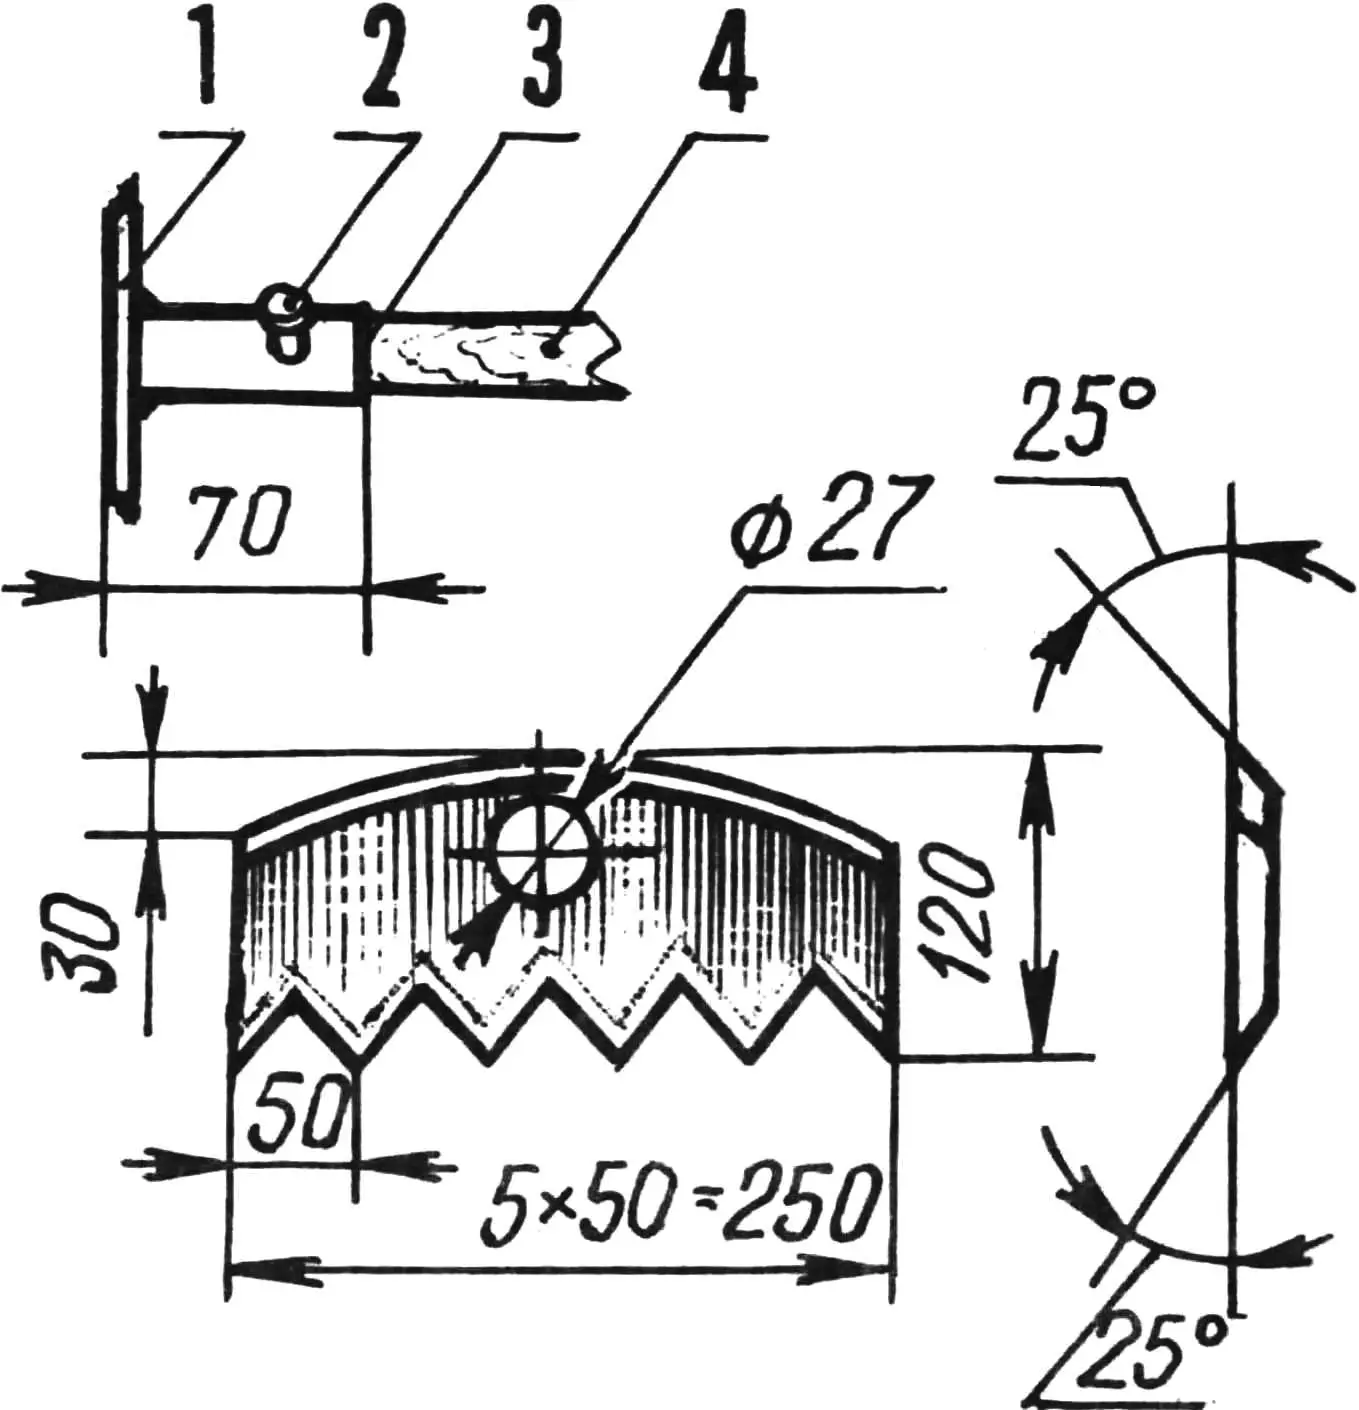
1 — figured working blade (from an old hacksaw blade), 2 — screw, 3 — welded nozzle (from segment of 33.5×3.25 pipe, steel water-gas), 4 — handle.
True, making such a hoe-cultivator requires some welding skills. After all, you need to weld a nozzle to the blade. But, as practice shows, everything pays off a hundredfold.
AND A LOG — INTO ACTION!
The most primitive, it would seem, tool — a roller. But when performing agricultural work, it is also indispensable.
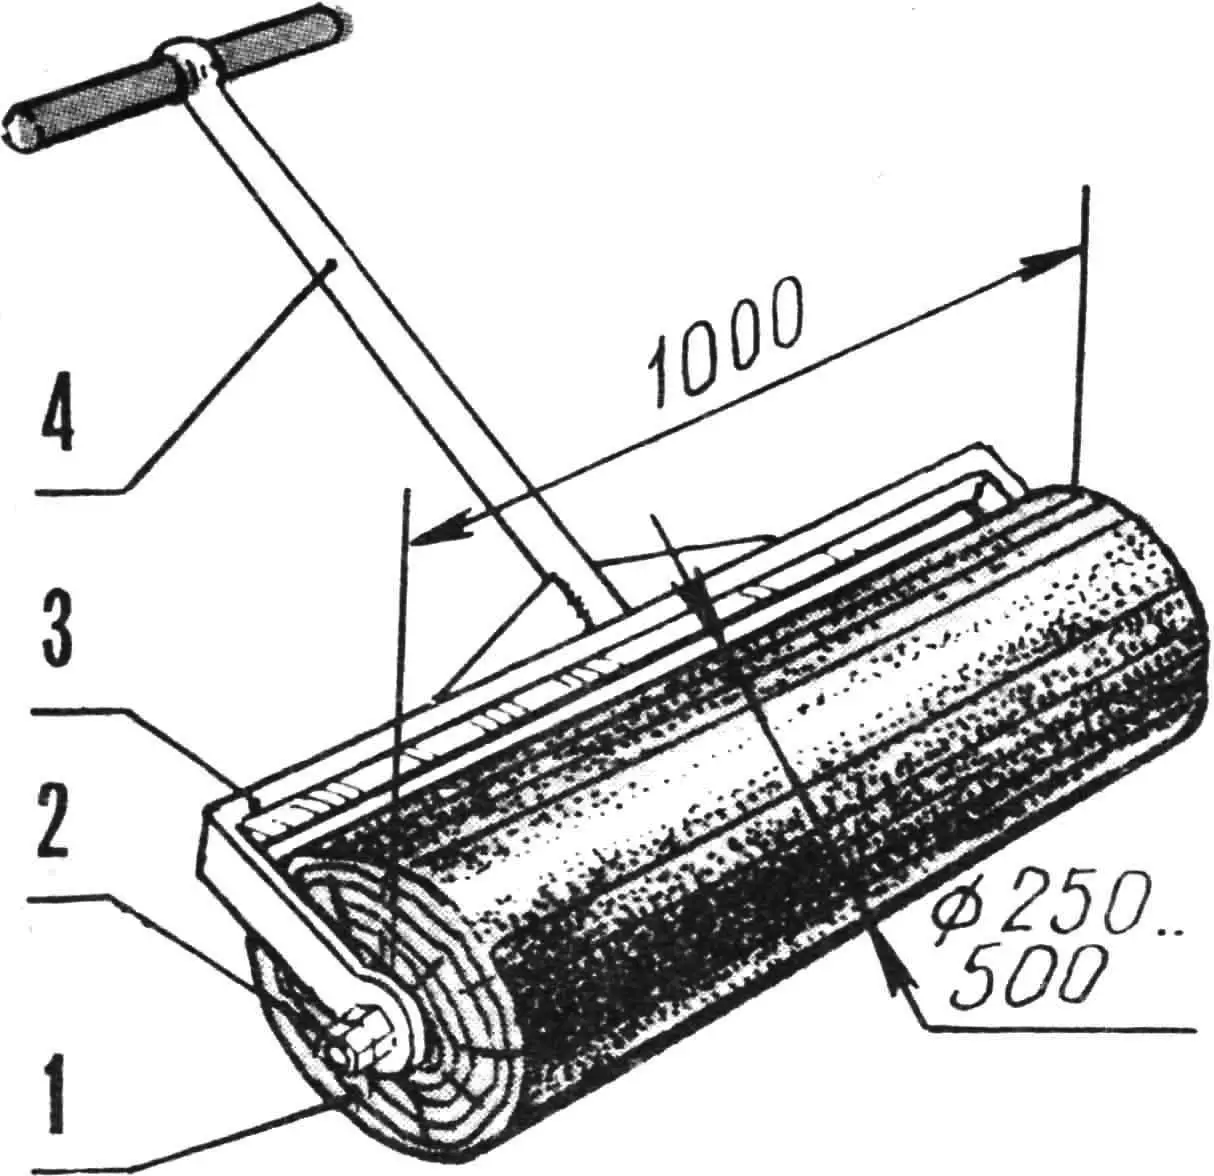
1 — working organ (segment of log from heavy wood species), 2 — half-axle (300-mm steel pin with head for M32 wrench, 2 pcs.), 3 — bracket-housing (from segment of St3 strip with cross-section 5×50 mm), 4— drawbar with handle (welded from segments of 33.5×3.25 pipe, steel water-gas).
The base is a block of heavy and especially strong wood species. It rotates on half-axles in a bracket-housing made of steel strip. And it is pulled by a drawbar with a handle (see fig.) — a welded structure from segments of steel water-gas pipes, reinforced with gussets (again welded!) at the attachment point with the bracket-housing.
“IRONING” AND HARROWING… CAR TIRES
It seems like a good use for old worn car tires — as original smooth (similar in design to the one described above) and ring rollers. For this, several tires are installed in a row close to each other and… Simply pulled together with two discs and four studs with nuts and Grover washers (the latter — a guarantee of reliability) into a single section.
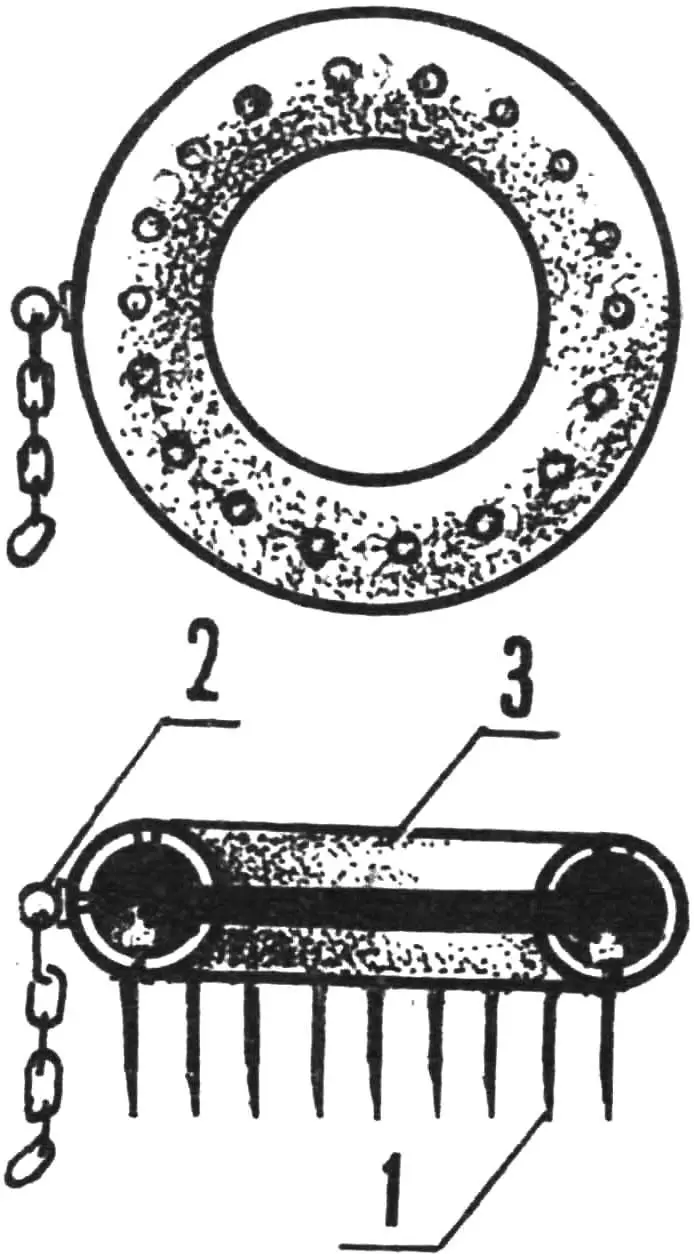
1 — teeth from harrows of the BZT type, 2 — eyelet with chain, 3 — car tire.
By mounting this prefabricated structure on an axle using ball bearings (preferably self-aligning, with protective washers — from dust-dirt) and enclosing it in an appropriate bracket-housing with a drawbar (or connecting bushing), an excellent result is obtained. And to make the roller ringed, teeth from harrows of the BZT type are fixed on the supporting surface of the tires. You can also make homemade ones, made according to the technology described in issue No. 10 for 1991. The installation of teeth on the supporting surface of the tires is carried out by burning holes in the latter with a red-hot steel rod. It is in them that the teeth are fixed using washers and nuts.

1 — old car tire (4…8 pcs.), 2 — axle Ø 30 mm (St5), 3 — bracket-housing (from segment of St3 strip with cross-section 5×50 mm, not shown on side view), 4 — drawbar, 5 — tie (M10 stud with nuts and Grover washers at the ends, 4 pcs.), 6 — self-aligning ball bearing unit (from decommissioned agricultural machinery, 2 pcs.), 7 — wheel disc (2 pcs.), 8 — teeth from harrows of the BZT type (number and arrangement — based on need and possibilities).
A “scrap” car tire can easily be turned into a “non-standard” but quality harrow. In this case, teeth from the same decommissioned BZT are fixed only on one, ground-facing surface. And to connect the homemade harrow to the hitch, an eyelet with a chain is inserted into it.
SPRING SUPPORT-FENCE
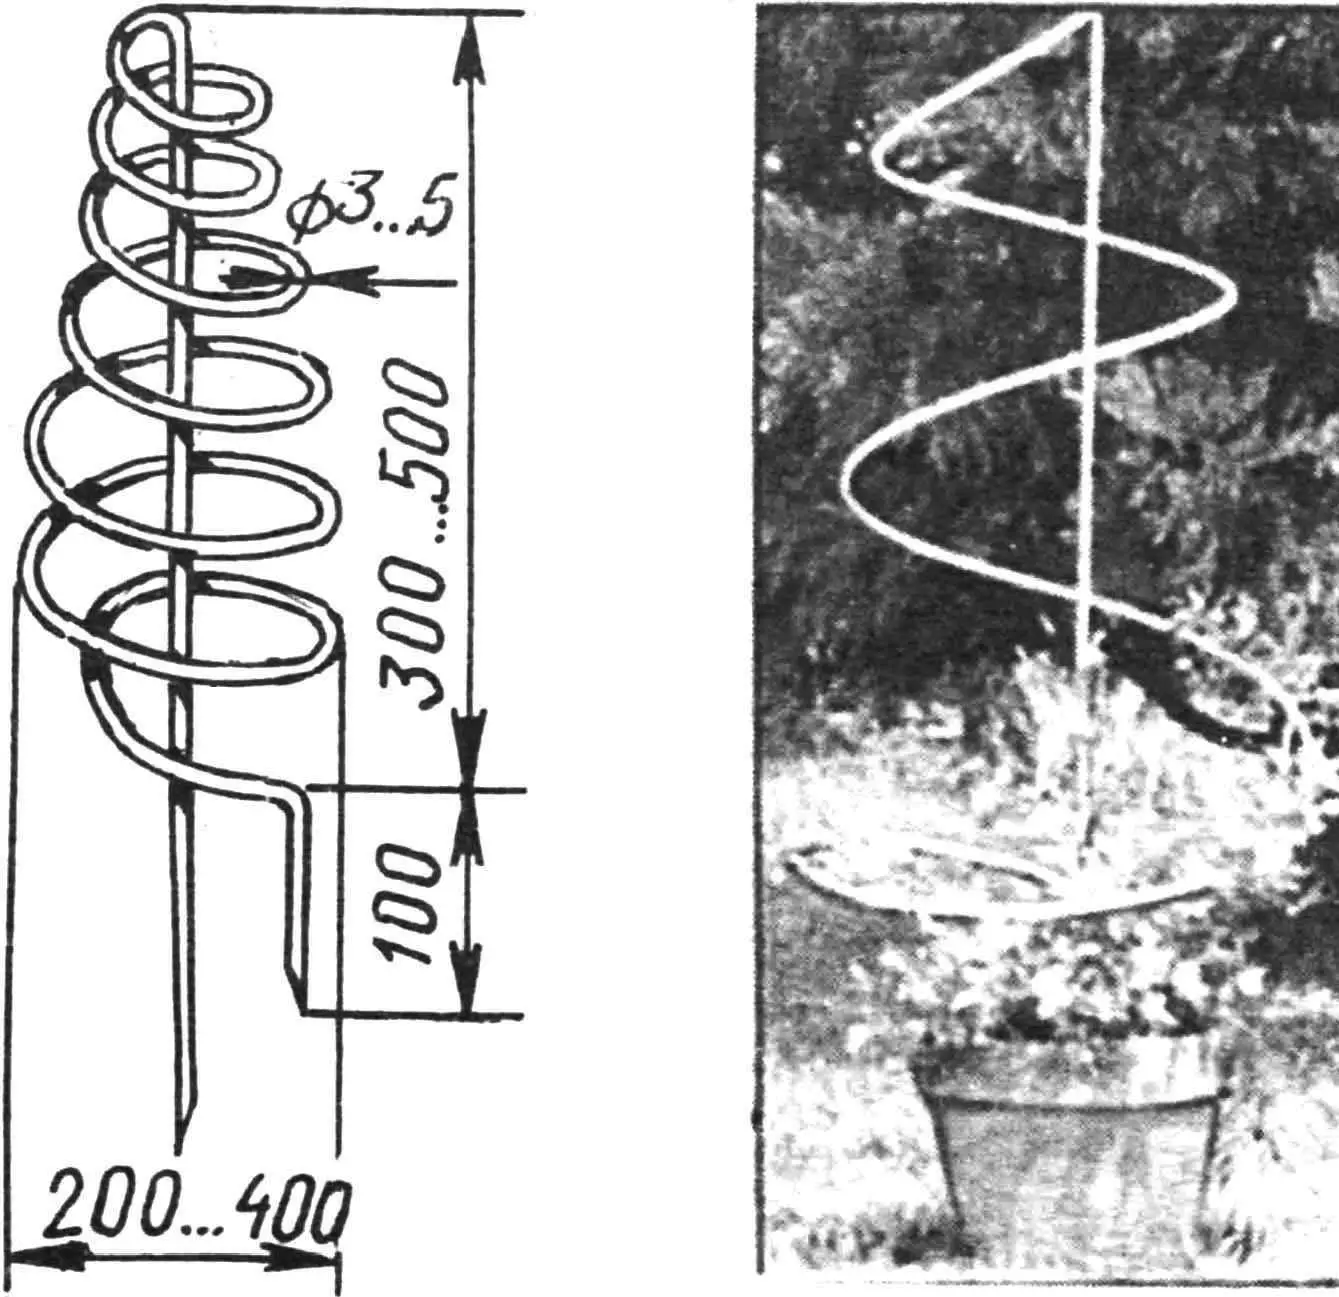
Here everything is clearer than clear. Take 3…5-mm wire rod, wind a spiral spring from it with two straightened ends stuck into the soil — and the support for plants is ready: reliable and beautiful. Quite acceptable even for indoor flowers.
“Modelist-Konstruktor” No. 5’95, selection prepared by N. KOCHETOV
Recommend to read
 A STEP WITHOUT A SKELETON!
What a pity that in his childhood the wise advice of adults fly in one ear and immediately out at another. Remember the many comments of parents and teachers like "straighten up!" or "sit...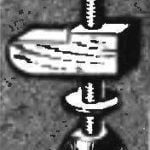 CLAMP? READY!
A simple clamp can be made from a long bolt, washers and nuts-lamb. The jaw faces are made of solid wood.
