With ingenuity and hard work — and contrary to the well-known saying — even a discarded pipe can turn into quite a good piece of gardening equipment. And with minimal manufacturing costs. The published material by Candidate of Agricultural Sciences S. Larkin confirms this.
“THE BLADED TOOL”
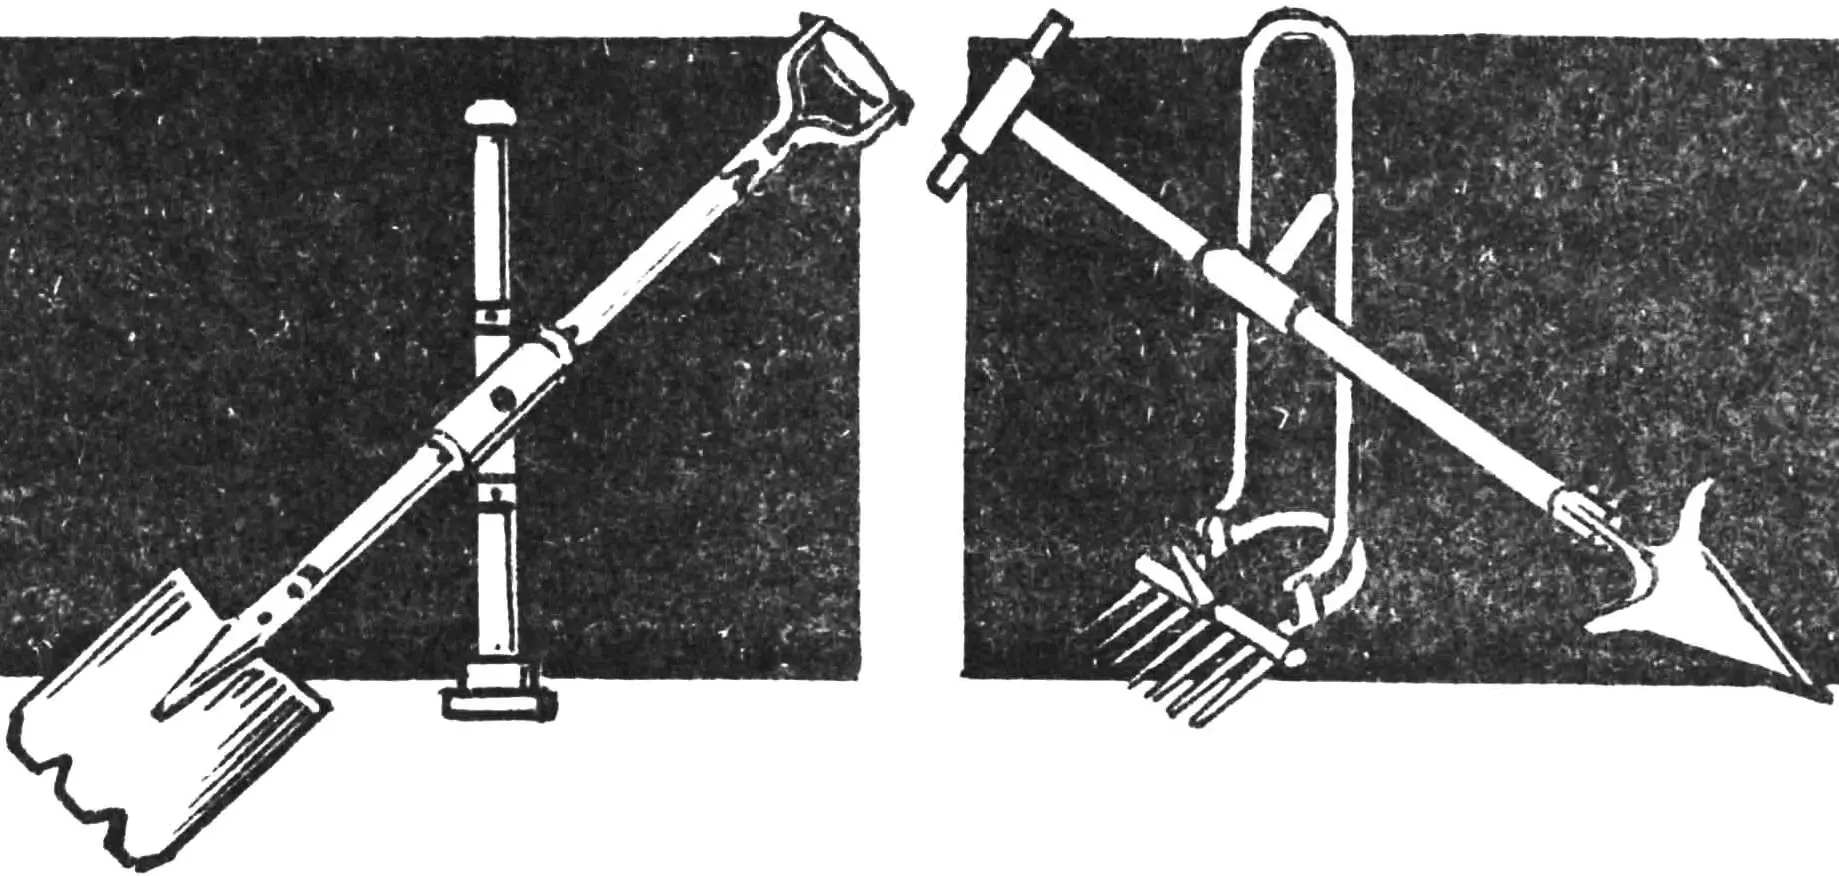
I took up gardening seriously about 6 years ago. Naturally, I needed proper tools. Among descriptions of numerous homemade shovel designs — an indispensable household “bladed tool for digging, scraping, piling, and shifting loose materials” (a definition from V. Dahl’s explanatory dictionary, still valuable after more than a century) — my attention was drawn to a publication in issue 3 of “M-K” for 1985. I liked the idea itself: using a piece of water-and-gas pipe with a coupling to attach the shovel-hoe blade to the handle. What did not suit me was the complexity of execution, the reduced reliability of the fastening pin (judging by the dimensions taken as a basis), and the dependence on a Czechoslovak assortment of factory-made parts.
The design I developed is free from these drawbacks. As in the prototype mentioned above, the swivel unit body in the proposed shovel-hoe is a section of pipe. From domestic standards, a steel water-and-gas pipe (GOST 3262-75) with an outer diameter of 33.5 mm and wall thickness of 2.8 mm fits best. The blade is made from a worn-out digging rectangular shovel KPL (GOST 19596-87), shortened to R-210 mm, with a modified socket.
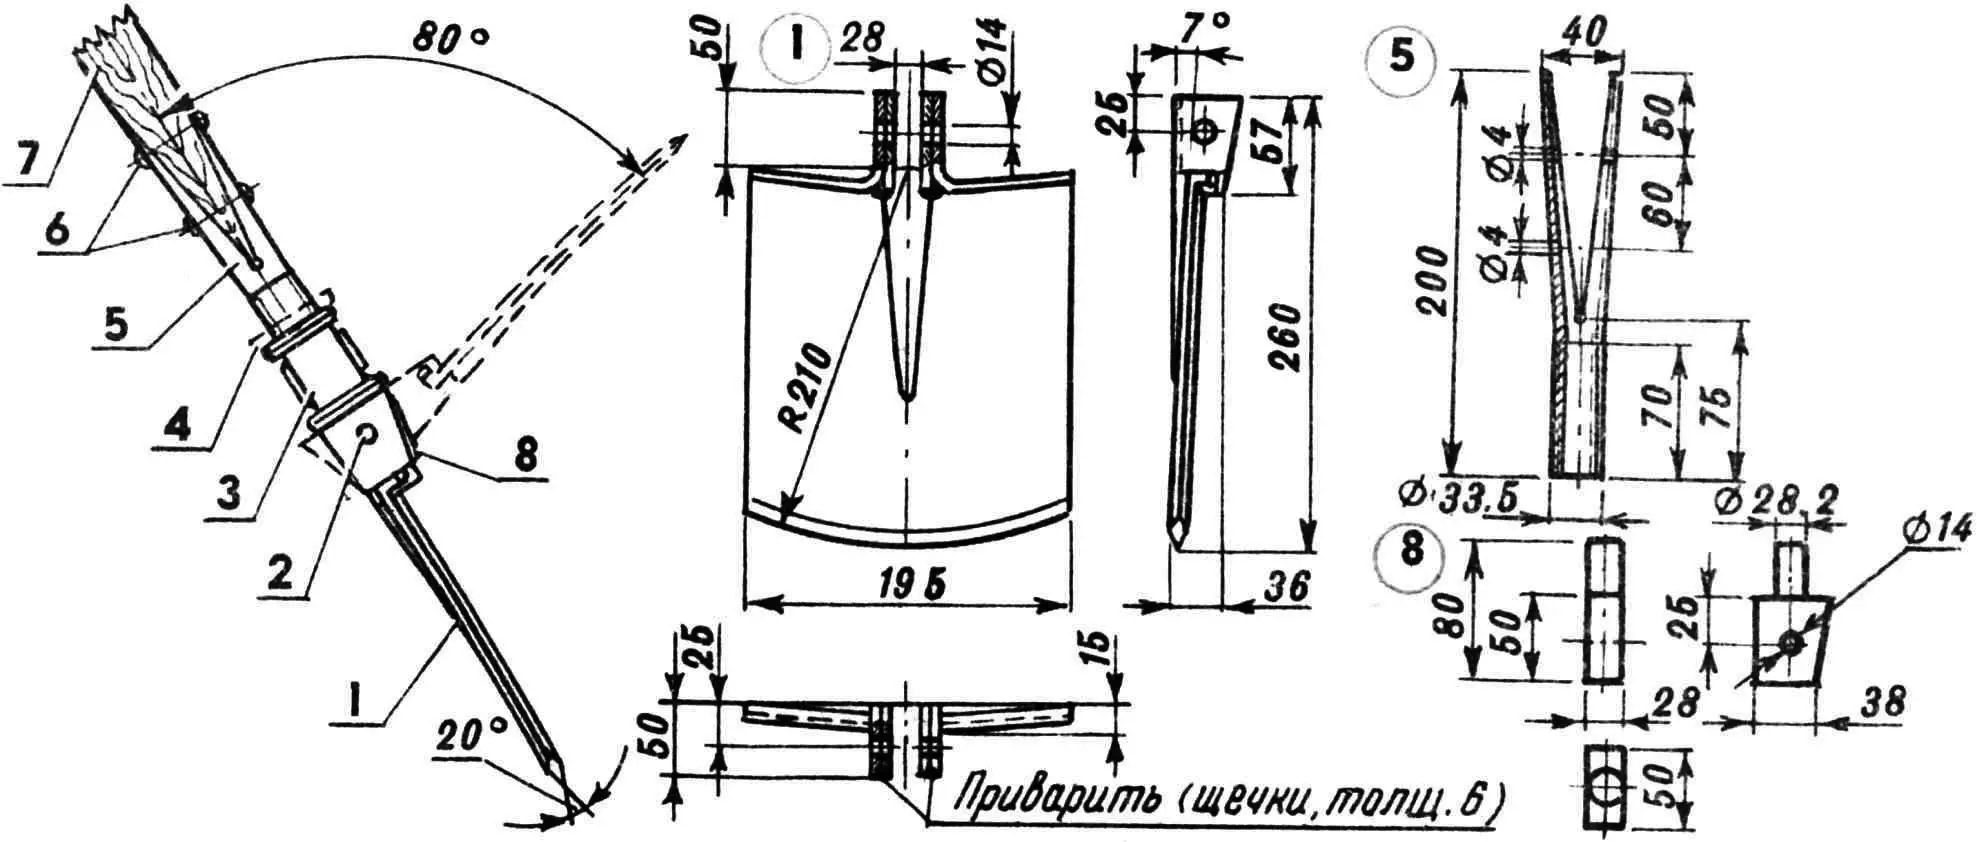
1 — shortened blade of digging rectangular shovel KPL (GOST 19596-87) with a modified socket, 2 — axle Ø 14 mm, 3 — pipe coupling, 4 — locknut (for prolonged work), 5 — wedged section of water-and-gas pipe, 6 — screws Ø 6 mm, 7 — handle, 8 — press-fitted pin in the pipe section.
The modification consists in cutting the socket to 57 mm and welding cheek plates made of St.3 sheet steel 5-6 mm thick on the inner side. Offcuts left from shortening the shovel can be used. A 14 mm hole is drilled in the side of the socket for a St.3 steel axle.
As in the prototype, to rigidly fix the blade in any of three positions, it is enough to turn the threaded coupling until it stops against the corresponding ends of the cheek plates.
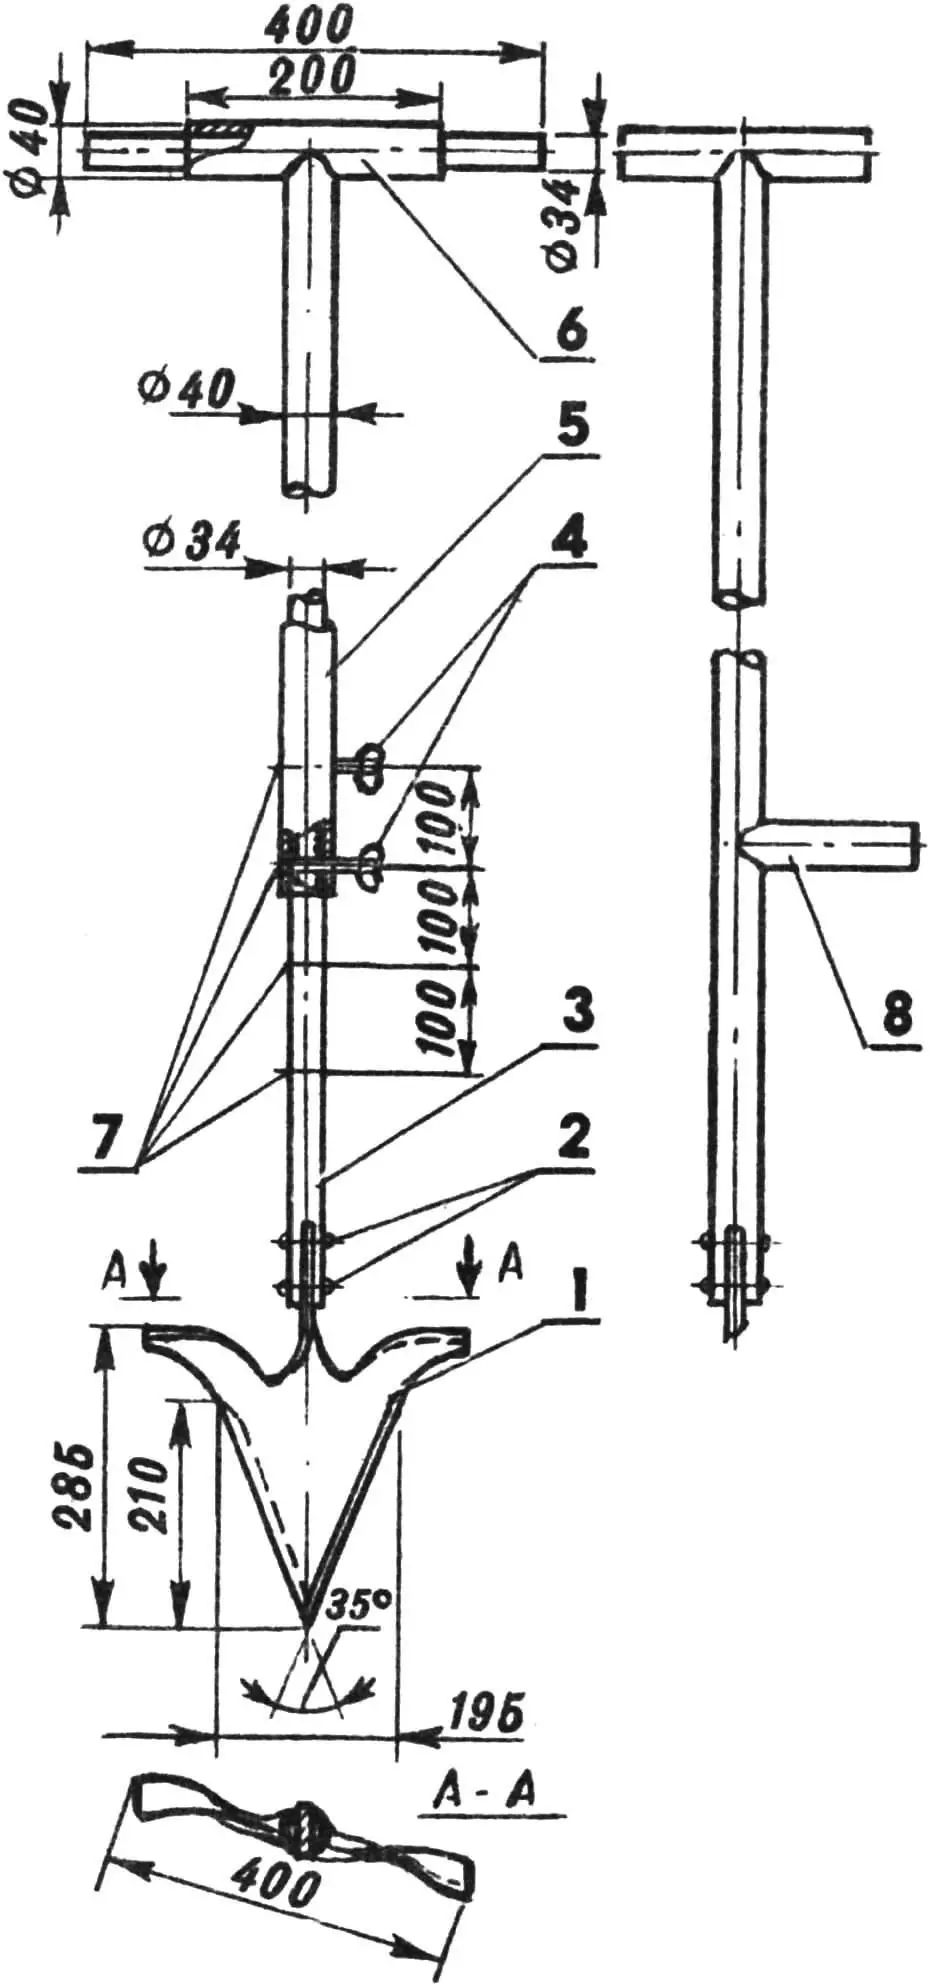
For elderly people, another tool can be recommended. Using it, there is no need to keep “bowing” while digging a garden or allotment. A support post with a bracket, “shod” with a rubber “shoe,” helps here, along with a special swivel mechanism made as two sleeves sliding relative to each other, from pipe sections with appropriate dimensions. To make blade penetration easier, the shovel has a wooden grip in a metal holder (from a wedged pipe section) and a slightly modified blade plane.
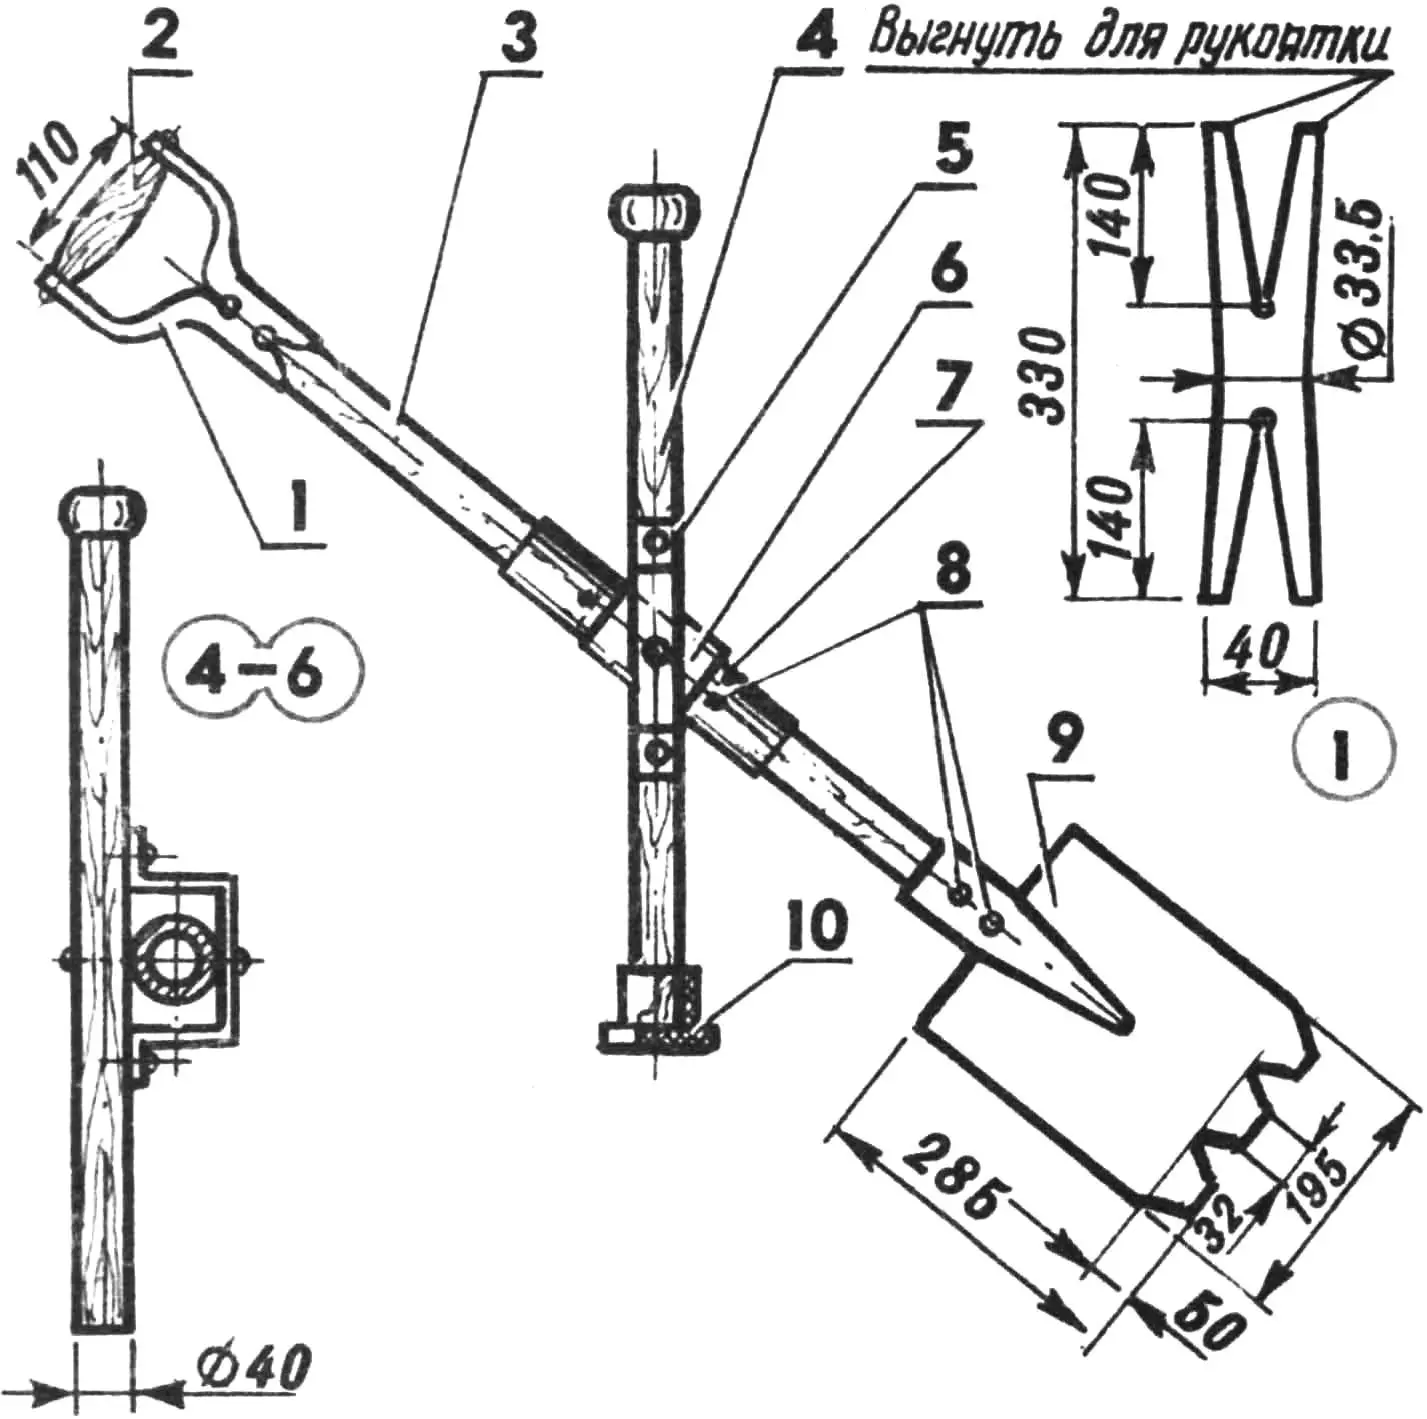
1 — wedged section of water-and-gas pipe, grip holder, 2 — grip, 3 — handle, 4 — support post, 5 — bracket, 6 — outer sleeve, section of seamless steel pipe (GOST 873475) with outer diameter 50 mm and wall thickness 2.5 mm, 7 — inner sleeve, section of pipe (GOST 8734-75) with outer diameter 45 mm and wall thickness 2.5 mm, 8 — screws Ø 6 mm, 9 — digging rectangular shovel (GOST 19596-87) with a modified blade, 10 — rubber “shoe.”
The basis of the design is again the KPL shovel. Only its blade is no longer shortened. To make it enter the soil deeper and with less resistance, without sliding off cut roots of forest undergrowth on the plot, its cutting end is made trapezoidal rather than smoothly rounded. At the same time, the blade plane itself, without touching the cutting edges, is straightened with a hammer. The resulting rectangular-section teeth are sharpened at 20 degrees and heat-treated to hardness 37… …53 HRCэ.
But making such a shovel is only half the job. It is important to learn how to use it. Holding the end of the handle with the right hand, the blade is pressed into the ground with the left foot (at about a 70-degree angle). Then the handle is pushed away until it becomes perpendicular to the soil. Immediately after that, pressing the support post to the ground, the shovel handle is sharply pulled (with a turn) toward yourself. As a result, the next portion of soil seems to throw itself forward.
Such a shovel is very convenient for digging potatoes and other root crops. Drive the blade under the soil at a right angle next to the plant bush. Then pull the handle slightly toward yourself and again sharply move it forward to a position perpendicular to the ground. Now press the support post with your left foot and, with a slight turn of the grip, throw the tubers toward the cleared row.
LIGHTWEIGHT RAKES COME TO THE RESCUE
Rakes are also extremely necessary in the household. Over many centuries of existence, their design has changed little. And modern rakes are essentially the same (according to V. Dahl) “hand harrow, consisting of a ridge, a one-arshin bar with through holes, up to 12, into which teeth are driven, finger-thick pegs, and a rake handle like a human-height stick inserted in the middle of the ridge.”
True, wooden rakes are now hardly seen anywhere. Instead, welded metal ones are usually used. But for me, for example, they are not always suitable. Industrially produced versions are generally too heavy. Even with slight pressure, they immediately sink into the ground and can tear surface roots of plants. That is why I prefer homemade rakes of an almost archaic wooden design.
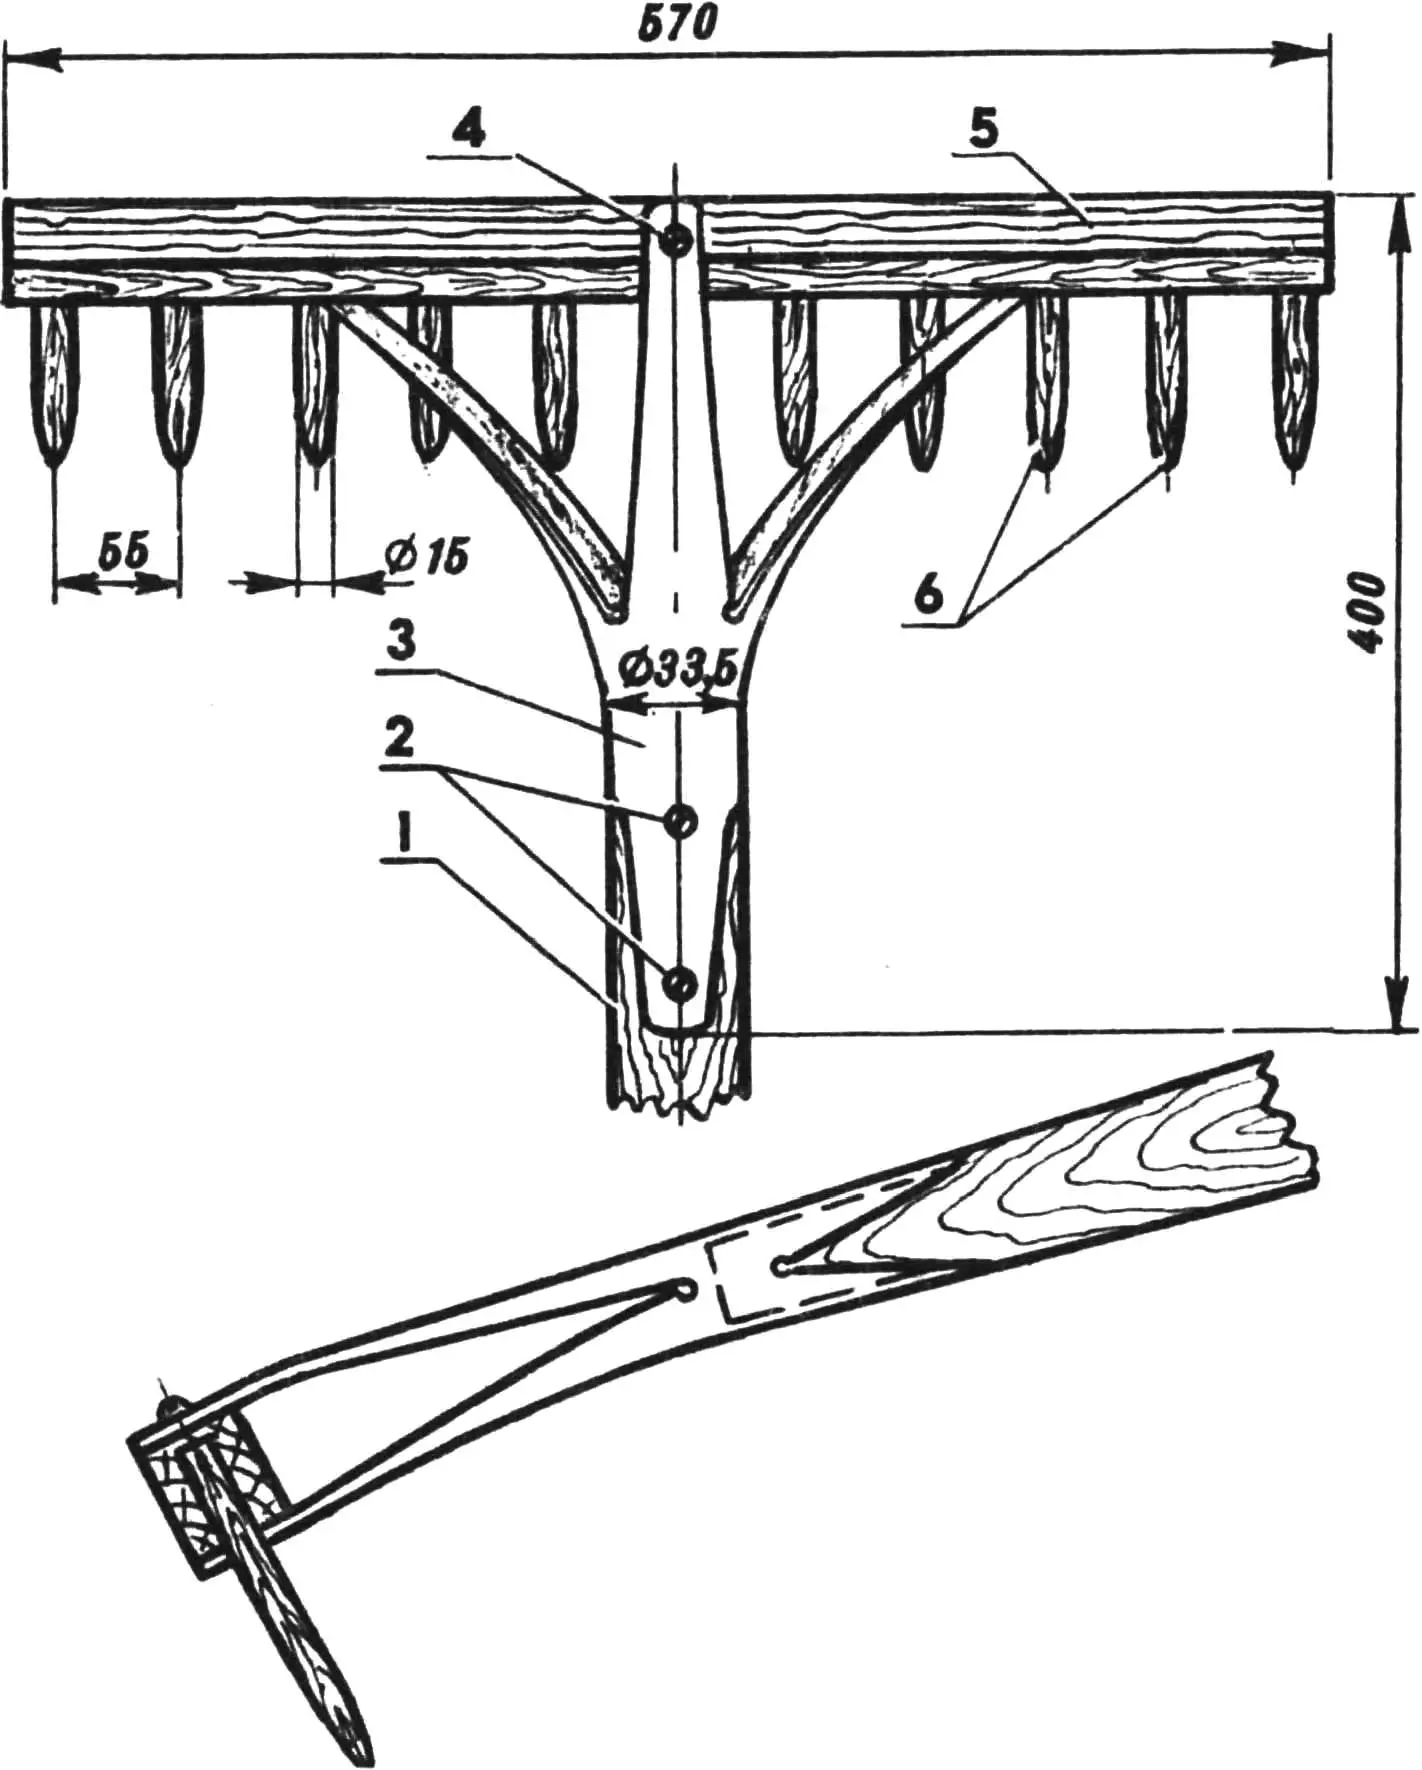
1 — handle, 2 — screws Ø 4 mm, 3 — wedged section of water-and-gas pipe, 4 — screw Ø 6 mm, 5 — strip 35X40 mm, 6 — teeth.
The mount is tubular. It is based on the same wedged section of water-and-gas pipe of suitable size. Pipes with outer diameters of 33.5 mm (or 26.8 mm) are preferable, as they pair well with handles Ø 40 (or Ø 30) mm and lengths of 1300-1600 mm available in retail. To avoid unwanted cracking during wedging, it is also necessary to provide process holes in advance at points of possible stress that could lead to cracks and breakage.
There is also a special attachment for the rake, so simple that it needs no explanatory drawings. It is a plate cut from an old saw blade, with a 570 mm base, side heights of 35 mm each, and a central part converging into an isosceles triangle. The apex of this triangle is 120 mm from the base.
The attachment is fixed to the rake teeth with a clamping plate screwed from the opposite side using M6 wing nuts. It is used to destroy weeds appearing in beds soon after sowing. During weeding, the weeds are first cut with the attachment. Then, after removing it from the teeth, all this “biomass” is collected with the rake and the topsoil layer is loosened.
LOOSENING WILL BECOME EASIER
You often have to loosen soil in a garden or vegetable plot. And domestic tools produced for this purpose are often made so that the worker has to bend repeatedly. Can this be avoided?
Of course, yes. Two cultivator designs are an example, and they successfully perform additional functions as well.
The cultivator-digger is made from sections of water-and-gas pipe with an outer diameter of 26.8 mm, hingedly connected to each other. The dimensions of the arc-shaped pedal and the swivel handle-post depend on the user’s body build. The handle-post can even be made telescopic. For example, from pipes telescopically inserted one into another. The teeth are made of St.3 steel according to the dimensions shown in the figure and fixed in crossbar holes by riveting the rear part of 8 mm necks. The support tooth is made and installed similarly. But its point is intentionally blunted for user convenience and safety.
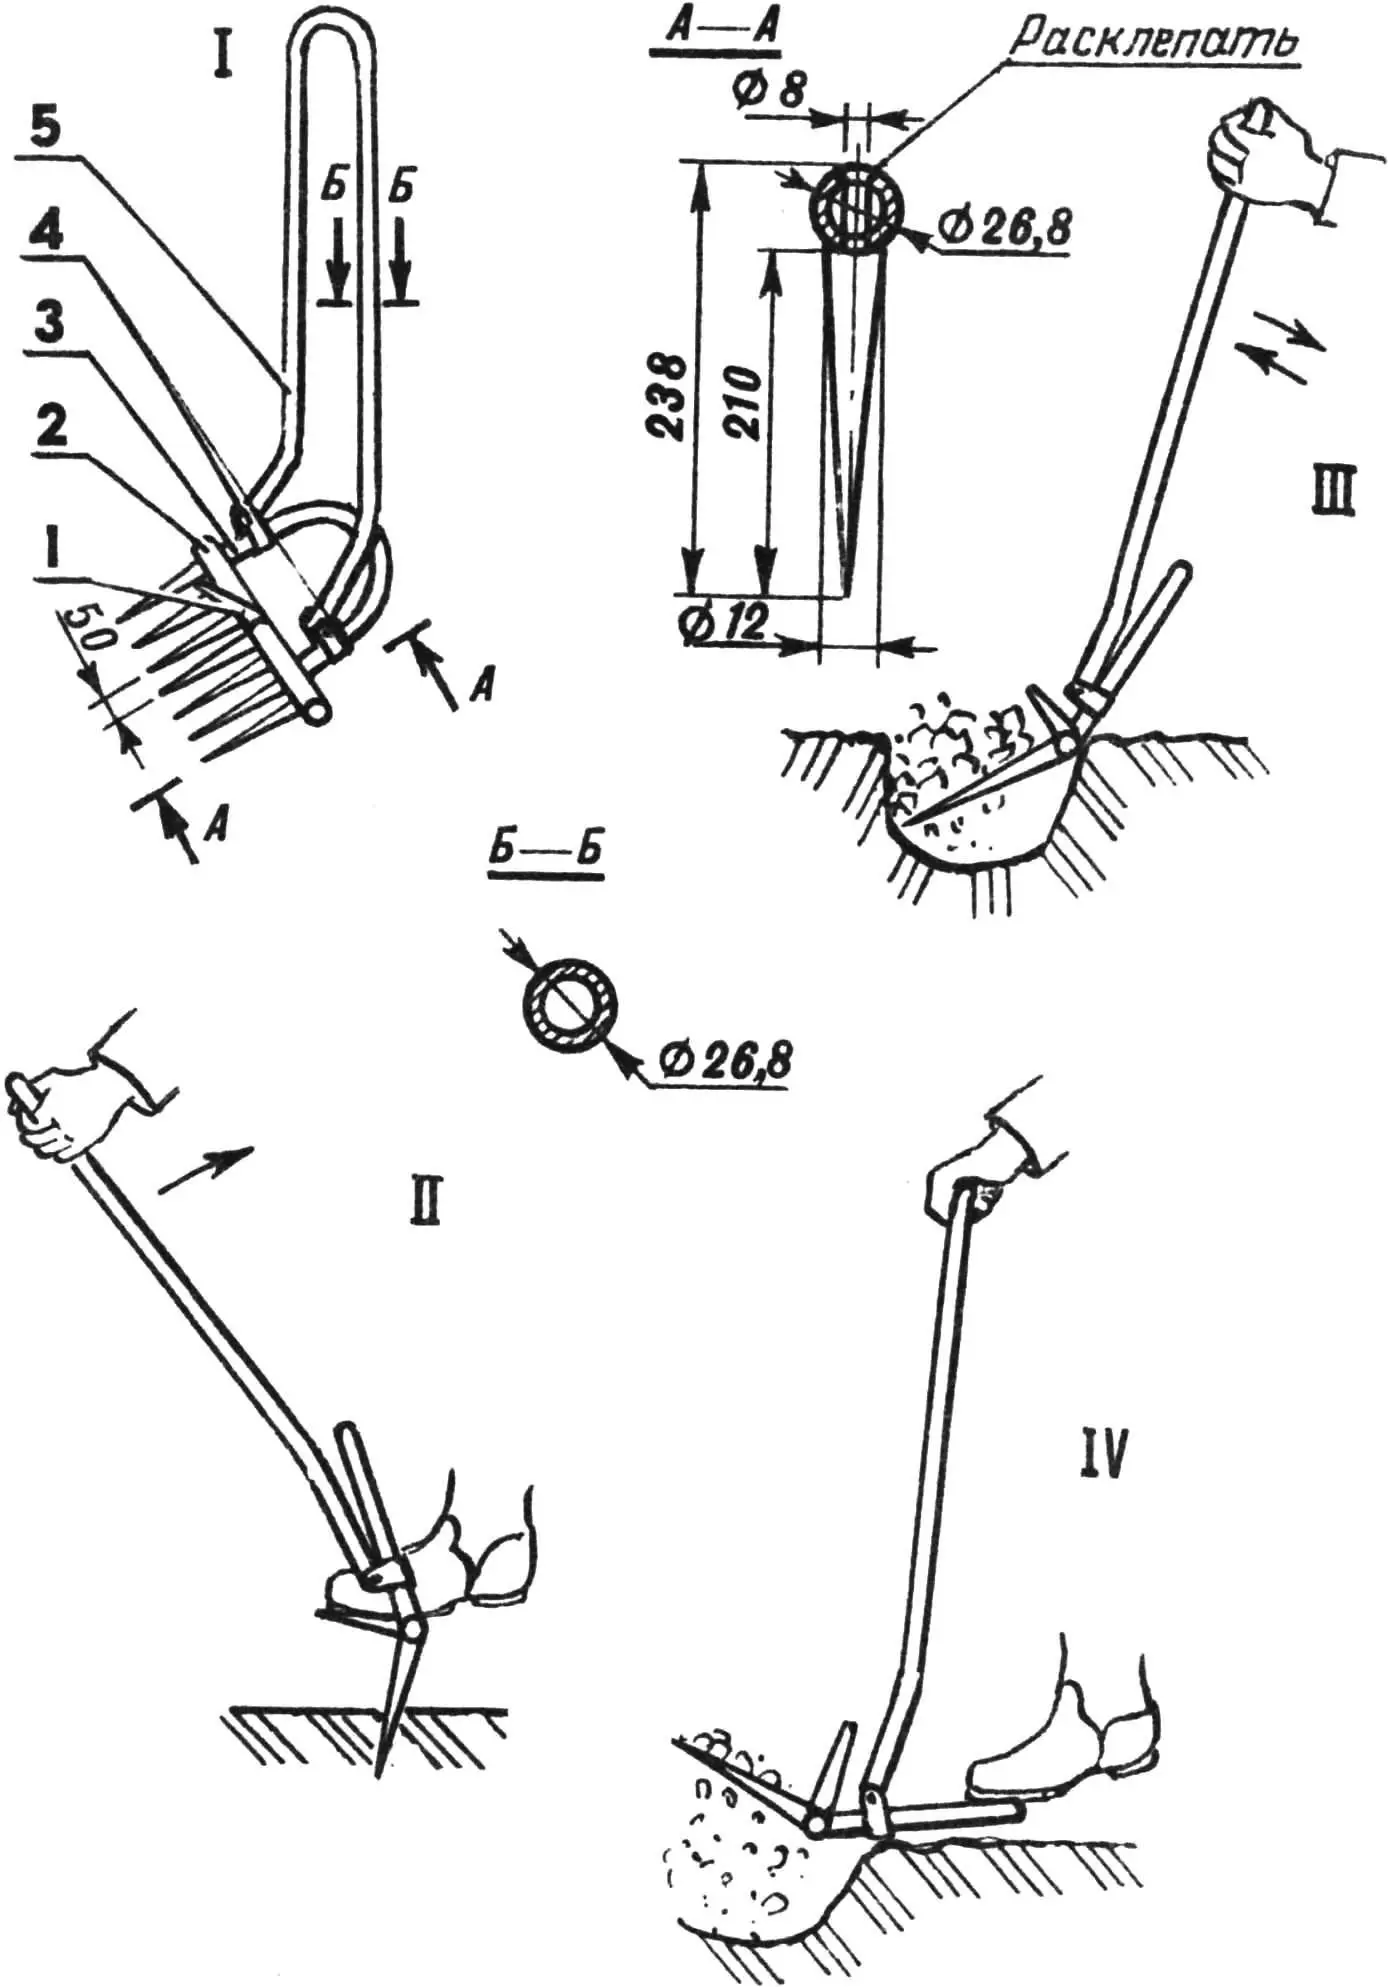
1 — support tooth, 2 — crossbar with working teeth, 3 — arc-shaped pedal, 4 — hinge joints, 5 — swivel handle-post; II — penetration, III — loosening, IV — digging out.
The method of using the cultivator-digger differs little from working with a swivel shovel that has a support post. Pressing the arc-shaped pedal, the gardener tilts the handle-post toward himself: the deepened crossbar with teeth easily turns out the next clod of earth.
To make the cultivator-hole digger, sections of water-and-gas pipe are also needed, but of a slightly different range. The working unit here is a kind of drill made from an old two-man saw blade. The head shape is triangular, point down. On the sides it has small cutting edges bent in opposite directions, sharpened at 20 degrees (not shown in the illustration). In the upper part, it has three wedge-shaped sections bent appropriately. This trio is formed by cuts followed by rotations: the central one counterclockwise, the others clockwise. The side sections in the upper part work as moldboard guides for soil cut by the edges, and the central section serves for reliable riveted fixing of the head in the lug made on the lower end of the post. The head is heat-treated to hardness 37…53 HRCэ.
1 — drill head, 2 — rivets, 3 — inner pipe (GOST 8734-75) of telescopic post, 4 — M8 bolts with wing nut, 5 — outer pipe (GOST 8734-75) of telescopic post, 6 — telescopic handle made of seamless steel pipes (GOST 8734-75), 7 — threaded M8 holes, 8 — optional post as turning lever.
The cultivator-hole digger has proven itself well for planting potatoes. It can also be used to make holes when planting bulb flowers. Keep in mind that planting depth depends on plant type, but the average guideline is the “three times” bulb height rule.
Planting depth means the thickness of soil above the bulb, not the distance from the bottom of a hole or furrow to the surface. On heavy clay soils, it is reduced to 2-3 cm, while on light sandy soils, it is increased by the same 2-3 cm.
“RECOILLESS” CROWBAR
If we proceed from the idea that genius is always simple, then perhaps the standard crowbar design known to everyone should be recognized as a model of super-genius. But there are other considerations.
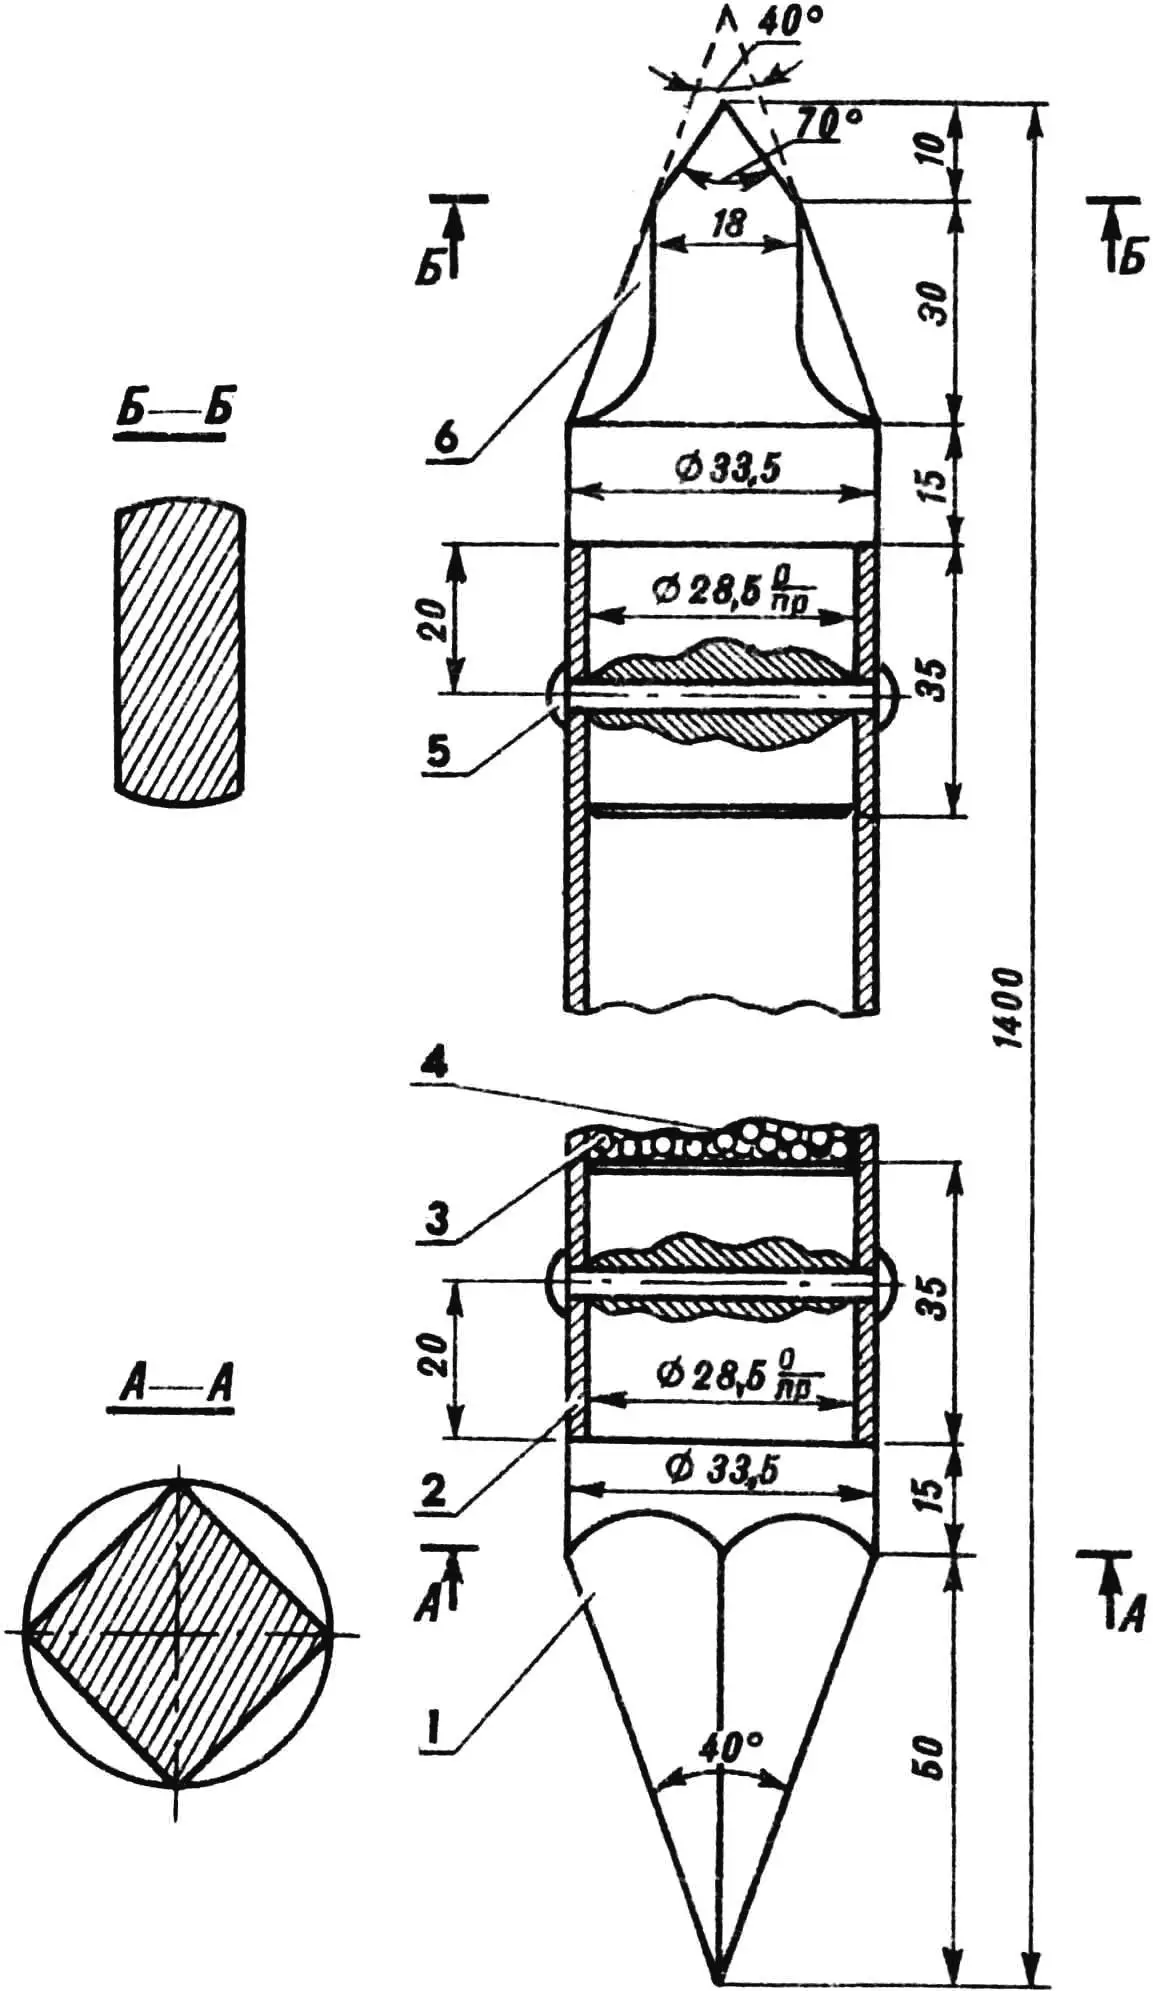
1 — conical tip, 2 — steel pipe (GOST 8734-75) with outer diameter 33.5 mm, 3 — coarse lead shot, 4 — machine oil, 5 — rivets, 6 — chisel-shaped tip.
The point is that an ordinary crowbar has quite noticeable kickback, especially in rocky ground. After working with it, as they say, you can hardly feel your hands. Yet industrial production of “recoilless” crowbars has for some reason still not been established here, although many designs are offered by DIY makers. Their basis is usually a pipe closed with tips and filled inside (to one-third of cavity volume) with coarse lead shot. The shot dampens reflection at impact. But it does so only partially due to friction of pellets against each other and against the inner walls of the crowbar body. In addition, the pellets gradually lose shape and wear out.
In the proposed crowbar design, each pellet has a diameter of 2-3 mm and is abundantly wetted with machine oil. On top of that, the tip shape is optimally matched to loads arising during operation. And this is important. The impact force here is greater than that of an ordinary crowbar.
Recommend to read
 LIGHT SIGNAL LAMP
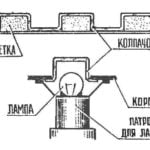
Plastic pill bottles medicine make excellent caps, signal lamps. The holes in the chassis are drilled on the diameter of the blanks. Caps, painted diluted capelike pasta from ballpoint...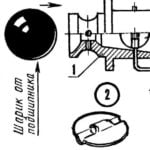 MANAGEMENT OF GAS — ON THE RADIO
There is a perception that control the "gas" compression of the motor as well as nitro, is almost impossible. However, for a long time had already been quite successful systems for...
