There’s no end to the chores on a farmstead. Some involve lifting, loading, or moving heavy objects. But when you only have two hands, such tasks can sometimes become an insurmountable problem.
However, if the farm has a tractor, which is not uncommon today, heavy lifting can be “entrusted” to it by using the hydraulic system of the three-point hitch. You just need to make a simple device that will allow lifting loads weighing up to 600–700 kg to a height of up to three meters.
The idea, by the way, is not new. There’s probably not a single tractor operator who hasn’t had to use the tractor’s hitch as a hoist at least once. For this, they take a log of medium thickness and three to four meters long, insert one end between the shaft of the longitudinal (lower) hitch links and the rear axle housing, and tighten a cable loop on the other end. That’s it, the simplest hoist is ready.
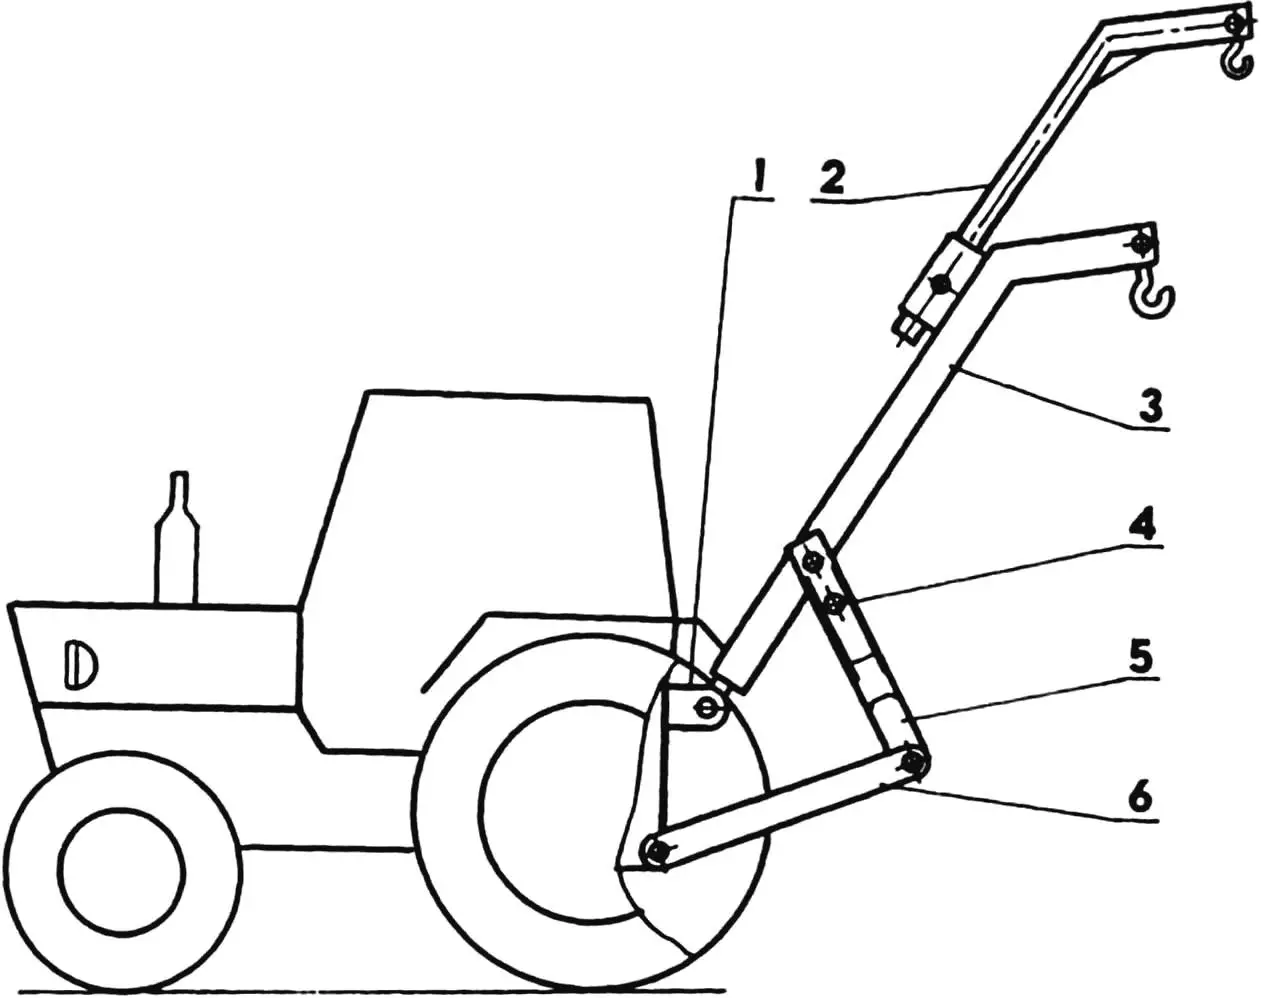
Layout of the hoist on the MTZ-80 tractor:
1 — bracket of the tractor hitch central link; 2 — extendable boom; 3 — main boom; 4 — “triangle” tip; 5 — “auto-coupler-triangle”; 6 — longitudinal hitch link
The device is quite functional, but not entirely safe. Under load, the log can break or slip sideways along the hitch at the most critical moment. So it’s better to make a metal version.
The design is very simple and consists of just three homemade and one factory-made units. These are the main boom, an additional extendable boom, a factory-made “auto-coupler-triangle,” and a tip for the “triangle” that is pivotally attached to the main boom.
Let’s first understand how the hoist works, then return to the design and dimensions of each homemade unit.
For those who work with tractors, there’s no need to explain what an “auto-coupler” is. It’s a triangular-shaped unit installed on the hitch (it’s called a “triangle”), designed for coupling (connecting) the tractor with some mounted or semi-mounted agricultural implements and machines. They all have a corresponding connection unit with the “triangle”—a slot that matches its shape. That’s why the “triangle” is called an “auto-coupler”—it allows attaching agricultural machinery to the tractor without assistance and in just minutes. Back up to the needed implement, position the “triangle” under its mounting slot with the hydraulics, raise the hitch, and—click! The machine is already on the hitch. Fast and safe. I’m actually planning to convert all my agricultural implements to use the “auto-coupler.” It’s very convenient.
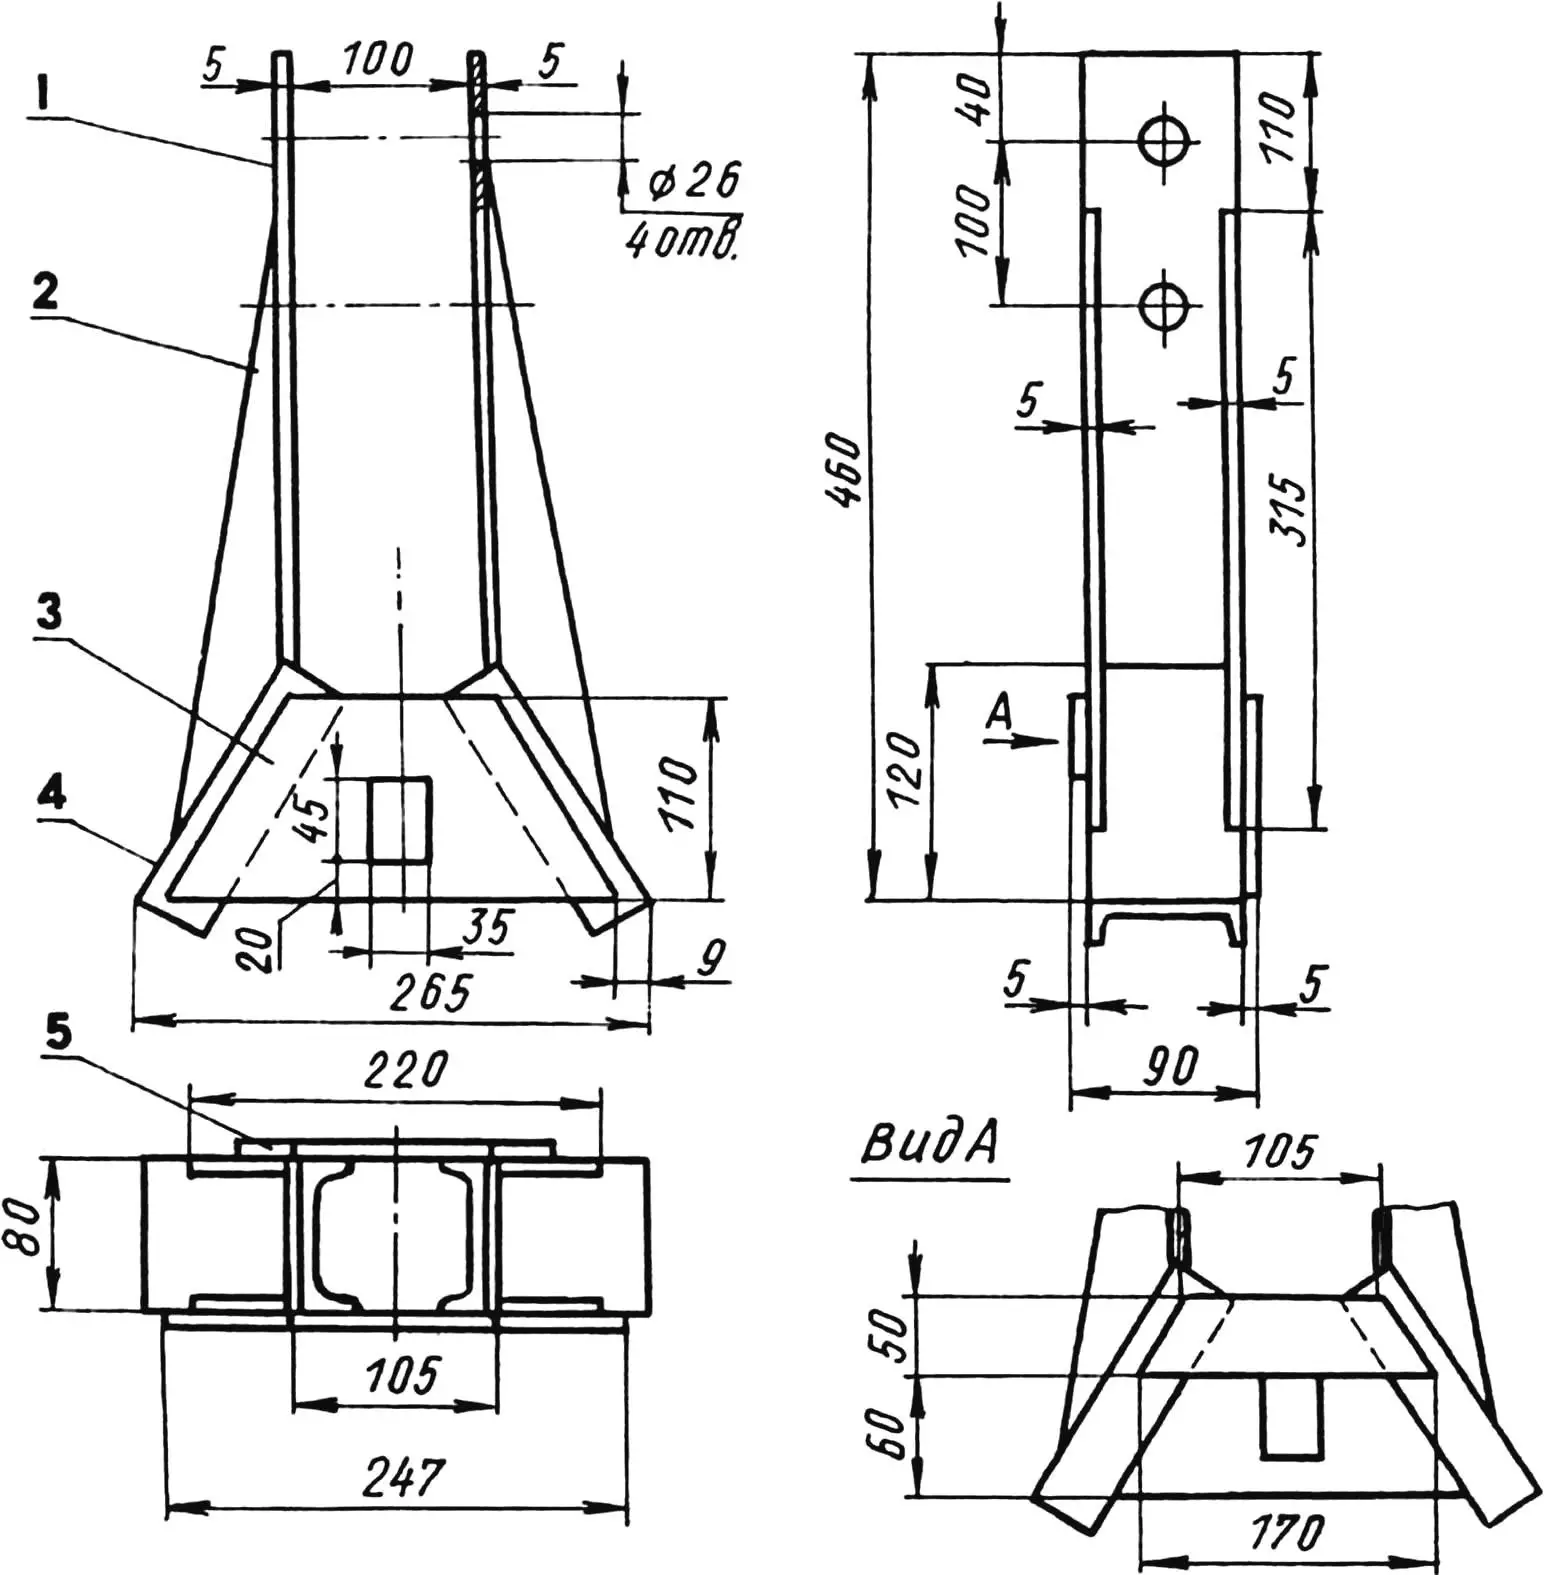
1 — eye (2 pcs.); 2 — stiffening rib (4 pcs.); 3 — plate with opening for “triangle” lock; 4— support (channel #8, L143, 2 pcs.); 5 — crosspiece;
material for parts 1,2,3,5 — steel sheet 5 mm thick
The homemade lifting device works as follows. When the hydraulic control lever is moved to the FLOAT position, the hitch lowers to the stop under the weight of the hoist boom. The main boom assumes a horizontal position, and its curved end touches the ground. This also applies when the additional boom is extended, the end of which is bent at the same angle.
The load is attached to one or both booms at once, depending on its shape and weight, as well as the lifting height. The heavier the load, the smaller the force application arm and lifting height should be, otherwise the hydraulics simply won’t be able to overcome gravity.
When the load is secured, it can be lifted. For this, slowly move the hydraulic control lever to the LIFT position. The hitch links begin to move upward and act on the boom through the “triangle” and its tip. The load lifts off the ground. Now you can carefully maneuver.
Once in the desired location, begin lowering. For this, very slowly move the hydraulic control lever from the HOLD position toward the FLOAT position. Once the desired lowering speed is reached, hold the lever until the load is fully lowered.
Now let’s take a closer look at the design of each of the homemade hoist units. Making the tip required channel #8 and a 5 mm thick steel sheet. Ten more parts were made from the same materials: two supports, two crosspieces, two eyes, and four gussets. The slot in the rear crosspiece serves as a groove for the lock equipped on the “triangle.”
All parts are joined together by welding with double-pass welds. Through holes 26 mm in diameter are drilled in the eyes for the pin that attaches the tip to the main boom. By securing the boom through the upper hole in the tip, you can increase the lifting height, and by using the lower hole—achieve lower boom lowering (this is necessary for some jobs).
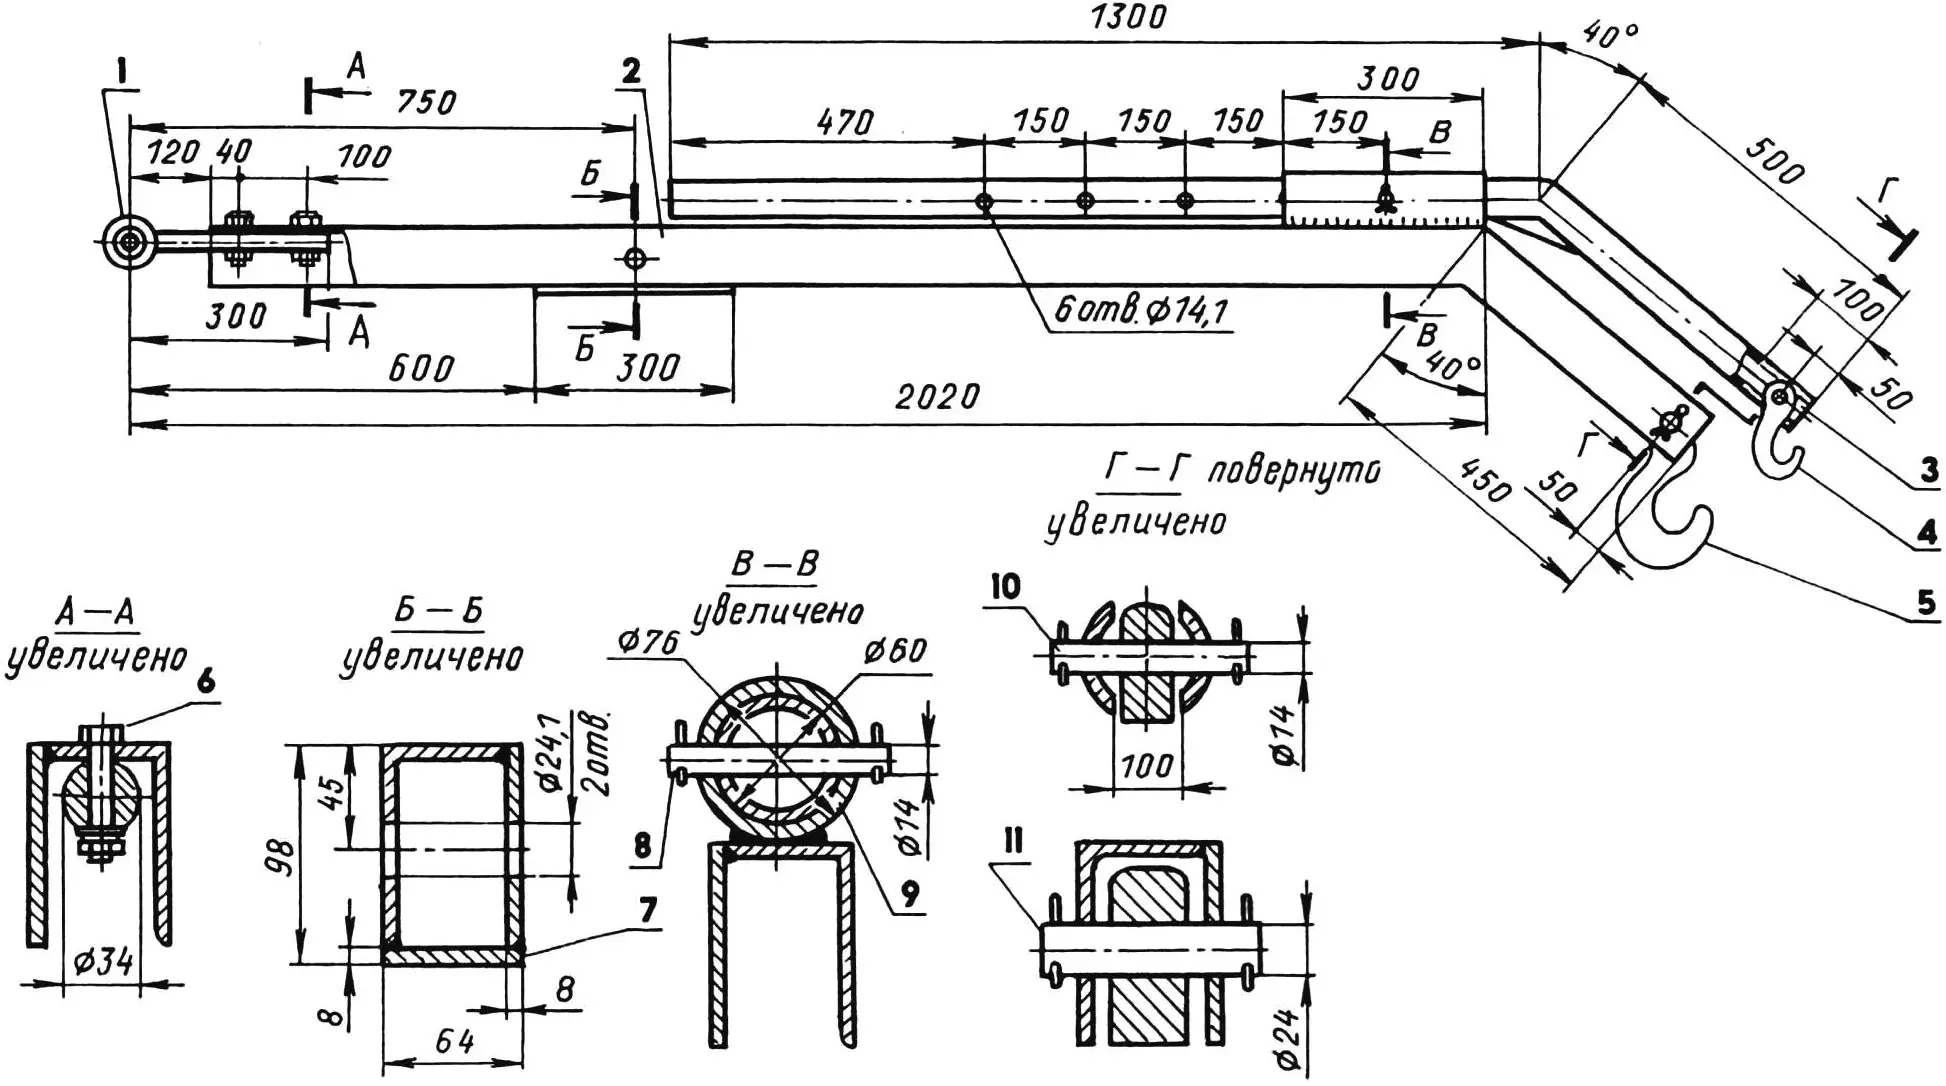
1 — ball support; 2 — main boom; 3 — extendable boom; 4, 5 — hooks; 6 — ball support mounting bolt; 7 — plate; 8 — extendable boom lock; 9 — extendable boom guide; 10, 11 — hook axles
The main boom itself is made from a 90x56x6 mm steel angle, to which a side flange from an 8 mm thick strip is welded along its entire length. This created a channel with dimensions of 90×64 mm. In addition, under the central hole, the channel is reinforced with a 300×64 mm plate from the same 8 mm thick steel strip.
One end of the boom is bent at a 40-degree angle and equipped with a mounting hook from a truck crane sling. A ball support from the central link is attached to the other end with two M14x1.75 bolts, and the boom is installed in its socket instead of this link.
A 76 mm diameter pipe section is welded to the top of the main boom. This pipe serves as a guide for the extendable additional boom, which allows increasing the total length of the hoist arm by almost a meter.
The additional boom is made from a 60 mm diameter thick-walled pipe. Five through holes are drilled along the entire length of the pipe to fix it in the guide at different extension lengths. A 14 mm diameter steel pin serves as the lock. The end of the extendable boom is also equipped with a mounting hook, but of a smaller size.
That’s the entire device. With the necessary materials and tools, the main one being a welding machine, the hoist can be made in one day. I can confirm this from my own experience.
Despite the simplicity of the design, the hoist is very useful. What jobs haven’t been done with its help! Setting oak posts for a garage, slinging logs, loading various boxes, containers, and even machine tools into a truck bed, and working on construction sites—supplying bricks, cinder blocks, and beams to walls.
And all of this took just minutes, turning from a problem into an interesting task where you enjoy the work process itself. And the positive result is guaranteed, as everywhere where a person adapts mechanical helpers for their needs. Especially ones made with your own hands!
«Modelist-Konstruktor» No. 7’2002, G. LEGOSTAEV, farmer
Recommend to read
 WICKET — A DIFFICULT
The gap exposed between the gate and the column will cause respect for the skill of the Builder from any incoming to the site. To do it by using two identical plate thickness-supak... ITALIAN FURNITURE
Who does not dream of an exclusive set of Italian furniture, made to order and to your individual drawings? From this can refuse unless a madman. Of course, to afford such luxury can not...
