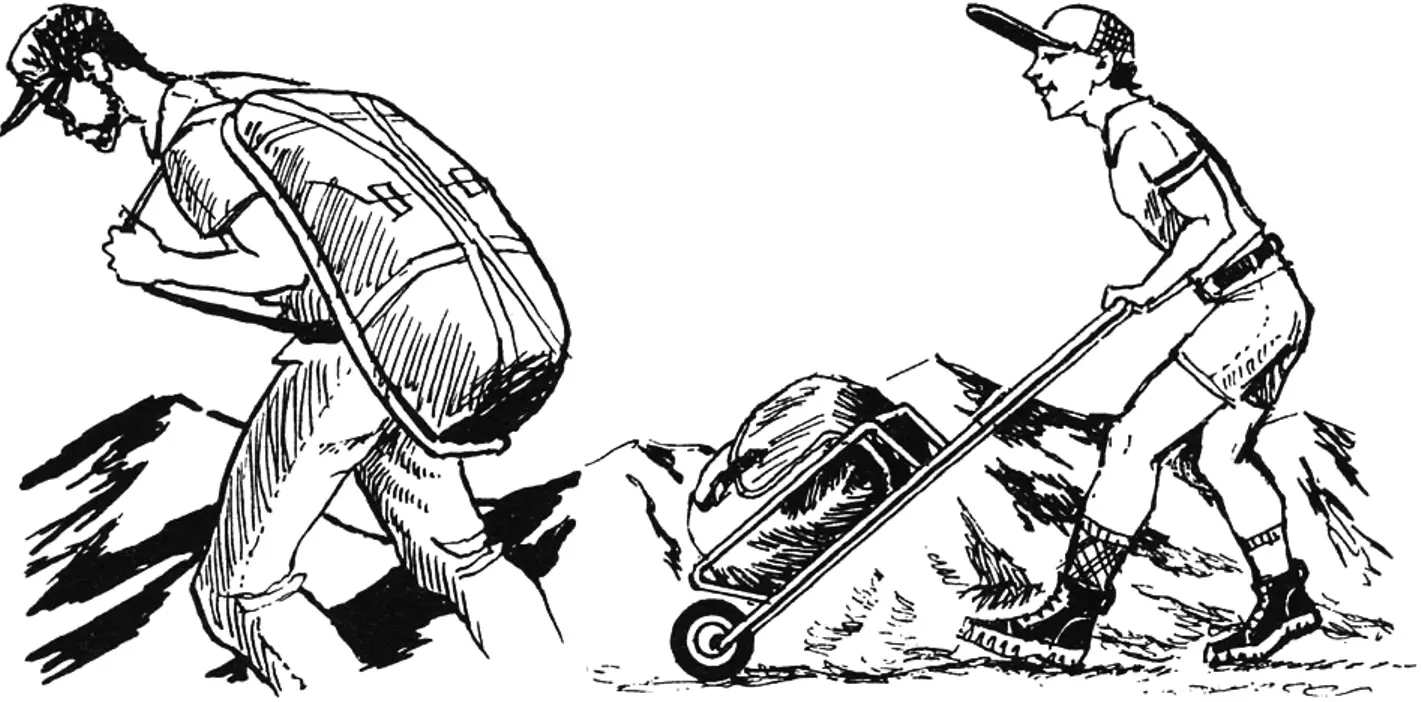
An experienced tourist’s backpack usually weighs about 40 kg. Agree, it’s not easy to make your way along untrodden trails with such a load. Moreover, almost all frame packs share one common drawback: when heavily loaded, they fit tightly against the back, and because there is no ventilation in that area, clothing gets damp. Besides discomfort, this risks catching a cold both in summer and in winter. Lifting a “unbearable” backpack from the floor or ground onto your back is a real problem: you either have to ask fellow travelers for help or manage on your own with some skill. It’s also not easy to pack a backpack properly, distributing items so that the center of gravity is as close to the back as possible, at shoulder-blade height, and without hard corners.
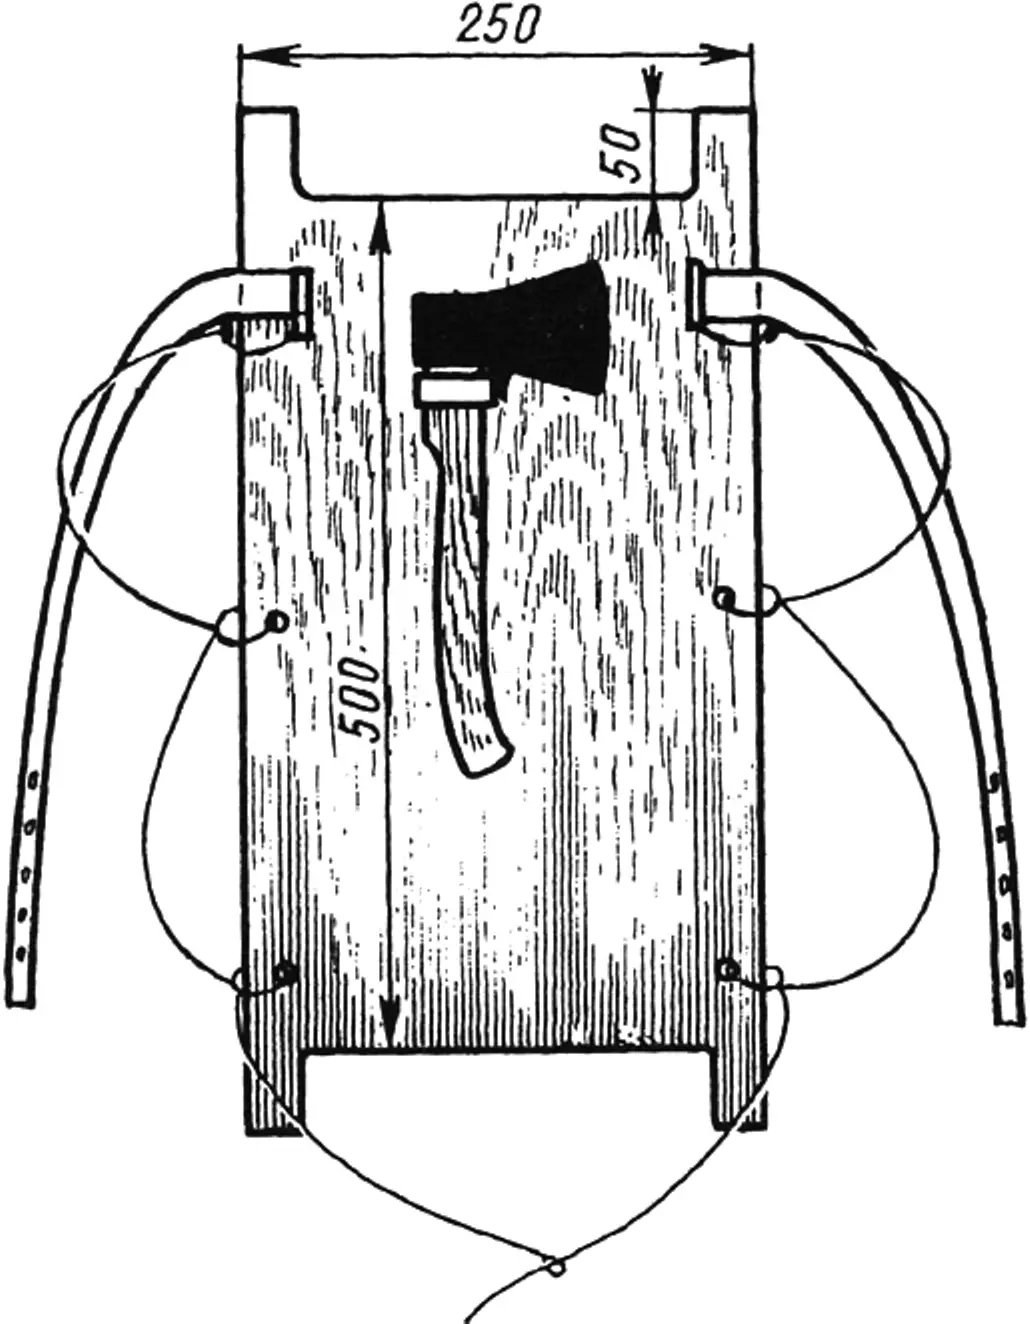
In Siberia, hunters and guides have used the ponyaga since ancient times. The same devices are still used today, for example, in Yakutia and Transbaikalia. According to Dal’s dictionary, it is “a back carrier made of bent rods,” and according to eyewitness descriptions, it is a frame of wide slats (or thin boards) to which a bag with some load is tied.
To make a ponyaga, take a strong board 500—700 mm long, 230—300 mm wide, and about 20 mm thick. When shaping its upper and lower edges, leave 50 mm protrusions on the sides. Then drill, burn, or punch several holes, including two in the middle part: an axe, so necessary in the taiga, is always hung here on a strap. The bag is tied on, and a rifle is hung on top, hooked with a strap to the board’s protrusions.
On a ponyaga you can carry items of any shape without risking bruising your back. And if you make a backpack on the same principle, the load, experienced tourists say, becomes easier to carry. No redesign is needed: the modification comes down to placing a rigid pad between the back and the load, for example, made of plywood.
Cut a plywood sheet to the size of the backpack, drill holes around the perimeter, and attach it securely with thread to the back wall. You can do it differently: sew an additional pocket inside the backpack and insert the plywood into it — the pad becomes removable. And one more small improvement: try cutting the lower part of the right shoulder strap and sewing in a ring-and-hook (carabiner) fastener. Now putting the backpack on is no problem. Just as easily and quickly you can drop it at any moment by unfastening the carabiner.
The frame backpack that has come into fashion is the same ponyaga, only modernized. The pad (in this case, the frame) is made of duralumin tubes, preferably titanium when possible. They are joined by welding, screws, or rivets. The side uprights are bent to match the profile of the tourist who will wear the frame; the crossbars are also curved, but outward: together with two thin support tubes they prevent the backpack from touching the back. Wide, well-tensioned bandage belts fit elastically to the shoulder blades and lower back. They are usually sewn from thick canvas 100 mm wide and laced from one end to the right upright. The shoulder straps are also canvas. Often they are made with foam padding inside. Moreover, if the top is sewn around the uprights at the joint with the crossbar, the bottom has leather loops or securely sewn metal rings by which they are put onto the side uprights from below.
The bag with belongings is attached to the frame the same way as to a ponyaga. It is simply tied with four straps: the two upper ones tighten it in a loop, and the two lower ones, supporting it, pass underneath and are pulled to the frame.
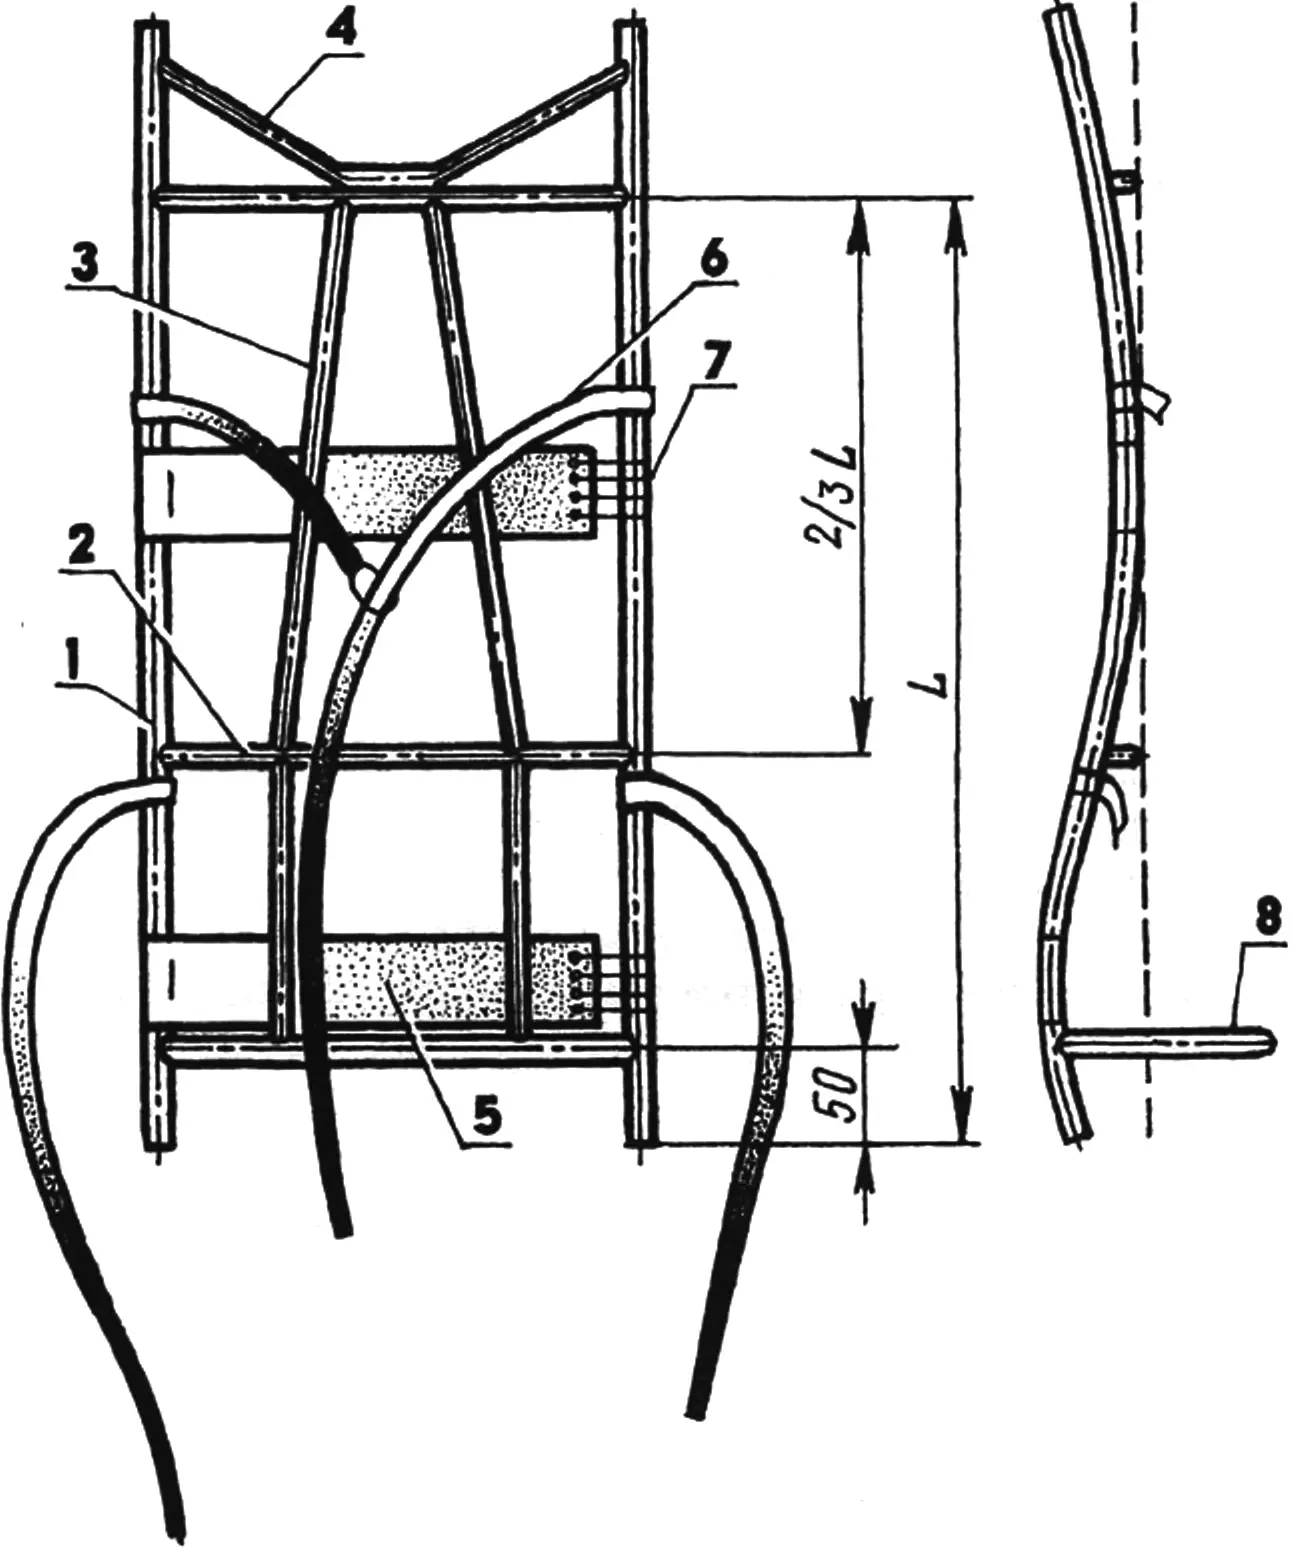
1 — side upright (duralumin tube Ø26, L750, 2 pcs.); 2 — crossbar (duralumin tube Ø20, L450, 3 pcs.); 3 — vertical support (duralumin tube Ø10, L650, 2 pcs.); 4 — reinforcement “horn” (duralumin tube Ø20, L520); 5 — bandage belt; 6 — binding strap; 7 — lacing; 8 — shelf (duralumin tube Ø26, L700)
Now about the main thing — the frame dimensions that make the backpack comfortable. Experienced tourists believe that for heavy loads and long hikes, frames must be strictly individual, that is, each is made to fit the body. Thus, its width equals shoulder width, the side uprights extend 20—50 mm above the shoulders, and end at hip-joint level. The bend profile of the uprights is chosen experimentally using thick wire. The placement of crossbars also follows certain rules: the upper one should be at the middle of the shoulder blades, the middle one — at two thirds of the distance between it and the lower ends of the uprights (L); and another is placed 50 mm up from the lower ends of the uprights. In addition, the bend of the crossbars must be such that they do not protrude beyond the straight line connecting them (shown dashed). As for the bandage belts, they can be moved up and down as convenient.
The frame design makes it unnecessary to pack and adjust items as carefully as with an ordinary backpack — the load’s center of gravity is automatically in the optimal position. Moreover, the frame allows using bags of different capacity and size, while sleeping bags, rolled tents, and other bulky items can be tied underneath. If a more curved semicircular shelf is added to the lower crossbar, it becomes easy to carry such heavy items as outboard motors and multi-seat inflatable boats.
It remains to add that when making a frame from duralumin tubes, these diameters should be used: uprights — 26, crossbars — 20, vertical supports — 10 mm. Approximate frame dimensions for a person of average height and build: overall height — 750, width — 450, distance between upper and lower crossbars — 450 mm. The weight of the entire structure is 2—2.5 kg.
As a result, using such backpacks greatly eases the tourist’s labor. However, it would be even better if the load were not behind the back but… rolling. Well, that can be done too. Only the entire frame — the backpack’s skeleton — will be metal, made of tubes 10—15 mm in diameter. In essence, this is already a knapsack covered with dense fabric, say, canvas. When a wheel and handles are added, the frame pack turns into a hand truck. For this, two tube sections with internal M12 thread — handle sockets — are welded to the bottom of the frame on the outside. In the ordinary knapsack version, future handles about 700 mm long are screwed into these sockets from above and complete the frame in that position.
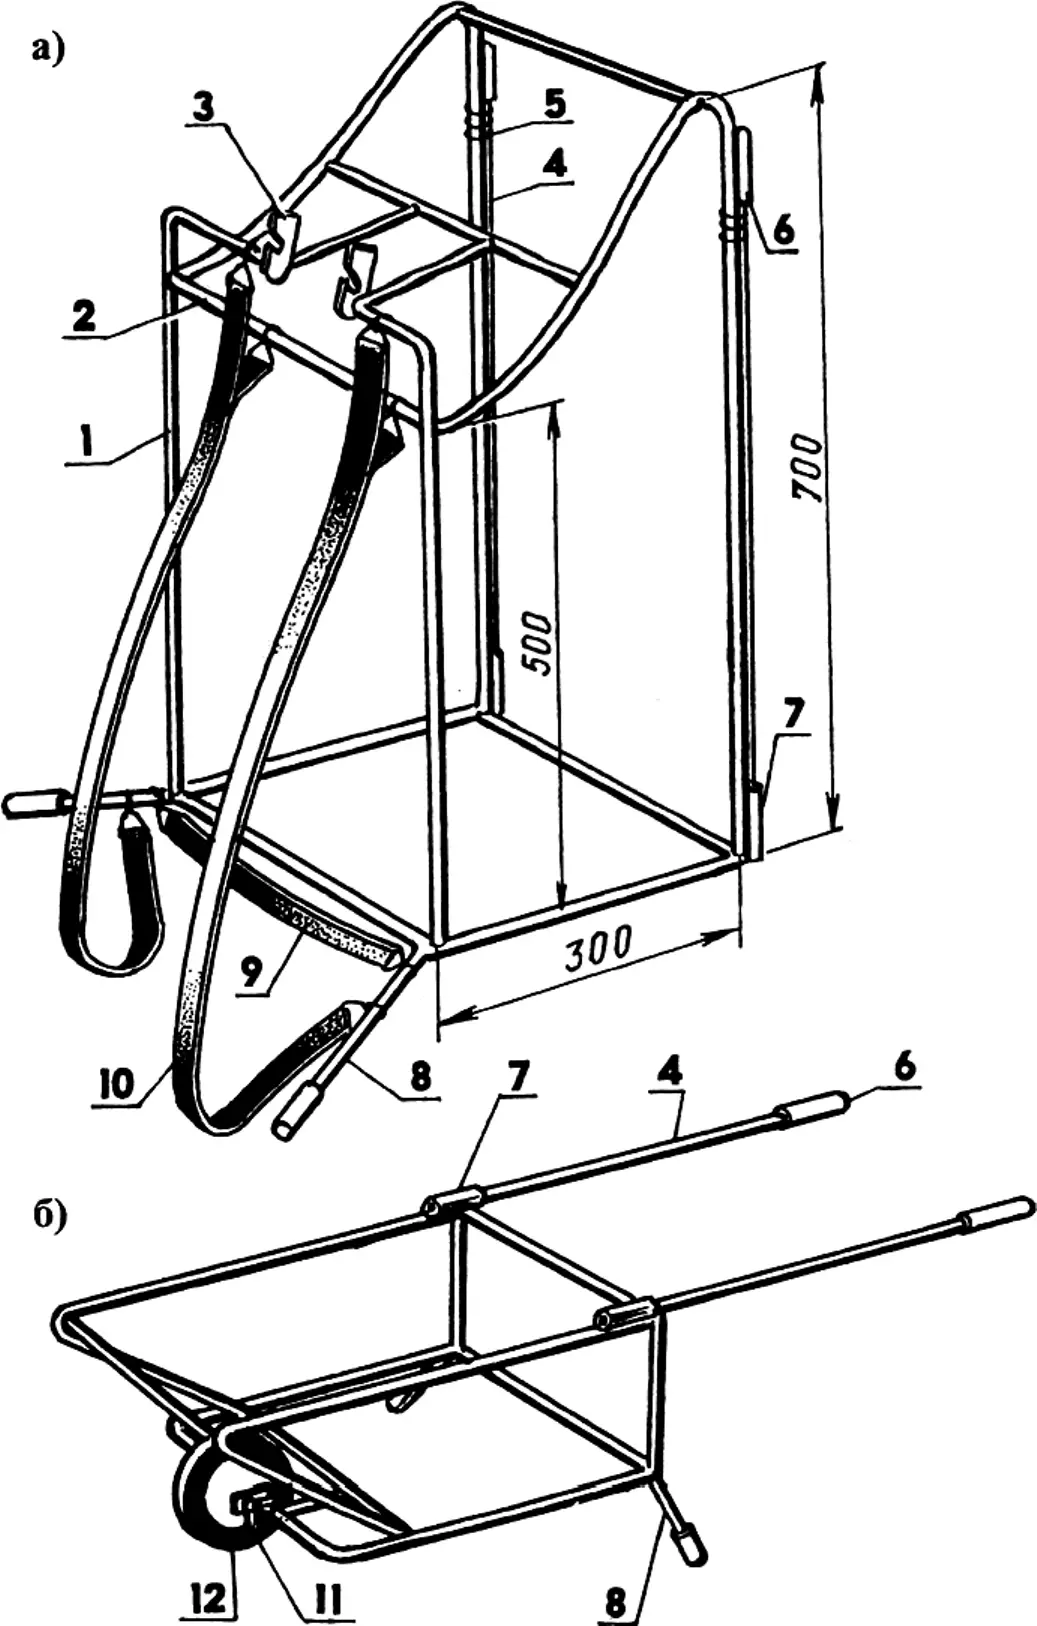
1 — frame; 2 — crossbar; 3 — lug (2 pcs.); 4 — handle (2 pcs.); 5 — handle wrap; 6 — handle tip (2 pcs.); 7 — handle sockets; 8 — support leg (2 pcs.); 9 — waist belt; 10 — shoulder strap (2 pcs.); 11 — wing nut (2 pcs.); 12 — wheel (from a child’s bicycle)
On the other, inner side there are support legs: in the wheeled hand-truck version, it rests on the ground on them. In the knapsack version, the shoulder straps and waist belt are clipped to them from below with carabiners through rings; moreover, on the move it is convenient to hold the backpack by them with your hands.
In the upper part of the frame a pair of lugs is installed; the wheel axle is secured in them with wing nuts — children’s bicycle wheels fit perfectly.
The shoulder straps are also attached to the crossbar from above with carabiners, and so that it does not bend under the weight, the straps are made double in this place and additionally hooked to the lug tubes.
Switching the knapsack from shoulders to wheels takes literally a couple of minutes: the straps are unfastened, the wheel is taken out of a specially sewn outer pocket and put in place, the handles are screwed into the sockets from below, and rubber or plastic tips are put on their ends. Tourists often use the freed straps to support the hand truck, clipping them to the frame and wearing them around the neck to free the hands. The advantages of a hand truck over a frame backpack are obvious, and on a good road they fully justify the extra 3 kg that includes the weight of the frame, wheel, and other hand-truck parts.
«Modelist-Konstruktor» No. 1’2001, V. TALANOV
Recommend to read
 BELOVED CLASS
United States of America entered into the 20-ies of XX century, the only real winner. "The great war" is not only completely removed from the scene of one of main competitors — Germany,... HEAVY WILL BE EASIER
Universal hook for easy carrying of bulky household items is easy to do from suitable tubing such as a roll-away bed. Especially for heavy things need an assistant and a second hook....
