
The development of garden and vegetable cooperatives, and the construction of dachas and cottages, has sparked increased interest in structures designed to preserve the generous gifts of autumn.
Recently, many gardeners prefer to store their harvested crops directly on the plot. However, this often leads to inevitable disappointment, since it is sometimes done without the necessary experience. For example, people fail to take into account that potatoes must be stored in a dark room at a temperature of 2–8 °C, with a relative air humidity of 85–95%. At the same time, the room must be well ventilated to prevent the accumulation of carbon dioxide, and it must be disinfected before each new loading.
It is clear that not everyone can create and maintain the required conditions. So what should you do to reliably preserve the harvest?
It is no coincidence that in the past, skilled craftsmen capable of building reliable storages and cellars enjoyed great respect in rural areas, alongside stove-makers and well-diggers. Today, however, the abundance of relevant literature and modern materials encourages many people to solve the problem of preserving the harvested crop on their own. Depending on personal skills, local terrain and natural conditions, as well as one’s own labor experience and available materials, everyone chooses their own solution. And the options can be very different — from the simplest to highly professional ones.
The most preferable among them is, undoubtedly, the construction of a cellar. In such a structure, with good waterproofing and properly selected ventilation, a stable temperature and humidity regime is maintained, along with favorable storage conditions: products keep for a long time, do not dry out, and do not lose their characteristic taste and aroma.
However, building a proper cellar takes considerable time. What if the season is already ending, the harvest has unexpectedly turned out abundant, and you would like to preserve it somehow?
Express storage
Since ancient times, rural areas have used not only permanent but also the simplest, yet no less effective methods of preserving agricultural produce. Among them, so-called burts (fig. 1) remain popular to this day. This is because the technology is quite accessible to many owners of gardens and vegetable plots, requires no major capital investment, and therefore allows the problem to be solved quickly — and most importantly, it is suitable for any crop.
Usually, a burt is simply a mound, for example of potatoes on the ground surface, covered with dry tops, spruce branches, or other suitable materials to protect against low temperatures. The site for a burt is chosen in a convenient corner of the plot; it should be dry in autumn and not subject to flooding during thaws and in spring; for this reason, a slight slope is preferable so that neither meltwater nor rainwater floods the burt.
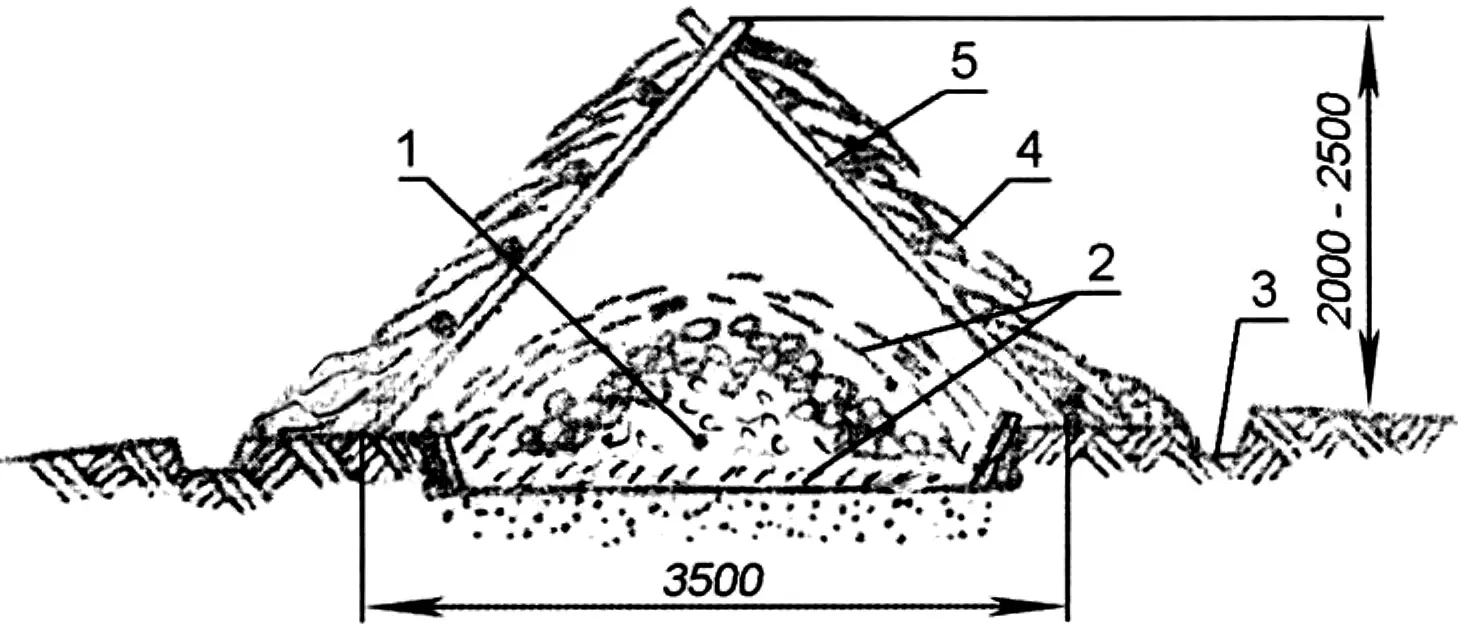
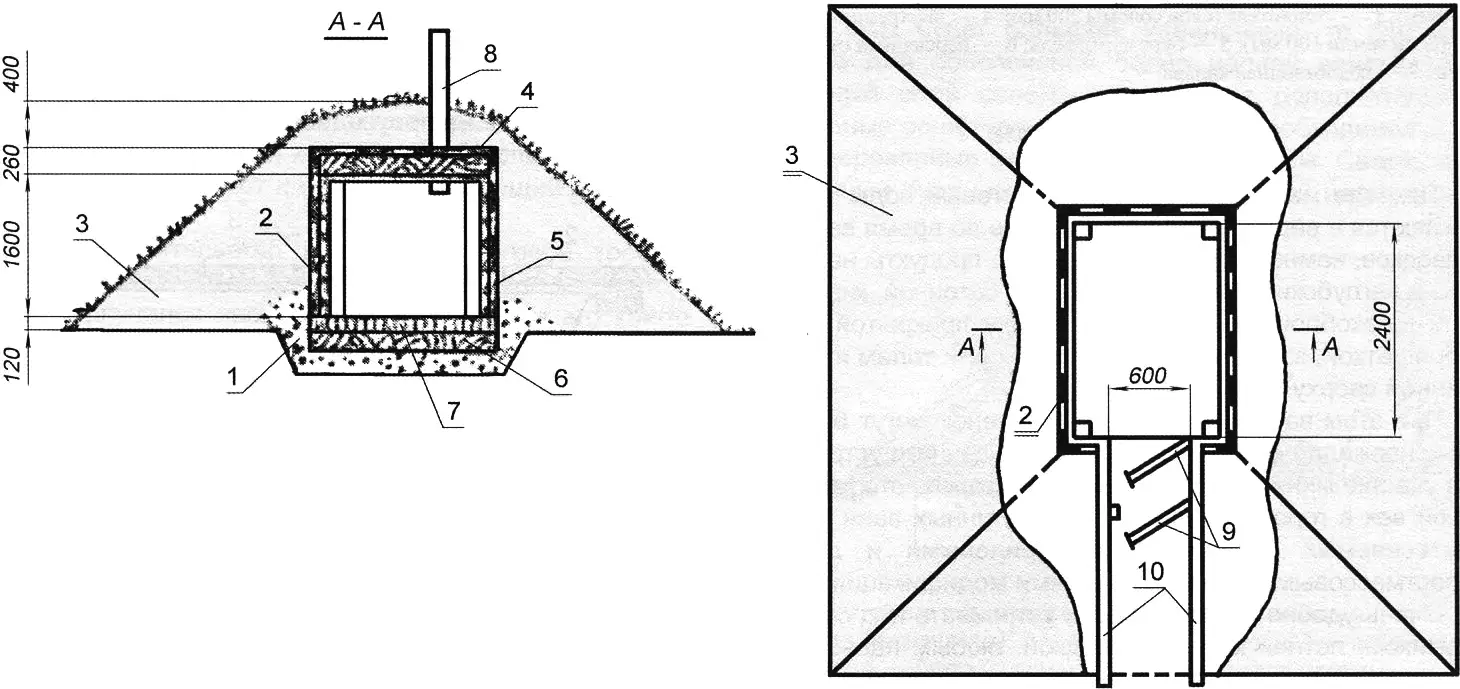
1 — tubers (root crops); 2 — insulation (straw); 3 — drainage ditch; 4 — tops (straw); 5 — roof frame (poles)
The selected plot of land is cleared, slightly leveled, and its surface is compacted. Then a good layer of straw is spread on top, and potatoes or other root crops and fruits are laid on it so as to form a local or elongated mound, which is also surrounded on all sides with a thick layer of straw. This is the burt itself. It is carefully covered with straw and dry soil, but in such a way that bundles of straw stick out at the sides, at the bottom, and at the top of the burt. This is necessary so that air exchange takes place through them, as if through special ventilation pipes.
The covering is formed in layers, in two stages: immediately after loading the products — with thin layers of straw and soil (so that excess moisture and vapors are removed faster), and with the onset of steady cold — with the main thick layer of straw and soil. Surface snow will also serve as additional thermal protection, but when spring thaw begins, it must be removed first.
If the burt is large and elongated, triangular lattice boxes are additionally laid on the bottom layer of straw during loading to ensure better ventilation, and if necessary, vertical wooden ones are also installed at the ends. Branches or specially made slat shields are placed on top of the loaded burt to strengthen the earthen mound.
The area on which the burt is laid is surrounded by a shallow ditch (up to 0.4 m) so that during heavy rains or snowmelt water does not get inside the storage.
Umbrella for a burt
Surface loading of a burt is especially popular in areas with mild winters. In the Non-Black Earth region, burts are recommended to be laid in shallow ground depressions — this option provides better protection against frost.
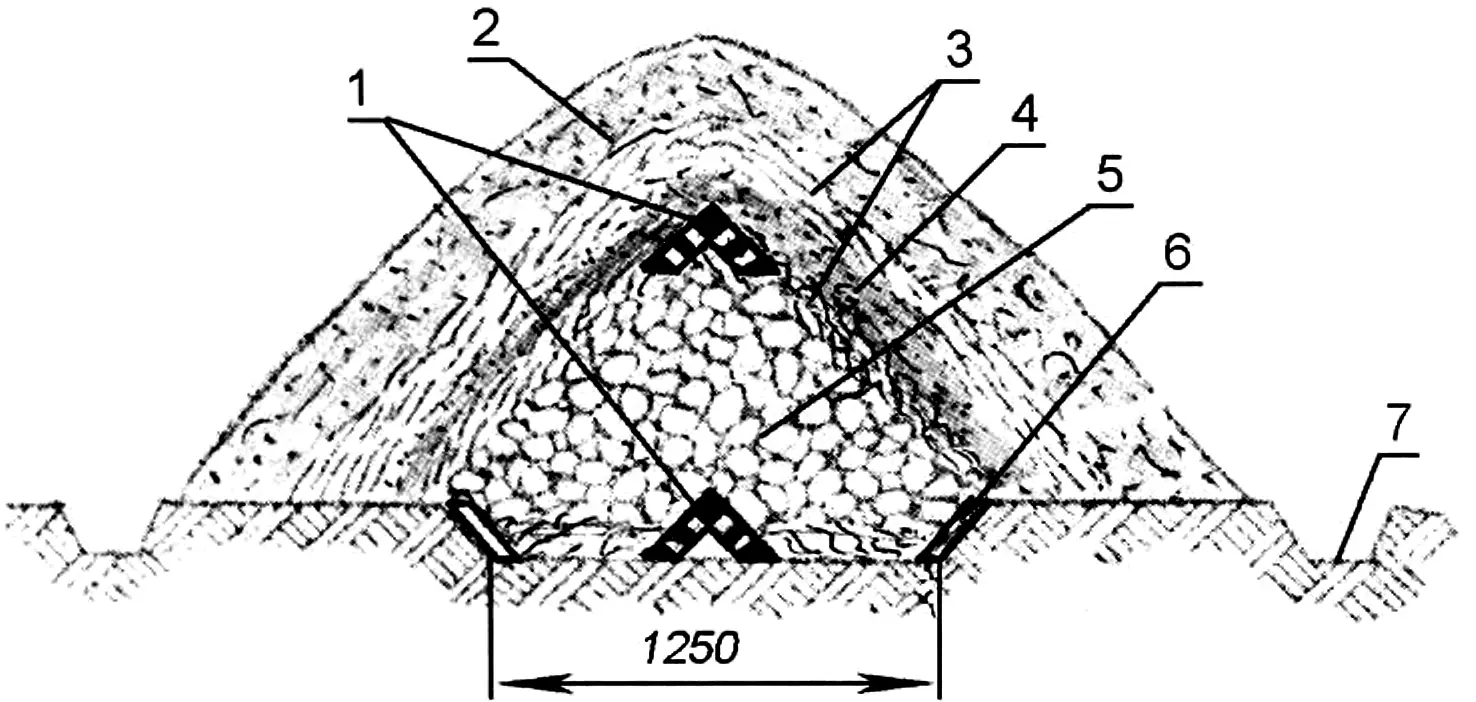
1 — ventilation grilles; 2 — outer embankment (300 mm soil layer); 3 — insulation (200 mm straw layers); 4 — inner embankment (100 mm soil layer); 5 — potato burt; 6 — wooden edging of the pit; 7 — drainage ditch
The design of such a covering (fig. 2) is an earthen “bath” about 0.3 m deep, with sloping (inward) walls reinforced with poles or brushwood. Such a burt may have two coverings on top: an earthen and a straw one directly on the product mound, as well as a simple gable roof over the entire storage — for more reliable protection against severe winter conditions.
Such a roof is made of clay-straw or wattle, on lathing of peeled poles. This storage is built quickly; it is not only reliable but also inexpensive, since it is made with one’s own hands and from local materials.
Not just a pit
Where the terrain is dry and groundwater does not rise into the upper layers of soil even during spring floods, it is much easier to store products in shallow pits bounded by a concrete, brick, or slag-block wall and covered on top with a light lathing lined with roofing felt or roofing paper and covered with soil (fig. 3).
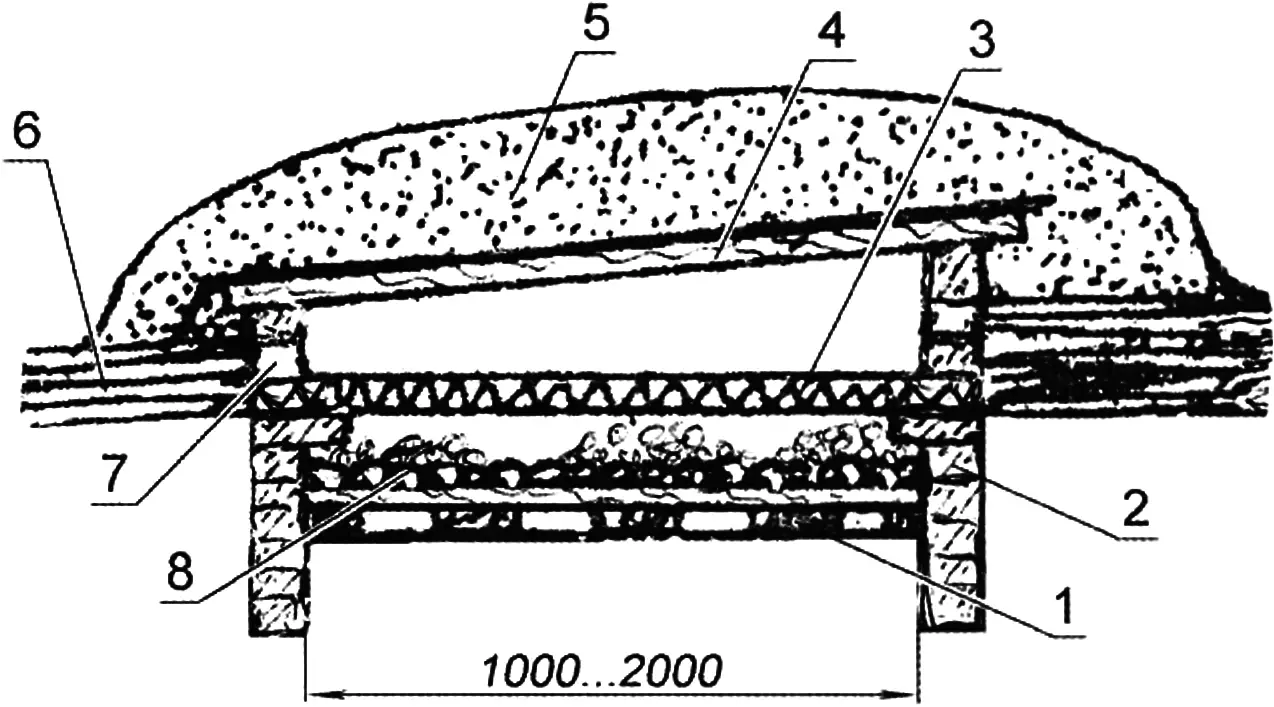
1 — lattice flooring; 2 — brick wall of the pit; 3 — hatch (fiberboard, wooden shield); 4 — lathing-roof; 5 — earthen embankment;
6 — ventilation layer of straw; 7 — ventilation opening; 8 — root crops
In this case, the options for reinforcing the walls can be most unexpected. For example, many gardeners arrange miniature cellars on their plots from old cast-iron bathtubs that have served their time in city apartments (fig. 4), being replaced by modern acrylic and other plastic and metal models.
It is very convenient to arrange such cellars under a garden house, summer kitchen, gazebo, or any canopy. In essence, these are miniature refrigerators thanks to which products in summer are always, as they say, at hand in recreation areas. An old bathtub is installed in a corresponding depression on a sand cushion 8–10 cm thick. Being sunk into the ground up to the sides, it is covered in two layers: there is an additional hatch under the top cover. Neither of them should impede the necessary ventilation, while the walls will provide reliable protection against rodents.
In a “bathtub storage” you can place not only pickles and jams, but also vegetables in polyethylene bags or plastic boxes and containers.
Cellars
The manufacture of stationary vegetable storages — cellars — is much more durable, but also more complex and expensive; however, the costs of time, labor, and money pay off handsomely in the end. Of course, all recommendations on their construction serve only as a basis for one’s own creativity in each specific case. The main thing is to observe three important conditions: waterproofing, thermal insulation, and ventilation. And an obligatory requirement for cellar construction is high-quality execution of building work, which is the key to reliable preservation of products.
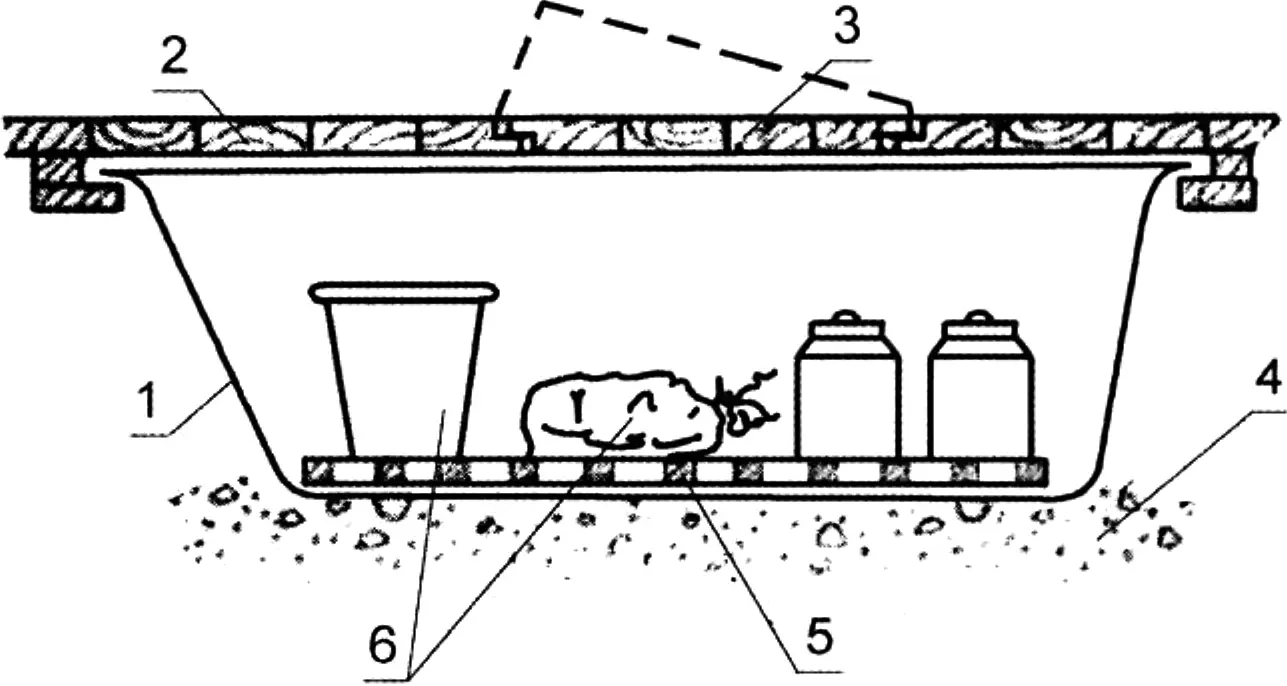
1 — bathtub body; 2 — cover (board shield); 3 — hatch; 4 — bedding (sand cushion); 5 — wooden grating; 6 — product packages
On a garden plot, a cellar is usually built with a volume of up to 8 m3, while on a homestead plot a somewhat larger one is possible — about 15 m3.
The important economic value of a permanent storage is determined not only by its design, but also by its location on the plot. If previously a freestanding cellar was the most common option, today people try to combine it with the main buildings — directly under the house, under the summer kitchen, utility block, or garage. Regardless of their location, reliable and long-term operation of such structures will depend mainly on careful execution of building and waterproofing work. The latter conditions are especially important for reliable protection of the storage from the destructive effects of surface and groundwater.
Choosing the design
A carefully and properly made cellar has great operational and economic value. The features of its design are chosen depending on the specific purpose, local conditions, the maker’s own skills, and available building materials.
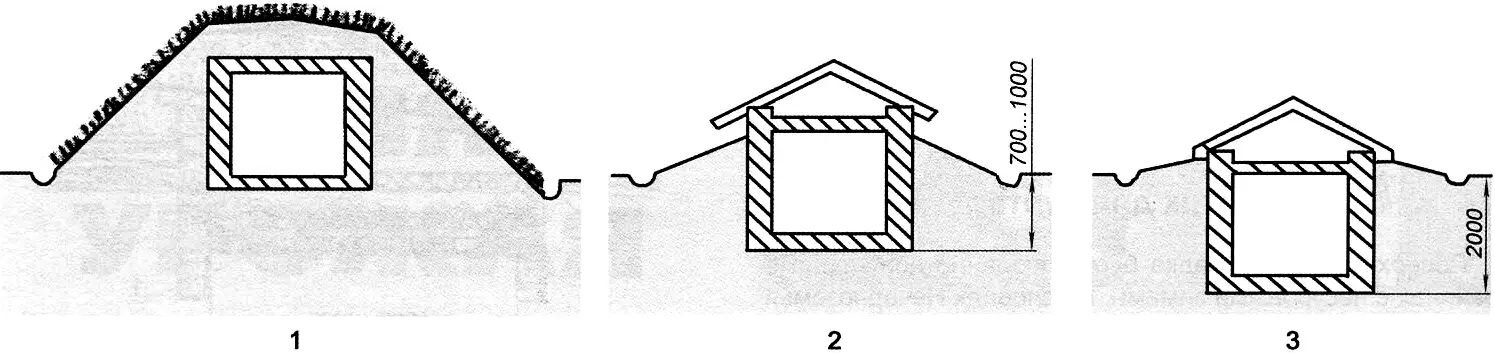
1 — above-ground (with earthen embankment); 2 — semi-buried; 3 — underground (fully buried)
Figure 5 shows the main types and designs of cellars. By their level relative to the ground, they are usually divided into three kinds: above-ground, semi-buried, and underground (fully buried). Which of them to prefer depends mainly on the hydrological conditions of the plot, a convenient location, the need for useful storage area, and the availability of building materials.
Since cellar construction takes considerable time, it is usually timed for mid-summer — the driest period of the season. Before starting construction, you should prepare the necessary materials and tools in advance so as not to interrupt work and lose precious time.
Above-ground cellar
Above-ground storages (fig. 6) have many advantages, and they are all obvious. The main one is that they can be built even on waterlogged soils or wet ground. In addition, their construction does not require special professional skills, and building will not require scarce or expensive materials — local improvised options are sufficient.
1 — sand-gravel cushion; 2 — walls of slab wood; 3 — earthen embankment; 4 — hydrothermal insulation (clay-straw); 5 — wall waterproofing (building paper); 6 — clay lock; 7 — floor (brick on edge); 8 — ventilation pipe; 9 — inner and outer doors; 10 — entrance
If groundwater rises close to the ground surface, such an “external” cellar is placed on simple waterproofing and a sand-gravel bedding.
Walls are made of coarse peeled slab wood (waste lumber in the form of long planks) or not very thick logs, and the gaps are carefully caulked with moss or oakum. The entire wooden part must be disinfected before assembly or treated with special liquids such as “Senezh” and “Pinotex”. The outer surfaces are coated twice with hot bituminous mastic or melted bitumen and, without letting it cool, covered with roofing felt to protect against moisture.
The ceiling is lined with a 50 mm layer of clay-straw, and then covered with polyethylene or roofing felt.
The floor is laid with brick on edge in a herringbone pattern, over a layer of clay for waterproofing. As practice has shown, about 64 bricks are needed per square meter of floor.
To maintain a constant temperature and humidity regime in the cellar, an earthen mound (embankment) is recommended on top; it should be covered with sod or sown with lawn grass. The mound can also be used as an alpine hill, with decorative plants and shrubs that will also serve to strengthen the embankment.
Inside the storage, bins, shelves, and lighting are arranged; a ventilation pipe is installed, and two doors — inner and outer — between which insulating material is placed during severe frosts.
Mini-cellar
Small above-ground cellars in the form of insulated wooden box-like houses (fig. 7), about human height, have become widespread among gardeners and dacha owners. No special area is needed for it — the size of the mini-cellar is dictated by the family’s needs and the volume of produce grown. And it can be built simply from available improvised materials.
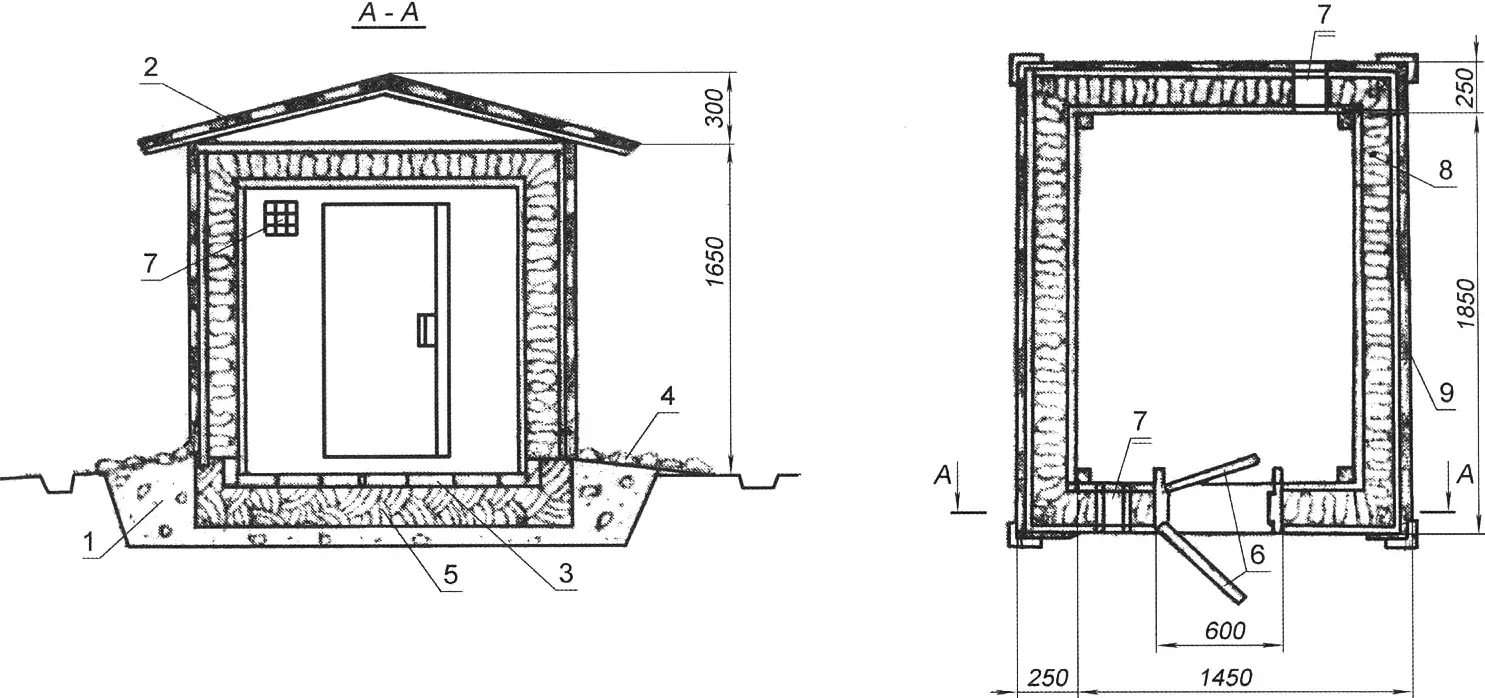
1 — sand-gravel base cushion; 2 — gable roof; 3 — brick floor; 4 — blind area; 5 — clay lock; 6 — inner and outer doors; 7 — ventilation openings; 8 — insulation (moss, straw, oak leaves); 9 — waterproofing (building paper)
Construction is carried out in the following sequence. At the selected site, a foundation is prepared — a shallow ground depression (0.3–0.5 m) is made, leveled, slightly compacted, and drainage is prepared: a layer of 0.08–0.1 m of coarse sand, fine gravel, pebbles, brick rubble, or expanded clay is poured in. Usually half a cubic meter of fill material is enough for 1 m2 of excavation. Next, the floor is prepared: a layer of soft clay 0.15–0.2 m thick is laid, and red fired brick is sequentially pressed flat into it (about 32 bricks will be needed per square meter of floor).
The above-ground part is a box structure with tightly nailed double walls of thick boards (40–50 mm). Thermal insulation material is placed in the gap between the walls: dry forest moss, oak leaves, expanded clay, sawdust treated with copper sulfate and dried with slaked lime. Experienced builders do not use mineral wool: over time it settles and loses its insulating properties.
Wooden surfaces are best treated with antiseptic. To prevent drafts through the walls, they should be lined with building paper, roofing felt, or roofing paper. An entrance with two doors is arranged on the end side, with insulation also placed between them for winter. On the same wall, a ventilation opening like a transom 0.12×0.12 m is made and covered with fine mesh. A canopy of any suitable material should also be made over this wall.
The cellar is covered on top with a single- or gable roof of slab wood covered with roofing felt or corrugated slate. A clay-gravel blind area 1 m wide with a slope is arranged around the perimeter of the walls. And at a distance of 0.5 m from the walls, a drainage ditch 50 cm deep is made, filled with brick rubble or gravel.
Underground cellar
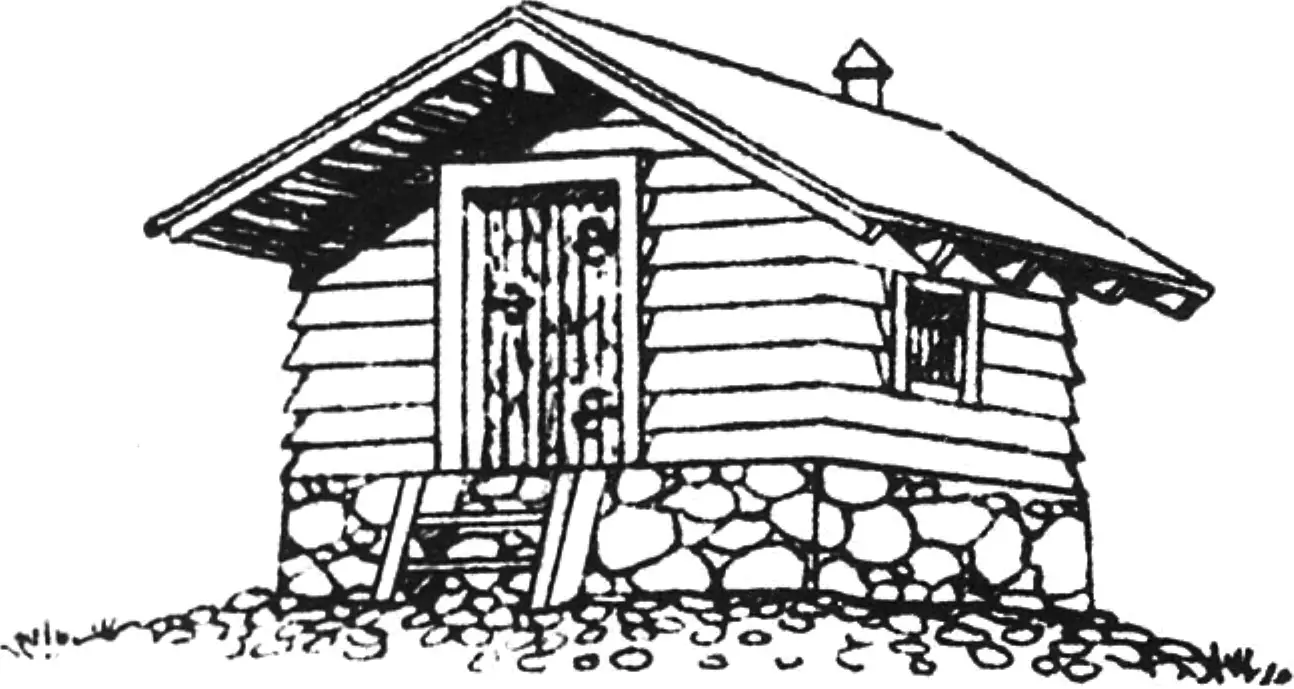
If the soil on the plot is dense and the place is dry and elevated, you can build the simplest underground cellar. At one time, such cellars became widespread in Yaroslavl Governorate, from which they received the name Yaroslavl cellars. They are convenient because they require no large expenditures and are built from local materials.
The pit (excavation) is dug with slightly sloping walls so that the soil collapses less (fig. 1).
1 — potato bin; 2 — drainage ditch; 3 — roof slope; 4 — shelves; 5 — clay floor
The pit walls are lined with slab wood, boards, or wattle. Lining is all the more necessary if the cellar is dug in sandy soil. It makes the cellar more durable and creates more favorable conditions for storing vegetables and potatoes. The lining is best made demountable so that in summer part of the structure can be dismantled and taken above ground for drying.
The cellar floor is clay, 80–100 mm thick, with the addition of fine sifted brick rubble. Crushed stone compacted to a thickness of 50 mm is laid in the base of the floor and poured with hot bitumen, which prevents capillary wetting.
The ceiling is made of poles or low-grade lumber, covered on top with clay-straw coating and filled with soil. The thickness of the thermal insulation fill of the ceiling is 300–400 mm.
The roof over the cellar is gable, lowered to ground level, covering the pit with overhangs of at least 500 mm on each side; it is made of fitted slab wood or any other local material, such as clay-straw, reeds, or branches (wattle). The roof ridge is best made of thick sawn boards with a strip of roll material underneath — roofing paper or roofing felt.
The cellar height is 1.8 m. If the groundwater level does not allow digging to that depth, the cellar height can be reduced or the platform can be raised to elevate the cellar floor. Groundwater must not come within 1 m of the cellar base. The groundwater level is determined in spring, when it is highest.
Inside, the cellar is divided into bins (partitions). Bins are provided about 1 m high, with a lattice floor for ventilation. The distance between shelves in height is 500–600 mm.
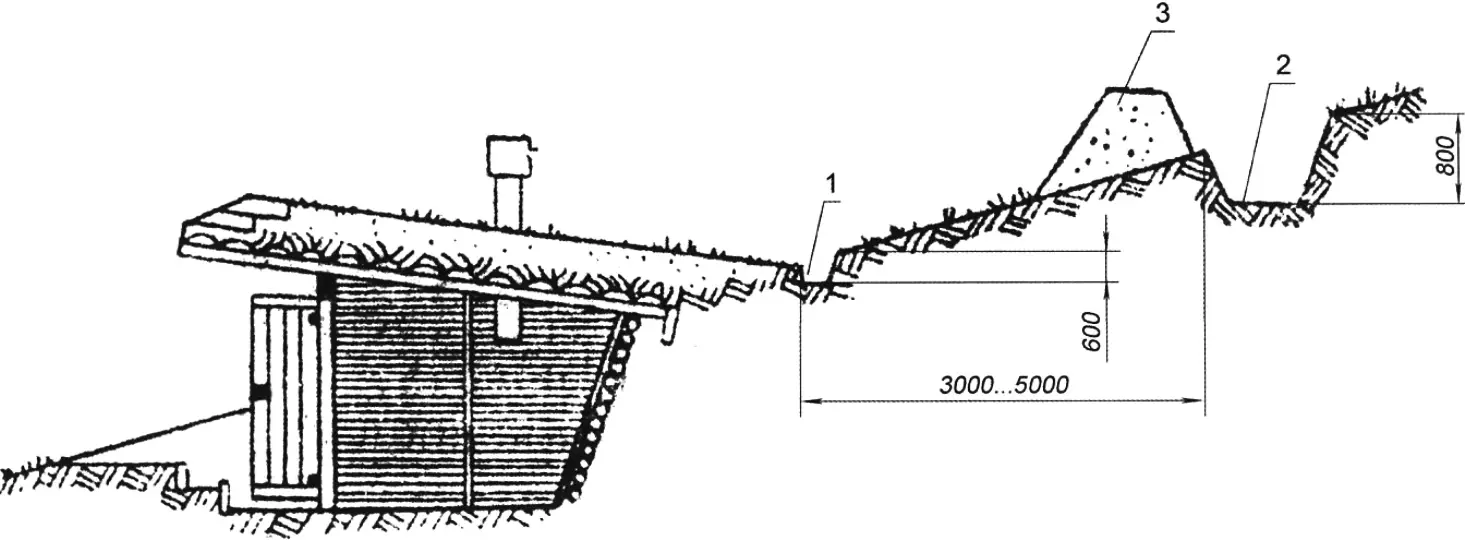
1 — drainage ditch; 2 — upper intercepting ditch; 3 — mound of soil removed when digging the ditch
To prevent the cellar from freezing in winter during severe frosts, the ceiling is additionally insulated with dry oak leaves, moss, peat, or simply straw.
A drainage ditch 500–600 mm deep is arranged around the cellar, graded so as to ensure rapid removal of atmospheric water.
If the cellar is built on a hillside, an upper drainage (catch) ditch at least 700–800 mm deep is also laid above it at a distance of 3–5 m (fig. 2).
It is better to arrange the ditch not across the slope, but at an angle (diagonally), so that even during very heavy downpours it will not be breached and will not flood the covering.
An obligatory feature of any cellar is a ventilation pipe. Thanks to it, the necessary freshness of air and temperature are maintained in the storage — two main conditions for quality storage of vegetables and fruits.
A regular thermometer should definitely be hung in the cellar, and even better a psychrometer, to control not only temperature but also relative air humidity.
In summer, the cellar hatch is left open for drying and ventilation. All demountable structures are taken above ground, thoroughly washed with hot water and soda, and dried in the sun.
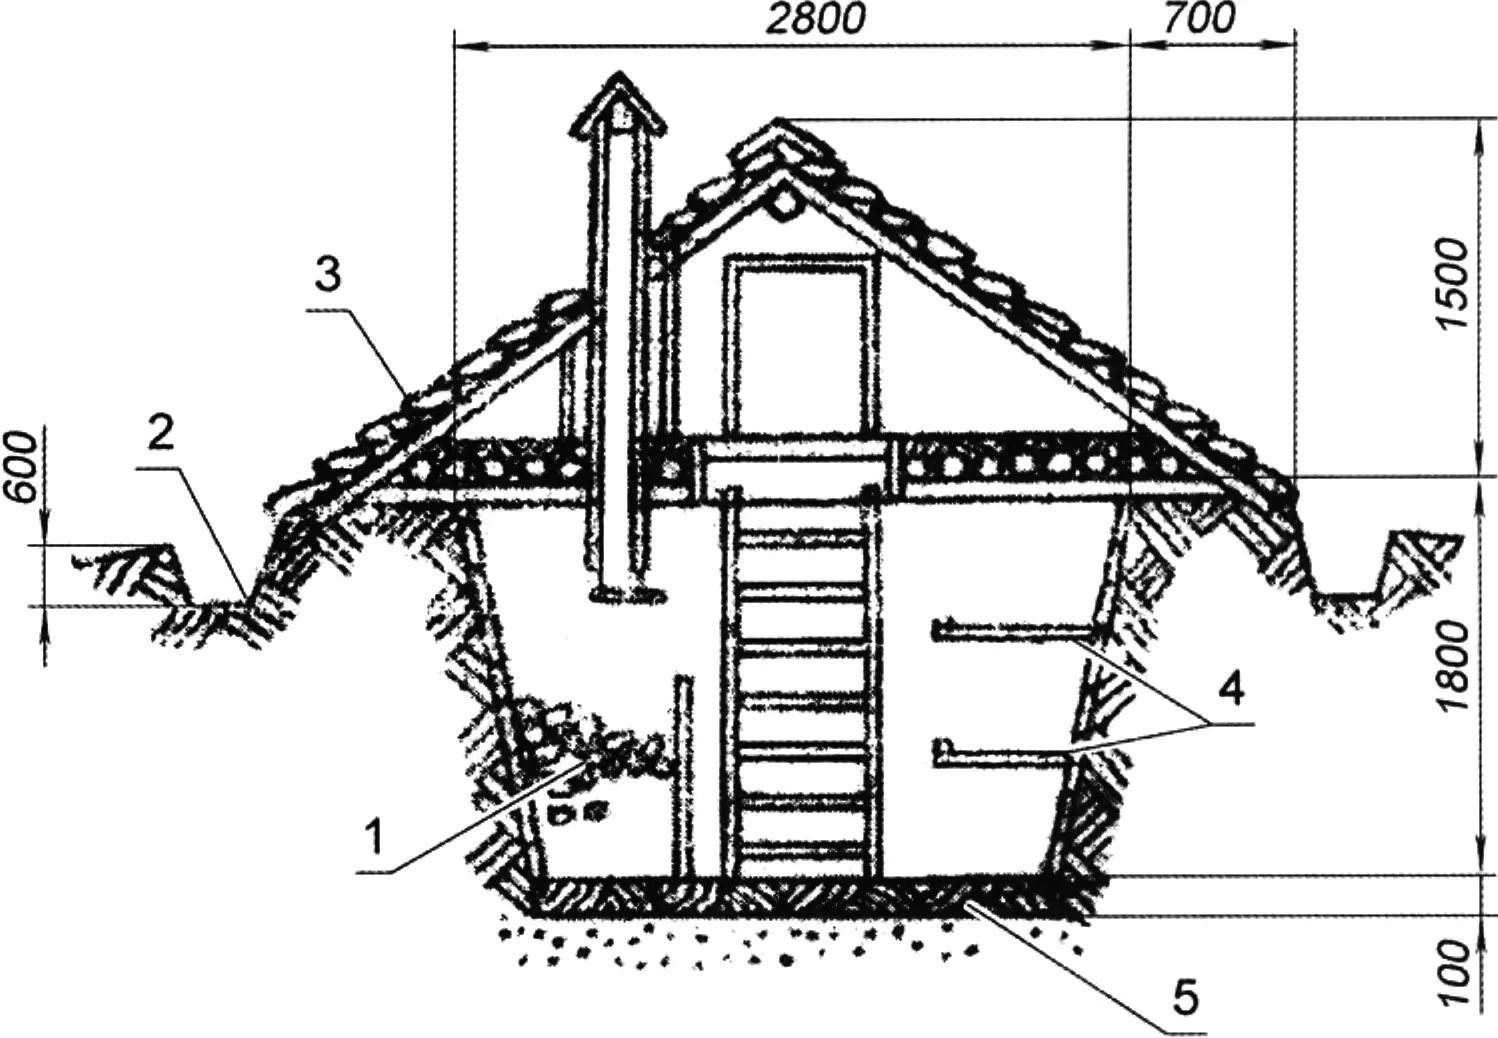
The space under the roof above the main cellar ceiling is called the cellar house (pogrebnitsa). Despite its relatively small volume, this room is also used for household purposes. The cellar house can be used as a room for short-term storage of vegetables before frosts, as well as for storing garden tools. If necessary, this part of the storage may have not only a roof but also its own walls.
Cellar house
A cellar with a cellar house is popular in many regions. It consists of two parts: the lower one — buried in the ground to a depth of about 2 m, which is the cellar itself, and the upper one — the so-called cellar house. In such a cellar it is cool in hot weather, and in winter it is much warmer than outside (fig. 3, 4).
The cellar house, being on the surface, protects the buried cellar from precipitation, winter cooling, or summer heating. It can be used as an auxiliary room. The cellar walls are built of durable materials: concrete (200–300 mm thick), stone and red brick (250–380 mm thick), slab wood (60–80 mm), or logs (120–180 mm in diameter) and are reliably insulated. The type of waterproofing is chosen depending on the specific conditions of the construction site. The cellar house walls are erected from thick peeled slab wood or planks. The roof is pitched, with wide overhangs, on solid lathing, with roofing of asbestos-cement sheets or roofing felt.
A clay-gravel blind area at least 1–1.2 m wide with a slope of 1:10 is arranged from the cellar house walls.
The entrance to the cellar house is best made on the north side, and the door — of thick (40–50 mm) tightly fitted boards. The door can be decorated with ornamental hardware — hinges, handles, and latches.
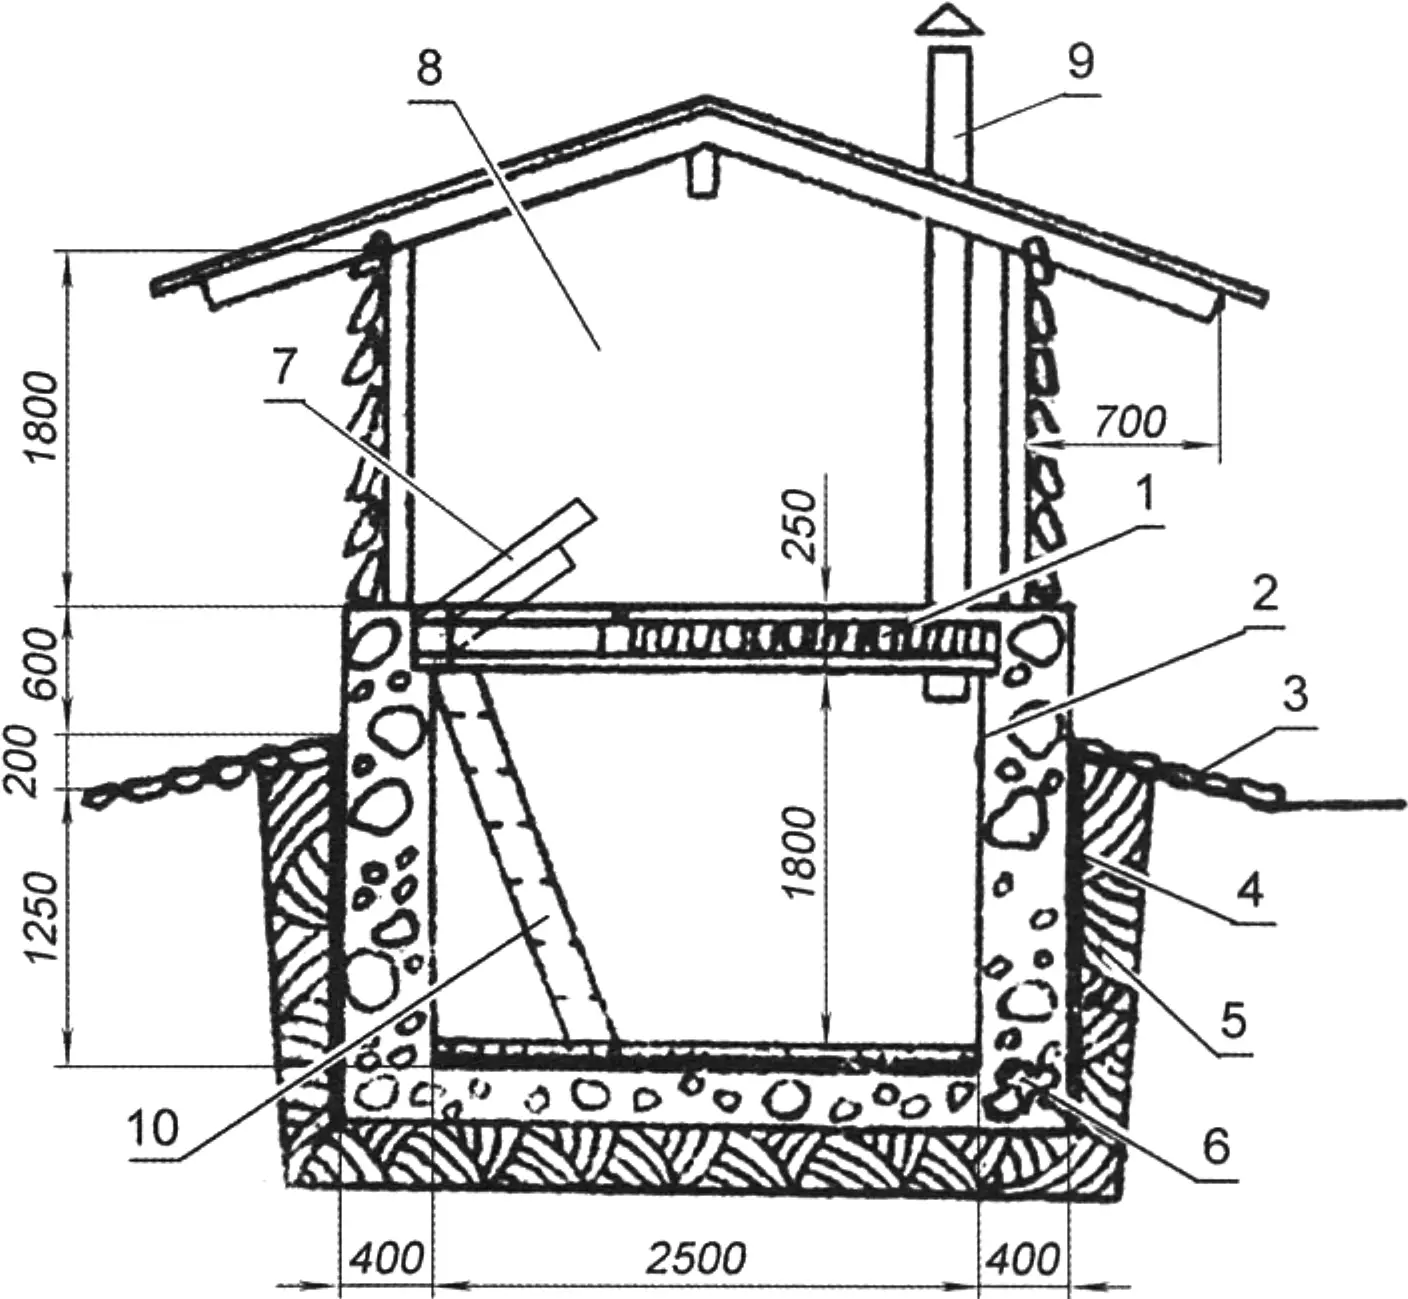
1 — insulated ceiling; 2 — lime cellar wall with whitewash; 3 — blind area; 4 — hot bitumen coating (2 mm); 5 — clay lock; 6 — rubble concrete; 7 — hatch; 8 — cellar house; 9 — ventilation pipe; 10 — stairs to the cellar
In wet soils, small depressions — sump pits for collecting water — can be dug around the perimeter of the pit. Water from the sumps should be periodically scooped out.
The pit bottom is leveled, compacted, and filled with draining material — a layer of rubble 80–100 mm thick. A layer of kneaded clay (20–30 mm) is laid on the rubble. Fat clay is best; it is spread and compacted, then a concrete bedding — mortar 100 mm thick — is laid. After the concrete sets, in 10–15 days a cement-sand screed 50 mm thick is laid on it and carefully smoothed with a steel trowel — iron-floated.
The spaces between the cellar walls and the ground, the so-called backfill voids, are filled with clay, laying and compacting it in a layer 200–300 mm thick, i.e., a side clay lock is arranged.
The cellar ceiling is insulated. Expanded clay, sifted brick rubble, and moss are recommended as insulation; they are laid on a clay coating (30 mm). The ceiling may be arched, depending on the cellar design. A hatch 70×70 cm is provided in the ceiling flooring, under which an inclined staircase is installed.
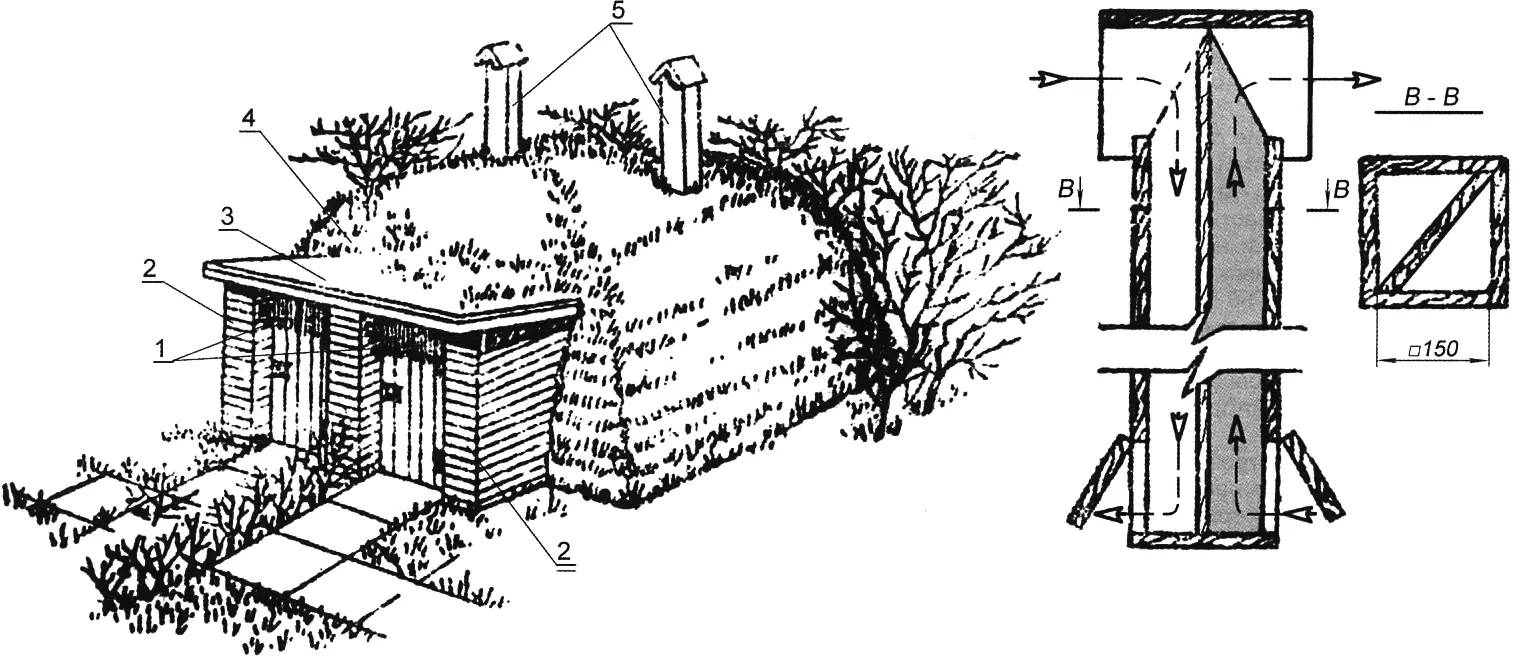
1 — two independent cellars; 2 — brick cellar walls; 3 — common block canopy; 4 — earthen embankment; 5 — ventilation pipes of each cellar in the block
To maintain the temperature and humidity regime, the cellar is equipped with a ventilation pipe (see fig. 4, 5). To increase air-exchange efficiency, the ventilation pipe can be divided into two channels: exhaust and supply. Air will be removed from the cellar through the first, and fresh air will enter from outside through the second. Interestingly, two compartments are possible not only in the ventilation pipe, but also… in the storage itself.
Double cellar
The need for a storage representing a twin cellar with separate entrances to independent blocks may be dictated by different reasons. For example, neighbors may jointly build such a block cellar on the boundary line of their plots (fig. 5, 6).
The advantages of such a cellar are obvious: first, overall construction costs are reduced on average by 20–25%, and materials are saved due to shared structural sections (inner wall, roofing, etc.); second, a cellar located on the boundary of two adjacent plots allows more rational use of land. Incidentally, the soil itself is used directly for the structure: the ground removed during shallow foundation excavation is then used to embank the cellar walls.
A block cellar is also convenient for one family: in separate compartments, products can be stored for different periods, or potatoes and vegetables can be kept separately, since when stored together they may acquire an unpleasant odor not characteristic of them.
After the pit is dug, a layer of rubble or brick rubble 80–100 mm thick (0.1 m3 per 1 m2 of base) is poured onto the cleared and leveled site, compacted, and poured with hot bitumen.
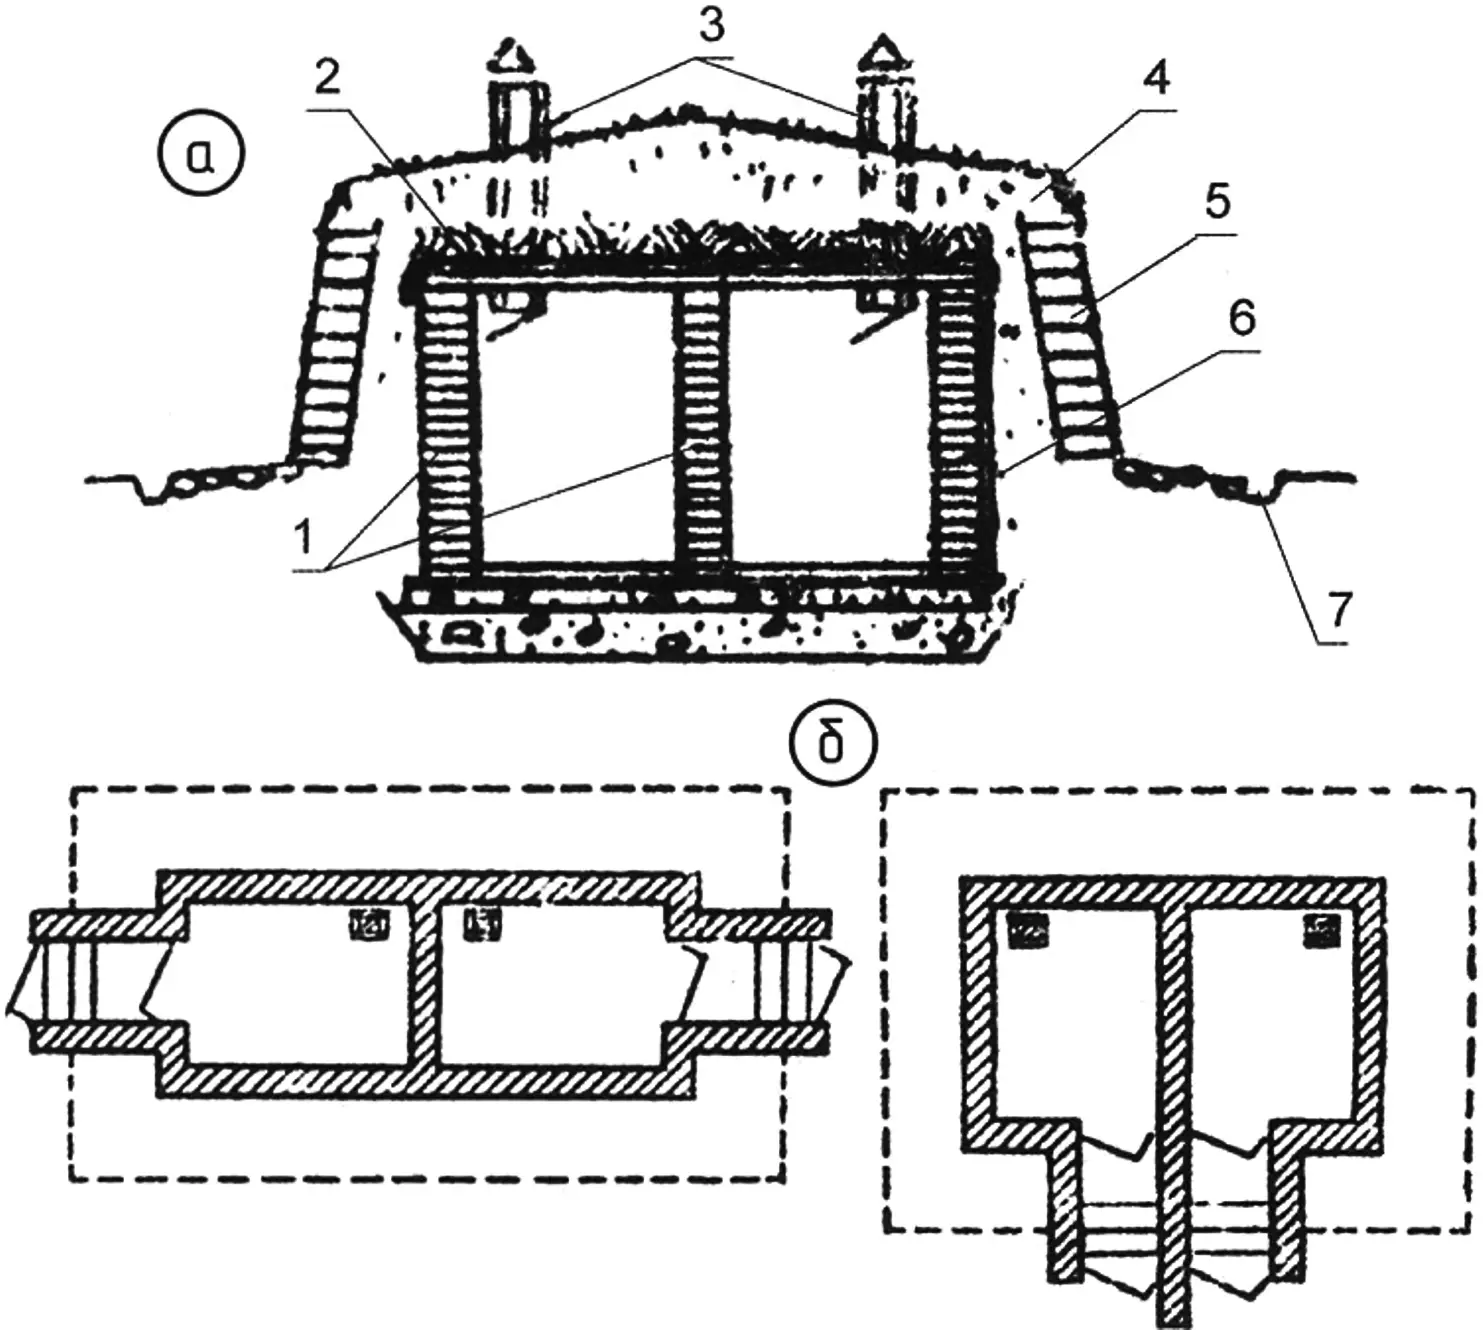
1 — brick walls; 2 — roofing felt on block ceilings; 3 — ventilation pipes; 4 — earthen embankment; 5 — sod reinforcement of embankment; 6 — wall waterproofing (bitumen); 7 — drainage ditch
Next, a monolithic foundation of dense concrete is laid, consisting of 1 part cement, 2 parts sand, and 4 parts rubble or gravel.
A week later (after drying), brick walls are erected, then they are covered on both sides with a 20 mm layer of cement-sand plaster. At the same time, a floor 40–50 mm thick is made from cement-sand mortar and smoothed with a steel trowel.
Ceilings are made of thick fitted slab wood or boards 50 mm thick. The ends of the boards at the points of support on the brickwork are pre-coated with hot bitumen, which gives them durability. The ceilings are insulated with a 200 mm layer of clay-straw, and then with soil at least 500 mm thick, on which grass is sown. Wall slopes are reinforced with sod.
Outside, the cellar walls are waterproofed with hot bituminous mastic (bitumen with filler) or, over a pre-applied bituminous primer 0.1 mm thick, with molten hot bitumen in 2 layers 2 mm thick (bitumen consumption 2 kg/m2). If necessary, a clay lock is provided.
«Modelist-Konstruktor» No. 9’2011, 12’2011, Yu. PROSKURIN, L. KOROTKEVICH
Recommend to read
 Heated cellar
To store the harvested root crops and vegetables, as well as plant seeds, flower tubers and bulbs, throughout the entire winter on any garden or dacha plot, a root cellar is necessary. If... RESONATORY CLIMBS
Today I want to introduce You to the model class B1, having almost the same set of wings. This force diagram consoles with a transverse set of pine slats is fully justified, since for...
