
I won’t go into detail about how fascinating (though not always easy) hiking can be. However, after a long, and sometimes multi-day trek, fatigue builds up in your muscles, along with sweat and dirt on your body. In hot weather, you can wash and relax in a river, lake, or stream. But in cool weather, you can’t do without a bathhouse.
So, the simplest bathhouse we used during hikes was quite primitive. On the shore of a stream or lake, we selected a spot with suitable boulders — two for supports and one to cover the firebox. Then, the firebox was surrounded with smaller stones, leaving a few small holes for smoke and one larger one for feeding the firewood. Such a stone stove was fired up for 2–3 hours, after which the coals and embers were removed, and a tent was quickly pitched over it. The bathhouse was ready — time to steam! Water was heated in a suitable container by lowering preheated stones from the stove or fire into it.
But I want to tell you about another (more advanced) type of field bathhouse that we built at the final point of our regular route. Such a bathhouse can also be built on a garden plot or as a summer house option.
In the not-so-distant past (the 1990s), I led the “Hiking” section at the city’s young technicians’ station. Together with club members and fellow hikers, we decided to build a field bathhouse in one of the beautiful distant ravines — the final stop of our weekend hiking route.
First, in the workshop, we built a bath stove using whatever materials we had on hand — and there weren’t many.
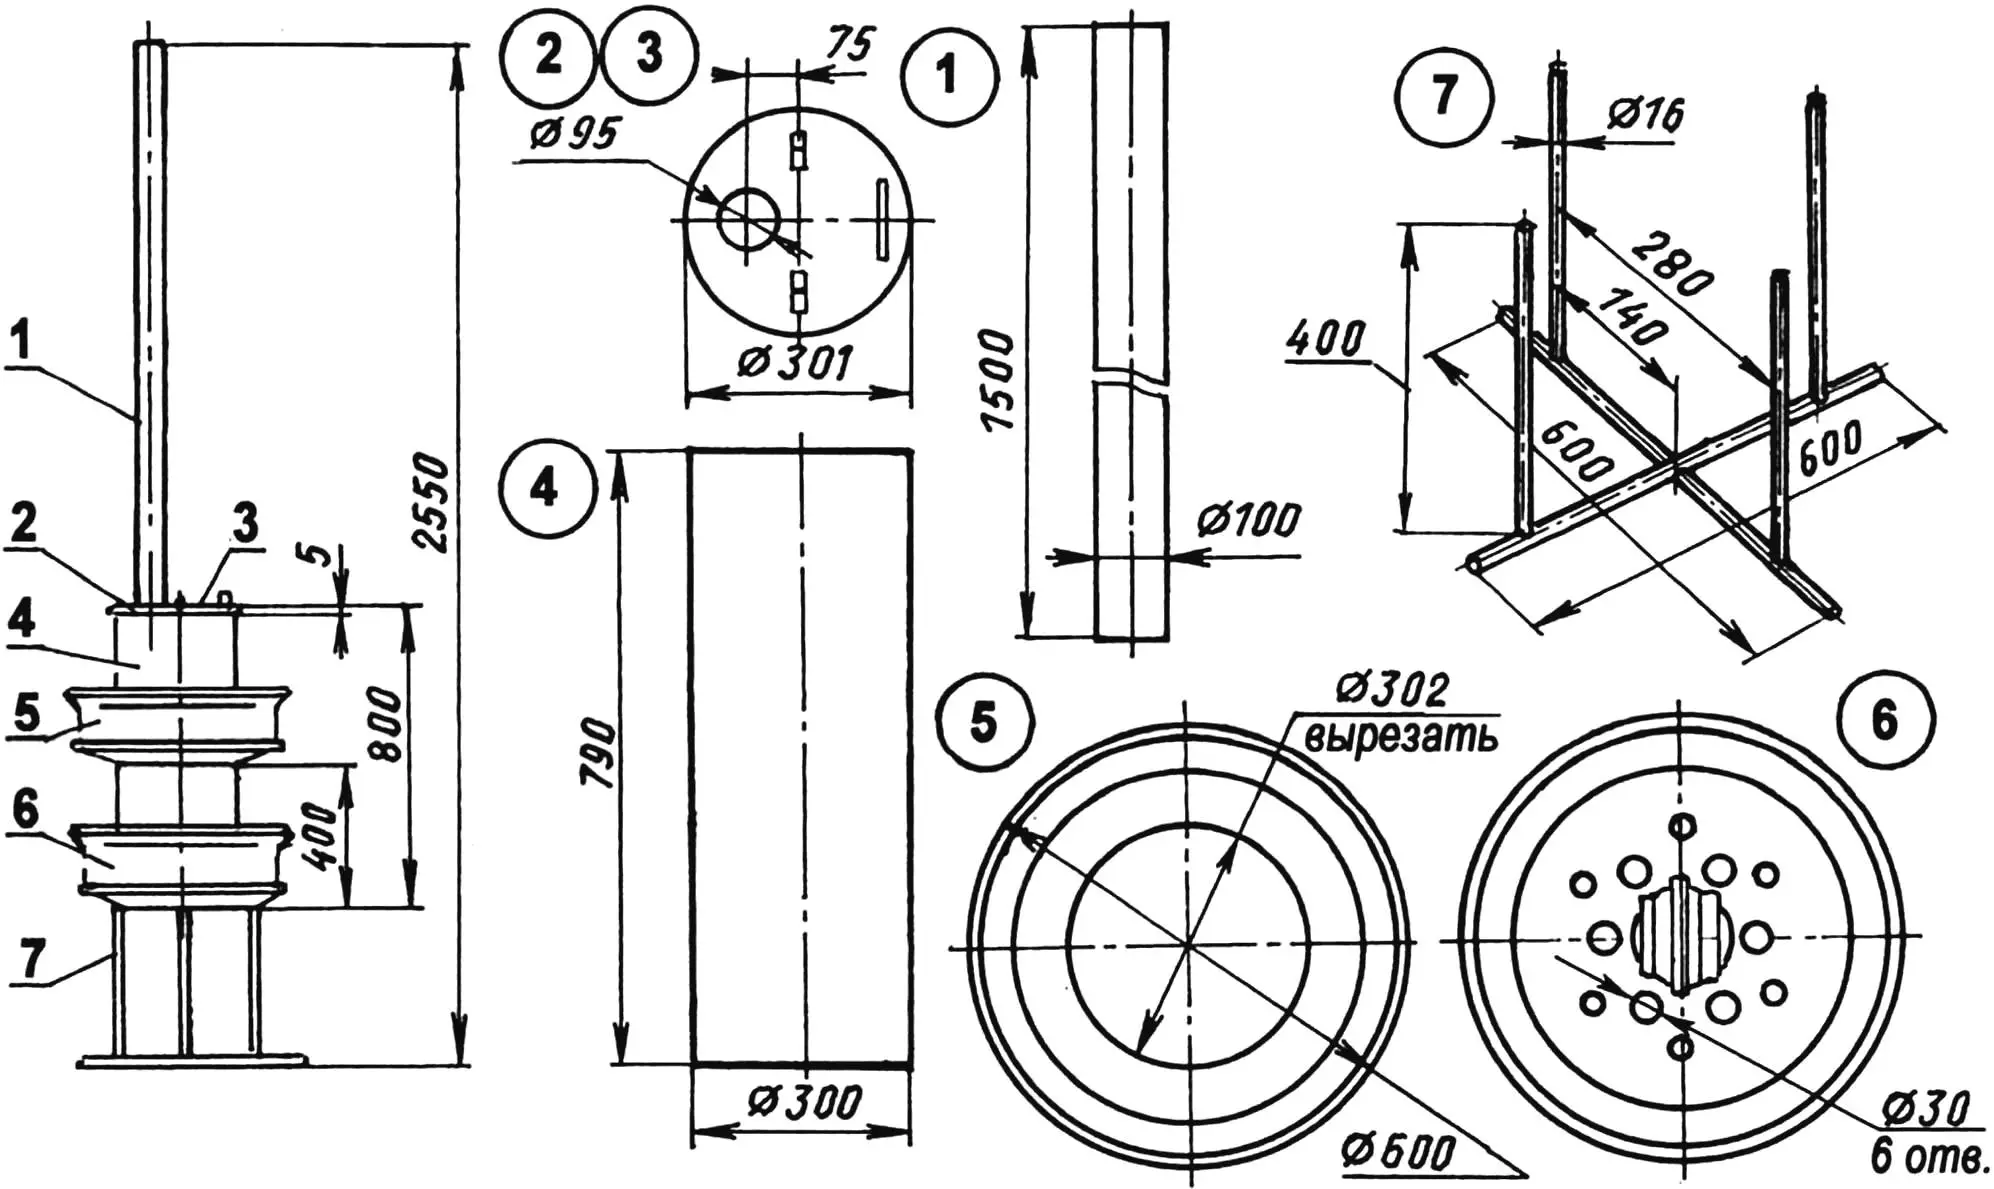
1 — chimney (Ø100×3, L = 1500); 2 — fixed half-cover (steel sheet s5); 3 — hinged half-cover (steel sheet s5); 4 — stove body (pipe Ø300×5); 5 — stone tray (wheel);
6 — grate tray (wheel); 7 — half-frame (steel rod Ø16)
The main body of the stove was a steel pipe 300 mm in diameter (5 mm thick) and 800 mm long. Since it was difficult to cut openings for the firebox and ash pan, we decided to make a “samovar-type” stove with a through firebox and top-loading fuel chamber.
The base was made from a large wheel rim (possibly from a tractor cart or a truck), with the central hub opening welded shut using steel rods to form a grate, and several small holes drilled through for air circulation.
Another similar rim, with a slightly larger central hole, was slipped over the stove’s upper part and welded in place. Both rims acted as trays for heat storage. Since there were no stones in the ravine, we used chipped and rejected ceramic electric insulators as heat accumulators.
The lid consisted of two semicircular parts: one, with a chimney opening, was welded to the body; the other was attached with hinges — through it, the stove was loaded with firewood.
The stove was supported by a half-frame welded from 16 mm steel rods. The lower rim was welded to the top of this frame, which was then embedded into the ground, leaving at least 150 mm between the grate and the floor.
The chimney was also made of thin-walled steel — 100 mm in diameter and 1.5 m high — and installed above the welded half-cover.
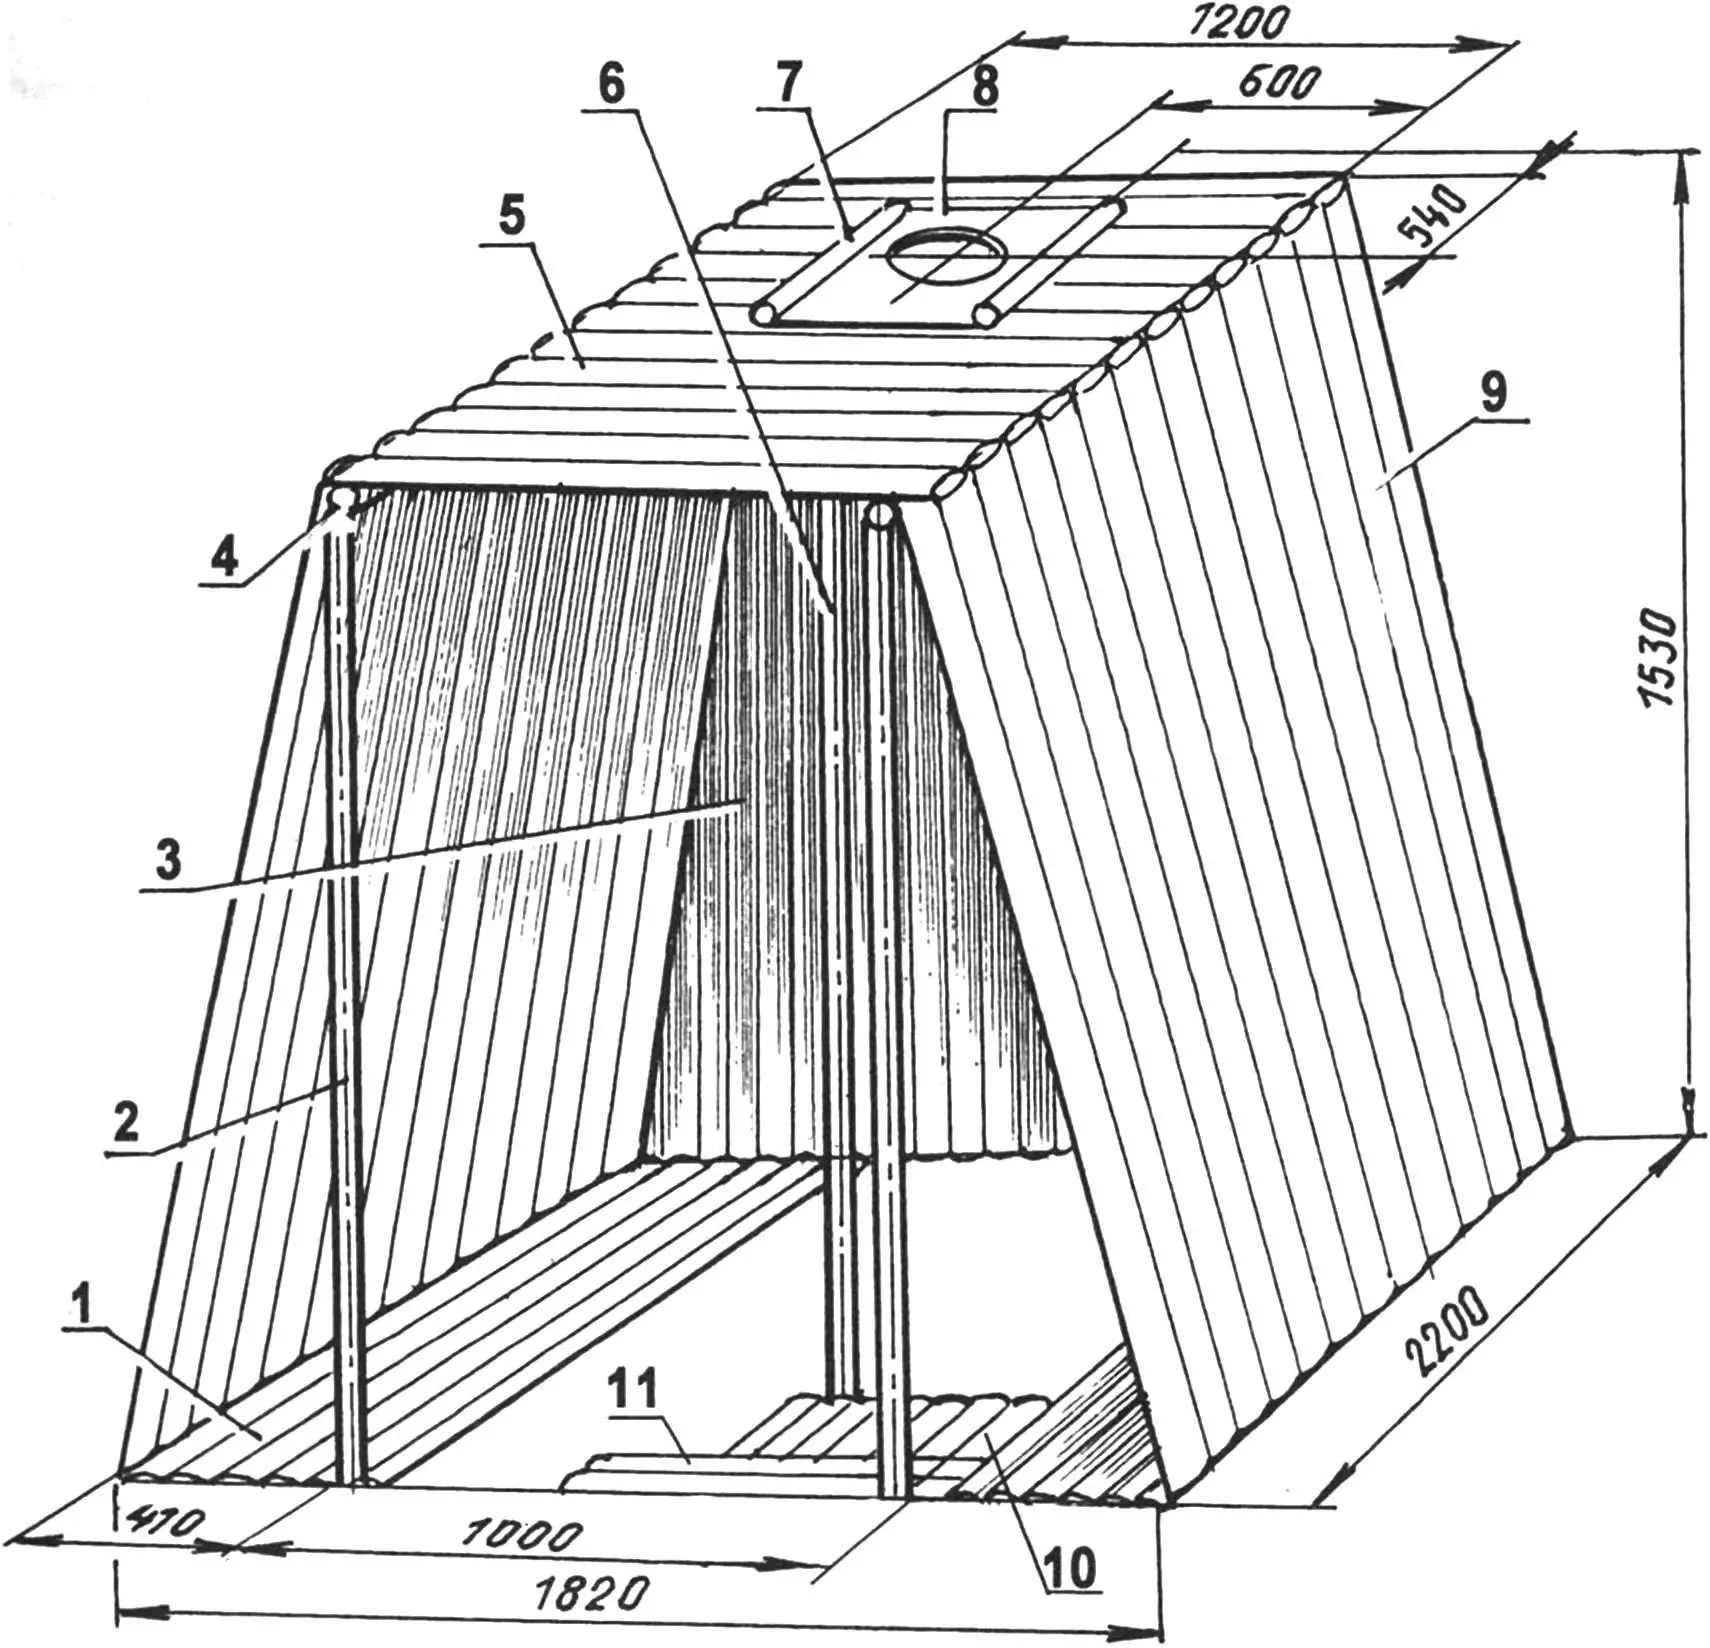
1 — bench seat, 2 pcs. (aspen poles Ø50–60, as needed); 2 — front post, 2 pcs. (maple pole Ø100–120); 3 — back wall (aspen poles Ø70–90, as needed); 4 — upper longitudinal beam, 2 pcs. (maple Ø100–120); 5 — ceiling (aspen poles Ø80); 6 — rear post, 2 pcs. (maple Ø100–120); 7 — ceiling joint ties (maple rods Ø50, 2 pcs.); 8 — ceiling protection (steel sheet s2); 9 — side wall, 2 pcs. (aspen Ø70–90); 10 — floor in pit (aspen Ø50–60); 11 — step (aspen Ø50–60)
On the next weekend, with a group of senior student hikers and some tools, we set off to the ravine called Barsuchiy. We discussed the location and design on the way, and upon arrival, immediately got to work.
First, we dug a pit with a step and deepened the area where the stove would sit. The half-frame with the stove was placed there, covered with soil, and tamped down. Then, we built the frame of the shelter from thick maple poles — four corner posts (front ones a bit shorter than the rear), slightly charred at the bottom to prevent rotting, connected on top with longitudinal and cross beams — which also served as ceiling poles. The poles were fastened together with pre-made metal brackets.
The walls were built from thinner aspen poles, arranged like a palisade. The side walls were installed at a slight angle, alternating thick and thin ends downward. The rear wall was made vertical and tied with wire to the posts. After assembling the walls, the ceiling was covered with poles. A 300×300 mm opening was cut in the ceiling and covered with a steel sheet (for heat protection) with a 300 mm hole for the chimney.
Finally, the gaps between the poles were sealed with clay, and the ceiling was covered with soil and turf. The bathhouse looked much like a badger’s burrow — quite fittingly for its name.
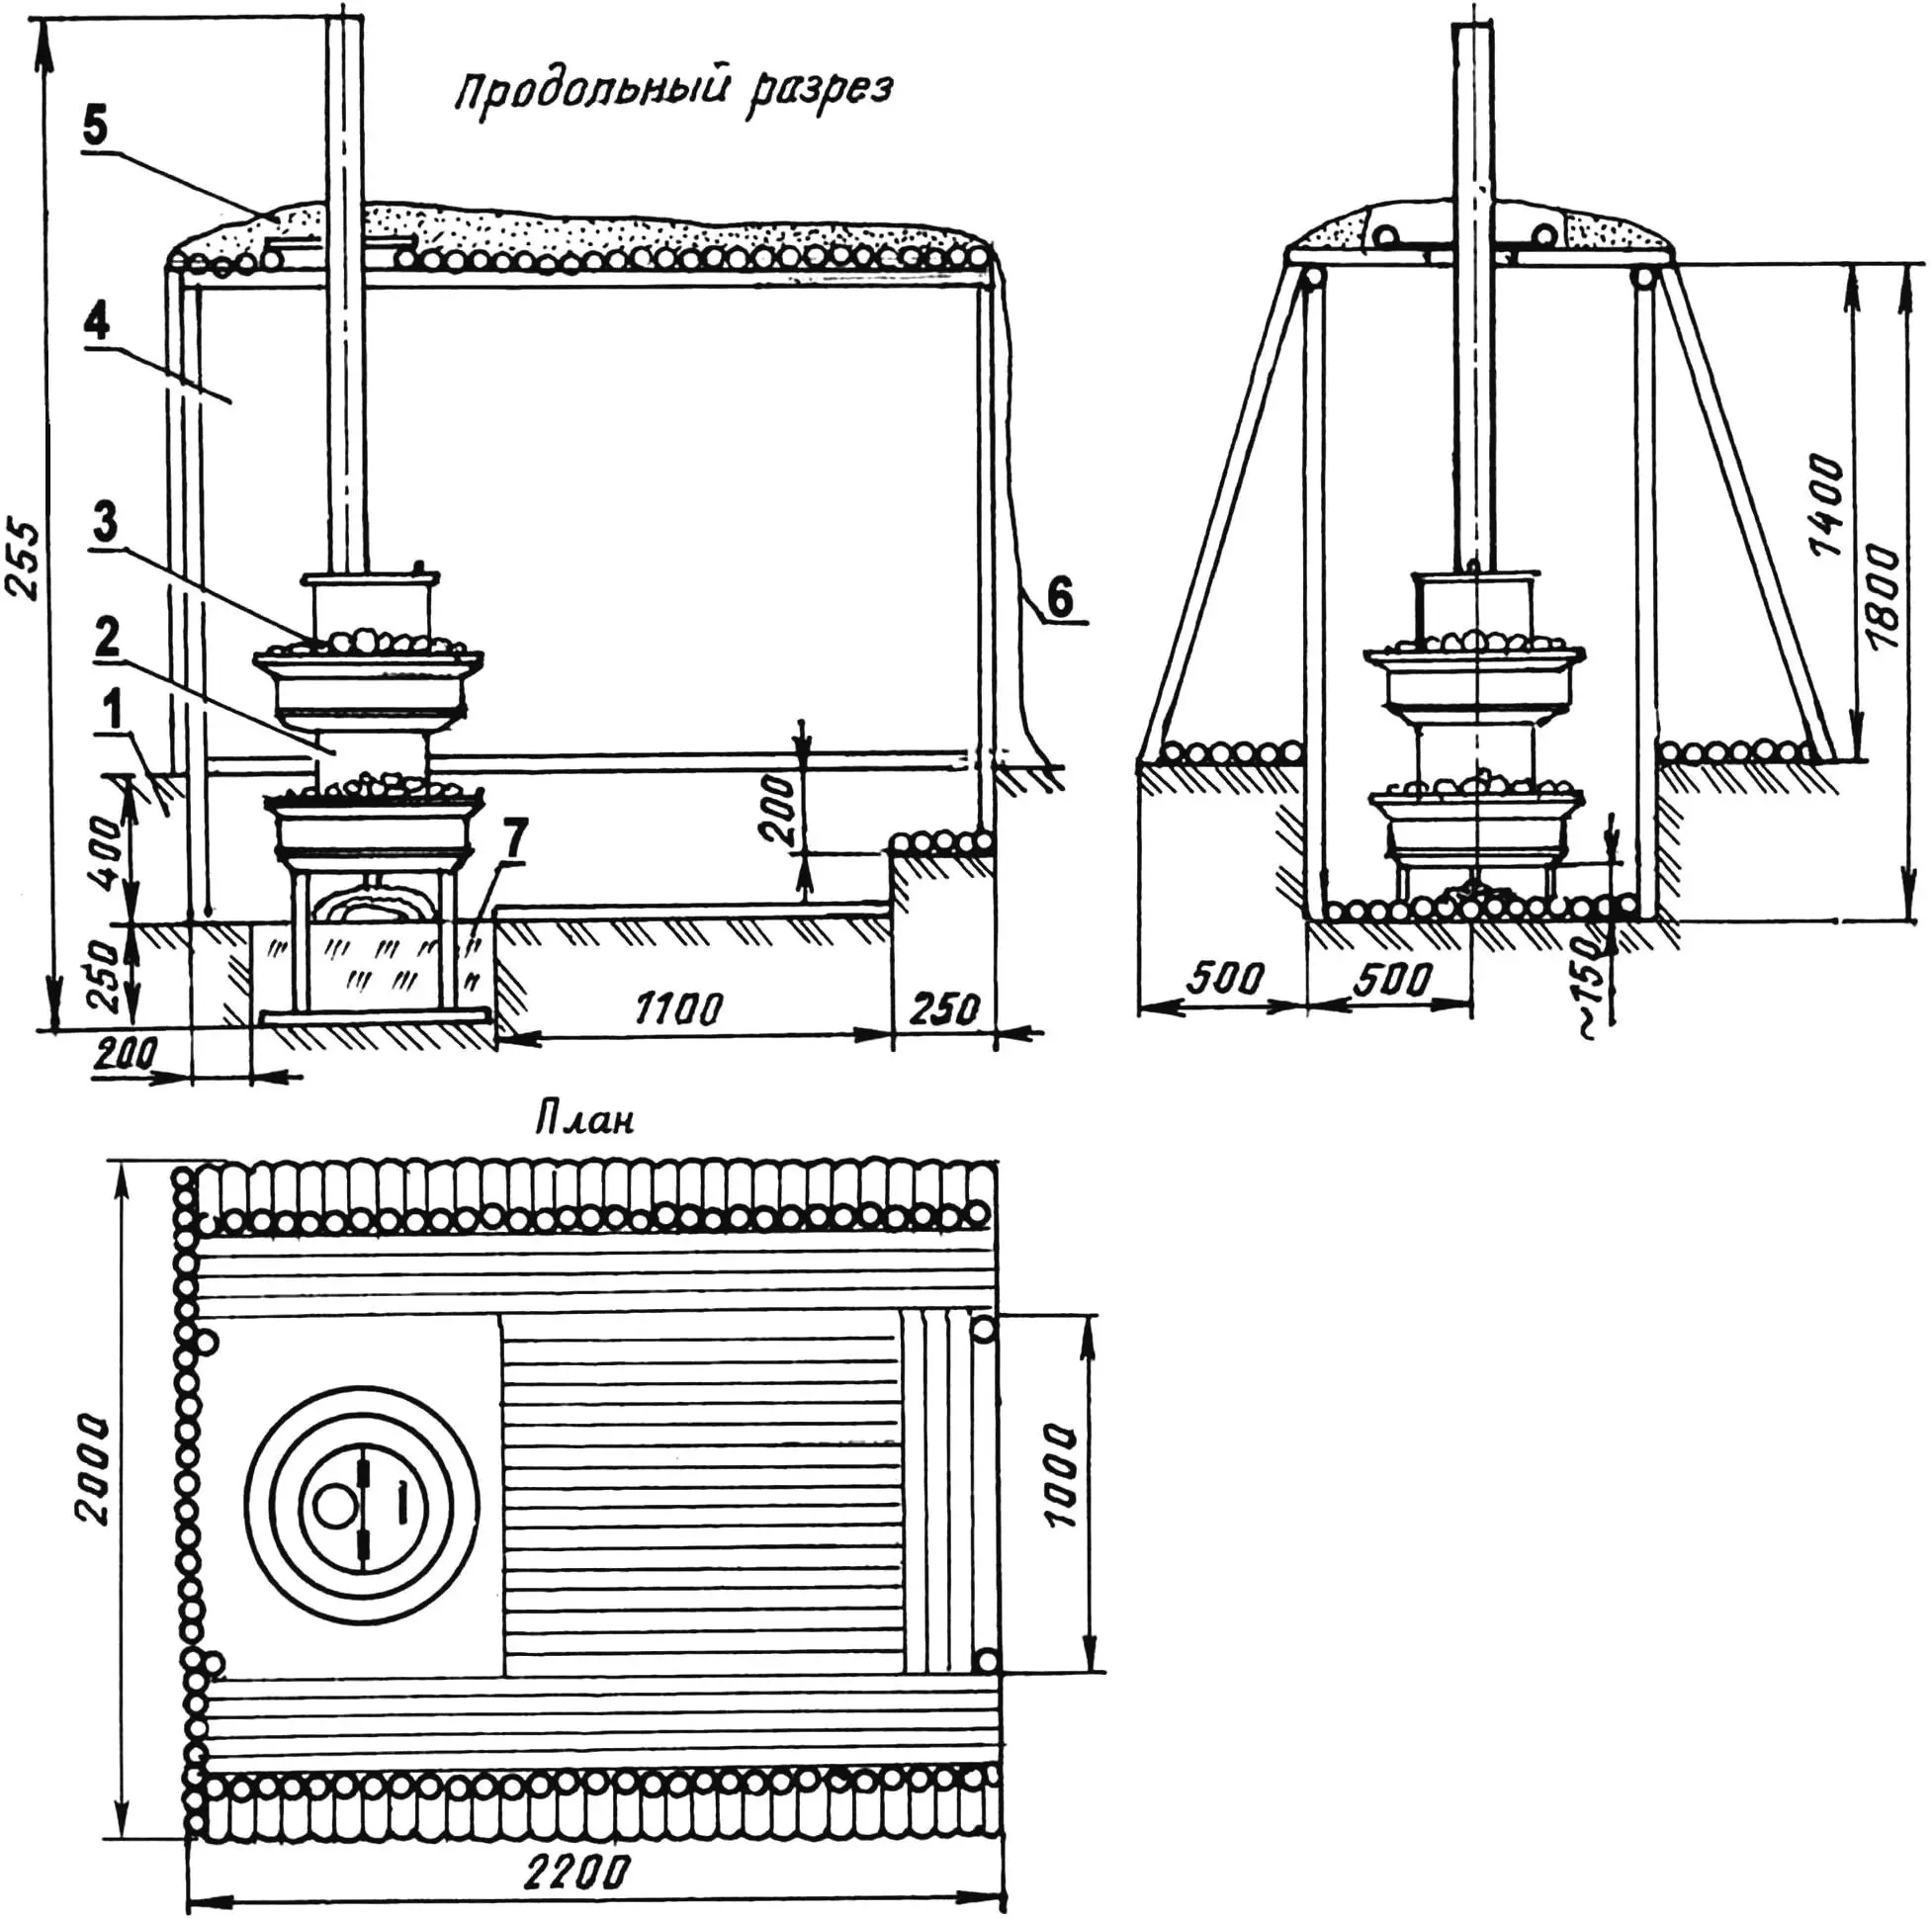
1 — native soil; 2 — stove-heater; 3 — heat accumulator (ceramic electric insulators); 4 — structure; 5 — turf-covered soil; 6 — awning (tarpaulin); 7 — backfilled soil
The entrance (the entire front part) was covered with a tarpaulin flap with a window. Though it could have been made as a full front wall with a small crawl-through opening.
The benches (at ground level), the pit floor, and the step were made of thin aspen poles laid close together.
Once finished, we performed a test firing. With this “samovar-type” design, ignition was tricky — you needed dry birch bark and splinters. First, load a bit of splinters, light the bark, and throw it in. Once they catch, add more splinters and then larger sticks. After heating the system for 5–10 minutes, the stove could be fully loaded with wood.
After 30–40 minutes of heating, even in winter, the bathhouse was ready for use. The temperature could be maintained by adding damp logs and partially covering the air holes with ash.
The most memorable moments for the young hikers were the winter bath sessions followed by rolling in fluffy snow.
I’m speaking in the past tense for a reason. Word got out about our camp in Barsuchiy Ravine — and some “tough guys” started visiting. They seemed to like the bathhouse too, though they used it carelessly, littering and damaging the place. Eventually, we got tired of cleaning up after them and dismantled the bathhouse, restoring the area to its natural state. Sadly, the stove was later scrapped for metal.
“Modelist-Konstruktor” No. 7’2006, A. MATVEYCHUK
Recommend to read
 UPGRADED CARTRIDGE
It is the lack of any drills often drill in the Chuck begins to rotate, especially when exiting from the drilled hole. And in electric drill drill bit you can still firmly hold a special... VOLKSWAGEN CONCEPT T
In 1904, the company Volkswagen has released a small series of sporting four-wheel drive is a pleasure car in the segment, created on the basis of the mechanisms of the VW Golf. The...
