Our town is located on a large “edge” of the huge West Siberian forest. The most beautiful places. Nature simply beckons to go hiking. And in the warm season, there are no problems with this, as they say. It’s just that most of the year the weather is cold and there is snow.
And when I took over the leadership of the “Hiking” club at the local SUT, I set up high school students for physical training for hikes during spring break to the Southern Urals. I took the material support upon myself.
Over two years, I managed to purchase forest skis, sleeping bags, and backpacks. But a suitable tent (six-person, insulated) could not be found in the “Goods by mail” catalog. What can we say about the tent — even suitable dense fabric like canvas could not be obtained. Only linen tick (mattress fabric) was found. I decided to sew a tent from it, and in the absence of insulation — to make the bivouac housing heated.
I decided to share the design of this tent and its heater through the “Modelist-Konstruktor” magazine with all the adult population of Russia, for whom the State Duma deputies also came up with New Year-Christmas “holidays”. Therefore, there is now time for winter hikes for almost everyone. Those who cannot spend a dozen days in a row at the festive table, and flying to warm countries is not affordable, can make such a tent in advance and go on a hike. Especially since the choice of material is now quite large, but I still haven’t seen ready-made winter tents on sale.

1 — slope (4 pcs.); 2 — side row wall (3 pcs.); 3 — side entrance wall; 4 — zipper lock (2 pcs.); 5 — bottom; 6 — canopy; 7 — pipe hole edging in slope (tin); 8 — post pad; 9 — rib (webbing tape, 4 pcs.); 10 — loop (webbing tape, 4 pcs.); 11 — guy line (nylon cord, 4 pcs.); 12 — stake (wire Ø6); 13 — stove; 14 — chimney; 15 — central three-section post (duralumin tube 30×2); 16 — stove suspension bracket on post (steel, sheet s3, 2 pcs.); 17 — post base plate (duralumin sheet s2)
The tent is, in general, classic — of the tent type: with low (700 mm) vertical walls and a roof in the shape of a quadrangular pyramid. The top of the tent is at a height of 2 m, which allows even a teenage accelerator to stand in it.
In plan (top view), the tent is square 3×3 m, and its bottom (or can be called — floor) is the same. Six people in sleeping bags can fit in it for the night freely (without pressing against the walls), and there is still room for a supply of firewood for the night and a passage from the canopy to the stove.
The width of the purchased tick fabric was 3.2 m, which facilitated the cutting of individual tent elements and sewing them into a single whole. In the case when the material width is smaller, the elements can be made composite, only the seam on the slopes must be longitudinal (top to bottom), and on the walls — vertical (with the tent installed).
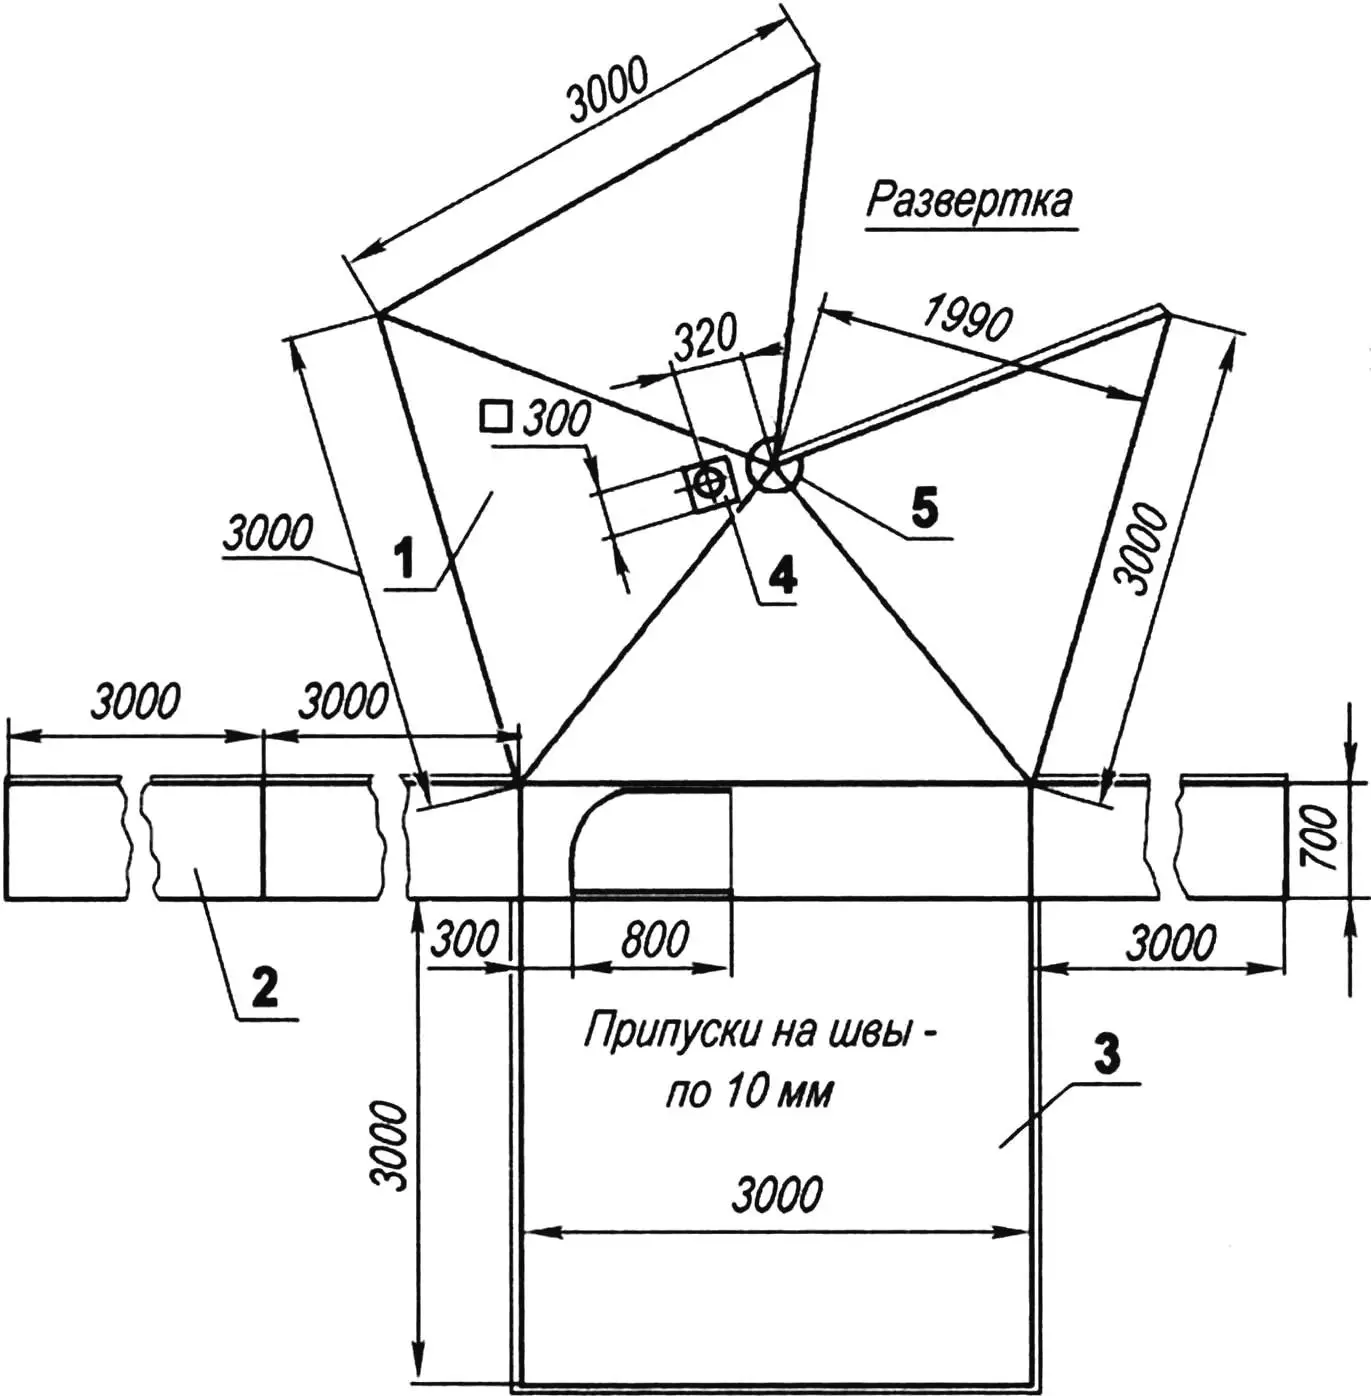
1 — tent element (4 pcs.); 2 — side element (4 pcs.); 3 — bottom-floor; 4 — hole edging; 5 — reinforcing pad (2 pcs.)
I sewed the elements on an old (but quite functional) Singer machine with a regular seam. At the same time, I covered the seams of the tent part with 20-mm wide webbing tape and stitched it to the edges of adjacent faces. At the lower ends, I led the tape into loops (folded it in half in the opposite direction). At the junction of all the vertices of the triangular tent elements on both sides (inside and outside), I first basted, and then stitched one round pad cut from the same fabric. At this point, the tent will be supported by the central post, and such reinforcement is necessary here.
Looking ahead, I note that in one of the tent elements (the one above the canopy-entrance), a hole was cut for the chimney and edged with tin. But this was done after a trial assembly of the tent together with the stove, and the dimensions were determined “on the spot.”
In one of the side walls, a cutout was made and two zipper locks were sewn into it so that when fastened, the locks meet in the middle of the canopy.
The floor was also cut from tick fabric. Therefore, when setting up (installing) the tent on site, a 4×4 m polyethylene film was placed under it. To tension the floor, loops of webbing tape were also sewn to its corners.
Also included in the tent equipment are guy lines — nylon cords and stakes — pieces of thick steel wire, pointed on one side and bent into a ring — on the other.
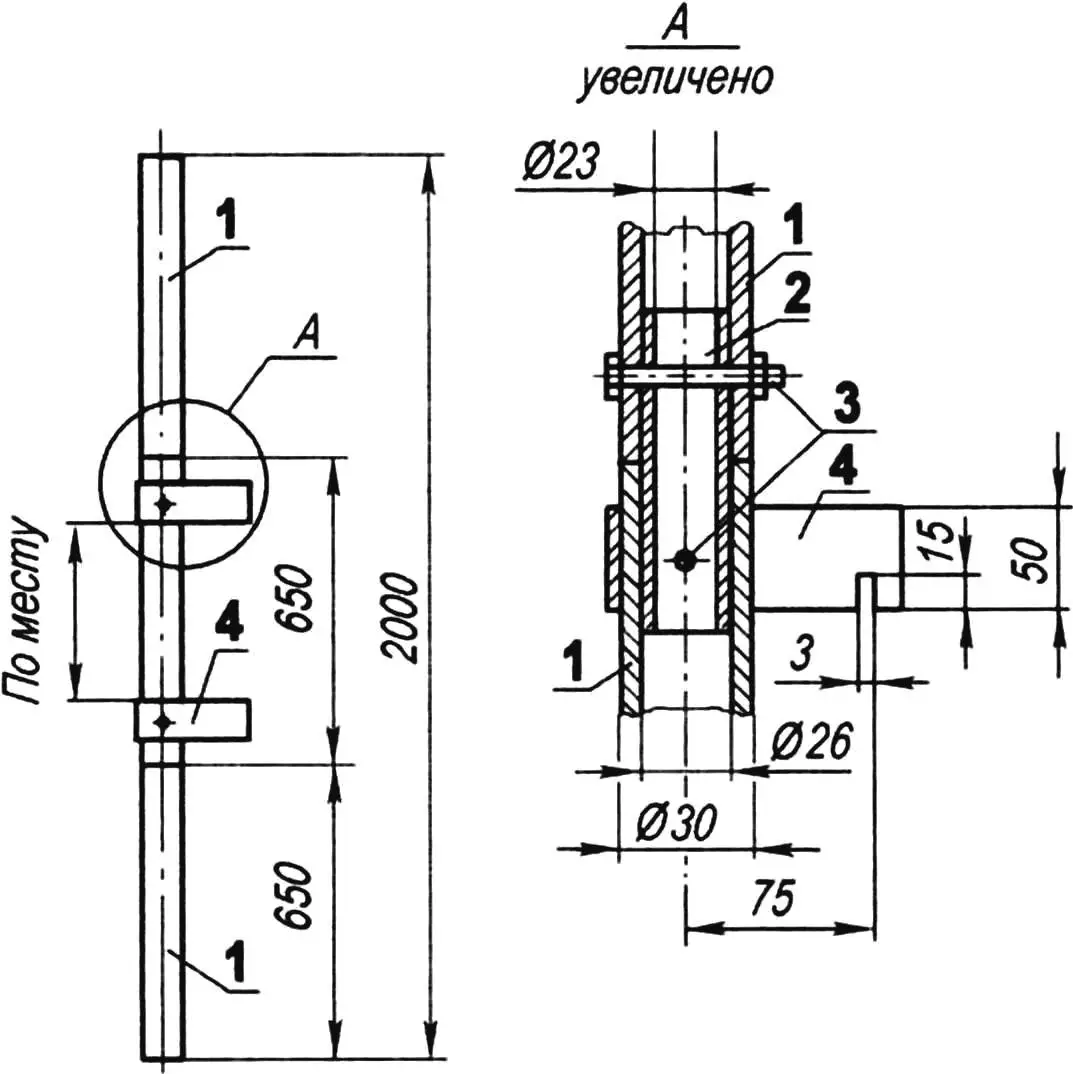
1 — section (3 pcs.); 2 — connecting sleeve (2 pcs.); 3 — fastener (bolt M6, 4 pcs.); 4 — stove suspension bracket (steel, sheet s3, 2 pcs.)
We did not make windows — after all, the tent is winter, and through them, as in houses, the main heat losses occur.
The tent is installed on one central post made of duralumin tube with a diameter of 30 mm and a wall thickness of 2 mm. For convenience of carrying the post in a backpack, it is made composite of three sections. The sections are connected to each other by means of sleeves and fastened with transverse bolts passing simultaneously through the sleeves and sections.
Two brackets having the shape of an arc, made of 3 mm thick steel sheet, are attached to the middle section with the same transverse bolts. Slots are made at the ends of the rays of each arc, into which the bottom and roof edges of the can-stove are inserted.
The upper section is oriented to the reinforcing pad, and a base plate made of 2 mm thick duralumin sheet is placed under the lower one (so as not to damage the floor). So that the post does not slip off it, a small stamping — a boss with a diameter slightly smaller than the hole in the tube — is made in the center.
After mounting the post, the floor and corners of the tent are tensioned, securing the cords to the stake eyes.
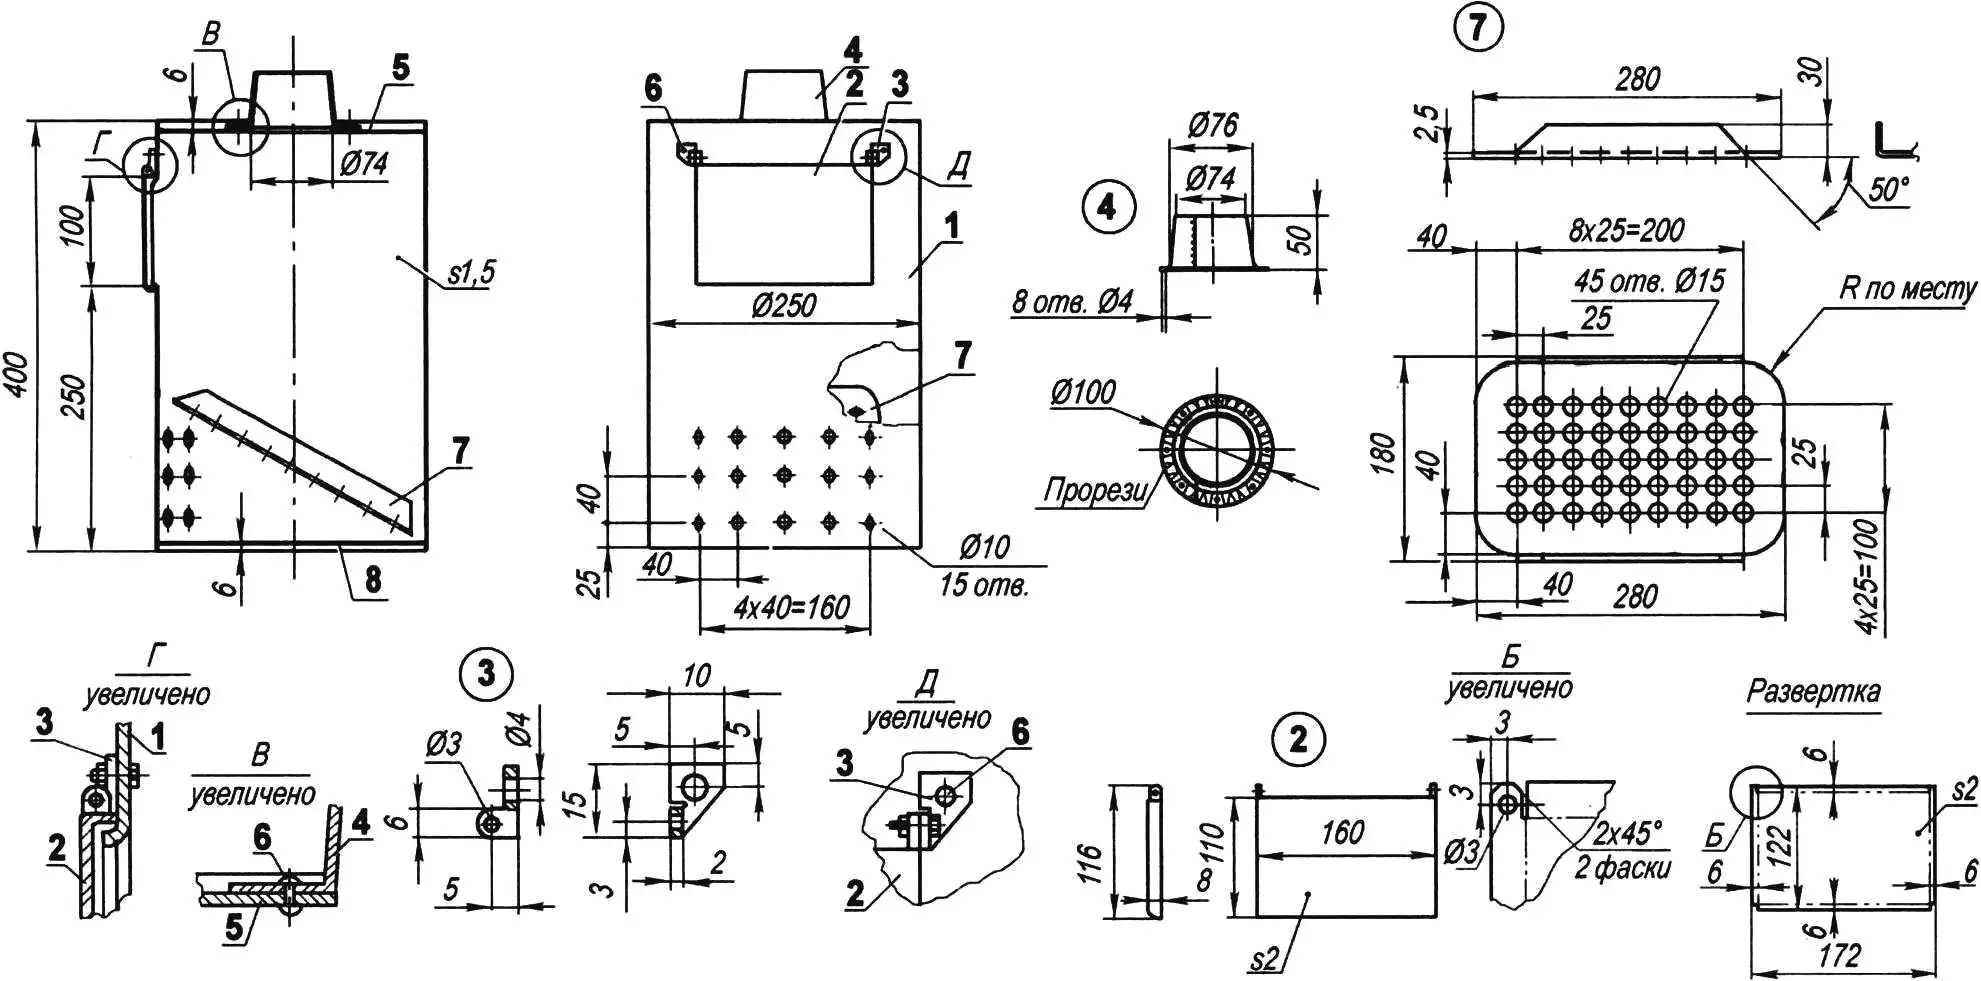
1 — shell (steel sheet s1.5, paint can); 2 — door (steel sheet s2); 3 — door hinge (steel sheet s2); 4 — nozzle; 5 — lid (steel sheet s2); 6 — rivets (steel, Ø2.5, 12 pcs.); 7 — grate (steel, sheet s3); 8 — bottom (steel sheet s2)
Starting the story about the heater, it is worth noting that I determined its design quite quickly — it is a “potbelly stove” type stove, and there was no alternative to it. It’s just that I had to think and experiment with its design and even its location. First, the stove must be portable, which means collapsible, and second — have a small mass.
As a result, I used a small paint can for the stove body, and made the stove pipe composite and removable.
In the can shell near the bottom, I drilled several holes — they serve as an air intake. A little below the lid, I cut a rectangular hole and bent its edges outward — made a flange. I made a lid from 2-mm steel sheet for the hole, but with a flange inward. I hung the lid on brackets so that it opens upward and closes automatically.
I inserted a grate — a steel sheet with two longitudinal flanges and numerous holes — into the stove through the hole. The grate in the stove is in an inclined position. Newly loaded firewood first dries at the top and then gradually settles and burns.
Around the hole in the can lid, I built a nozzle — the lower section of the chimney is put on it. I attached the nozzle to the lid with steel rivets (but small bolts could also be used). The upper section of the chimney is led out through a tin-edged hole in the tent roof to the outside.
The stove is suspended in brackets on the central post at a distance of about 700 mm from the floor to the bottom. In this position, it does not occupy useful area in the tent and heats its internal volume more evenly.
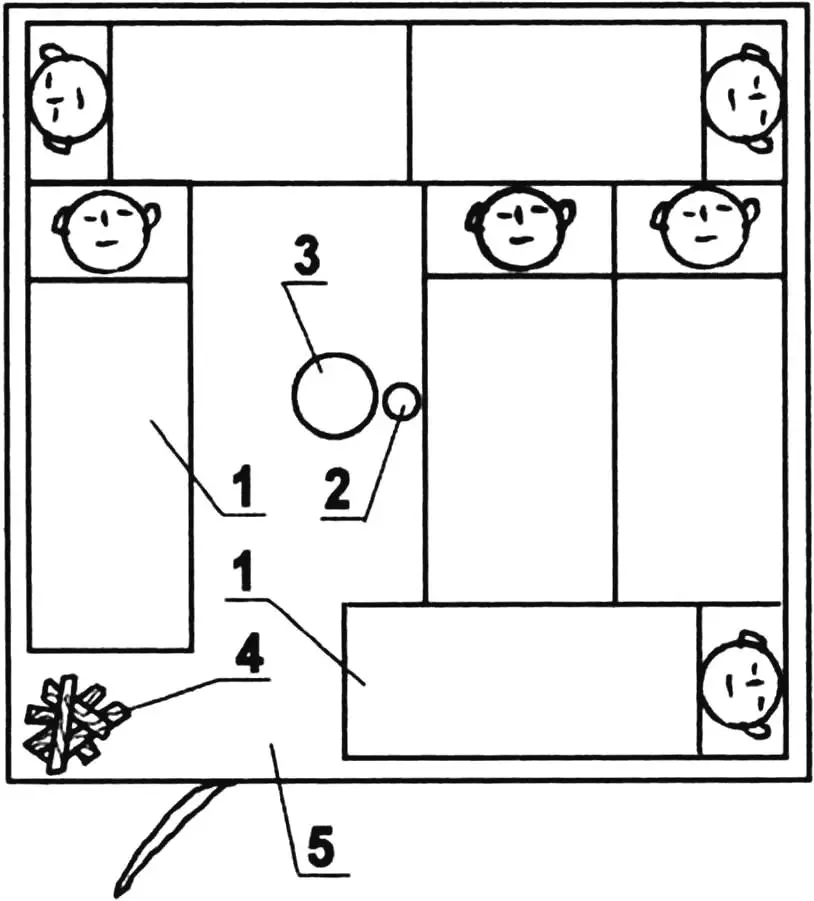
1 — sleeping places (6 pcs.); 2 — central post; 3 — stove; 4 — firewood storage stack; 5 — passage
The firewood supply is stored at the tent entrance. It is better to use dry firewood of deciduous species. Ash pan cleaning is done in the morning: the stove is removed, the grate is pulled out, and the stove is turned over. Shift duty officers are assigned for stoking.
The tent and stove were first tested in two-day winter “weekend” hikes with one overnight stay. During them, the physical training of the guys was also checked. Only after that, during spring break, we made a multi-day trek along the still snow-covered slopes and valleys of the Ural Mountains to Zlatoust and back. The hike was successful. No one got sick.
The tent was not idle in summer either, but without the stove.
In conclusion, I note that for winter hikes, you can also use a suitable summer tent by making a tin-edged hole for the chimney in its roof and equipping it with a heating device.
«Modelist-Konstruktor» № 4’2008, A. MATVEYCHUK
Recommend to read
 IT WOULD SEEM THAT TRIVIA
Bit by bit is going to experience handling different materials in each circle. Often, the decisions and processing methods used by the guys during the construction of the models, to the... THE CAR IS A DREAM
If "Attesi-TX" able to enchant you just the same as at the time, and me, I think I may be able to help you make this very simple, compact and as a result, cheap and affordable car....
