 “…The barge is loaded mast and folded sail, half pushed into the sea, floated on a light wave…
 The boys came over and, without much difficulty pushing the barge, jumped into her already on the move.
— Let’s go!
Gavrik deftly untied and picked up a new square sail. A weak breeze slowly filled him.
The barge pulled sideways. Becoming knees on the stern, Gavrik with stress put on the heavy steering wheel and stuffed him rumple.
Feeling the wheel, the barge went straighter… Gavrik pulled the tiller and fell on his back. The mast is slightly bent. Water was bubbling up loudly on the Board. Jumping up and slapping a flat bottom on the wave, the barge sailed to the open sea and went along the shore”.
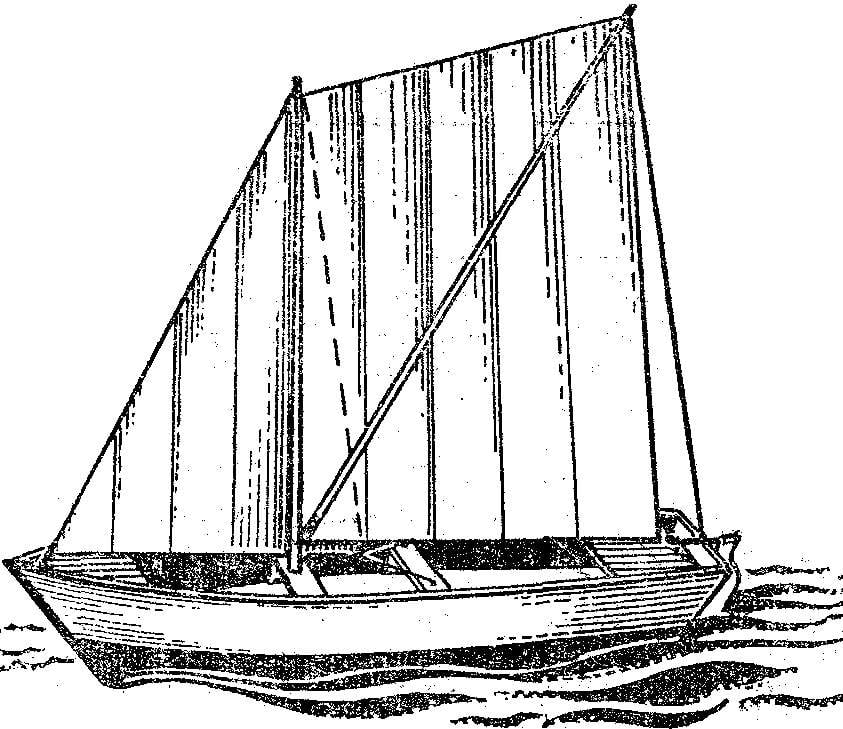
Many of our readers, after reading these lines, of course, remembered a wonderful book by V. Kataev “lone White sail”. A lot of interest to ship modelers of this simple fishing boat. That’s why we offer the model of the black sea scows, the description of which was prepared by A. Kochergin, and A. Efimov.


Model of the black sea scows:
1 — ear, 2 — mast, 3 — staysail, 4 — FLC, 5 — fu, 6 — brace, 7 — wheel, 8 — transom, 9 — food Bank, 10 — bottom, 11, 14 banks, 12 — emphasis banks, 13 — bracket, 15 — bow-Bank, 16 — bar stem, 17 — Board.
The model is simple to manufacture, is constructed from abundant materials.
On thick paper will watertite templates bottoms (figure); the top and bottom (shown in phantom). Fold them on the middle, the median line and cut along the contours with scissors.
Vystrugat a plate with a thickness of 8-10 mm. Dividing it from both sides across the width in half, draw a pencil the middle line. Then, combining the line patterns and the workpiece, draw the top and bottom contours of the last bottom.
Trim the workpiece along the upper contour and the bevel edge to the bottom without going over the pencil lines. The plane of the bevels carefully apply a file. From a piece of the same plates fabricate the transom.
Side cut out with a jigsaw from plywood of 3 mm thickness on the pattern. For the formation of the sharp edge of the stem at the bow, parts of the sides need to remove the chamfer as shown in the drawing (one on the right, the other on the left side for a width equal to the thickness of the plywood). Before Assembly, the side edges of the strip. Assemble the body on the nails the in length of 10-12 mm or shortened pins, additional bonding nitrocream (enamel or AK-20).
We must begin with the nose. Attaching in several places one Board to the bottom, engage the other. Observe the coincidence of the edges of the stem. After checking fasten the Board to the bottom and put the transom, which provides a snug fit details.
Harvesting of timber of bow trim in place and fasten to the housing. Irregularities of the latter and protruding nail heads, scrape with a file and sandpaper.
You should then outline on the plywood and cut out banks and stops and, cleaning the edges to fit and glue them into the housing.
From straight grained pine slats vystrugat the mast and RAS-far, treat them on a piece of glass and sandpaper.
Of wire or a paperclip to bend the part 13, which tightly and neatly (thread to thread) tied to the end of the spacers (after which the whole winding should be lightly lubricated with glue). Drill a hole in the Bank and insert the mast into the housing.
For protection against swelling body and all the wooden parts, it is desirable to cover nitrovarnish. Out of paper clips or thin wire to make the ears and nail them to the body and banks. The wheel cut-out sheet and attach it to the transom.
Sails can be made of cloth or paper. Install the sails and the top ends of the clipping to the mast and released for disposal. The free lower ends pass through the lugs as shown in the drawing, and secure. From the top of the spacers to the lug on the transom pull the string-a sling.
To run the model in a shallow reservoir with little wind.


