But this problem has a very simple and effective solution. It is — to use ready-made products for the most massive elements. For example, a housing of thin-walled plastic bottles-cylinders under household detergents! The weight of one of such procurement does not exceed 100-150 grams, and for the construction of a sports model sailboat need four. Do note that the winning weight with a guarantee covers all the losses associated with the flow of unusual buildings. This is supported by the fact that the test is like a racing sailboat even with a light wind reliably comes to the planing! With strong gusty winds model almost does not feel download the windward hull. The impression that a sharp transition of the conical part of the cylinder and cylindrical plays the role of a redan is so spectacular “flying” catamaran, confident overtaking on the classic scheme.
To build a racing technique, you will not need long to search for materials. Several sections of pine or birch slats with the cross-section 10X10 mm, an aluminum plate, a piece of cloth like “Bologna” or thick plastic film Yes if possible the top knee from spinning — that’s the whole list of basic materials.
Sailing model yachts-catamaran:
1 — rudder, 2 — body, 3 — mainsail, 4 cave, 5 — buckler,, 6 — guys, 7 — “weight”, the 8 — tower 9 — staysail, 10 — forestay, 11 — shtag-potens, 12 — end, 13 — a fin keel, a 14 — reference segment frame 15 of the binding housing, 16 — the Central beam of the frame, 17 — transverse beam 18 is a Central cross-beam, 19 — aft extremity, a 20 — brace the keel 21 — the keel beam.
The upper part of the mast:
1 — grotto, 2 — mast (top of the knee of a spinning cone or wooden rake), 3 — forestay, 4, “fittings” (aluminum with a thickness of 2 mm, square 10 X 10 mm), 5 — guy, 6 — reference tying the mast (nylon yarn with glue).
Installation of an adjustable fin keel:
1, the Central longitudinal beam of the frame, 2 — openings for spurs mast, 3 — nut M4—M5 4 — a bracket (aluminium 3 mm), 5 — strut, 6 — screw M4—M5, 7 — fin keel (aluminum with a thickness of 2-3 mm). Use brass screws.
Frame model yacht collection.
Housing Assembly:
1 — rudder (aluminum with a thickness of about 1 mm), 2 — regular cropped tube tank, 3 — cylinder, 4 — feed edge (birch), 5 — harness (nylon thread with glue), 6 — longitudinal beam, 7 — extremity (birch; and det. 4, size d to clarify the cylinder), 8 — keel beam.
It is better to start with the selection of empty bottles-cylinders. Main dimensions — a diameter of about 80 mm and the cover has a length of about 300 mm is not critical, though and set the dimensions of the entire model. By the way: it is better to use opaque cylinders with the thinnest wall (all mechanical loads are not they are giving the role of the power elements of the frame). In the absence of plastic bottles of similar size, use less. To enlarge a boat is not necessary, as still remains in force the limit of the square sail and the model may lose the quickness of the turn. But in accordance with small buildings windage is easy to decrease, creating a high-speed ultralight microparasitic how you can take part in official competitions.
Before you begin building the model, look closely at the drawings and understand the construction of all nodes. I hope that after this you will not have almost any questions and we can dwell only on certain points.
The basis of all power on the yacht — the frame is assembled from wooden bars. Mutual frame of longitudinal and transverse elements specially designed incomplete, so as not to weaken the power of half “I-beam”. After adjustment, all of the grooves and control the size of the frame is glued together with an epoxy resin by impregnation of the seams on the outside sugarsweetened composition. To complete the curing of the binder frame is placed on a flat table. Basic segments stick immediately, so the table frame is better to place the “upside down”.
After gluing the frame you will probably experience the same feeling that we do: the design will seem pereprodannosti. Weighing scales will show the weight of the frame is equal to about 100 g, if you are overzealous with the glue and didn’t choose a thick wood for the frames. Whether in the future to remove approximately 20 g of weight by switching to the rail cross section 8X8 mm, or even more subtle — you decide for yourself. However, we must warn you that in this scheme the catamaran, where all the loads of rig and rigging will take frame only, this way is associated with the risk of non-rigid torsion model.
After assembling the frame, you need to run rails all the holes and grooves, and then to cover (twice) the wood with hot linseed oil: it will protect items from exposure to water.
Dried frame with four linked cylinders with the simultaneous installation of a plywood keel beams. After the control provisions of the latter can be filled filament strapping epoxy resin. Finally, put the wooden tip soaked in the same hot linseed oil. These wooden “plug” must be fit very tightly to the necks of cylinders — here the accuracy depends on the integrity of the hulls of yachts. The notches in the aft end under the rudder blades to perform better then — so will be able to put the feathers perfectly vertical. How to mount an adjustable fin keel, visible in the pictures. By the way, the main keel can be accomplished from aluminum and aircraft plywood of appropriate thickness, and protecting it from moisture impregnation varnish. Here the gain in weight will be significant, but at the same time the model will be less versatile with increasing wind speed more than 5-6 m/s have against tipping the weight on the windward hull with lead. But in light winds fully manifest the advantages of a light boat!
Perhaps you have a question: why is the keel designed adjustable? This technique allows for fine adjustment at a predetermined rate relative to the wind direction. If the model shows a pronounced tendency to uvarivanie from the wind, the fin of a withdrawn forward, shifting the center of lateral resistance forward also. Conversely, if the yacht is to windward, the keel is tilted back. Additional adjustment due to the binding of the feathers of both rudders. The angles of their installation must remain the same.
The abutment of the frame with the balloon corps:
1 — keel beam (3-4 mm plywood), 2 — shell plastic container, 3 — reference segment frame (plywood 3-5 mm), 4 — longitudinal beam of the frame (pine or birch cross section 10X10 mm), 5 — harness (nylon thread with glue).
Typical attachment points of the rigging on the frame:
A — intermediate B — fore (option). Material — brass wire Ø 3 mm; shank thread M3.
The lower part of the mast:
1 — grotto, 2 — mast, 3 — strand panitanki of sail, 4 — clip (strip of polyethylene with a thickness of about 1 mm), 5 — thrust washer (cut from a sheet of polyethylene and on the glue firmly press on the mast), 6 — spurs (brass wire Ø 3 mm), 7 — rail clamp (nylon thread with glue), 8 — the mainsail.
Standing rigging is made of nylon fishing line or steel semi-rigid wire. Sails better to use a thin material, such as “Bologna”, as the plastic film is very hard to make Podgorski and strengthening the corners of the sail. Before entering the competition starts, useful to get acquainted with the rules of measurement of area of the sails and checking kit, planning for your microart. Then, if the measurement area will not exceed 20 DM2 , will not have any issues and the judges.
On the issues of adjusting the position of the sails on some tacks it is useful to consult with experienced modelers-athletes, although a lot of information will be gleaned from literature, including from the journal “modelist-Konstruktor”.
Alexey YUDIN
Recommend to read FIRE BURN When the firebox of the fireplace or stoves in the country wood raw material to the combustion process from time to time it is necessary to control: throw the wood, increase craving,... THE NAIL WILL NOT BEND To score a long thin nail, and especially copper or brass (e.g., with mounting frames) is always a problem. Will help you in this case, the conventional pliers or a wooden clothespin. 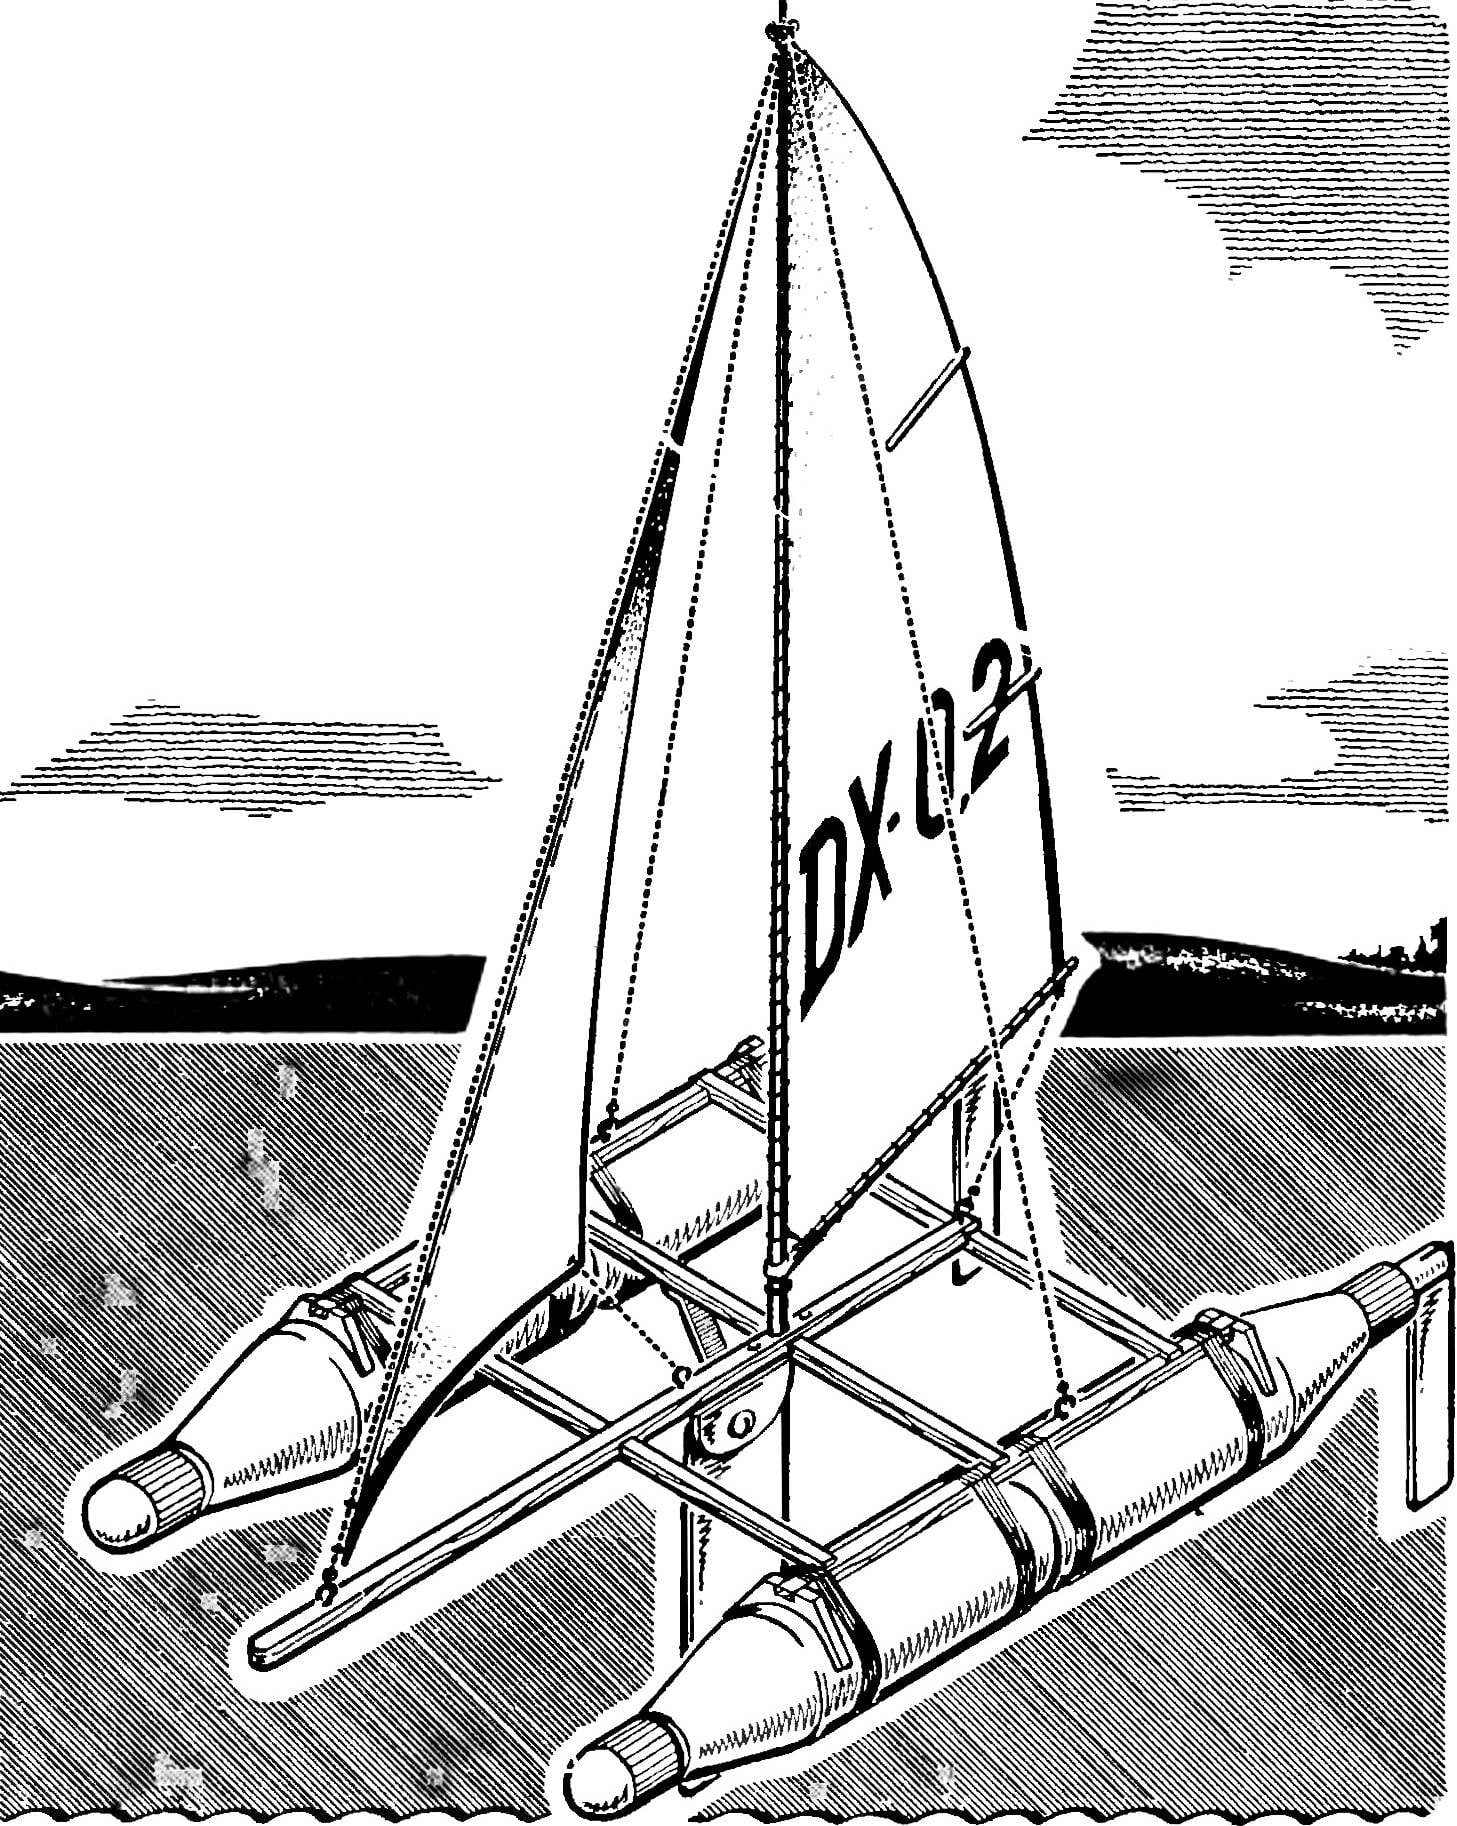
 Even on these racing yachts there is a continuous struggle to reduce weight. It is known that any extra pounds at least for a little bit but increases hydrocortisone fragile vessel due to the precipitation and growth of the wetted surface of the hull. And when it comes to model and conditions, it is already possible to say that relief even ten grams is the achievement.