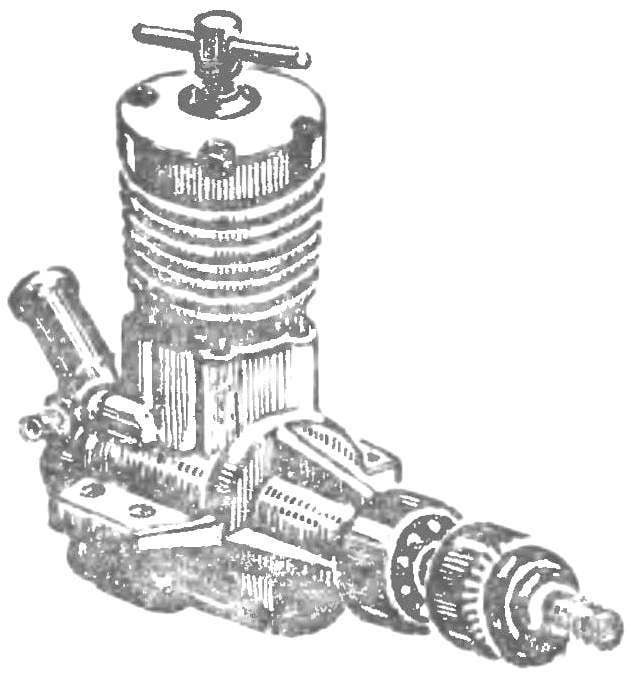
 Domestic micro-motors RITM respond well to tuning and boost. This is evidenced by the experience of the laboratory of auto modeling sport of the Tyumen regional syut. The results of the control runs and competitions brought the engines showed that the power of engines increased, easier to run them in winter conditions. Models equipped with these engines, developed more speed. To Refine selected and tested engine with good compression, giving the stand 12 000-12 500 rpm with a propeller Ø 180 mm and a step of 180 mm.
Engine disassembled, washed and carefully inspect the details. Fix the position of the sleeve on the seat. On the sleeve in any case should not be scuffing, scratches and traces of Podgora, if these defects exist, the engine is replaced by another.
On the supporting flange of the sleeve on the side facing the toe of the engine, is a semi-circular cut on the depth 0.5—0.7 mm. gipsu Then inserted into the crankcase, as before disassembly, and drill 1.5 mm Ø serverlimit hole to a depth of 5-6 mm. In it insert the pin from steel wire so that it protrude above the surface of the crankcase 1 mm. This will prevent improper installation of the sleeve and its arbitrary rotation.
In the motor with a dual scavenging groove make the bottom end of the sleeve, and the pin is mounted on the reference side of the crankcase in the hole under the sleeve.
The liner is marked and sawed the window of the overflow channel to the height difference from the edge of the exhaust window of 0.5—0.6 mm (option refinement with four-channel flushing of the engine).
After completing the work, the lower part of the sleeve (to the exhaust window) ground cast iron or aluminum lap so that the piston under its own weight fall to the LOWER edges of the Windows.

Revision of details of the engine:
1 — turning of grooves in the wear of engine; 2 — the relief piston; 3 — brazed knee-to-nozzle; 4 — finalization of the spool, 5 new crossmember screw kontrpartiya.
The crankshaft is carefully inspected, paying attention to the lack of scratches and burrs on the friction surfaces. We also recommend you to clean up the mill scale and to smooth out the sharp edges of the cheeks of the counterweight, and then carefully Polish all surfaces.
Made of aluminum D-16T made a new rod with an increase of 0.7— 0.8 mm center-to-center distance. In each of his head drilled for lubrication of the two finger holes Ø 1.0 mm. Then, the surface of the rod is carefully treated and polished.
Piston pin of connecting rod, it is desirable to replace the finger from the MD engine is 2.5. The latter is much easier, as has a through drilling.
Controlling out of the sleeve using a brass or aluminum drift. The surface facing the piston, Polish microcephalin paper, holding controlling split mandrel on a lathe.
The piston is as easy. To do this, it set in the split mandrel in the lathe and handle, as shown in the drawing.
The crankcase set on a steel mandrel machined (the surface is pre-polished). Then to wear a special cutter on the lathe face piercing holes, three grooves with a width of 1-1,5 mm to a depth of 0.2—0.3 mm. the Inner surface of the crankcase POPs, but the seat liner can’t handle.
A distribution mechanism modify in the following way. The inlet window of the spool cut in length so that it completely aligns with the window of the back cover. The whole intake tract polished. Before polishing technology spot drilling the back of the spool should be filled with solder POS-40, or epoxy resin.
Diffuser treated with a conical scan with an angle of 5-6° so that the conical surface is aligned with the axial stone pine the nozzle.
A jet carburetor should be redone. A notched part, which is put on the fuel line, saw round up to Ø 2.6 to 2.9 mm and shortened to 3 mm. Copper or brass tube with inner Ø 2.0 mm bent at an angle 9C° and adjusted so that it tightly depressives sawdust on the part of the nozzle. Making sure that the direction of the installed tubes is correct, it probailout and cut.
On the adjustment screw kontrpartiya make a new cross member made of steel wire Ø 2.0 mm.
After the work was completed the engine parts washed thoroughly with kerosene and lubricate with engine oil and proceed to the Assembly.
Insert the crankshaft into the crankcase without the crank), set him on the cone and bearing washer from the spinner of the propeller, well pull and check the rotation. It should be freely and rotate easily without jamming. The axial displacement of the shaft should not go beyond the limits 0,10—0,15 mm.
The head of the cylinder after positioning of the connecting rod, piston and liner are evenly tightened. The engine crank for the screw. It should be easy to navigate within 90° either side of lower dead point. Upon further movement there is a resistance compression piston without jamming, with the increase to the top dead point.
Pay attention to the movement of kontrpartiya, which when loosened the screw, if you abruptly turn the motor shaft comes to the top position.

The screw adjustment of the carburetion should turn without much force, which can be locked in any position.
The ease of rotation of the valve timing check set it in place. Sure that not have any additional resistance to the rotation of the crankshaft. This inspection is to take place before installation to the place the casings of the engine.
Assembled engine mounted on a test stand, equipped it with a screw Ø 180 mm by 180 mm (same as when choosing a motor for revision).
Taking the fuel the same as in the control runs. Carefully adjusting the position of the screw kontrpartiya and needle carb adjustment, measure the engine speed. If they are within 13 600-14 000 you with the task of fine-tuning the engine coped successfully.
V. OGIBENIN
Recommend to read
 “SPINNING” FOR CUTTINGS
Increasingly in forestry a method of growing seedlings of valuable species of trees not from seeds but from cuttings. It is one thing to cut the stalk from the fruit tree — here a hand... COMPACT ELECTRO-SOLDERING IRON
I have improved the conventional electric soldering iron. It turned out lightweight and compact (see Fig.), you can carry even in your pocket. It is easy to make and a beginning radio...
