 Easy to fly model aircraft. I want to offer young readers with “M-K” unpretentious three models, the design of which worked at the Center for Children’s technical creativity of the city Staraya Russa, where I work as the head of the model aircraft association. Drawings and diagrams allow a few hours to make good flying models, using quite affordable materials and simple tools. An important advantage of the proposed designs is that they can be run not only outdoors, but also indoors – in a school gym or in the hallway.
Start advise mini-glider “Igla”. For its production, you will need lime or pine plate thickness of 1 mm and 2 mm, and the tool – jigsaw, knife and sandpaper.
First of a 2 mm thick plate blank cut fuselage and wing, and from 1 mm plate – blank fin and horizontal stabilizer. Next, using the skins of the wing is attached to the workpiece is convenient, streamlined profile cross section, it is shown in one of the drawings. Profile keel and horizontal tail is easier – a rounded front and slightly pointed at the rear.
Treated and polished billet assembled with glue. To this should be fine PVA, “Moment” and “Volcano”. The latter is designed to fix the foam ceiling tiles, but stick together good details of the proposed models. During assembly it is necessary to control the “geometry” of the mini-glider – in the absence of twisting of the wing, horizontal tail distortions with respect to the plane of symmetry of the model. When gluing wing console should be fixed at an angle of 3 to 5 degrees to the horizontal plane, which makes more stable flight pattern.
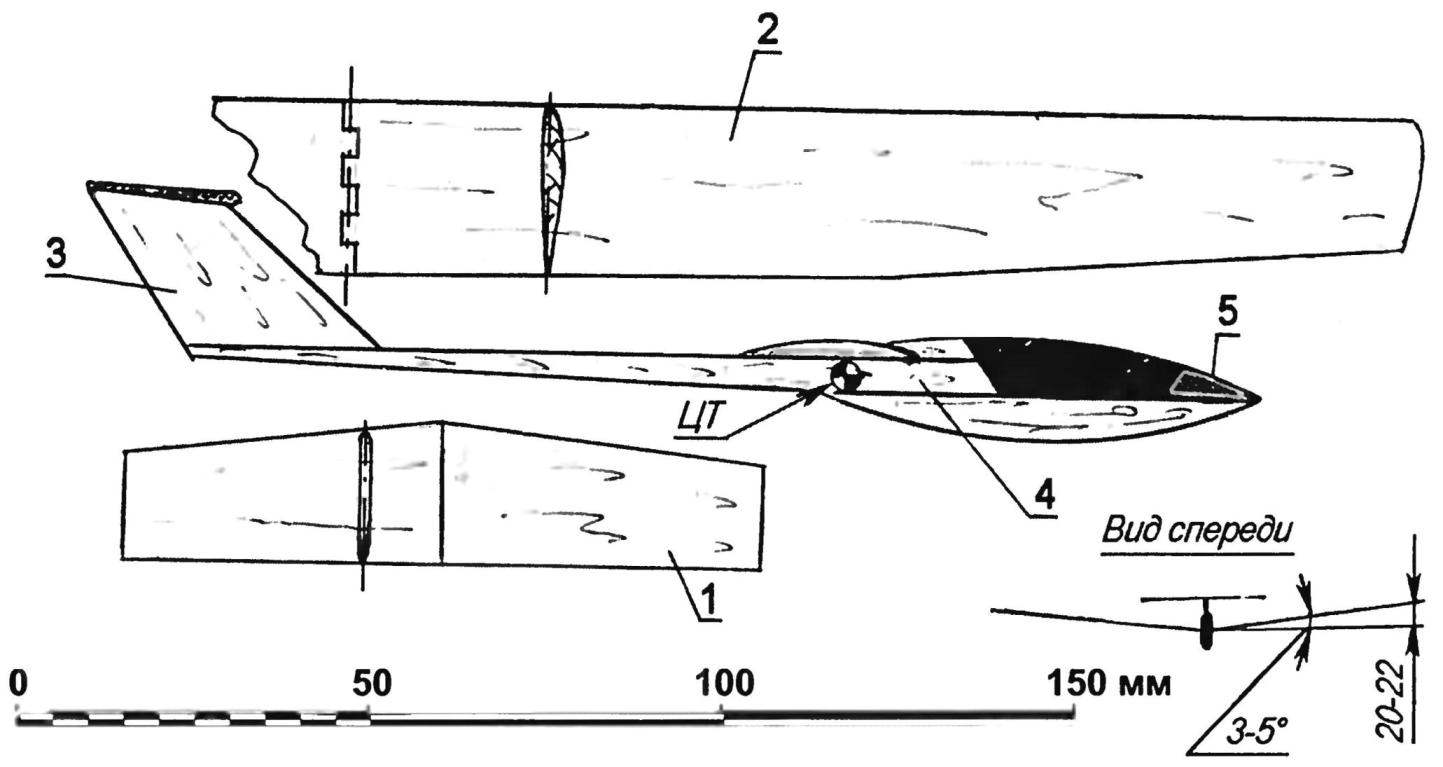
Tossing mini-glider “Igla”:
1 – stabilizer (basswood or balsa s1); 2 – outer wing (balsa or basswood s2); 3 – keel (balsa s2); 4 – fuselage bar consists of three parts, as shown in Figure (linden, s2); 5 – centering weight (tin, lead)
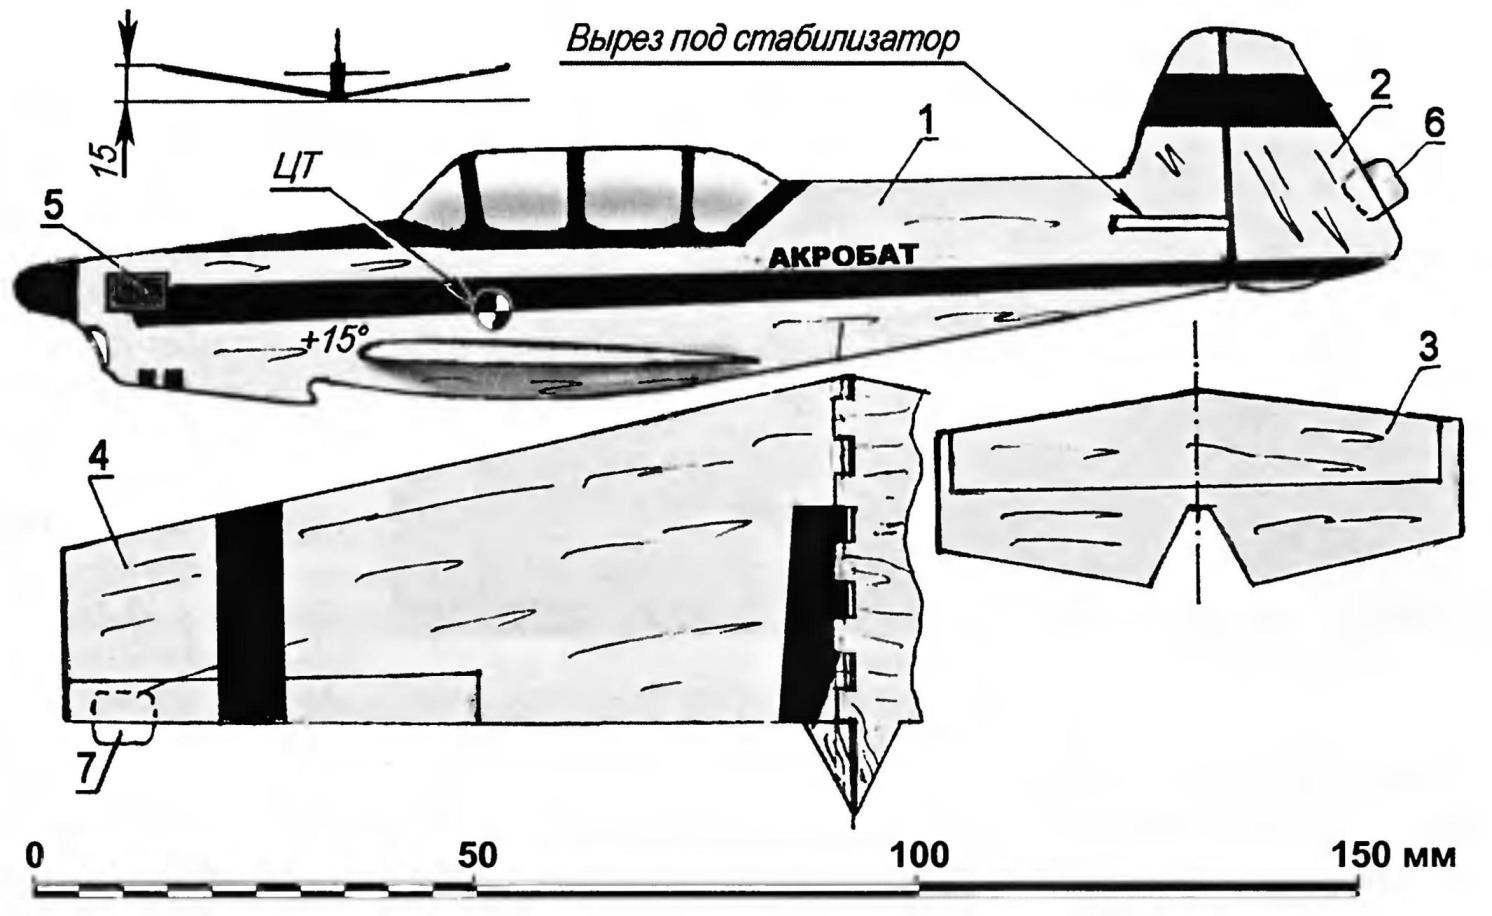
Aerobatic model airplane throwing, a semi-copy of “Acrobat”:
1 – fuselage beam (linden or pine s2); 2 – vertical tail (linden s2); 3 – the stabilizer (linden s1); 4 – wing console (linden, s3); 5 – the goods (tin and lead); 6 – an adjusting plate rudder (aluminum sheets, s0,1); 7 – an adjusting plate aileron (aluminum sheets, s0,1)
If desired, the model can be painted – it is best to use nitroenamels right color in a spray can Run a model you can with your hands or use a rubber band from a few strands. If you make a few mini-gliders, you can arrange a competition – on the duration or distance of the flight.
Throwing mini-glider “Acrobat” is made in the form halfspear sport aircraft – when you run it, depending on the roll force, the installation angle of the wing, its twist, as well as the installation angle of the horizontal tail “Acrobat” will perform a loop, Immelmann, barrel and other more intricate aerobatics. To conduct demonstration flights, it makes sense to do more of the same airplanes, adjusting each one a certain figure. To simplify the adjustment it makes sense to embed in the rudder and the ends of the consoles plate of thin sheet of aluminum – it is best to use for this purpose the bank out of the carbonated drinks.
manufacturing and assembly technology model is virtually identical to that used in the assembly of the mini-glider “Igla”.
And another, more complex structure – room rezinomotornaya flying model aircraft “fly.” However, in its manufacturing technology is not much new in comparison with the assembly “Needles” and “Acrobat”.
To build the “Flies” and lime required balsa plate thickness of 1 mm and 2 mm, length of steel wire 0.4 mm in diameter, duralumin strip thickness of 0.5 mm, model aircraft tire cross-section 1×1 mm, glass bead for air bearing screw, as well as lavsanovaja thin film or condenser paper stitched wing.
When assembling the model should be strictly maintain the parallelism of the planes, and the center stabilizer. Biases regarding horizontal tail wing ending. During assembly of the wing of its endings ( “ears) are glued to the center section at an angle of 25 – 30 degrees, thereby improving the lateral stability of the flight.
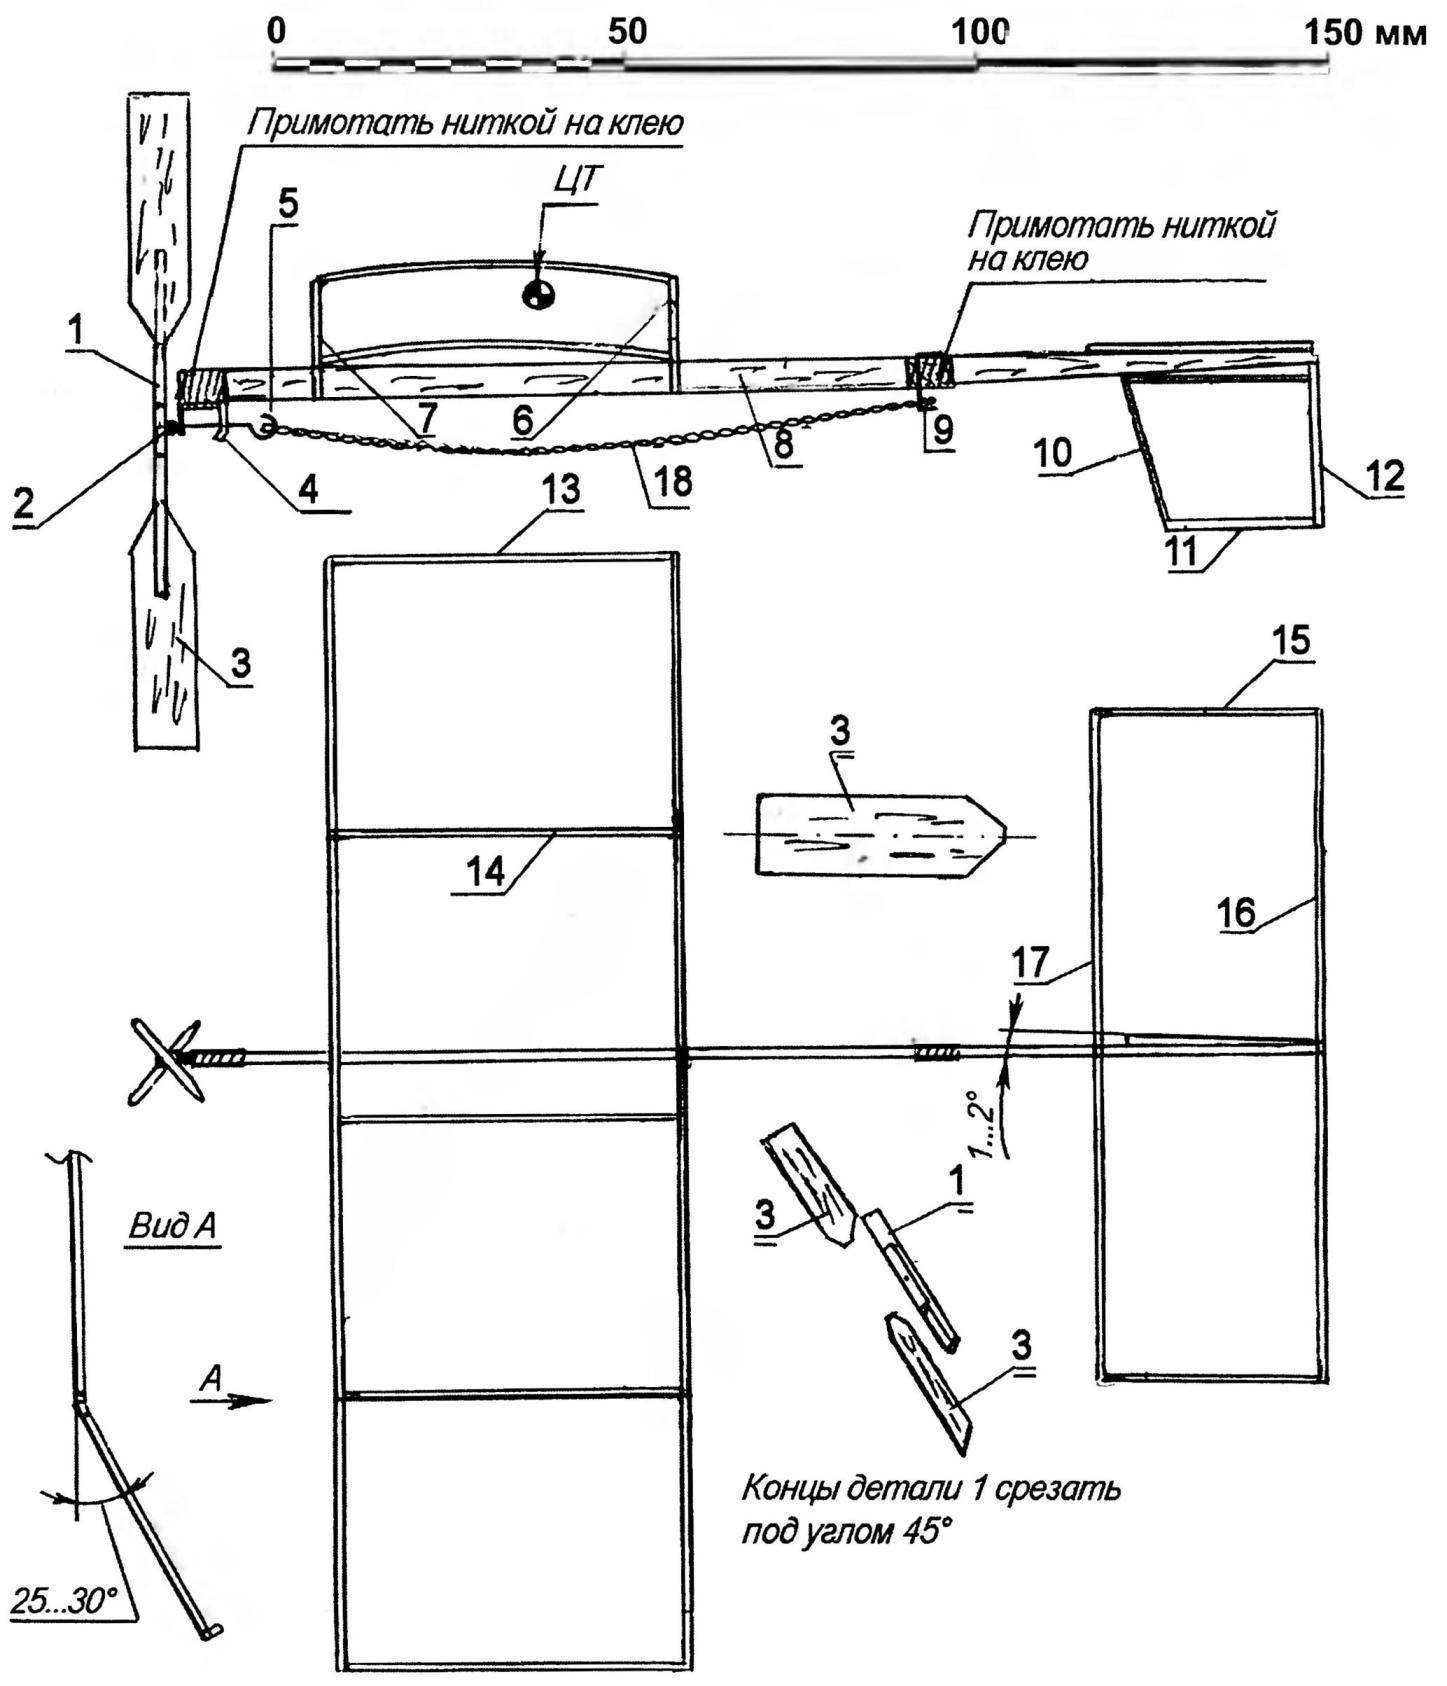
Indoor model aircraft “fly”:
1-sleeve propeller (linden 3 x 3); 2-bearing (glass beads); 3-blade propeller (balsa, s2); 4-bracket (duralumin, s0,5); propeller 5-axis (steel wire with a diameter of 0.4); 6, the trailing edge of the wing (1×1 pine); 7, the leading edge of the wing (pine, 1×1); 8-fuselage beam (pine, 2×5); 9 rezinomotora hook (steel, wire diameter of 0.4 mm): 10, the leading edge of the keel (pine, 1×1); 11 ending the keel (pine, 1×2); 12, the trailing edge of the keel (pine, 1×2); 13 wing tip (pine, 1×1); 14-rib of the wing (pine, 1×1); 15 ending the horizontal tail (pine, 1×1); 16, 17, back and front edge of the horizontal tail (pine, 1×1); 18 rezinomotor (1-2 thread model airplane rubber 1×1)
Kiel is fixed to the fuselage a beam angle of 1 – 2 degrees – this allows the model when running in circles a diameter of 2 – 3 meters.
Rezinomotor consists of a pair of strands of rubber model airplane. The propeller hub is assembled from lime and balsa blades; balance should be, sandpaper scraping the wood with a heavy blade; perfectly balanced propeller is stopped after the rotation at any position (in neutral equilibrium).
Before running the model, you need to check the location of its center of gravity – he must defend from the front edge of the wing at 25 – 30 mm. The first “test flights” should be carried out without spinning rezinomotor. If the mini-plane will plan the hollow, without ballooning and subsequent dives, it can be sent flying into the engine.
Before flight with engine rezinomotor need to spin at 50 – 70 rpm and a slight push hands to release the airplane in the air at an angle of 10 to 15 degrees to the horizontal.
V. MALYSHEV
Recommend to read
 NUT INSTEAD OF SOLDERING
When making loops on the ends of the steel wires are usually soldered. Propose a rapid method of producing such hinges. Reliability is guaranteed. I put the nut on a loop of the right... FIBERGLASS A MODEL AIRPLANE
The industry has already mastered the production of some basic parts from thermoplastics. This is an interesting and promising method for production of large series, however, for...
