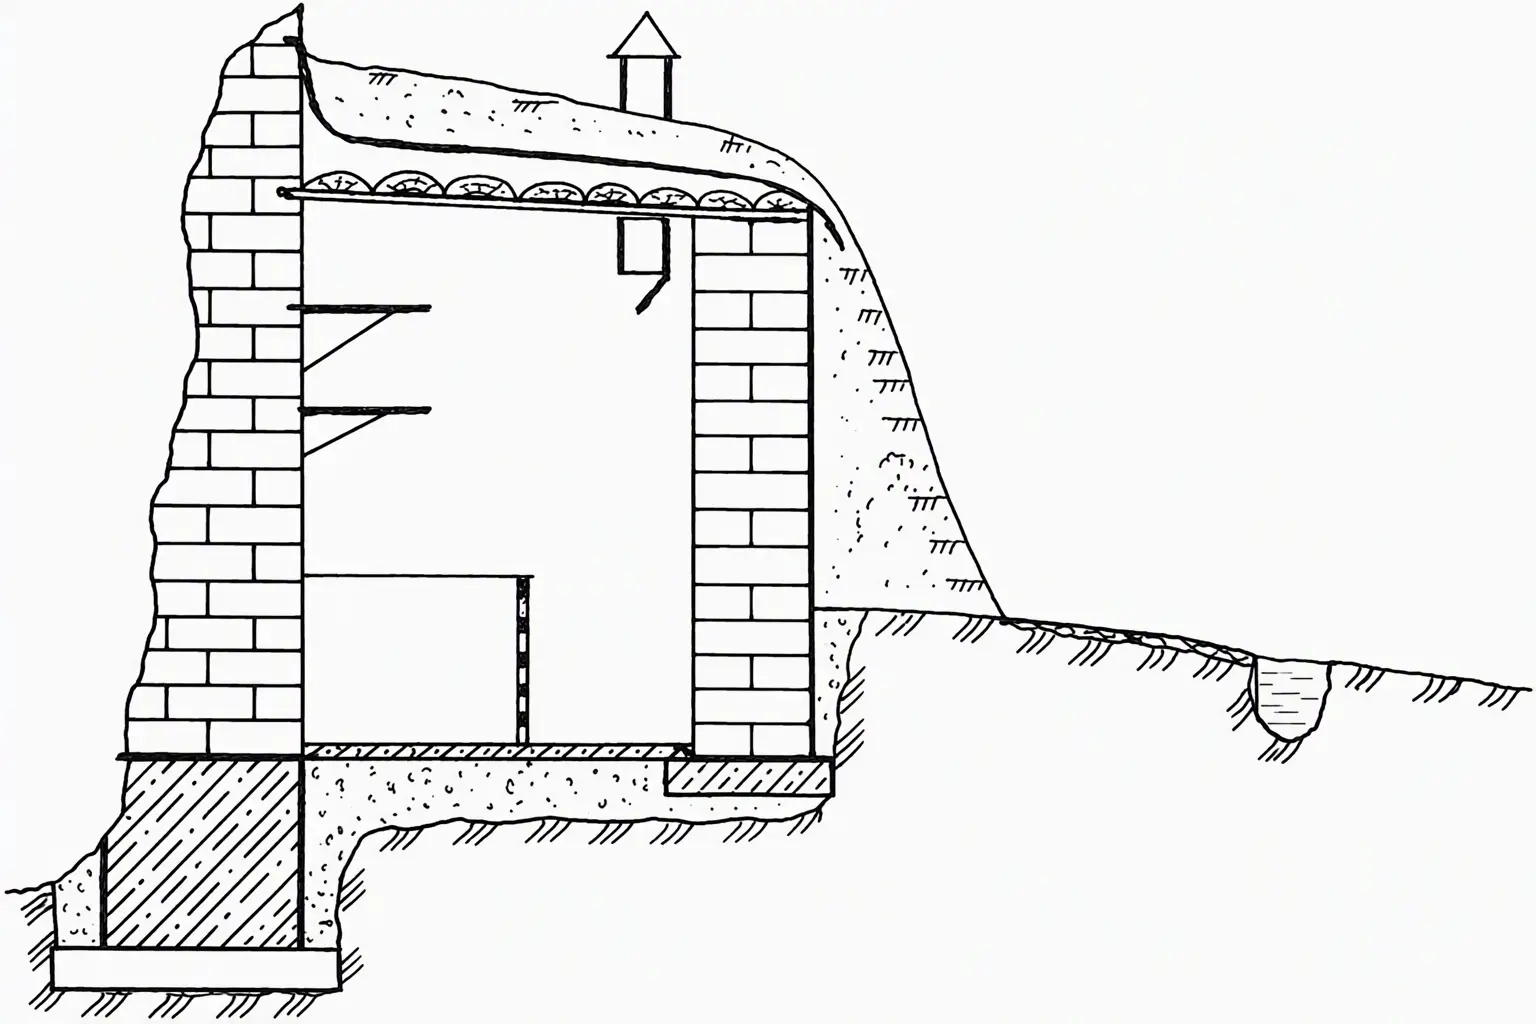
Despite the widespread use of electric refrigerators, a structure such as a cellar has not given up its positions. Especially in rural and suburban areas, where in these compact, carefully arranged storerooms with good waterproofing and properly chosen ventilation people still know how to maintain the required temperature and humidity regime and favorable conditions for keeping food, which for a long time neither rot nor dry out, without losing their unique taste and smell. However, if a freestanding cellar used to be the most common type, today many people, to save space, prefer compact storerooms for vegetables, fruit, and household provisions fitted under a summer kitchen, shed, or garage…
In particular, I prefer a semi-recessed extension against a blank wall of the house. This is the so-called wall-adjacent, completely safe cellar (Fig. 1). Its design largely resembles the popular option of a wall-adjacent greenhouse extension (see, for example, the material published in No. 1, 1998 of the magazine “Modelist-Konstruktor”). That is no surprise: in both cases the foundational parts are the house wall and a mini-excavation. But there are also significant differences.
In a greenhouse, as is well known, there is a greenhouse effect that imposes its constraints on many features of the structure, from the transparent roof to the trench profile. Heating of a wall-adjacent cellar, by contrast, is mainly provided by soil (deep) heat accumulated by the surface layers of the ground in summer (the soil’s storage of solar energy), with an added thermal contribution from the wall of the house itself. The temperature in such a storeroom stays stable because the thermal conductivity of the soil and the wall is low. In winter heat enters the cellar from the soil, and in spring and summer cold does, because at that time the ground is cooler than the surrounding outdoor air.
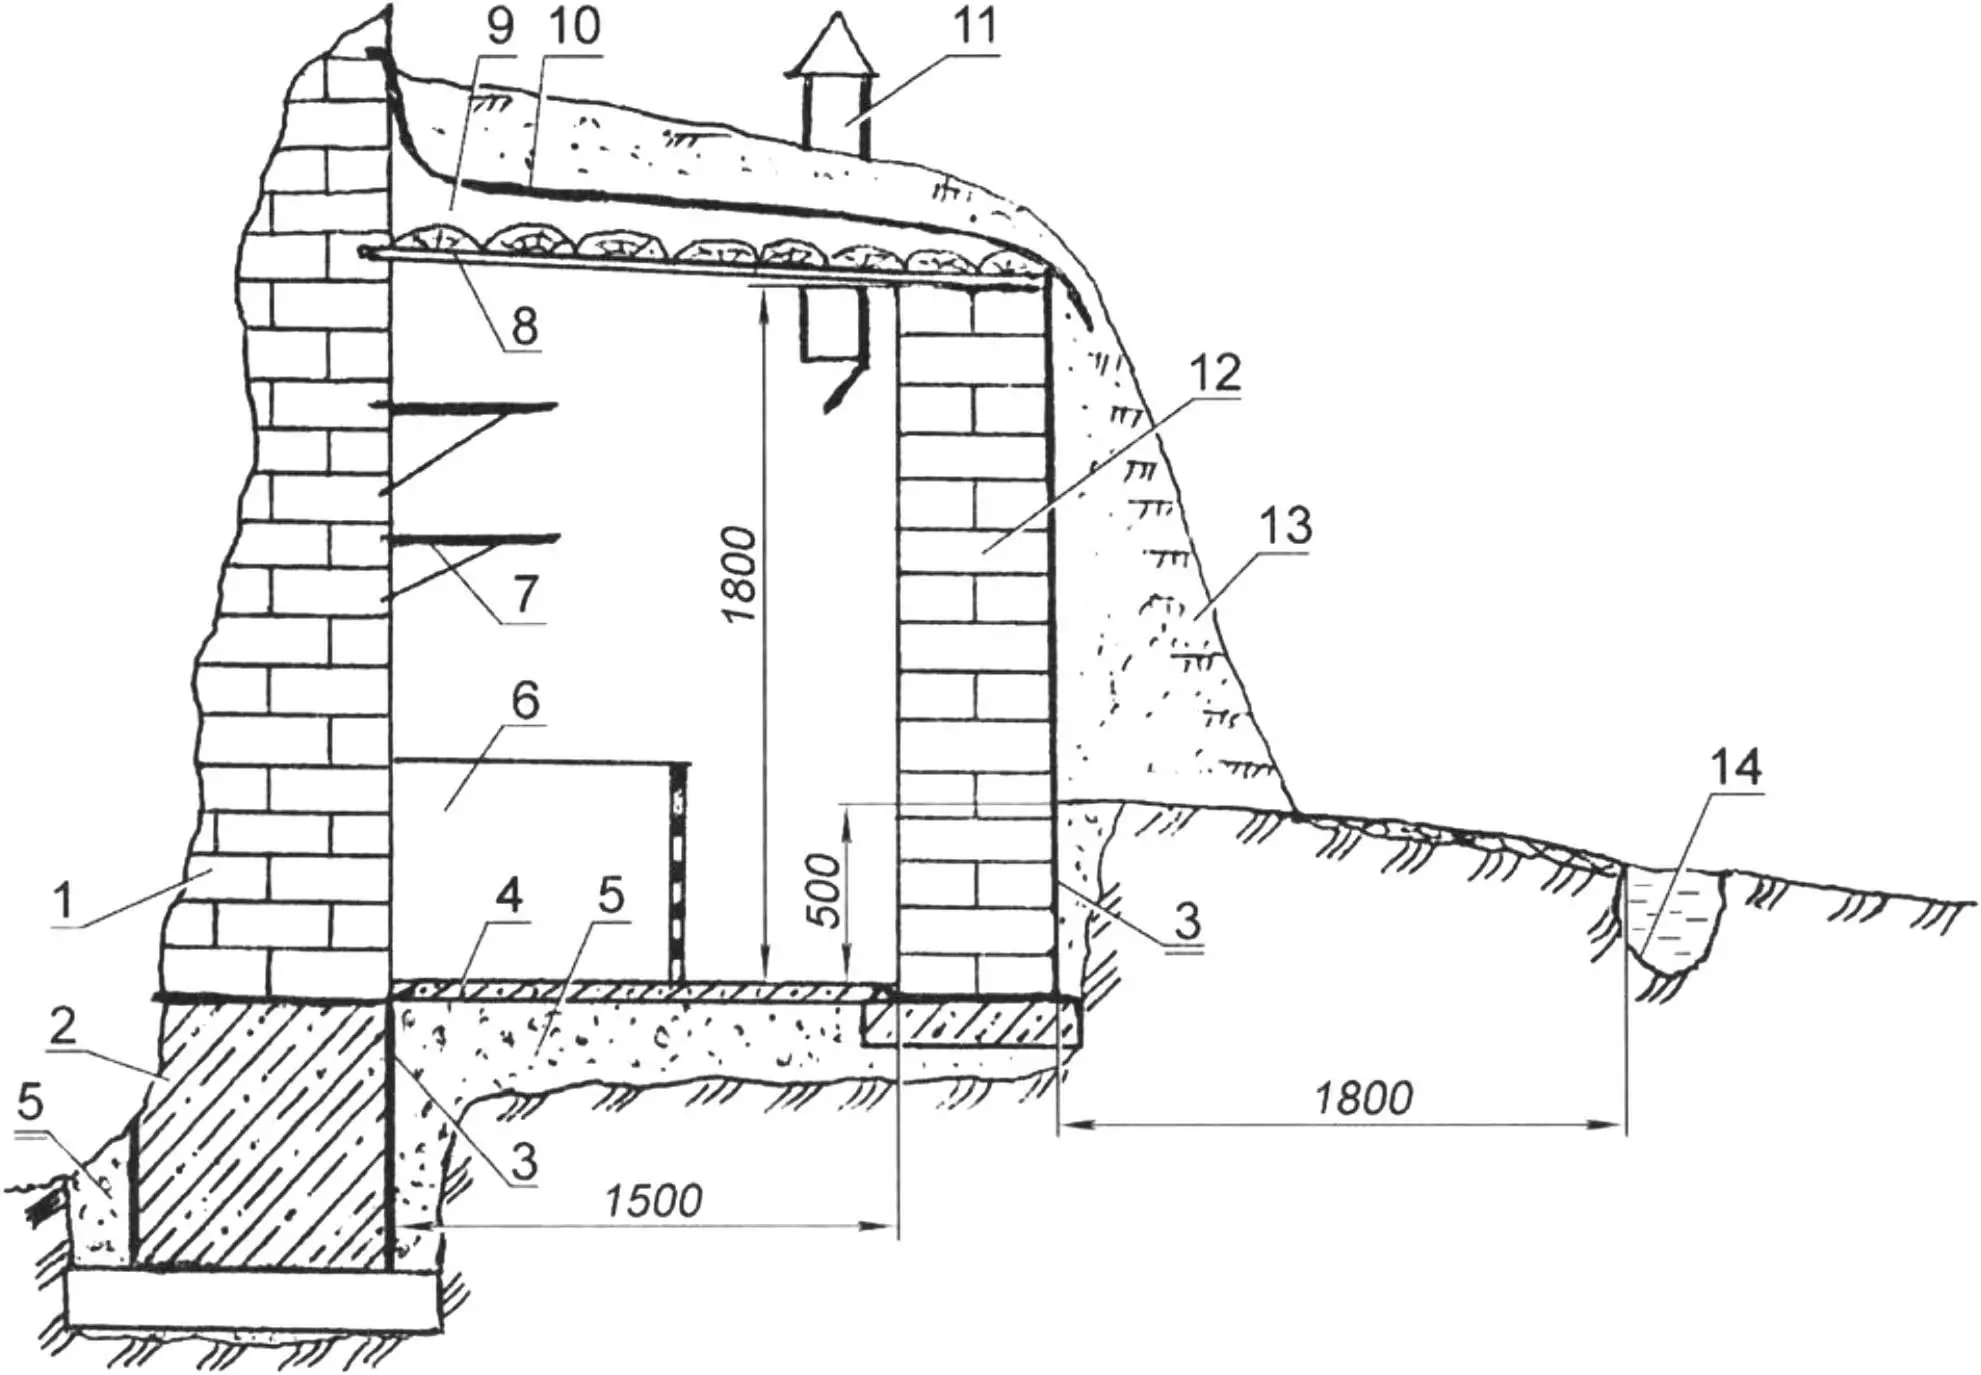
1 — house wall; 2 — foundation; 3 — two-layer bitumen coating; 4 — cellar floor; 5 — bedding (compacted crushed stone); 6 — bin; 7 — food shelf; 8 — ceiling (thick slabwood with fitted edges); 9 — waterproofing layer (worked clay); 10 — main waterproofing of the ceiling (roofing felt, 2 layers); 11 — ventilation pipe with damper (2 pcs at opposite ends of the cellar); 12 — brick wall of the cellar; 13 — earth embankment; 14 — drainage ditch
The additional walls of the cellar I recommend are laid of red, well-fired clay brick on a cement-sand mortar. Monolithic concrete and flagstone may also be used here. The walls are plastered with cement mortar, and on the outside they are waterproofed with a coating — hot bitumen in two layers.
The floor should be cement, 50 mm thick, laid on compacted crushed stone. The ceiling is made of thick slabwood with dressed edges, over which a layer of worked clay is laid, and then roofing felt in two layers. The use of timber with cracks and end splits that indicate reduced strength is not allowed.
Nor should previously used material be applied (from the demolition of old houses, even ones that look fairly strong), because such wood is usually infected with fungal spores. For the same reason one should not use timber that has lain outdoors for a long time (three years or more), or standing deadwood, which is usually weakened by wood-boring beetles and is less strong in a damp environment. In any case, I recommend treating the wood chosen for building the cellar with an antiseptic solution.
It is best to start building the cellar in midsummer, when the groundwater level is at its lowest. Of course, before starting work one must prepare all the necessary building materials so that interruptions in the work are not later allowed. At the chosen place the vegetative layer must be removed, and then an earth excavation of 500 mm or more made (the depth depends on the groundwater level). The excavation improves heating of the cellar by soil heat. The excavated soil can be used for the outer embankment of the cellar.
The further technology is largely traditional. The base of the earth excavation is tamped and filled to 70–100 mm (with subsequent compaction) with coarse sand, fine gravel, screened brick rubble, expanded clay, etc. Such bedding reliably protects the cellar from dampness. On the draining material a mini-foundation is laid, on which three walls of red brick are carefully erected (not forgetting waterproofing!).
The embankment is made with dry earth or peat and grass seeding. Around the cellar, at a distance of 1–1.8 m, a drainage ditch is arranged.
The height of the cellar to the ceiling is 1.8 m. Inside, on one side of the aisle, lattice bins raised 100 mm above the floor are placed; on the other side (at intervals of 500–600 mm in height) — shelves. The bins are made about 1 m high with a lattice floor for ventilation.
To avoid freezing of the cellar in case of severe frosts, the ceiling is additionally insulated. Around the cellar a drainage ditch about 300 mm deep is arranged; it may even be filled with draining material: stone, broken brick, crushed stone, or brushwood from bark-stripped branches.
The whole cellar is embanked with earth and sown with grass or covered with sod. This helps keep a constant temperature inside the cellar. Moreover, the cellar mound itself is often used for planting ornamental plants.
As the outstanding Russian scientist and agronomist Andrei Timofeevich Bolotov (1738–1833) wrote, a sound cellar “needs to be dry and spacious enough so that it is not stuffy in it, but there should be no cool draft, for it dries out the vegetables. If, on the contrary, it is dead (with stagnant, unventilated air) and damp, then the vegetables rot.”
Of course, to maintain a normal temperature and humidity regime in the cellar there must be sufficiently good supply-and-exhaust ventilation. It is good to install two pipes — an exhaust and a supply pipe — which for better air exchange are placed at two levels and, if possible, in different places, to avoid drawing in fresh air improperly.
The exhaust pipe is placed at the top, right under the ceiling, and the supply pipe at the bottom at a height of 500–600 mm from the floor. Air movement through them occurs due to the difference in specific weight between cold outdoor and warm indoor air, so such a ventilation system is called natural. Using a larger number of small-section exhaust pipes is undesirable, especially in northern regions.
In addition, there is always an extra inflow of outdoor air through gaps and a non-hermetic door hanging. The air speed is greater the higher the temperature difference between the cellar and outdoors. The pipes are made of thick (30–40 mm), well-fitted and tightly joined boards and are fitted with slides (valves) and dampers to regulate air exchange and the temperature-humidity regime.
For a small cellar one may limit oneself to a single two-channel ventilation pipe (with wind catch), for which it is divided vertically into two channels. Through one channel air enters the wall-adjacent storeroom, and through the other it is forced outdoors. An independent slide can be made for each channel.
It is useful to hang a thermometer in the cellar to record the temperature accurately. But it is even better to install a psychrometer, which makes it possible to measure temperature and determine the relative humidity of the air — a very important characteristic of its state. For example, the optimal storage temperature for potatoes is from +2 to +5°C at a relative humidity of 85–95%.
At reduced relative humidity potatoes (and root crops put into storage as well) dry out. Conversely, too high humidity can lead to the formation of condensation water, which combined with elevated temperature creates favorable conditions for rot and premature sprouting of tubers.
A psychrometer is easy to make oneself: two alcohol thermometers are fixed side by side on a common stand. The bulb of one of them is tightly wrapped in thin cloth — batiste or gauze — moistened with water (preferably distilled); the bulb of the other must be dry. The reading of the wet thermometer will be noticeably lower than that of the dry one, because moisture continuously evaporates from the surface of the bulb and heat is spent on this.
From the difference between the dry and wet thermometer readings, using a special table (see the publication named above), absolute and relative humidity and the dew point are determined. In exceptional cases (for example, when a psychrometer has not yet been installed in a new cellar) the maximum permissible air humidity can at first be judged “by eye.” In particular, one cannot fail to notice that with excessive dampness the walls and ceiling become wet, covered with water droplets and mold, and the upper layer of potatoes becomes moist. A musty smell is felt. And that means it is time to take urgent measures!
One more point. In cellars it is recommended to use alcohol rather than mercury thermometers, to avoid dangerous poisoning if through carelessness the glass bulb of a mercury thermometer suddenly breaks. It must be remembered that mercury vapor is a powerful poison and can accumulate in the human body.
Now about lighting and electrical wiring. One should not forget that all basements and cellars for storing vegetables are potentially hazardous premises from the standpoint of electrical safety specialists. Earth and concrete floors, damp walls, and elevated air humidity do not permit using the ordinary household power network for wiring directly. To avoid electric shock a transformer is needed that lowers the voltage to at least 36 V.
If there is no special transformer, a TVS-180-2 power transformer from an old UNT-47/50 tube television will do for this purpose without any modification. In such a voltage converter the windings are distributed equally on two coils located on the magnetic core (Fig. 2).
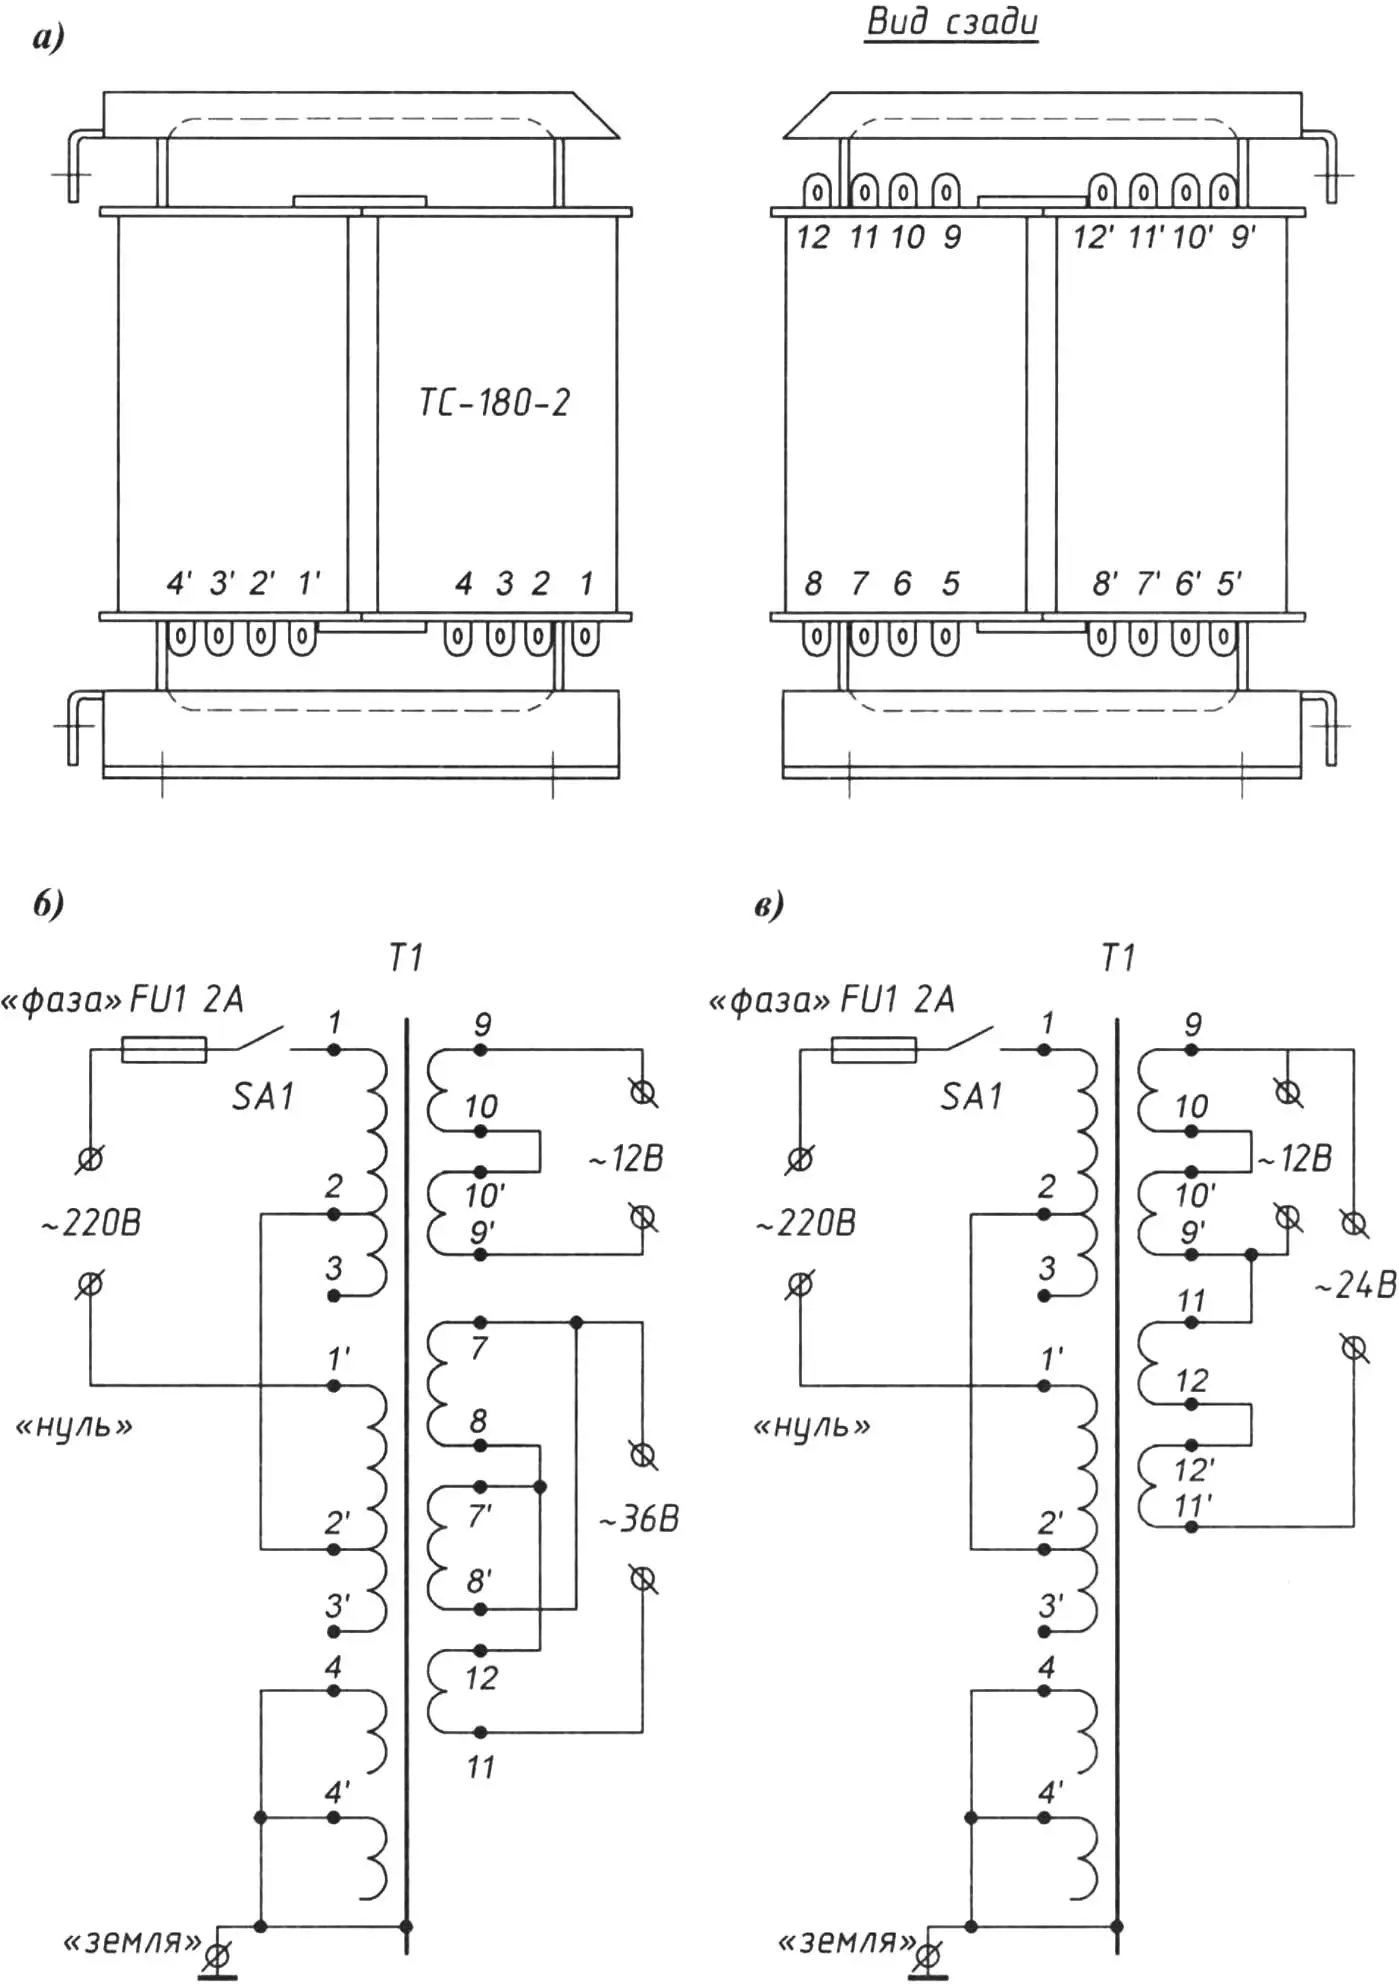
Both primary (mains) windings are connected in series, and grounded screens (brass protective pads) are placed between them and the secondary windings. In the event of a “phase” breakdown of mains voltage onto the grounded screen, only fuse FU1 burns out. High voltage does not reach the step-down windings in that case, which fully meets safety requirements.
The winding leads of our base transformer are soldered to tabs with corresponding numbering (on one coil the numbers are without primes, and on the other with primes). With certain connection combinations one can obtain, for example, 36-volt voltage for the cellar’s regular lighting (say, for a 60-watt incandescent lamp), and 12-volt for a portable lamp.
Removing the power transformer from an old UNT-47/50 is fairly simple. One need only unscrew four fastening screws on the metal chassis of the tube television, unsolder the colored wires that went from the transformer leads, and then solder them according to the new wiring diagram you have adopted. A two-ampere fuse and a switch must also be introduced into the phase wire of the mains winding circuit.
It is desirable to mount the transformer on an electrical panel, cover it with a grounded enclosure, and in doing so connect both the magnetic core and the electrostatic windings to the “Earth” terminal. The transformer must not be installed directly in the cellar itself.
Electrical wiring in the cellar is done in the open way, on rollers or anchors with insulators. Wire with copper conductors and double rubber insulation in a braid of cotton yarn impregnated with an anti-rot compound is used. The most suitable for this purpose are considered to be PR and PRG; as an exception, APR wire is allowed.
Light bulbs are fitted with glass protective covers, using moisture-proof fittings. Switches are placed outside, at the entrance to the cellar, at a height of 1.5 m. Installation of socket outlets in cellars and basements is forbidden. Wiring entries into the cellar are made so that moisture does not accumulate on them.
The harvest is put into clean and disinfected storerooms, so our cellar should also be washed, aired, and disinfected every year (of course — before storage!). The most accessible disinfection method is whitewashing with lime (1 bucket of lime putty to 5–6 buckets of water) with the addition to the solution of 10% copper or iron sulfate (1 kg of crystals previously dissolved in warm water per 1 bucket of whitewash mix). Hard-to-reach places are sprayed with a rubber bulb. A strong solution of potassium permanganate can also be used as a disinfectant, as well as a “tobacco” decoction (50 g of dry makhorka or tobacco dust per 1 liter of water).
In addition, for disinfection the cellar can be fumigated annually with sulfur, pouring it onto a hot frying pan or baking sheet with glowing charcoal at the rate of 30–60 g per 1 m³ of room volume. The door is tightly closed, cracks are sealed with clay putty, and for sealing the hatch (if there is one) a cotton mattress or old blanket can be used. After 1–2 days the cellar is aired.
Sometimes sanitary rules force more decisive measures. All affected places are then cut out or sawn out. The removed wood is burned immediately, but not in a stove and not on the plot, so as not to help spread the infection. Then within a radius of 1 m from the damage focus wood that looks healthy is also removed and burned. The remaining (healthy) wood is carefully treated with antiseptic using one of the effective solutions. Moreover, all temporary foundations of walls and plinths at the points of abutment of beams, brackets, and ceilings affected by fungal infection are burned out with a blowtorch or gas burner (with strict observance of fire safety rules!) to a depth of 10–20 mm. The earth floor is sprinkled with a thin (1 cm) layer of hydrated lime.
To destroy insects that often enter the cellar with vegetables put into storage, and also to fight mold and rotting fungi, the vapors formed when slaking chloride of lime may be used. For every 10 m³ of cellar volume, 2–3 kg of unslaked lump lime are taken, poured into a tank or other container, then water is poured on and one quickly leaves the cellar. The door and hatch (if the design of this storeroom has one) are carefully closed, sometimes even coated with clay for airtightness. The cellar is left closed for 1–2 days, after which it is thoroughly aired. Such treatment of the cellar should be carried out 2–3 times at intervals of 1 week, so as not to let insects and fungi regain viability.
Using a chloride of lime solution with a concentration of more than 40% for disinfection and disinfestation is not recommended, because it risks giving the products a specific aftertaste. However, treatment with highly concentrated solutions is allowed if only seed material will be stored in the cellar.
“Modelist-Konstruktor” No. 6’2011, M. POVALYAEV
Recommend to read
 DRY AND “NEPROLIVAJKU”
Once ceased to overlap the water in the cistern of the toilet. It turned out that the plastic float is stuck in the down position and through the unsealed hole for the end of the lever... REZINOMOTORNAYA CLASS B-1
Rezinomotornaya model aircraft class b-1 designed and built in the aeromodelling circle of the pioneer Chkalovsky district of the city of Sverdlovsk schoolboy Vladimir Ivanov. Speaking...
