
Greenhouses are, of course, not a whim or a fashion, but a necessity that many have struggled with. After all, these structures, covering a plot of land with glass or film, allow not only to plant seedlings in the ground earlier, but also (which is no less important) to protect the growing plants from acid rain and all kinds of “herbivorous pests”.
Collapsible greenhouses are in particular demand among the population. However, the options produced by domestic industry are mostly far from perfect, inconvenient and, as a rule, exorbitantly expensive. So summer residents-gardeners on their plots make all sorts of structures from available materials, where film, nails, boards and homemade clamps lead. The structures turn out to be flimsy, “greenhouse-like”, not even withstanding one season of operation. But… Every spring, people persistently cover the skeletons of their greenhouses with dried film (another one is somehow not at hand at this time).
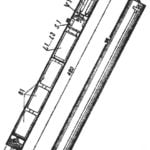
There are no bad reviews about the arched (though “polyethylene double-layer”) design, a sketch of which is given below. The operation of several such greenhouses over three seasons confirms their sufficient strength, good wind resistance and economy, which is largely facilitated by the successfully found streamlined shape of the frame, the “nail-free” method of fastening the film, and the double-layer sheathing that reduces heat loss.
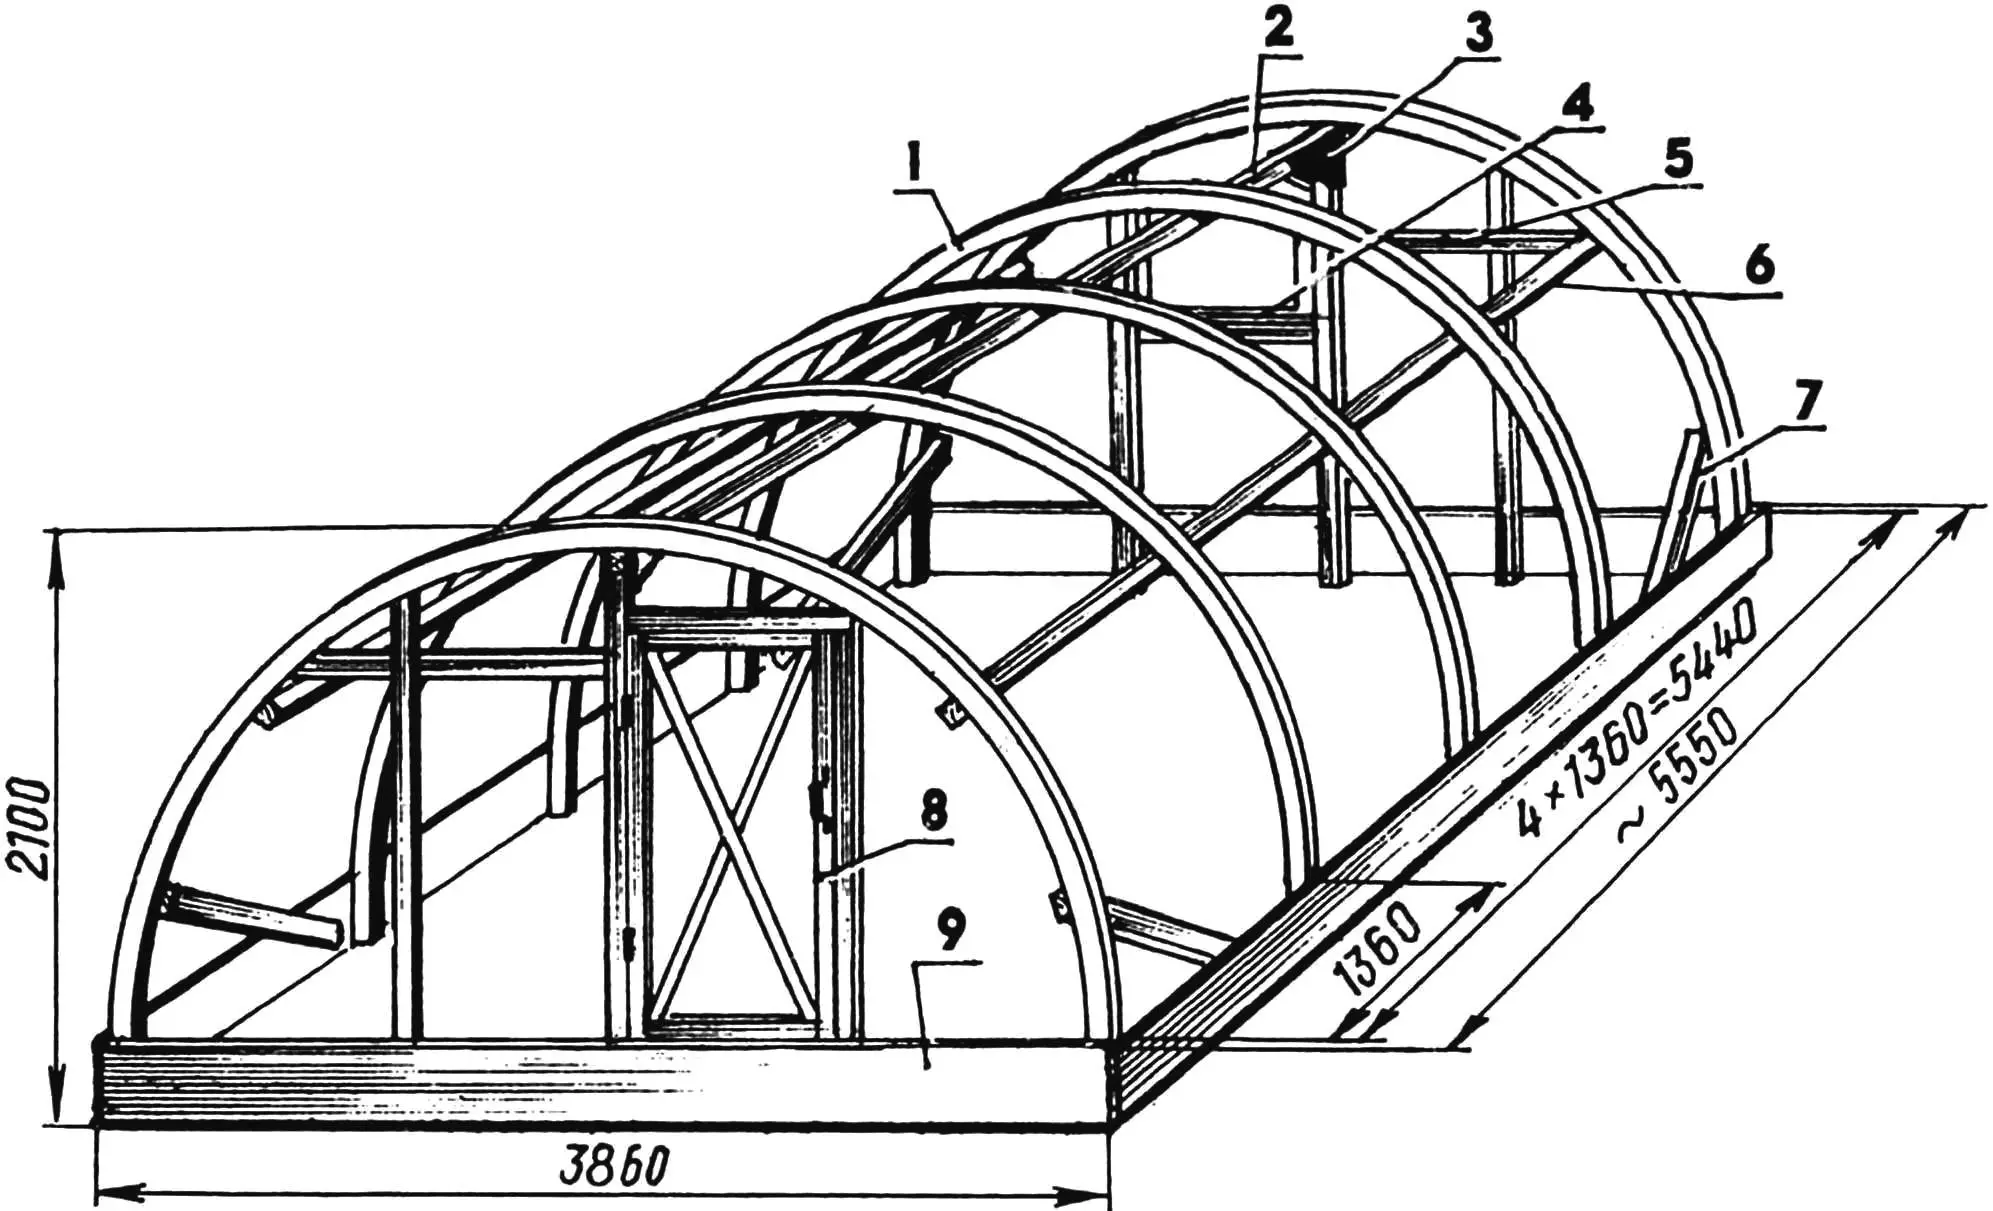
1 — arch; 2 — ridge beam; 3 — gusset (4 pcs.); 4 — vent; 5 — strut (2 pcs.); 6 — longitudinal beam (2 pcs.); 7 — brace (4 pcs.); 8 — door; 9 — base sheathing. The distance between arches and, accordingly, the length of the entire structure depend on the standard size of the double-layer roll film.
The basis of my greenhouse became arches assembled in the form of “sandwiches” from planks (the material for which was scraps of 20-mm boards left after building the dacha), and three beams. As a result, a cheap, simple and at the same time strong structure was obtained. All connections are made with screws — in case of repair, it is easy to replace one or another element, and if necessary — to dismantle the greenhouse.
For those who have decided to make a similar structure for themselves, I recommend starting work with the preparation of planks at the rate of 42 pieces per arch. In the planks of the outer layers, it is necessary to drill holes equal to the diameter of the screws. This will simplify installation and prevent the blanks from cracking.
The assembly of each of the arches should be performed on a flat floor. Using a cord, an arc of the required radius is drawn there, into which the first (outer) plank layer is pressed. On it, like bricks when building a foundation, the second (inner) one is laid with a shift along the circumference by half the length of the plank and temporary “fixing” with several nails to the floor. The third (outer) layer goes last. The laying is similar — with a shift.
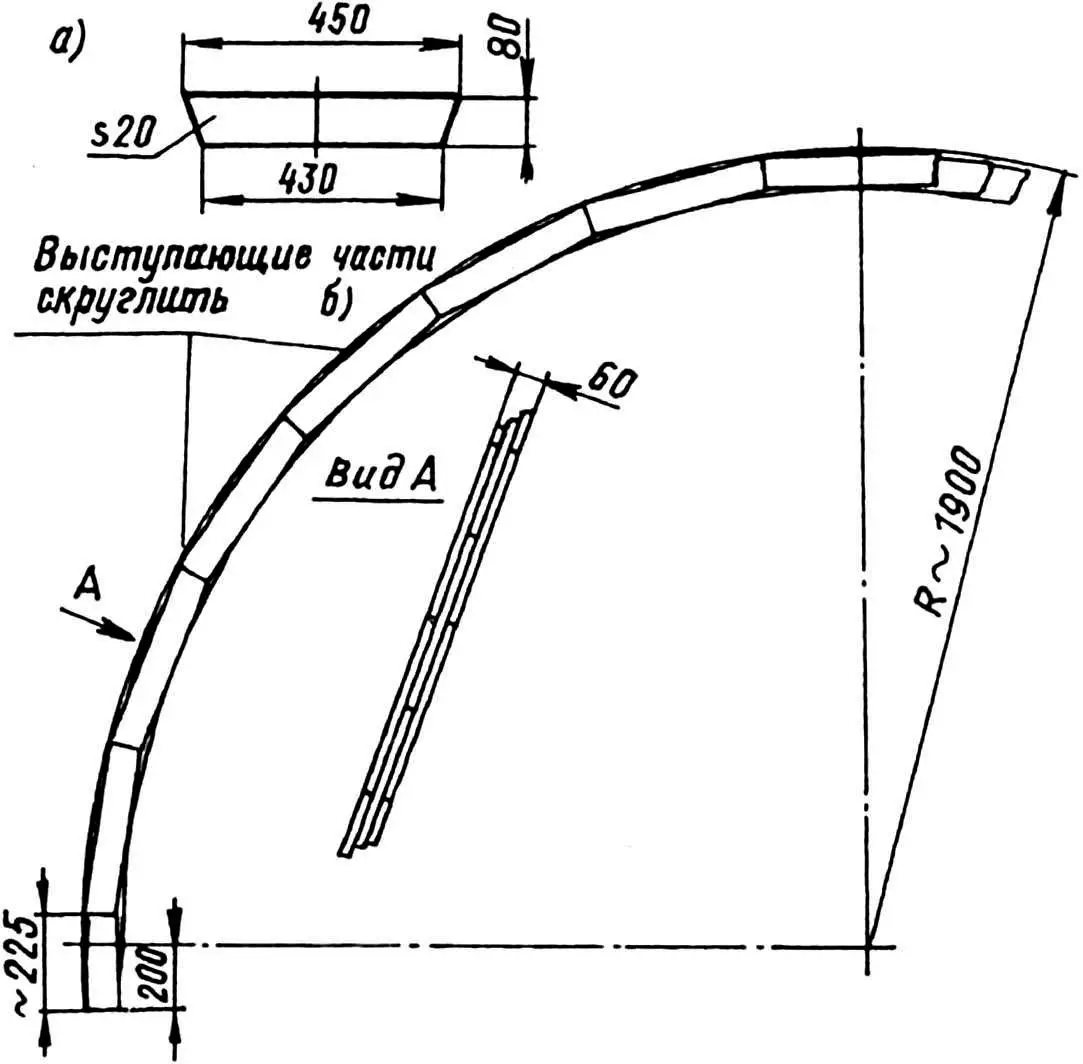
The resulting three-layer “sandwich” is thoroughly “stitched” with screws: first from one side, then from the other. Doing this manually is, of course, tedious. A screwdriver attachment for an electric drill can be recommended, the use of which facilitates and speeds up the assembly of not only arches, but the entire greenhouse as a whole. The protruding parts of the planks at the joints are hewn with an ax with subsequent processing with a rasp to eliminate sharp corners and give the arch a smooth curvature. The number of arches to be made depends on how long the greenhouse is planned to be built.
The load-bearing elements of the structure are also two side longitudinal beams and a central one, called a ridge purlin. The material for them is pine timber 40×40 mm. But you can also use a whole pole, giving it, if possible, a square cross-section. And for the formwork, unedged boards, slab or any other lumber with a width of up to 300 mm and a thickness of 20—30 mm will do. Moreover, in everything, from the purlin to the last board of the sheathing, holes are drilled (with a pitch of 1360 mm, if the greenhouse polyethylene double-layer film has a one and a half meter width) for 8×70 mm screws.
The vent and door are lightweight. It is possible (and as practice has shown, in Siberian conditions — even advisable) to install a second door instead of a vent. To extend the service life of the greenhouse, all wooden parts of the structure are covered with two layers of red lead or natural linseed oil.
The installation of the greenhouse on the allocated plot begins by connecting the ridge purlin with the arches. Longitudinal side beams are screwed to the resulting frame at regular intervals from the inside, and low sheathing is attached at the base of the arches. Then the central posts are installed. They are attached to the ridge beam at a right angle using plywood gussets 10—12 mm thick, and at the bottom they are screwed with screws directly to the sheathing boards. To give the frame ends even greater rigidity, the extreme arcs are reinforced with additional posts and braces.
Direct contact of the wooden frame with the ground is excluded by placing tar-treated bricks under the ends of the arcs and posts — a kind of mini-foundation with a waterproofing layer. And to prevent the greenhouse from shifting (for example, under gusts of hurricane wind), tarred oak or pine stakes are driven from the inside of the sheathing (at the corners).
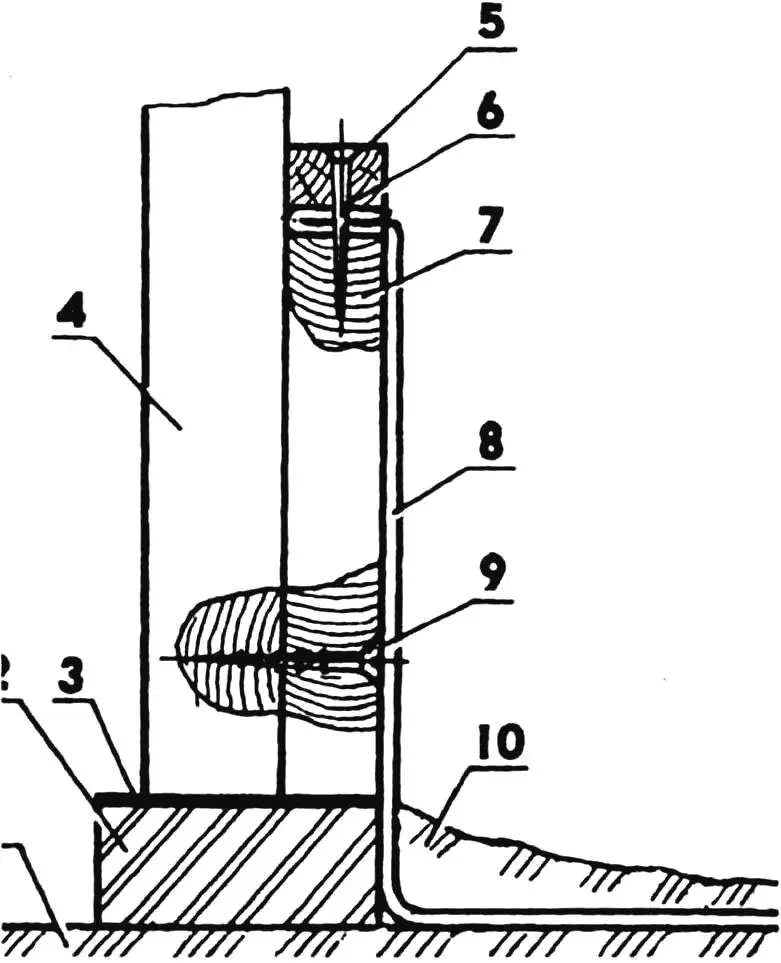
1 — soil; 2 — mini-foundation made of brick; 3 — waterproofing; 4 — arch; 5 — clamping strip; 6 — nail; 7 — wooden base sheathing; 8 — moisture-proof skirt (roll polyethylene film); 9 — screw; 10 — earth backfill.
The material for the moisture-proof skirt that closes the gap between the sheathing and the ground is thick vinyl film. But thin polyethylene will also work, which for greater strength and durability is pre-folded into several layers. In any case, the skirt is attached to the upper edge of the sheathing using a clamping strip and nails, and at the bottom it is simply covered with earth and rolled.
The ends of the greenhouse, the vent and doors are covered with strong reinforced (not removed for winter!) film. It is nailed to the base beam again not directly, but through a 3—4 mm thick batten. At the same time, one should not at all strive to achieve drum-like tension here. After all, the optimal is considered to be a covering performed with a barely noticeable sag, otherwise the film, shrinking in the cold and losing its former elasticity, may burst.
Covering the arched vault of the greenhouse with double-layer film has its secrets. The length of the blanks cut from the roll should be 20—30 mm shorter than the arc itself. It is recommended to cover the ends of each “sock” with 3—4 layers of “tape”. This will help protect the film fabric from tearing during covering.
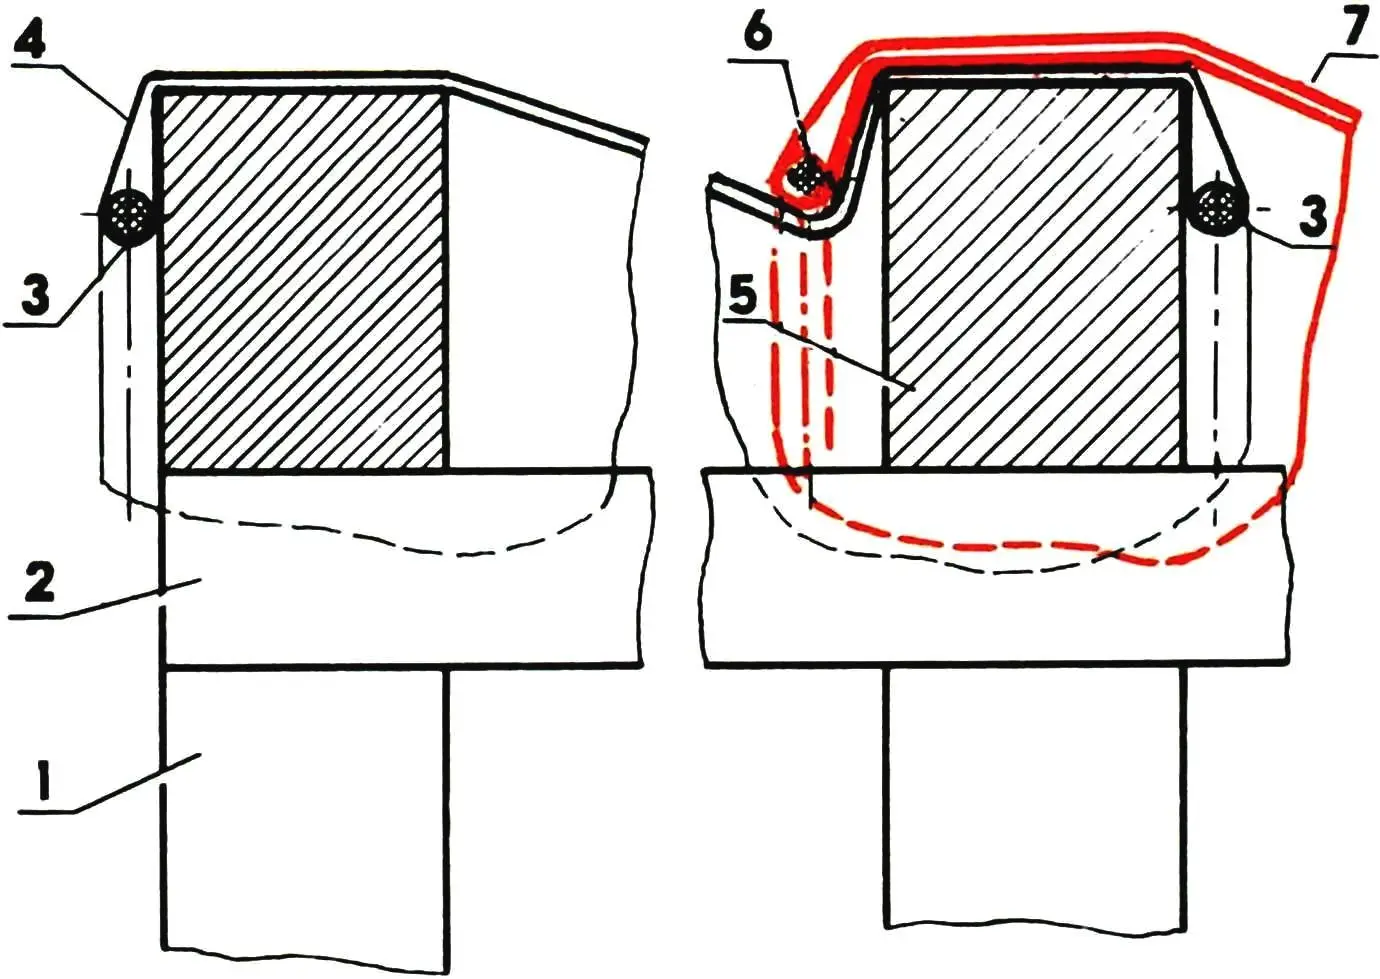
1 — arch No. 1 (front); 2 — ridge beam; 3 — first pair of ties (clothesline, 2 pcs.); 4 — film “sock” No. 1; 5 — arch No. 2; 6 — second pair of ties (clothesline, 2 pcs.); 7 — film “sock” No. 2; arches are conventionally shown as a solid structure.
A pair of strong cords (like nylon clothesline) must be threaded inside each “sock” so that later, having thrown the blank stretched on them over the arched vault frame, tie all this to thick hook nails driven from the outside into the wooden sheathing of the greenhouse. Uniform tension of each of the resulting double-layer strips is achieved in a sequence that is easy to understand from the given diagram, where the arches are shown as solid structures.
At the end of the summer season, the film vault is removed from the greenhouses by untying the cords from the hook nails and rolling the double-layer “sock” strips into rolls for storage until next spring.
Yu. MASYAEV
Recommend to read
 “E-COLI”
Instead of bulky and uncomfortable electrostatic machines Wimshurst, coils Ruhmkorff in high school physics classrooms are increasingly high voltage converters voltage. They can be used... OVERSEAS THE CONCEPT OF “LIGHTNESS”
Admirals of the United States of America long resisted the emergence in its fleet of light cruisers, preferring the beloved "Washington" class. End to the resistance put by the London...
