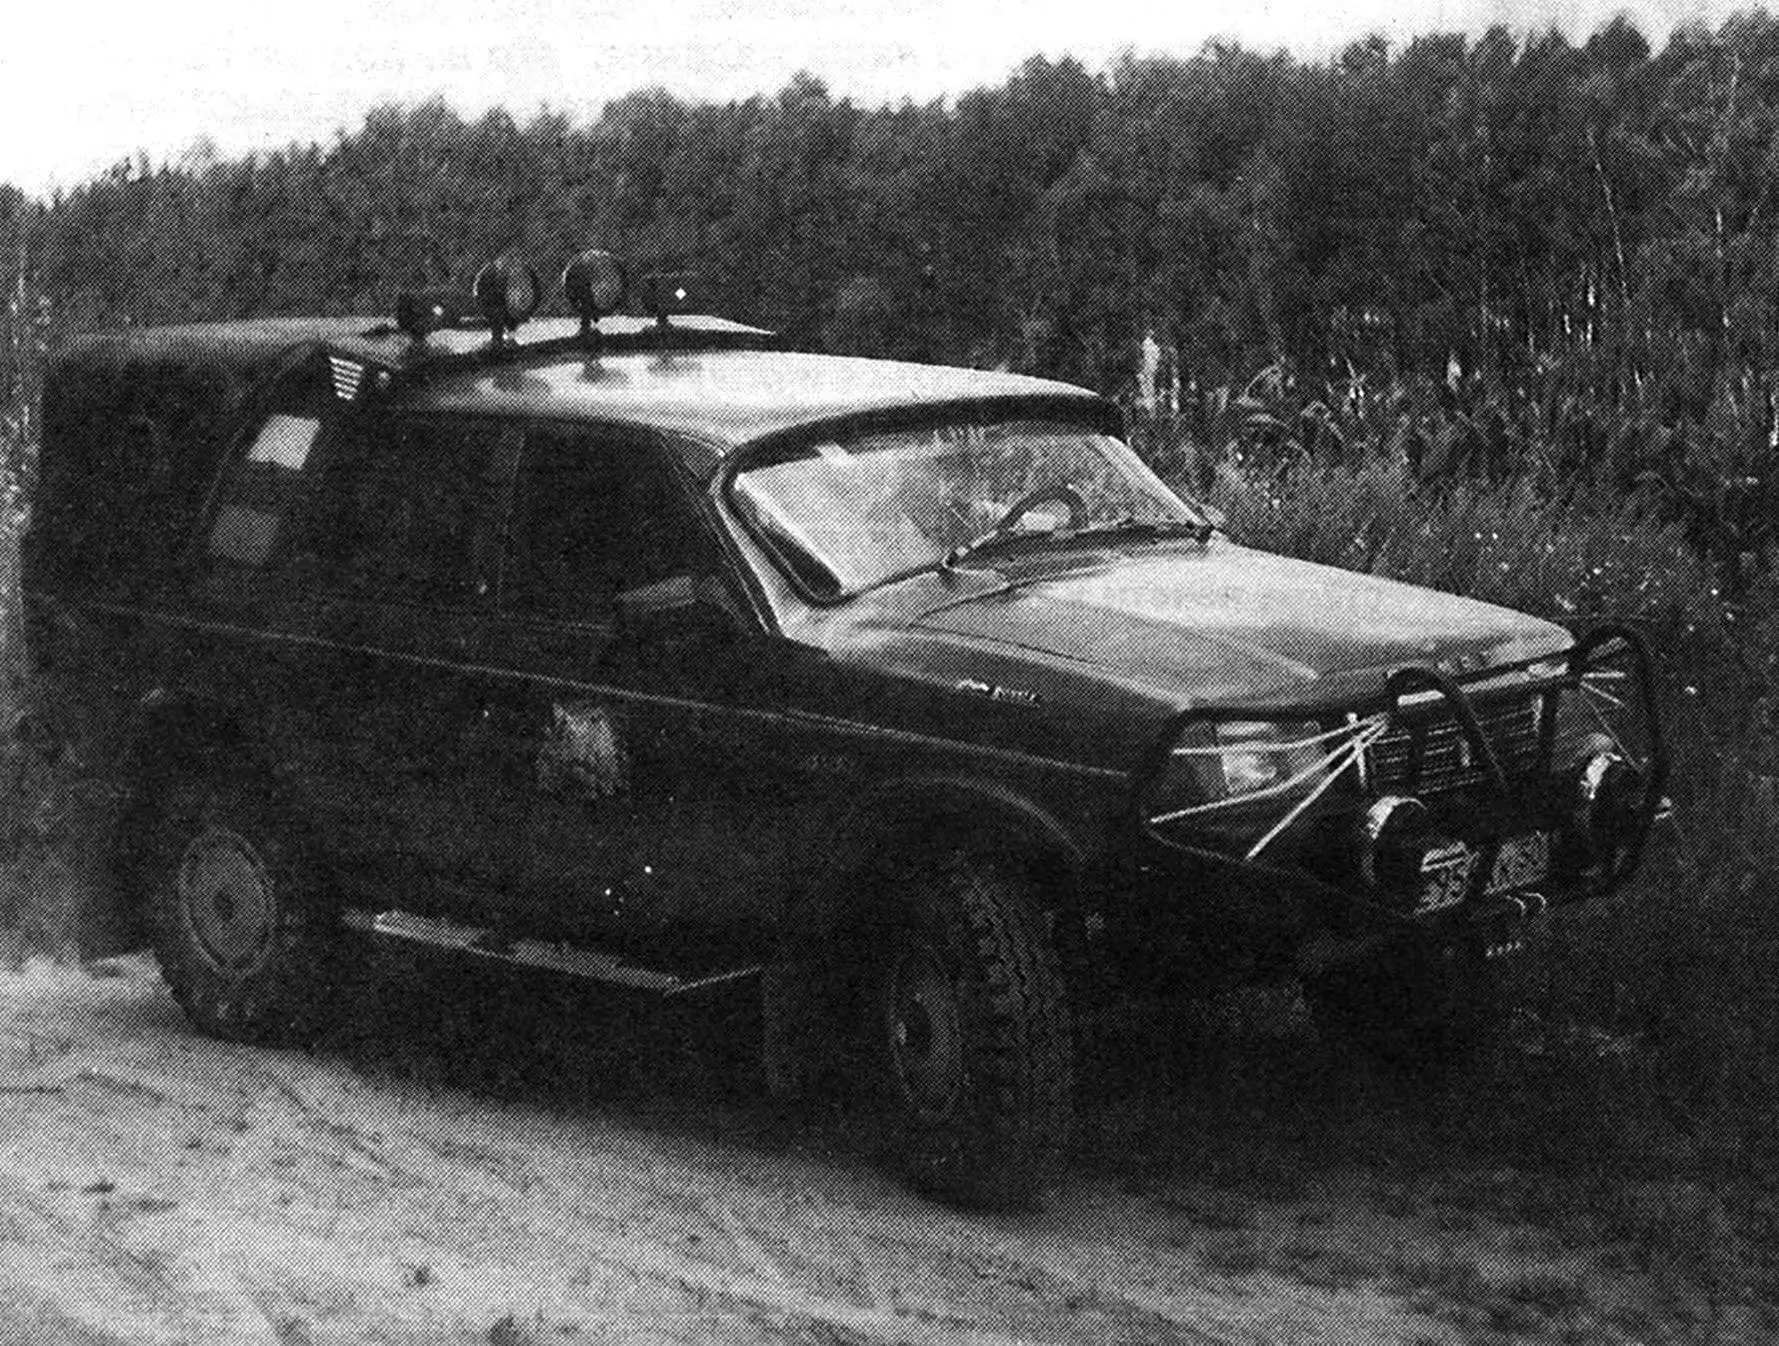
Amateur constructor Oleg Alievich Starikov from the Moscow region village of Ostrovtsy is known to many thanks to his handsome jeep “SIMOT”, built in 1996. This car could be seen on the television program “Podmoskovye”, as well as at the celebration of the newspaper “Moskovsky Komsomolets” in Luzhniki, at “Survival Races” in Krylatskoye and auto races “Moroz-98” in Ramenskoye, where it participated as a technical support vehicle, and finally, in an auto rally along the “Golden Ring”, dedicated to the 850th anniversary of Moscow. Everywhere the jeep attracted attention, despite its somewhat stern appearance, which is why, by the way, it got the nickname “APC”. Even on Moscow streets, literally packed with foreign cars, “SIMOT” arouses interest among owners of expensive overseas jeeps.
The history of creating my car is simple. After serving in the army, I got married and stayed to live in the Moscow region town of Zhukovsky. All relatives live nearby. But getting to them without a personal car was oh so problematic… And in the household, you always need a helper on wheels. So my wife and I decided to buy a used car. First we bought a “Moskvich”, then — a “Volga”. I struggled with them a lot, but I brought them “to their senses”. Over time, I learned to do metalwork well, solder, mastered electric and gas welding. I built and equipped a garage. That’s when the thought came to make a vehicle, if possible, from the same units and components that I had to deal with almost every day.
This was supposed to be a car with good capacity and load capacity, adapted to rural roads. I first embodied my idea in a drawing — my skills in drawing and artistic modeling came in handy. The result was a jeep with a five-seat cab and a small body covered with a tarp.
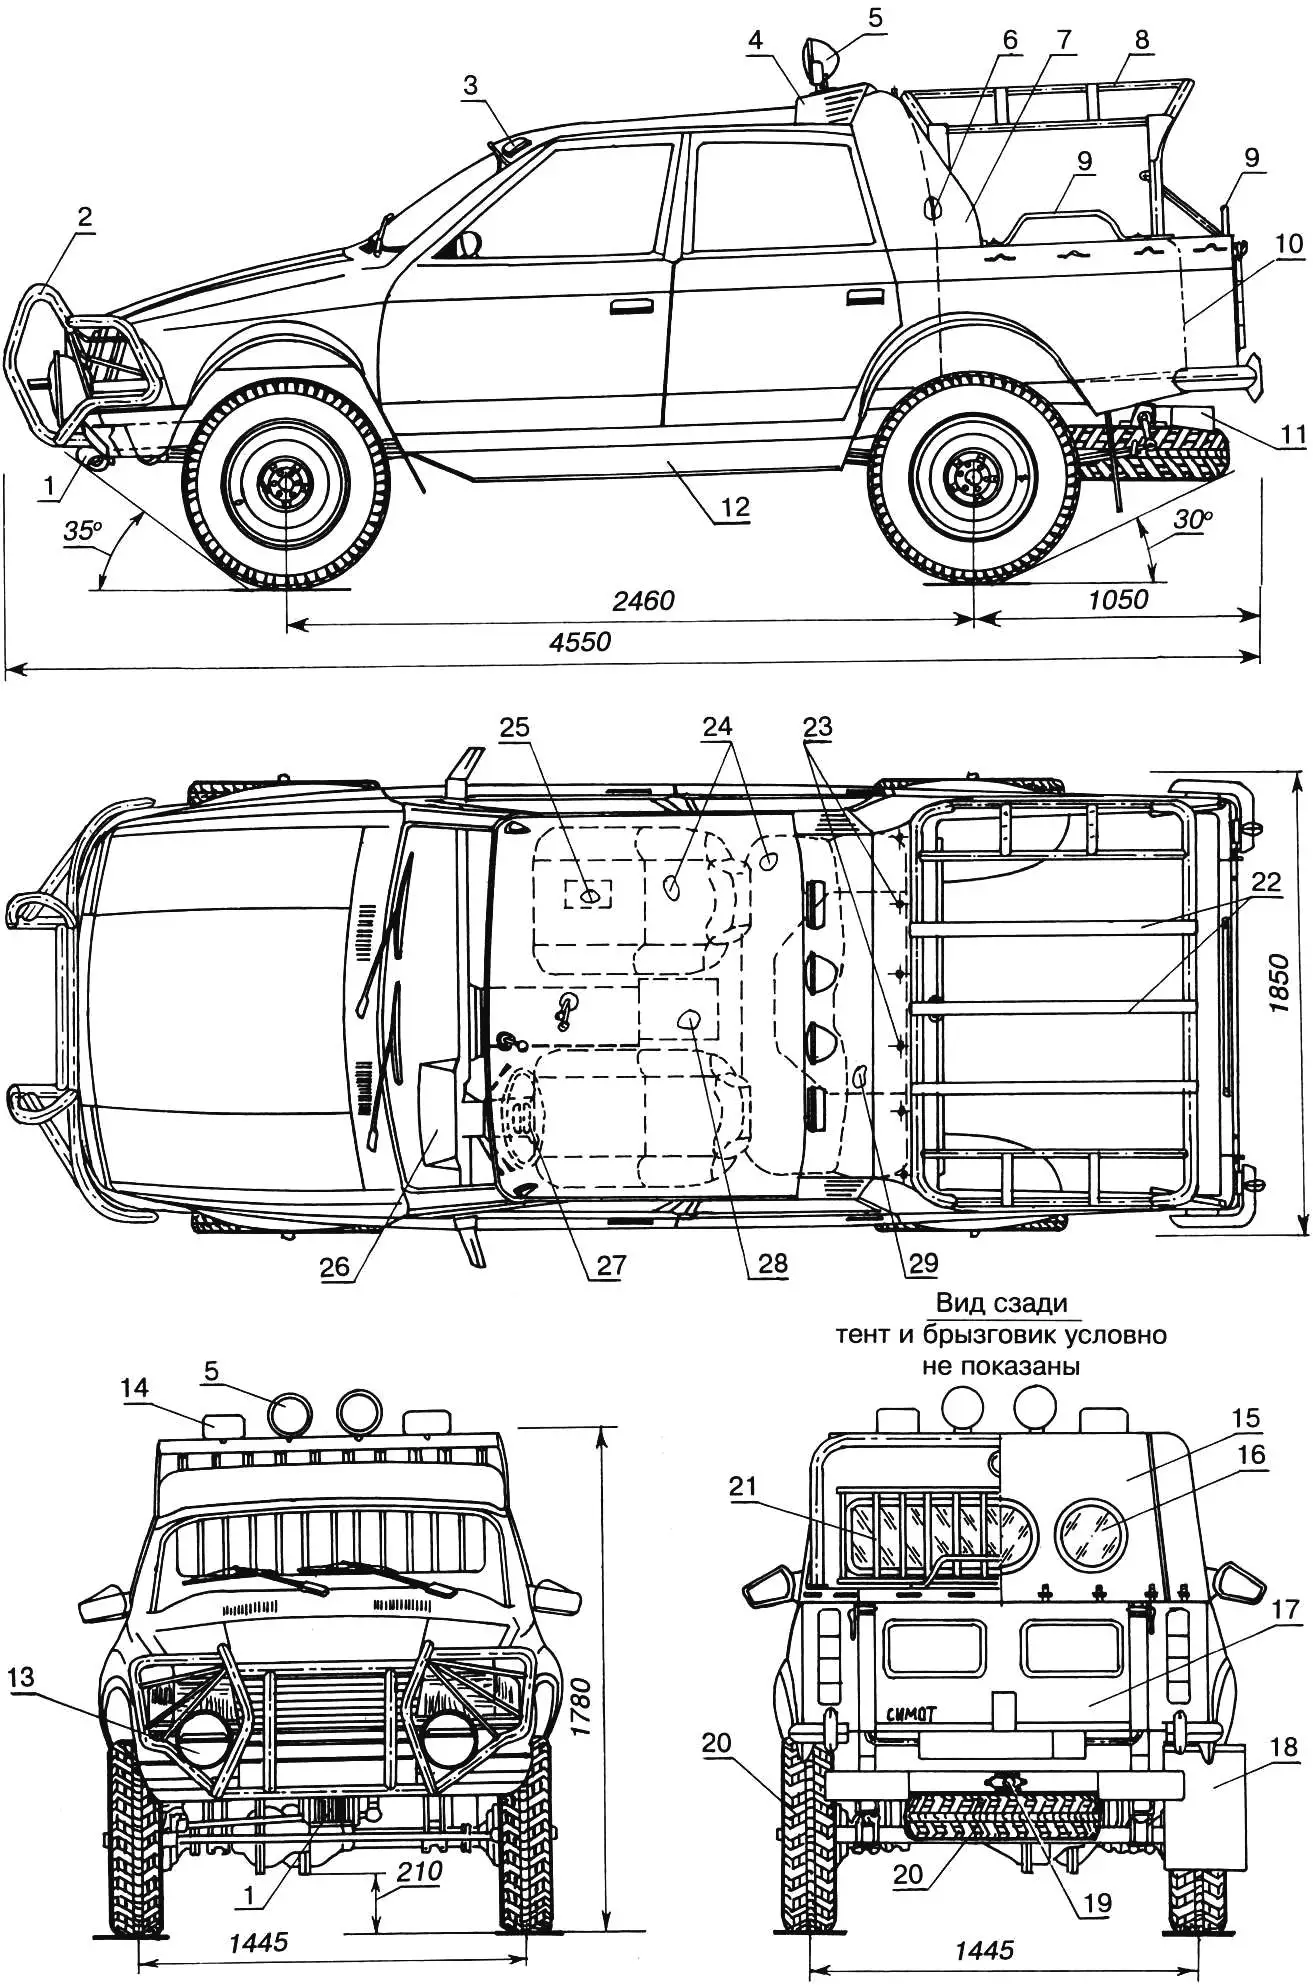
1 — winch (from spare wheel hoist of KamAZ); 2 — front guard (St3, tube 42.3×2.8); 3 — turn signal repeater (rear turn signal from “Moskvich-412”); 4 — visor (St3, sheet s1); 5 — spotlights; 6 — rear cab wall (from GAZ-53 cab); 7 — body fairing (St3, sheet s1.2); 8 — tarp frame (from UAZ-469); 9 — handrails (St3, tube 21.3×2.5); 10 — rear fender joint line; 11 — bumper; 12 — running board (St3, sheet s1.5); 13 — headlight with mask; 14 — fog light; 15 — tarp (remade from UAZ-469 tarp); 16 — window; 17 — folding side (from LUAZ); 18 — mudguard; 19 — trailer hitch; 20 — wheels (from UAZ-469); 21 — window grille; 22 — tension straps; 23 — M6 tarp mounting studs; 24 — seats (from “Moskvich-2141”); 25 — battery; 26 — dashboard (from VAZ-2109); 27 — steering column (from “Moskvich-2141”); 28 — heater (homemade); 29 — fuel tank (from “Moskvich-2141”).
On the top view, headlights pos. 13 are conventionally not shown.
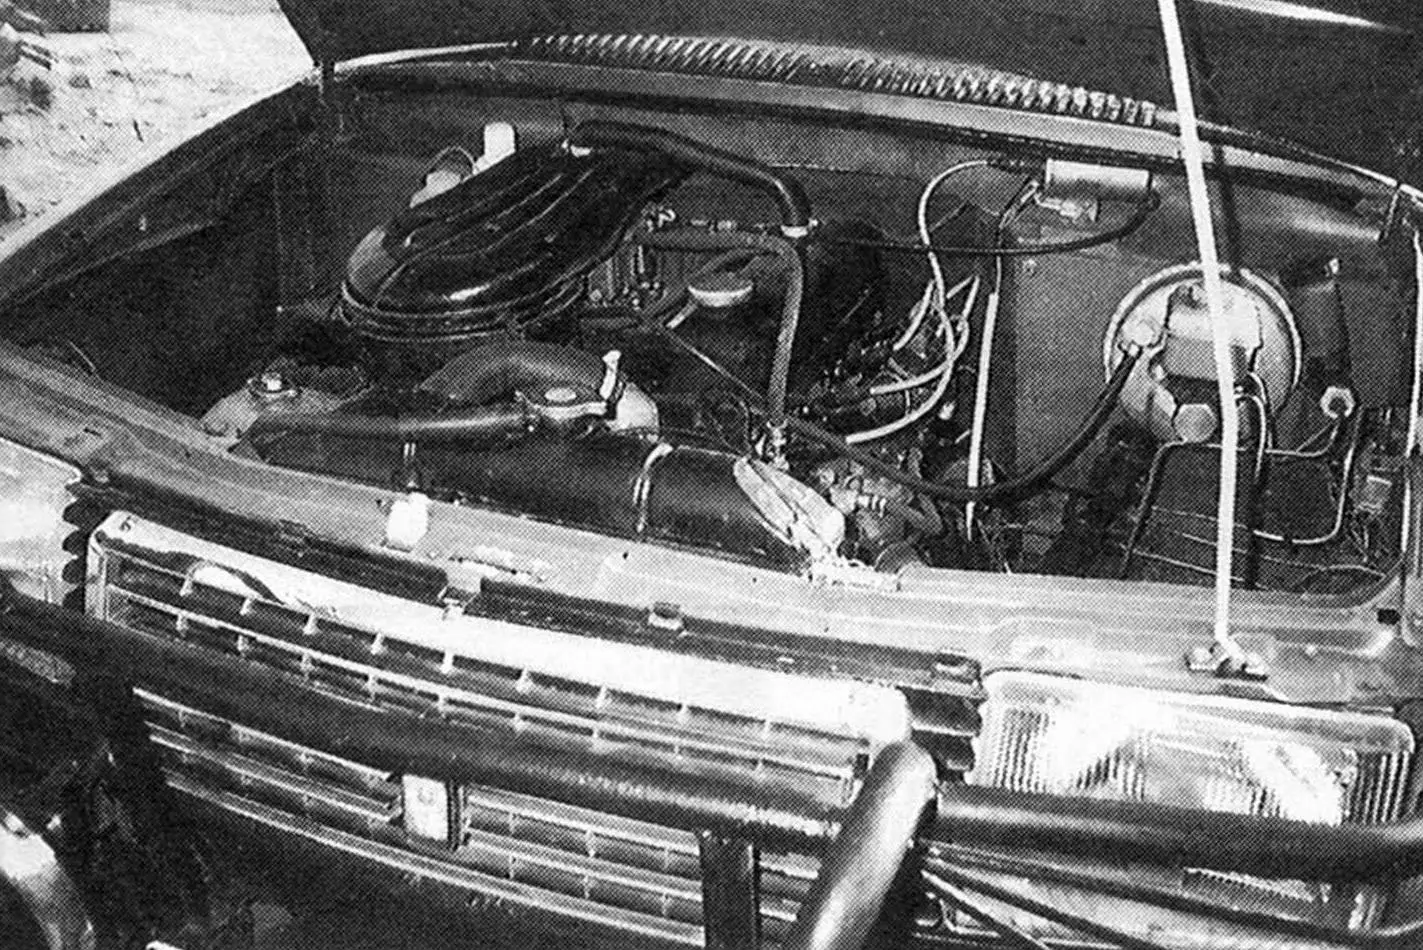
I started selecting the necessary units and components. The most suitable chassis for it turned out to be from a UAZ-469 car. But the “UAZ” gearbox (GB) and transfer case (TC) did not suit me in terms of operational parameters. I had to replace them with units from GAZ-69, somewhat modifying the frame for their installation. In addition, the frame had to be modified due to the fact that the fairly low body of “Moskvich-2141” was taken as the basis for the car body, and my “Volga” engine protruded beyond the contours of its hood.
To install the engine, I replaced the engine mount beam with a lower one from RAF, and used “original” ones for the GB and TC — from GAZ-69. The “operations” were successful, as the frames of these cars are very similar. I cut off the bumper and the front part of the side members with hooks as unnecessary. I also removed other unnecessary elements. The jeep body turned out to be slightly longer than the “UAZ” one, so I had to increase the rear part of the frame by 150 mm by means of inserts, and to maintain the strength of the structure, I made the cuts for the trailer hitch and side member mounts figured (offset relative to each other) — I cut the side member shelves and inner walls at an angle before the trailer hitch beams, and the outer walls — behind them. Then I sawed the side members along the ribs between the cuts and, spreading the parts, welded steel inserts between them. Since the distance between the rear spring supports increased, I shifted their front pins back by the same 150 mm and welded four spring travel limiters.
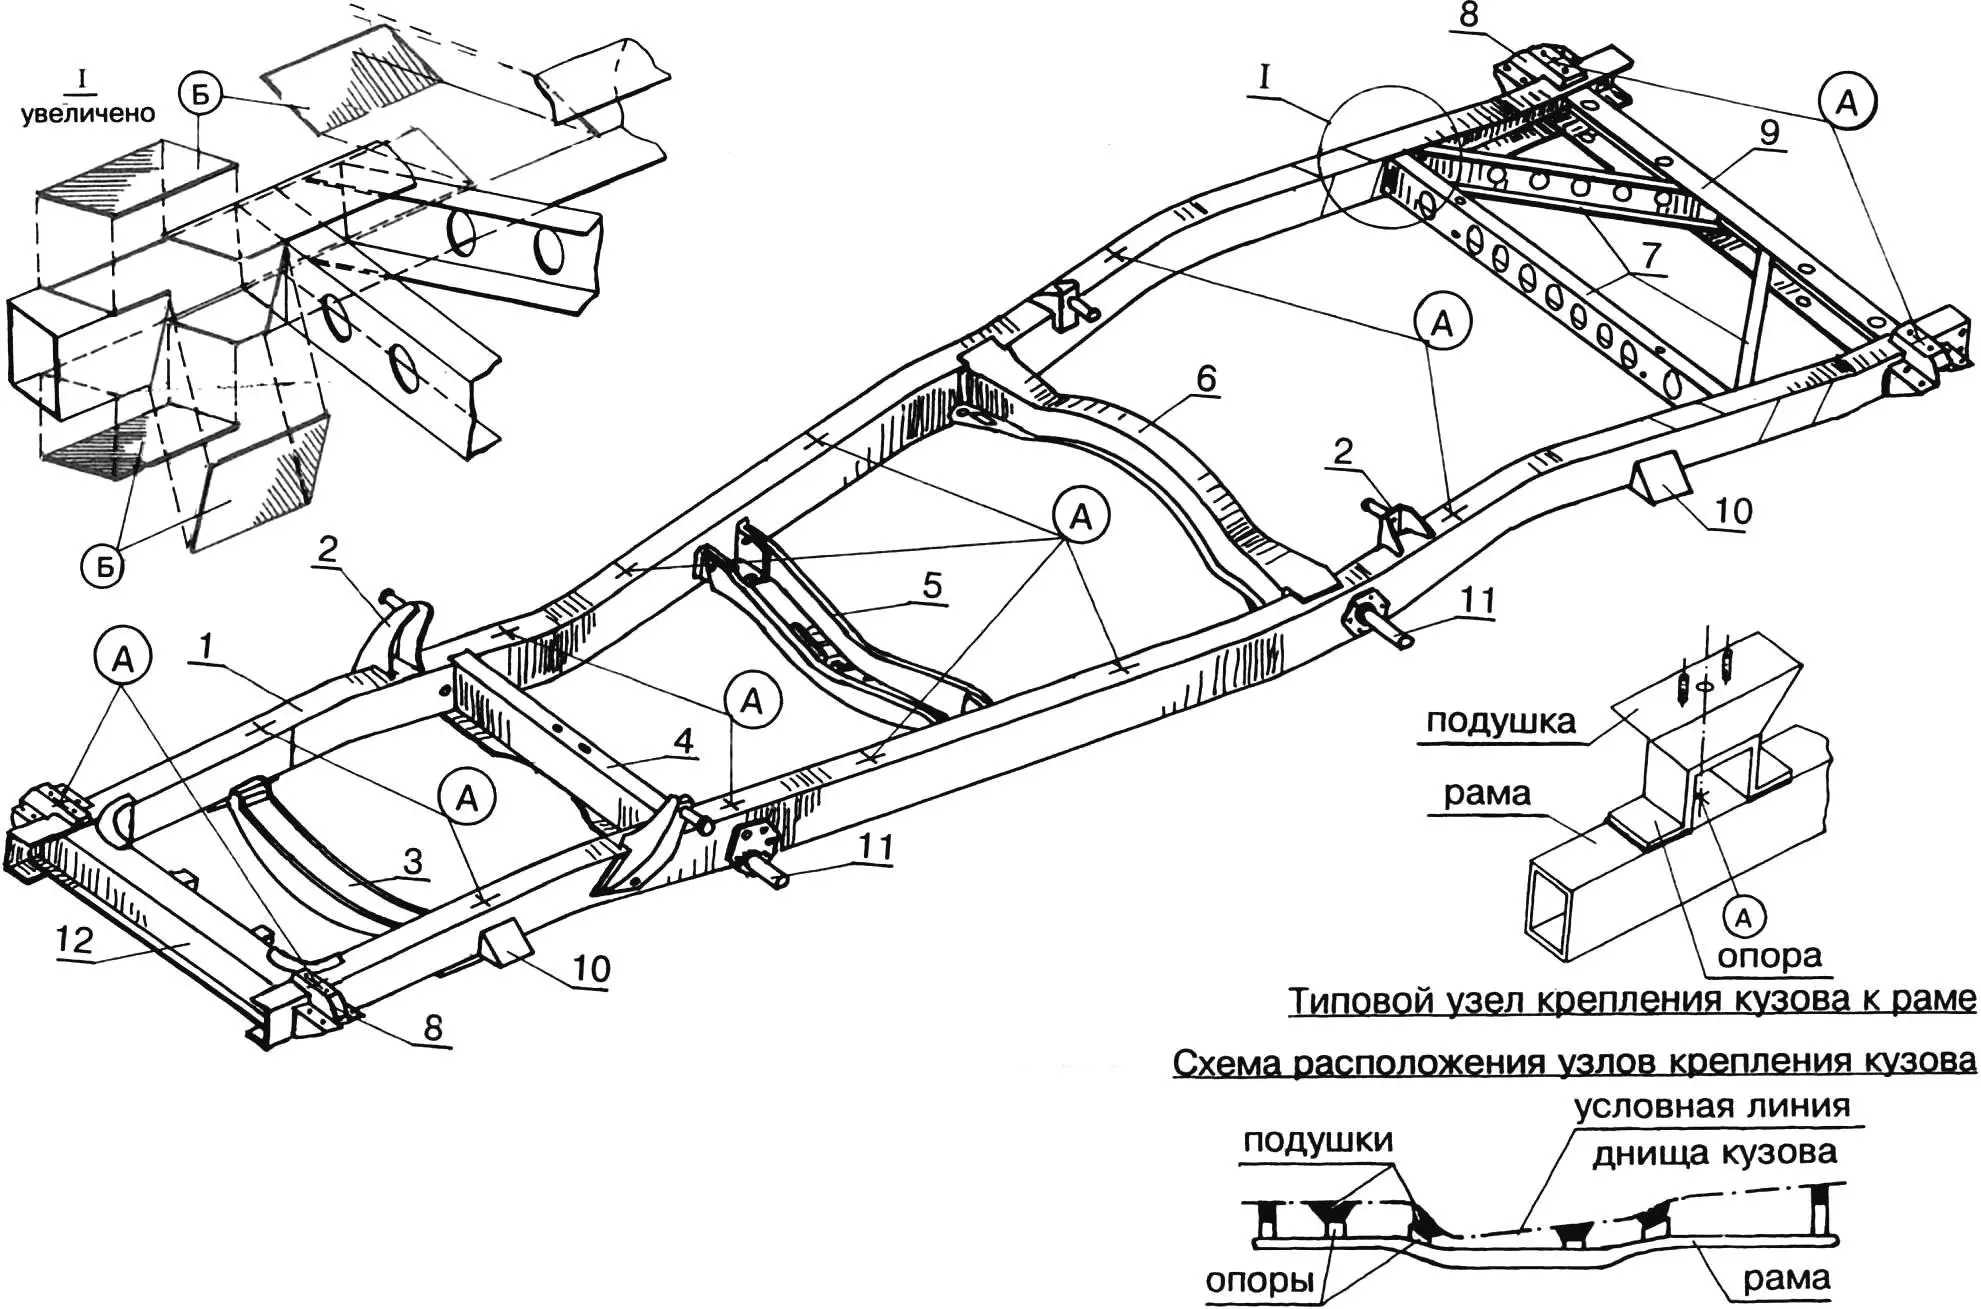
A — support mounting locations; B — insert mounting locations; 1 — side member (from UAZ-469); 2 — shock absorber mounting brackets; 3 — engine mount beam (from RAF minibus); 4 — GB mounting beam (from GAZ-69); 5 — transfer case mounting beam (from GAZ-69); 6 — cross beam (from UAZ-469); 7 — trailer hitch mounting beams (from UAZ-469); 8 — spring shackle mounting brackets; 9 — rear beam (from UAZ-469); 10 — spring travel limiters (St3, sheet s4); 11 — spring pins; 12 — front beam (from UAZ-469);
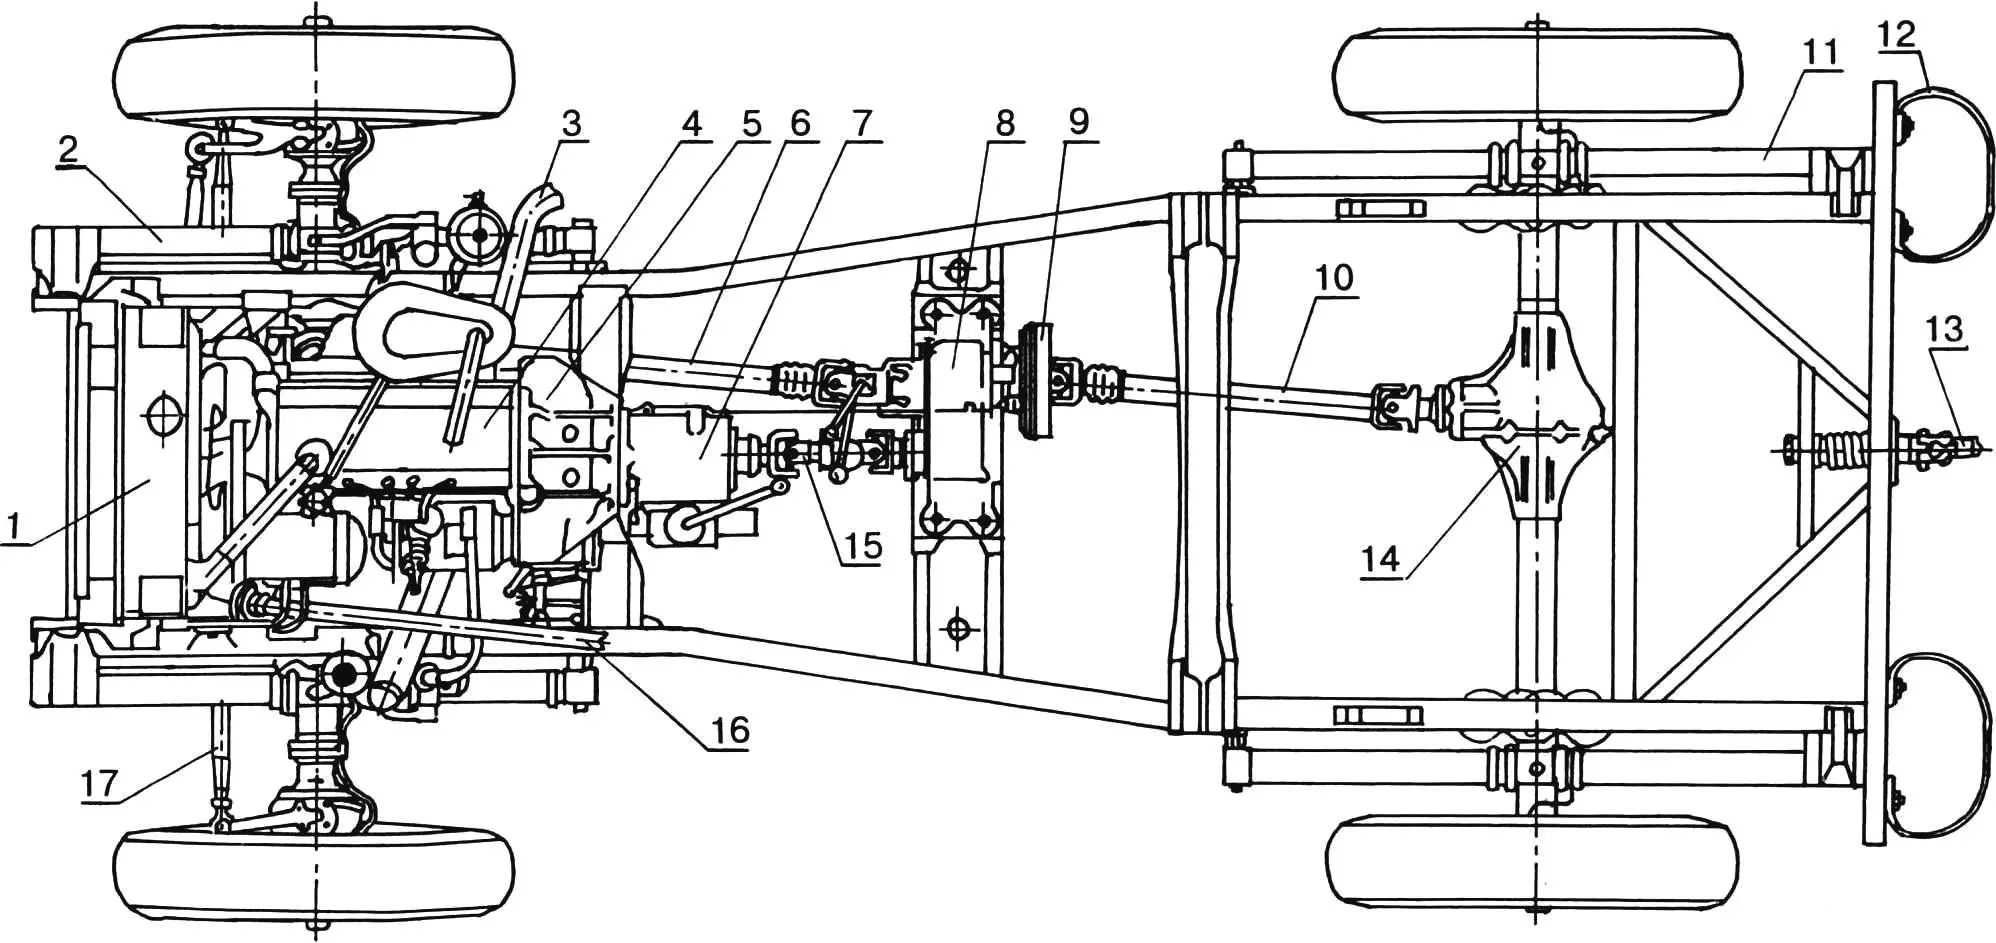
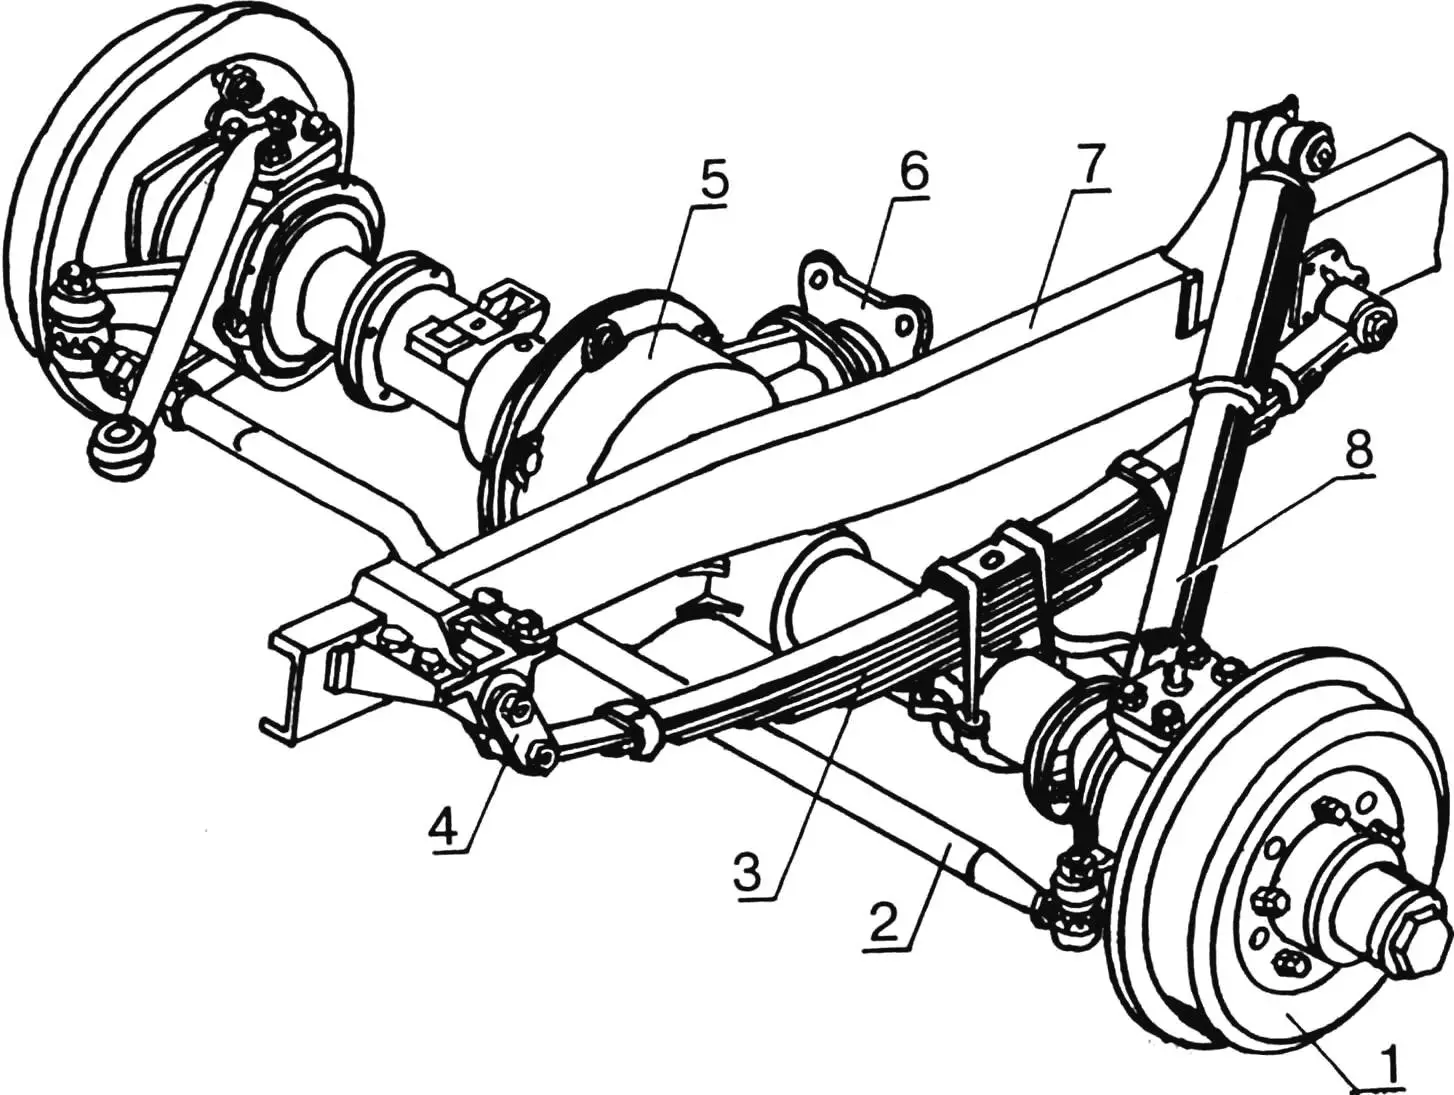
1 — radiator; 2 — front spring; 3 — exhaust pipe; 4 — ZMZ-2401 engine; 5 — clutch mechanism (from UAZ-469); 6 — front axle drive propeller shaft (from UAZ-469); 7 — gearbox (from GAZ-69); 8 — transfer case (from GAZ-69); 9 — parking brake (from GAZ-69); 10 — rear axle drive propeller shaft (from UAZ-452); 11 — rear spring; 12 — bumper; 13 — trailer hitch; 14 — rear axle main reducer (from UAZ-469); 15 — intermediate propeller shaft (from GAZ-69); 16 — steering shaft (from GAZ-53); 17 — steering rod.
The body is of welded construction, assembled from available side panels with fenders, hood, front grille with headlights, bumper and floor from “Moskvich”. To increase the interior volume, I used a windshield with an opening and the rear part of the cab from GAZ-53, and the roof — from “Niva”. Of course, to connect these heterogeneous parts, I would have needed to build a jig, but due to limited space in the garage, I only used a construction level and plumb line. I preliminarily fitted the parts by eye, then set or hung them, connected them with wire, and after evaluating the visible body shape, tacked them with welding.
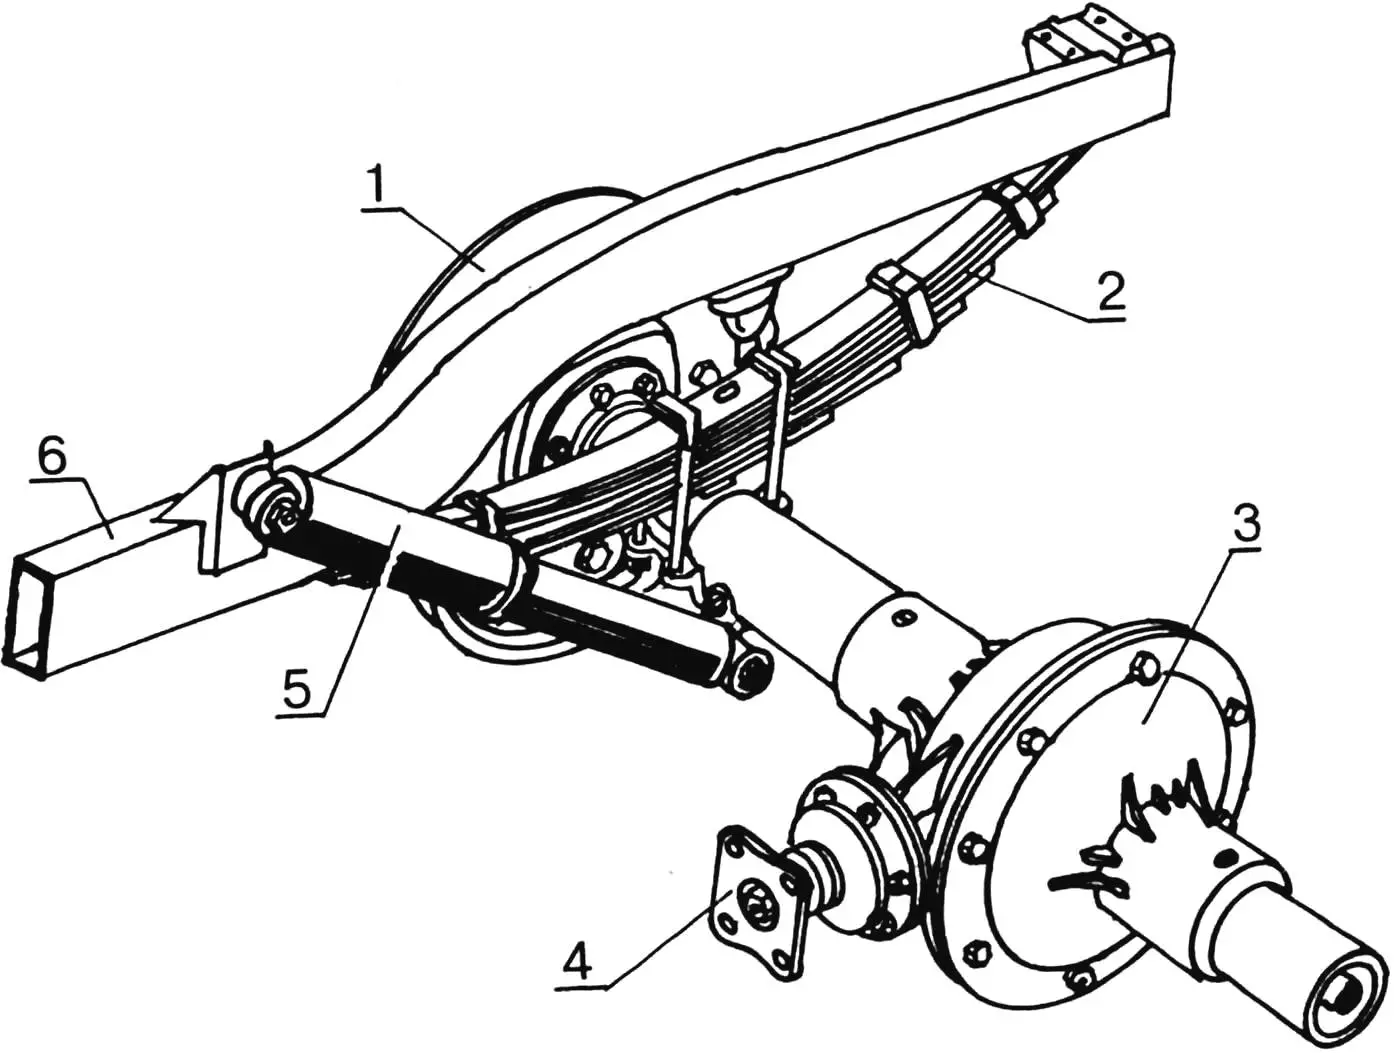
1 — wheel hub; 2 — steering rod; 3 — spring; 4 — shackle; 5 — main reducer; 6 — propeller shaft connection flange; 7 — frame side member; 8 — shock absorber.
The door openings, widened at the top due to the wide roof, required changing the shape of the front fenders. I made them higher but shorter, fitting them to the radiator grille, hood openings and windshield. The “windows” formed due to the mismatch of the contours of the finished parts, I smoothly connected with inserts cut from 1.2 mm thick steel sheet. The sides, cargo platform floor and wheel wells I welded from the same metal. By the way, I trimmed the wheel arches front and rear — to increase the gap between the wheel and fender.
1 — wheel hub; 2 — spring; 3 — main reducer; 4 — propeller shaft connection flange; 5 — shock absorber; 6 — frame side member.
I connected the finally assembled body to the frame with bolts, using standard rubber engine mounts as additional shock absorbers. Each mount rests on a support bent from 4 mm steel strip and welded to the frame. The support locations were chosen to give additional strength to the car floor in the most critical places: under the engine compartment, seats and cargo platform. This condition and the different curvature of the floor and frame lines led to each pair of supports having its own configuration. Operation of the car showed that the solution was chosen correctly — when driving on the highway at speeds up to 100 km/h, vibration from the rigid chassis is almost not transmitted to the interior.
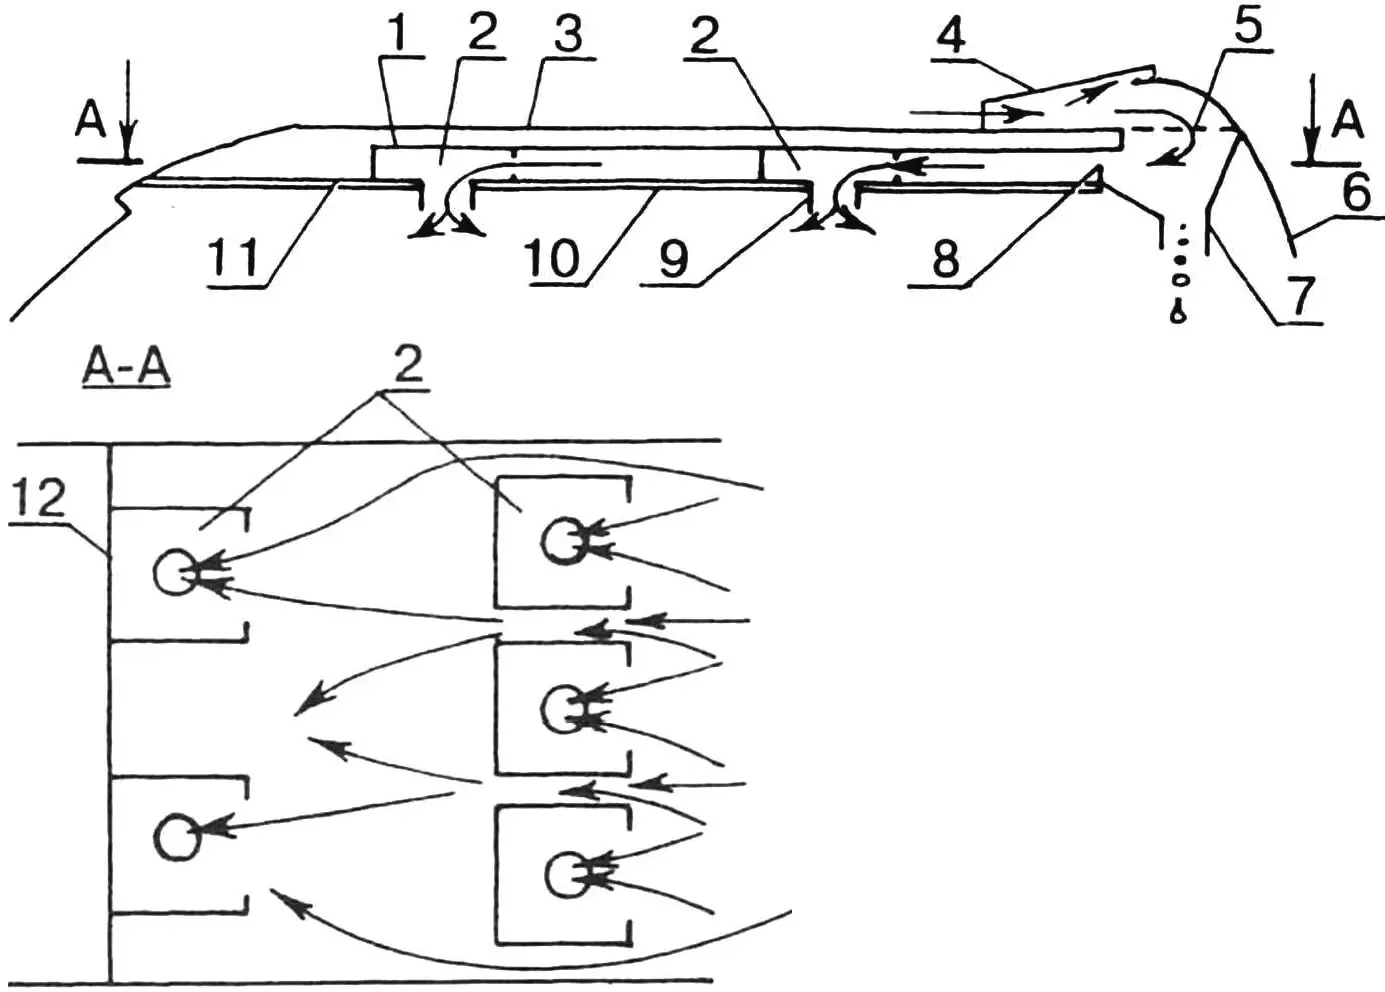
1 — box upper wall (St3, sheet s1); 2 — ventilation units (from LAZ bus); 3 — roof; 4 — visor; 5 — filter (multi-layer mesh); 6 — rear interior wall; 7 — water drain; 8 — water deflector; 9 — ventilation unit swivel nozzle; 10 — interior upholstery; 11 — box lower wall (St3, sheet s1); 12 — box front wall (St3, sheet s1).
Further work consisted of equipping the car: I hung a homemade engine sump guard on the front frame beam and side member ends, closed the frame on the sides with additional sills bent from sheet and welded to the “original” sill, assembled the tarp frame from “UAZ” elements and remade the tarp itself, equipping it with round windows. I secured the spare wheel on the trailer hitch beams.
The interior equipment of the car, including electrical equipment, is mainly taken from “Moskvich” and “Zhiguli”. Only the heater and interior ventilation system are homemade. I should dwell on the latter in more detail. The idea for it arose when garage neighbors brought me several individual panels with lighting and ventilation units from a decommissioned intercity bus. I installed them in my car’s cab. I placed the air intake on the roof, and under it — a box, in front of which the air is cleaned by a filter from debris and dust. Rainwater is retained by a deflector rib, accumulates in a water collector and drains overboard through tubes. The adjustable swivel nozzles of the units are very convenient — the stream of fresh air can be directed in any direction, and the light from the bulbs, turned on by passengers at night, does not bother the driver at all. True, there is one drawback — the box and ventilation units “ate up” 50 mm of interior height.
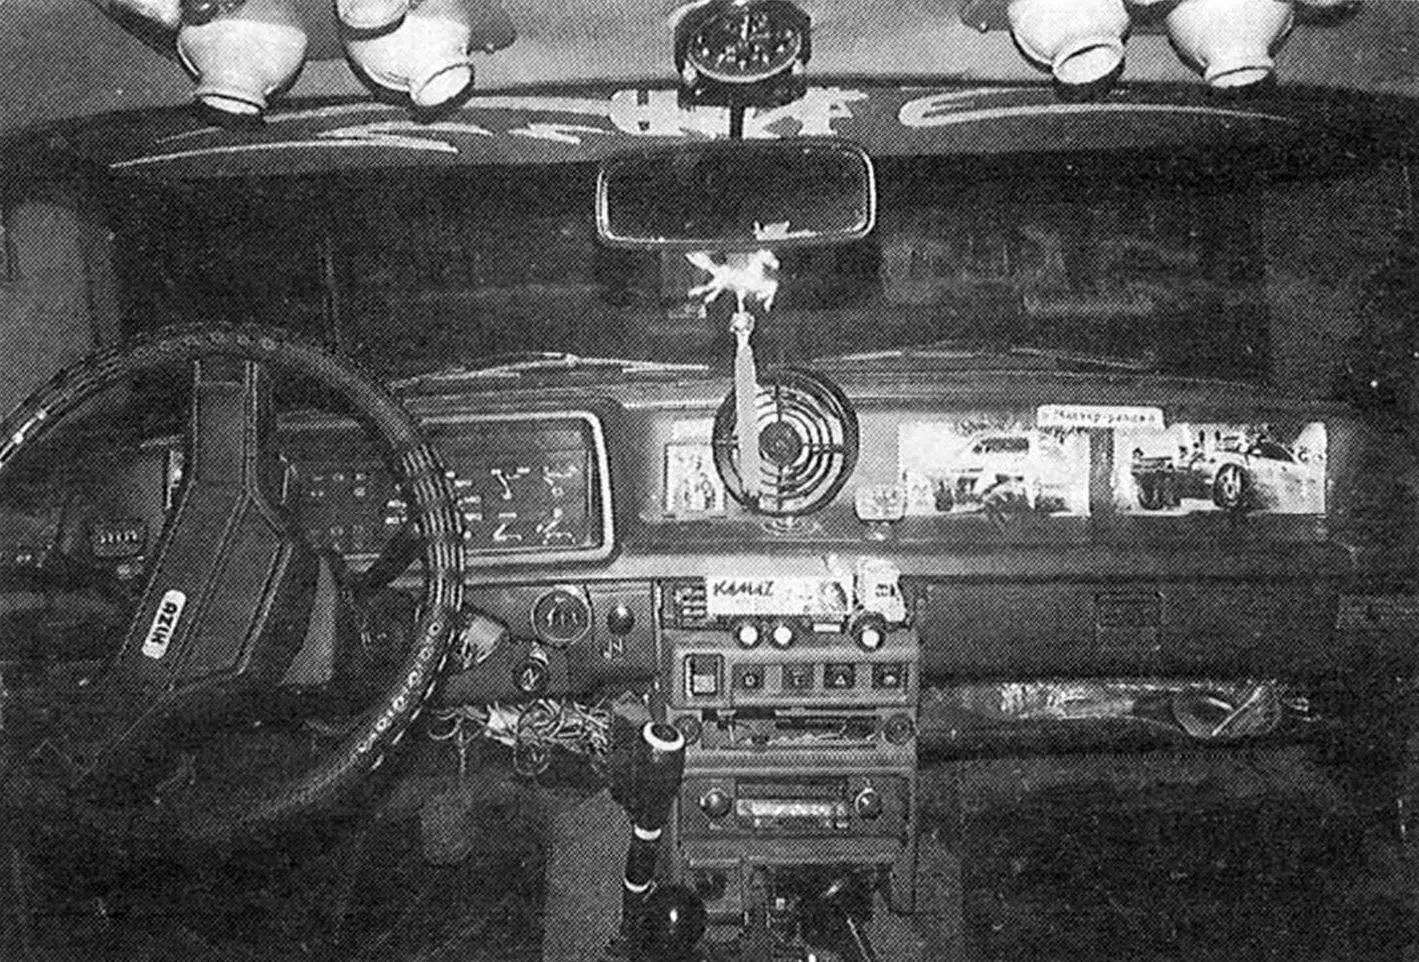
“SIMOT” has been reliably serving us for more than two years. Many who see my jeep for the first time ask the same question: what does the car’s name mean? I always answer: “Starikovs Irina, Marina, Oleg, Tatyana” — my friendly family”.
O. STARIKOV
Recommend to read
 BUILDING A CAR
NOT YET — HIS HANDS To build a car from beginning to end with their hands — a tempting idea, but hardly feasible. The main aggregates should take ready, the serial and only in rare... CONVERTIBLE “TOURIST”
Homemade car "Tourist", designed by V. Golovchenko from the city of Tashkent, has good proportions, clean lines. Great help, the author notes, had a publication in our magazine about the...
