
In issue 6 for 2010, Modelist-Konstruktor told about repair and adjustment of a trimmer – a motor or electric scythe. The article is useful . What can I say, this tool is now widely used not only by summer residents and janitors, but also by farmers. Meanwhile, on small plots, in hard-to-reach places, an ordinary manual peasant scythe remains an indispensable assistant (and even a means of combating physical inactivity, as one of the types of “agrofitness”). In addition, this tool does not break down in the midst of work, does not require maintenance (and in winter, most likely, it will not be stolen from the dacha).
There are several types of hand scythes (for example: the “pink salmon” scythe), but we will focus on the classic, most common of them – the scythe-stand or “litovka”. These scythes are distinguished by numbers: No. 5, No. 6 … No. 9, indicating the length of the blade in decimeters (earlier they were simply measured by the width of the palm). In addition to the blade (it is also called a blade or knife), the scythe consists of a scythe (handle) with a bow (handle) and parts that secure the blade: a wedge and a ring. The ring can also be an assembly product. Some scythe designs provide for a regular bolt fastening instead of a ring connection of the blade and the scythe.
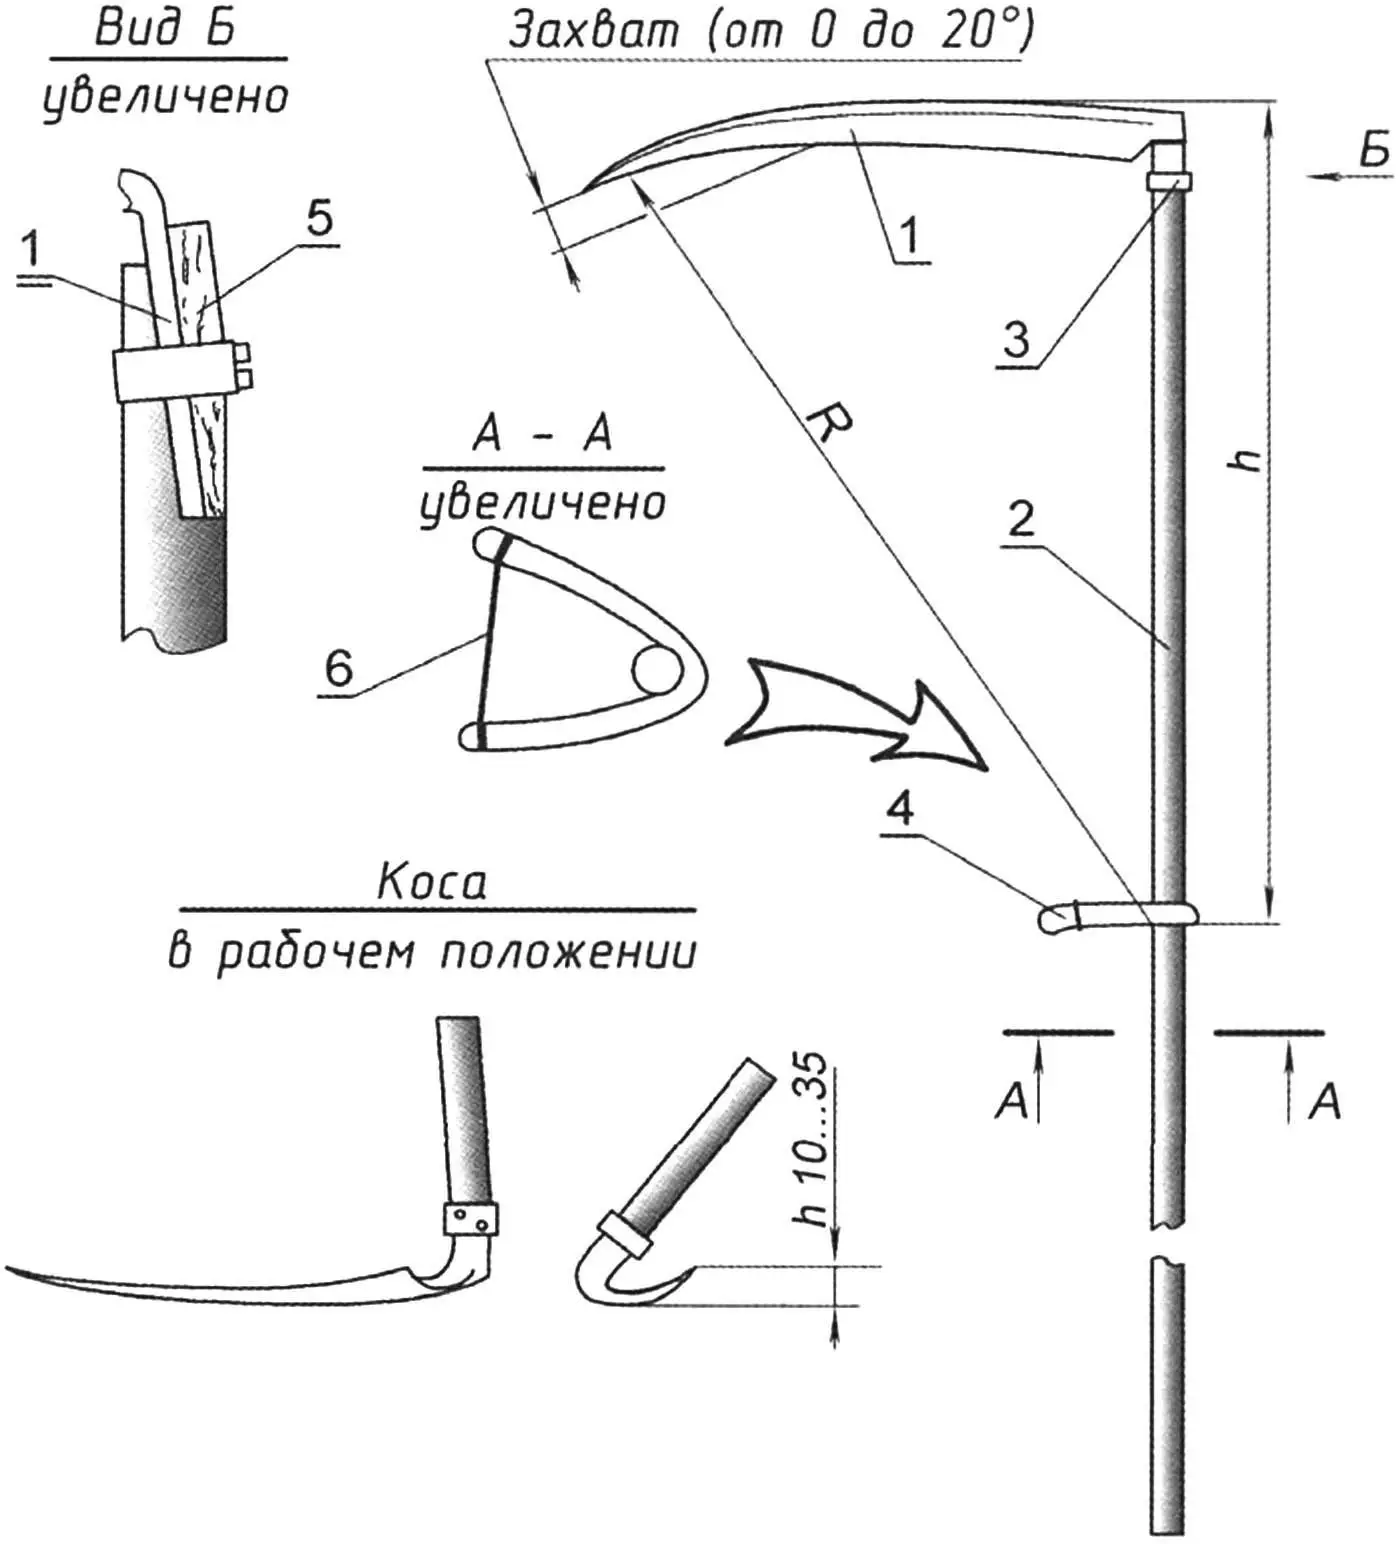
1 — knife; 2 — scythe; 3 — ring; 4 — bow; 5 — wedge; 6 — bow tie
But to make working with such a scythe enjoyable, it, like any other tool, needs to be adjusted. Preparation of the scythe begins with beating (cold notching or forging) of its blade, which is desirable to do regularly before the start of the season (however, new scythes are sold already beaten, but this is enough only “for the first time”). This operation is performed with a special semi-elliptical hammer with narrow strikers (or an ordinary hammer with a slightly spherical striker) on a device called a headstock and representing a narrow anvil, which is probably not available for sale now.
High-quality braiding is, if not an art, then at least a high craft that not everyone has. Therefore, for inexperienced craftsmen, they have come up with a device that they call a braid beater. It does not require significant skills and ensures sufficient quality of braid preparation for work.
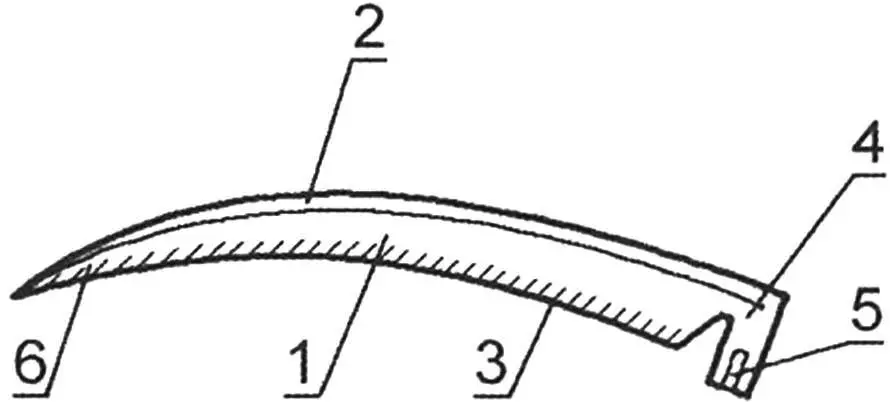
1 — blade; 2 — butt; 3 — point; 4 — heel; 5 — thorn (beard); 6 — nose
As a result of beating, the scythe blade becomes thinner, acquires surface hardening and serration of the blade from work hardening (notching) (not to be confused with waviness in the plane of the blade, which is undesirable). It is easier to mow with a beaten scythe, it does not become dull longer, and the mowing is cleaner. A high-quality scythe after good beating can withstand at least four hours of continuous work, after which it is enough to sharpen it with a whetstone.
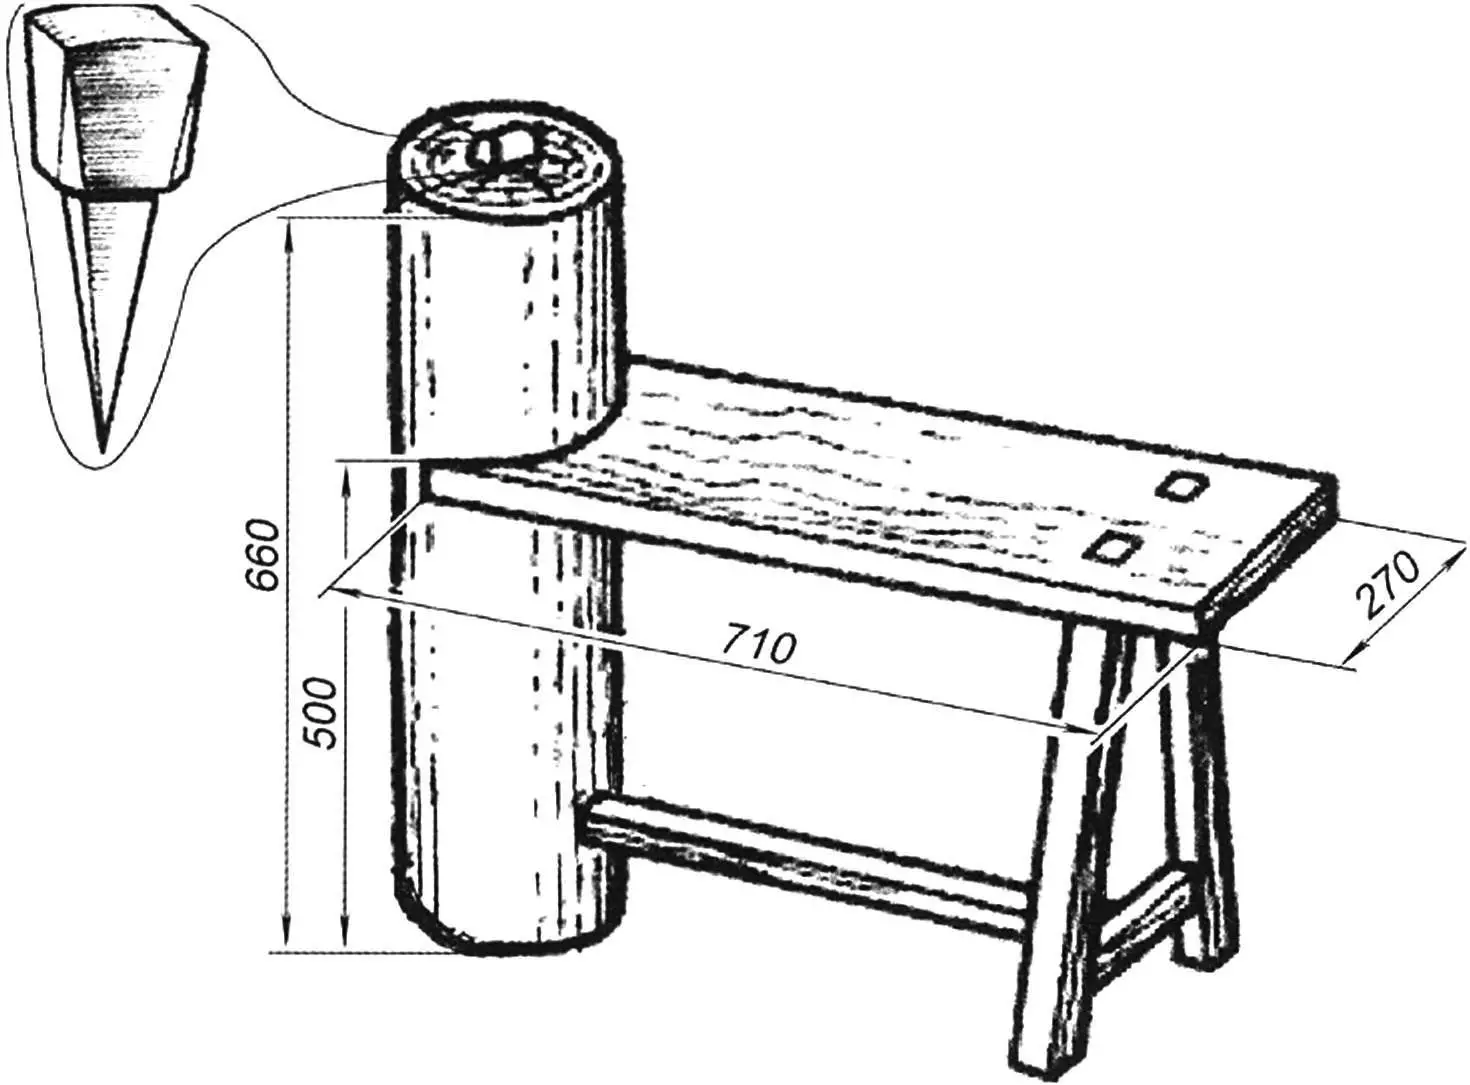
In the past, a special bench on two columnar legs of different heights was made for beating scythes. A seat (board) was placed on the low leg, and a cut-in piece was inserted into the higher one. A metal headstock (“anvil”) with a wide washer at the base was driven into the end of the latter.
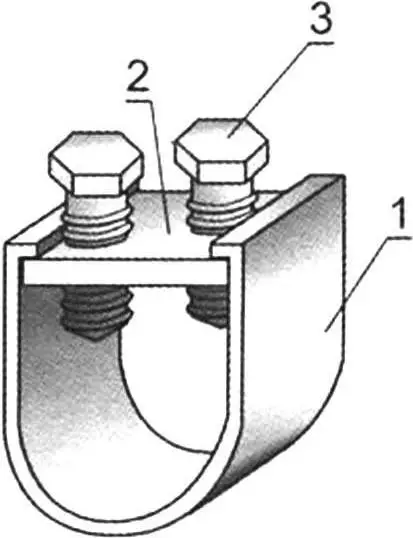
1 — bracket; 2 — plate; 3 — screw (2 pcs.)
The blade of the scythe is beaten from heel to toe, holding the blade first by the heel and then by the butt (thickened back edge).
If you beat the blade without removing the scythe (without disassembling the scythe), then for convenience the latter can be rested on the shoulder. In the old days, to support the scythe, a post with pins driven into it at different heights was dug in behind the bench, or the bench was placed under a tree, and a rope with a loop at the end was thrown over the branch, into which the scythe was pushed.
But the above methods of beating the blade of the scythe are classic and fundamental. I would like to offer more simplified, so to speak, “field” methods. After all, to beat a single scythe once or twice a year, it is at least impractical to make a bench – you can get by with a block of wood, and in the field – a stump or a small block, into which you need to drive the grandmother. But it is better not to drive the grandmother (after all, you will have to pull it out later – this is much more difficult), but to clamp it between a couple of wooden blocks, and then nail or screw the blocks to the block of wood, stump or block.
The headstock is also easy to make yourself, for example, from a piece of spring or a large flat file. One of the requirements for the device is that its working surface should have sufficient hardness (56 – 62 HRC units). In the absence of both, if necessary, the blade can be beaten on the butt of an ordinary axe, driving it with the blade into a “stump-log”, or even on the striker of another hammer. But you just need to try to ensure the quality of the beating when using any available tool.
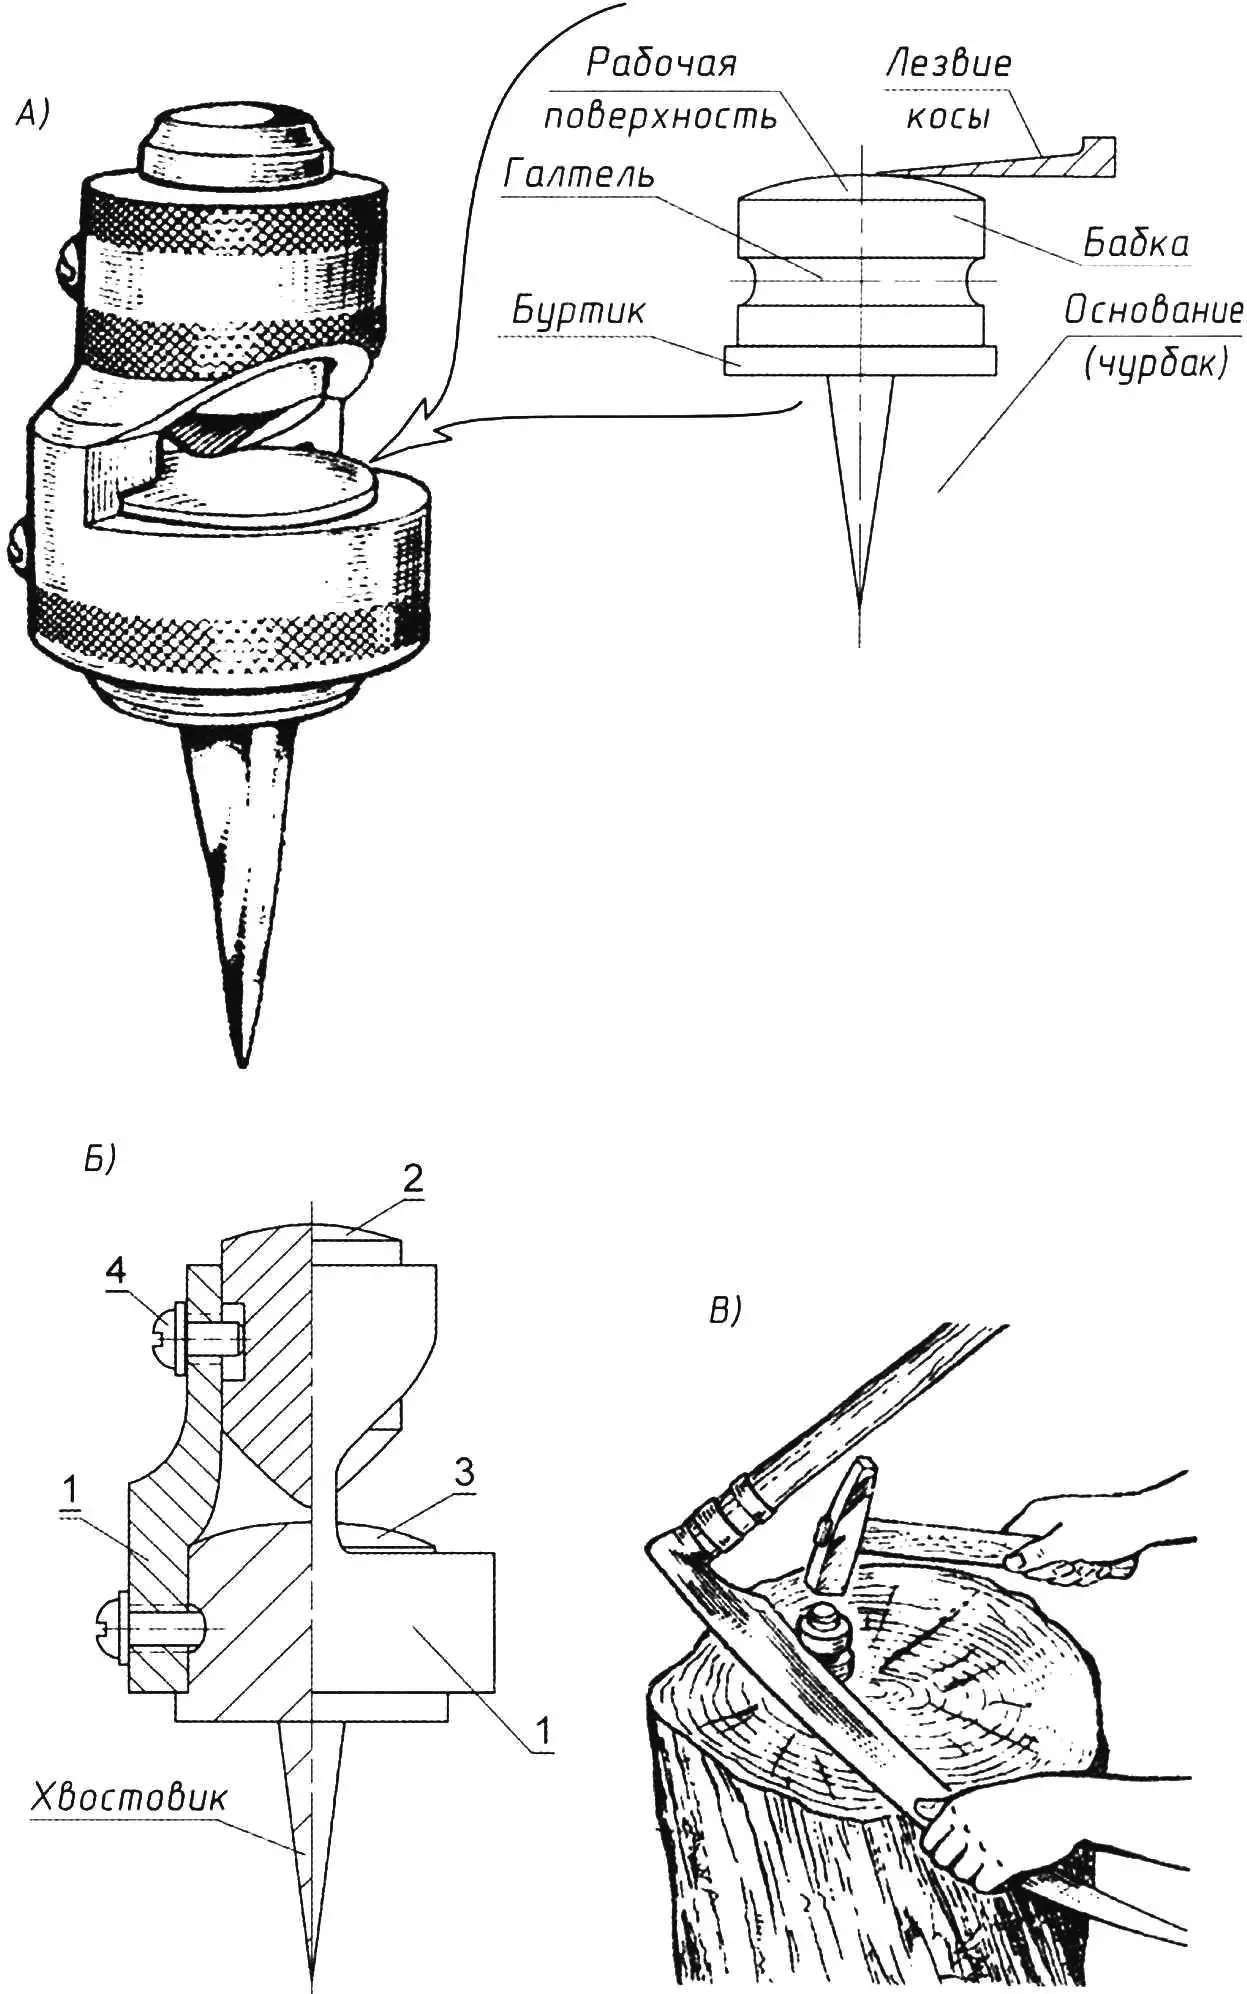
1 – body; 2 — striker; 3 – grandma; 4 – screw (2 pcs.)
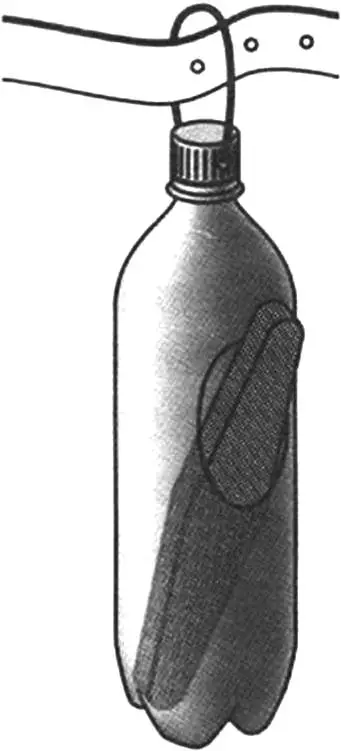
During the actual work, the scythe blade will have to be sharpened many times. This is done with a hand whetstone – an oblong sanding block. To do this, carefully remove any grass that has stuck to the blade (usually a bunch of mown grass). The tip of the scythe is stuck shallowly into the ground and pulled tight with the scythe, the end of which is also rested on the ground. Sharpening is done from heel to toe with a diagonal movement of the whetstone (installed at a slight angle to the plane of the blade) along the blade alternately from both sides. Inexperienced mowers are better off sharpening this way first on one side and then on the other. The mower has to carry the whetstone with him at all times, so it would be a good idea to make a holster for it. The easiest way to make one is from a small plastic bottle that is hung on the belt.
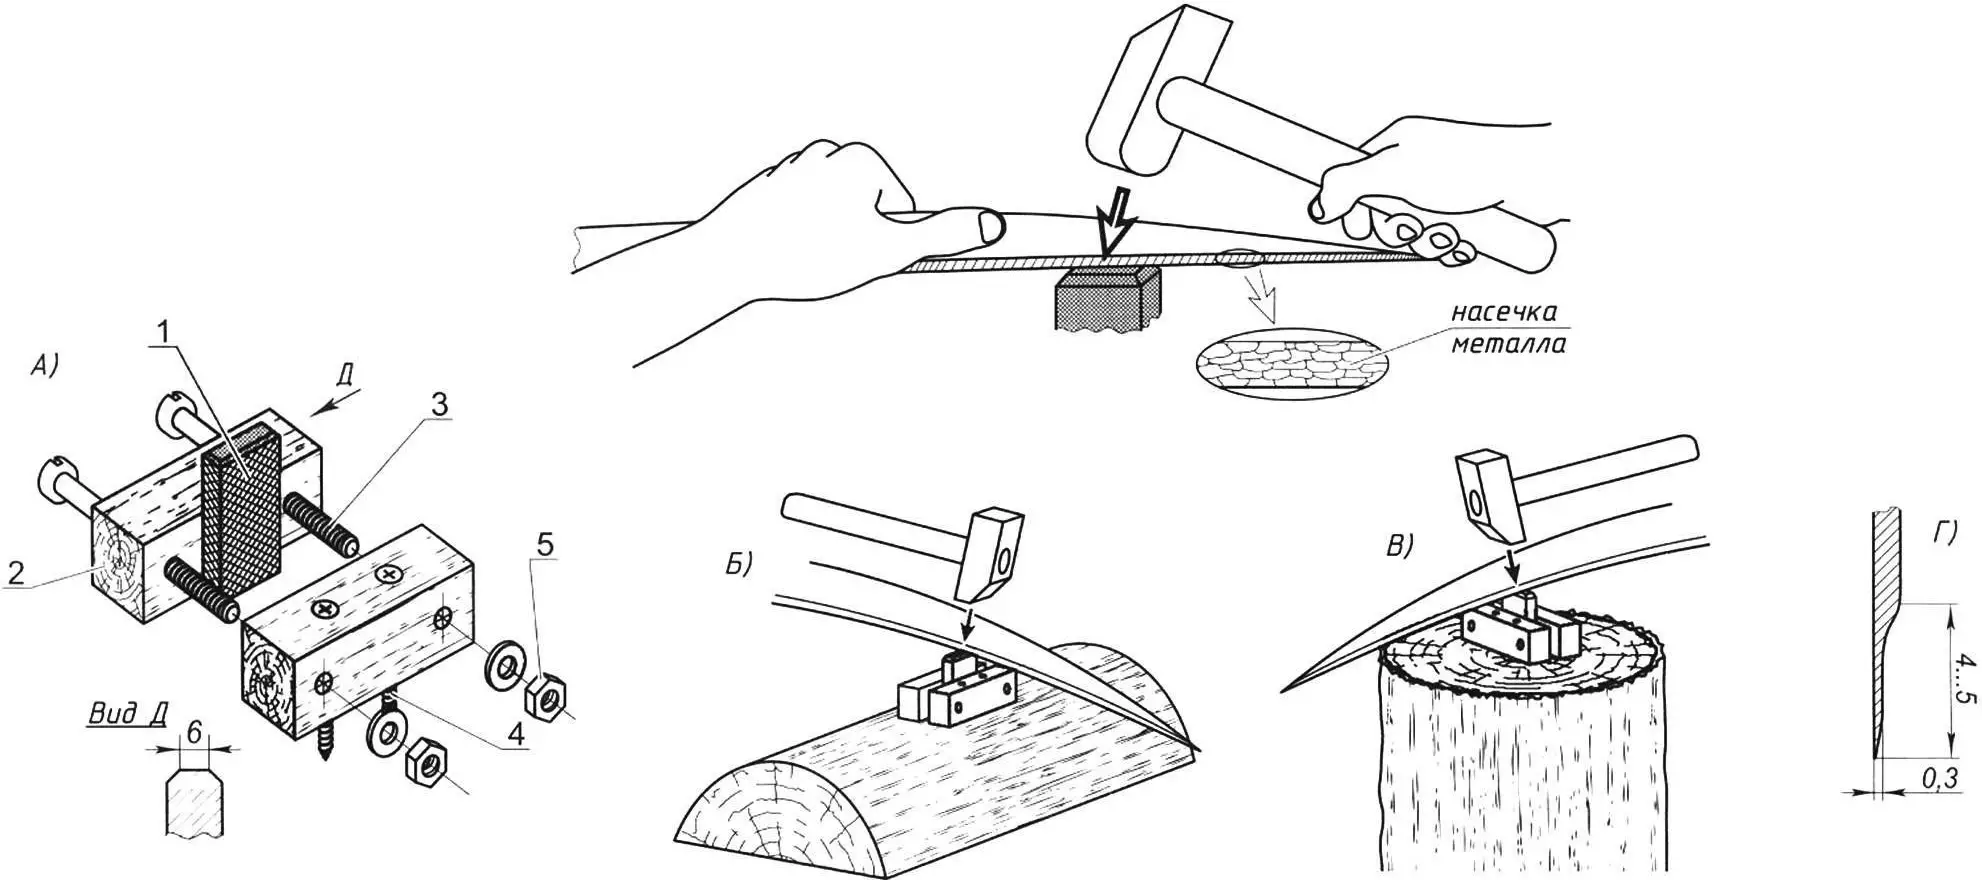
A — fixing a homemade headstock in a yoke made of two wooden blocks; 1 — headstock (a section of a spring or a file); 2 — yoke (wooden block, 2 pcs.); 3 — M5 bolt (2 pcs.); 4 — screw (2 pcs.); 5 — M5 nut (2 pcs.); B — beating on a block; B — on a log or stump; D — approximate dimensions of the scythe blade after beating
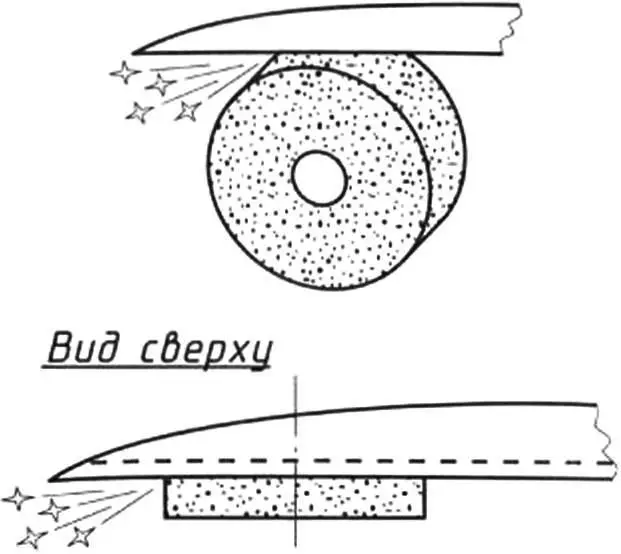
You can sharpen the scythe, if possible, using a sharpener, preferably a manual one. If the sharpener is electric, then you need to set the minimum speed (it is better not to use a high-speed sharpener), and moisten the blade with a wet cloth or pour water on it before and during sharpening. Make sure that the blade does not overheat (so that tarnish colors do not appear on it).
Advice for those who are picking up a hand scythe for the first time. The most loaded part of the scythe is the junction of the blade and the scythe body, and the weakest link here is the lower end (cut) of the scythe body. When the ring fastening is loosened (which even an experienced mower does not immediately notice), the tenon nest on the cut inevitably “breaks” and the end of the scythe body may even burst. Then you will have to shorten the scythe body and make a new cut with a nest for the tenon. To prevent this from happening, you can reinforce the nest in advance with a bracket made of a steel millimeter strip, with two oblong holes for the tenon (and in the bevel of the scythe body – two corresponding nests) for installing the blade at different angles (for small and large captures of mown grass).
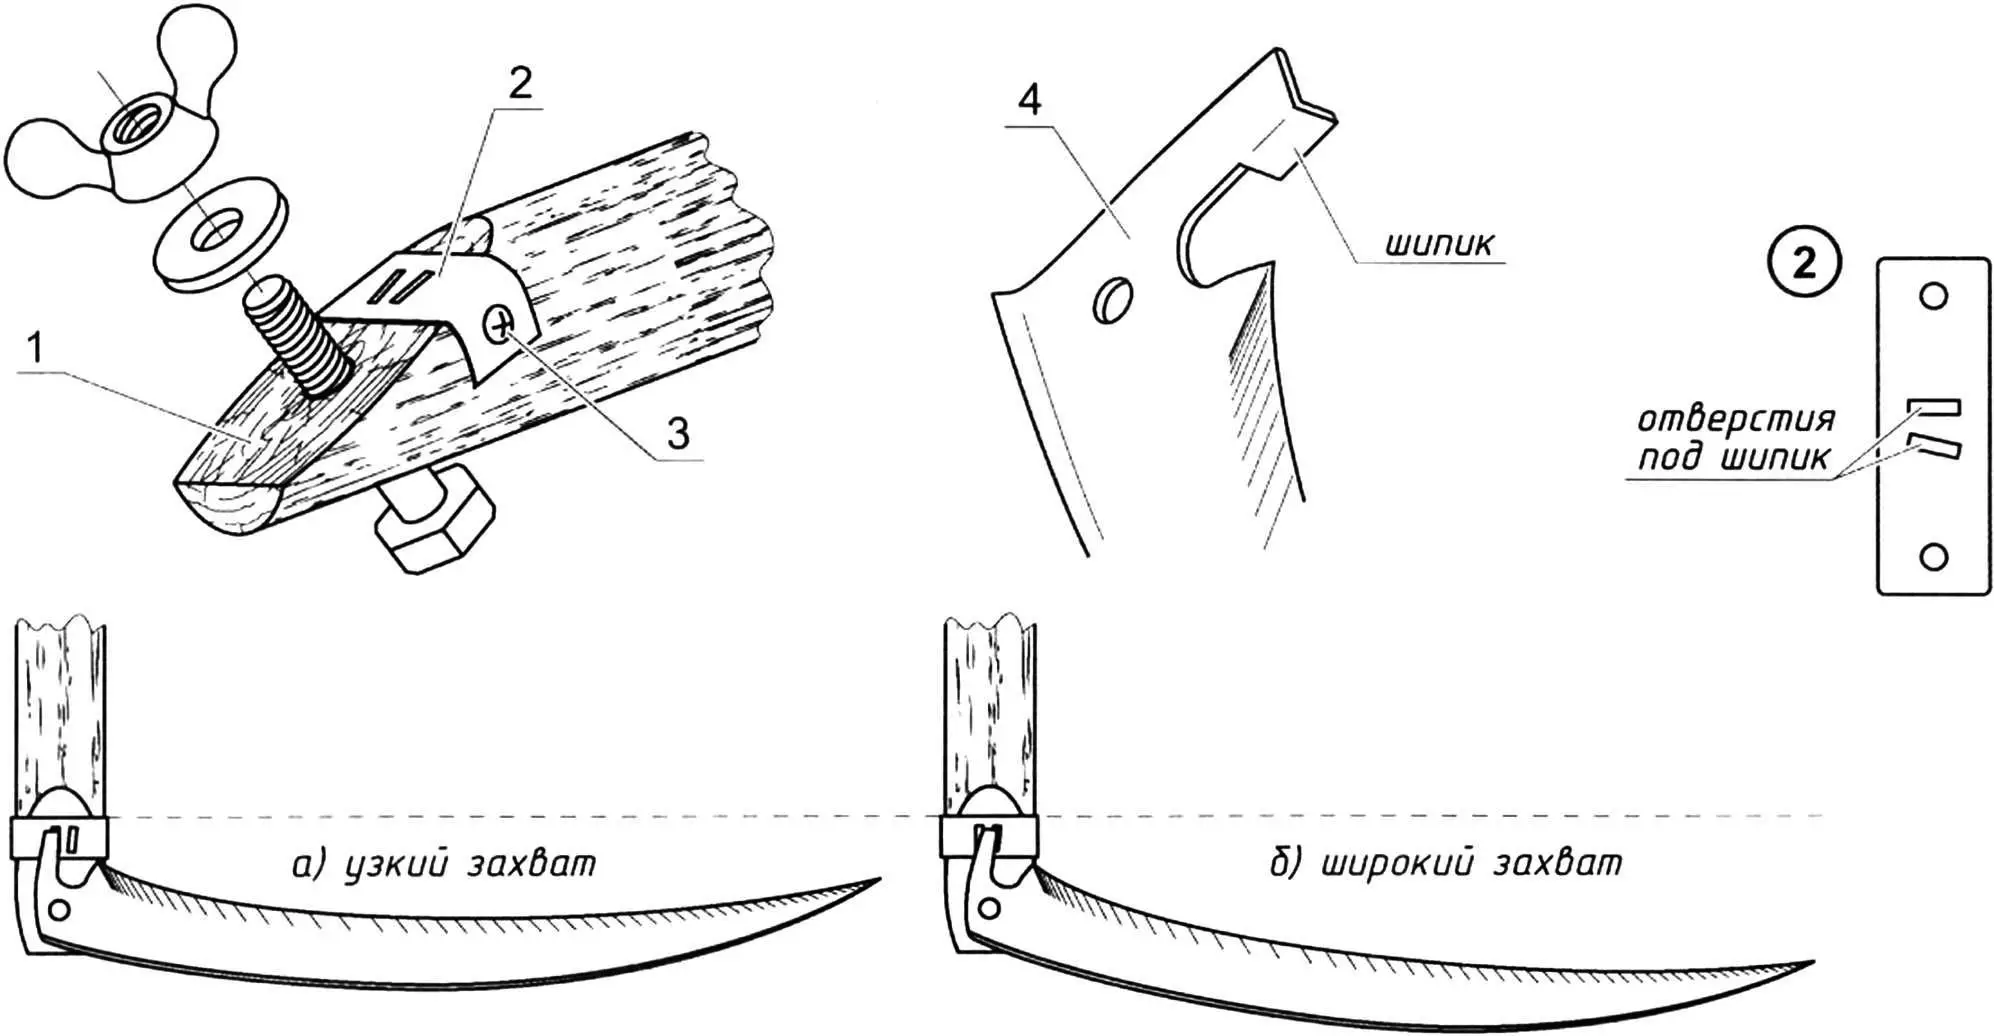
1 – braid; 2 – bracket; 3 – screw; 4 – heel of the canvas
To sum up the conversation about preparing the scythe for work, it is worth noting that every experienced mower has his own subtleties and features that help him in this difficult work, while others learn them in practice.
When working, you must remember that a scythe is an unsafe tool and should be handled with care. And it should be stored like a gun, making it inaccessible to children, at least reliably isolating the blade in any way (even just wrapping it in canvas).
M. EZHOV
Recommend to read
 STEP BY STEP
Every time I talk about the French ships of interwar buildings, we have to remember the relevant Italian. The constant rivalry between the two Mediterranean Nations forced the designers... NOT TO THE DUMP, AND IN THE OVEN!
Gramophone, phonograph, record player, radiogram... Today, the replaced player and even a computer, and instead of plates — laser discs. Well old records where? I propose to use them...
