“HUT” OF YOUR GARDEN

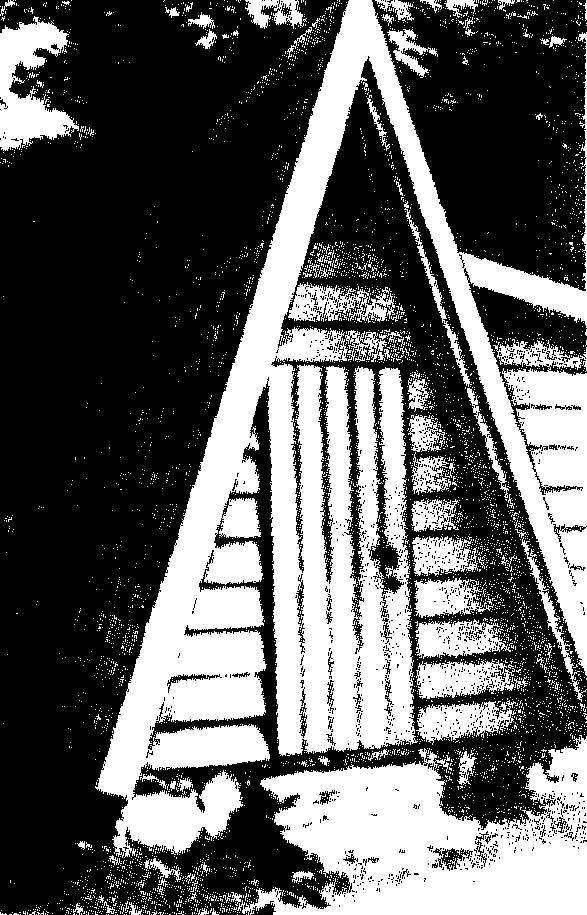
Mini-house, which we’ll tell you now, perfectly fits on any garden plot. If necessary, this can be a key or a temporary shelter for you and your family (if you build another big house). It is useful and as a storage and joinery, plumbing tools, garden accessories. For the construction of “shelter” will take a total of a few days — of course, if all the materials for its construction will be on hand.

The Foundation


Under this small wooden house will need only a 2X2 square m. the Basis (Foundation) for it is laid in concrete and stones laid on the leveled surface.
 
Height of footing from ground level is 0.3 m. First on the prepared pad set frame of six-foot boards, the upper plane of which must be strictly horizontal. From the sides of the frame at the site is strengthened with stones and rails. Her pristykovyvayas formwork for the porch. In the Foundation of stacked stones or old bricks (for example, from any of the destroyed buildings), and the sides should be the biggest of them. The space between them is filled with cement mortar which then forms the entire horizontal plane of the base.
 
Preparing the formwork of the Foundation and framing of the porch.
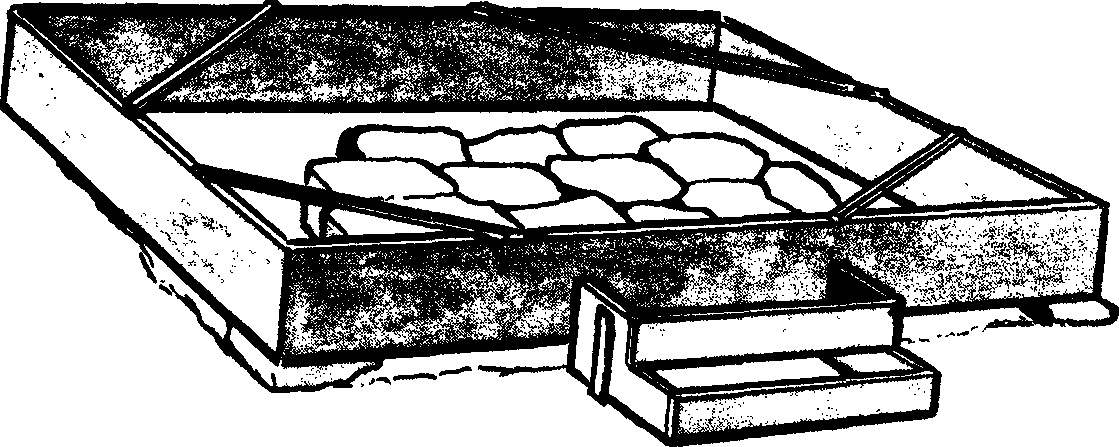
Preparation of formwork and Foundation formwork porch.
The porch is better to lay natural stone of rectangular form, filling the gaps with cement mortar.
 
The frame of the “tent”
 
The cabin itself is made of bricks and boards. If “hut” is used as a temporary or as a pantry door size, its shape will have to change. In this case, the doorway can be located in the side extension (which should increase), and the window opening to be done on the front or the rear.
 
Until the concrete sets (a few days), get a wood frame house and outbuildings. On the South side of the “tent” is the door on the East Annex building and the window opening. Side of the house (“overhangs”) in favor of the Foundation of the house by 0.4 m on both sides.
 
The main frame of the “tent” and the frame of the extension going from bruskov by section 50X70 mm. Note that if the figure around the bar is the size 70X50, it means that the 70-mm side “looks” to us; on the same figures, which indicate the amount of 50X70, we are “looking” 50-mm side.
 
Frame bars are connected to each other by screws and nails. Connection “a thorn” (as inset) is only applicable when connecting them to the frame-basis. Last deepens into the concrete Foundation. The bars of the frame are connected to each other with screws. The side bars are hammered in nails (approximately every 0.5 m): thanks to them buried in concrete frame stronger contact with the Foundation. Two side frame are connected to each other with a steel plate having a size of 50X100 mm on the ridge of the roof.
 
The sidewall and the extension are connected to each other (in addition to the ties on the ridge of the roof) and even three bars.
 
Wood paneling “the hut”
 
The frame house is sheathed inside and outside with boards. Paul also made of boards nailed to the joists with nails. Inside the house it is best to sew paneling, particle Board or wood slabs or plywood. Cracks of door and window openings are also sealed with planks at the joints cut at an angle of 45°.
 
The front facade of the house (South side door), outbuilding with window and rear facade are of the same cladding boards overlap, calling each other by approximately 20 mm.
 
The sides (which are both the roof) and the roof extensions have the same skin. It can be PVC tile commonly used for flooring (with a picture). plate cut from linoleum (unbonded), or, finally, roofing material. Trim that protects from rain, glue and its edges attach to rails and nails. The facade of the house and outbuildings will be thus not only protected from weather, but also will look beautiful.
 
The ridge of the roof should be closed area a bent aluminum or galvanized steel strip.
 
Before the construction of the frame rails needs to be impregnated with the composition of the “Senezh”. Board inner trim is best Pomorie and varnish. In the case of the use of plywood, particleboard or fiberboard wall is covered with paint. The outside covering of the “tent” covered with stain, linseed oil (in two steps) and oil paint or varnish.

Garden house tent: the figure shows the types of front and rear facades.
 
Frames left and right parts of the house.
Frames right and left parts of the house.
 
The frame of the front wall of the outhouse.
Frame the front wall extension.
 
Base
The base of the “tent”. Below is shown a typical sealing bars of the frame base to the concrete floor.
 
Outside the window of the house, it is desirable to close shutters lockable from the inside. Window unit contrived carved frames.
 

According to the magazine “Ezermester” (Hungary)

Recommend to read

  • PLUMBER PHOTOGRAPHER!PLUMBER PHOTOGRAPHER!
    As with the least effort to calculate Clichy connecting pipes when installing plumbing fixtures in the toilet and bathroom? The simple way is to photograph the place liner collectors and...
  • THE BIKE TO “HOOK”THE BIKE TO “HOOK”
    It is well known that in the winter bike should be stored so that the wheels do not touch the floor. It can be hung on special hooks that are made from scraps of steel wire Ø 6 mm.