Fig. 7. Protection log from a sudden lowering :
1 — bolster, 2 — wedge. 3 — log .
The bottom of the well can also be formed by a layer of gravel or crushed stone.
BUILDING THE TOP FRAME
Even for deep wells, to dig a mine wholly or at least bring it to a depth of 7-8 m not just. The operation has to be divided into several stages.
If the soil crumbles, the walls temporarily strengthen boards, the bottom carefully align. The mine down the first aisle, he put the second, then the third and so on according to the label, while the frame does not rise for three to five crowns above ground level.
When laying their crowns priazovya hitting the wooden lining, wooden hammer-a cat weighing at least 5 kg. To design is not cranky when moving, the inner side of the frame in the center of each of the parties nailed thick boards (in increments of three crown).
Alternately propping one or two churbachkov lower crowns and urging the wedges under the middle of each wall choose the soil to a depth of 20— 30 cm and Then undermine the ground in the corners. Dredging should be carried out so that in the center of the formed hole — this will press out the sliding walls, the ground, water flows. Now alternately take out the wedges and the bolster — frame is smoothly and evenly lowered. Put the crowns to the depth of the well.
In the process of lowering a frame, the soil lifted from the bottom of the bucket or pail. To facilitate the work on mine put a solid stand with a cross on it hung from the block, arrange the gate or the crane; using them, the assistant lifts the ground. Working down the should For safety be in one of the corners from the opposite load side.
Fig. 8. Clogging grooved boards Baba :
And Baba, B — decking.
If the frame is stuck, upset his whiskers several times strongly hit the lining of a thick Board. It happens, however, that this does not help. In this case, take four logs, three to four meters each. Put them on the frame crosswise and firmly fixed with brackets. On logs plank planks, nail, and pile top soil, stones, bricks, bringing the weight up to several tons. After precipitation the load off and continue working.
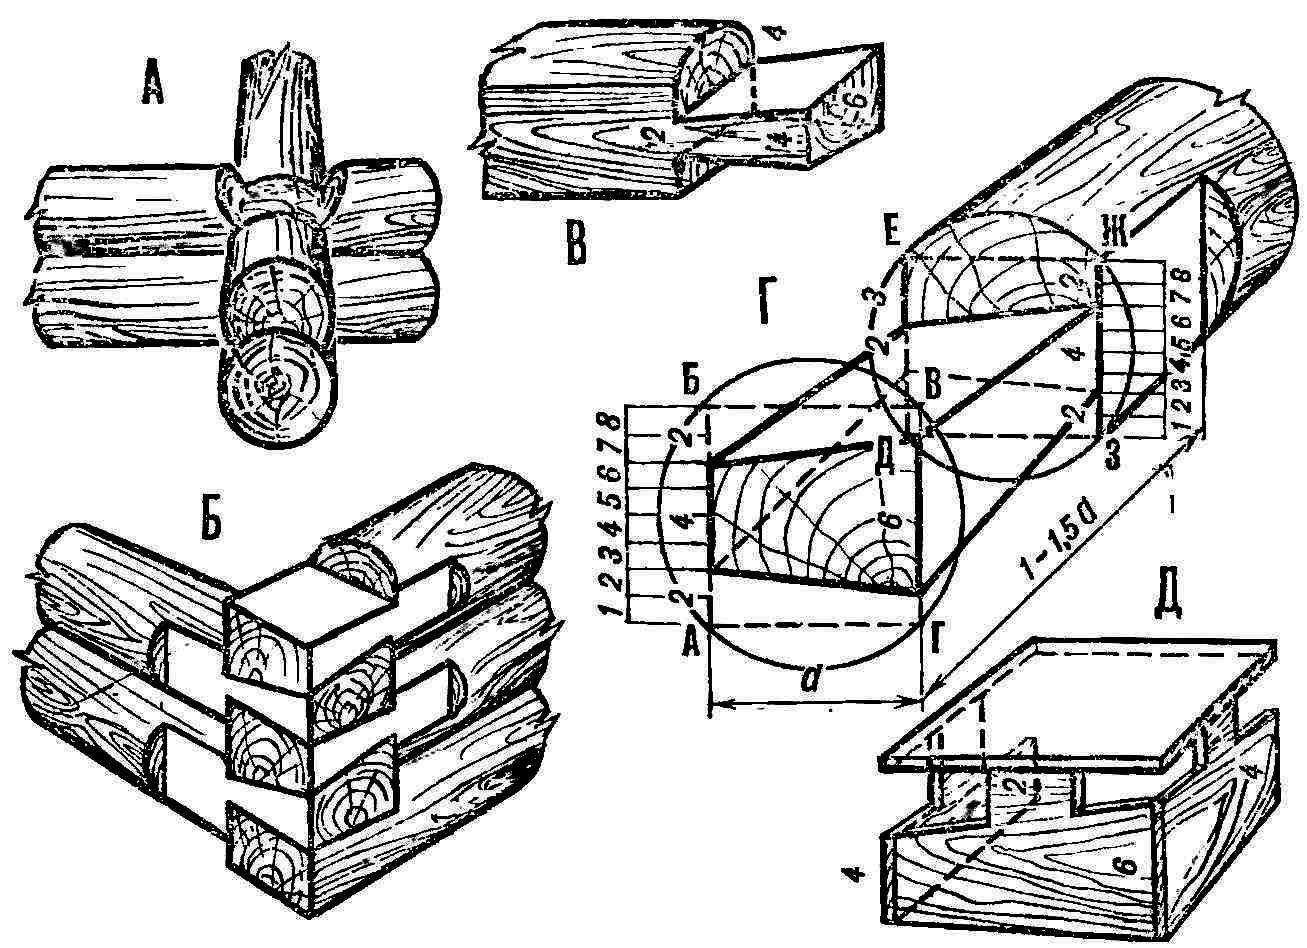
THE CROWN UNDER THE CROWN
Not often, but it happens that to increase the frame have at the bottom.
This method is less convenient, more time-consuming and inefficient. Nevertheless, it is sometimes necessary to use.
To bring the crowns from the bottom, undermine the ground on one side and in the space formed insert the prepared log. It pressed tightly to the previously installed lower crown with lining and wedges. From the opposite side, similarly, placed second, and then the other two. In the same sequence, using pads and wedges, sets the whole frame.
Firmly entrenched in the mine design may suddenly down, so a few crowns made from logs longer than the nominal 60-70 cm They establish so. From opposite sides of each log are digging in the soil of the mine is oblong pit, the “mortgages” or “chambers”. Their length should be at least 40 cm Into these holes are inserted the protruding ends, and under them enclose large stones or wooden chocks with one flattened side. Between the gasket and the end of the drive a wedge, bringing the beam to the lower crown. Laying lead alternately from opposite sides. Protruding ends — they call them fingers will play the role of brakes.
In dense soils the “mortgages” put 2-3 m, and in the weak — 3— b crowns.
We must also recall that in the dense ground the frame is lowered smoothly and fairly quickly.
WELLS IN QUICKSAND
Quicksand is a very fine sand saturated with water. To dig in the wells without reflux (pumping) of water is almost impossible. It is necessary to arrange temporary fencing walls. To do this, take a thick pine boards, not necessarily grooved; the ends on one side sharpen. In the ground they are hammered with trestle wooden mallet — a woman, working two or three times.
Between the walls of the log cabin and the mine must remain a space of 25— 30 cm After the soil available depth, set vertically one Board so that it could slide between the mounting posts. The second Board put to the downtrodden, bind, not to depart, and also score. In such a sequence to form all the walls.
Then again the soil is removed, not forgetting every 1.5— 2 m to put spacers between the walls. Drill down to the aquifer and only after that start a build log. The crowns should be systematically upsetting bar-Shik and the inner side to fasten boards with nails.
As well satisfied wells in loose soils.
Floorboards removed by means of jacks or levers.
THE DESIGN OF THE WELL
Regardless of which primer is selected from the mine, the space between it and the walls of the frame should fill in dry clay, especially the last 1.5 m to the ground level. Clay is placed around the well within 1.5—2 m. This pilot controlled check valve: it is required to protect the reservoir from contact with the supersoil water. On thoroughly compacted clay can be laid in stone-flagstone, brick or pour the surface concrete or asphalt.
The head frame must rise above ground level is 0.9—1 m. It is densely covered outside with boards, through the cracks did not penetrate the dust.
In areas with very cold winters, trim the heads do double indented from frame 10-20, see the resulting “the bench” fall asleep sawdust, shavings or a mixture thereof can be used as slag, moss and other insulation materials. This will prevent the water from freezing. The head of the frame is closed with the lid hinged, or valve moving in the grooves of the bars-directing.
Fig. 9. The upper design of the wells :
A, B — with collar, V — block. Mr. with a crane.
Over the well satisfied with the canopy (the umbrella). Its design, size, shape are dictated by your capabilities.
Water lift pumps, gates, cranes, and even manually lowering and raising the bucket on the block on a solid rope or chain.
HYGIENE WELL
Drilled wells should be cleaned at least once a year to remove from the walls mucus, Tina. From time to time don’t forget to scoop mud or sand, but the seabed to deepen should not be.
Before you go down into the well, you need to check it on the fumes, dropping in the mine to the bottom of lighted paper or candle. If they are out, so it has accumulated carbon dioxide. It was removed repeatedly lowering and taking out an empty bucket, thus gas “wikipipedia” due to the unusual ventilation. You can tie a rope to the bunch of straw, to set fire to it and drop to the water. Only after re-checking on the fumes to descend.
Work better together or even a Threesome. One tied by a strong rope at the waist, and others insure.
Drinking water from wells should be clean and transparent. Not to have a smell and any taste.
Therefore, they should be arrange on the highest place of the estate, away from amenities. These sanitary requirements are strictly mandatory.
Before device well, you need to determine whether there is water underground. After that, prepare all the materials and tools and then get to work.
Should be warned that the water from any vnoel built well must and mandatory to check on the sanitary-epidemiological station. To control the raw water should not be consumed: in the extreme case, it should be well boiled.
If you are using a ladder, it is necessary to clean and wash, and leaving the water tips to increase svezhevystrugannye bars. The one who will deal with the cleanup should wear rubber boots, well washed and scalded with boiling water. To wear them should do very well becoming on a clean bed of straw or fresh-planed boards.
Top to bottom is first put in order the walls of the mine, and then the bottom part, replacing the gravel or crushed stone to a new, previously cleaned and washed.
Repaired, cleaned or a new well is disinfected with chlorinated water, that is, 3% of chlorinated compound. It prepare so: 300 g of bleach pour a small amount of water and pound with a rolling pin. The resulting liquid slurry is poured into a container of water with a volume of 10 liters, mix thoroughly and few hours defend. The upper transparent part of the resulting concentrated solution is poured in the glass, densely closed ware and store in the dark. For 1 m3 of water in the well requires one bucket of 3% of the composition.
Wall sweep off and wipe with a clean cloth (rag) or with a brush. Then choose the fallen debris, all the accumulated water and settled sludge, and then spray gun, sprayer or brush liberally cover the walls with a disinfectant composition. Depending on the amount of fresh incoming water in the well, it added to the composition at the rate of 10 liters per 1 m3 of water. Mix everything clean sixth, cover the top frame of the wooden lid or cover with a thick cloth and leave for 10-12 hours, and preferably for a day. Then coming into the well the water is pumped out until, until there is no chlorine smell and taste. Operation it is useful to repeat a day after the first treatment. This provides a more reliable disinfection.
A. SHEPELEV, engineer-Stroitel
Recommend to read WARDROBE WITH RADIATOR The Idea of this cupboard gave me your magazine. In one of the rooms published design window of the refrigerator and the vegetable box in the window sill niche. I liked it, and I did... WHO IS FASTER You've probably heard: "he's Got good reflexes." Thicket just as they say about athletes. For example, the goalkeeper. He must react instantly to the ball rapidly flying into the net. Or... 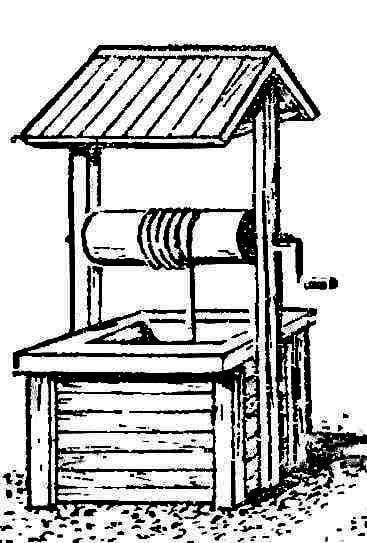
 Note: despite the outward simplicity of the device is a good boy — not an easy task. And although in principle it forces everyone who is able to work with a shovel and a saw, the construction of this reservoir will require both time and skill. However… built the same wells from time immemorial our ancestors, not frightened of this work and we.