When developing the project and building the sauna-bathhouse on the garden plot, I proceeded from the fact that it would require as little materials and time as possible. And this, it seems to me, was successful, mainly due to the reduction in the dimensions of the structure, achieved by replacing the large washing compartment with a small shower. In addition, the sauna design is calculated so that all its main elements can be made by yourself or ordered from a workshop according to drawings.
A compact stove-heater and a direct-flow system for obtaining shower water and steam allow minimizing the time to prepare the bathhouse for operation: after lighting the stove, you can take a shower in 10-15 minutes, and dry steam with a temperature of 100° C and above at a relative humidity of 5-6% is ready in 25-30 minutes. The capacity of the sauna-bathhouse is unlimited: add water to the tanks, throw firewood into the firebox. On days of “pilgrimage” of friends and neighbors, up to 15 people used the full bathhouse service.
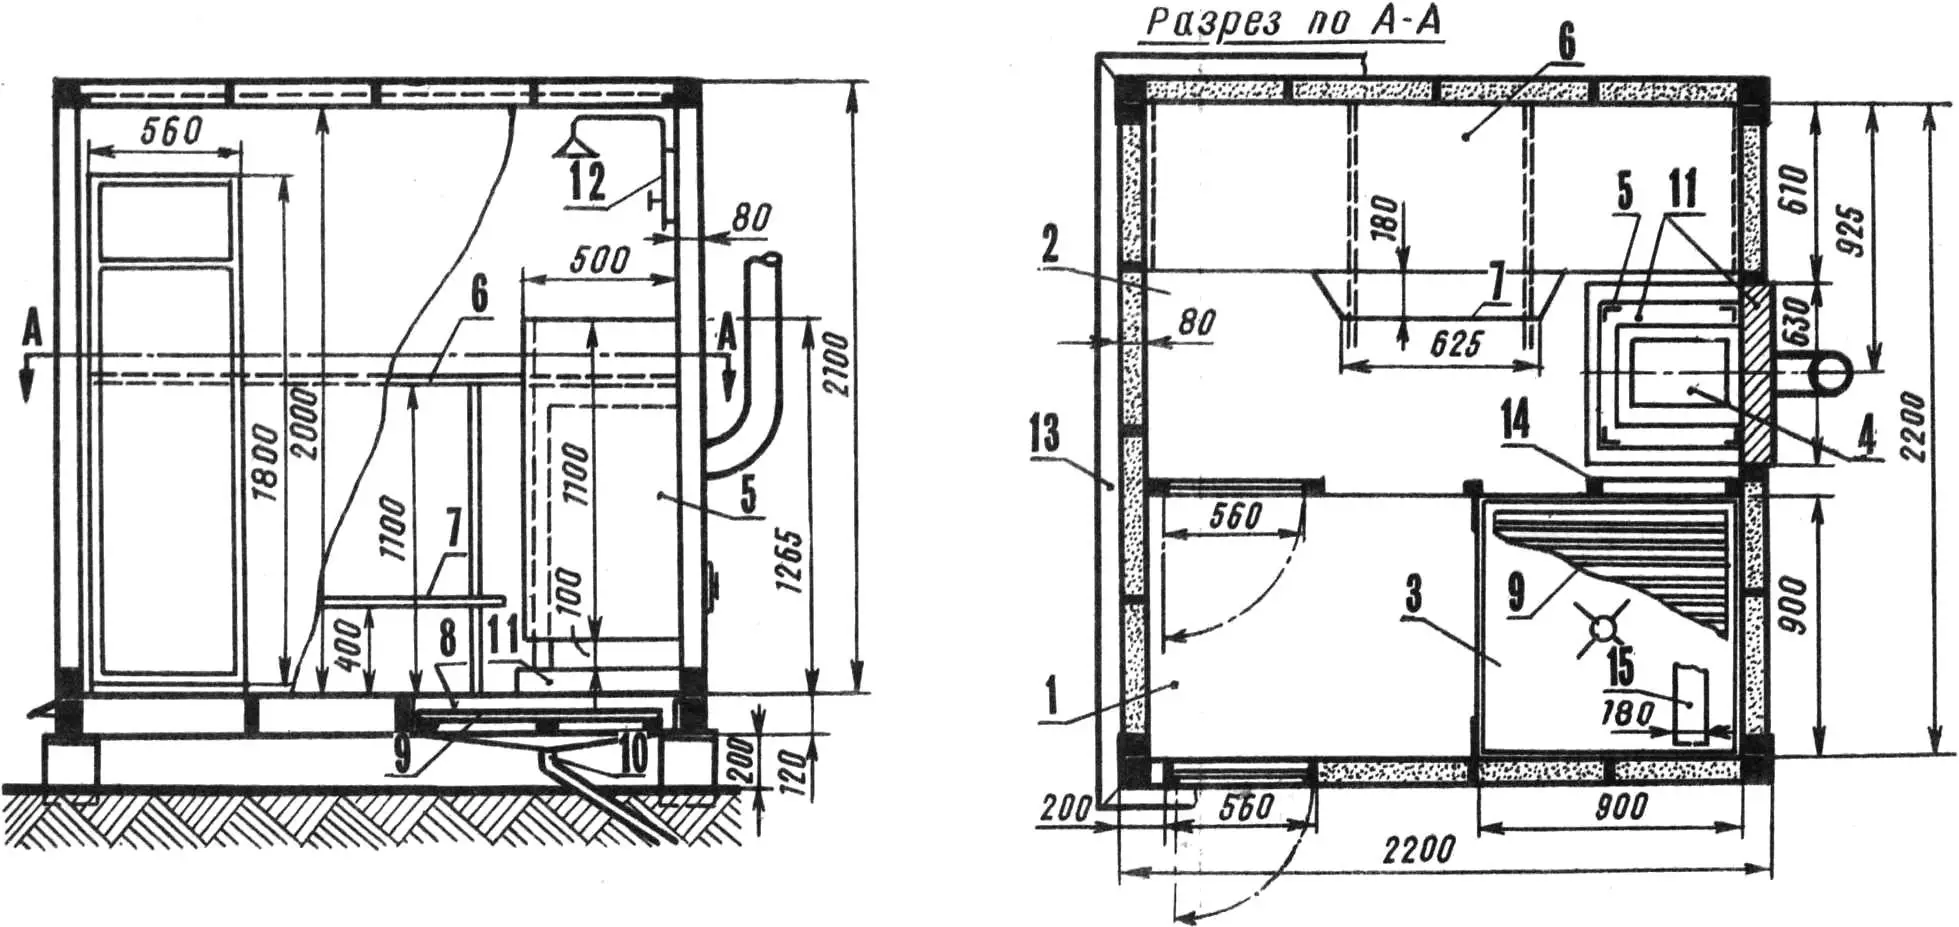
1 — changing room, 2 — steam room, 3 — shower, 4 — stove, 5 — asbestos screen, 6 — bench, 7 — step, 8 — pan, 9 — grate, 10 — drain, 11 — brickwork, 12 — mixer, 13 — drip board, 14 — screen, 15 — bench.
Such a sauna can be easily “fitted” into a room of a residential house, into a utility room for livestock workers on a farm, builders or other workers engaged on mobile sites or working on a shift basis.
LAYOUT
The project provides for three main rooms of the sauna-bathhouse: changing room, steam room and shower. Their general layout is given in figure 1.
FOUNDATION
If the soil at the construction site is sandy-loamy, with deep groundwater, it is sufficient to make the foundation in the form of concrete pedestals under the corners of the structure (after removing the vegetation layer of soil). On soils capable of heaving, the foundation is laid to the depth of soil freezing.
SAUNA-BATHHOUSE PREMISES
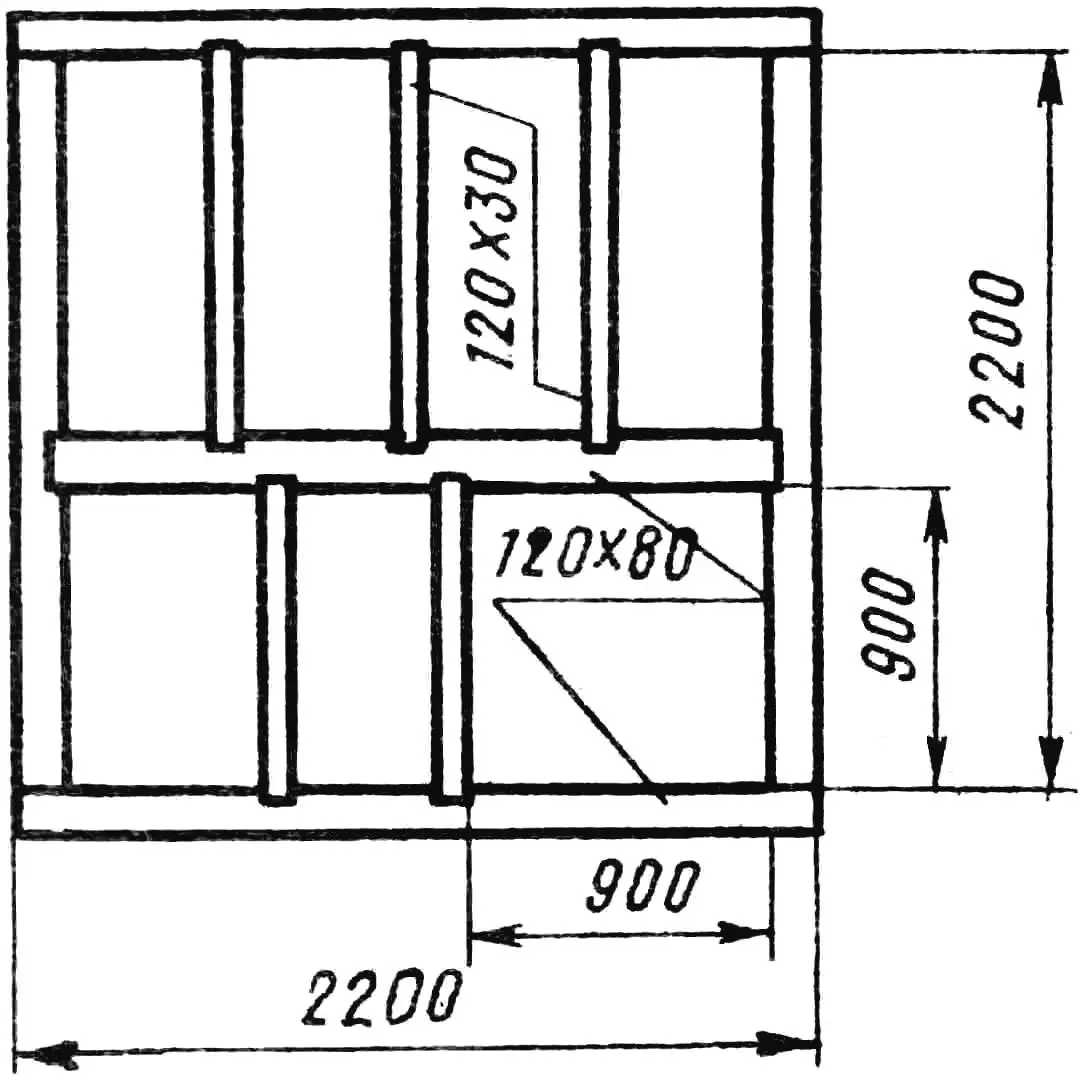
The base of the structure is the lower frame (fig. 2), made of 80X120 mm timber. The joists have a cross-section of 30X120 mm. At the corners, the timbers are cut into half-lap joints and fastened with nails. The frame is laid on the foundation with a waterproofing layer of roofing felt and checked by diagonals.
The bathhouse walls are made in the form of separate frame-filled panels in a horizontal position on the site. Their frames are assembled from timbers with a cross-section of 50X60 and 50X30 mm. The elements are joined with overlapping joints, with half-lap cuts.
A layer of roofing felt or polyethylene film is applied to the finished frame and sheathed horizontally (along the height of the panel) with boards 15-20 mm thick and 100-120 mm wide (with quarter joints). The panel is turned over, the cavity is filled with dry wood sawdust with tamping (or mineral wool), covered with polyethylene film, two layers of paper and sheathed with boards diagonally across the panel. This arrangement of boards creates longitudinal stability.
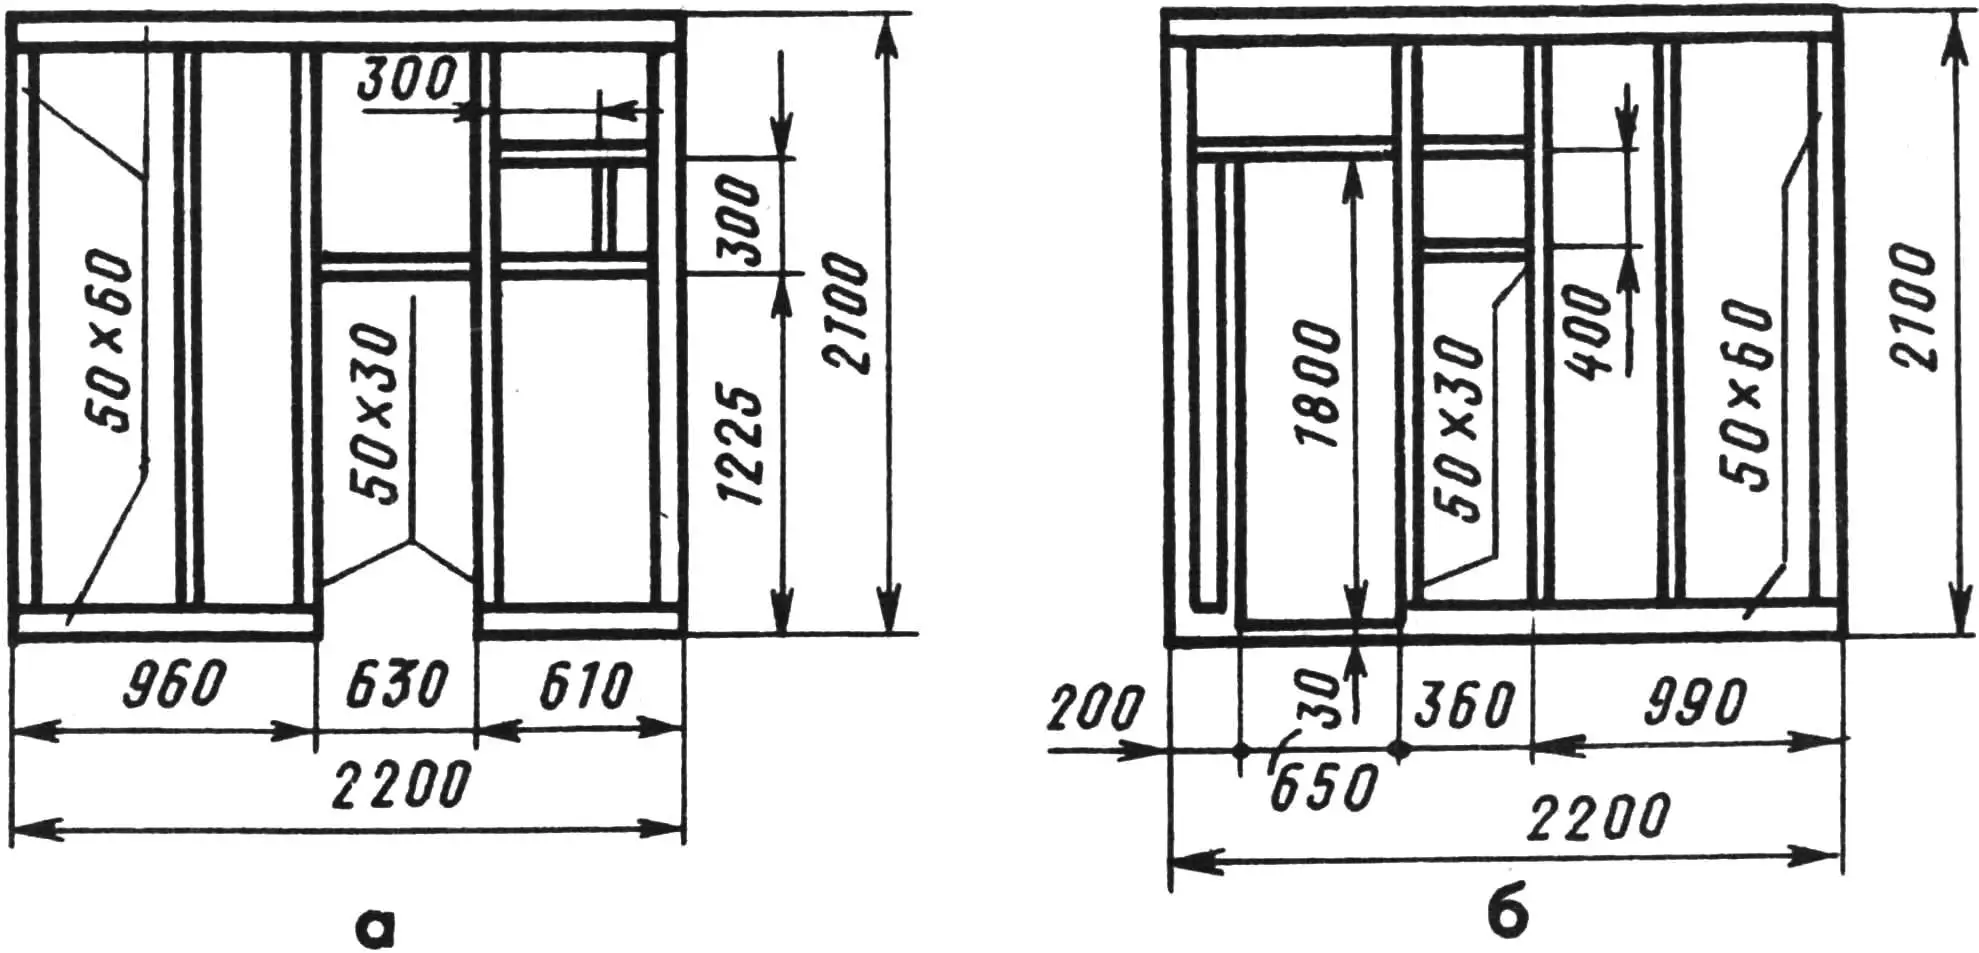
a — right side, b — front.
The best material for exterior sheathing is coniferous wood. The steam room ceiling, the wall adjacent to the bench, and the bench itself must be made of hardwood. The best of them is aspen. It has lower thermal conductivity, heats up quickly (coniferous species containing a lot of resin burn the skin; “stalactites” appear on the ceiling). To avoid cracking, the moisture content of the boards should not exceed 15%. Such a wall holds heat well without “sweating”. The right side panel (fig. 3a) has an opening for installing the stove and window. In the front one (fig. 3b) — openings for the door and window to the changing room. The left side and rear panels, which have evenly spaced posts, are sheathed completely. On all panels at a height of 2020 mm, along the posts, a 30X40 mm bar is nailed to support the ceiling beams and ceiling sheathing. The side panels are installed on the lower frame; they are fastened with long nails at the ends and in the middle.
The front and rear panels are fastened to the ends of the side ones with three wood screws (“lag screws”) through a soft gasket. “Lag screws” with a diameter of 10-12 mm and a length of 180 mm can be made on a lathe. In extreme cases, reliable fastening is also done with nails of similar length. The joints are sheathed with a 150 mm wide board with a soft gasket.
The floor in the steam room and changing room is laid with 30 mm thick aspen boards, on 30X40 mm battens, fastened to the lower frame and joists.
The ceiling is sheathed on the beams and joists with 20 mm thick boards with quarter joints. Then several layers of dense paper are laid on top, polyethylene film, wood sawdust is poured to the height of the beams, which is covered with roofing felt. The bathhouse partition is made of 20 mm thick boards (with quarter joints). Its frame consists of bars on the panels and posts resting on the floor and ceiling. The bathhouse roof is single-pitched, covered with slate.
Doors are made in the form of frames from 40X50 mm bars, joined at the corners and on the lintel with mortise and tenon joints. In the middle, they are covered with 4 mm birch plywood (with quarter joints), on both sides, with casein glue.
The shower pan measuring 900X900 mm is made of sheet steel 1.5-2 mm thick. The 120 mm high flanging at the corners is welded with a continuous seam. The slope for water drainage is made by stretching the metal along the diagonals from the center. In the center, a nozzle is welded to the Ø 50 mm hole. On both sides, the pan is painted in two layers with red lead and fastened to the lower frame with nails. A wooden grate is installed on it.
Waste water is drained by a 2.5″ pipe (fig. 1) outside the structure into a pit measuring 1200X800X600 mm, lined with slate and covered with a slab and a layer of earth. These works are more convenient to perform before installing the bathhouse walls.
The shower walls up to human height are covered with waterproofing. The wall surface is leveled with putty.
After drying, the walls are covered with thick oil paint, on which strips of textile material (old sheets, etc.) are first applied in the corners, and then over the entire surface with overlap and rolled with a roller. The coating is applied in two layers (it is necessary to cover the “wall — pan” joint). The floor in the changing room is treated in the same way. Finally, the shower and changing room are painted with “silver paint” (aluminum powder on clear varnish). After five years of operation, such waterproofing has shown its high reliability.
The shower is equipped with a folding bench and shelves. The passage from the changing room to the shower is closed with a folding curtain.
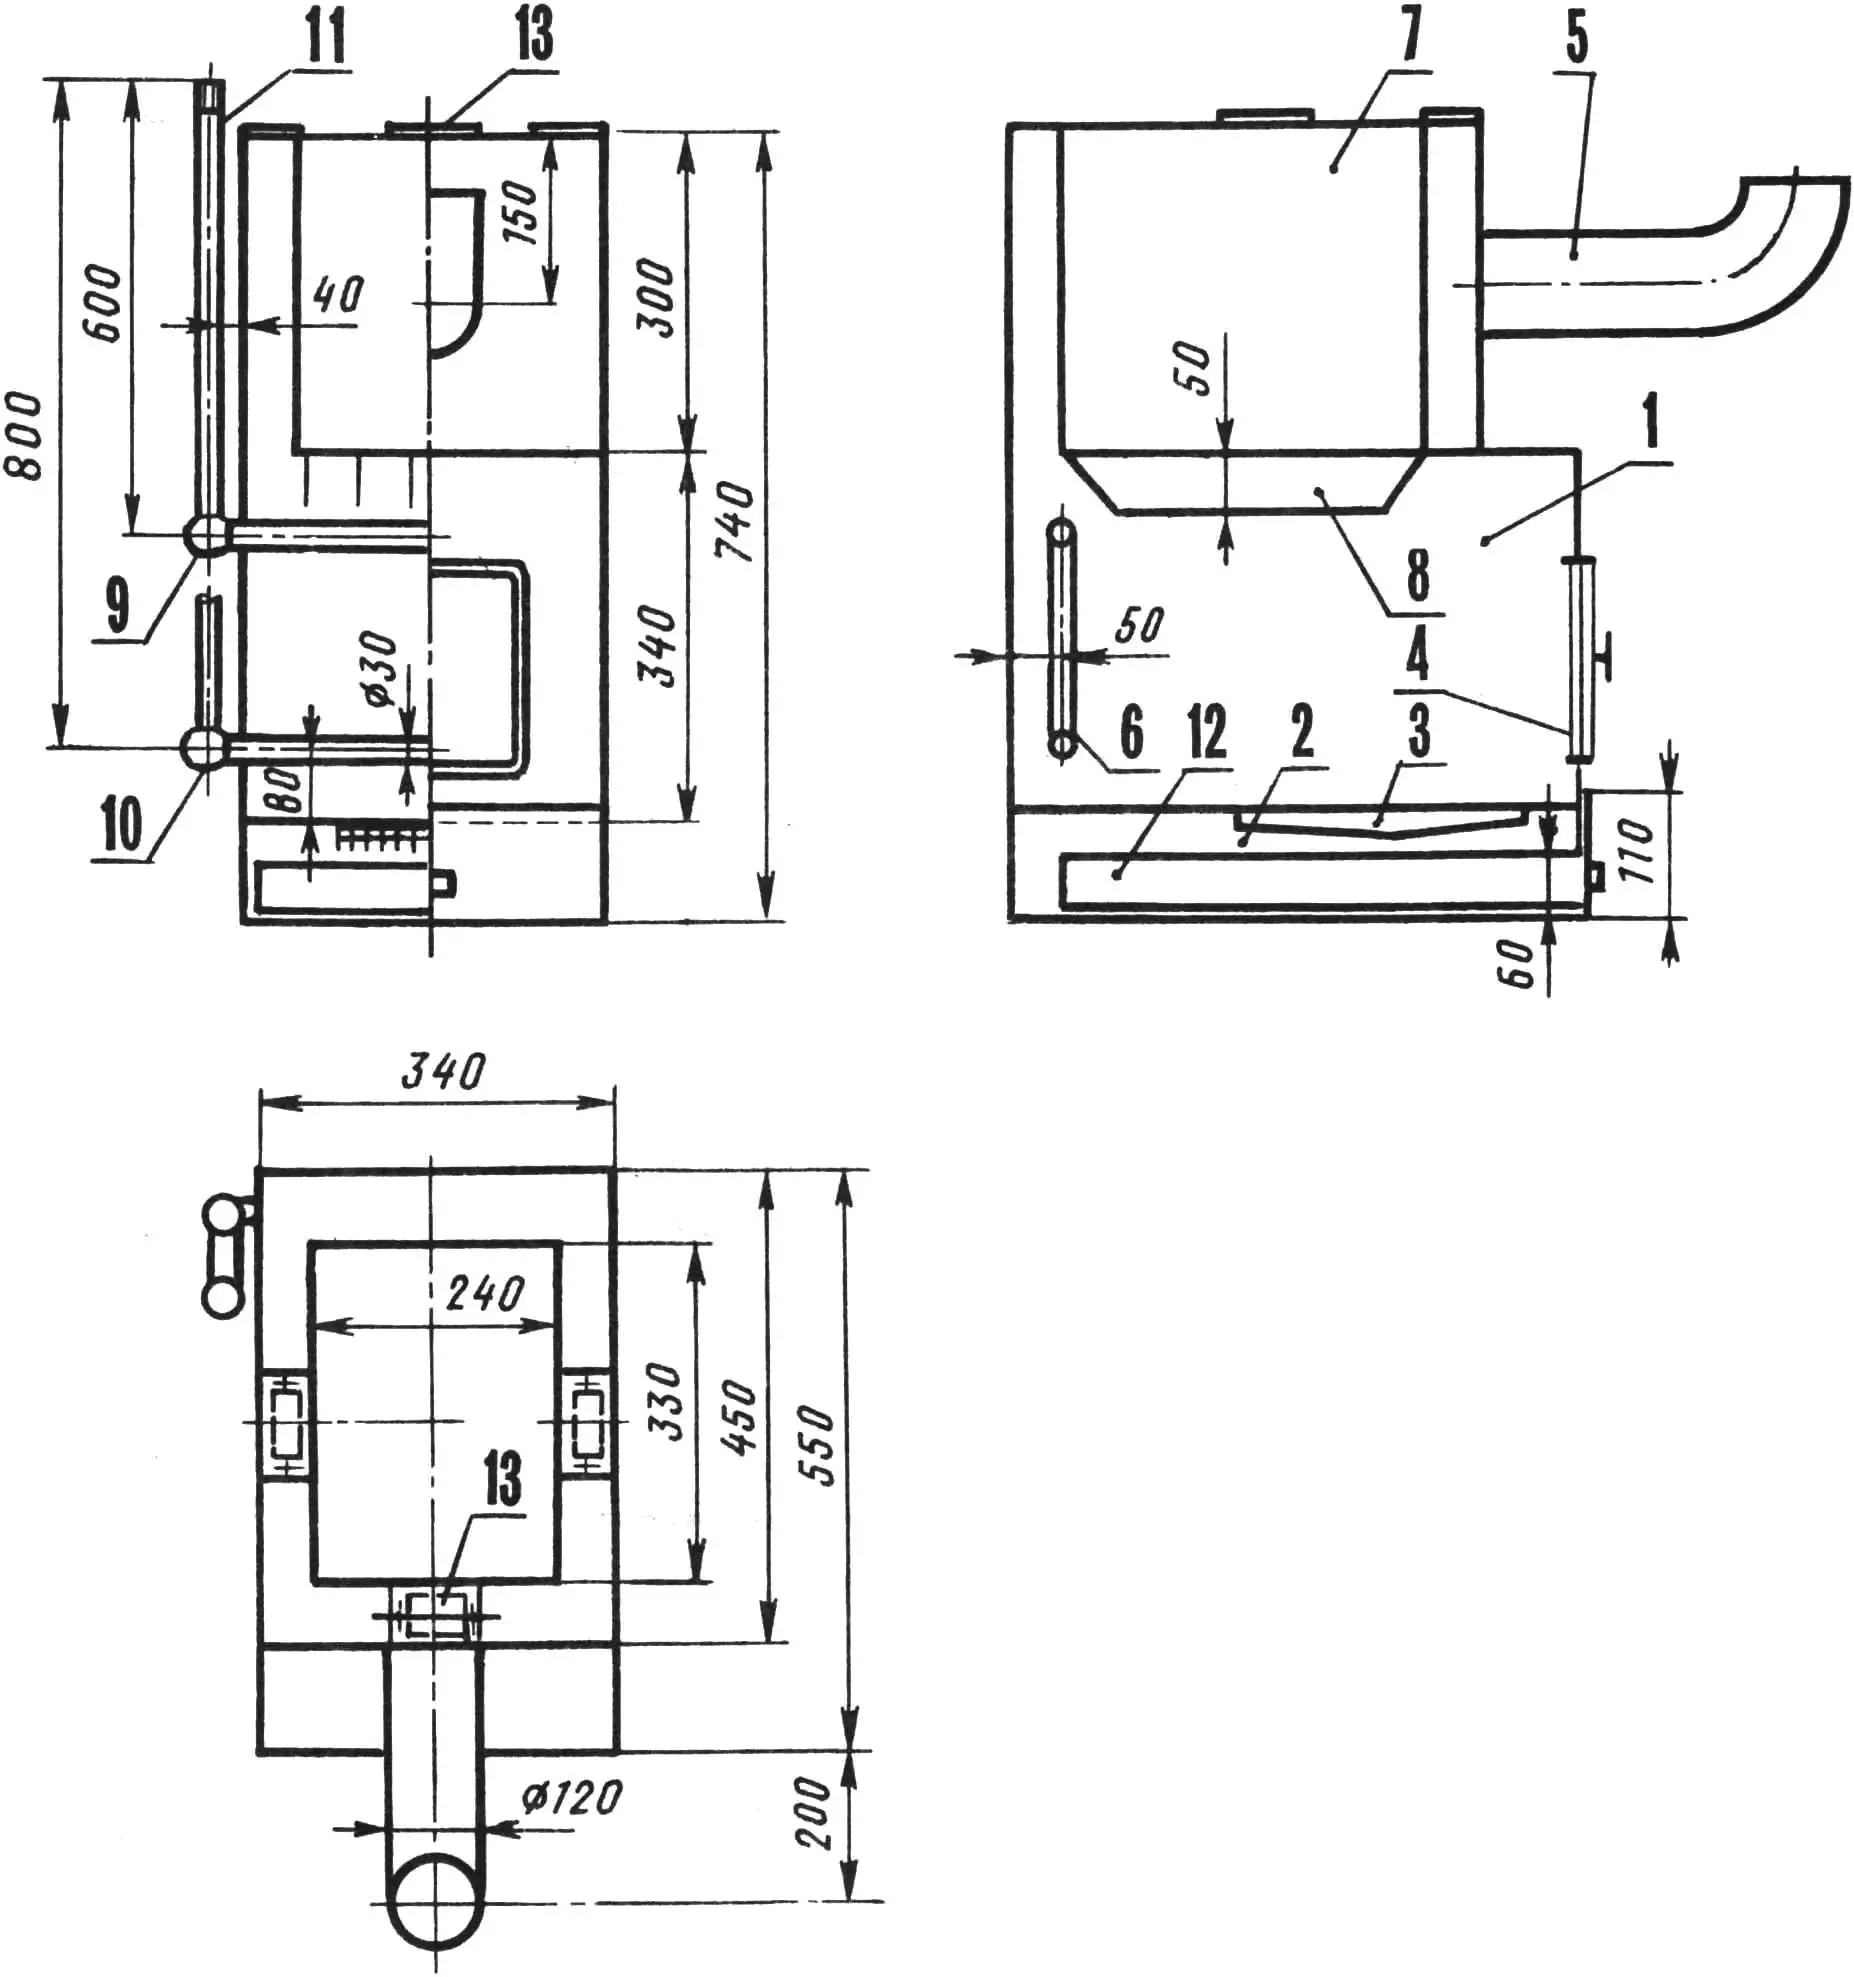
1 — firebox, 2 — ash pan, 3 — grate (standard), 4 — door, 5 — chimney, 6 — water heater, 7 — heater, 8 — ribs, 9 — angle 3/4″X1/2″, 10 — tee 3/4″X1/2″X1/2″, 11 — pipe 1/2″, 12 — ash pan box, 13 — hatch cover.
The stove (fig. 4) is a two-pass stove with a developed heating surface of the heater and a firebox isolated from the bathhouse room; welded with a continuous seam from 4 mm thick sheet steel.
The base for installing the stove and protective screen is brickwork (fig. 1). The firebox and chimney are led through a half-brick wall outside the steam room. The “masonry — stove body” connections are sealed with a soft asbestos gasket. A 2.5 m high pipe is installed on the chimney from the outside. Three screen walls (fig. 1, item 5) made of asbestos-cement sheets measuring 1100X500X8 mm are fastened with bolts to 40X40 mm angles, the lower ends of which form legs. Such a device, in addition to protection, performs well the function of ventilating the room with a convective flow. The second screen (item 14) made of a sheet to the height of the stove is fastened to the partition (with a 100 mm gap at the bottom).
Despite its relatively small size, the stove fully provides continuous preparation of water and steam. Depending on the intensity of combustion in the firebox and the amount of water poured on the heater, you can get a sauna mode — dry steam with a temperature of up to 100° C and above at a relative humidity of 5-6%, or wet steam at a temperature of 60-70° C at a relative humidity of 40% — Russian bath with a broom.
WATER PREPARATION
Figure 5 shows the water preparation scheme. The pressure that drives water circulation in the heating circuit arises from the weight difference of the columns of cold water in the downcomer pipe and heated water in the riser pipe.
The direct-flow system for preparing shower water consists in the fact that hot water for the mixer is taken not from the heated water tank, as is usually done, but from the riser pipe (item 2). This allows minimizing the time for preparing shower water without waiting for all of it in the tank to heat up to a certain temperature.
Pressure tanks of 120 l are installed on a metal structure made of old pipes, attached to the right side of the sauna-bathhouse, at a height of 400-500 mm relative to the mixer grate. Threaded fittings 1/2″ are welded to the bottom of the tanks at the corners (diagonally). The piping is made with pipes and fittings 1/2″ on threads. During installation, it is necessary to observe minimum pipe slopes for draining water from the system. The external and internal surfaces of the tanks are primed and painted with oil paint. Thermal insulation made of 50 mm thick polystyrene foam is applied to the hot water tank on all sides. Feeding the pressure tanks with water, depending on local conditions, can be done from the water supply network, from a reserve tank with a pump, and finally, with buckets using a ladder stand.
In our case, water heating is also done from a solar battery. Its device is simple. A thin-walled welded battery, painted black, is placed in a box and covered with polyethylene film. The hinged suspension of the box provides two degrees of freedom of movement — so that for most of the day the rays fall normally on the battery surface. Through the fittings, the battery is connected with flexible hoses to the hot water tank. On a hot sunny day, the water heats up to 70° C; even by morning, a temperature of 40-45° C is maintained — you can take a shower at any time.
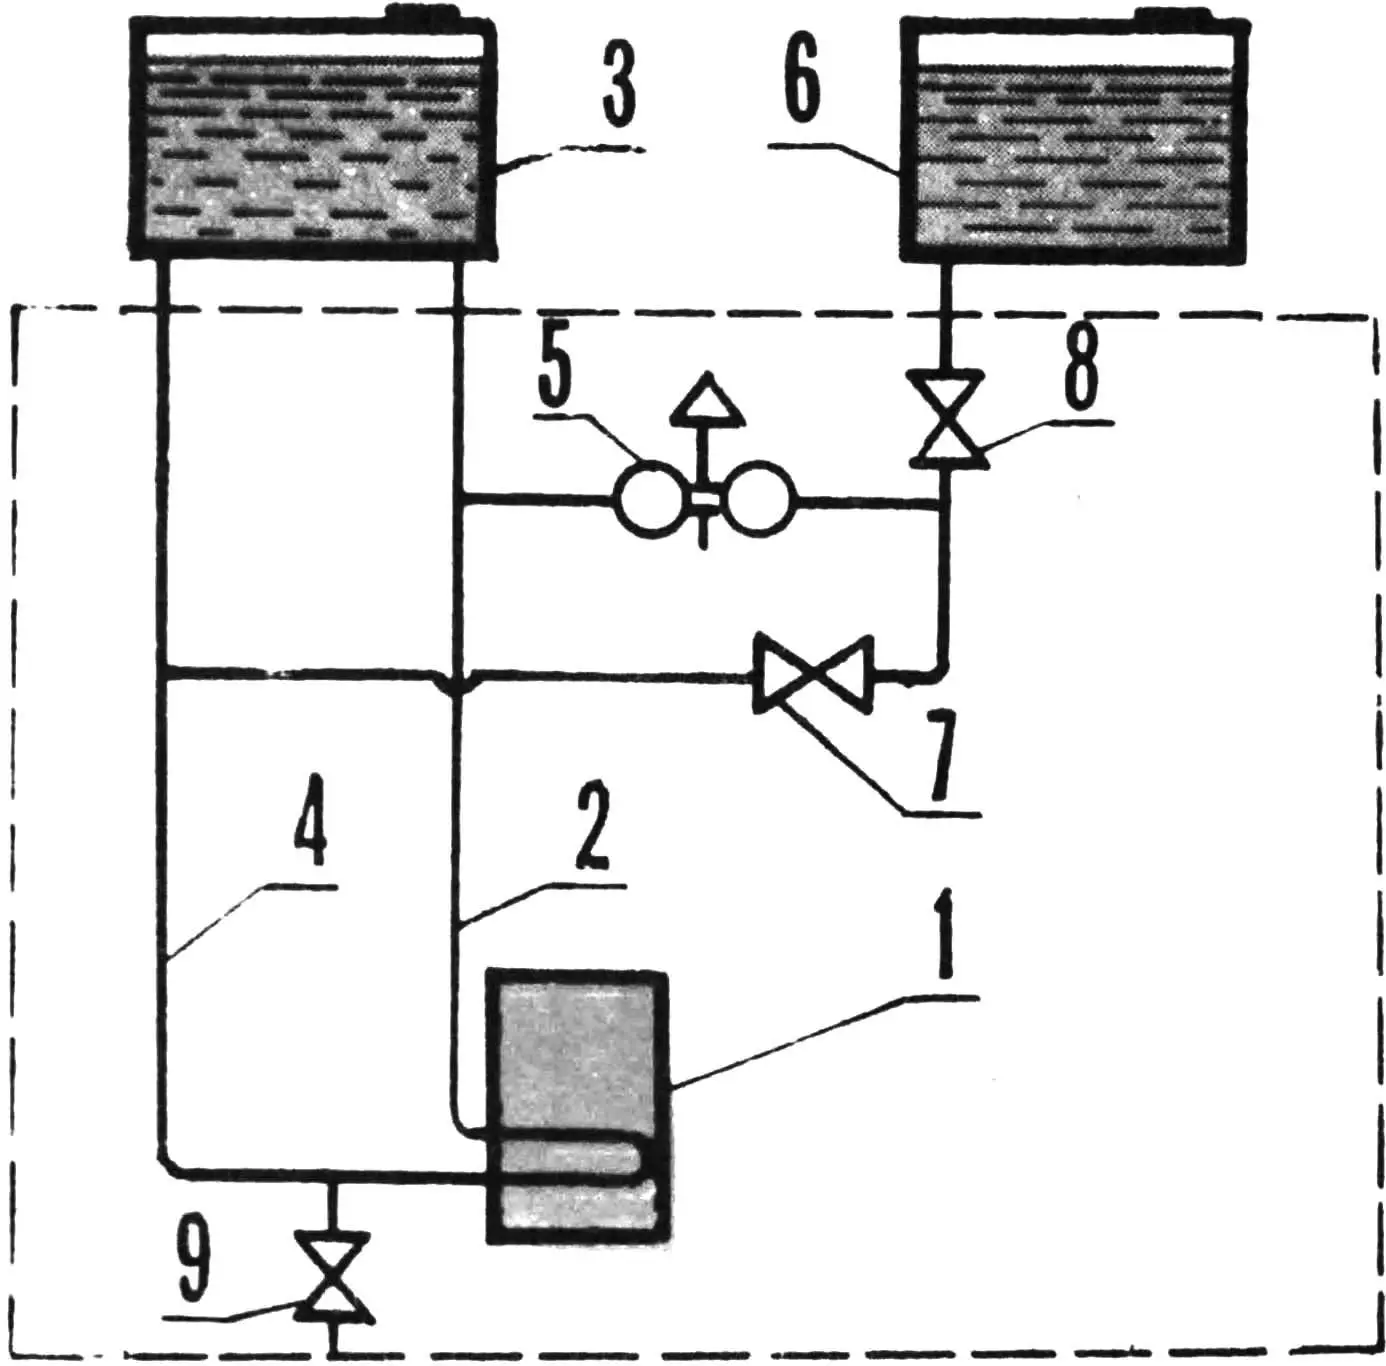
1 — water heater, 2 — riser pipe, 3 — hot water tank, 4 — downcomer pipe, 5 — mixer, 6 — cold water tank, 7, 8, 9 — valves.
The bathhouse can be used in winter conditions. For this, the scheme provides for a valve (fig. 5, item 8) that disconnects the cold water tank: in this case, water is taken from the return pipe.
At small negative outdoor temperatures, it is necessary to: light the stove, pour a bucket of water into the tank, open the steam room door and slightly open the hot water valve of the mixer (for heating). After steady circulation in the circuit, add water as needed. At lower temperatures, the first portion of water is heated to 50-60° C.
Before the winter season, it is necessary to drain the system: drain water with a hose through a valve (fig. 5, item 9) from the heating circuit; open the mixer valves; turn the handle to the lower position and drain water from the solar battery.
«M-K» 2’90, B. VDOVIN, engineer
Recommend to read
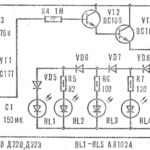 PROTOTYPE -HOURGLASS
The Romanian magazine "Technium" offers a diagram of the electronic timer operates on the principle of the 5-minute hourglass clock every minute. The indication to carry out the LEDs....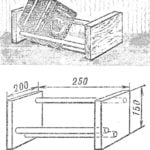 TABLE SHELF
Book required at the moment for work, must be always at hand; however, the folded stack on the table, they interfere, and use them uncomfortable. Make a simple table shelf, and you'll...
