Many youth technical stations have their karting sections. The kids who train in these sections build and improve their karts themselves, achieving very good results in competitions.
So what’s next? Logically — high-speed racing cars. But teenagers cannot compete in them: driver’s licenses can only be obtained from the age of 18.
In recent years, new cross-country cars — buggies — have become very popular, just like karts once did. This is understandable: they don’t need excellent highways or special racetracks, they are designed for off-road competitions. On closed tracks, you can compete in them even with a children’s driver’s license. Building a buggy is accessible even in school clubs and pioneer camps, where they can also serve as training cars.
Today we introduce recommendations for building such a simplified design — the “Moskvichonok” buggy. Our previous publications on this topic will also help you in your work.
***
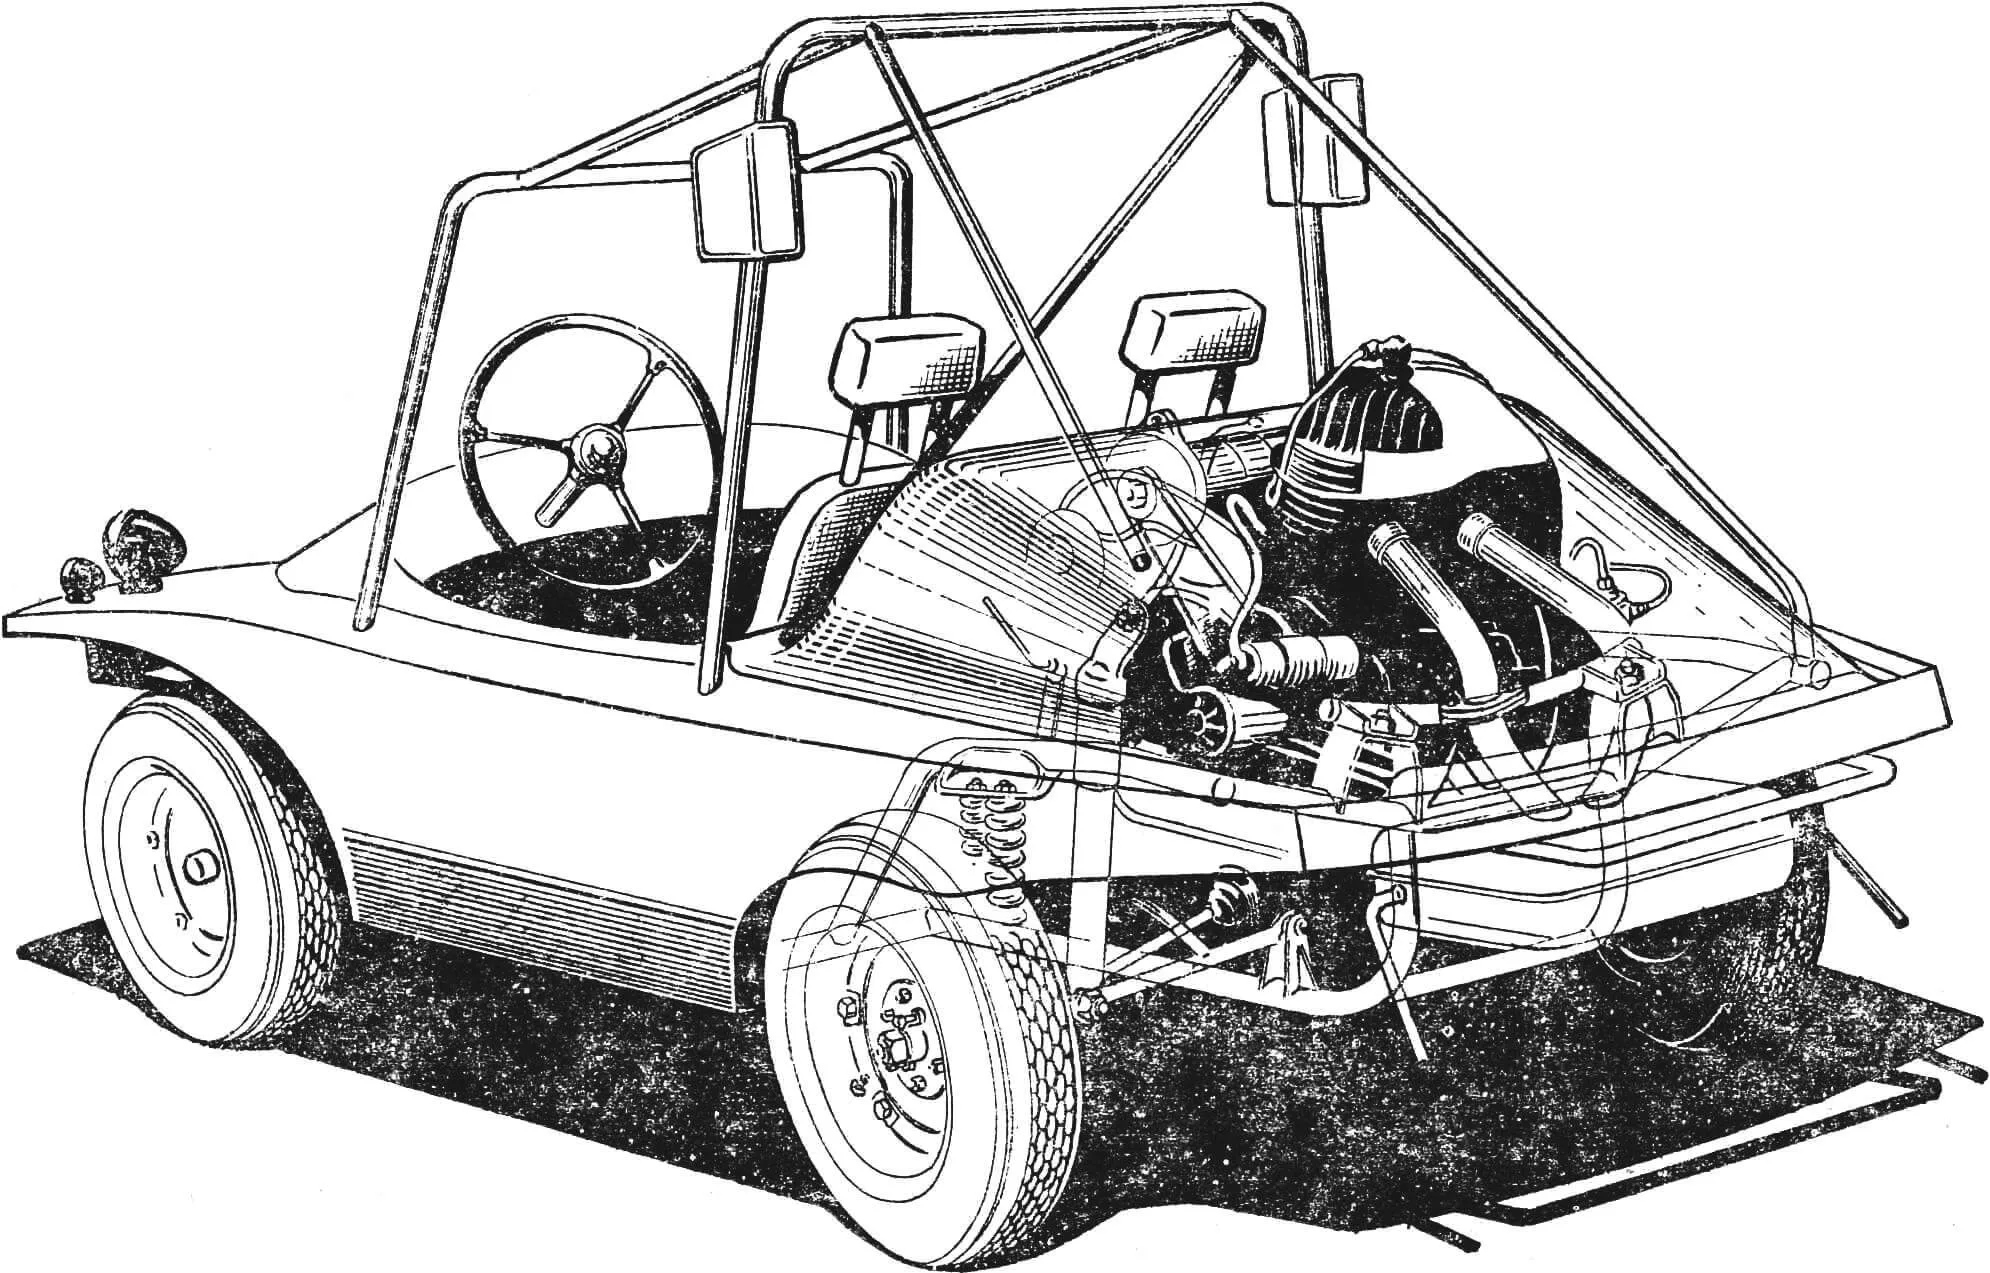
…This was last summer at a pioneer camp. A strange-looking car drove up to the gates and was immediately surrounded by curious onlookers. Small, nimble, the size of a “Zaporozhets,” but with an open body almost like a kart, it had all the main components — engine, gearbox, steering, corresponding pedals and levers — and yet it wasn’t very similar to a regular car. And although the presence of headlights (with high and low beam), parking lights, turn signal “flashers” and brake lights indicated the possibility of its movement on regular roads, the appearance suggested that it was still intended for off-road use.
Questions poured in to the driver. He explained that such sports microcars, which move equally well on dirt roads and highways as well as on rough terrain, are called buggies. Their purpose is automobile cross-country competitions. Well, and to be able to get to the starting point under their own power, all necessary lighting and signaling devices are installed on them.
— What a car, — the kids said admiringly. — A real car. For learning, for sports, for play…
— And for tourism, — the driver added.
— Where are they made? — the squad leader asked businesslike.
— In some countries, for example in Czechoslovakia, buggies are assembled at automobile factories. In our country, sports teams are still doing this. So, the student sports club of the Moscow Automobile and Road Institute built a buggy based on the GAZ-69 car, and now builds from components of “Zhiguli” and “Zaporozhets.” Several buggies were created by students of the Zaporozhye Polytechnic Institute, young designers of the collective farm named after S. M. Kirov in Estonia, and other amateur teams. And schoolchildren from the children’s sports club of the city of Zelenograd took an ordinary wheelchair as the basis for the buggy.
— A wheelchair? With a motorcycle engine?
— Yes. Based on a wheelchair, such a machine is easiest to build. Its foundation is the running gear of the Serpukhov plant’s motorized wheelchair and an engine with a cylinder displacement of 350 “cubes.” The components are simple in design, convenient in operation and maintenance,
And then came the most important question:
— Can we build one ourselves?
The answer to this question interests, apparently, many…
***
So, to build the “Moskvichonok” buggy, you will first need a decommissioned SZA motorized wheelchair. It will have to be partially dismantled: remove the electrical wiring, headlights with brake light, instrument panel — all this will come in handy; separate the body and floor from the frame using an autogen torch or simply with a hammer and chisel. The skeleton of the car will remain.
In the new equipment of the car, one of the most important parts will be the safety cage, which is formed by tubular arches: they will protect the driver in case the buggy overturns on the track. For the arches, only seamless drawn (GOST 8734-—53, T45x2.8 mm) or chrome-manganese-silicon steel pipes (grade 30KhGSA) are suitable. To give them the necessary shape, a tube bender is used; fastening — by welding (see the safety cage diagram). The first arch is placed behind the front axle. In addition to ensuring the safety of the racer, it also “works for the structure”: the front part of the body and the steering column are attached to it. On the rear part of the frame, we will weld two brackets — for installing the rear body panels, as well as platforms for attaching the safety arch and diagonal braces. We connect both arches at the top with two tie pipes. To increase the rigidity of the safety cage, the presence of three diagonal braces is mandatory. The attachment points of the cage posts to the frame are reinforced with steel gussets with a thickness of at least 2 mm. The total area of each should be at least 35 cm2, with one-third of it used for connection with the vertical pipe.
The body of the “Moskvichonok” buggy is fiberglass, consisting of three main parts: bottom, hull, and engine half-hood. It is advisable to lay them up using a pre-made mold (the layup technology has been repeatedly described in our and other magazines). The connection points of the parts, as well as the attachment points of levers and pedals, are reinforced with steel insert plates embedded in the fiberglass. When laying up the bottom, a mounting location (recess) for the fuel tank is provided.
The seats (laid up from fiberglass or on a metal frame) should have a backrest, integral with the base, with a height up to the level of the racer’s crown or with headrests. The seat attachment is adjustable, allowing them to be moved forward and backward so the driver can choose a comfortable distance to the pedals. The laid-up body blanks are kept for the required time in a ventilated room.
After the resin cures, the body elements are primed and painted with any, preferably bright, nitro paint.
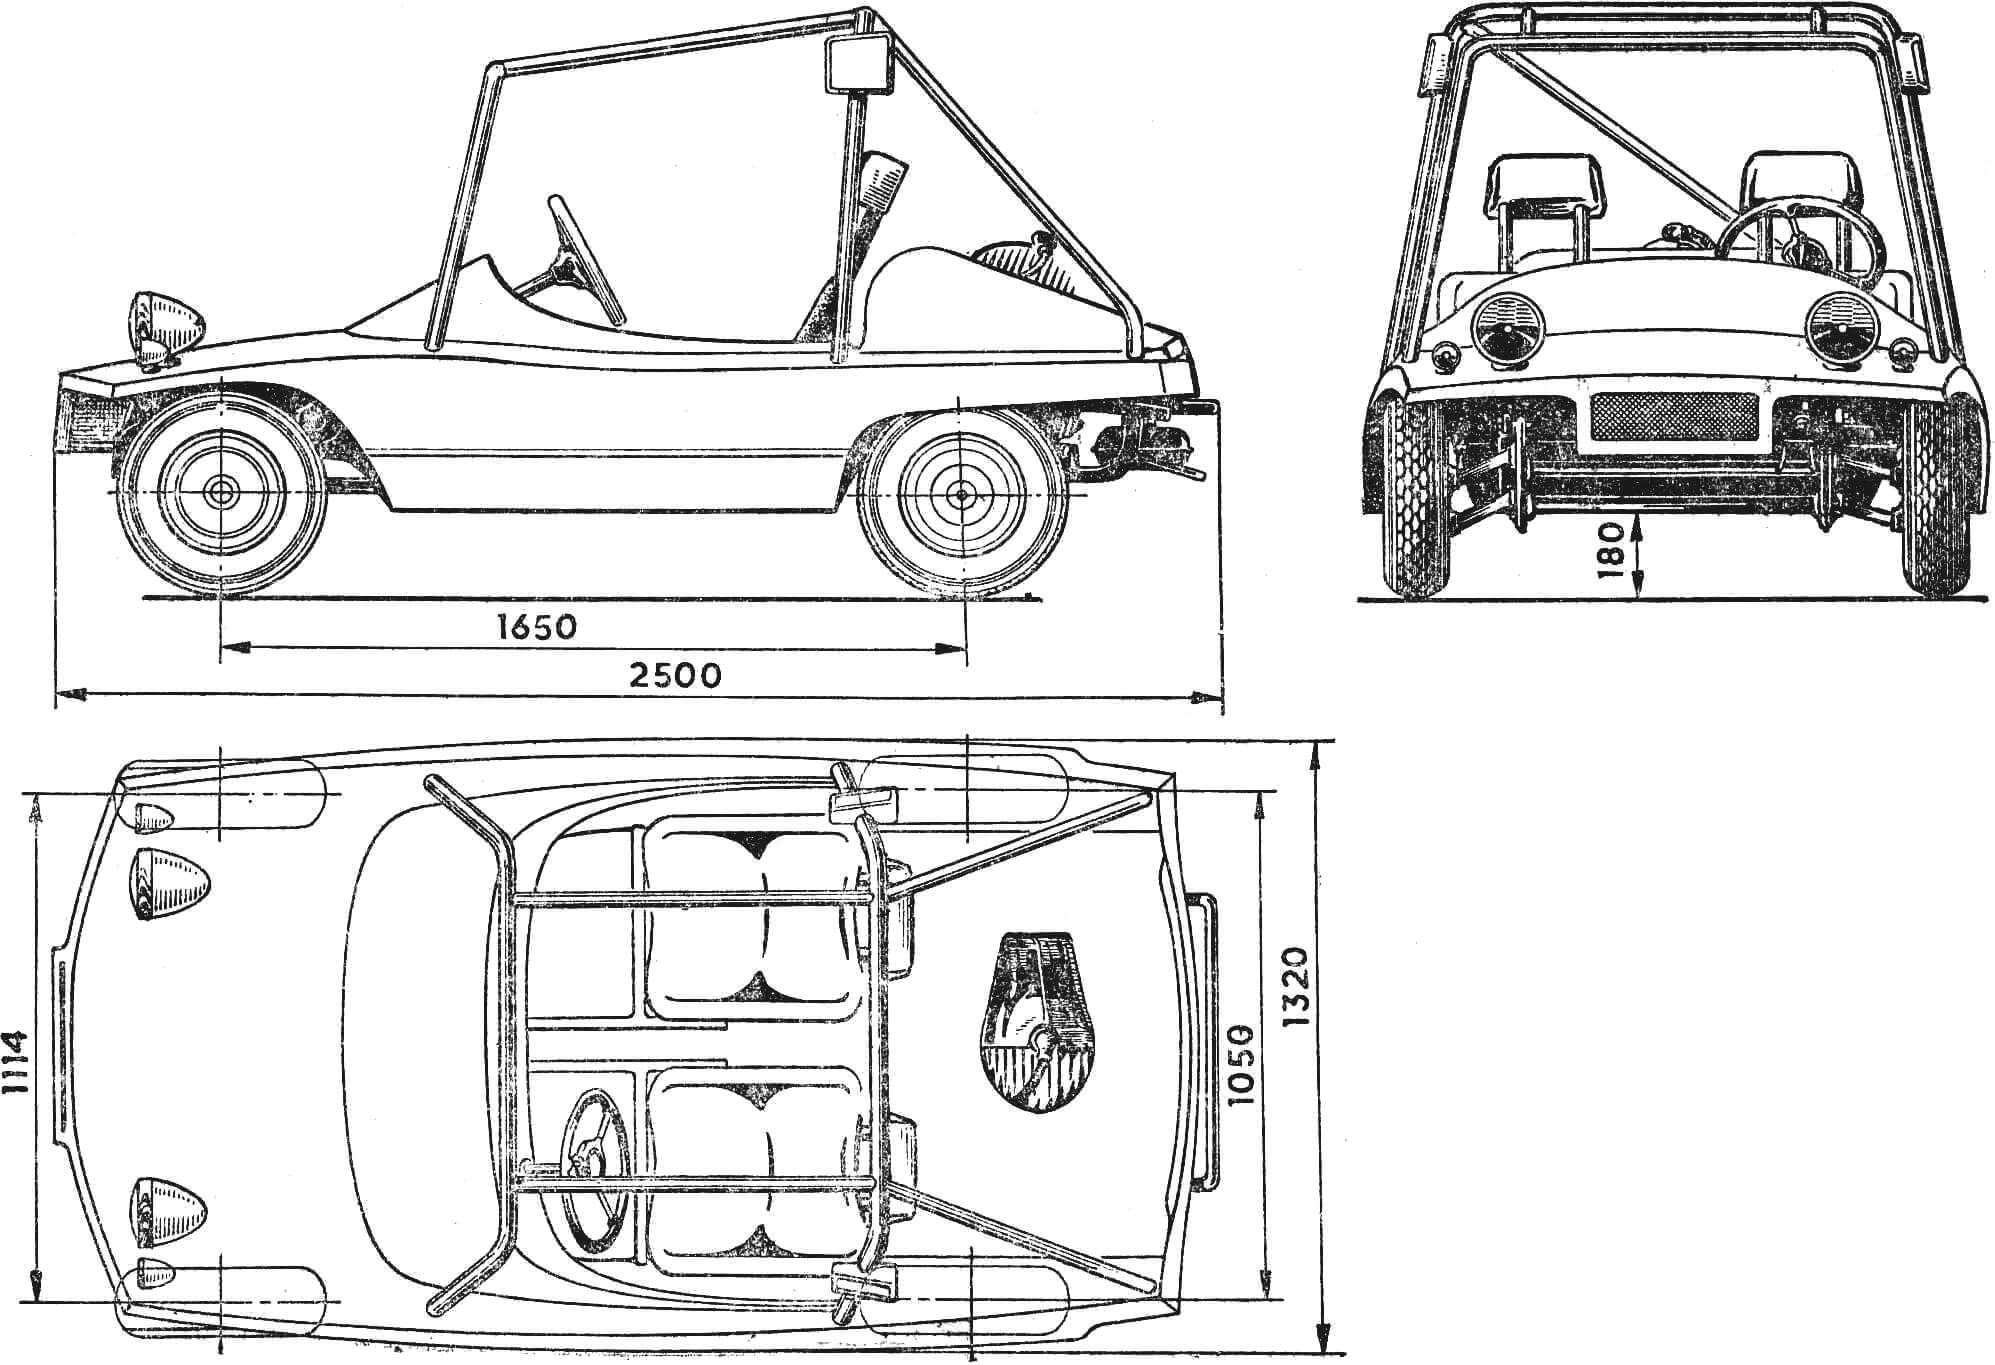
If the “Moskvichonok” will be not only a training car, you will have to follow the technical requirements for buggies and the regulations adopted by the International Automobile Federation FIA for cross-country cars. The body must have a solid floor and fenders covering at least 1/3 of the wheel circumference. Considering that tracks are sometimes rocky, the car is fitted with unbreakable windshield glass, which in the lower part transitions into an opaque protective screen. For the driver’s comfort in the car, the inner width of the “Moskvichonok” body should be at least 800 mm. Additional driver safety is ensured by such absolutely necessary elements as protective side panels. Their height from the floor level is at least 420 mm.
The use of safety belts on the buggy with their attachment at four points is mandatory. And finally, all cars must be equipped with additional locks that close the engine hoods and trunk lids, as well as secure various accessories: spare wheel, tool bags and similar “trifles.” The battery should also be securely fastened, and if it is located in the cabin, its sealing should be ensured. By the way, installing a spare wheel is not mandatory.
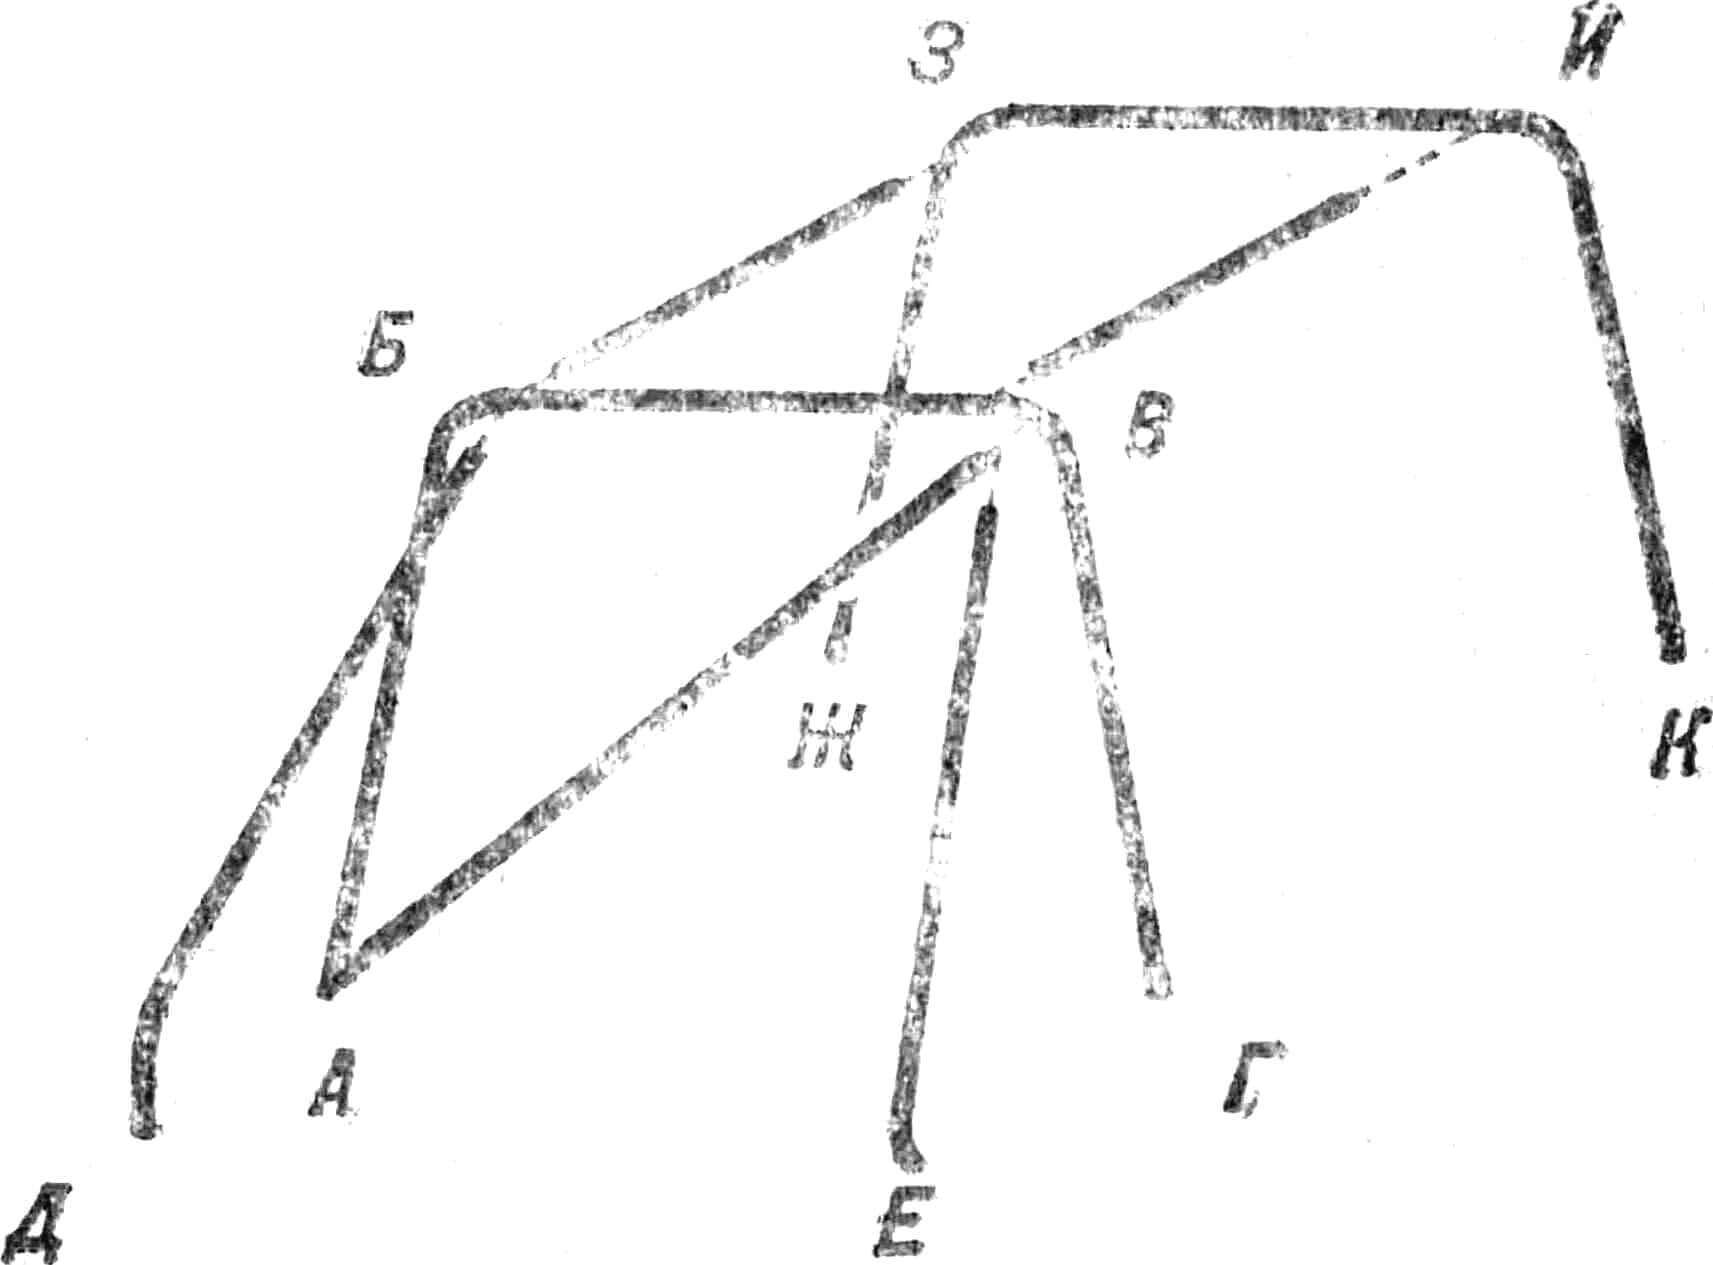
The main arches ABVG and ZhZIK are made from pipe with smooth bends, without wrinkles and wall damage. The pipes are seamless, with a diameter of at least 45 mm, wall thickness — 2.6 mm.
A few words about the windshield. Those who have been to competitions have probably noticed that, as a rule, there are no windshields on buggies. The FIA sees this as a gross violation and prescribes athletes “…to wear a transparent visor or protective glasses in case there are holes in the windshield…”. What then can be said about its absence! Foreign rules, in particular, require both front and side glass made of rigid organic glass with a thickness of at least 6 mm or triplex.
The “Moskvichonok” cabin must be separated from the engine by a reliable fireproof partition. It is prohibited to place containers for oil and coolant, fuel tank in it; moreover, the proximity of the latter to the engine is regulated by a minimum distance of 400 mm. The fuel tank is built into a sufficiently protected place from external damage, so that its filler neck does not protrude beyond the body. Containers and pipelines should be arranged in such a way that in case of fluid leaks, they cannot accumulate in one place (for example, in the body) and electrolytic contact between the electrical wiring and the body and frame elements would be completely excluded. This is achieved by additional protection of fuel lines and hydraulic system pipelines passing under the bottom of the body from the danger of destruction (accidental stone impacts), corrosion, ruptures. If fuel lines pass inside the body, the requirements for them are tightened: they must be additionally insulated with a sealed and non-flammable material. The cars also provide for a branched system of pipelines for supplying fire-extinguishing composition to fire-hazardous points of the car, preferably type VS (freon 12V1).
The capacity of the fire extinguisher cylinder is at least 5 kg, and it is fixed in an easily accessible place. The brackets on which it is installed must withstand the loads that occur during competitions.
Metal bumpers that protect the body during accidental collisions in competitions are installed at the front and rear of the car. It is best to bend them from seamless steel pipes Ø 25—35 mm. The front bumper is fixed on the front axle at the points of its connection with the frame. The rear one is attached to the car frame. For quick evacuation of a car that has left the track, the cars are equipped with towing eyes both at the front and rear. The installation of two mirrors and rear red brake lights, located no higher than 1500 mm from the ground, is also mandatory.
The running gear of the “Moskvichonok,” borrowed from the motorized wheelchair, needs to be improved. The wheel rims should be widened to 180 mm, then on turns the tire will not be crushed and traction with the ground will improve. This is simple to do — you need to turn a ring 60 mm wide and install it between the standard rims.
Instead of friction shock absorbers, it’s good to install hydraulic ones on the “Moskvichonok.” The rear brake drive can be left old, but the front axle is better equipped with hydraulic brakes from the SZD motorized wheelchair. You’ll have to install, true, a master brake cylinder, which is actuated by the foot brake pedal, but in this way we get two independent brake systems that ensure effective braking of the buggy and eliminate the possibility of brake failure. The throttle and clutch drive is cable-operated.
The engine for the “Moskvichonok” is best taken standard, from the motorized wheelchair: it is very convenient for training driving, as it is equipped with a forced cooling system from a “blower.”
In case of using engines of other types, good results are achieved by installing fans with a drive from an electric motor; true, in this case the presence of a generator is mandatory. The muffler can be left “motorized wheelchair,” but a motorcycle one has less effect on engine power. Under no circumstances should you remove partitions from the muffler or make other similar “improvements.” The engine power will practically not increase, but the noise will increase, which will significantly affect not only the driver himself but also those around him. Due to the fact that the fuel tank is located below the carburetor level, a fuel pump from a boat engine is installed on the “Moskvichonok.”
The air filter is preferably of the contact-oil type from IZH-Yu-2, IZH-“Planeta” motorcycles or with a paper element. A dynastarter from the “Tula” motor scooter quite replaces both the starter and the generator.
On buggies of this class, it is allowed to install any domestically produced engines with a displacement of 350 cm3, for example IZH-Yu-2 and IZH-Yu-3, but they should be equipped with a starter. Any tuning can be done, but the basic parts of the engine — the crankcase and cylinder — must remain unchanged.
Make the steering column foldable for the convenience of the driver getting in and out, but with fixation in two positions. For this, it is best to take a universal joint and parts of the motorized wheelchair’s half-axles.
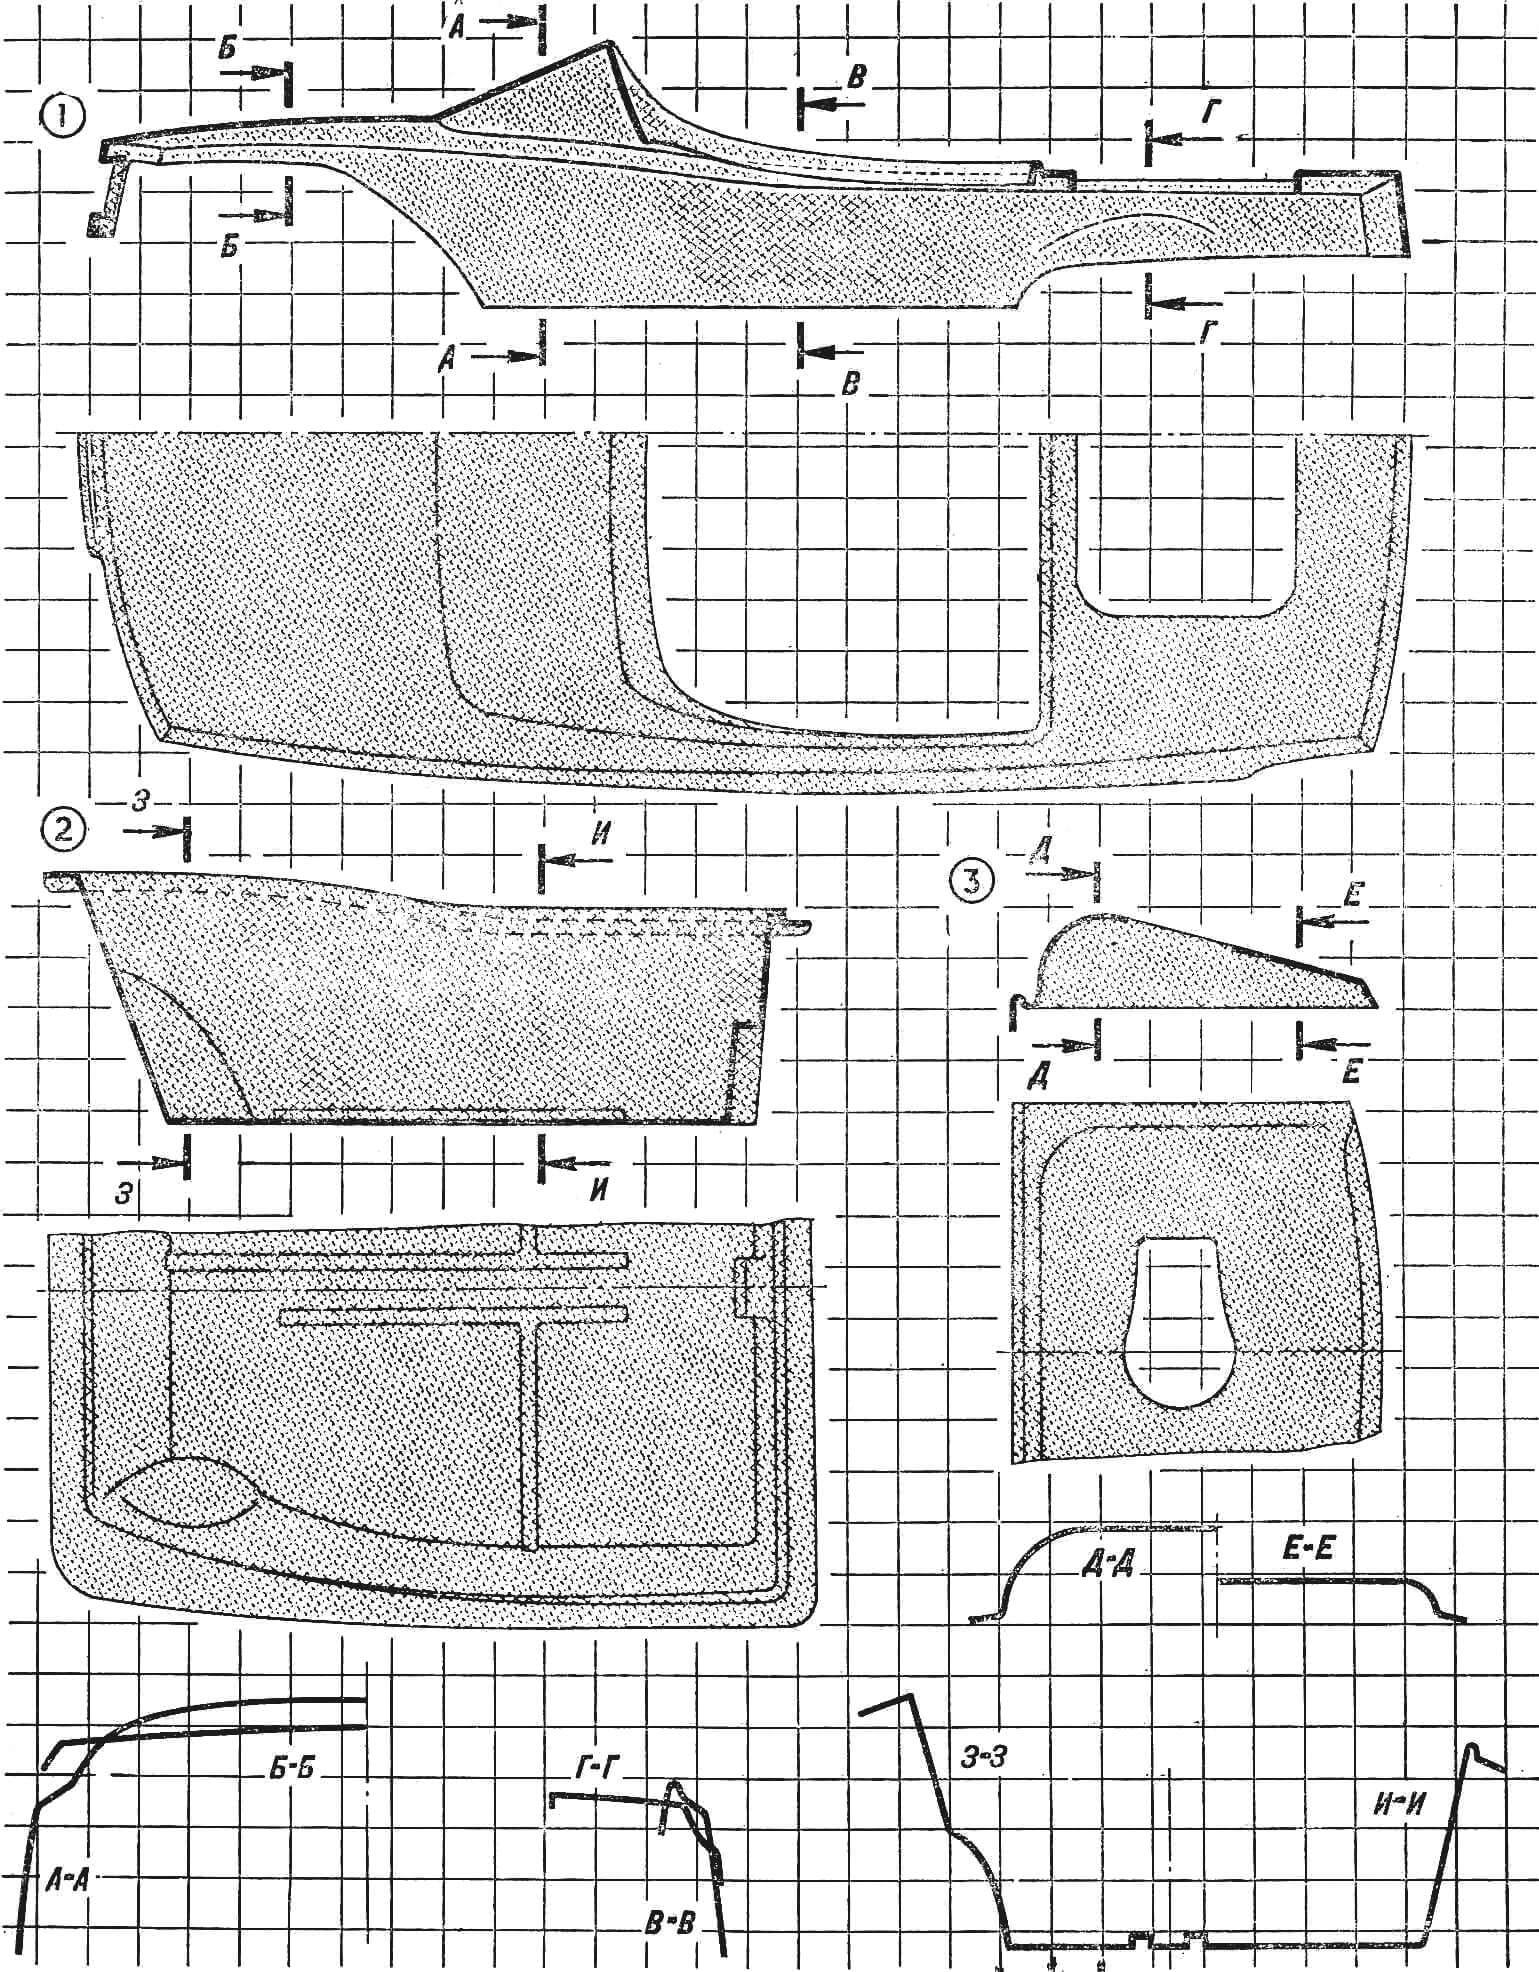
1 — upper part of the hull, 2 — lower part, 3 — engine half-hood.
Now let’s proceed to assembling the car. First, we put the bottom on the frame and glue porous rubber to its flanging to seal the gaps between the bottom and the body. This will protect the cabin and driver from dirt and water flying from under the wheels. Then we install and secure the top of the body. The battery is located in front of the longitudinal tunnel in the bottom and is covered with a lid, a half-hood with a lock is mounted over the engine. The fire extinguisher is hung so that it can be easily reached both from the driver’s seat and from outside. The best place for it is on the safety arch on the mechanic’s side.
Thus, as a result of all modifications and improvements, the weight of the buggy compared to the base motorized wheelchair will decrease to 140 kg versus 350. Due to this, even with the standard engine, the car’s dynamics improve, and it can be fully used for competitions.
The minimum set of instrument panel equipment includes a speedometer, battery charge indicator light, turn signal switch, headlight light switch, and ignition lock with starter engagement. The light switch is best made foot-operated, as on passenger cars, but it can also be placed on the instrument panel. Headlights, rear lights, and turn signal “flashers” are more convenient to combine into two blocks, which are fixed in the upper part of the safety arch. During competition, such a block is easily removed, of course, if it is connected to the electrical wiring with a six-pin sealed plug connector.
Brake signals must be effectively functioning. The minimum area of each light is 69 cm2, and the lamp power is 15— 40 W. The reliability of braking when designing a buggy must be given the closest attention. Therefore, a mandatory condition is the use of a dual-circuit brake drive, the requirements for which are as follows: “…the action of the brake pedal must normally be transmitted to 4 wheels. In case of brake fluid leakage when the pipeline or other parts of the hydraulic drive are damaged, the pedal action must be ensured on at least two wheel brakes.” By the way, the on-board electrical network must have a main “ground” switch with marking — a red lightning bolt on a blue triangle outlined with a white border with a side of 12 cm and with clearly marked positions “On,” “Off.” It should be located so that the driver can practically activate it in any position. It is most rational to install it on the main safety arch. A sound signal is mandatory.
The car is ready, run in, the first competitions have been held on it… And what? Put it in the garage until the next races? Nothing like that. Hang duplicate pedals on it — and you get a training car, simple in design and easy to operate. It can drive around the city on par with other cars. On such buggies, you can organize an auto rally, they are not afraid of climbs, descents, or fords. And if you install a machine gun mockup made by the kids for the “Zarnitsa” game, you get an excellent “reconnaissance vehicle” that can deliver packages with “valuable data,” transport “wounded” and much, much more. Well, and if you make a trailer for the car, the buggy will become an indispensable assistant on school plots.
V. YEGOROV
Recommend to read
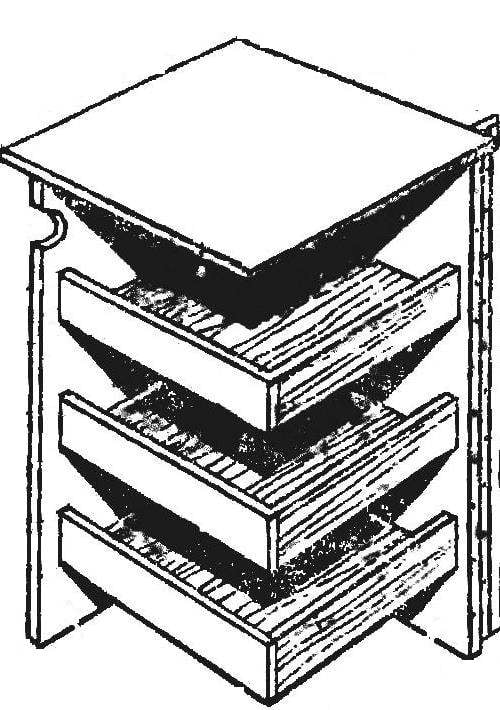 COMPACT AND CONVENIENT
A year ago, and the compilation of materials on furniture for the baby, was told about the table-the bedside table, which also hosts all the "dowry" baby. Taking up minimal space, this...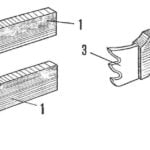 FROM OLD SAWS
Completely unexpected, very witty use of found G. Ortynski served drank Geller. As is known, they consist of two - and Treasury segments. Each segment, according to the innovator, can be...
