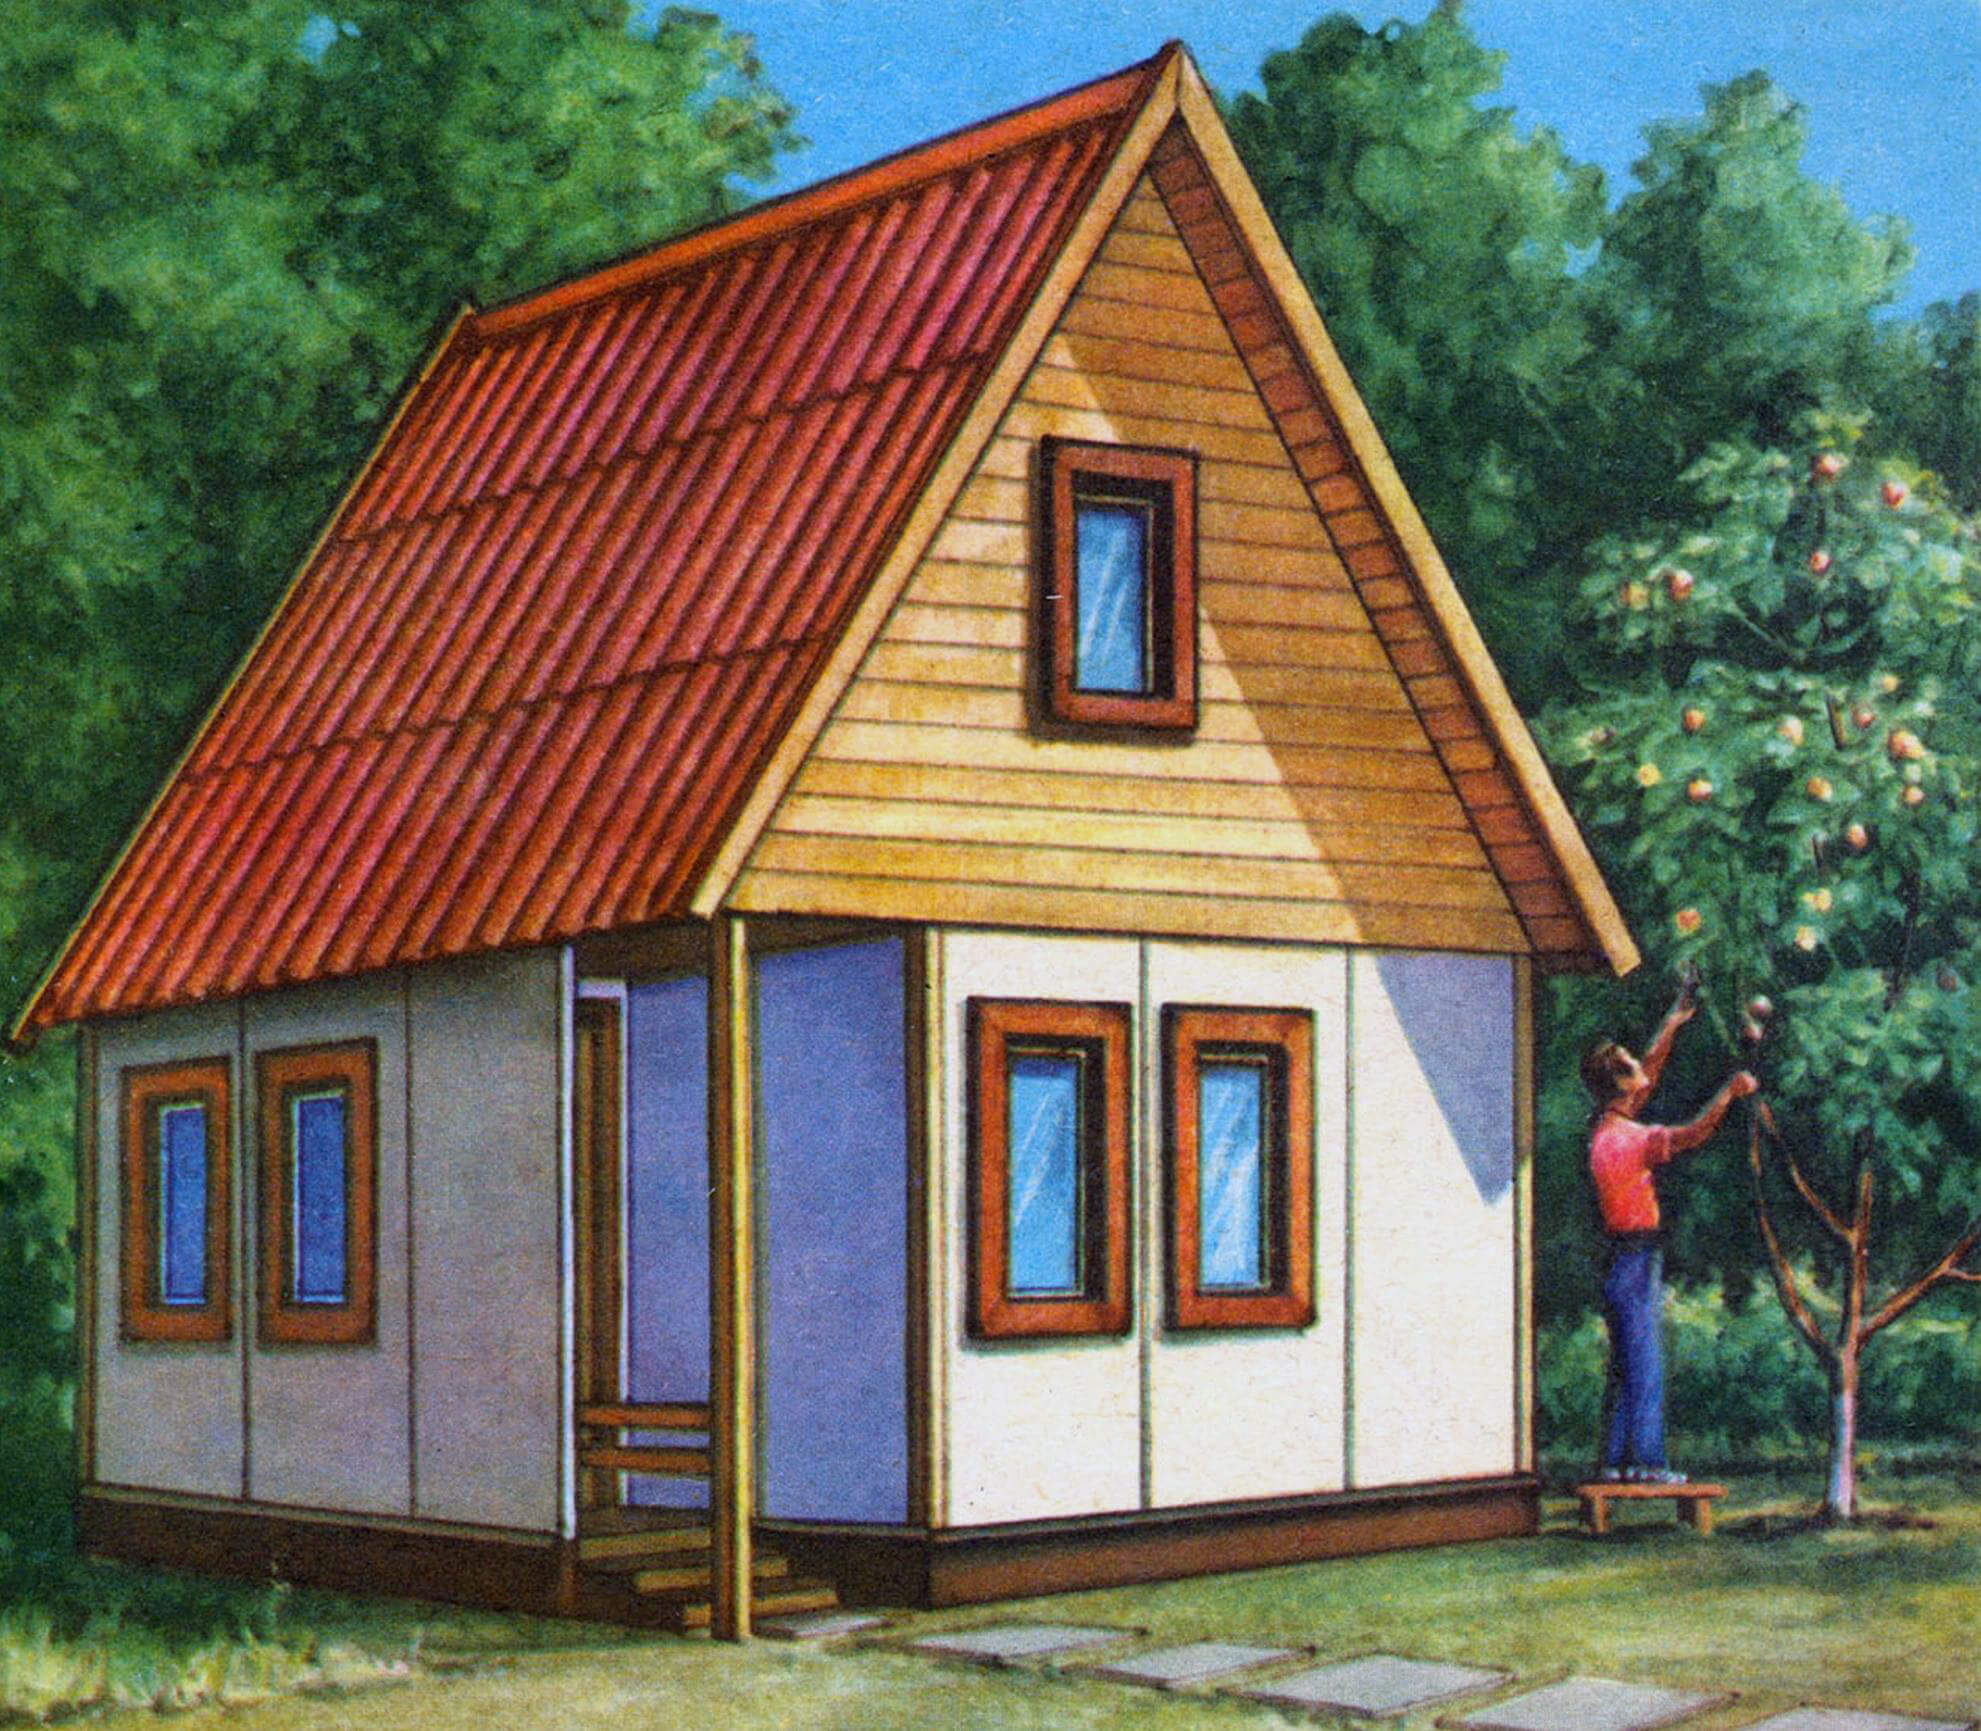
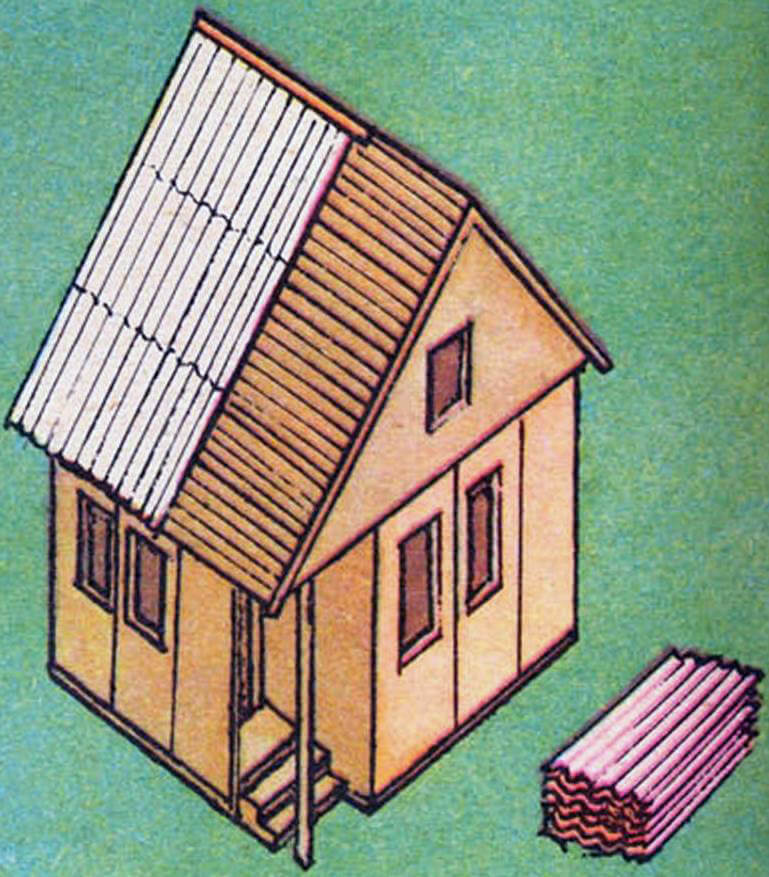
A small summer house that you can build on your own is the dream of many gardeners. In this article, we introduce readers to the development of the Novovyatsky wood panel plant – a project of a prefabricated panel house for a garden plot. Maximum functionality in a small size (the house has a room, a kitchen, an entrance hall with a staircase leading to the attic), laconic form, and ease of assembly make this design especially attractive. And the contrasting color scheme of the building will go perfectly with the green spaces of the site.
“Do you need a garden house? Please,” – such an advertising appeal can be seen on the stands of the specialized store “Your Home” in the city of Kirov. Indeed, on the site in front of the entrance to the sales area are displayed samples of garden houses, which can be purchased as a kit with subsequent assembly directly on the site. In addition, on the shelves there are a lot of building materials, various devices and devices needed on the farm. Unfortunately, such stores are not available everywhere. And gardeners often build housing from scrap materials, and according to their own, sometimes not the most successful, designs.
Today we introduce readers to one of the exhibits of this exhibition and sale: a project of a small panel garden house with a living room, kitchen, and attic, developed by the Novovyatsky wood panel plant for construction on a garden plot with your own hands.
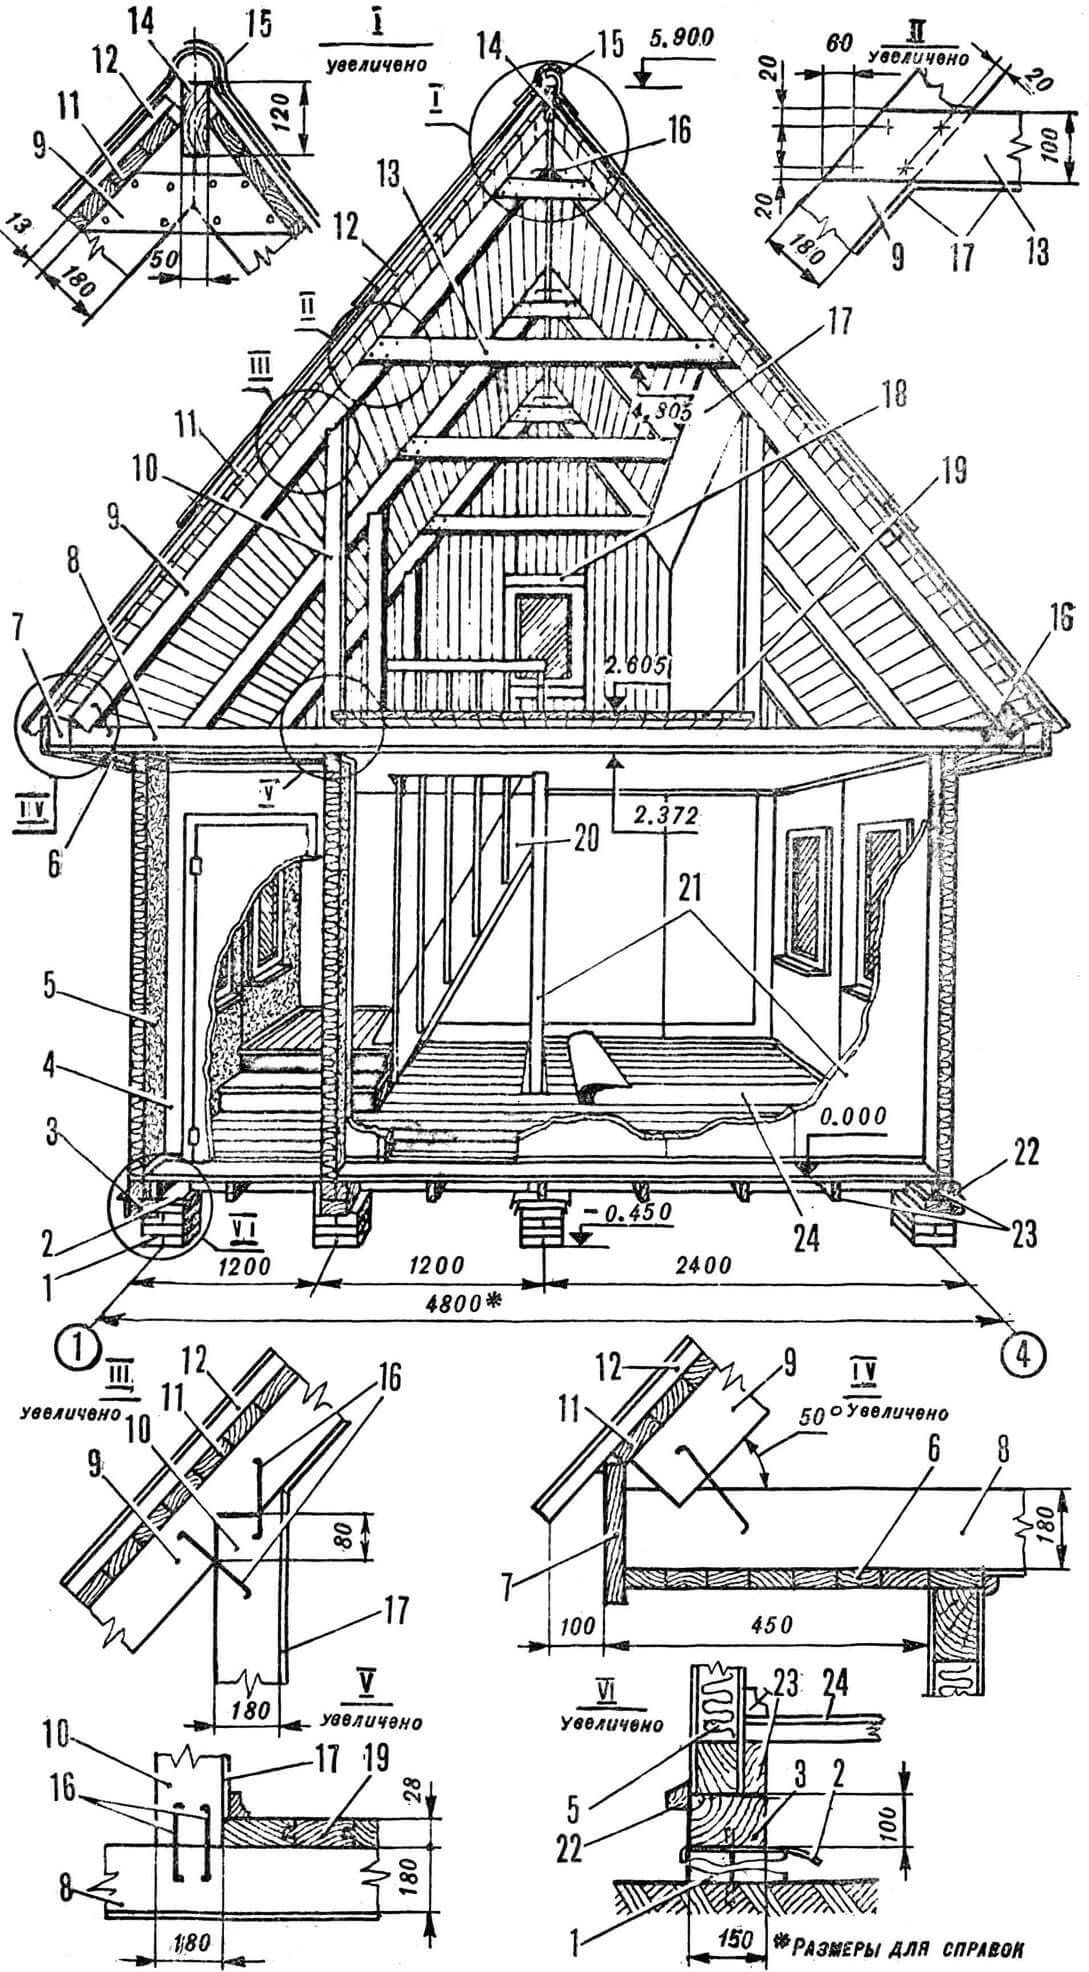
1 – foundation, 2 – waterproofing, 3 – frame beam, 4 – panel with door block (DG21-9), 5 – blank panel with insulation, 6 – sheathing boards, 7 – front board, 8 – lower rafter run, 9 – rafter leg, 10 – post, 11 – sheathing, 12 – corrugated asbestos-cement sheet, 13 – screed, 14 – ridge board, 15 – asbestos-cement ridge template, 16 – brackets, 17 – fiberboard cladding, 18 – gable window unit fastening elements , 19 – attic floor boards, 20 – stairs, 21 – partitions without insulation, 22 – drain beam, 23 – joists, 24 – floor covering (linoleum, hardboard, etc.).
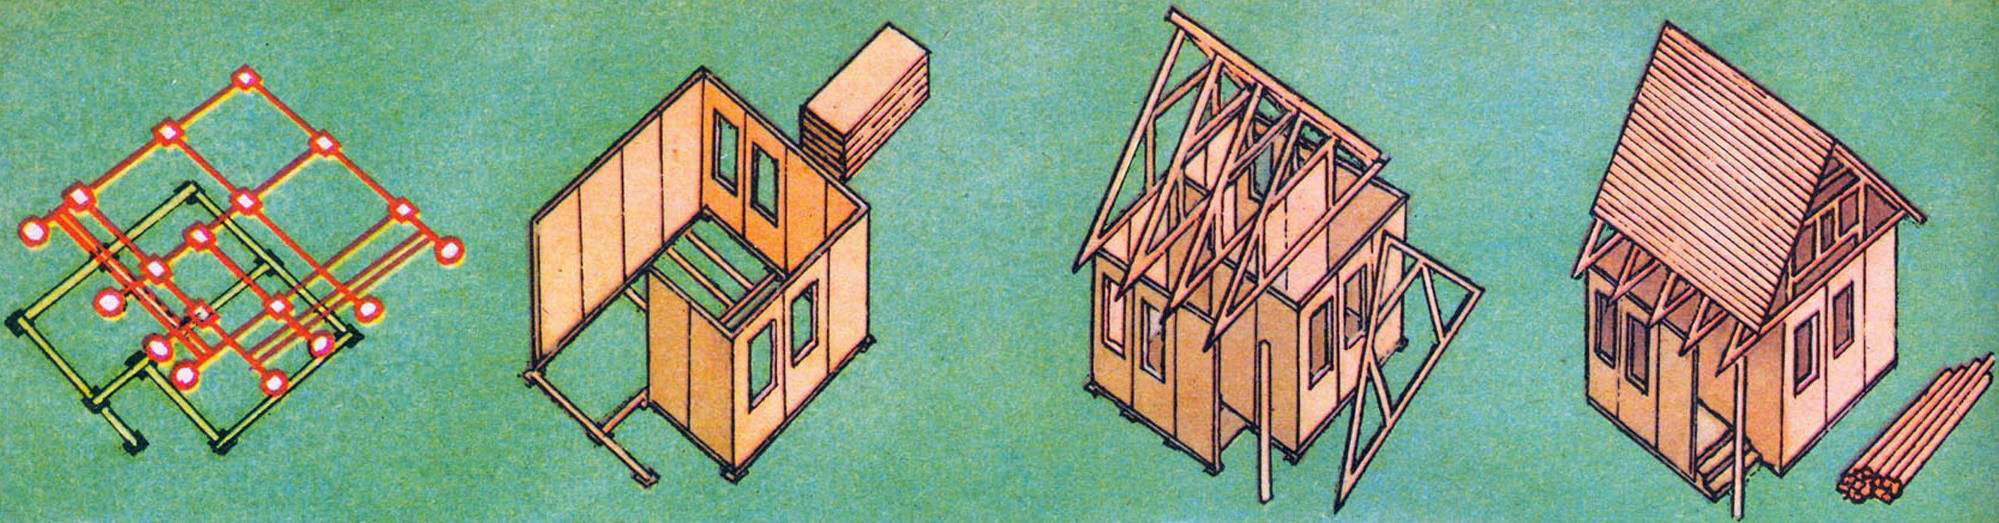
Every house begins to be built from the foundation. All its parameters and characteristics depend on the specific conditions of the site. Therefore, it is not advisable to recommend any specific type of foundation. This requires coordination with the district architect involved in site planning.
This option involves the use of a columnar foundation, on top of which a framing beam is laid, having previously placed waterproofing under it in two layers of roofing felt to protect the premises and the structure itself from the penetration of soil moisture. The strapping beam repeats the plan drawing. In the corners and places where beams join, connections are made in quarters and fastened with nails.
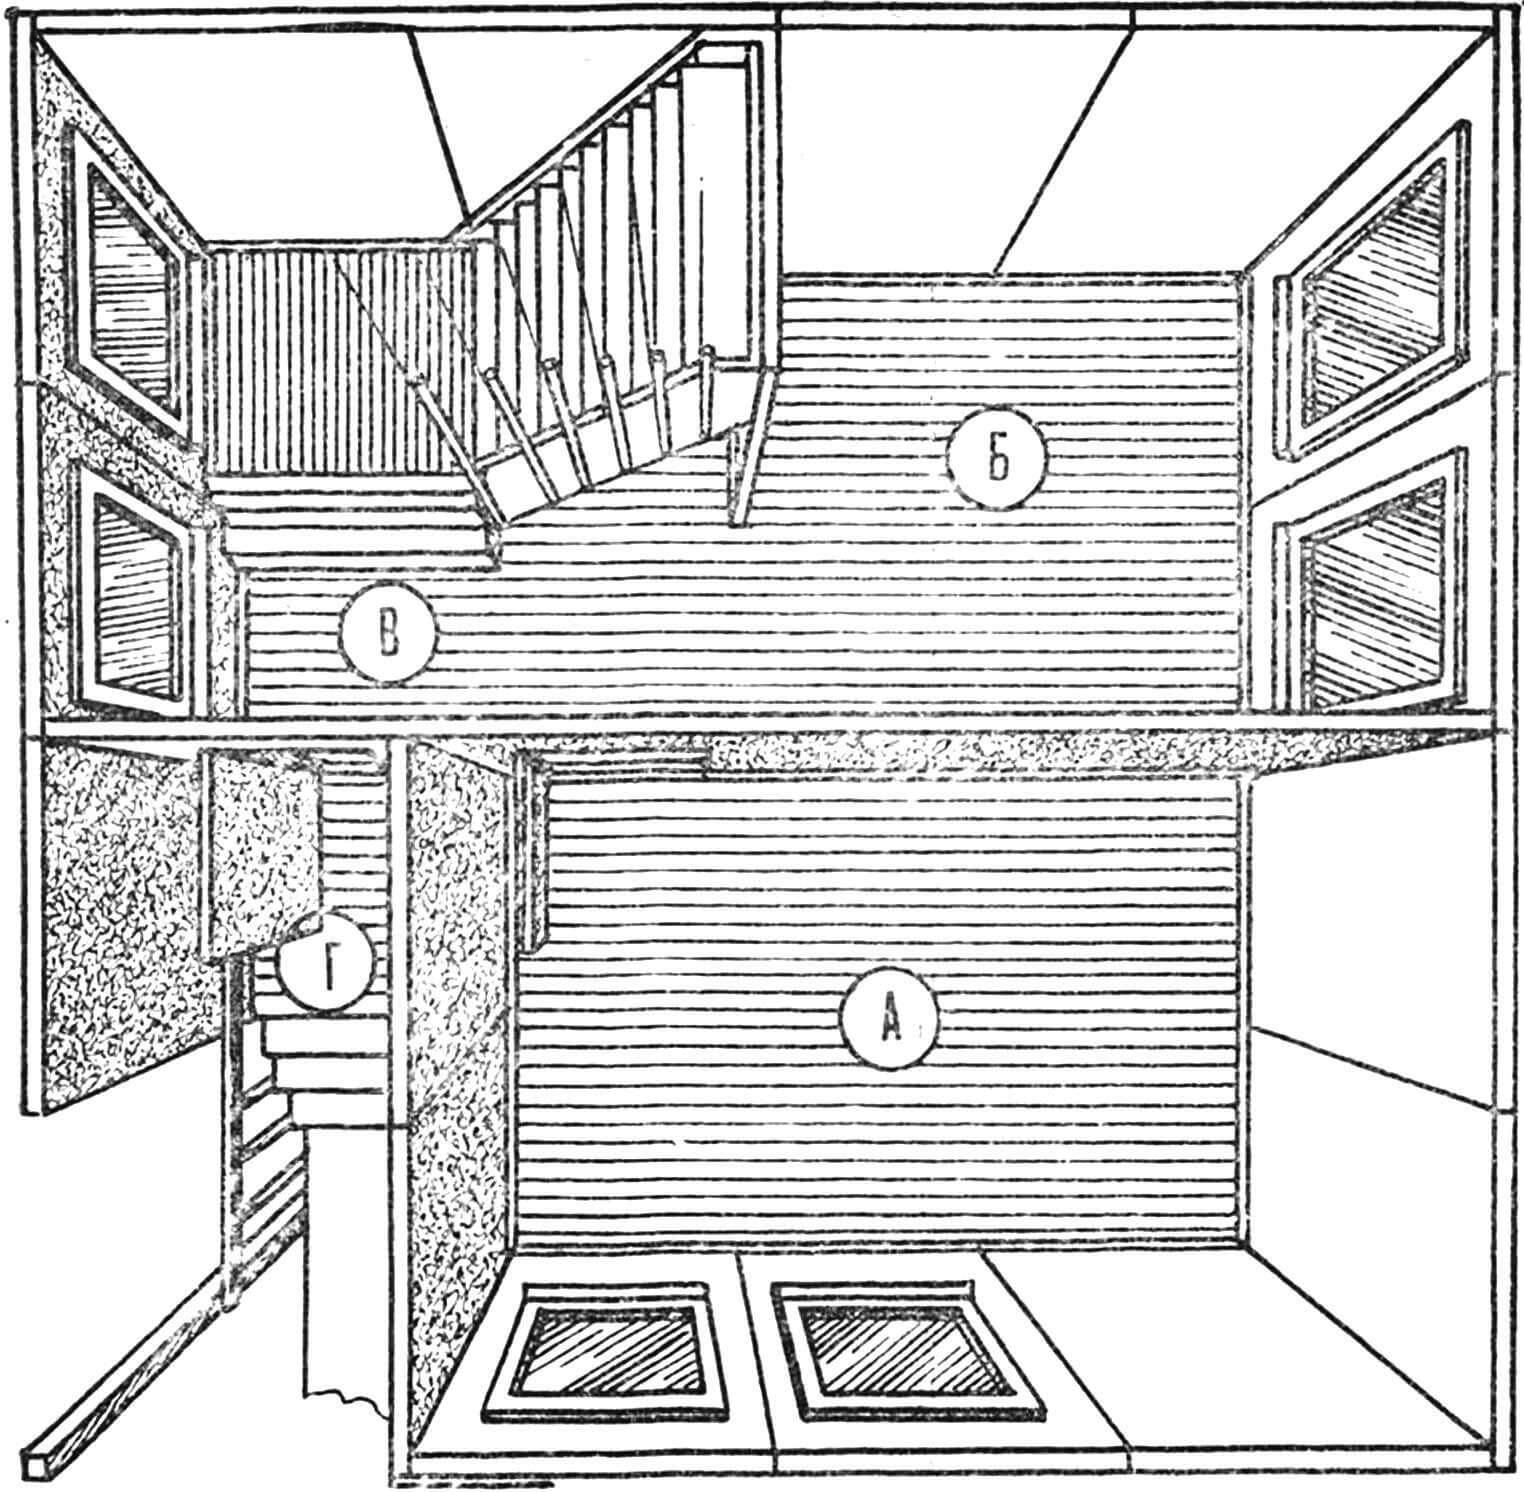
A – living room (8.6 m2 ); B – kitchen (5.8 m2 ): B – hallway with stairs to the attic (2.9+2.9 m2 ); G – porch with stairs.
Along the outer edge of the frame, shields are installed to form walls. To do this, you will need three types of panels: solid, with a standard window block OR12-09 and with a standard door block DG21-9. All panels are assembled from timber 100X100 mm, forming a frame 2500X1196 mm, which is sheathed with sheets of fiberboard (plywood, boards). External walls are filled with mineral wool insulation. Internal partitions can be hollow. The shields are attached to the strapping beam with nails (oblique face). The top of the wall is tied together with a 19X110 mm board, forming the top frame.
Upon completion of the installation of vertical structures, a floor is installed in the premises of the first floor. Logs (bars with a cross section of 50X100 mm) are laid out on the protrusions of the lower trim in the direction of the axes indicated by numbers, at a distance of 600 mm from each other. Floor boards with a cross section of 28X94 mm are laid on top of them. Then a platform 300 mm high is made in the hallway – it serves as a support for the stairs to the attic.
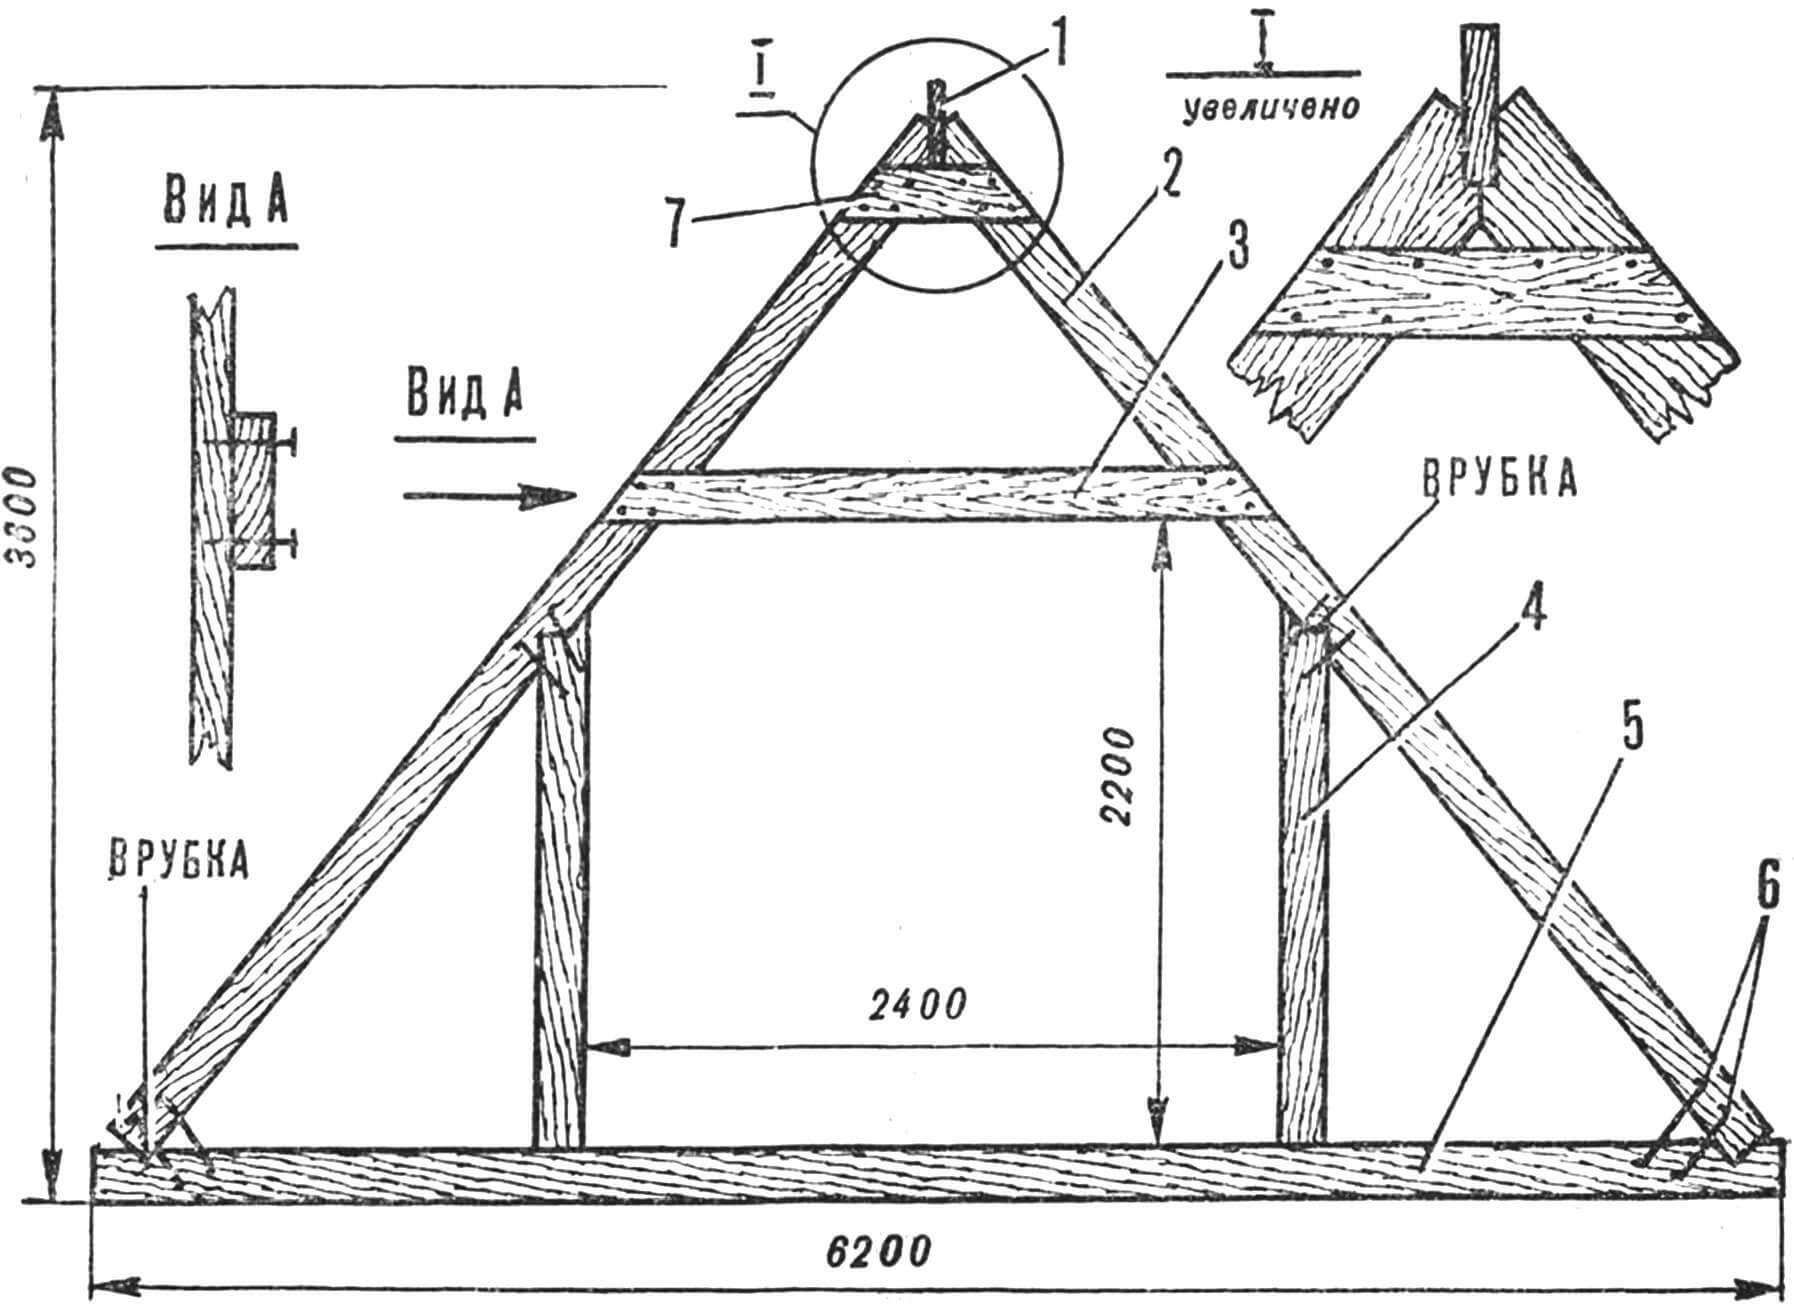
1 – ridge board (50X120 mm), 2 – rafter leg (50X180 mm), 3 – tie (50X100 mm), 4 – stand (50X180 mm), 5 – lower rafter run (50X180 mm), 6 – staples, 7 – overlay (50X10 mm).
Having completed the construction of the main volume of the house with residential and utility rooms, you can begin constructing the roof and equipping the attic. The rafters, which are a triangular frame, are assembled separately and, in finished form, mounted directly on the top trim board in increments of 600 mm in the direction of the axes indicated by letters. The outer frames are also gables, into which standard window units 0Р09-06 are mounted. The outer surface of the rafters is covered with decorative slats 13X94 mm. To support the pediment of the main facade, a post-beam with a cross section of 100X100 mm is installed, the lower end is embedded in a concrete base. At the upper nodes, the rafters are connected with a ridge board with a section of 50X120 mm. To impart rigidity to the structure, the outer pairs are fastened with wind bond boards located in the diagonal direction.
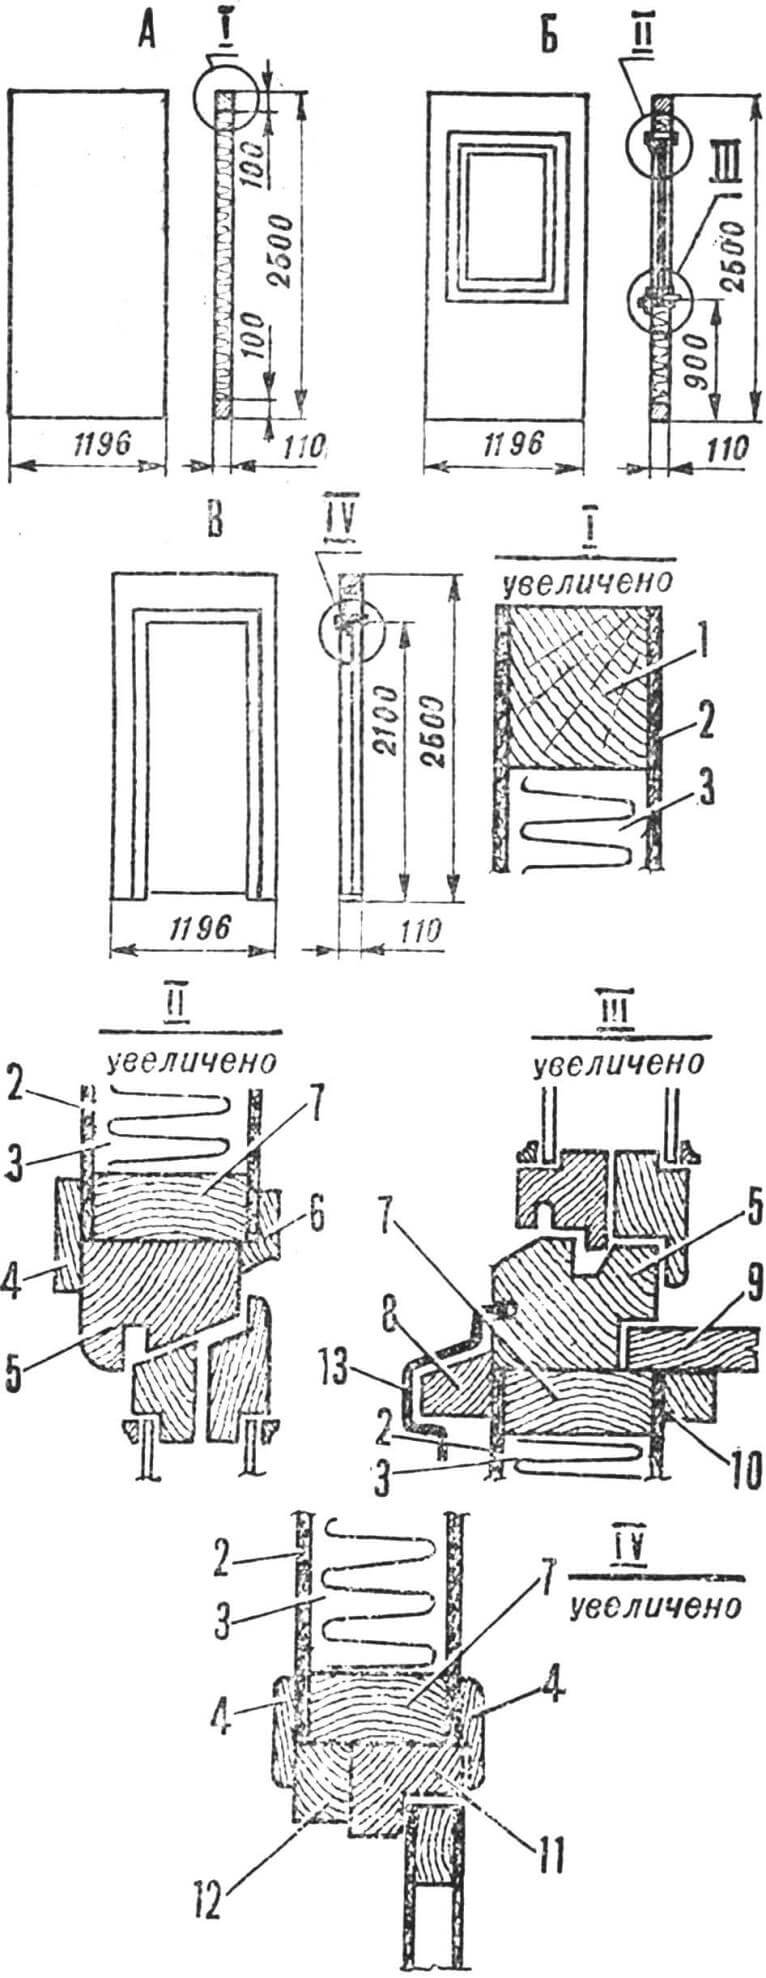
1 – timber (100X100 mm), 2 – fiberboard, 3 – insulation (mineral wool), 4 – platband-board (59X26 mm), 5 – standard window block OR12-09, 6 – platband-board (19X54 mm), 7 – timber for fastening the window block (100X50 mm), 8 – drain beam (44Х Х44 mm), 9 – window sill-board (144Х Х44 mm), 10 – timber for fastening the window sill (44X44 mm), 11 – standard door block DG21-9 , 12 – timber (45X36 mm), 13 – metal drain.
The roof surface is covered with continuous sheathing boards, onto which the roofing – corrugated asbestos-cement sheets – is then attached. The ridge is covered with special templates. Upon completion of the roof finishing, front boards with a cross section of 22X144 mm are nailed to the ends of the sheathing and lower rafter purlins. The overhangs of the rafters are covered with a decorative strip with a section of 13X94 mm.
For the attic floor, boards with a section of 28X94 mm are used. They are laid directly on the lower rafter purlins, leaving the staircase hatch uncovered. The walls and ceiling of the upper floor are covered with sheets of multi-layer plywood or chipboard. Fencing slats are nailed to the stringers (stringers) of the stairs, extending into the attic hatch to a height of 900 mm and decorated with railings.
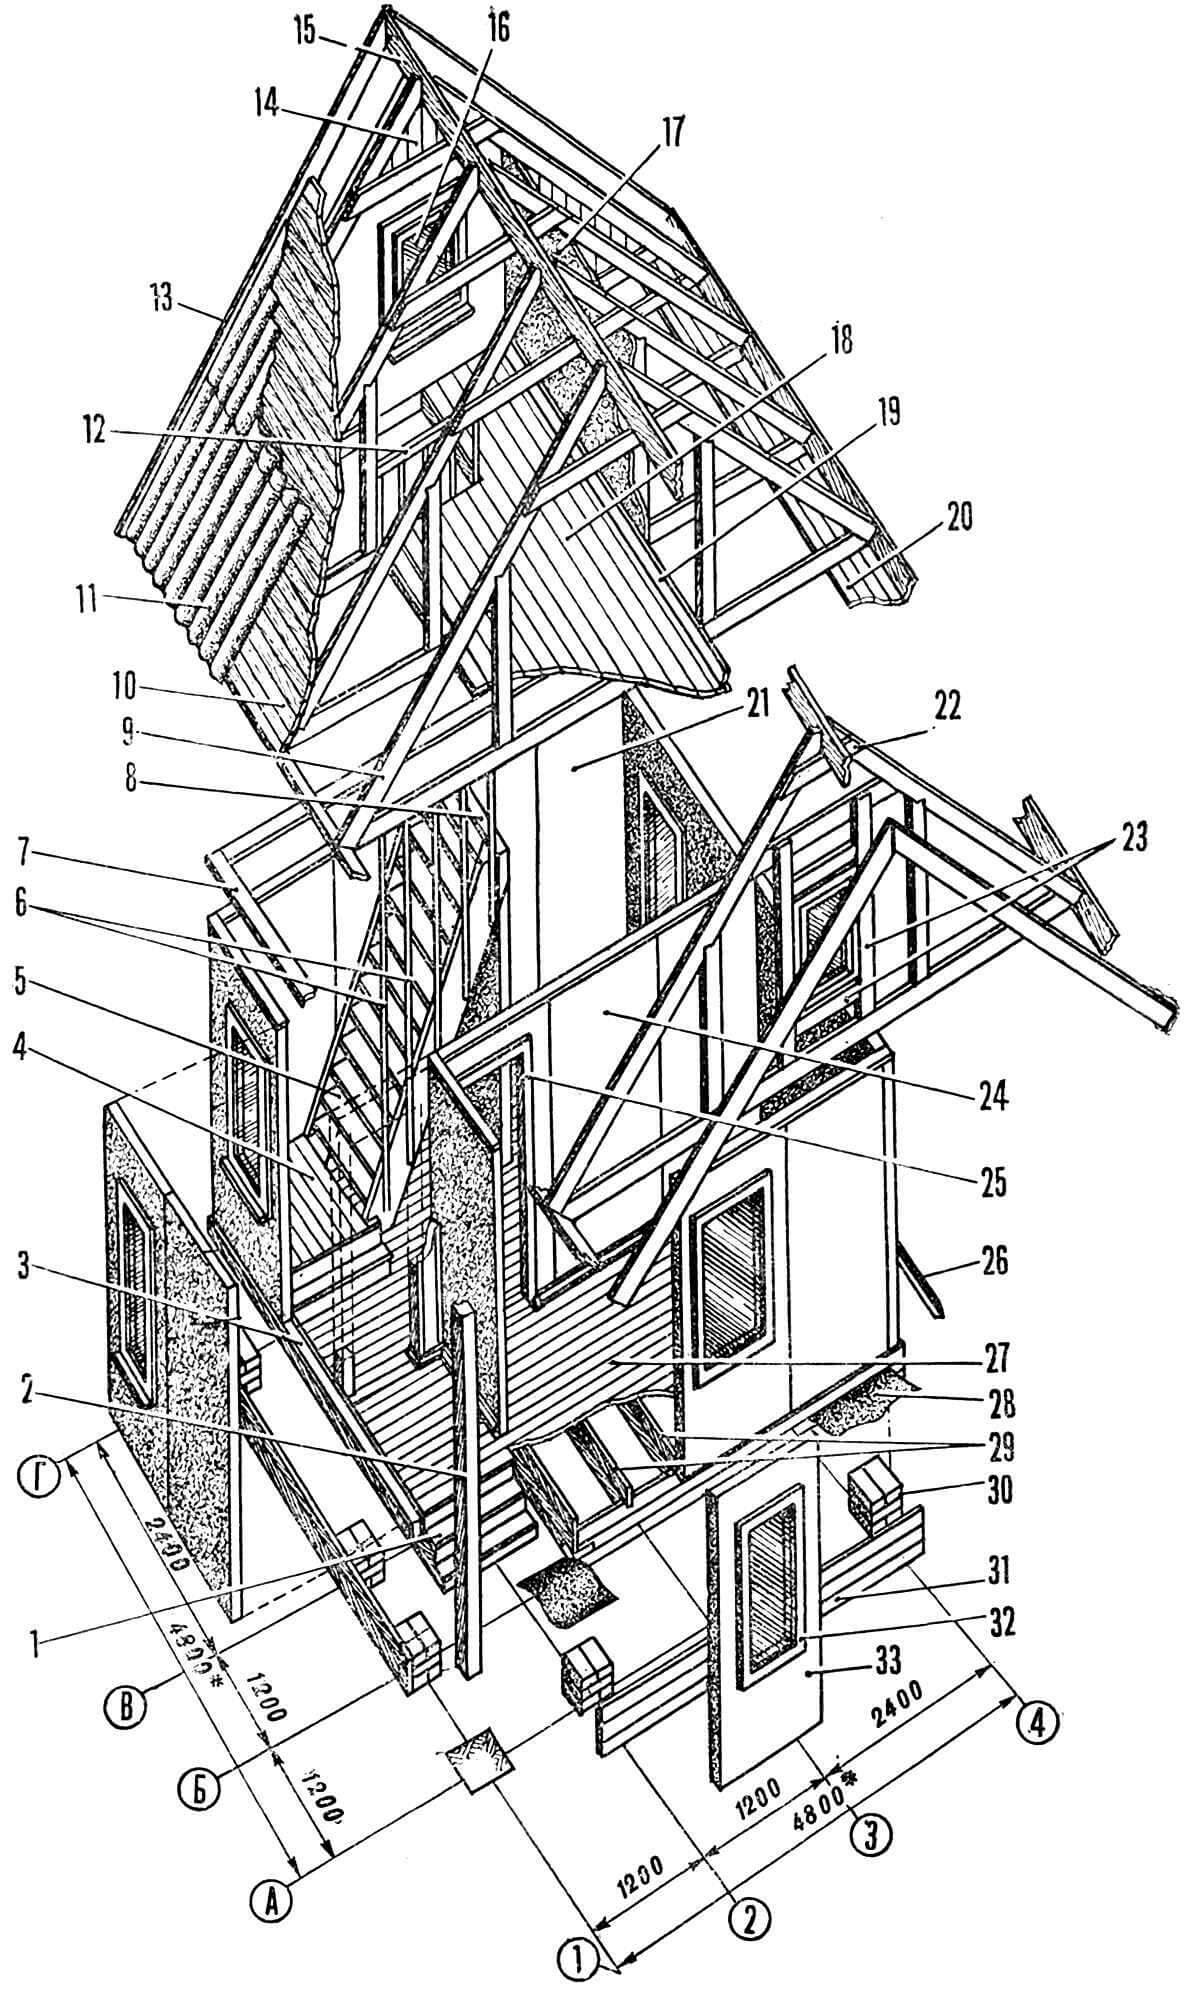
1 – roof, 2 – stand, 3 – frame beam, 4 – staircase landing, 5 – staircase to the attic, 6 – staircase railing, 7 – top rail, 8 – kitchen partition, 9 – rafter leg, 10 – sheathing, 11 – corrugated asbestos-cement sheet, 12 – attic hatch fencing, 13 – front board, 14 – pediment cladding strip, 15 – ridge board, 16 – pediment window block, 17 – multi-layer plywood (chipboard) cladding the attic walls, 18 – attic floor, 19 – plinth, 20 – sheathing of rafter overhangs, 21 – external blind panel, 22 – overlay, 23 – fastening elements for the pediment window block, 24 – internal partition, 25 – panel with door block, 26 – drain beam, 27 – floor boards. 28 – waterproofing, 29 – joists, 30 – Foundation, 31 – base cladding boards, 32 – window block, 33 – external panel with window block.
Then window and door blocks are inserted into the panels with openings; the joints are sealed with platbands. On the inside of the window openings, window sill boards with a cross section of 144X44 mm are installed, reinforced with beams 44X44 mm. A drain block covered with galvanized sheet is nailed to the beam of the bottom trim along the entire perimeter of the house. The joints of the boards are sealed with tow and covered with a lath with a cross section of 13X28 mm.
Having completed the construction of the house, you can begin finishing work. The ceiling in the premises is sheathed with sheets of fiberboard, plywood or hardboard. The surface of the “clean” floor is covered with linoleum, hardboard or other sheet material, then the baseboard is nailed. The part of the foundation protruding to the surface is covered with boards, from which a clay blind area is made to drain rain and melt water from the building.

Interiors are covered with enamels, water-based or oil paints. Doors can be covered with film or stained. For exterior painting, it is advisable to use waterproof paints: light colors for the walls, and dark colors for the pediment and details.
A. GRISCHENKO, our specialist. corr.
Recommend to read
 THE AIRCRAFT, F-3
In our city of Kingisepp were gliding club ROSTO, which I have since 1996 worked as a flight instructor. Of aircraft in the club were two light aircraft, four airframe. But they were not... THE MICRO CO2
Model airplanes still did not pay attention to a very promising engine, liquefied gas C02. But the simplicity of manufacture and operation make it much more affordable than compression and...
