For a thrifty, handy owner, everything is always at hand. There may even be a homemade mini tractor, not to mention mowers-threshers and other motor and electric helpers. And this is quite understandable: with such equipment you really will not be at a loss anywhere.
A worthy place here is occupied, helping to keep the household in proper condition, by hand tools and simple (but very effective in practice) devices. The magazine has already told its readers about some of them. Mostly these were original designs and technical solutions “for the garden and vegetable plot” (“Modelist-Konstruktor” No. 6’91, 9’93, 5’95).
The publication below is about homemade designs whose field of application is focused on the homestead. They are made from so-called available materials, using “home” technology that is accessible and understandable to any beginner. With a minimum of cost, you can achieve a maximum result.
HAND-CRANKED GRAIN CRUSHER…
Why not give it a try, after all? Especially if the amount of raw material (and therefore the product at the output) is not so large that it has to be counted in hundredweights and tons.
At the same time, the grain crusher itself can be simplified so much that it will differ little from the classic “grandfather’s” one. Yet no expensive motors or scarce gearboxes are required. And it takes, as they say, almost no time to make it.
So, the first option is proposed. With millstones made from… logs. For the parts that actually crush the grain or groats, it is better to use blanks from hardwood — it does not contain resin. The diameter of the logs is at least 250 mm, the height is about 250 mm. The contacting surfaces of the future millstones should be made toothed. Small pieces of cast iron or steel hammered into the wooden base—the log—can serve as teeth.
The upper millstone has a through hole in the center in the form of a funnel. Grain is poured into it.
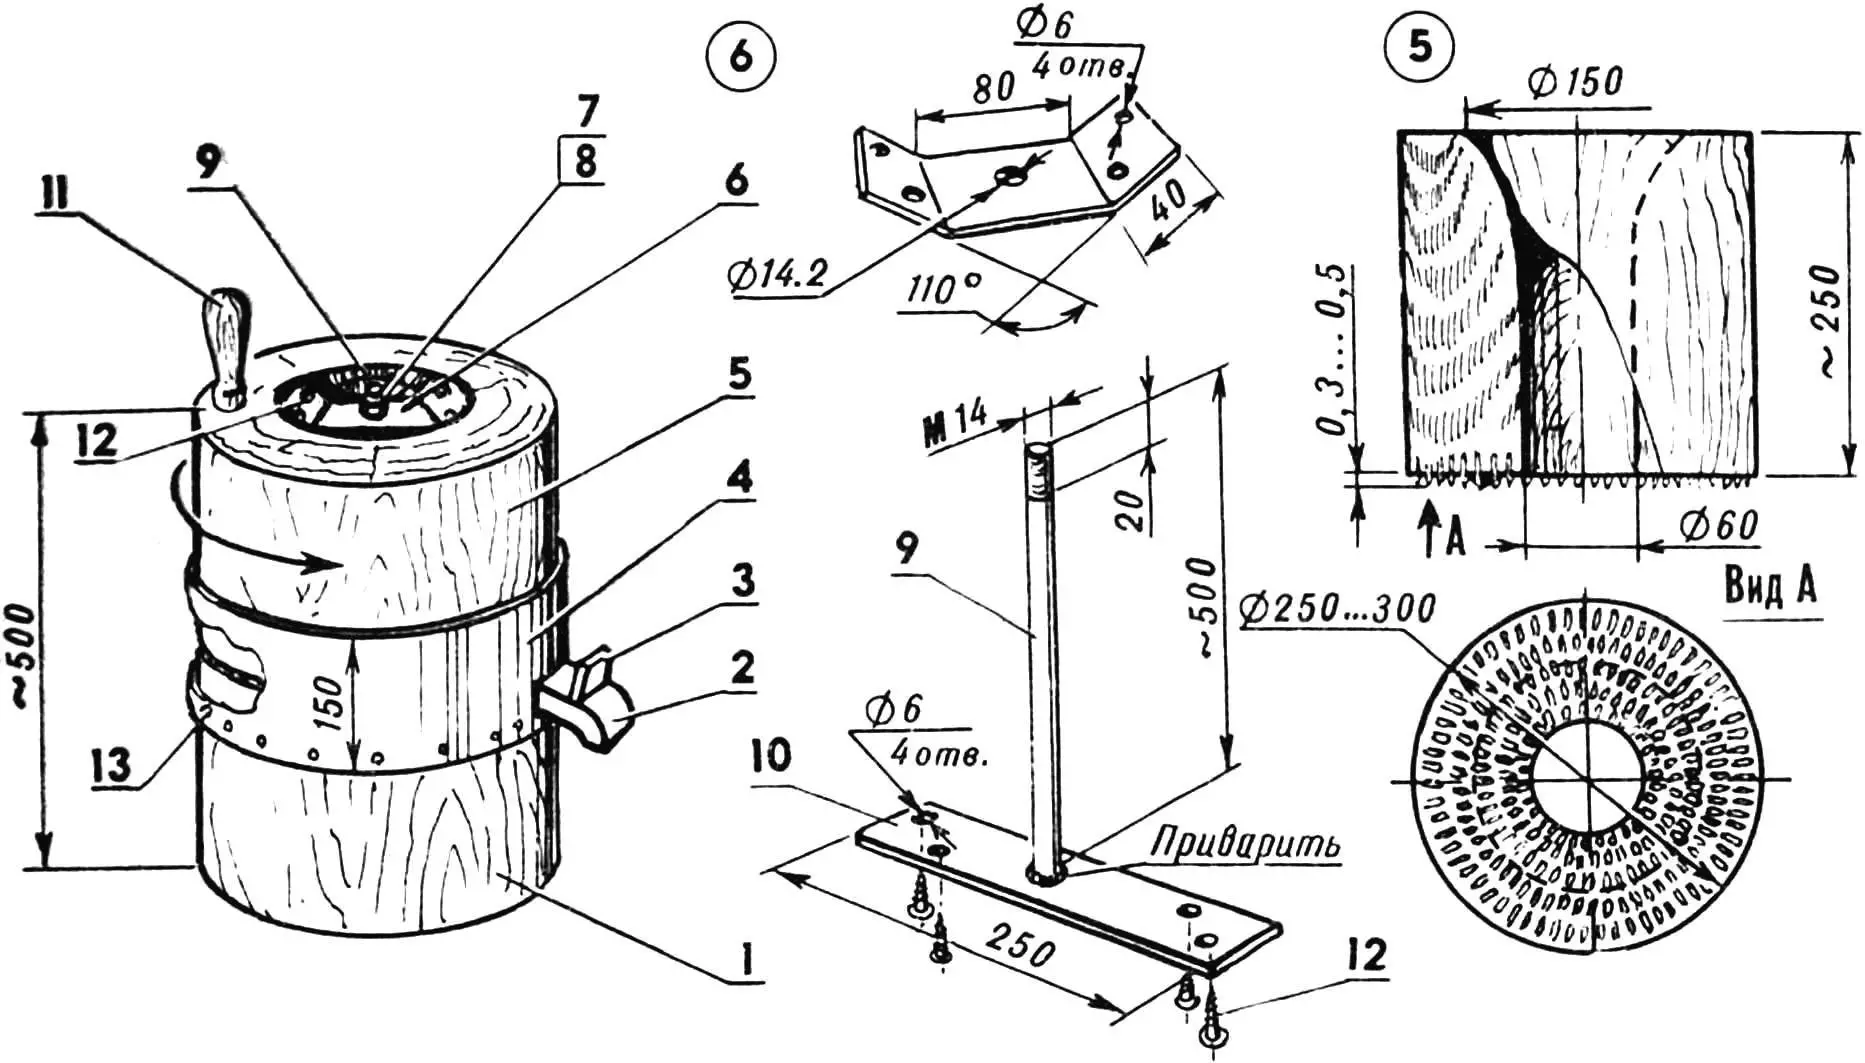
1 — lower millstone, 2 — discharge chute (tinplate, s0.5), 3 — magnet (from a furniture latch), 4 — connecting ring (tinplate, s1.5…2), 5 — upper millstone, 6 — upper bracket (St3, strip 40×4), 7 — nut M14, 8 — washer (brass), 9 — shaft (St3, bar Ø14), 10 — lower bracket (St3, strip 40×4), 11 — wooden handle, 12 — screw 4×40 (8 pcs.), 13 — nail 4×60 (16 pcs.).
The upper part of the lower millstone-log is wrapped with a strip of tinplate 150–200 mm wide. A hole for the crushed grain is also provided, into which a sloping tin discharge chute with a magnet fixed in it is inserted. The latter retains fine particles formed by abrasion of the cast-iron (steel) teeth, which protrude above the working surface of the millstones by no more than 0.5 mm (otherwise the crushing will be too coarse).
The upper millstone can rotate freely by means of the handle, without shifting from the center. This is achieved with the help of a special bracket in the grain loading funnel. It, in turn, has a hole that matches the diameter of the rod fixed in the lower millstone-log with another, lower bracket.
The operating procedure on this grain crusher is simple. Holding the wooden handle, you rotate the millstone with one hand and add grain gradually with the other. A container for the crushed product is placed under the chute. The resulting product is then passed through a sieve.
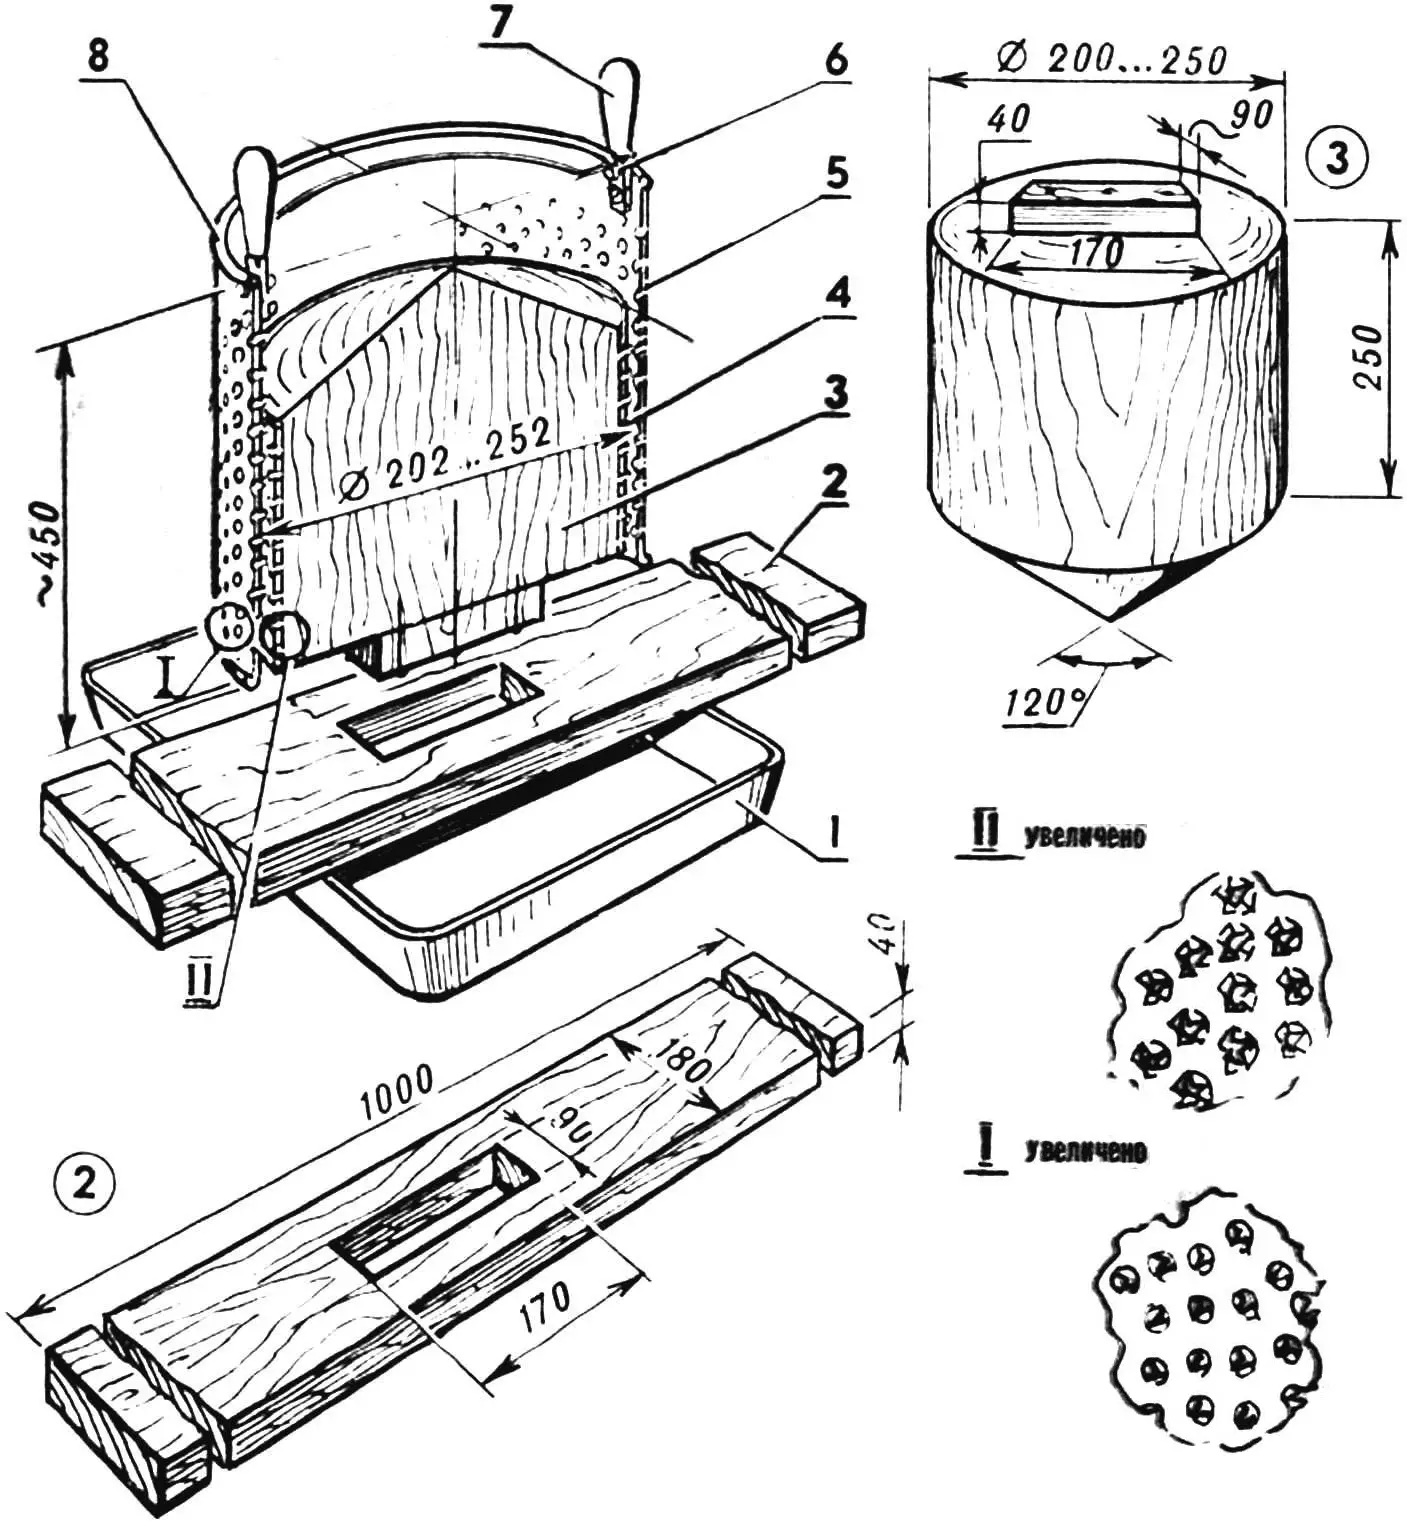
1 — tray, 2 — base board, 3 — log piece, 4 — inner grater, 5 — outer grater, 6 — bolt M5 with nut (4 pcs.), 7 — handle (2 pcs.), 8 — stiffening ring.
The second design of the grain crusher also does not require any special skills or craftsmanship to make. You simply take a piece of white tinplate (for example from large food cans) and form two cylinders so that the diameter of one is 2–3 mm smaller than the other.
Then, using a nail and a hammer, you turn the surface of both tin cylinders into a kind of grater so that on the outer cylinder the sharp edges of the holes face inward, and on the inner one they face outward. The smaller grater is fixed on a cleaned log piece with a diameter of 200–250 mm. The inner cylinder is closed with a conical lid. In its lower part a rectangular wooden block 40 mm thick is tightly fitted. It is then installed on the base board with a matching hole that will subsequently ensure that the inner cylinder remains stationary.
The outer grater has special handles for rotating around the inner one.
The base board is installed above the tray between two supports (stools, chairs, etc.) and fixed. After that, the grain is poured in and the grain crusher is rotated by the handles both clockwise and in the opposite direction.
MULTI-DAY POULTRY FEEDER
Anyone who keeps poultry knows that it must be fed regularly and adequately. However, there can be less routine work if you make a multi-day feeder. Despite all its structural simplicity, this homemade device makes it possible to keep more than two dozen chickens on a garden plot, leaving them in winter for up to two weeks without daily feeding. The bunker capacity is about three buckets of feed!
The materials for making the feeder are crate boards, galvanized iron, tinplate or, even better, sheet aluminum 1.5–2 mm thick.
The feeder has a body fastened to a tray. It is suspended on chains, wire or a strong rope (50–70 mm above the floor). Let it swing! This promotes the flow of loose feed through the gaps between the body and the tray and at the same time prevents the compound feed from caking.
The dimensions shown in the drawing should not be changed. And to feed a large number of birds, it is better to make two or three such feeders. If there are only a few “diners”, it is recommended to fill the bunker completely.
1 — tray, 2 — body, 3 — hanger, 4 — lid, 5 — handle.
Access to the feeder is provided from all sides. The tray depth is designed for adult birds. For quails or bantam chickens, the height of the rim is reduced to 80 mm, but no more; otherwise the feed will simply be scattered from the tray. The distance from the floor to the feeder can be reduced to 30 mm.
A rubber hose with a longitudinal cut is used to edge the tray rim. To make the body more rigid, wooden versions are reinforced with stiffeners (bars of 25×25 mm cross-section), while metal ones use duralumin angle pieces. Those who have sheet-metal working skills can join the seams with a fold.
Painting the feeder, especially inside, is undesirable. It is better to paint only the outer surfaces of the body and the bottom of the tray.
BAKED FEED FOR PIGLETS
In old times it was considered almost sinful to feed livestock with bread; they were given a crust only occasionally as a treat. In recent years (due to the shortage of compound feeds) bread began to be fed to chickens and pigs in villages. Now bread is expensive, and compound feed still remains in short supply. What can be done?
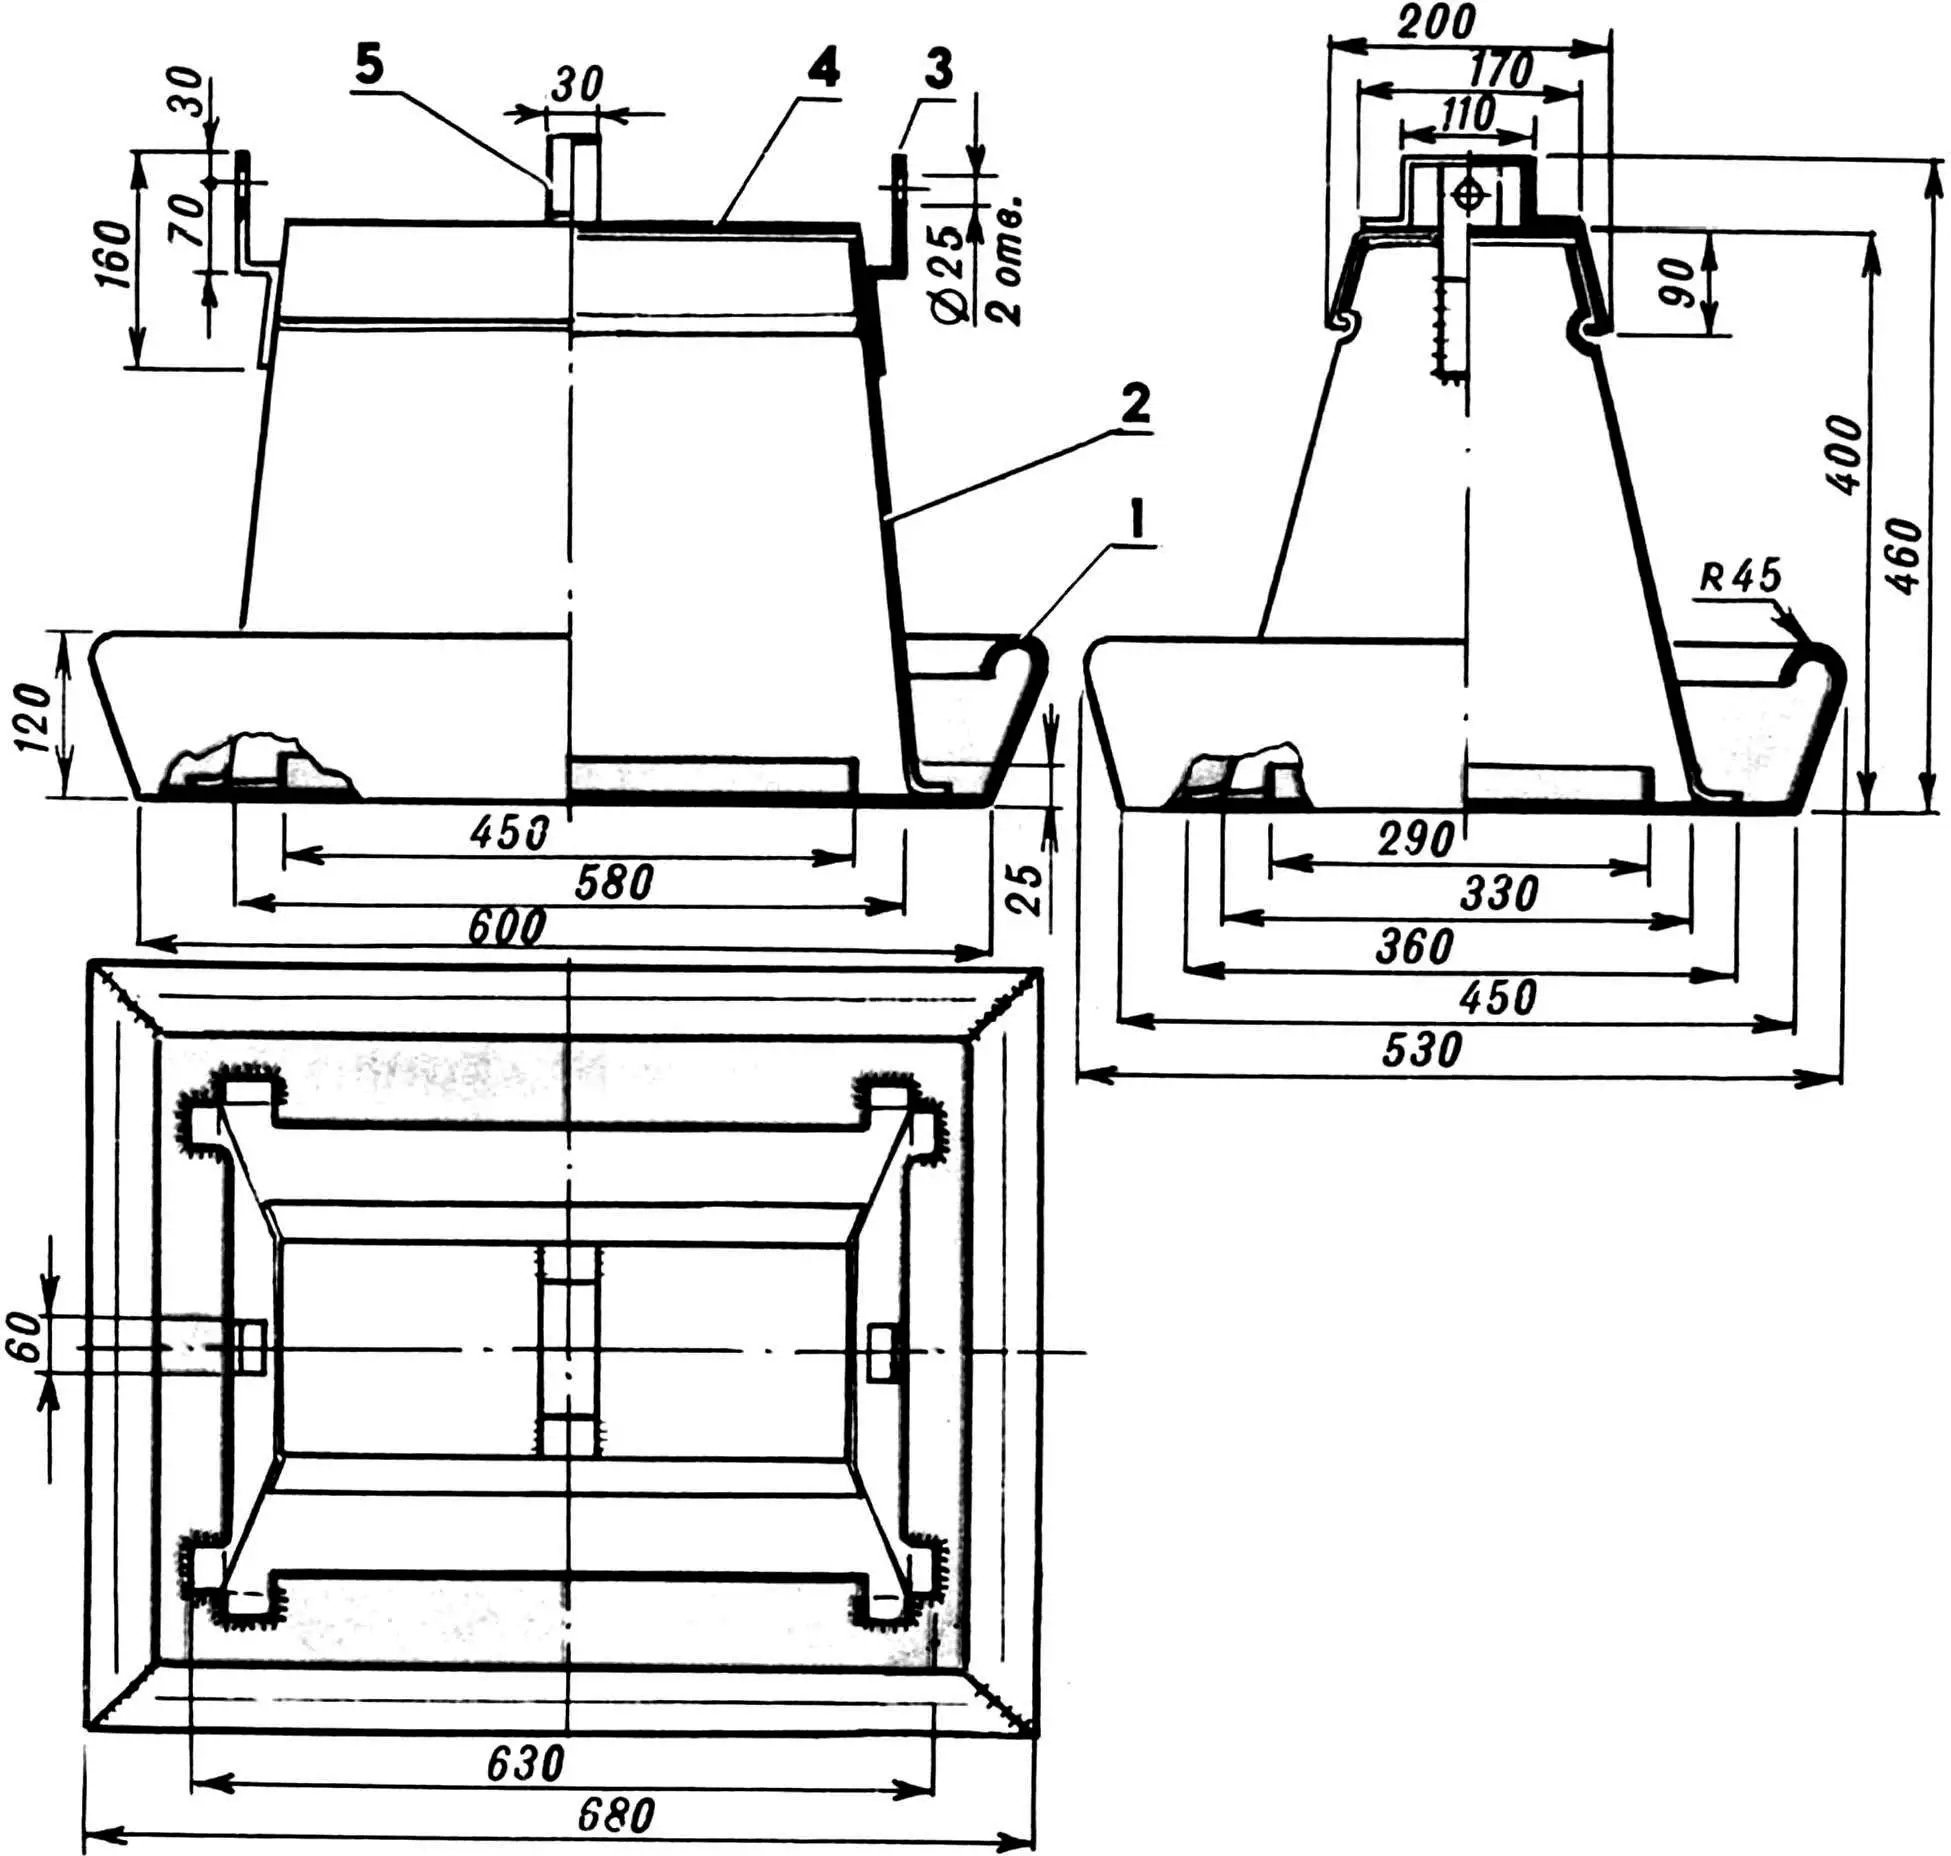
The proposed design makes it possible to prepare feed for livestock that is no less nutritious and high in calories than bread. The unit is a tilting, box-type tub made of dielectric material (wood, lignofolium, 20‑mm textolite, etc.). On the inner surface of its walls, plate electrodes (from sheet aluminum or stainless steel 2 mm thick) are fixed and connected to a power cable. When current is supplied, evaporation and baking of the feed mixture occur between the electrodes, which in fact cover the entire inner surface of each wall.
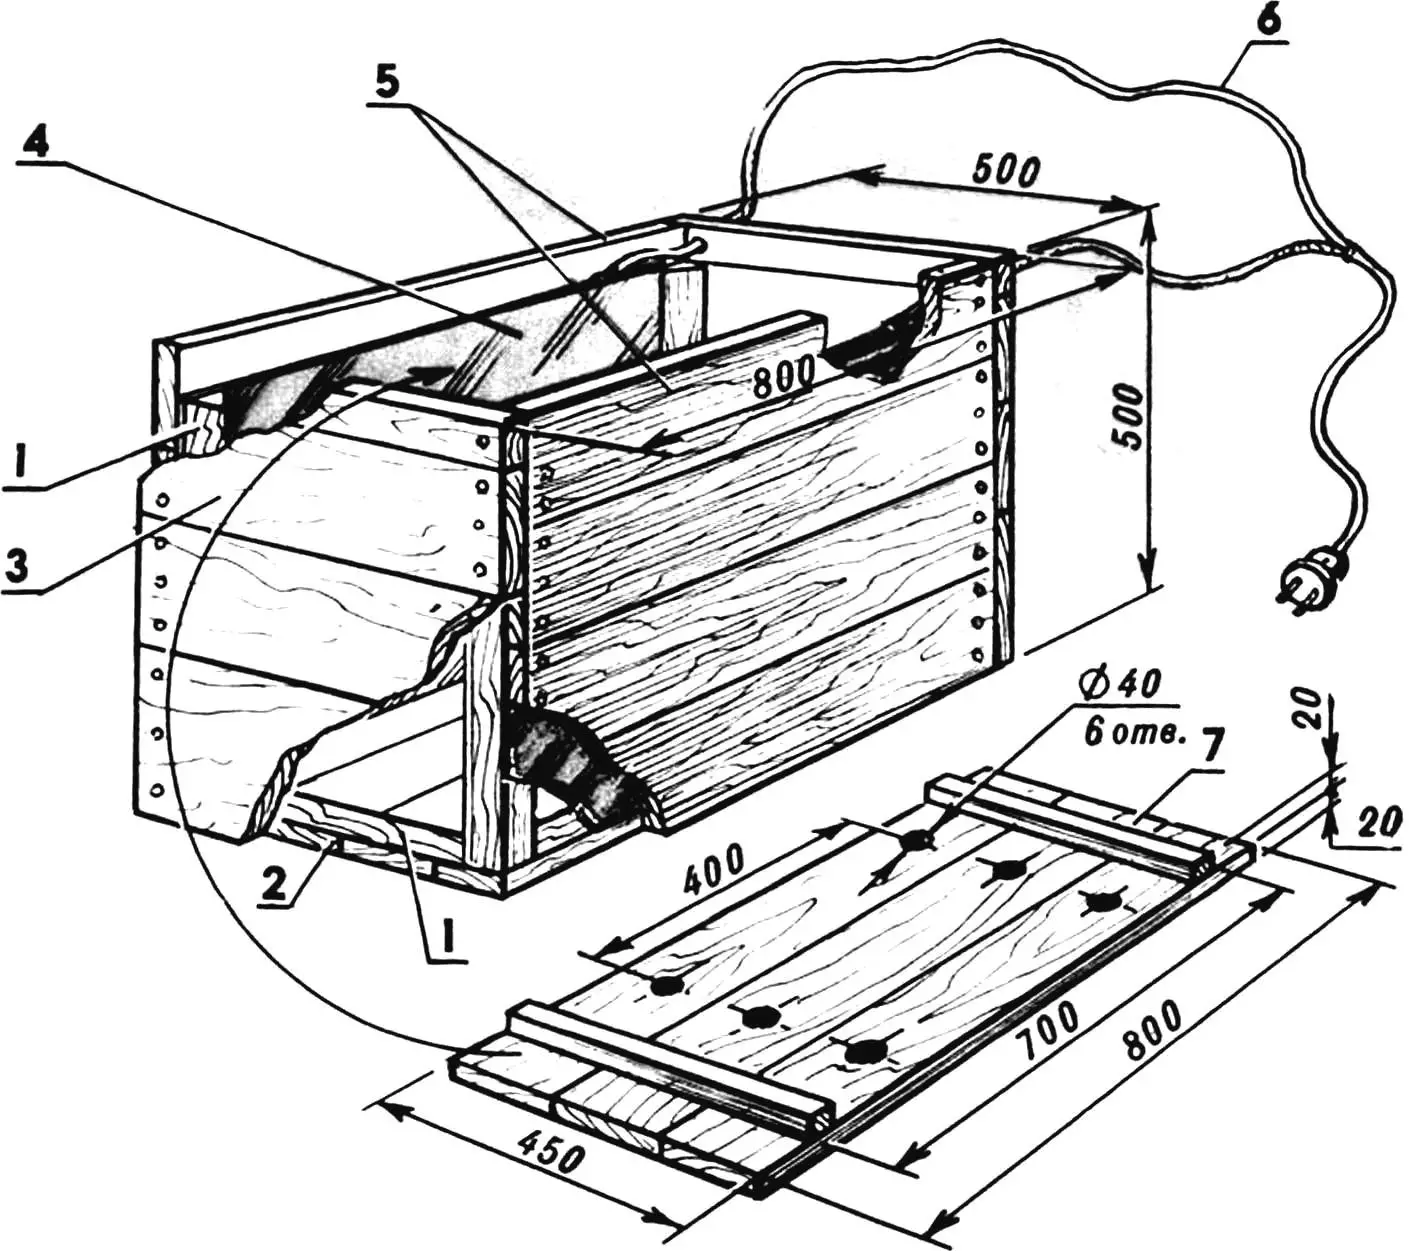
1 — ribs (wooden angle), 2 — bottom, 3 — end wall, 4 — electrode, 5 — front and rear walls, 6 — cable with plug on the end, 7 — removable lid.
Almost anything can serve as raw material for such a unit: a mixture of food scraps, potato peels, pieces of beet with the addition of dry compound feed. Bran can be mixed with a little flour spoiled during storage, as well as salt, vegetable waste, chopped grass and water.
The resulting mass should resemble thick porridge or dough. This mixture is placed into the tub and the current is switched on. The contents begin to heat intensively with significant steam release, so the tub must be covered with a dielectric lid with small holes for steam to escape.
The evaporation process lasts 15–20 minutes. During this time, the mass turns into a baked casserole.
After switching off the power, the tub is tilted and cleaned out. The feed for chickens, piglets and other livestock is ready. Very little time is spent, and the benefit is great: pigs readily eat this “baked good” even when it is cold. Such a “feed cake” does not spoil for 2–3 days.
Yu. Polyakov, Moscow region
BEE “OPERATING TABLE”
Among the troubles that threaten an apiary, varroatosis is far from the least serious. This invasive disease is caused by a mite that, at all stages of its development, parasitizes on the bodies of worker bees, queens and drones, as well as on the brood.
To combat insidious varroatosis, both physical methods (for example, heating the bees in a thermal chamber for 15 minutes to t = 46–48 °C) and chemical agents are currently used (for instance, Apistan strips placed in the hive for 10–20 days). In rural backwaters, the latter are often replaced by the “old-fashioned” treatment of frames with oxalic acid: it is cheap and quite effective. And to make the procedure more convenient, I recommend using a special device — a kind of operating table for deacarization of bee colonies. It is designed for the simultaneous treatment of two comb frames fixed with four movable brackets on a rotating stand-platform.
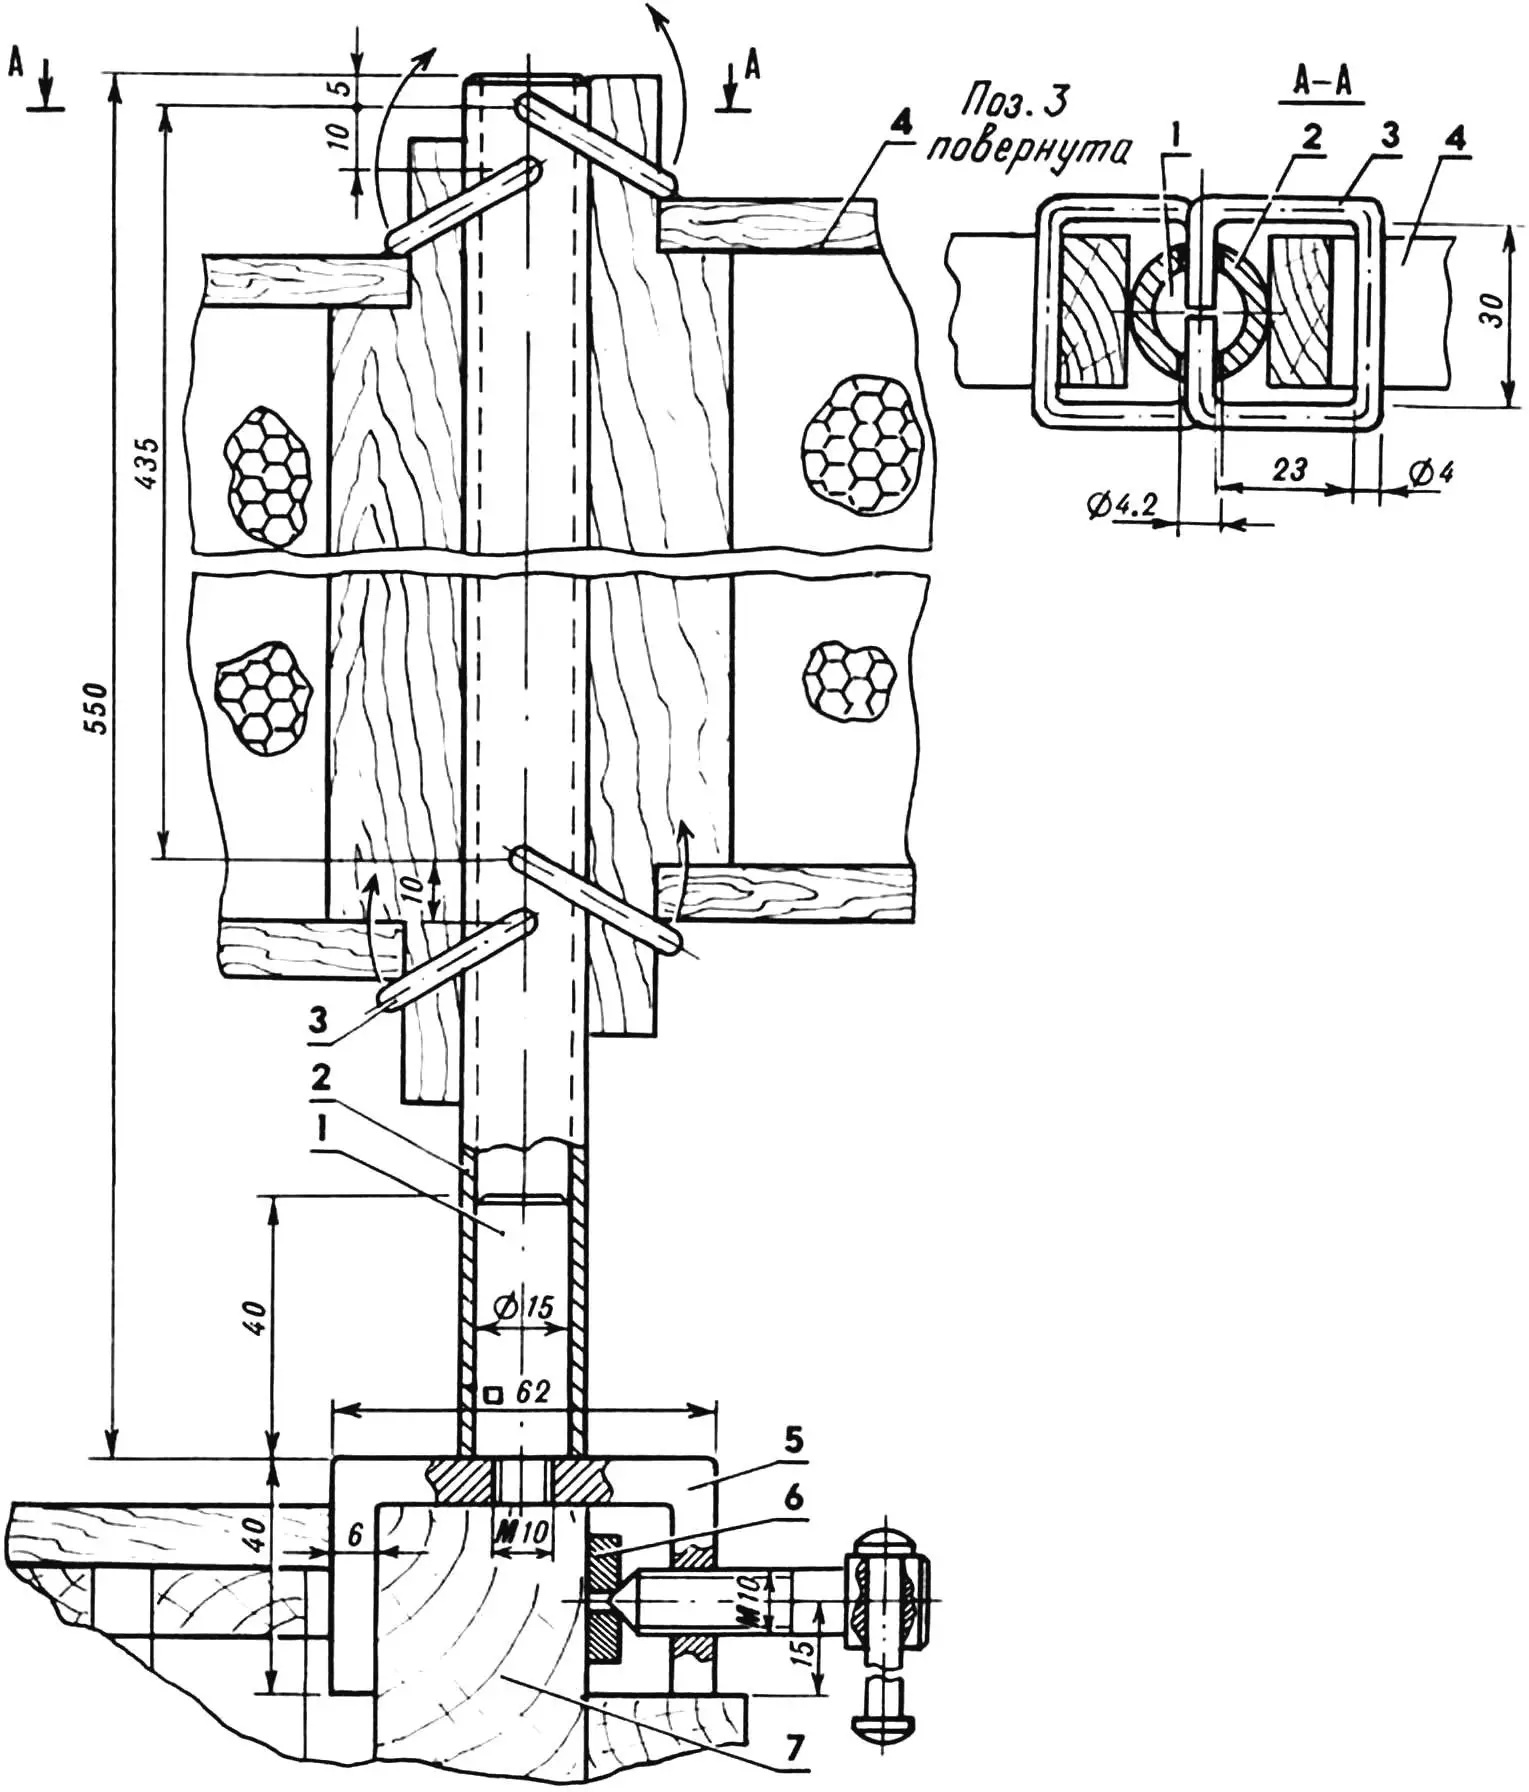
1 — axle (St5), 2 — stand-platform (steel tube 20×2.5), 3 — bracket (steel wire Ø4, 4 pcs.), 4 — comb frame (2 pcs.), 5 — clamp, 6 — pressure washer, 7 — hive wall.
The device is simple to manufacture and operate, and has small overall dimensions and weight. It is attached directly to the hive wall with a clamp located at the base of the structure. By setting the rotating stand-platform with the fixed frames at various angles to the spray nozzle, deacarization is carried out. This takes very little time, and the effect is excellent. Make an “operating table” for your own bees and see for yourself how effective it is in treating varroatosis.
“Modelist-Konstruktor” No. 6’97, A. Tsapenko, Kyrgyzstan
Recommend to read
 CLASS “A-3” the mass is, the skill will be!
This is one of the most heavy and high-speed models. It belongs to the class "A-3" according to the Rules NAVIGA. The model consists of the following main components: hull, floats, motor... JOYSTICK WITH KEYBOARD?
The simpler the keyboard, the greater the number key (buttons) to press alternately or simultaneously to enter a particular character. For example, to write in a personal computer (PC)...
