
Do you want to build a sailboat? Then you’ll probably be interested in a dinghy of simplified construction, designed for home manufacturing technology. Of course, while maintaining good hydrodynamic hull lines and, accordingly, good sailing qualities.
A boat with waterproof fabric sheathing will seem very attractive to many. However, soft sheathing for a dinghy is unlikely to be suitable — the maneuverability of a sailboat is limited, and any splinter can cause an accident. Moreover, the loads on the sailboat’s hull are more significant, which leads to a heavier frame — after all, soft sheathing practically does not increase its rigidity. Despite this, there is a rational beginning in covering the frame with fabric, which can be fully developed by making, following the example of a collapsible kayak, a rigid non-collapsible hull with membrane sheathing.
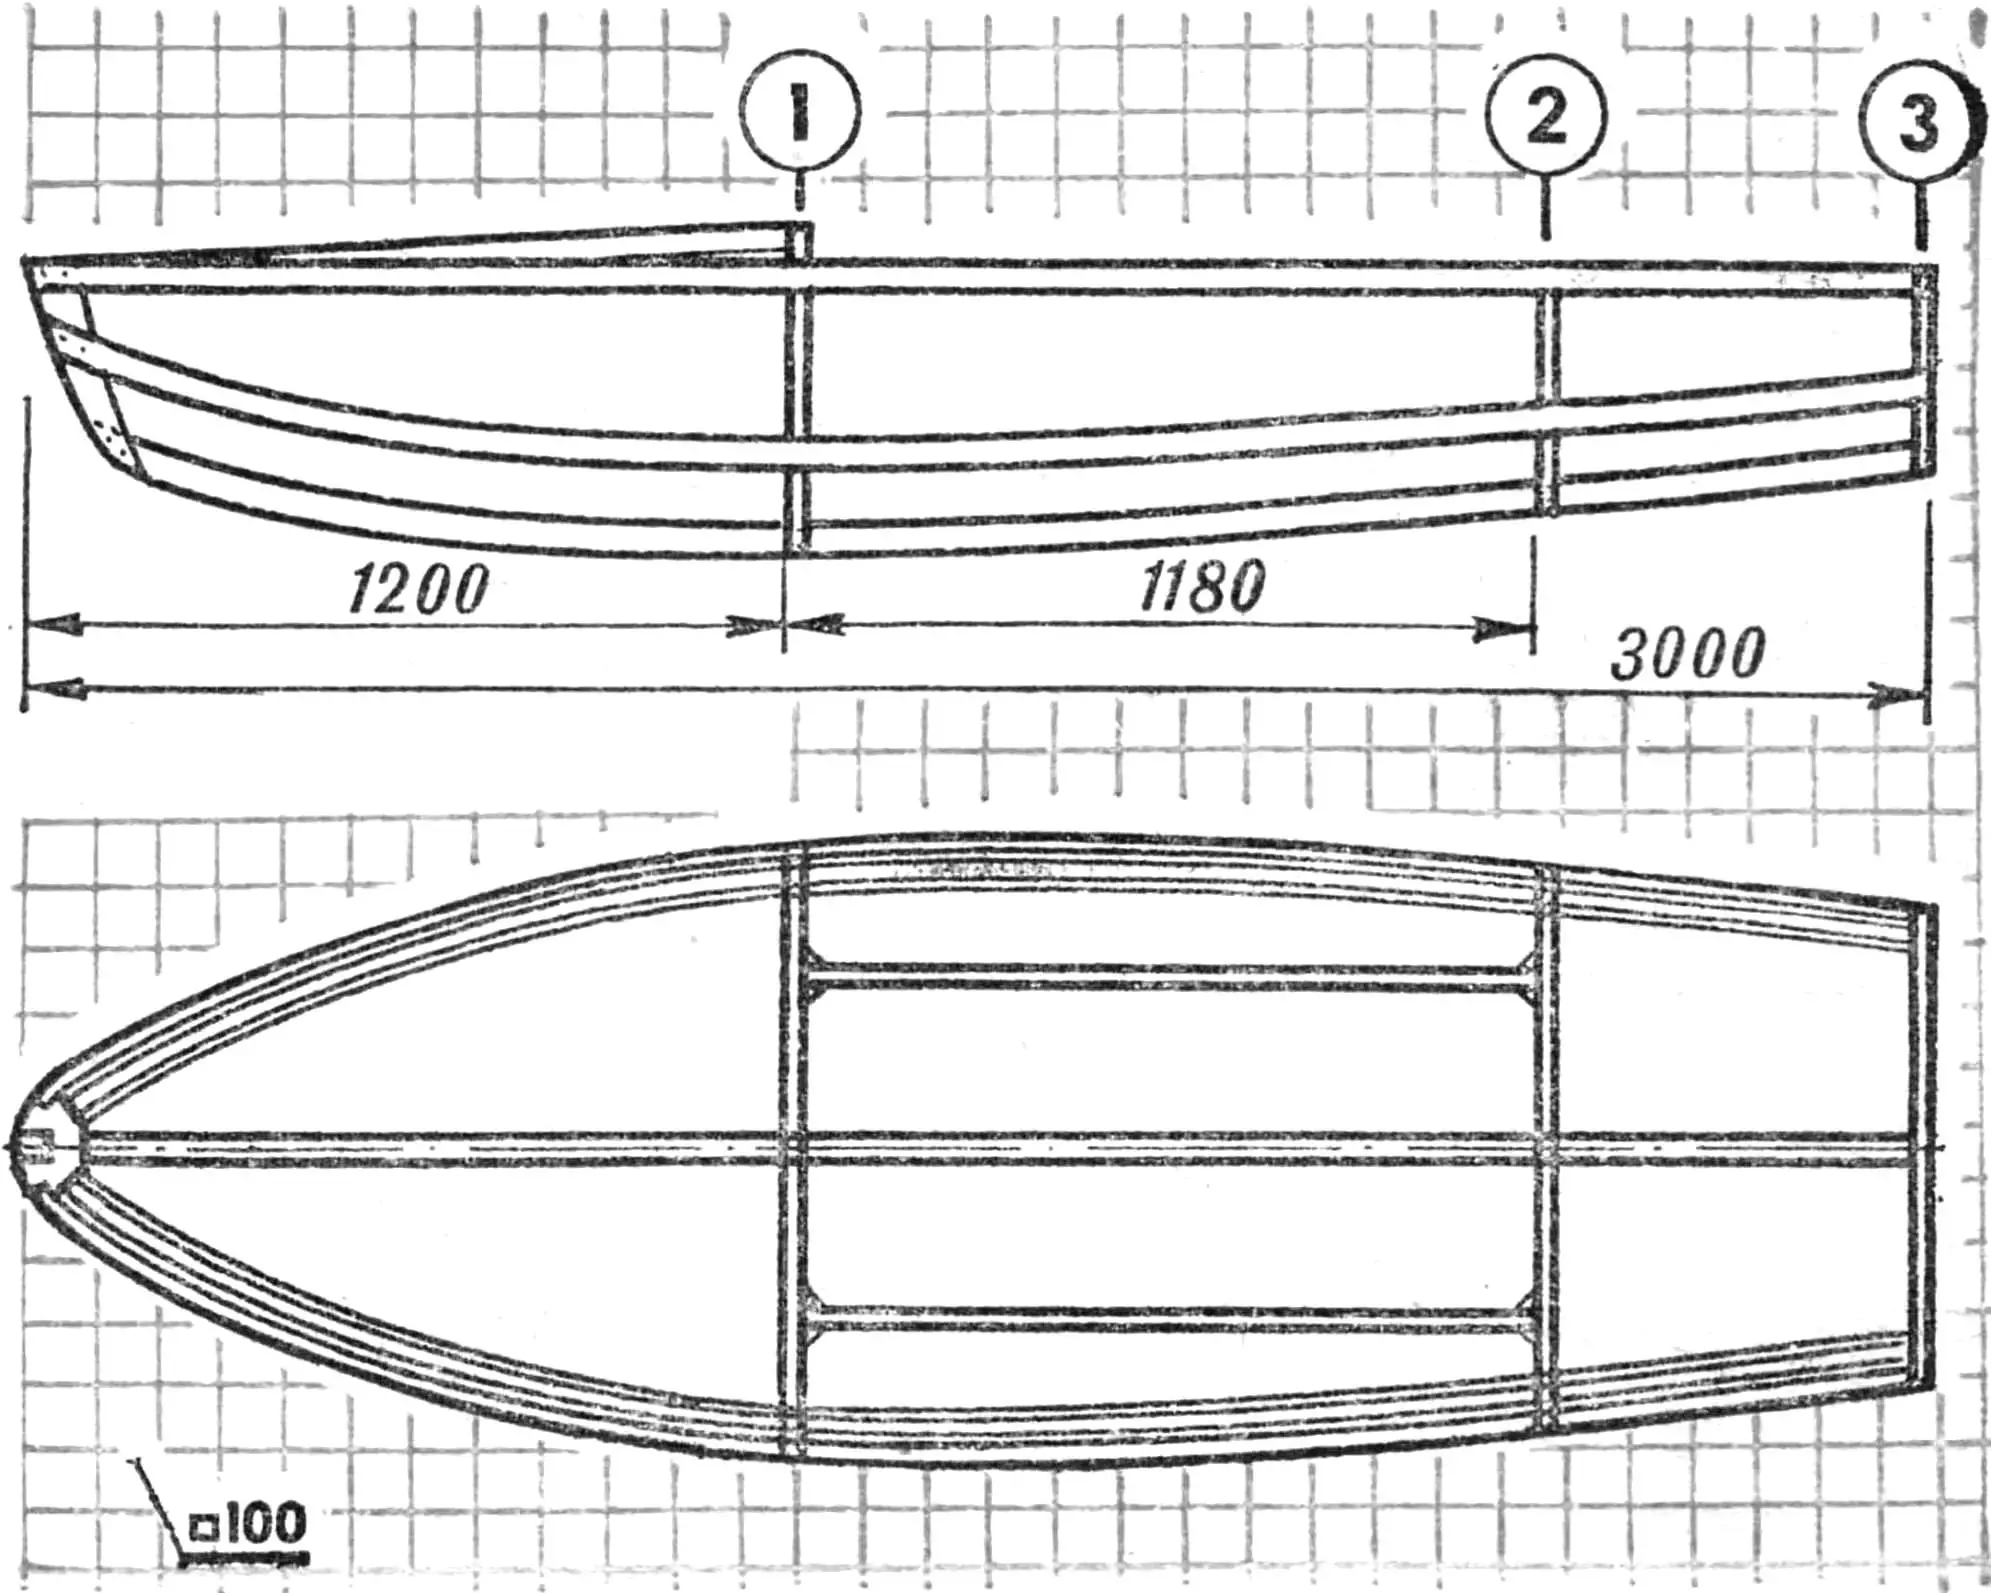
The dinghy’s frame is wooden, lightweight type. It consists of three built-up frames, a keel, and four stringers. The midship frame is reinforced, since the mast is attached to it, as well as the centerboards.
The mast is made of duralumin pipe or is a rotating, wooden one. The sail rig is Latin. The sail area is about 3.2 m2.
The centerboards are plywood, hinged in a duralumin pipe glued into the midship frame.
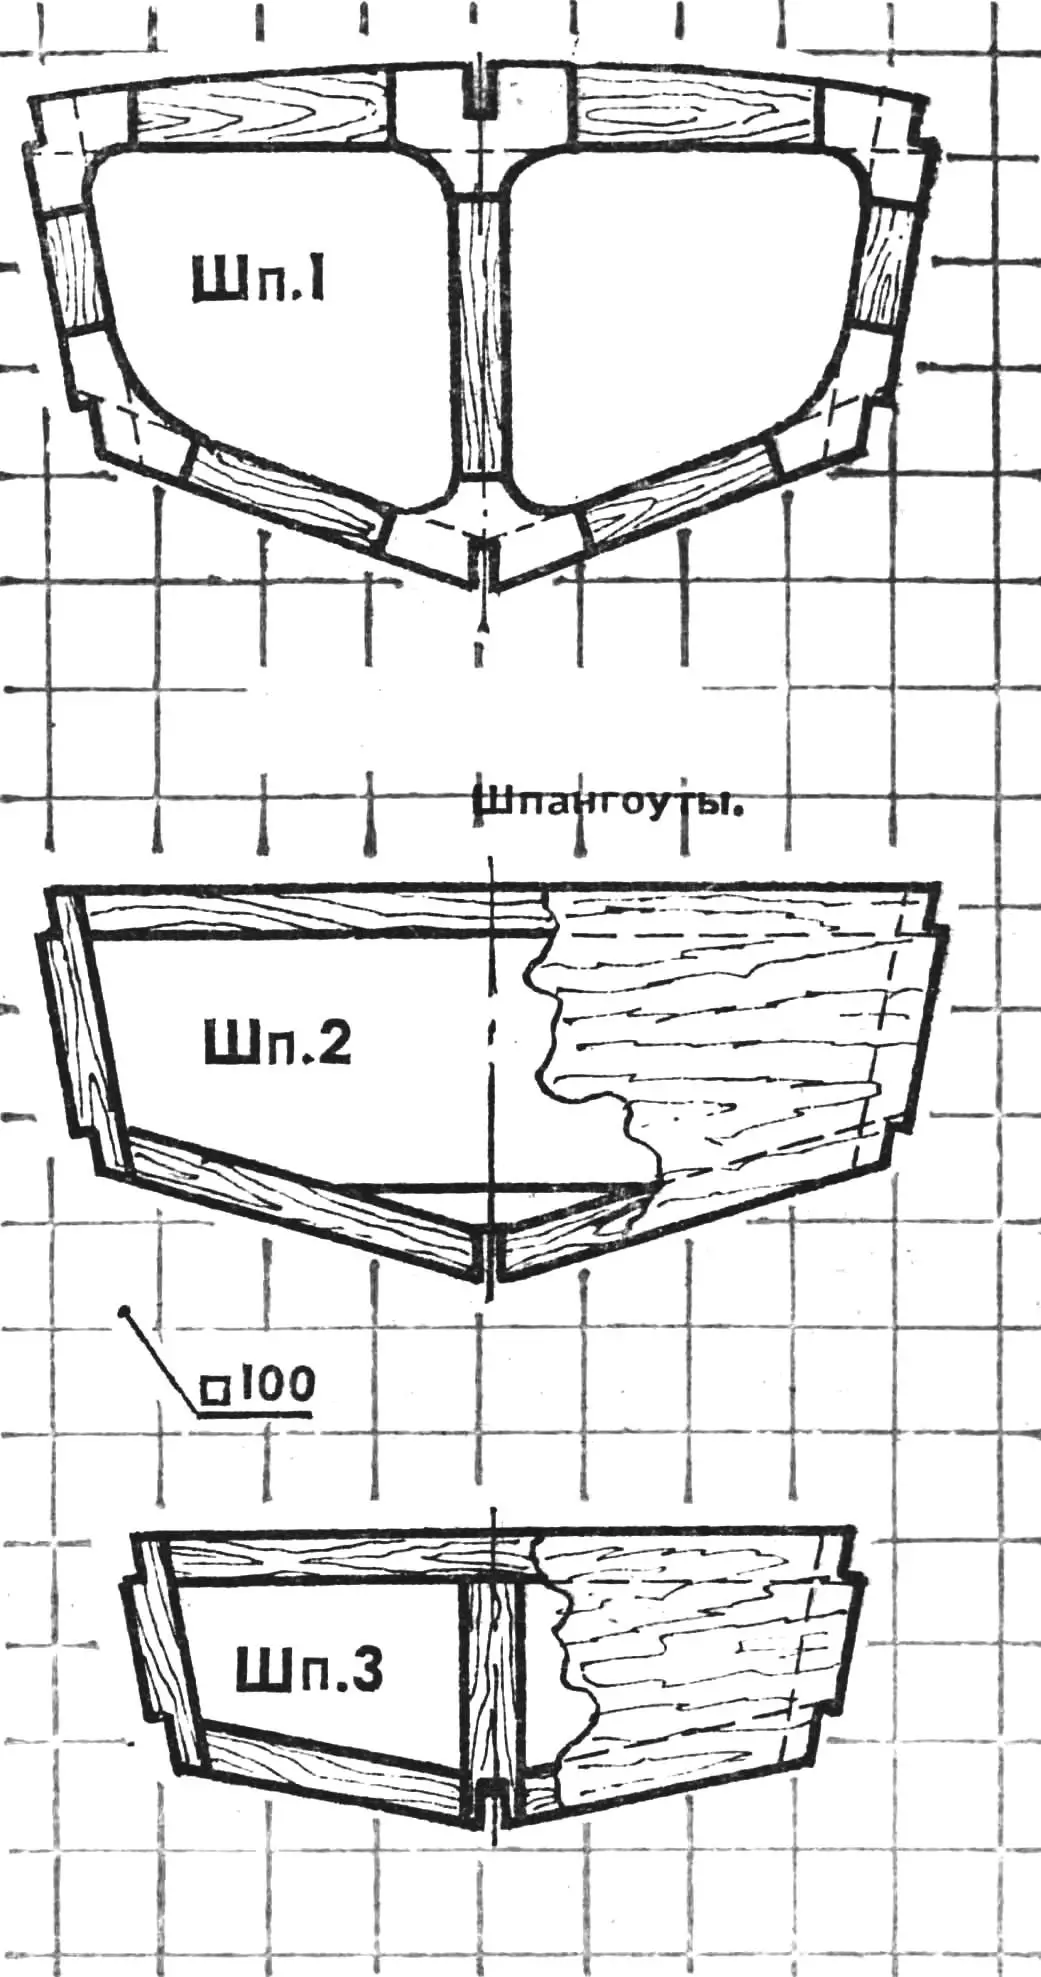
The hull assembly work begins with the manufacture of three frames — for them you will need pine slats with a cross-section of 20X50 mm, as well as plywood about 3 mm thick. Assembly is performed on a loft — a sheet of plywood with the contours of theoretical frames drawn on it. Each element of the frame is fitted to the corresponding line of the theoretical drawing and the adjacent slat and temporarily fixed with nails. After fitting all the parts, a sheet of plywood is placed on top of the frame and fixed on the slats with nails and glue (preferably epoxy). Next, the frame blank is separated from the loft, turned over, and on the other side, the joint areas are reinforced with plywood gussets — also using glue and nails.
The transom board is assembled in the same way, but it has double-sided plywood sheathing.
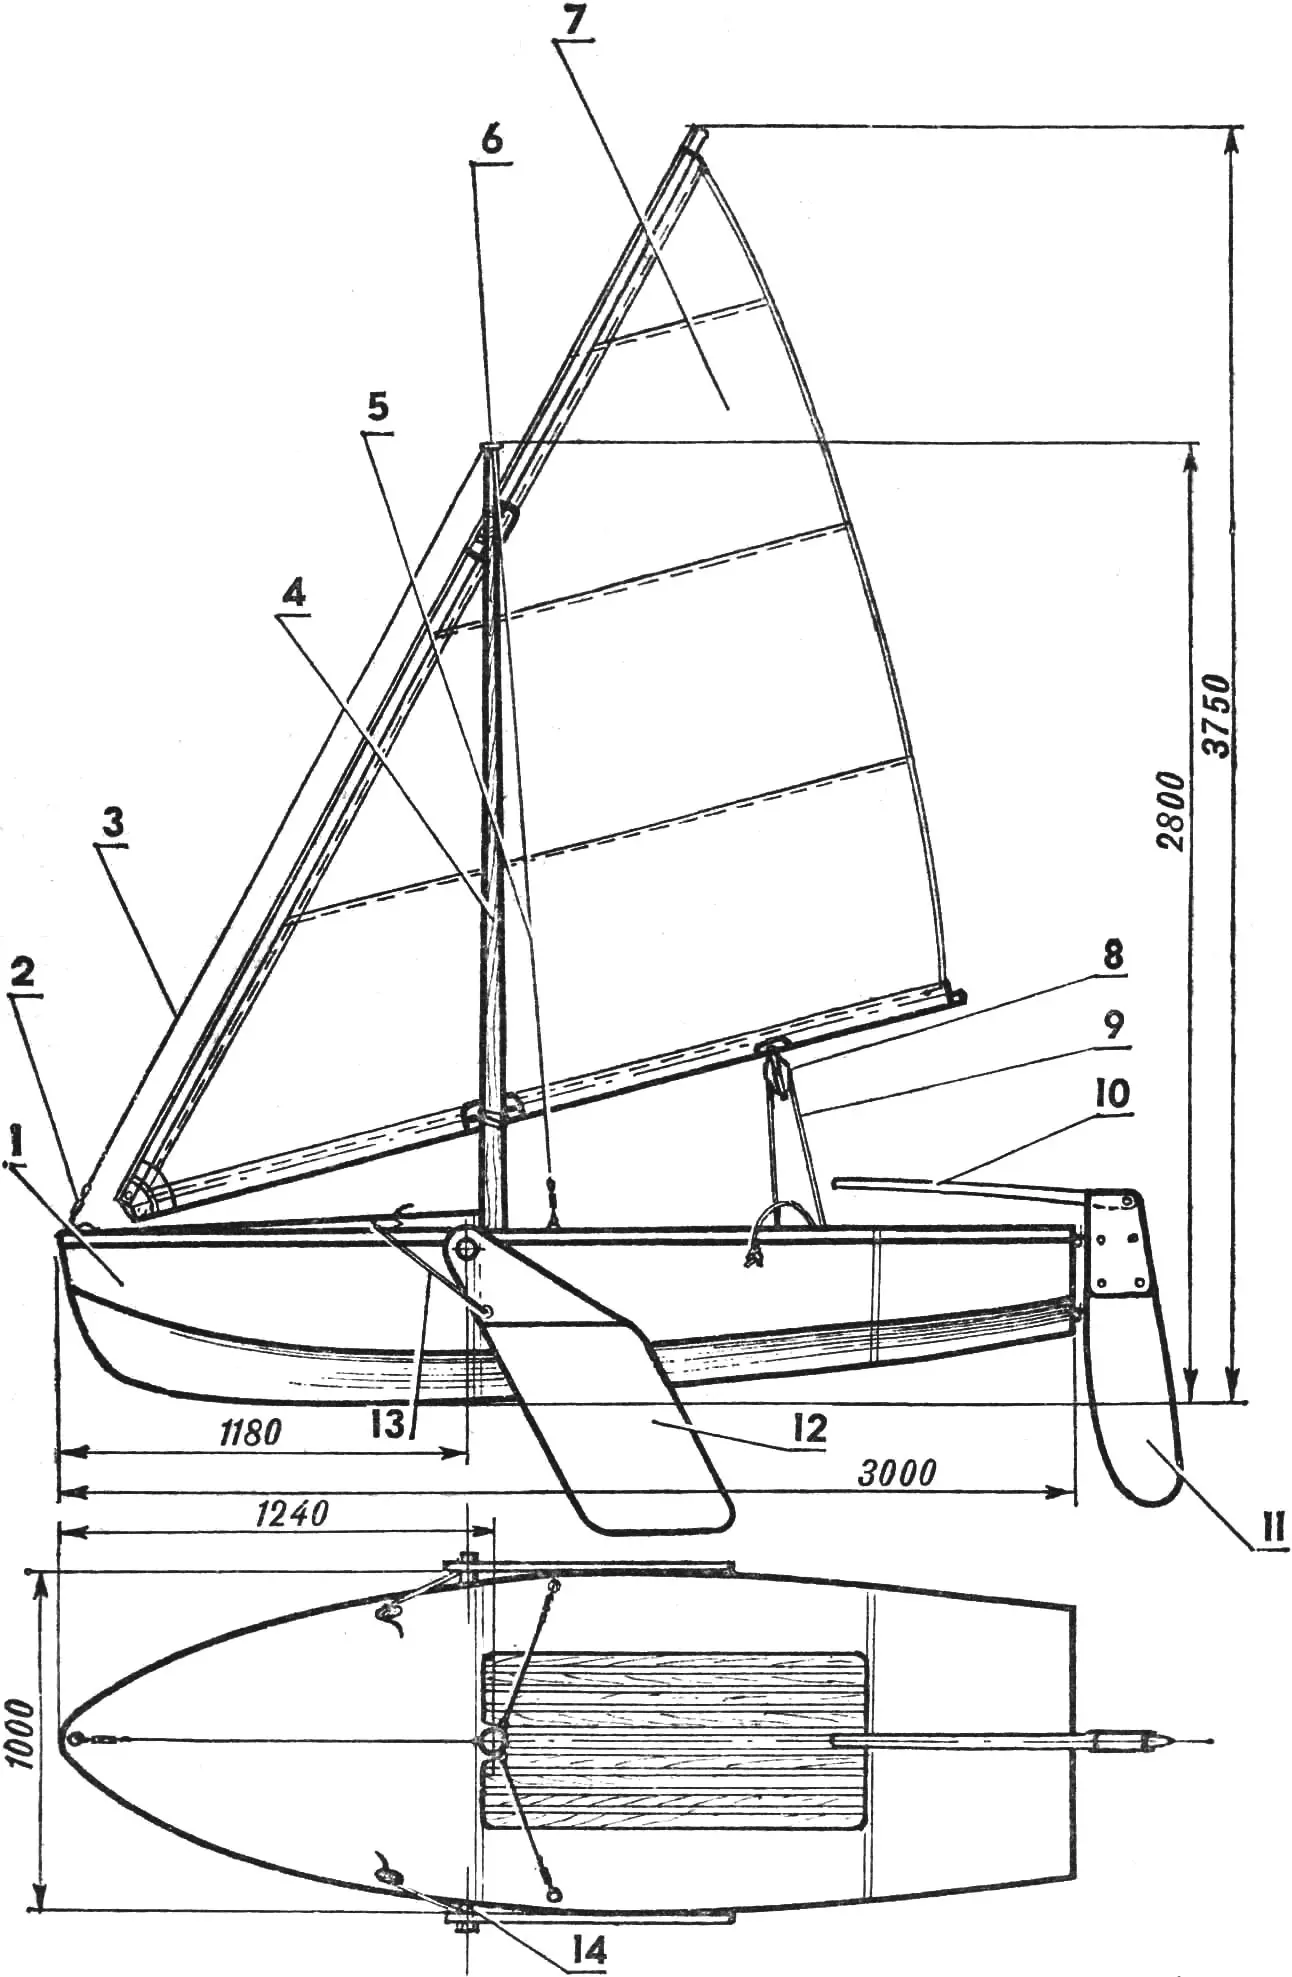
1 — hull, 2 — turnbuckle, 3 — forestay (steel wire Ø 3 mm), 4 — mast (duralumin pipe 50X2 or wood laminate), 5 — shrouds (steel wire ОВС Ø 3 mm), 6 — mast fitting, 7 — Latin sail with an area of 3.2 m2, 8 — boom sheet block, 9 — boom sheets, 10 — lifting tiller, 11 — rudder blade, 12 — centerboard, 13 — downhaul, 14 — centerboard axis (pipe with internal diameter of 18 mm).
The frame assembly is performed on a level floor. First, a line of the diametral plane, the location of the stem, frames, and transom board are drawn on it. Next, the frames, transom board, and stem are temporarily fixed on the floor, and then the keel and other elements of the longitudinal set are attached to these elements of the transverse set with screws and epoxy glue. After the glue cures, the frame is leveled with a plane, rasp, and sandpaper. Its sharp edges are rounded, and unevenness and depressions are filled with putty made from wood sawdust and epoxy resin.
The next stage of work is obtaining the sheathing. First, the frame is tightly covered with fiberglass — this can be done using epoxy glue and small nails.
The stretched sheathing is impregnated with epoxy resin. The first layer can be applied using a spray gun, having previously diluted the thick epoxy with acetone. In this case, be sure to use a respirator or gas mask, and it is advisable to work outdoors. The next two or three layers of resin are applied with a brush — in this case, the resin should not be diluted with acetone.
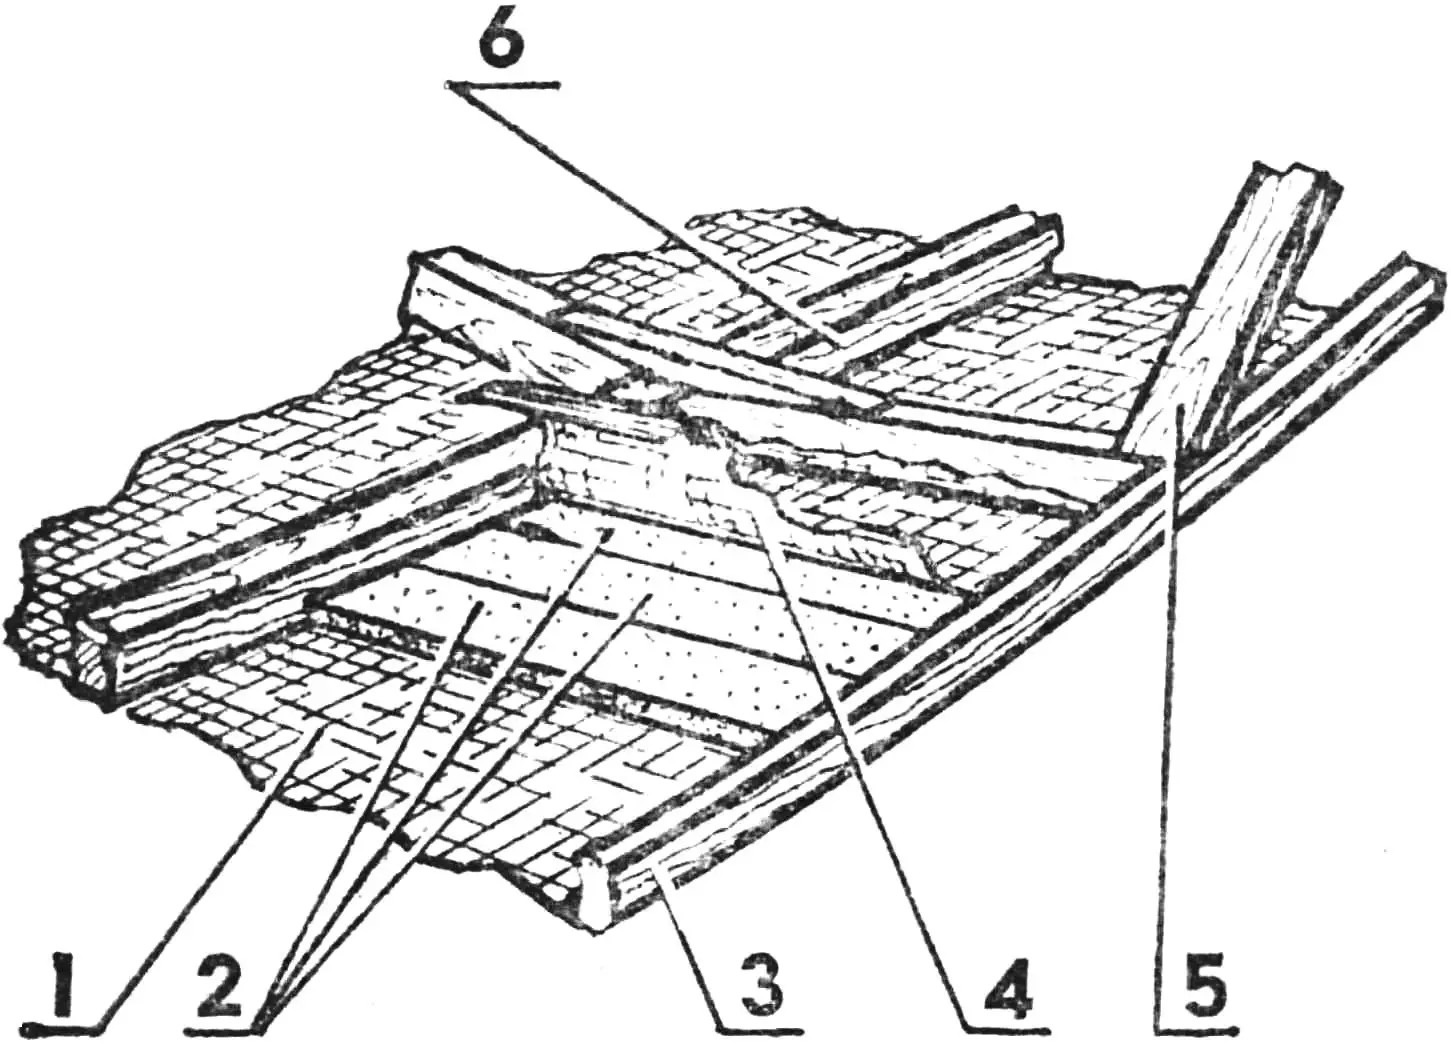
1 — fiberglass sheathing, 2 — foam filling, 3, 6 — longitudinal set elements, 4 — inner fiberglass sheathing, 5 — frame.
The resulting sheathing is not rigid and strong enough, so it must be reinforced — lined from the inside with foam (construction or packaging). It is cut into plates about 10 mm thick with a red-hot nichrome wire heated by electric current, stretched over a particle board on two porcelain insulators. The voltage is adjusted using a variac. When gluing the bottom, do not try to use large-area plates, it is better to cut them in advance into strips about 100 mm wide — such are more convenient to fit to the bottom and hull set elements. The foam strips are pressed with polyethylene bags filled with dry river sand.
After gluing the inner surface of the hull with foam, its surface is leveled, puttied with a composition of epoxy and wood sawdust, and lined from the inside with one or two layers of fiberglass.
A duralumin pipe Ø 22—30 mm is lashed to the upper part of the midship frame, and then finally attached using epoxy putty made from wood sawdust — the side centerboards will be fixed in it.
The dinghy’s deck is made of plywood or hardboard, although it can also be made the same way as the hull sheathing. The only difference is that after covering the deck with fiberglass, the foam and the second shell of the “sandwich” should be glued not from inside the hull, but from the outside. This, however, will require more careful leveling of the foam on the deck before the final molding of the fiberglass to it.
Inside, on the hull’s keel, near the midship frame, a mast step socket is installed, and flush with the deck — a clamp made of 3 mm thick steel strip: they form two supports for the rotating mast.
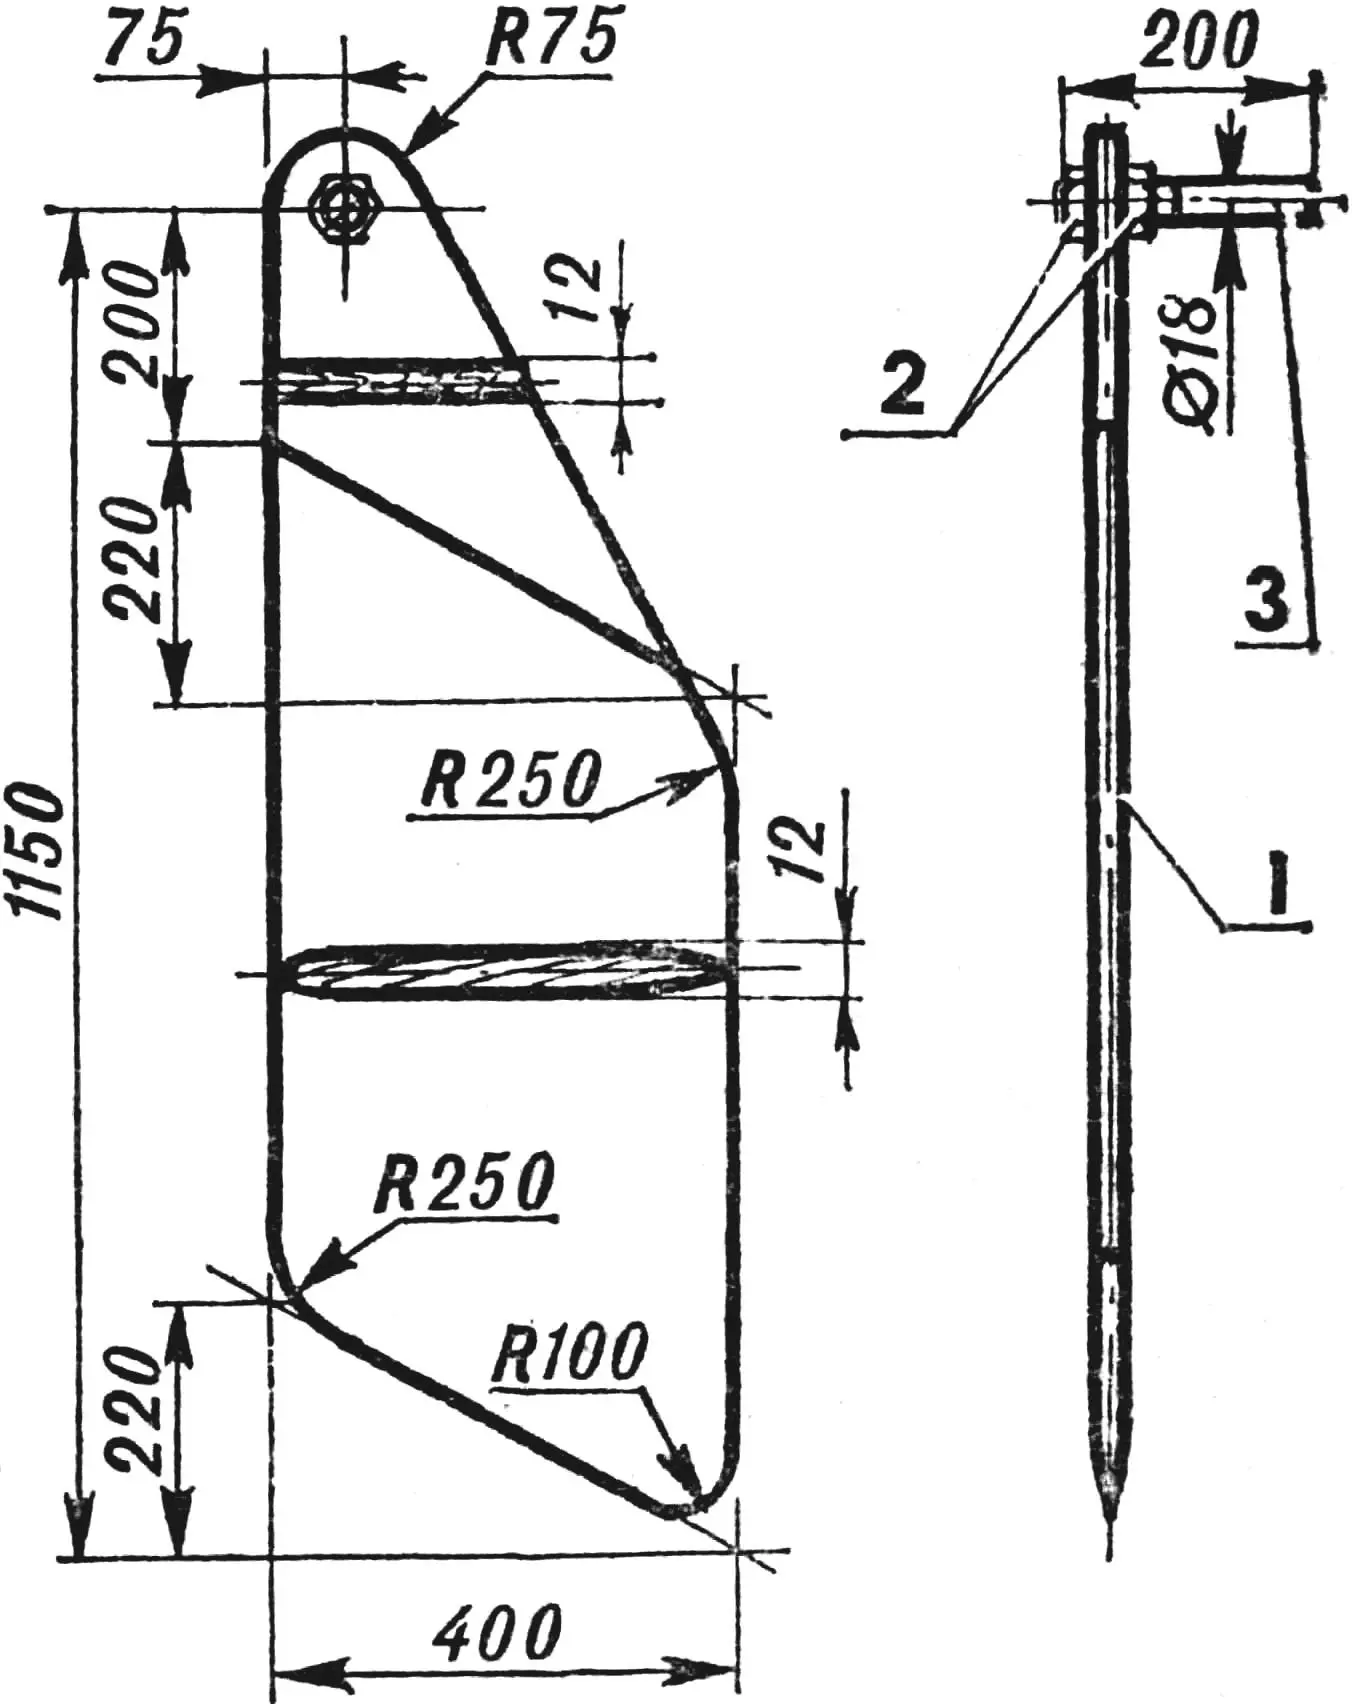
1 — centerboard (12 mm thick plywood, covered with fiberglass on epoxy resin), 2 — nuts, 3 — duralumin stud.
The centerboards are cut from 12 mm plywood. They are given a streamlined shape, resembling a biconvex aircraft wing profile in cross-section. Each of the centerboards is covered with fiberglass and after sanding is primed and painted with bright paint. The centerboard’s rotation axis is a duralumin stud with a thread on one end. The centerboard is fixed in it between two nuts. The centerboards are fixed in the pipe using a nylon lashing, with which it is attached to a cleat.
The rudder blade is made of 12 mm plywood. Like the centerboard, in cross-section it represents a streamlined profile. And in exactly the same way, the final operations in its manufacture are covering with fiberglass, sanding, priming, and painting with bright enamel. The blade is attached to the transom using hinges-brackets mounted on it. They are one-sided threaded steel studs bent in the shape of the letter L and fixed on the transom board with nuts and washers. The corresponding parts of the hinges, resembling pins with rings in shape, are also bent from the same studs. In the rudder blade, they are fixed in holes drilled in it with epoxy glue.
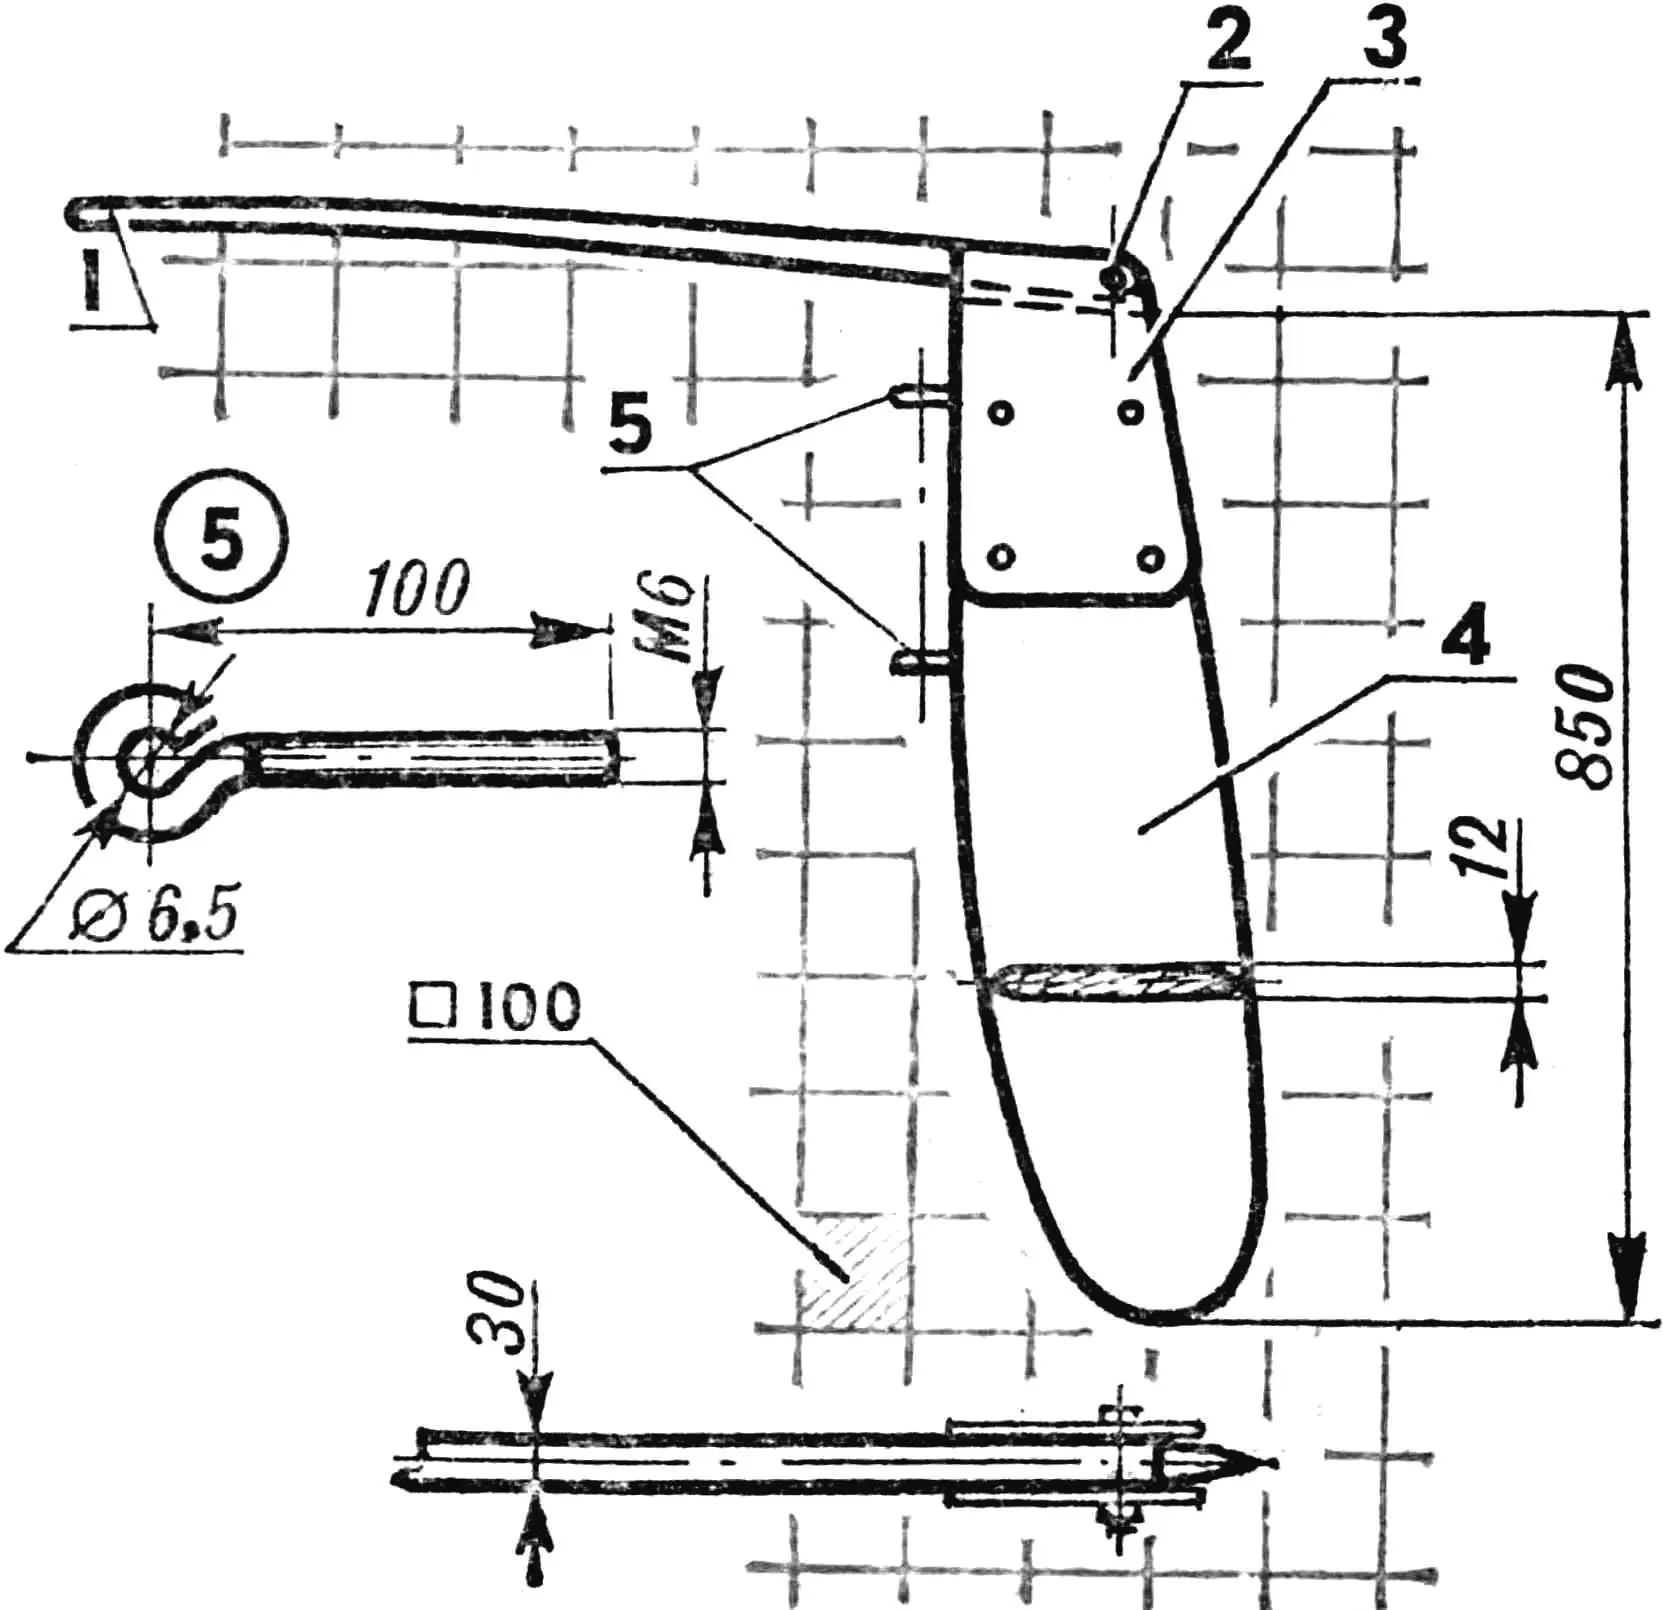
1 — tiller (beech, oak cross-section 30X30 mm), 2 — tiller hinge (bolt with self-locking nut), 3 — rudder stock box (duralumin plates 2.5 mm thick), 4 — rudder blade (12 mm thick plywood, covered with fiberglass on epoxy resin), 5 — mounting hinges (M6 stud).
The tiller is made of oak or beech slat. It is best to connect it to the rudder stock with a hinge. This will make sailboat control more convenient.
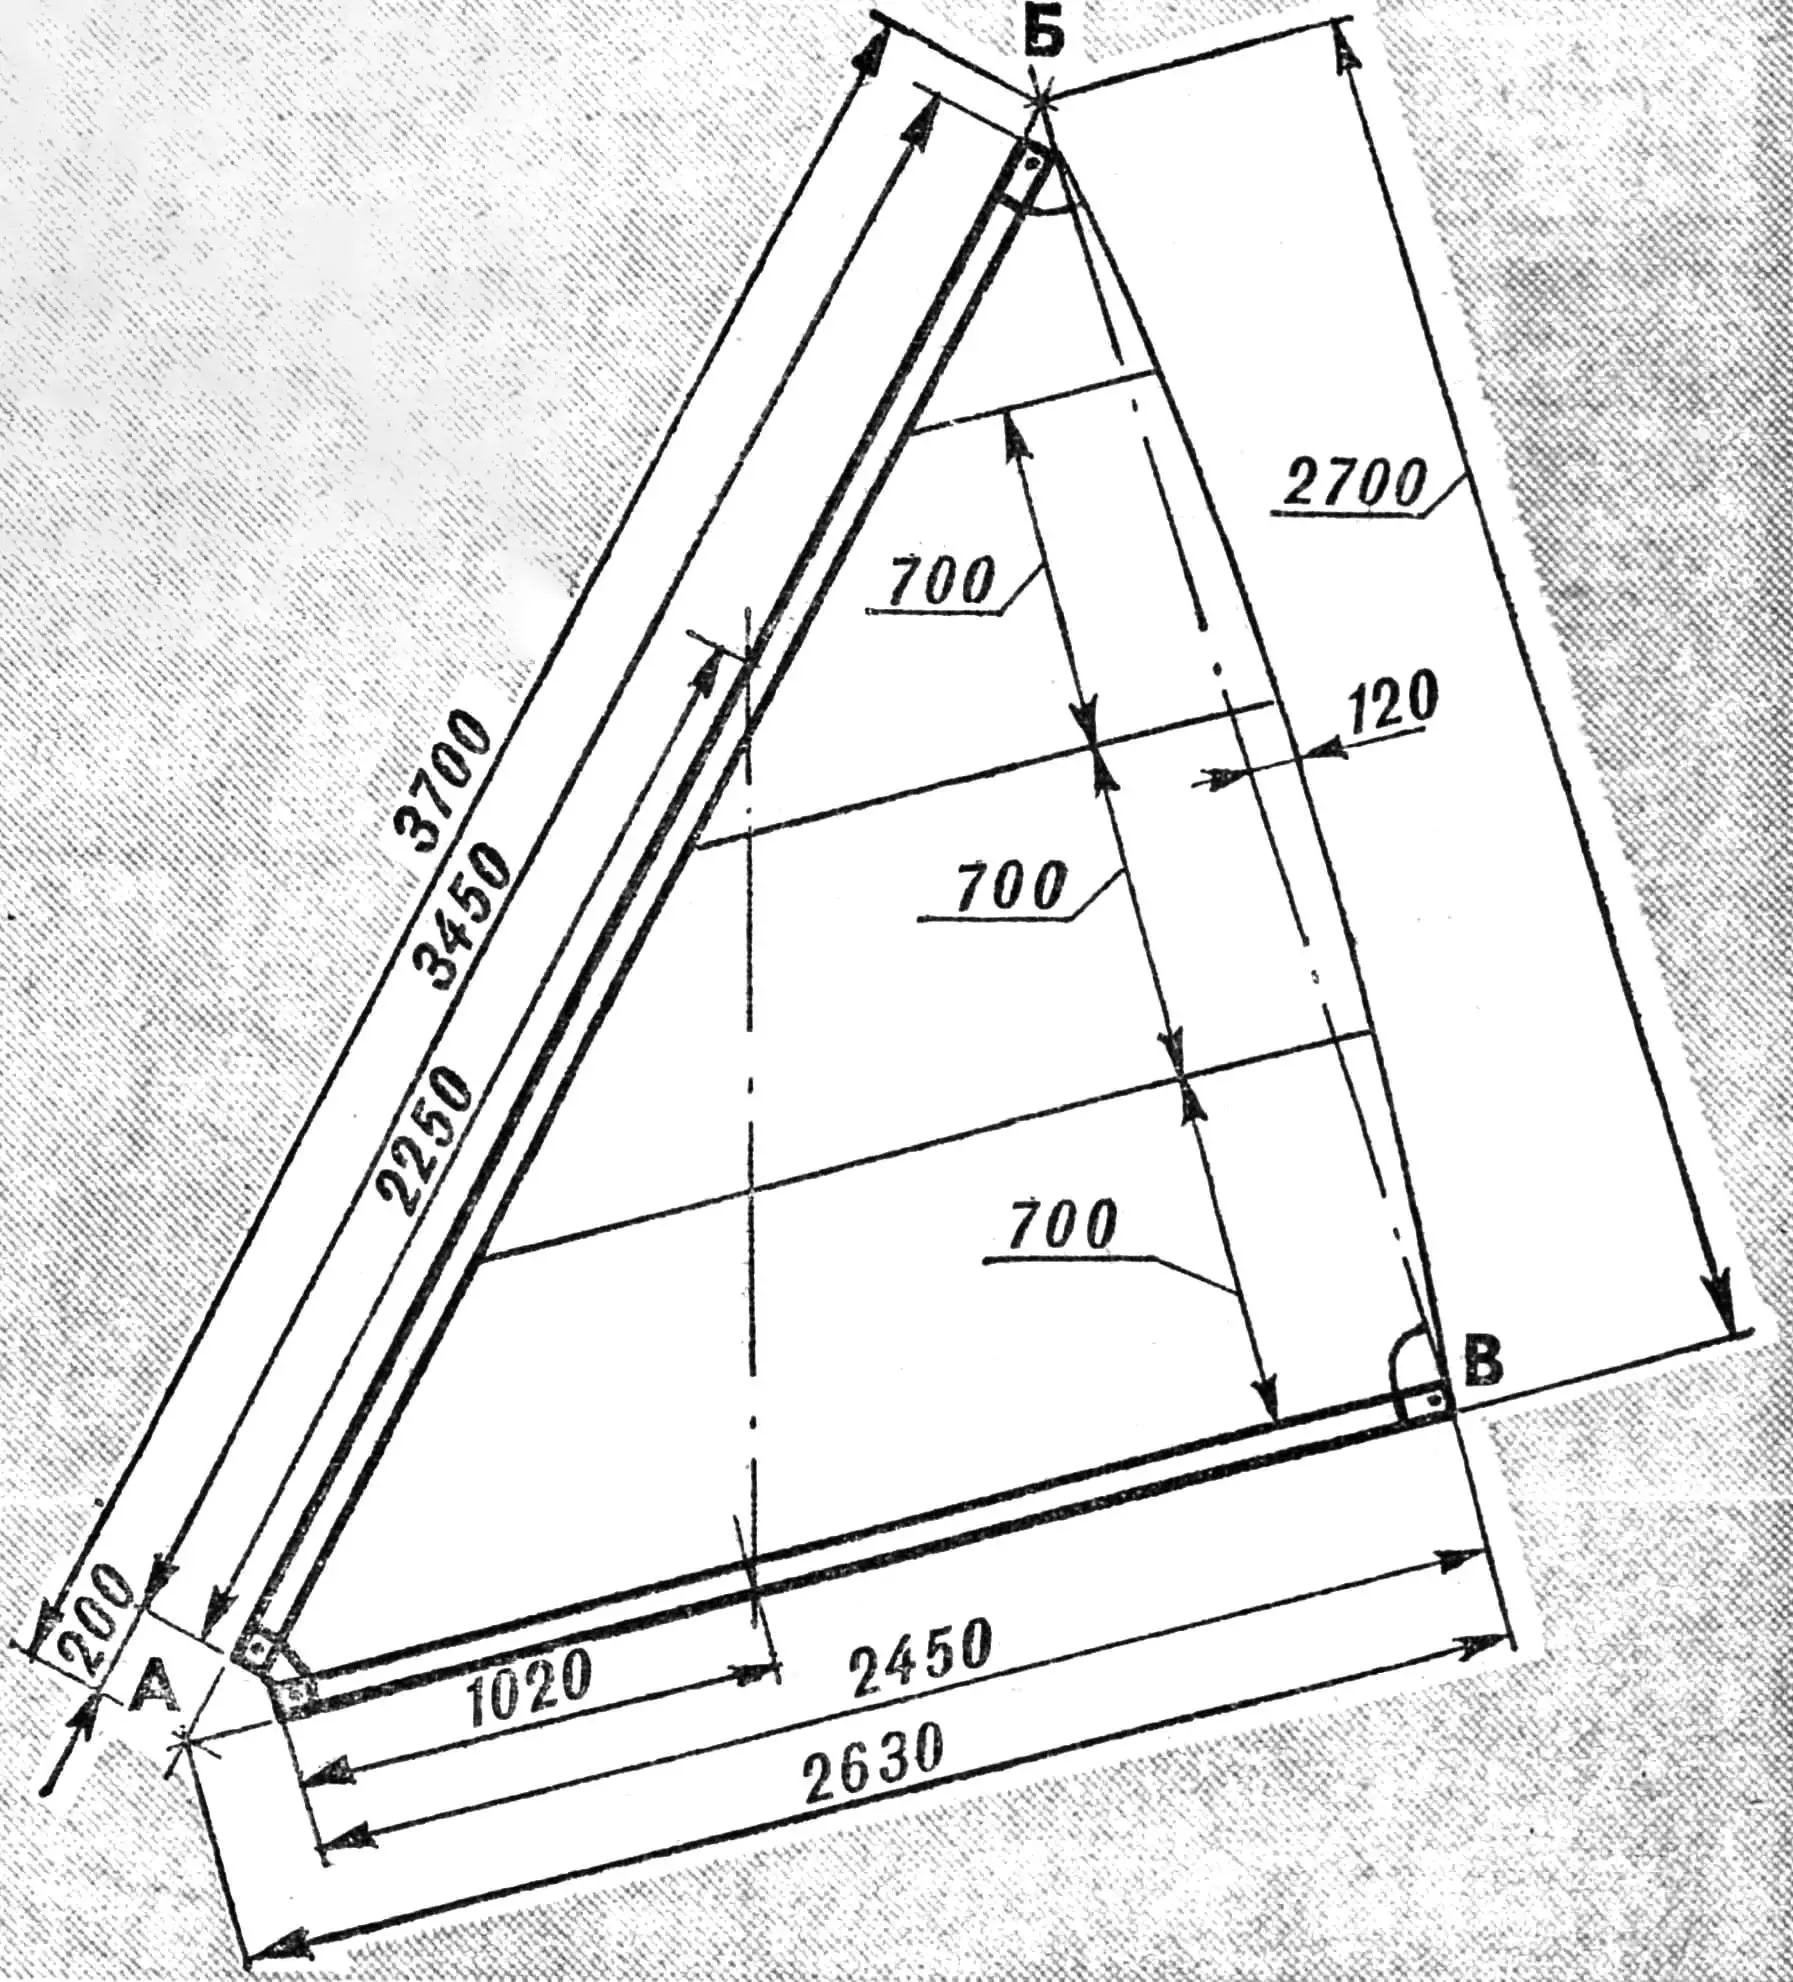
The yard and boom of the Latin sail are unequal. The yard length is 3600 mm, the boom length is 2600 mm. They can be wooden, planed from straight-grained wood, or tubular, duralumin — for example, from pole vault poles. At the front, the yard and boom are joined by a duralumin plate, providing a hinged connection of these rigging elements.
The yard and boom are connected to the mast with nylon lashings, which are wrapped in “figure eights” around these rigging elements. The sail height fixation is achieved by passing the fastening lashing through a hole in the mast.

1 — front fitting (two duralumin plates 3 — 4 mm thick), 2 — yard (wood laminate, diameter at base 60 mm, at top — 45 mm, length 3600 mm), 3 — boom (wood laminate, Ø 50 mm, length — 2600 mm), 4 — sail.
The sail is connected to the yard and boom using “pockets” cut from fabric denser than that of the sail itself. The placement of sail panels starts from its tack corner so that the line of the first seam forms a right angle with the leech. All sail corners are reinforced with fabric patches-battens. For the sail, fabric like “bolonka” or pillow ticking is most suitable. Tent fabric will also work.
On the first trips to the water, tune the dinghy. The main thing is to align the centers of sail area and lateral resistance. The misalignment can be noticed immediately: the sailboat with the rudder in neutral position will either luff (sail closer to the wind) or bear away (sail fuller to the wind). To balance the dinghy, you need to either move (forward, backward) the sail relative to the mast, or deflect (forward, backward) the centerboards. A well-tuned sailboat has a slight tendency to sail closer to the wind; this helps in squalls or emergency situations to bring the dinghy into the head-to-wind position — bow to the wind.
A few tips for beginner sailors:
1. When a squall hits, don’t wait until water pours into the cockpit, promptly ease the boom sheets and accordingly the sail!
2. When the yacht is sailing on a downwind course (wind — from behind), try to avoid the sail jibing from side to side — this is fraught with capsizing or mast breakage. Choose a course so that the wind blows not exactly at the transom, but slightly from the side.
3. Avoid downwind turns when the sailboat’s stern crosses the wind line — in this case, the sail also jibes with all the consequences that follow. It’s better to make upwind turns when the sailboat’s bow crosses the wind line. In this case, the sail fills gradually, without jerks.
4. Even when going on the shortest voyage, don’t forget to wear a life jacket!
«M-K» 7’88, V. YEVSTRATOV, yacht captain
Recommend to read
 LET THERE BE LIGHT!
Headlight and Dynamo is a good addition to the bike, allowing you to travel in the evening or early in the morning when it's still dark outside. Generator works great, but over time, the... RELIABLE HEAD PROTECTION
The human neck is very perfect mechanism that performs many vital functions. However, it is very compact, flexible and surprisingly agile. All this allows to consider it one of the most...
