
Despite the fact that industry produces many diverse small vessels (including yachts), the number of homemade boats built by amateurs grows year by year. They boldly experiment with various materials and use interesting technical solutions in their projects.
The technology for building small vessels used today is the result of many years of experience. But there is no limit to its improvement, and there always remains the possibility of improving individual stages of the multifaceted process, which can make construction either less labor-intensive, not requiring high qualifications, or cheaper. Thus, in recent years, several non-traditional methods of hull construction have been proposed and tested, which, undoubtedly, may interest amateur shipbuilders.
Before moving on to their description, let us recall the traditional technological cycle usually used in the construction of yachts and small boats.
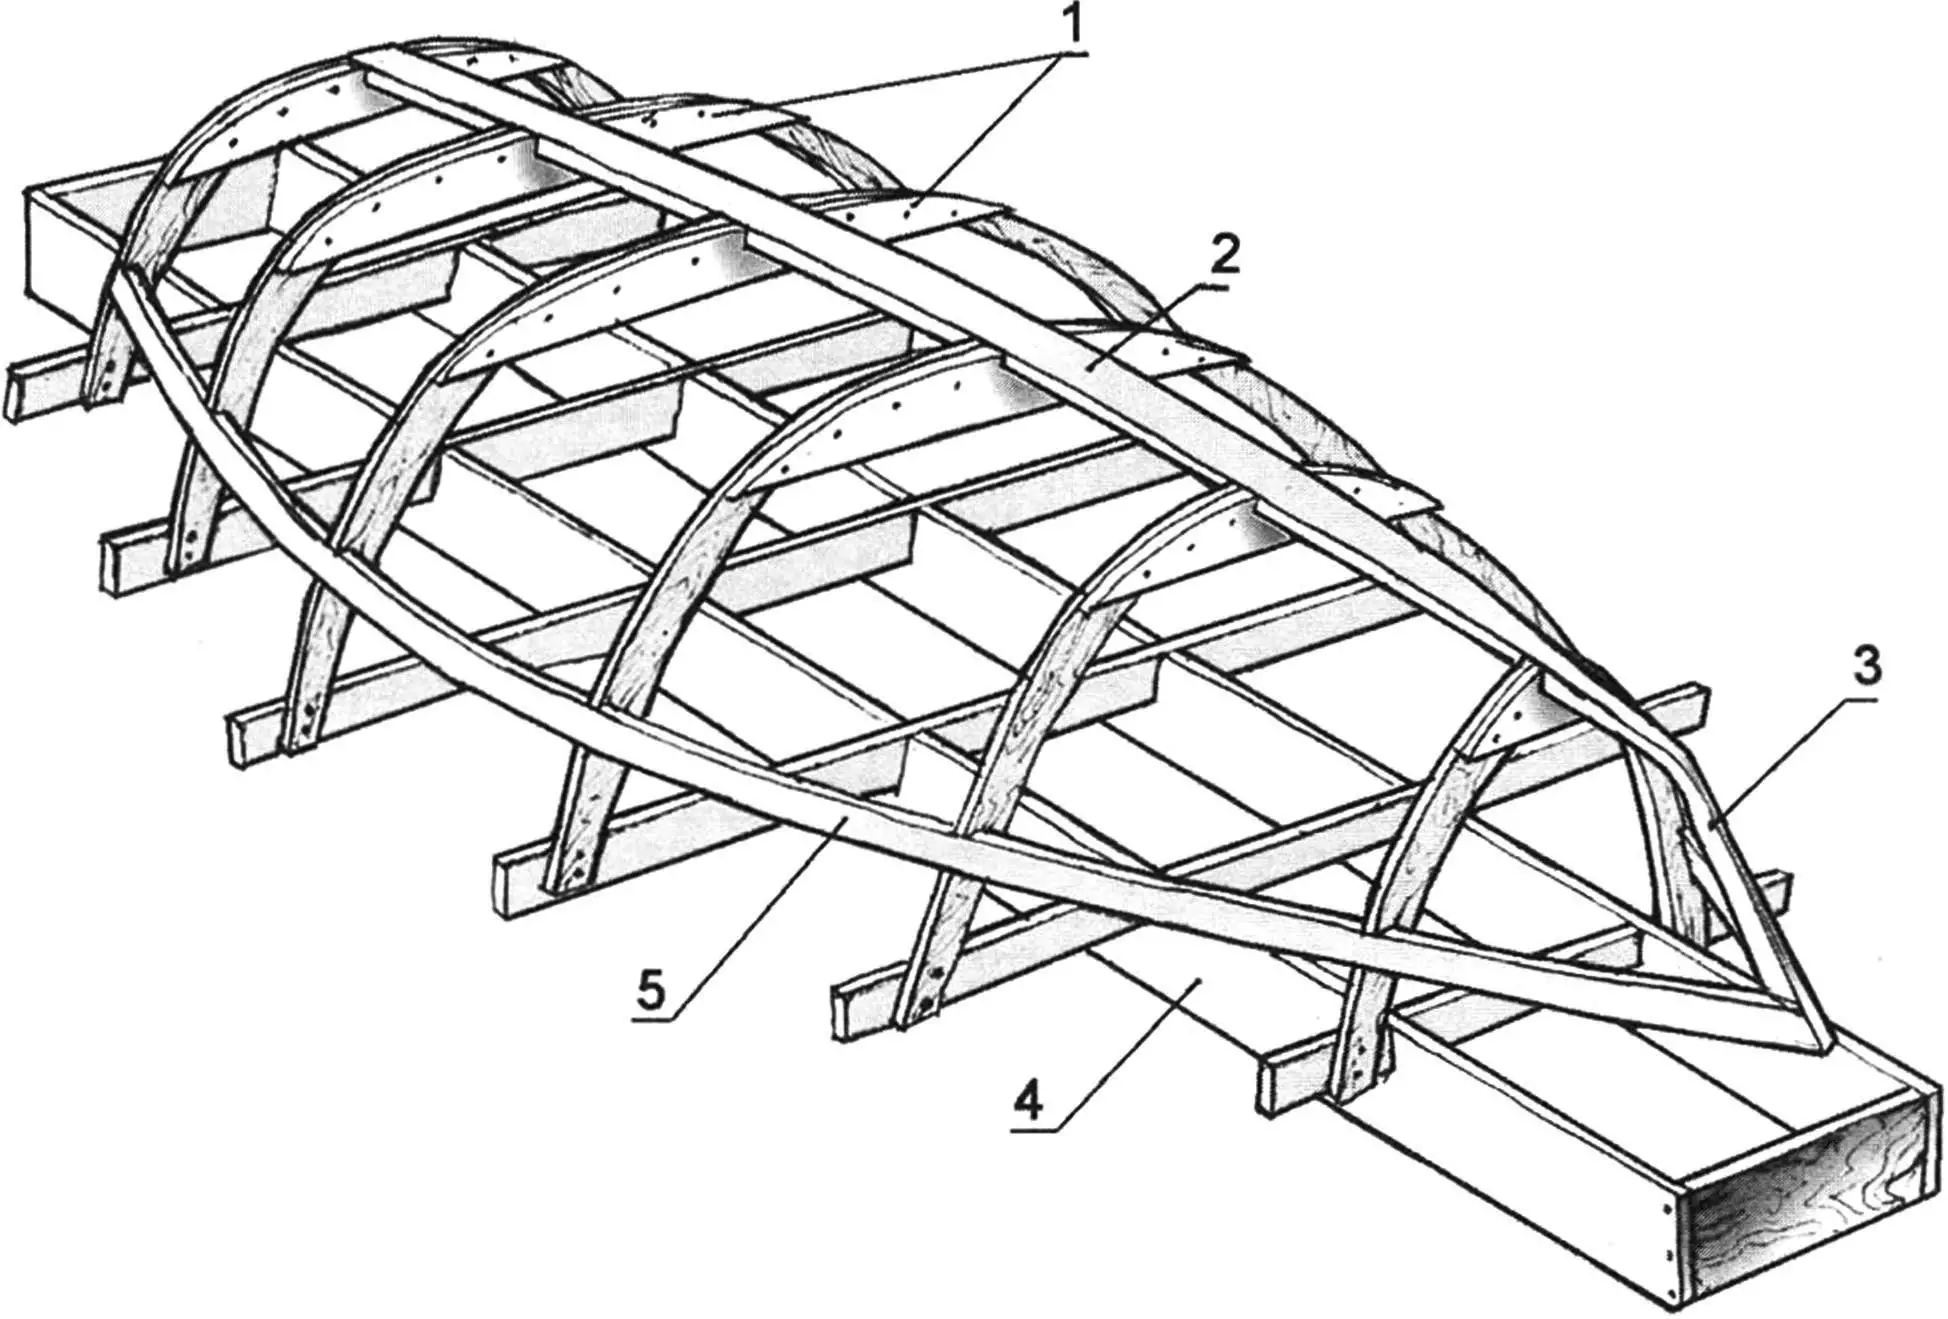
1 — frames; 2 — keel timber; 3 — stem; 4 — building berth timber; 5 — gunwale timber
After coordinating all the curves of the theoretical drawing on a full-scale loft, the elements of the hull structural frame are manufactured according to the contours of the frames and bulkheads. It is advisable to simultaneously install elements for securing berths, shelves, and lockers — in order to minimize finishing work.
Hull Construction on a Building Berth
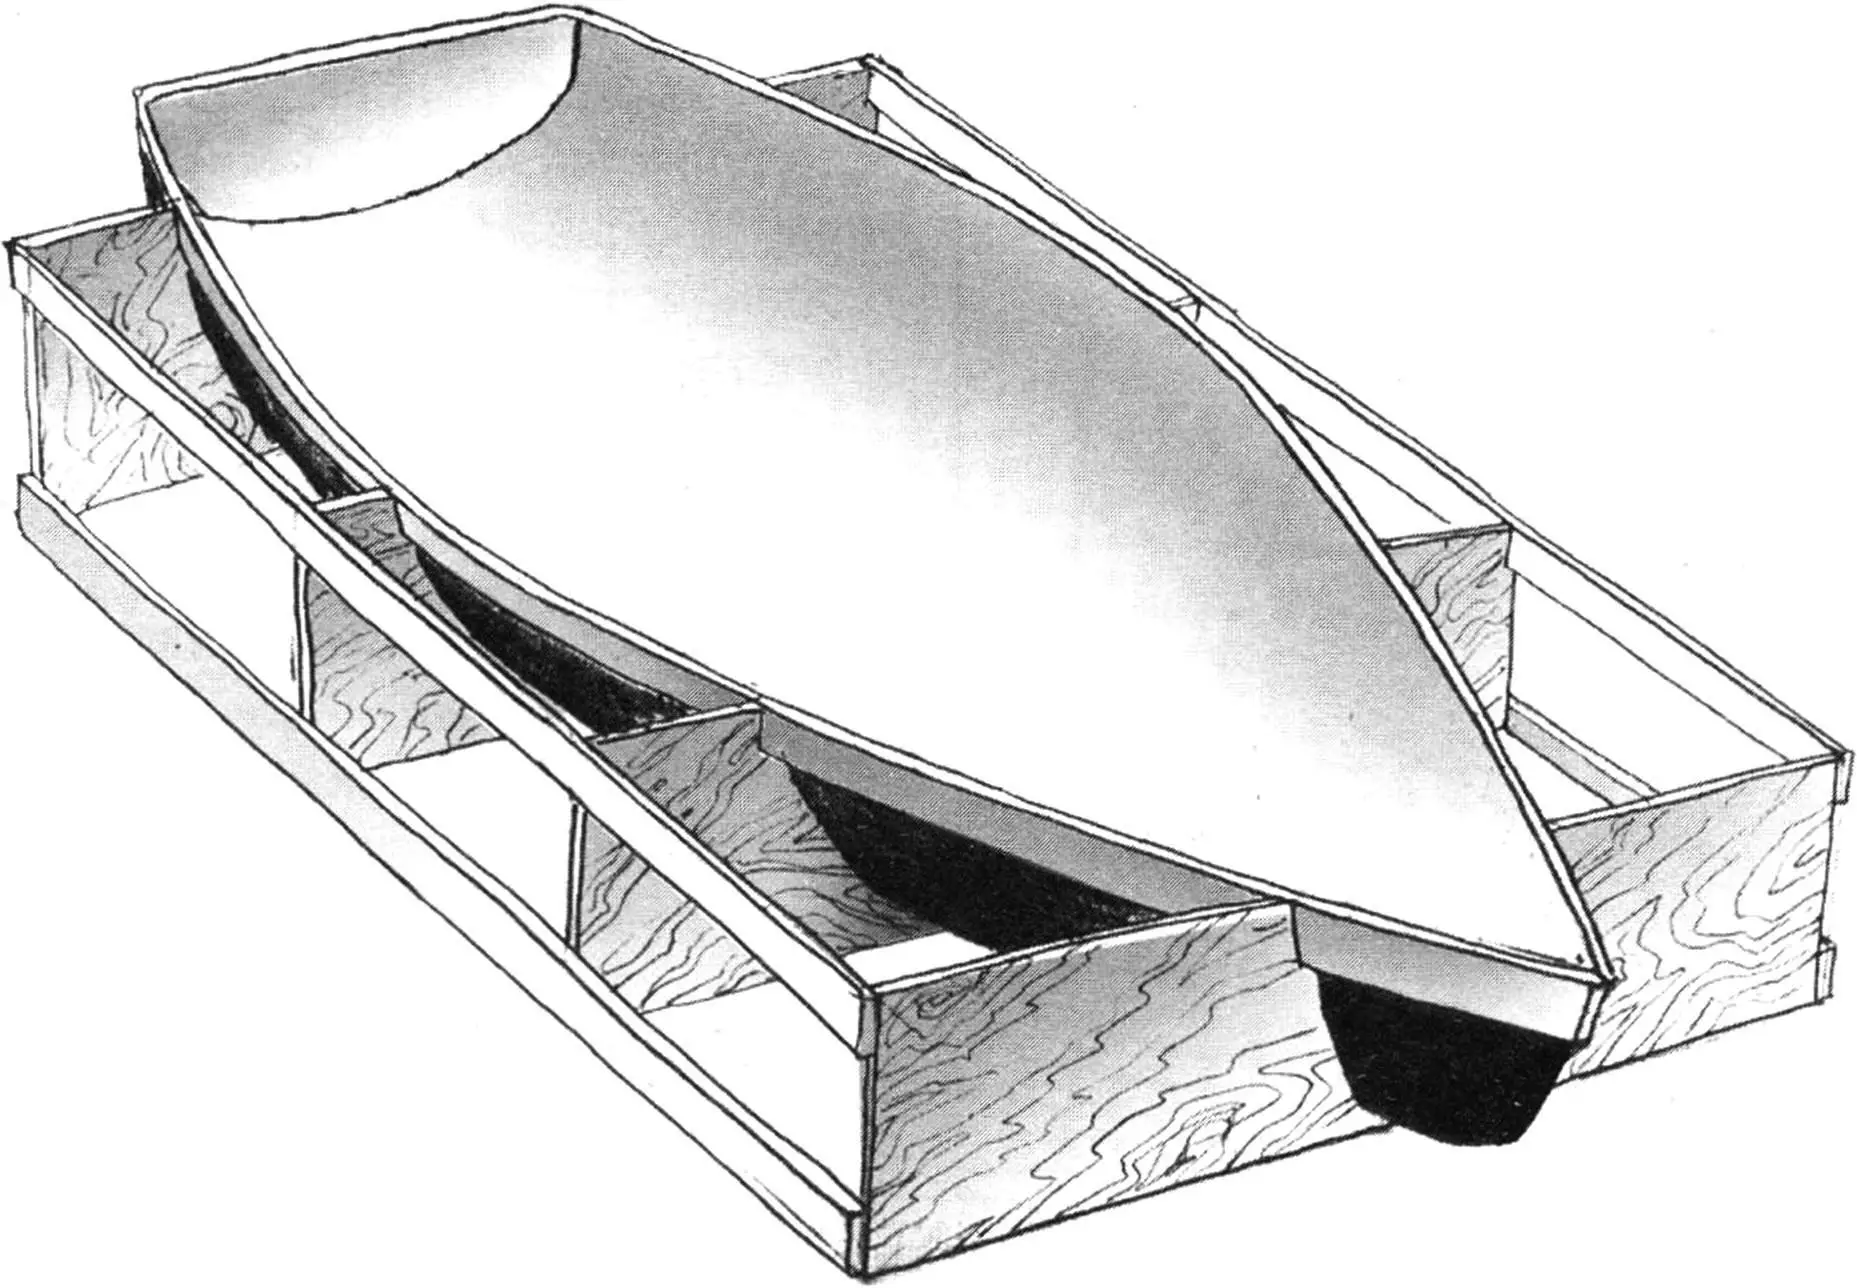
To assemble the hull, a building berth is made, usually using two carefully planed wooden beams set strictly horizontally. The frame of the future vessel is usually positioned with the keel up. In pre-marked places on the berth, frames and bulkheads are installed, and then with the help of the keel timber, stem, and gunwale timbers, the frame is united into a rigid spatial structure (fig. 1). Round-bilge hulls are planked with wooden strips or boards, hard-chine hulls — with plywood. When building boats and yachts from composite materials using this technology, a plug (punch) is made. Its outer surface turns out to be quite rough and requires further careful finishing — sanding and polishing. If it is planned to make an entire series of fiberglass vessels, it is advisable to make a polished mold from the plug, in which the required number of hulls can be molded that do not need further finishing (fig. 2).
Making a building berth and setting frames and bulkheads on it is not so simple: this operation requires great precision and care. As a rule, it takes about 20% of the time necessary to build the entire hull. To accommodate the berth, a sufficiently spacious room is needed, at least 1.5…2 meters exceeding the vessel’s dimensions in length and width. It is even more difficult to make tooling for forming hulls from composite materials — fiberglass and synthetic resins. The labor costs for making a plug are comparable to building a wooden hull of similar dimensions. So using methods of building boat and yacht hulls without using a building berth (for wooden vessels) and a plug or mold (for composite vessels) will speed up and simplify the construction process and reduce its cost.
Building Vessels Without a Building Berth
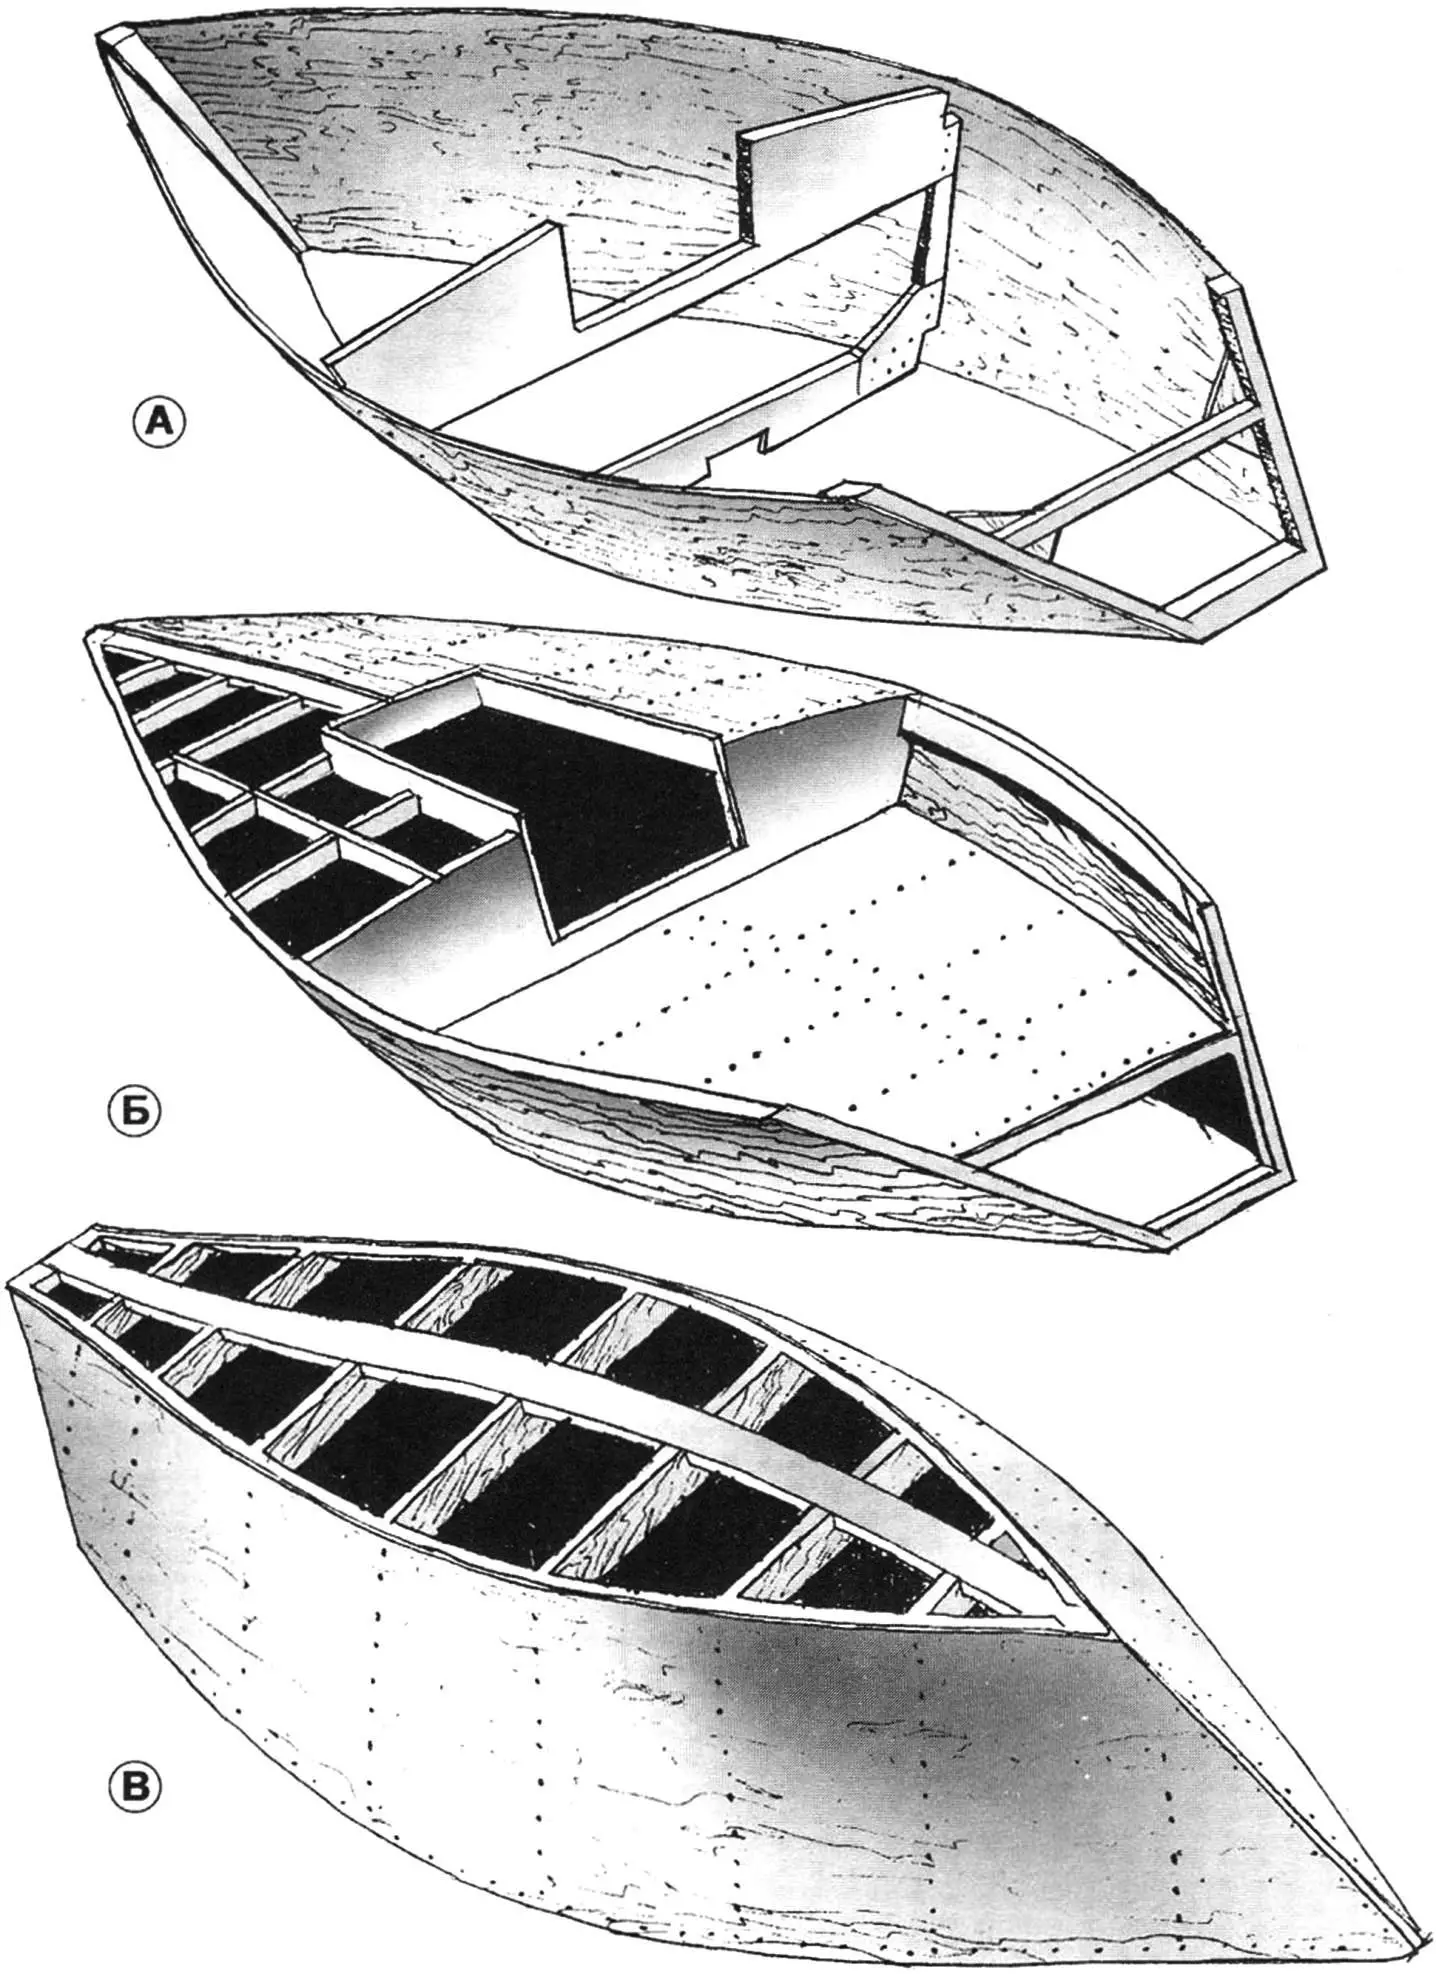
The essence of this method lies in assembling the hull from a set of blanks of such a shape that when connected to each other, they take on the given shape. In this way, boats of the most various sizes and purposes can be built: both small rowing dinghies only 2 meters long, and motorboats, and even cruising yachts 7… 8 meters long. Of course, the technology imposes known limitations on the vessel’s lines — they must be developable onto a plane, that is, such that can be planked with flat sheets. Flat-bottomed lines of the “dory” type, hard-chine of the “sharpie” type, and double-chine are best suited for this purpose (fig. 3).
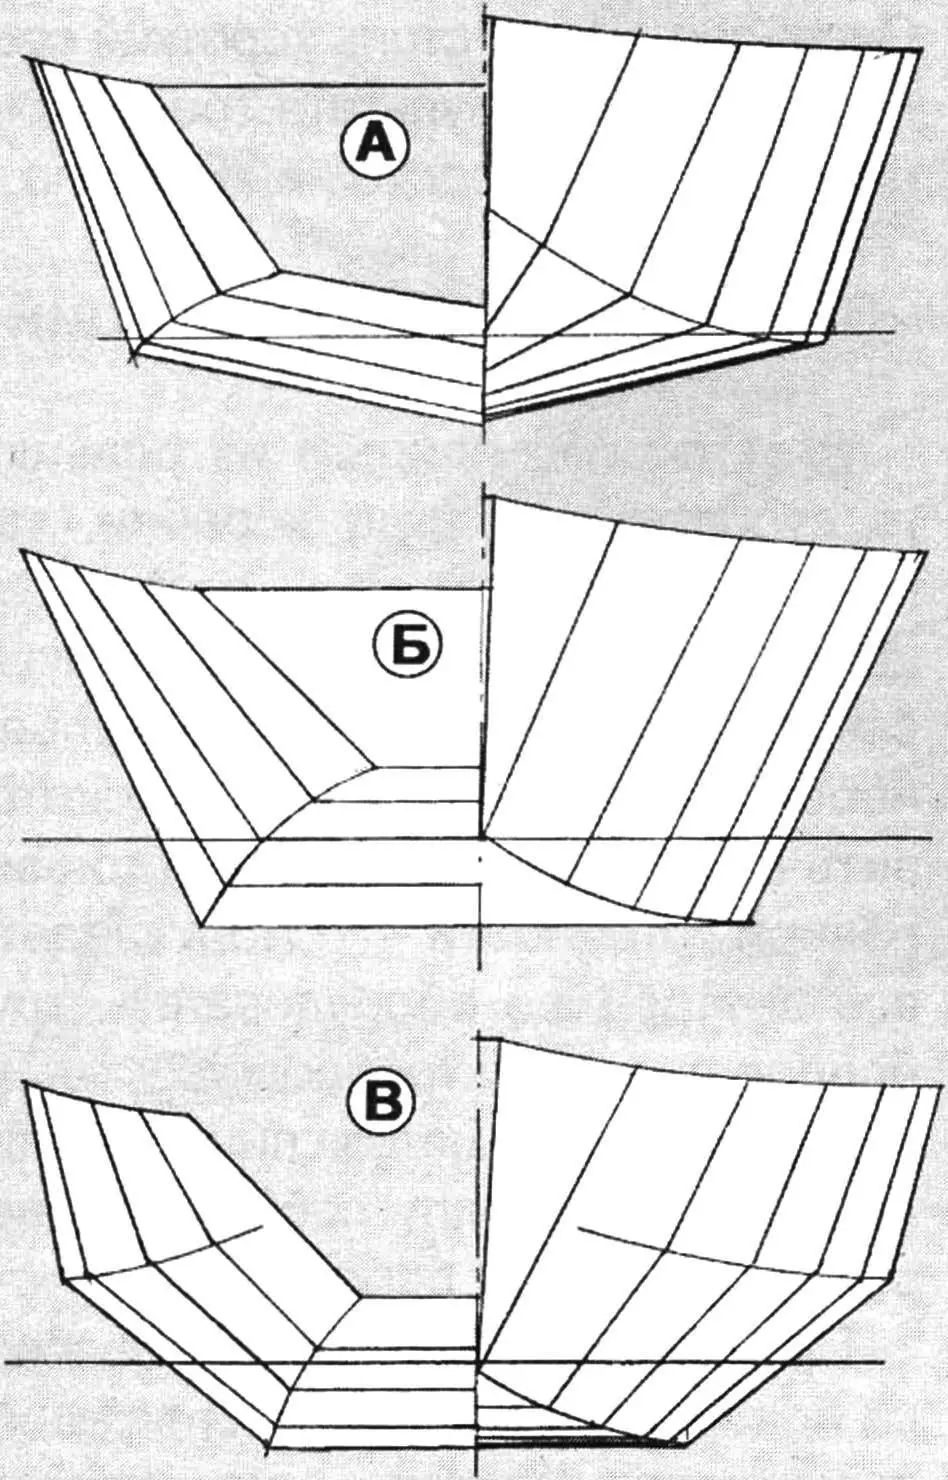
A — single-chine of “sharpie” type; B — single-chine of “dory” type; C — double-chine
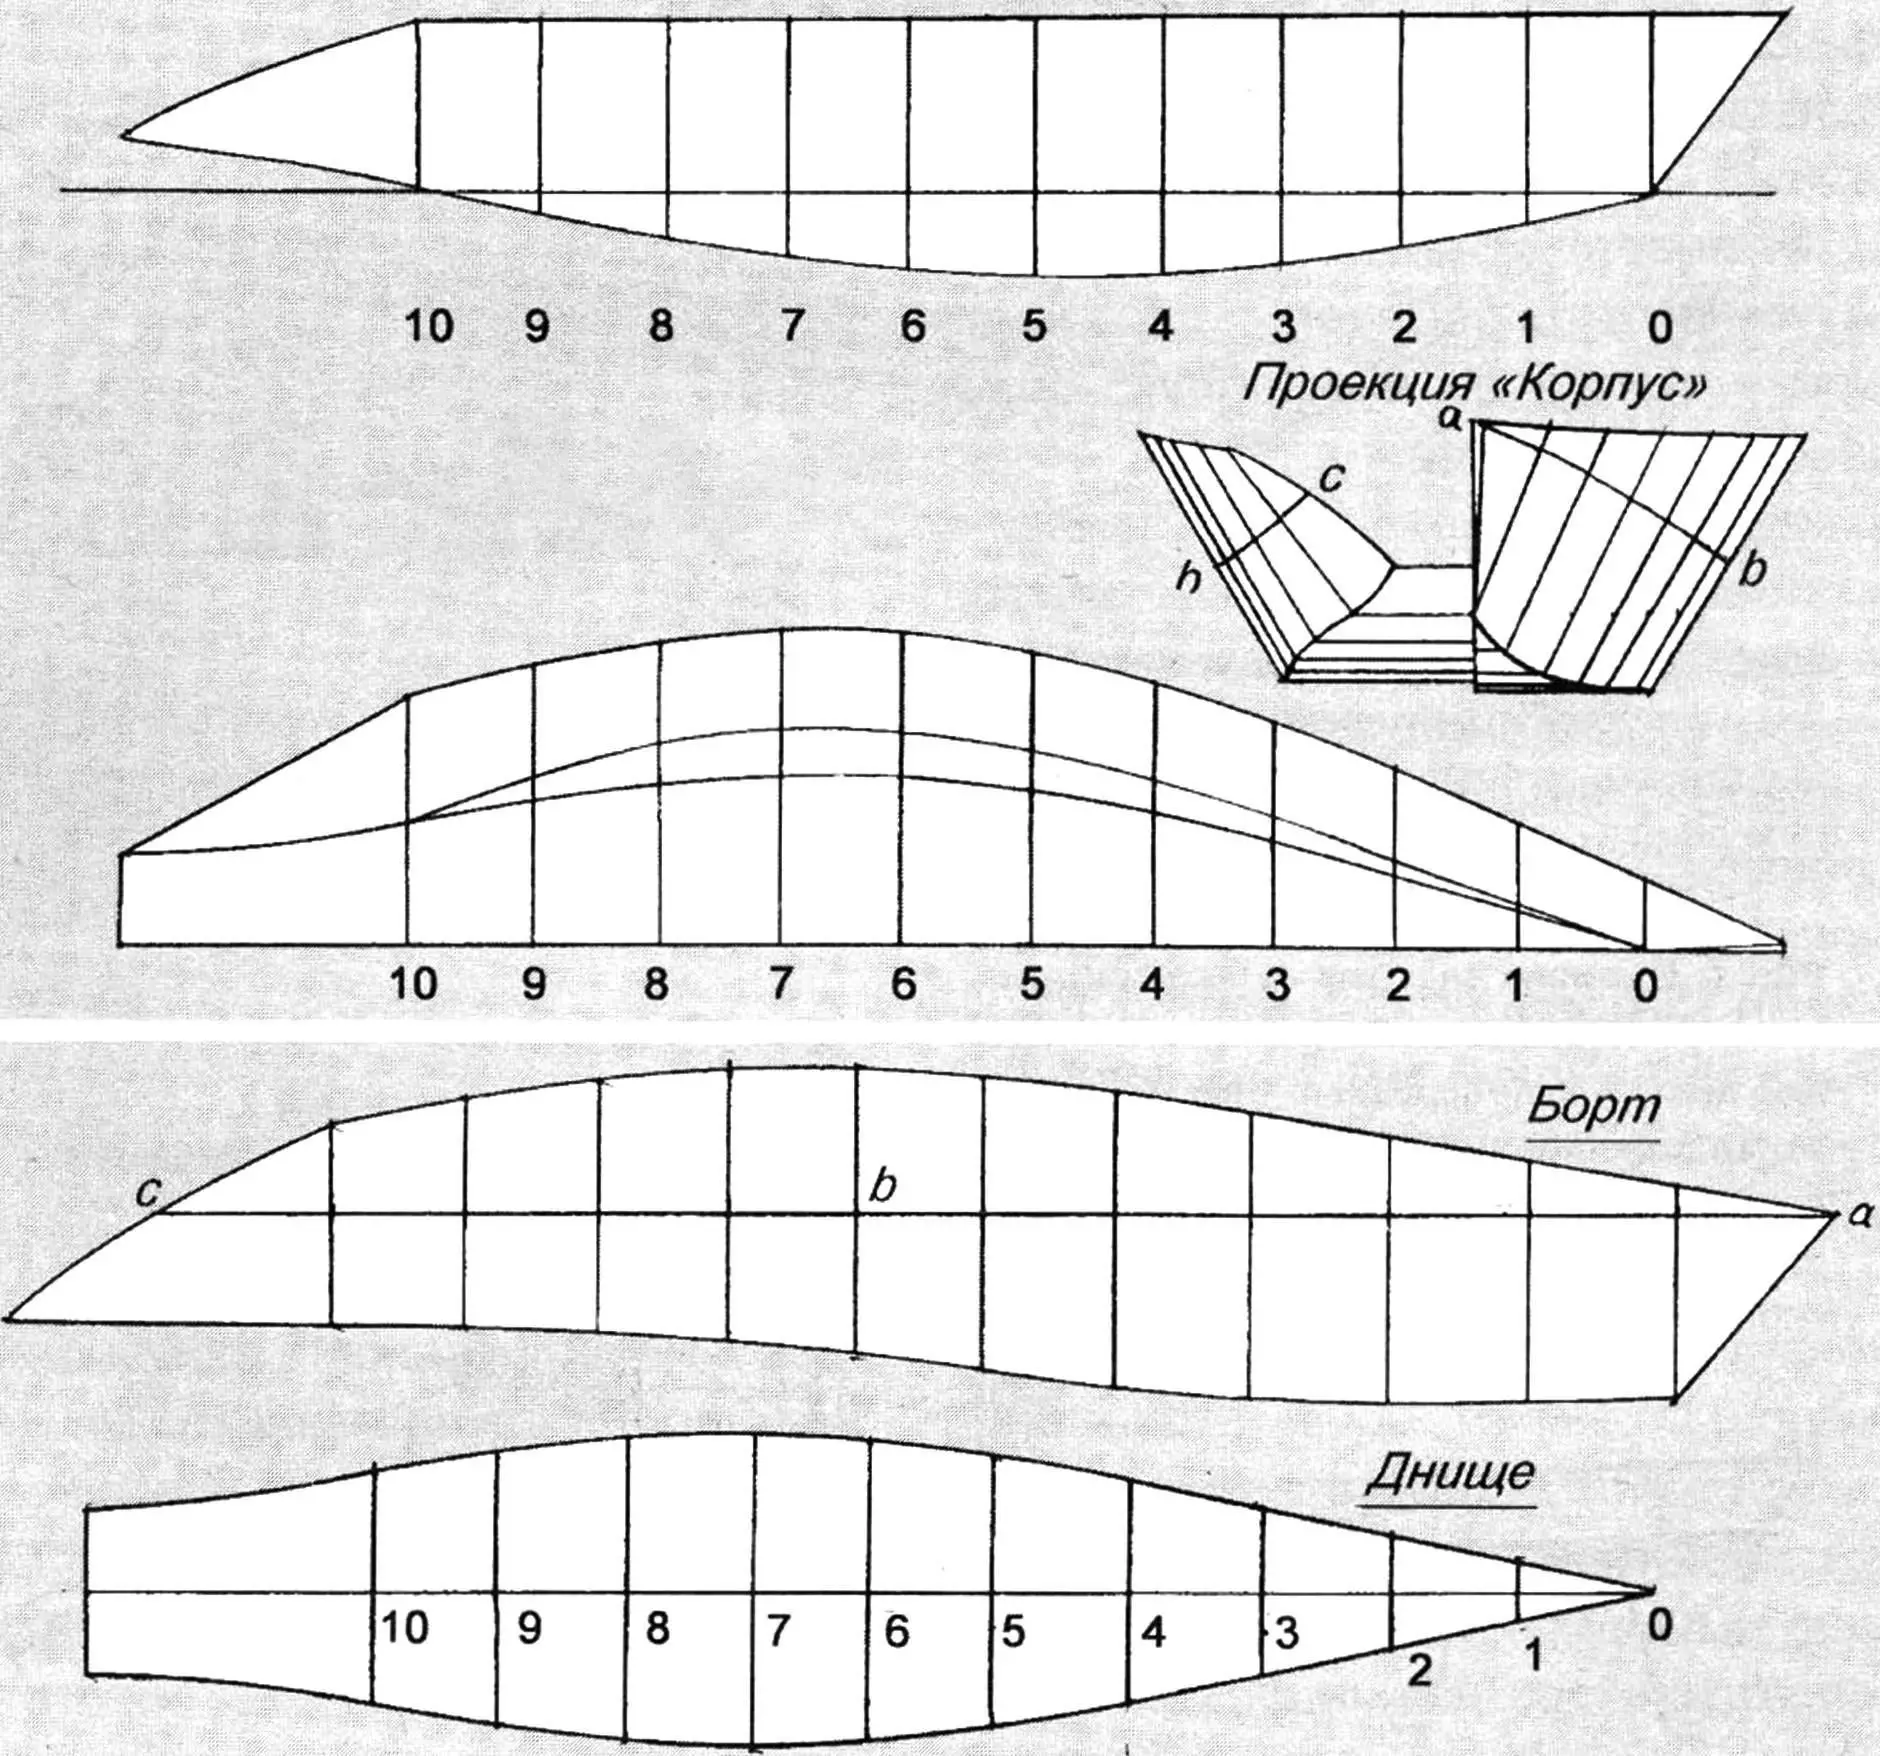
Construction is usually carried out in the following order. First, frame frames and bulkheads are made according to the theoretical drawing. Blocks for securing berths, shelves, and lockers are installed on them, and slots are cut for the keel, centerline timber, gunwale timbers, and chine stringers. Next, developments of the sides and bottom are applied to plywood sheets joined to the required dimensions (fig. 4). The exact locations for installing frames and bulkheads are marked on the cut blanks.
Then both side blanks are set up on a level platform and connected to each other by the stem and transom frame. The middle frame is installed. The hull already takes on its outlines (fig. 5 A).
After this, the remaining frames are installed according to the markings applied to the sides, from amidships — to the ends. Gunwale timbers, centerline timber, and deck stringers are laid in the pre-cut slots. After checking the correctness of the lines, internal equipment, berths, cabinets, etc. can be installed.
The next stage is the installation and fastening of deck sheets, cockpit bottom, and transom to the frame (fig. 5 B).
A — stem, middle frame, and transom frame installed; B — all frames installed, deck and cockpit bottom mounted; C — hull prepared for securing the bottom
Next, the hull is turned over, and the keel and chine stringers are laid in the previously cut slots. The bottom planking sheet is installed last (fig. 5 C).
Building vessels using this method provides great time savings. Suffice it to say, for example, that the hull of a cruising racing yacht 7.8 m long and 2.8 m wide was built in just four months. Work was carried out on Saturdays and Sundays by two people. Obviously, achieving this result in such a short time using the traditional method is simply impossible.
Assembly from Ready Sections
This method came from large shipbuilding, where ships are usually assembled on a building berth from several sections. Each such section, having relatively small dimensions, can be manufactured in a workshop and brought to a state of complete readiness — all internal equipment, pipelines, and electrical wiring can be installed, and on the building berth platform, only connect the modules to each other and carry out finishing work.
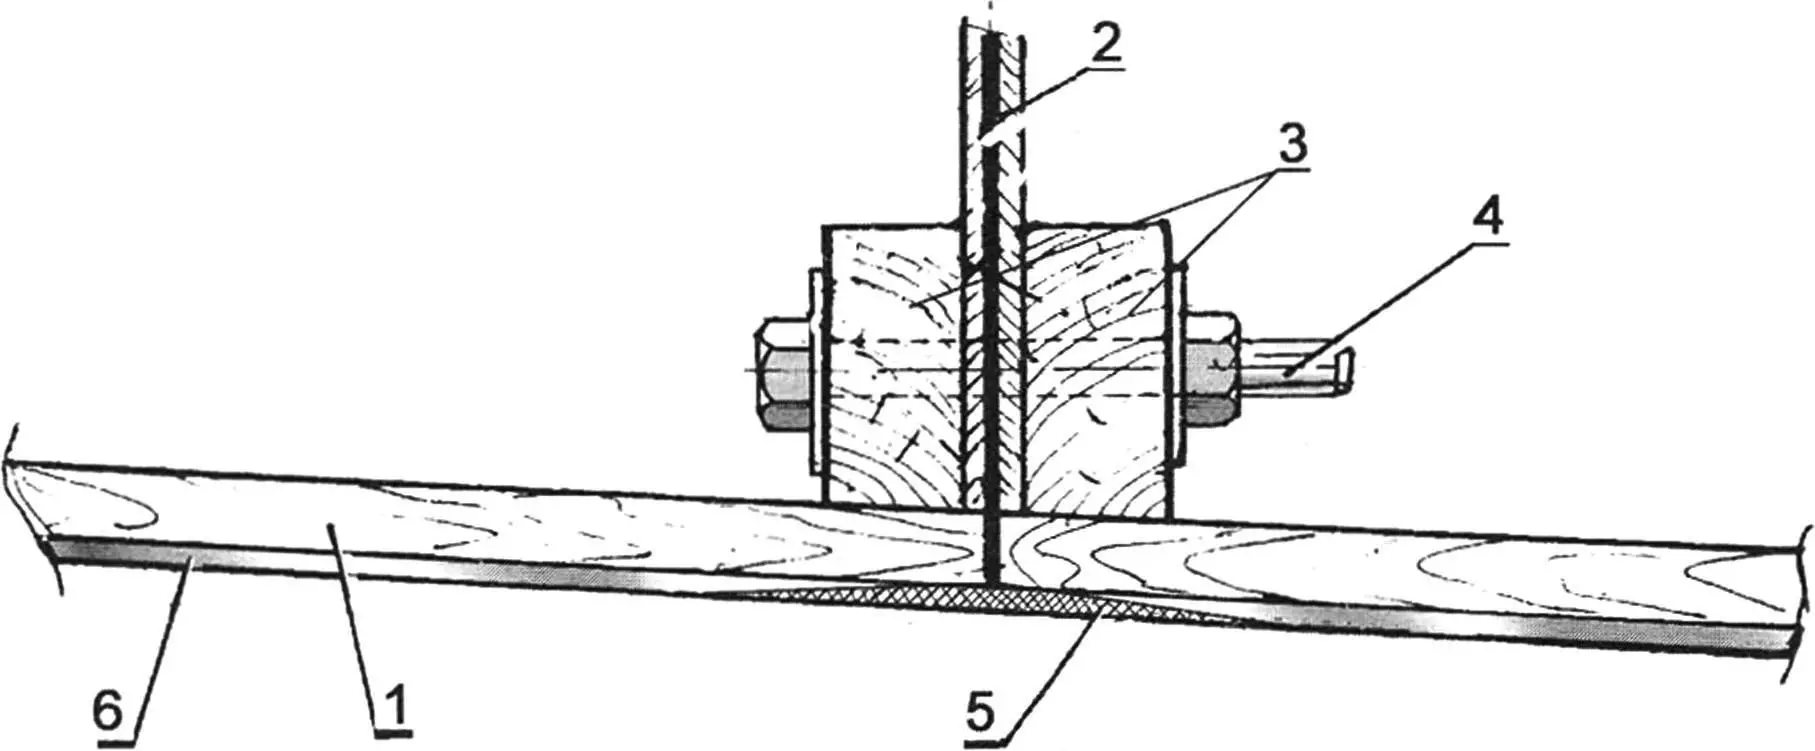
1 — wooden hull planking; 2 — adhesive seam; 3 — transverse timbers of double midship frame; 4 — tie bolt; 5 — additional joint covering with fiberglass (3…4 layers); 6 — fiberglass coating
By applying this method to assembling boats, boats, and yachts, we will be able to build relatively large watercraft in limited spaces. After all, it often happens that an amateur shipbuilder has a small room where it is impossible to place a boat of the required size. It also happens that the room is quite spacious, but the gates in it do not allow the finished vessel to be removed. In these cases, only assembly from ready sections will help.
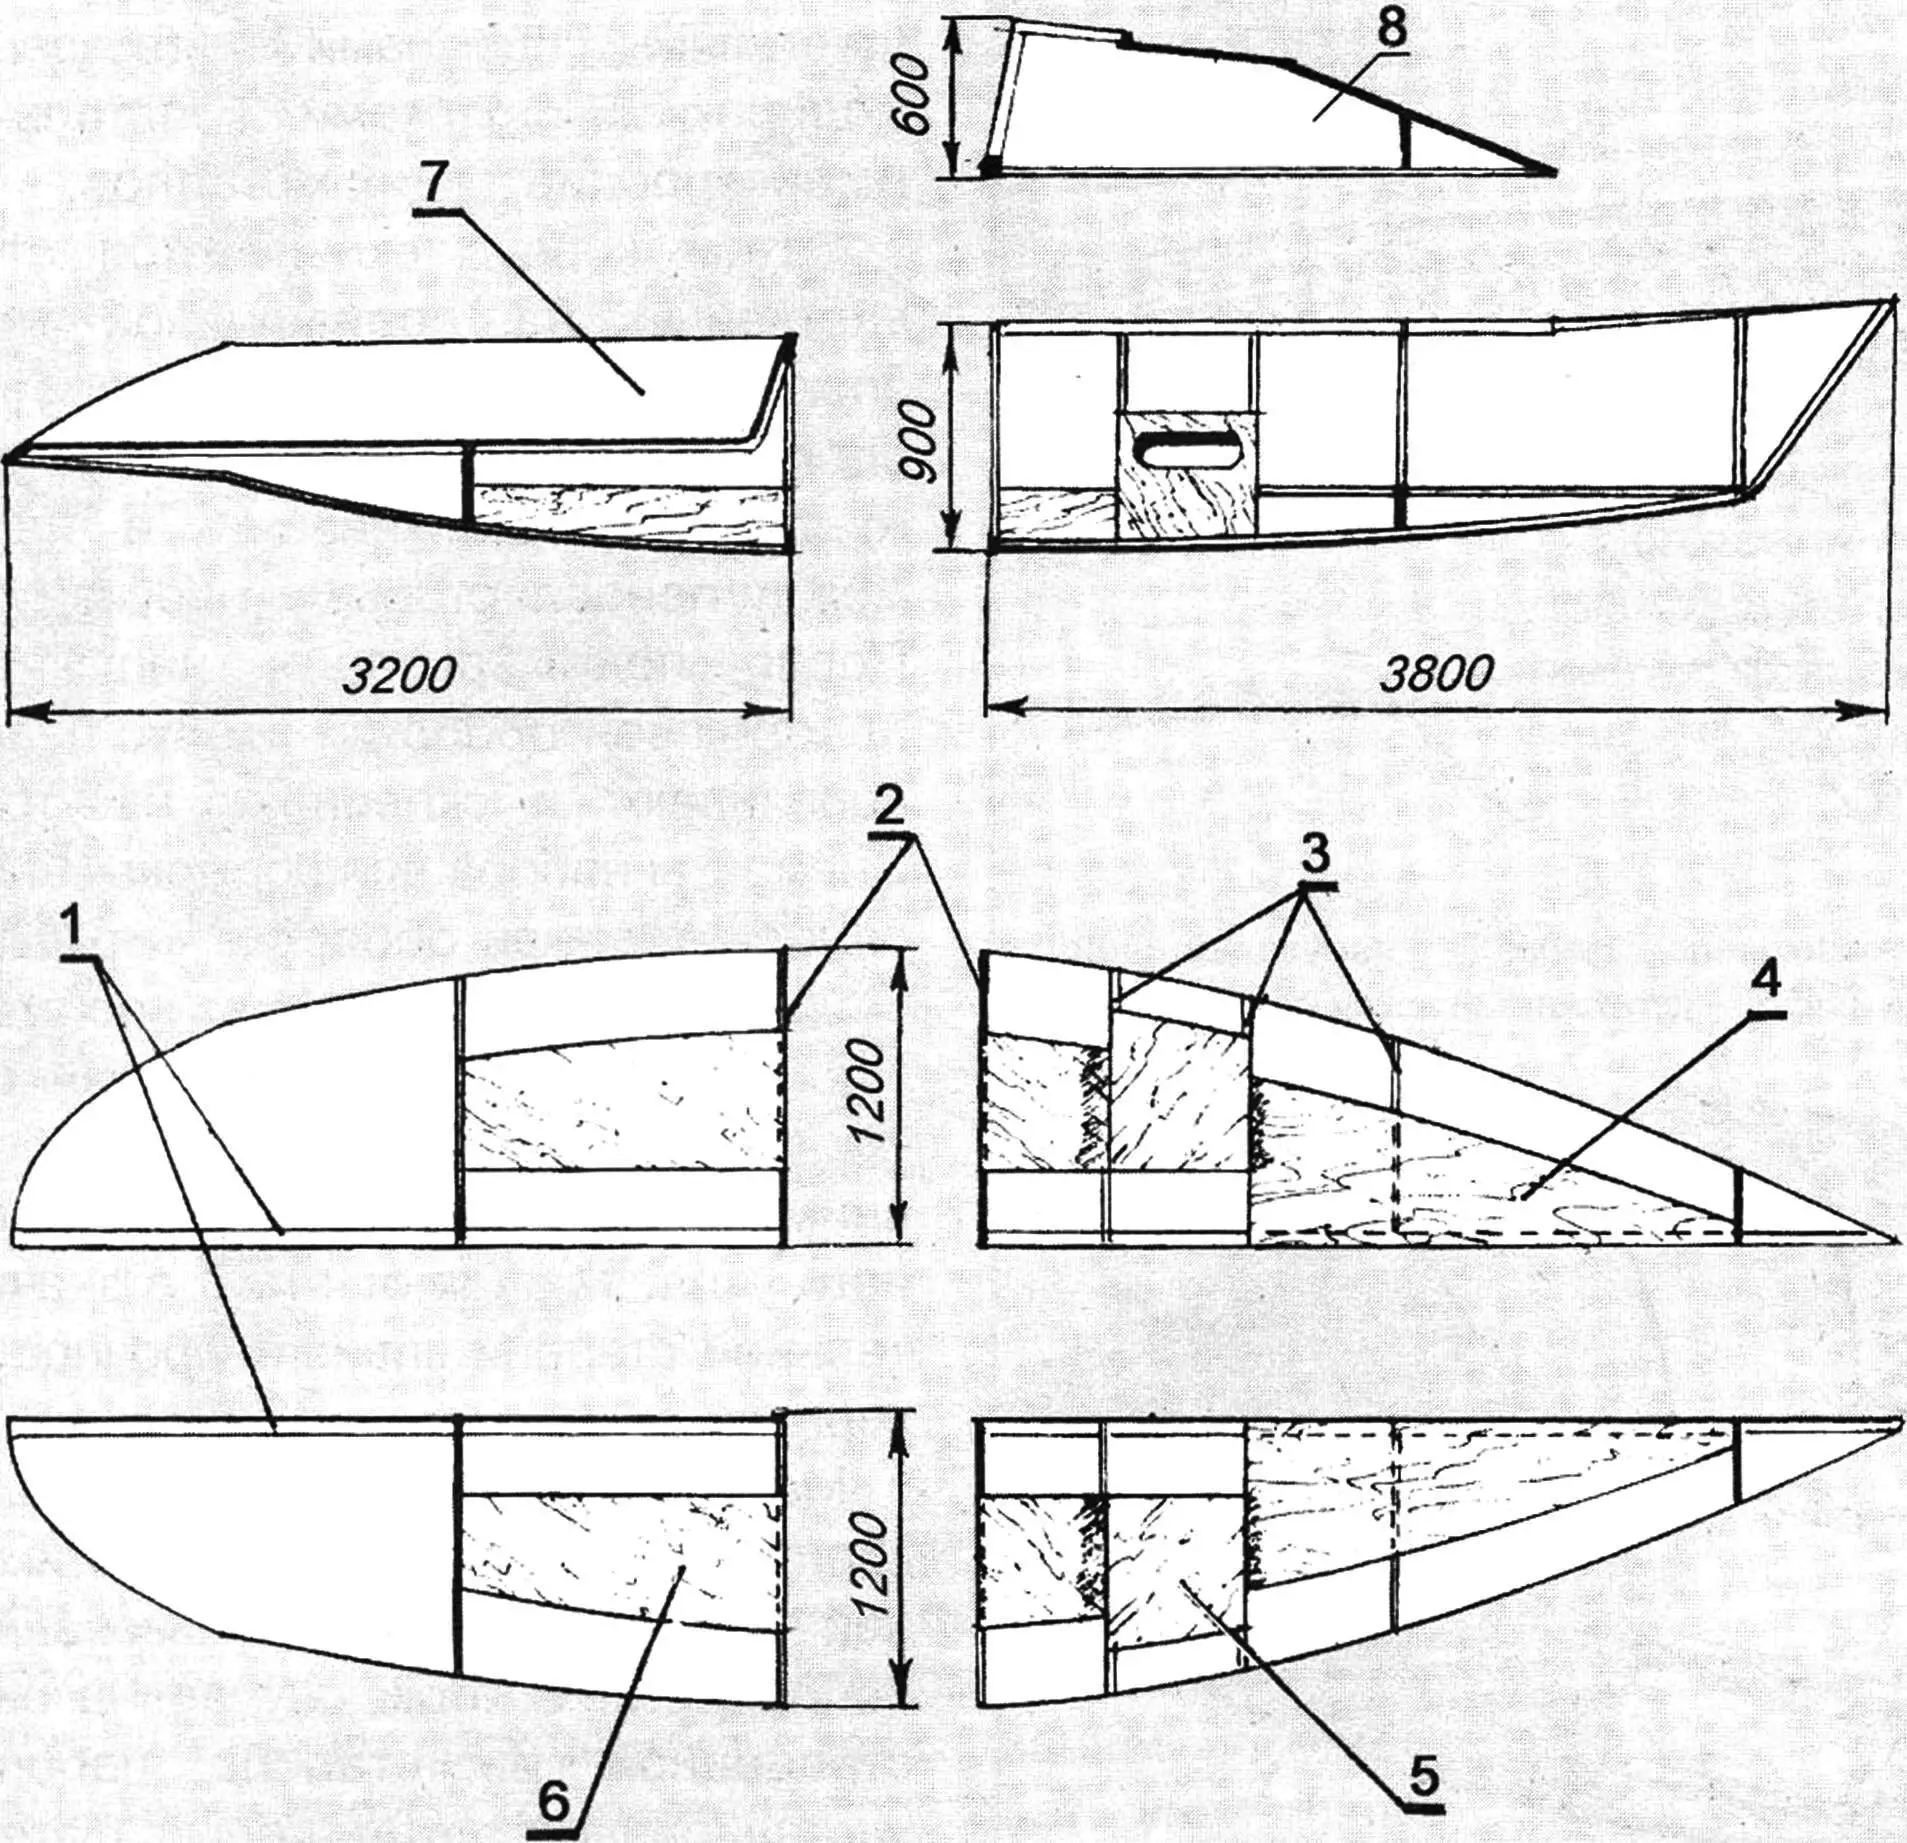
1 — double keel timber; 2 — double midship frame; 3 — frames; 4 — forward berth; 5 — navigator’s table; 6 — aft post; 7 — self-draining cockpit; 8 — wheelhouse
Figure 7 shows an example of breaking down the hull of a small cruising yacht into sections. The overall dimensions of each section do not exceed 3.8×1.2×0.9 m, and a room with an area of 5×2.5 m is sufficient for their construction. Before final assembly, each block needs to be brought to a state of complete readiness. All structural elements and parts should be installed in it — bulkheads, berth and locker decking, cabinets, etc. It is advisable to perform interior finishing, and if necessary, cover the outer surface with fiberglass. Then on the assembly platform, it will only remain to connect the modules, putty and sand the joint areas, and paint the finished hull. One of the options for connecting sections is shown in figure 6. It is necessary to especially note that all work must be carried out with high precision to avoid problems during their joining later.
Building Fiberglass Vessels Without Tooling
As already noted, making tooling for forming fiberglass hulls — a plug and mold — is a rather complex and expensive operation. In recent years, methods that allow doing without it have been increasingly practiced. One of them is the manufacture of composite hulls with a “sandwich” planking (fig. 8). The frame elements of such hulls — bulkheads, frames, keel, chine and gunwale timbers — are made of wood and plywood, and the three-layer planking consists of two thin fiberglass shells — outer and inner — and foam between them. The planking thickness is determined depending on the vessel’s size and operational loads. Usually, the fiberglass layers have a thickness of 2…4 mm (the outer layer, as a rule, is made one and a half times thicker than the inner one to resist local loads and wear from friction), and the foam layer — 8…15 mm. Only those grades of foam should be used that are not dissolved by polyester and epoxy resins that are part of fiberglass.
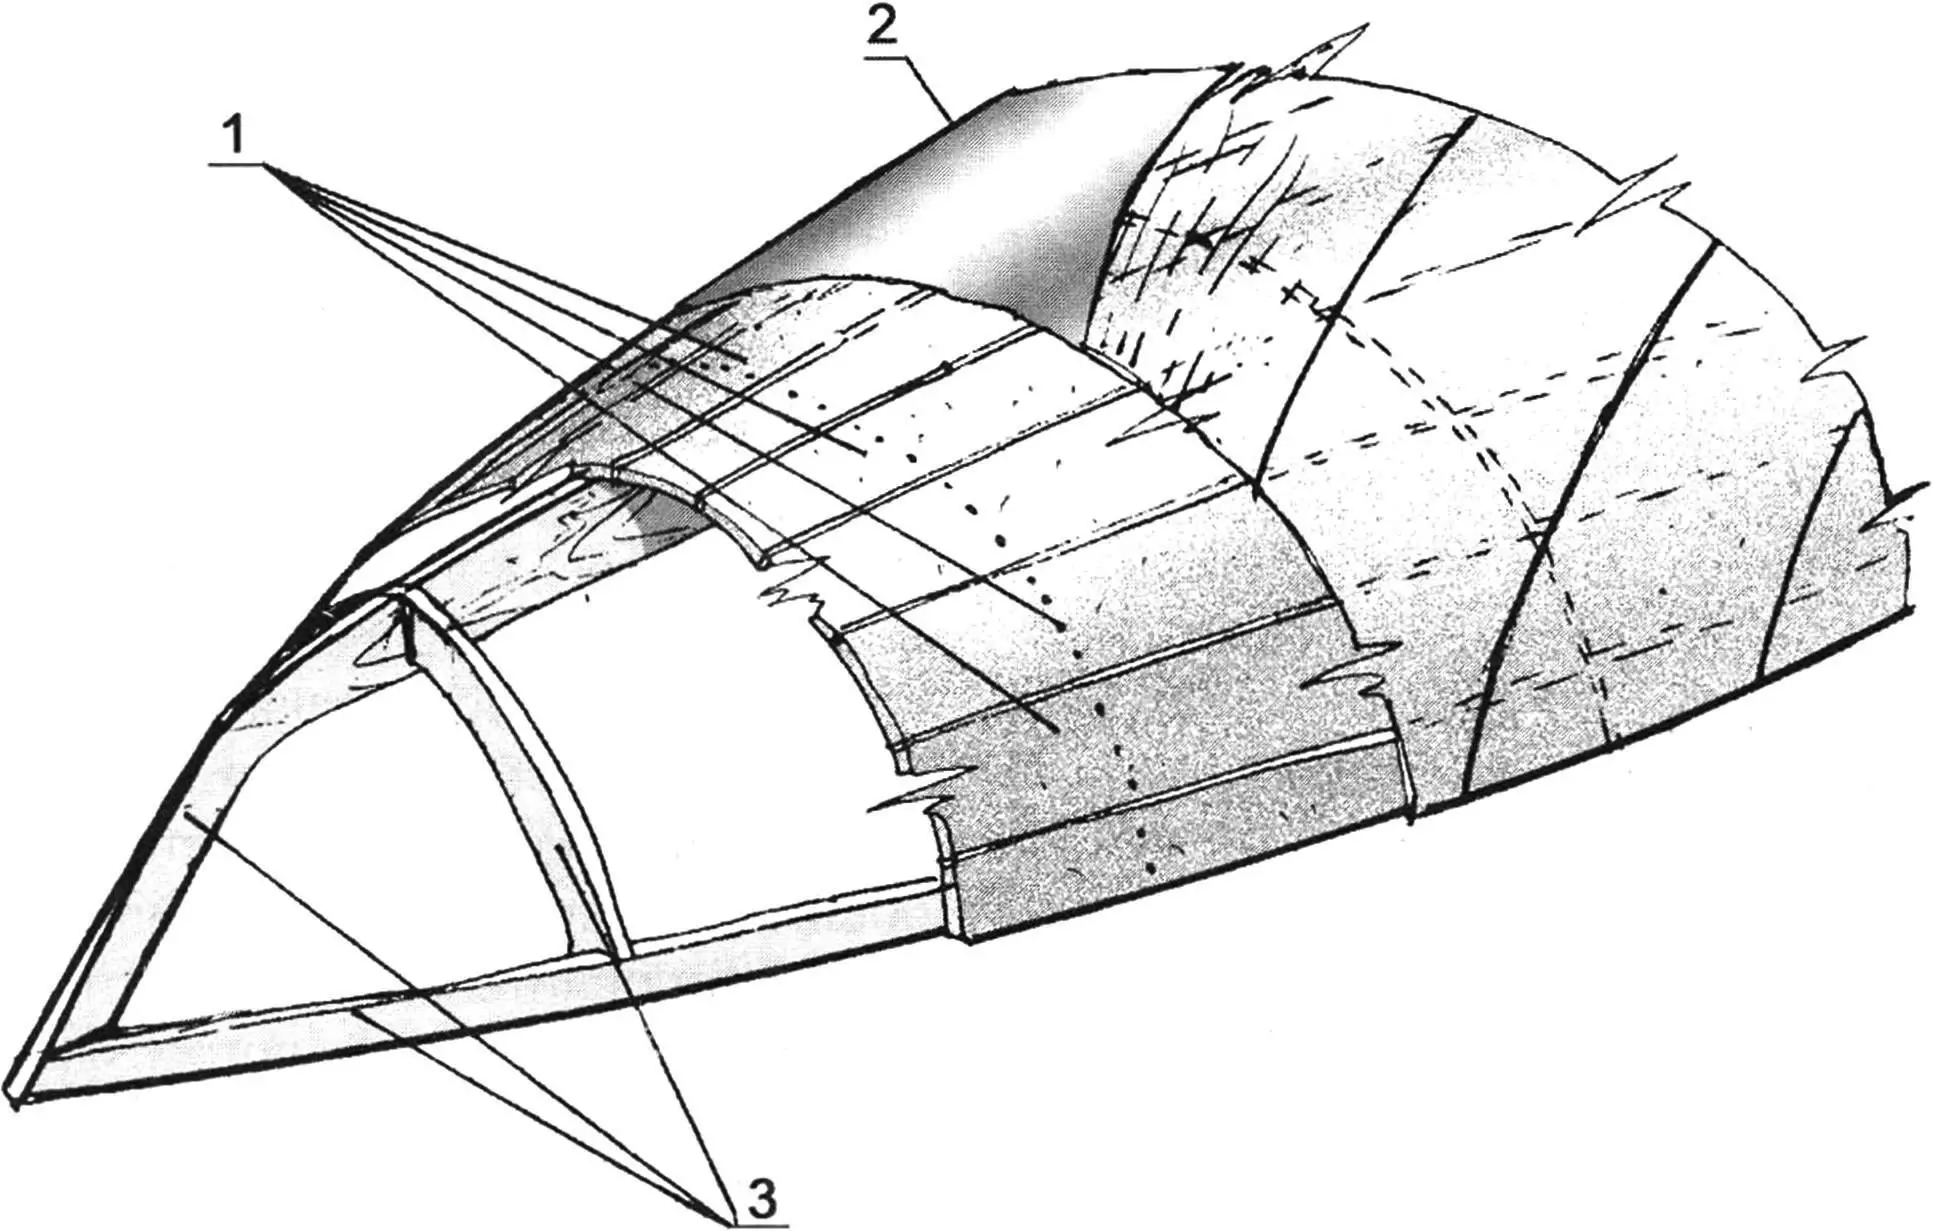
1 — foam “boards”; 2 — fiberglass; 3 — wooden frame elements
The construction technology is as follows. Initially, a wooden frame consisting of frames and bulkheads is set up on the building berth and connected into a rigid spatial structure with the help of the keel and gunwale timbers. Frame spacing is chosen within 500…800 mm. Then the frame is planked with foam “boards”. They are obtained by cutting foam sheets using a simple thermal cutter containing a nichrome wire heated by electric current. Small gaps should remain between the “boards”. Subsequently, they are filled with resin, which will reliably connect the inner and outer plastic shells (fig. 9). Fastening the foam to the frame is done with screws or nails with wide heads, preferably made of non-corrosive metals.
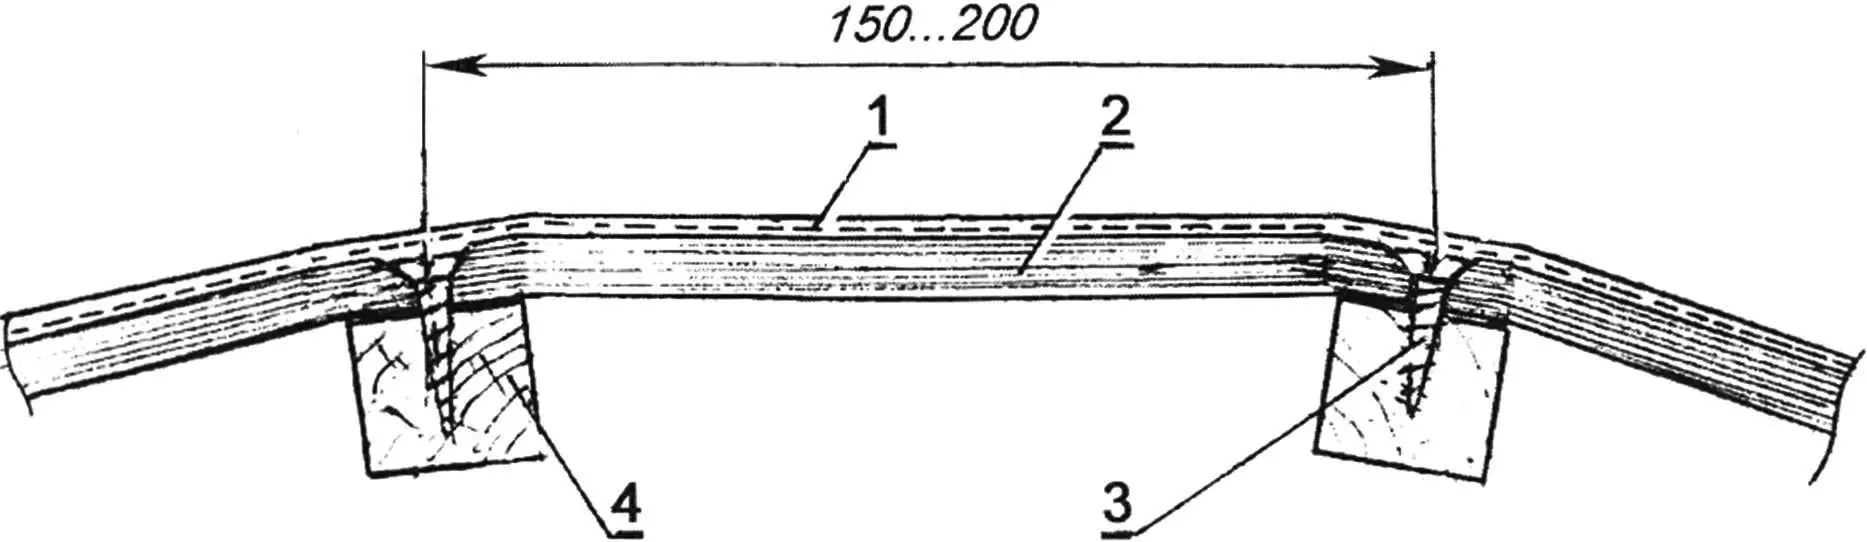
1 — foam “board”; 2 — gap filled with fiberglass; 3 — outer fiberglass layer; 4 — inner fiberglass layer; 5 — wooden frame element
Then the hull is bonded with fiberglass using polyester or epoxy resin. The first one or two layers of fabric are pushed into the gaps between the foam “boards” using a wooden spatula. After polymerization of the outer plastic shell, the hull is turned over and bonded from the inside. Frame elements are molded to the inner shell with a “wet corner” consisting of several strips of fiberglass impregnated with resin. Special attention should be paid to the quality of this joint, as the hull strength largely depends on it.
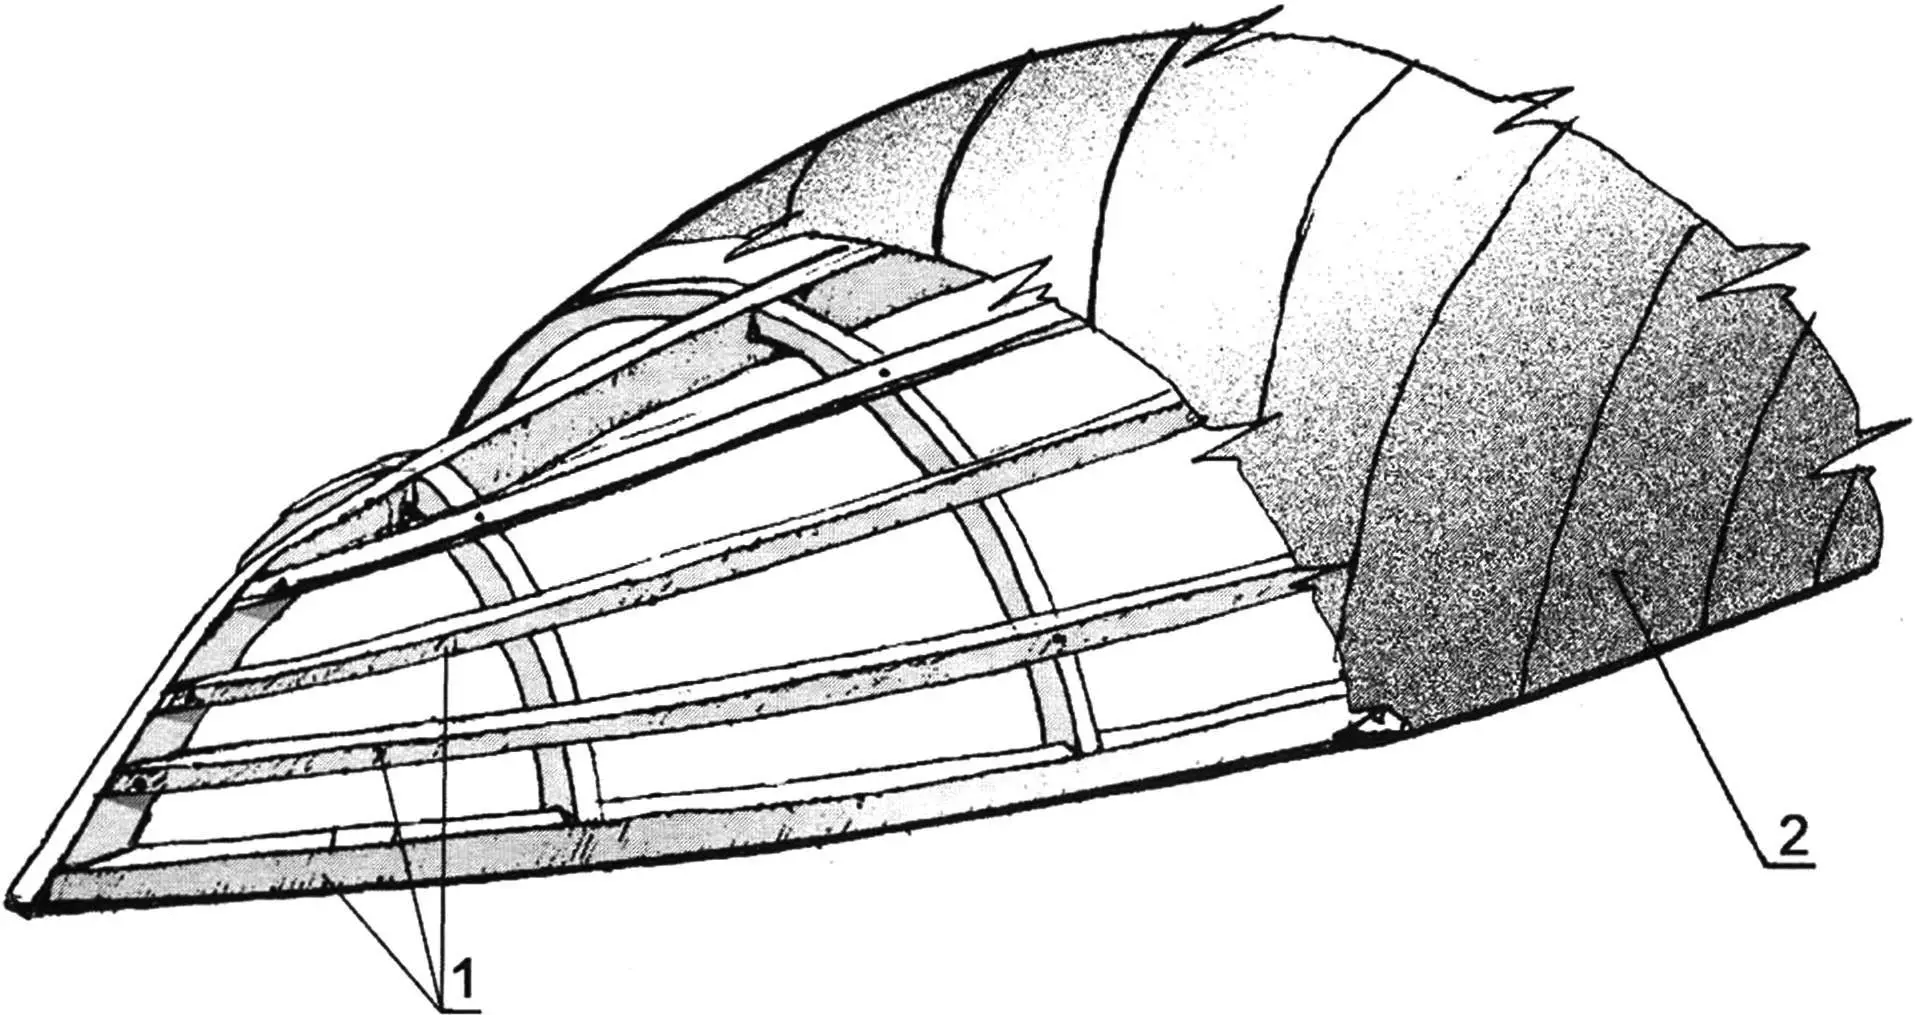
1 — wooden stringers; 2 — fiberglass
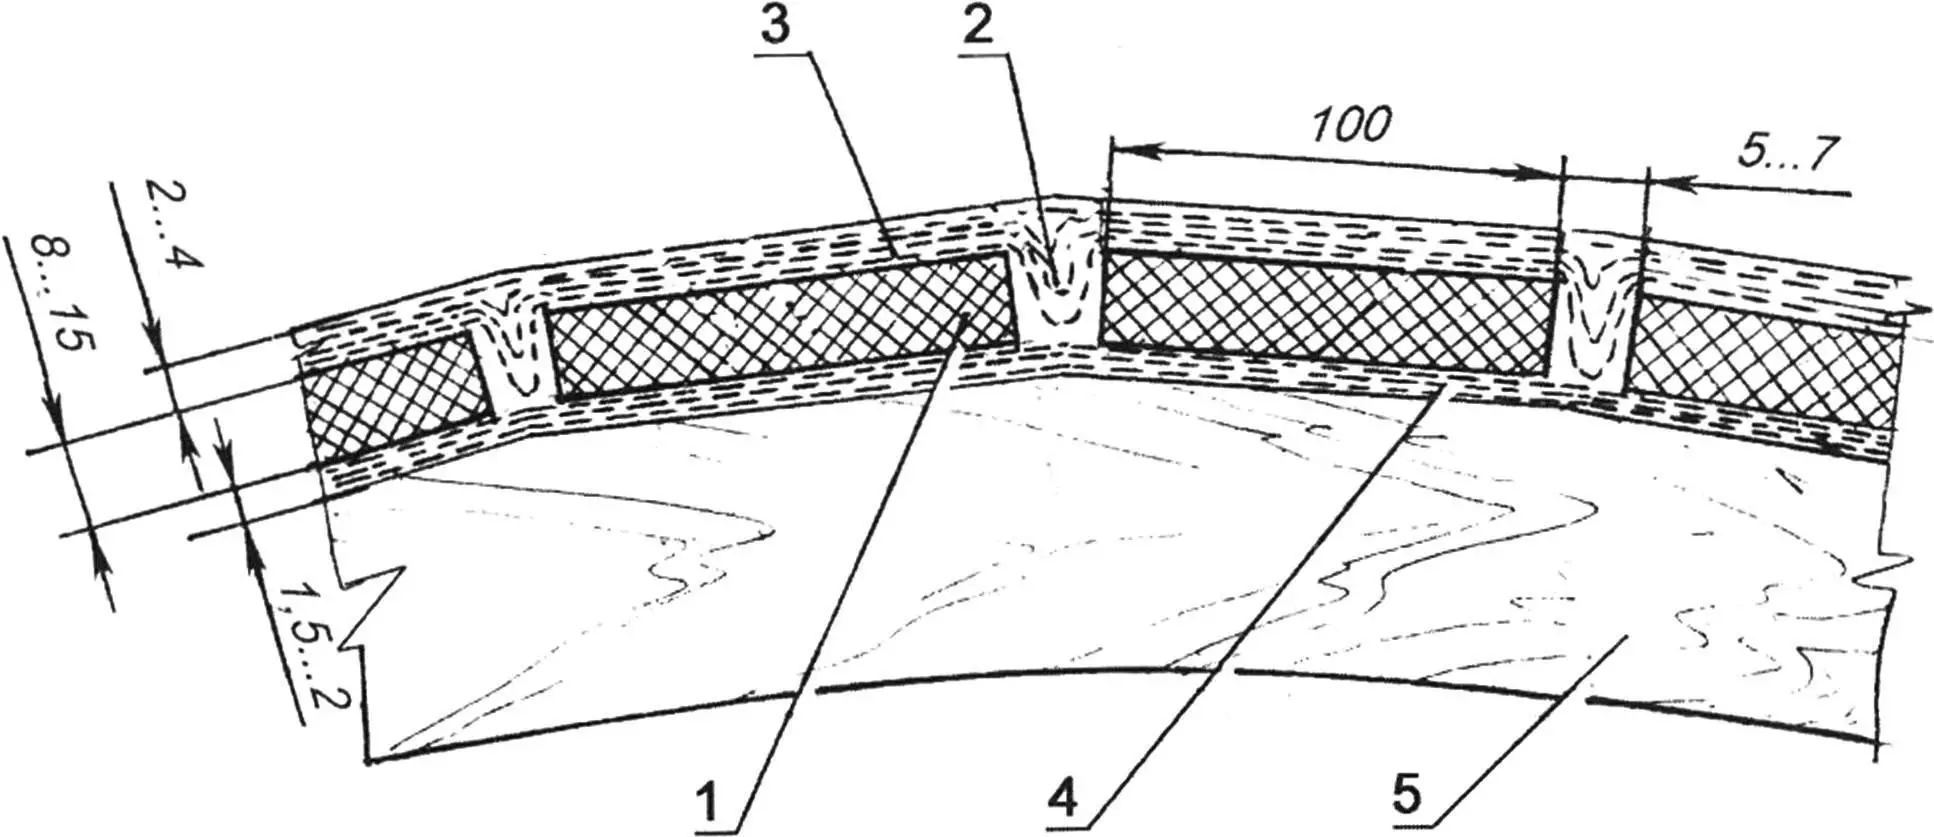
A composite hull can also be made with single-layer plastic planking, without using foam. In this case, stringers are installed on the frame set up on the building berth with a spacing of 150…200 mm. Their cross-section should be from 15×15 mm to 30×30 mm — depending on the hull size. Then the frame is covered with dense fiberglass, best of all fiberglass mat, impregnated with resin. The material tension force should be sufficiently large to eliminate sagging between stringers (fig. 11). Before forming the planking further, the first layer needs to be allowed to “set” so that it does not deform later under the action of the mass of subsequent layers.
1 — outer fiberglass layer; 2 — main fiberglass planking (3…4 layers); 3 — brass or galvanized screw; 4 — wooden stringer
To increase the reliability of attaching the plastic planking to wooden stringers, it needs to be additionally secured with small screws, and then covered with one or two layers of thin fiberglass mesh to hide the screw heads.
Of course, a hull built in this way will have faceted lines, but this will practically not affect either the vessel’s performance or its appearance.
V. MURNIKOV
Recommend to read
 BLITZ FILTER
For homebrew, working on motorcycles, always up to date selection of the optimal variant of the air filter. The most common available contact-oil (lubricated with a thick oil mesh or... NAKAJIMA B5N
This Japanese carrier-based torpedo bomber with radial engine, Nakajima "Hikari 1" made its first flight in January 1937. Delivery of the first production NAKAJIMA B5N1 on Japanese...
