The advantages of compact folding boats are obvious, the disadvantages too. In one of the old issues of the “Modelist-Konstruktor” magazine (on the last page of the cover), photographs and a brief description of a folding trimaran by Leningrad shipbuilder V.A. Vakulenko were published. His trimaran consisted of three folding hulls arranged in a triangle and connected into one whole by a lattice platform. The most remarkable thing about this design is the extreme simplicity of manufacturing the hulls. This is the basis of my boat as well.
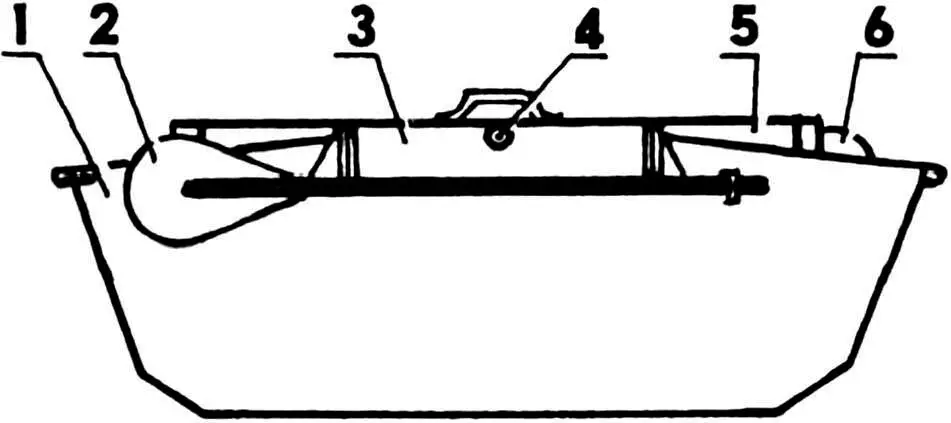
It consists of four identical folding compartments. Their sides, unfolded and fixed in this position by a spacer, resemble a rhombus in plan. At the same time, the underwater parts of the compartments have smooth streamlined contours. The compartments fastened together with a seat and two spacers form a trimaran.
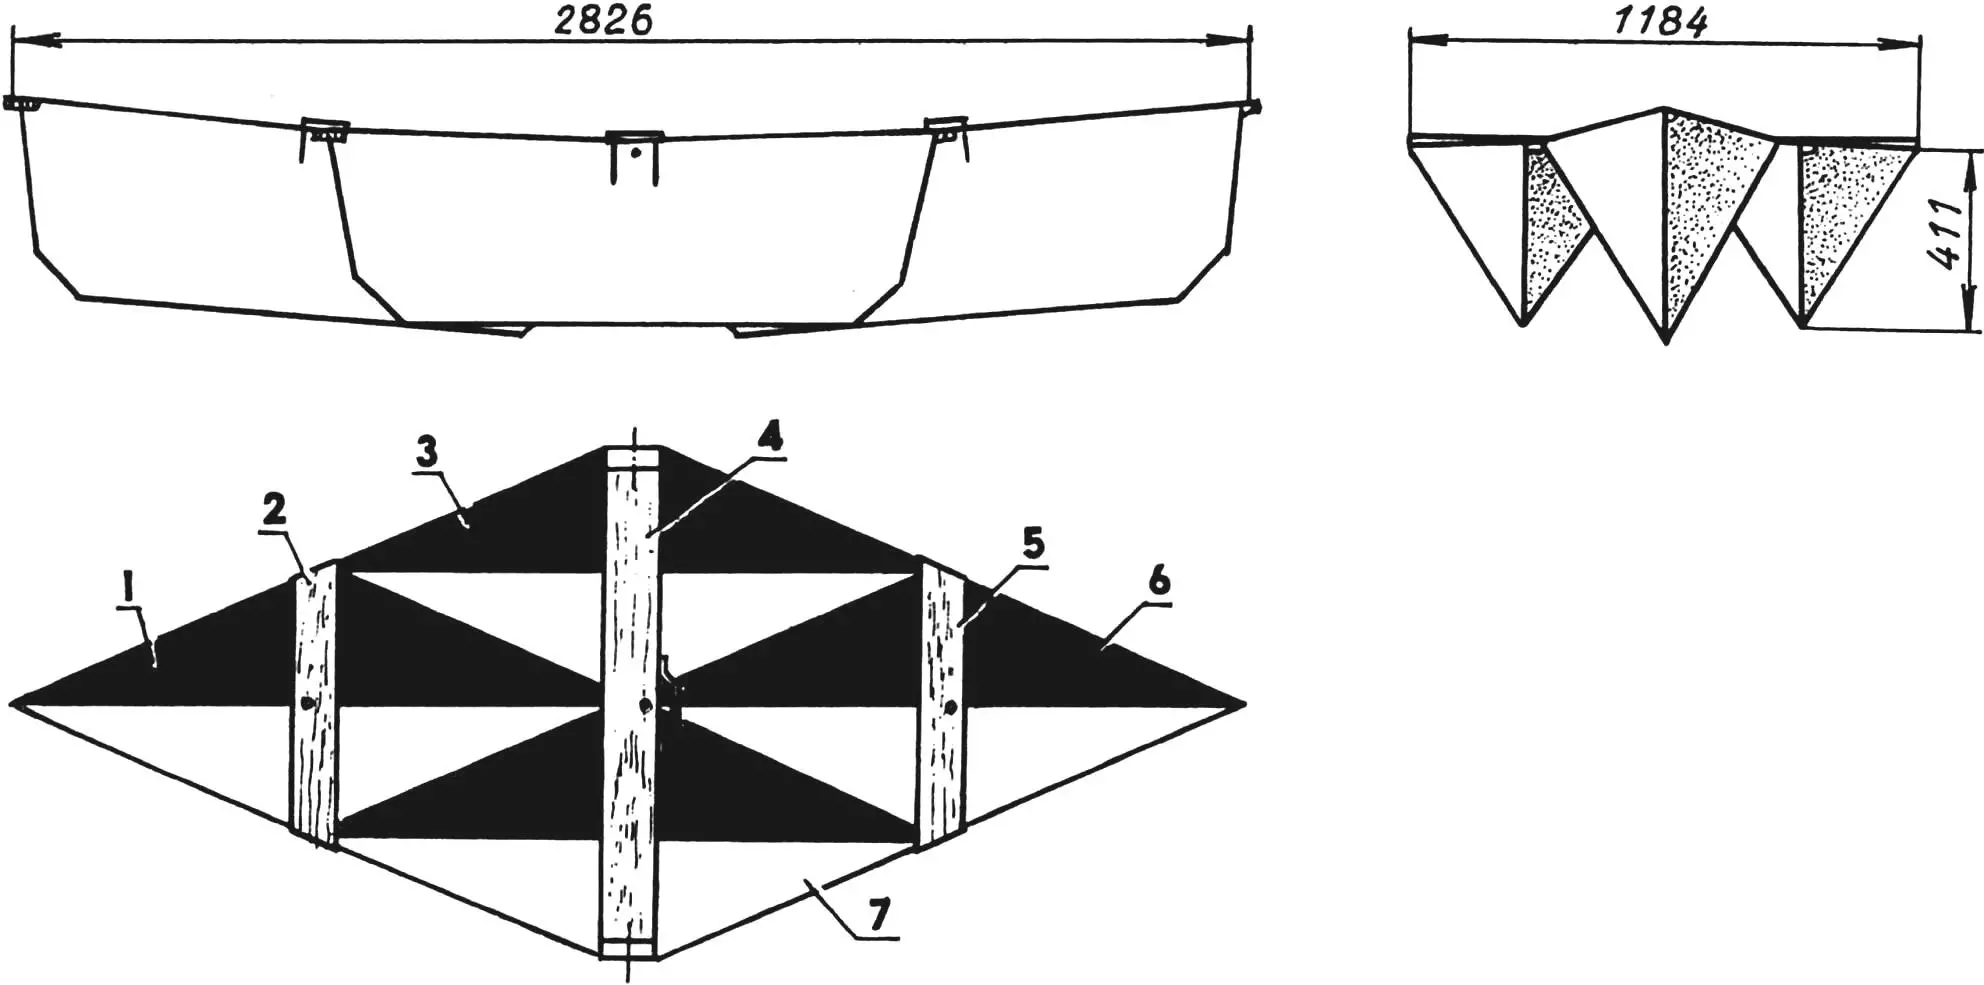
1,6 — bow and stern compartments; 2,5 — spacers; 3,7 — side compartments; 4 — seat
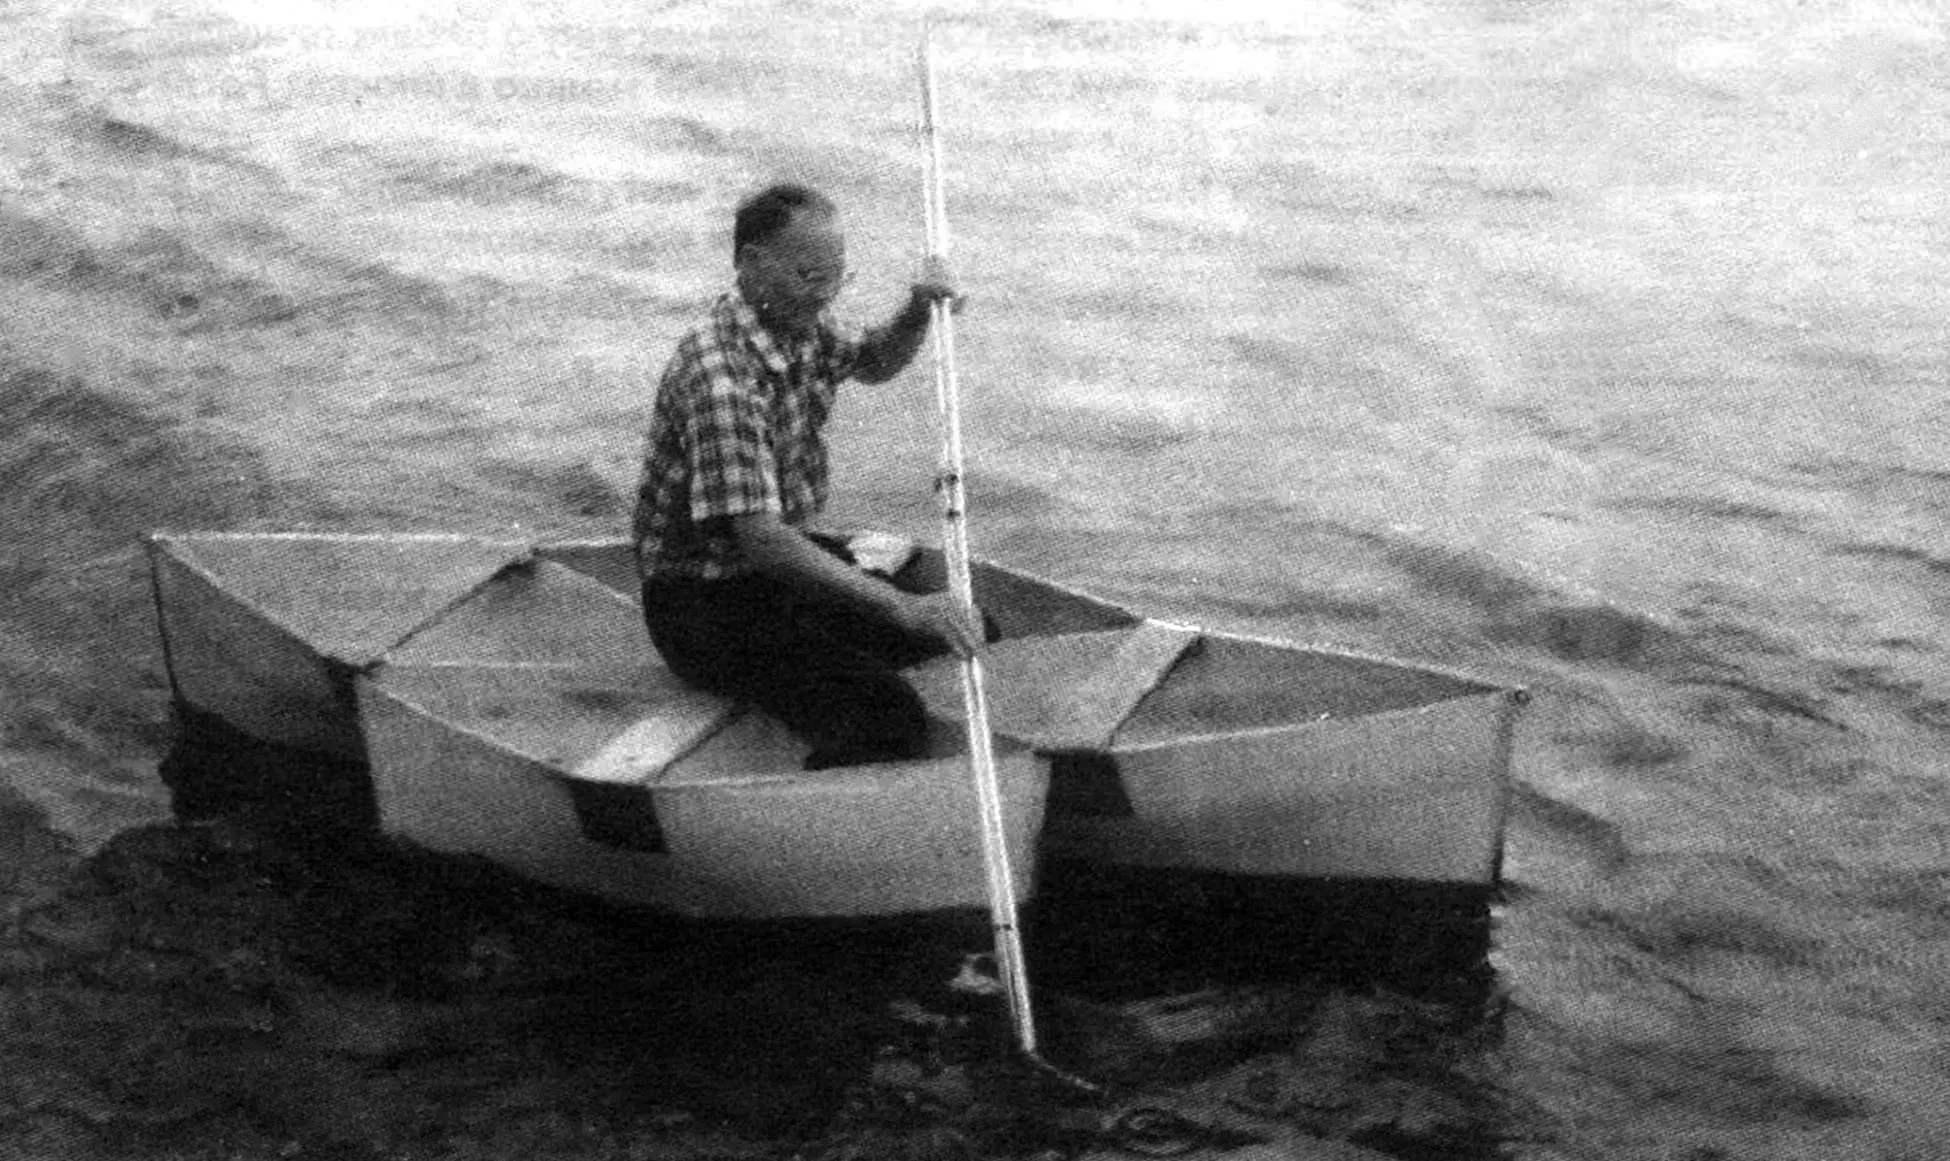
The rhomboid construction of the boat in plan and triangular in cross-sections, as well as the convex bends of the sides, give the entire structure special strength and rigidity, difficult to achieve in conventional folding boats. The trimaran is stable on water, stable on course, and fast. The rower sits in it like in a kayak — facing forward, but rowing here is less tiring. This is facilitated by the natural (high) seating position of the rower, when his legs rest against the bottoms of the side compartments, and his arms with the oar are positioned at waist level. The detachable two-bladed kayak-type oar is made from a sheet of duralumin and old ski poles.
Each compartment of the boat consists of two identical plywood sides connected along the keel by a piano hinge 600 mm long. The hinge is riveted to the sides, but short screws with subsequent peening of their ends can also be used. In addition, the sides folded together along three sides of the perimeter (except the top — the sides) are covered with a strip of rubberized fabric (dense canvas can also be used) 60 mm wide. The strip serves as a kind of fabric hinge that allows the compartment sides to spread apart.
This hinge in the unfolded state experiences significant loads on the stems directed at tearing the fabric from the sides. Therefore, the stems are reinforced — stitched with synthetic threads through holes pierced with an awl with a pitch of 8—10 mm, and the seams are coated with waterproof glue. And one more thing. To protect the fabric hinge from wear, the compartment keel is additionally covered with a narrow strip of rubber cut from an old bicycle inner tube.
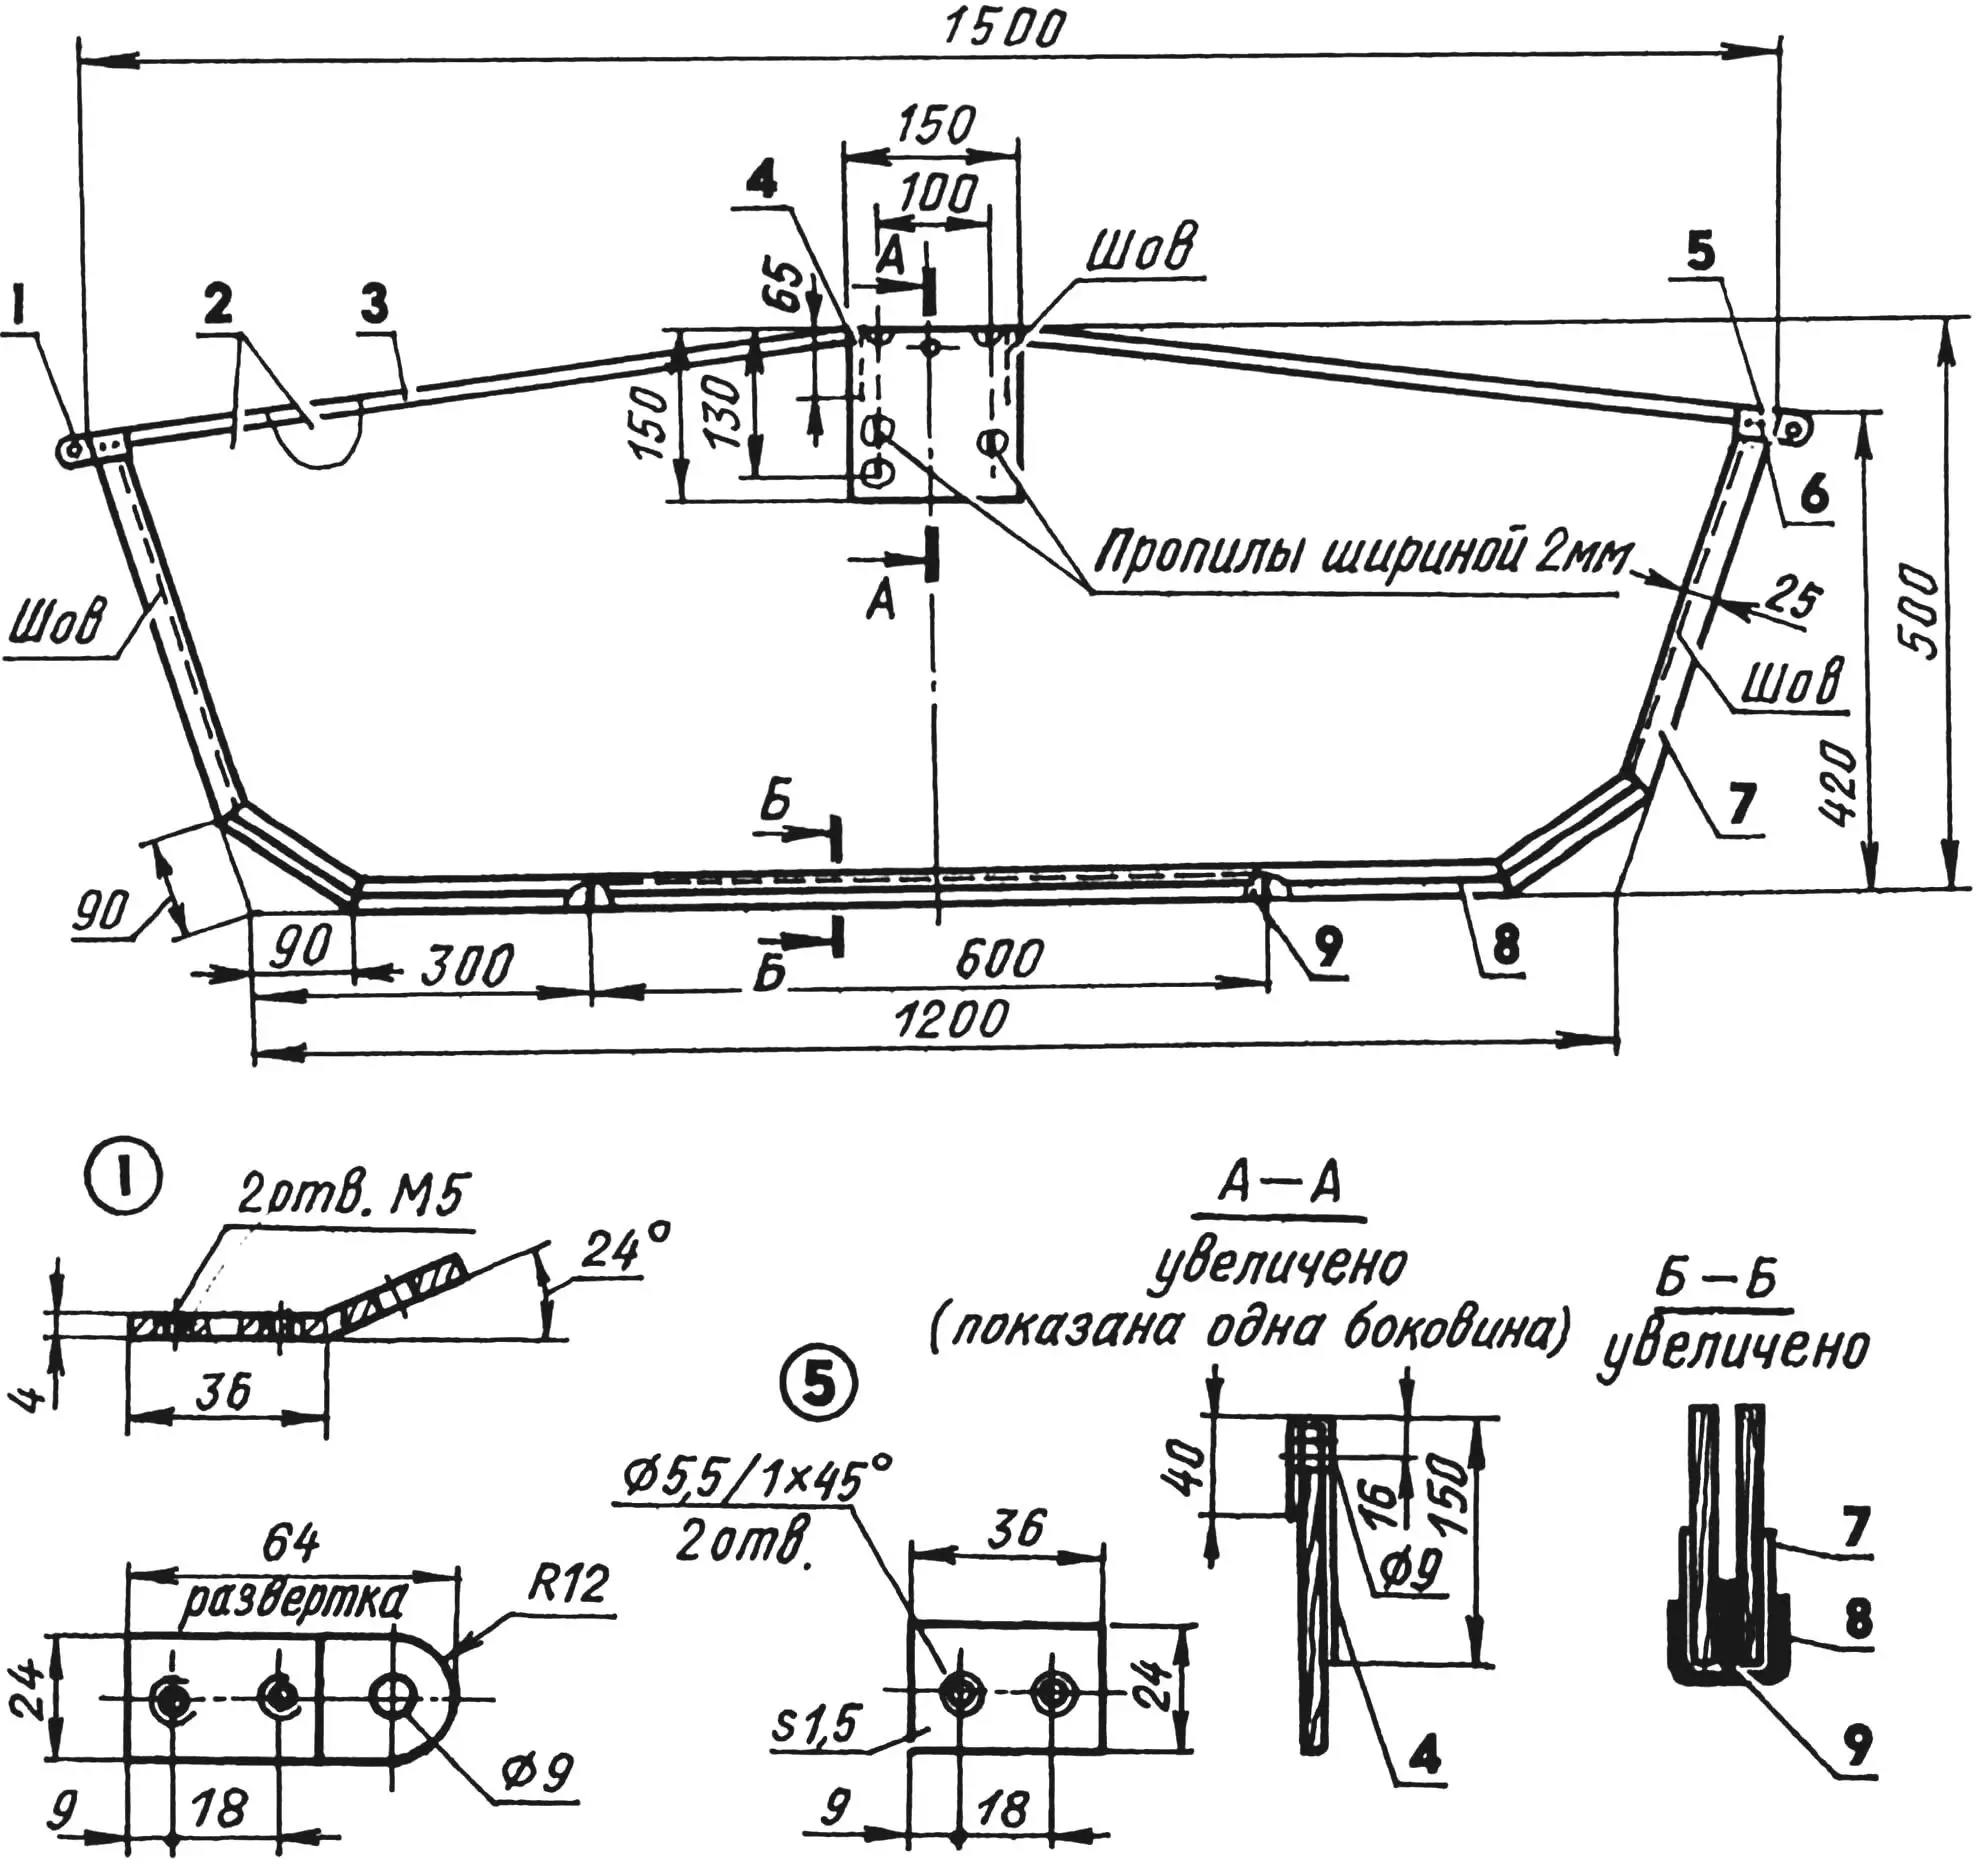
1 — eye (D16T, strip s4, 2 pcs.); 2 — sides (plywood s4); 3 — upper edging (fabric, 4 pcs.); 4 — overlay (rubberized fabric, 2 pcs.); 5 — backing (D16T, strip s1.5, 2 pcs.); 6 — screw M5 (4 pcs.); 7 — fabric hinge (rubberized fabric); 8 — lower edging (rubber); 9 — piano hinge
The compartment sides in the middle — at the points of maximum break when unfolding — are cut with a hacksaw to a depth of 130 mm. The cuts are covered with overlays made of the same rubberized fabric. So that the overlays do not tear off from the plywood during repeated unfolding of the compartment, they, like the stems, are stitched with synthetic threads with the same pitch of 8— 10 mm and the seams are coated with waterproof glue.
The edges of the sides are covered with narrow strips of dense fabric, which give the compartments a finished appearance and protect the edges from damage.
The glued compartments are sanded, impregnated with linseed oil, and painted outside and inside with two layers of PF-115 enamel.
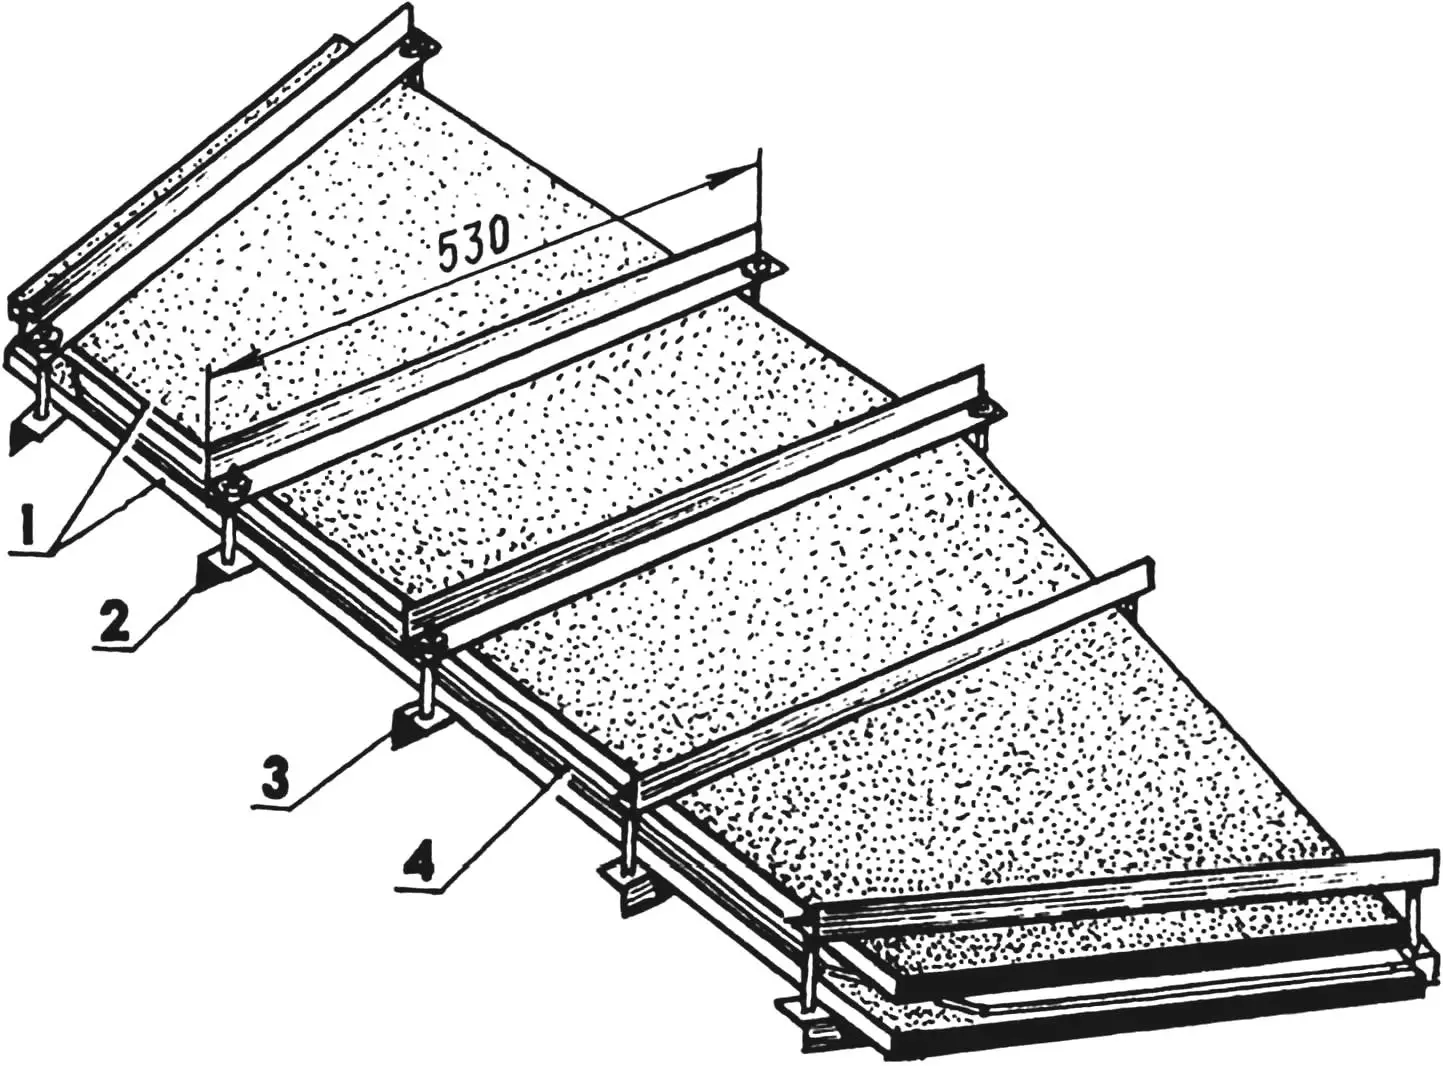
1 — panels (chipboard, sheet s16); 2 — clamp (steel angle 36x36x4, 10 pcs.); 3 — bolt M10x70 (10 pcs.); 4 — compartment to be glued
The compartments are connected to each other by eyes — curved duralumin plates located in the “bow” and “stern” of each compartment. The eyes are attached to the sides with countersunk screws through duralumin backings.
To make the boat, I needed three standard sheets of 4-mm construction plywood measuring 1525×1525 mm. I cut all the side blanks in one pass with a circular saw. For this, I first cut the plywood sheets into strips 500 mm wide so that the fibers of its outer layers were oriented in the longitudinal direction. I stacked eight strips, fastened them at the corners with nails, applied the side contours according to the drawing on the top one, and drilled the side holes and holes for the eye mounting screws. I cut the blanks along the marked contour and made two parallel cuts in the sides with a hacksaw.
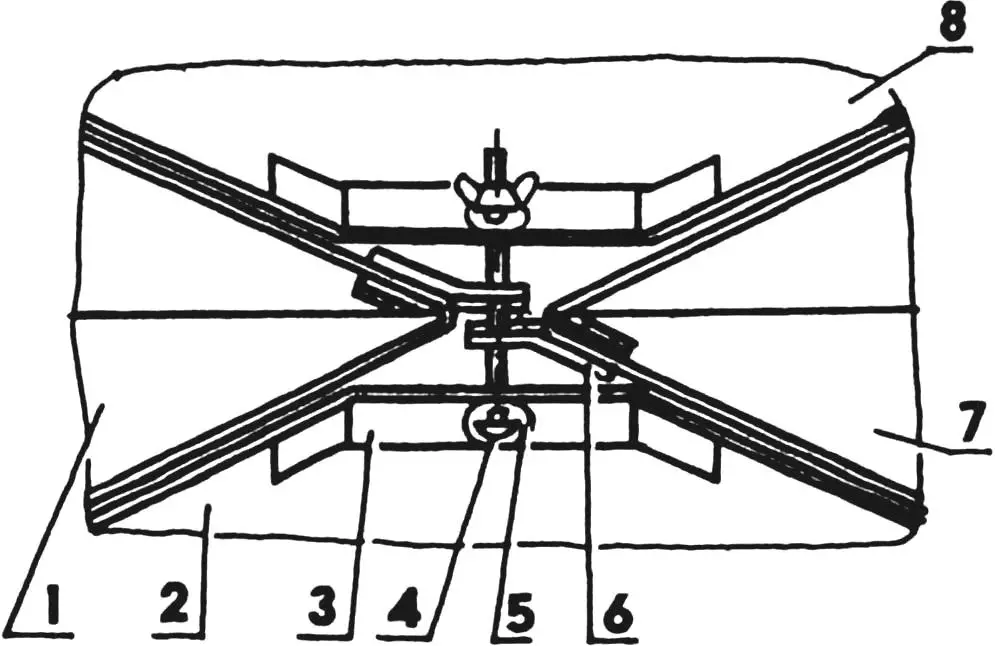
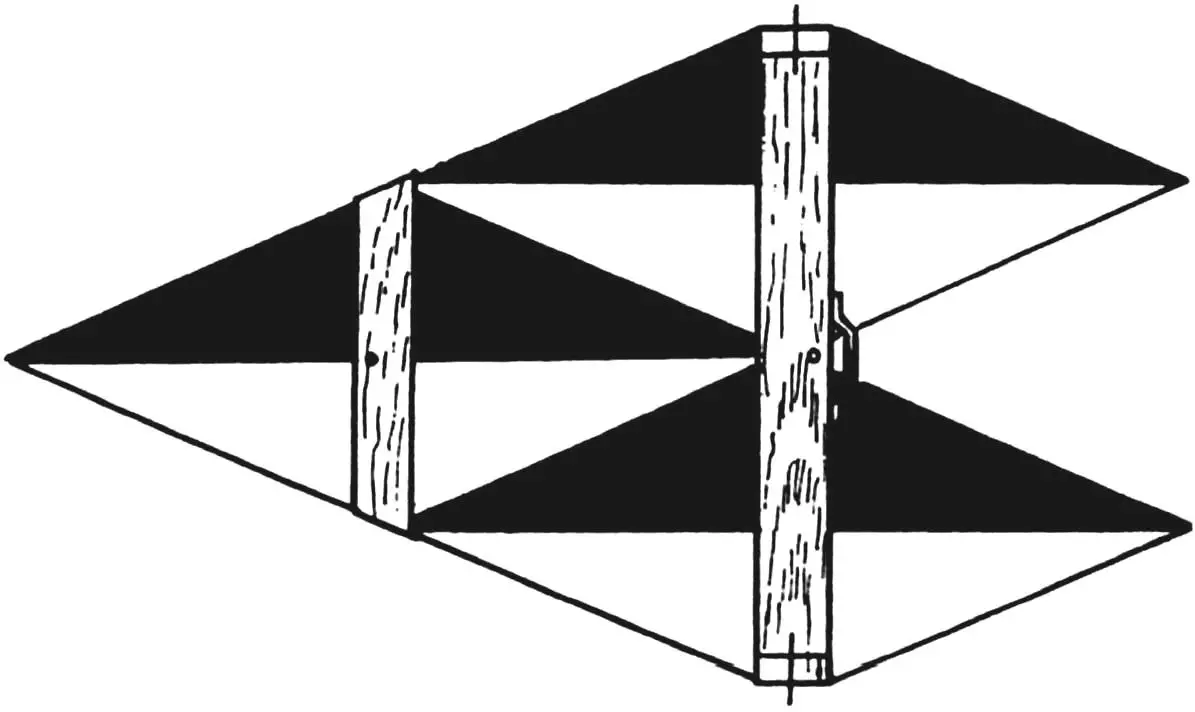
1,7 — bow and stern compartments; 2,8 — side compartments; 3 — overlay made of rubberized fabric; 4 — central bolt M6x110;
5 — washer 9x32x2.5 (2 pcs.); 6 — eye
Making compartments from plywood sides and rubberized strips using waterproof glue for wood and fabric is better quality under a press. Therefore, I used the simplest press: I clamped each compartment to be glued using angles and bolts between two chipboard sheets cut along the side contour with a small allowance. I separated the plywood from the chipboard with polyethylene film.
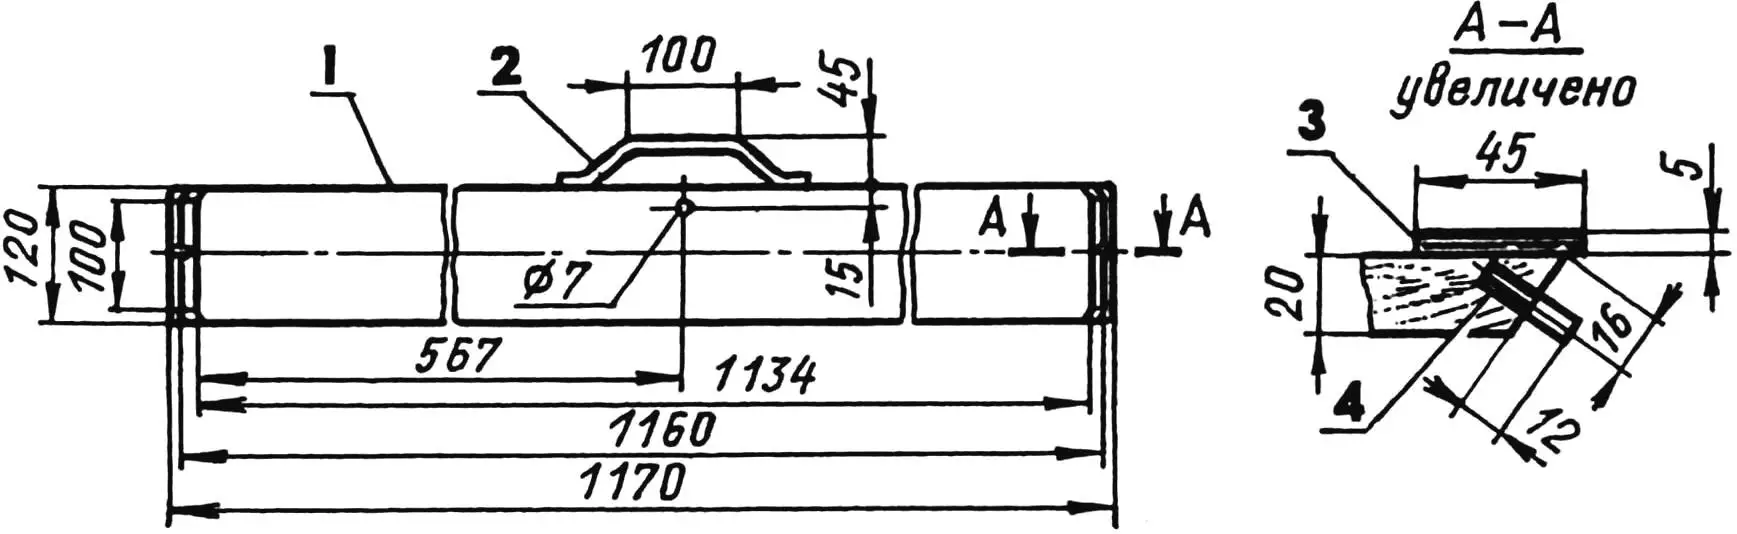
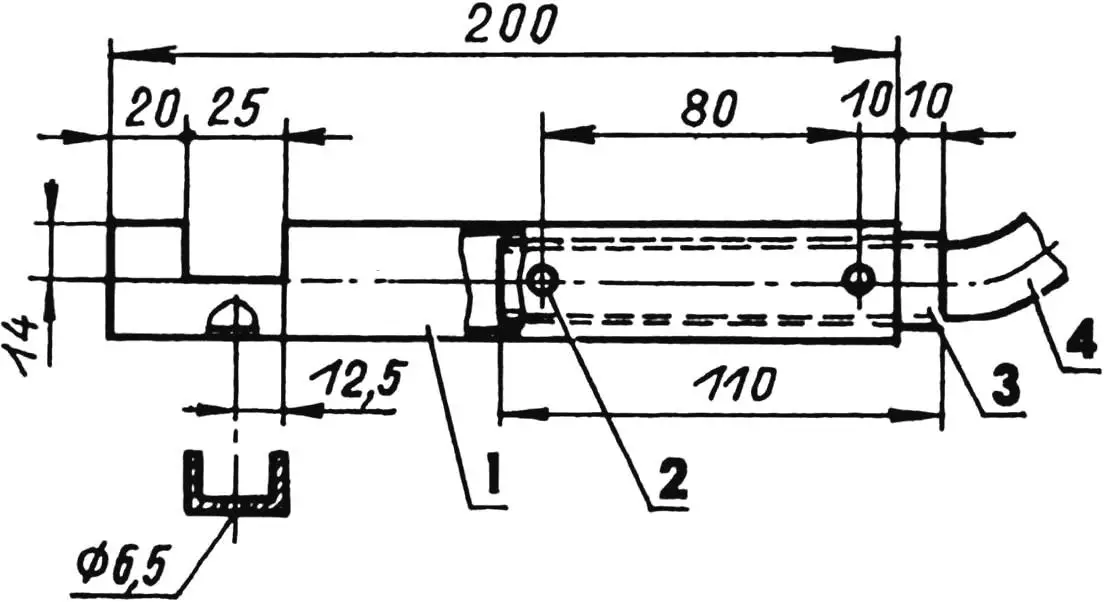
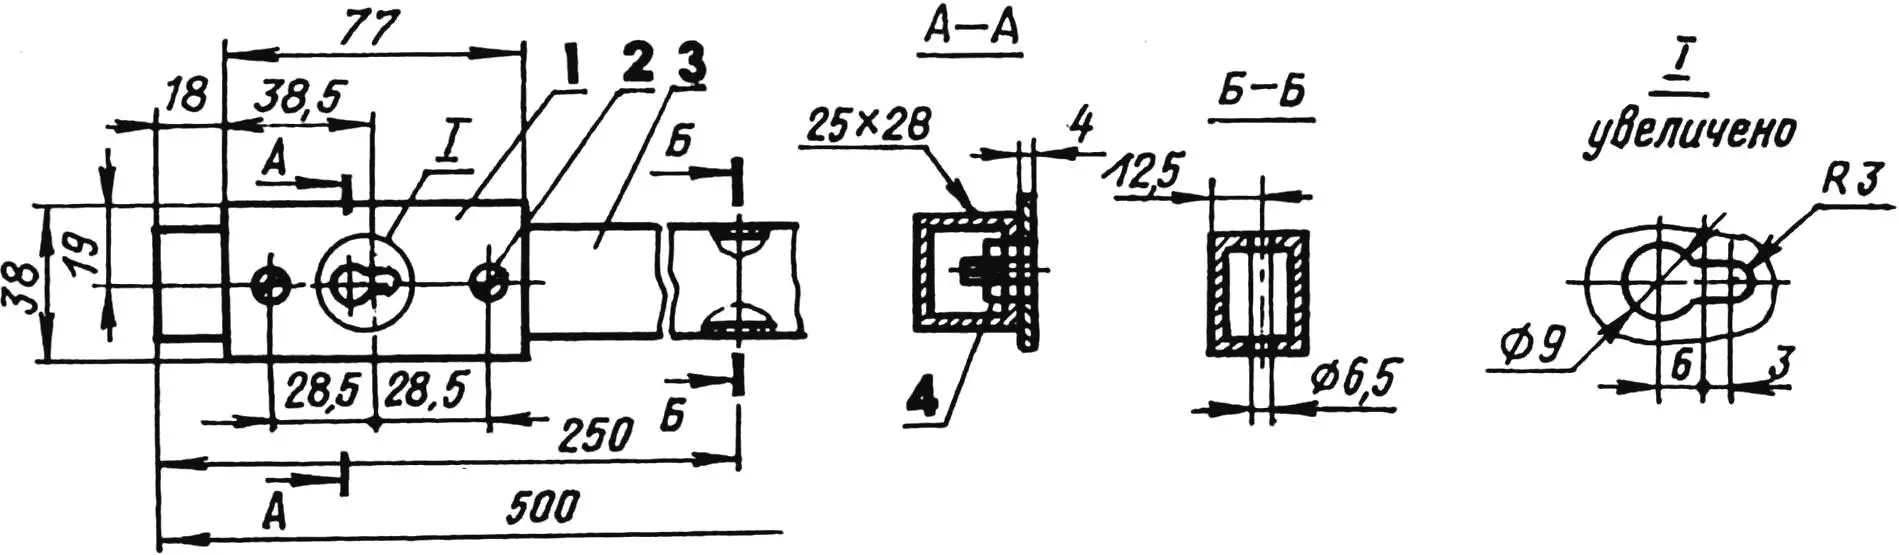
1 — beam; 2 — handle (aluminum tube 16×1.5); 3 — side overlay (plywood s5, 2 pcs.); 4 — pin M8 (2 pcs.)
On the shore, I assemble the boat in the following order. First, I fasten all four compartments with one central bolt. For this, I place the side compartments side by side, and position the end ones (bow and stern) between them so that the inner side holes of the side ones and the eye holes of the end ones coincide. I pass the central bolt with washers through these holes and screw on the wing nut. Resting my foot against the opposite side of the far side compartment, I pull the side of the near one toward me and insert the seat between them, aligning its pins with the outer side holes. Then I spread the sides of the end compartments and insert the spacers. I put the eyes of the side compartments on the spacer bolts and screw on the nuts. So that the seats or spacers do not accidentally slip out of my hands and cause serious injury, I insert their pins first into the holes closest to me, and then into the far ones. The central bolt and spacer bolts do not experience significant loads, so I do not tighten their wing nuts too much.
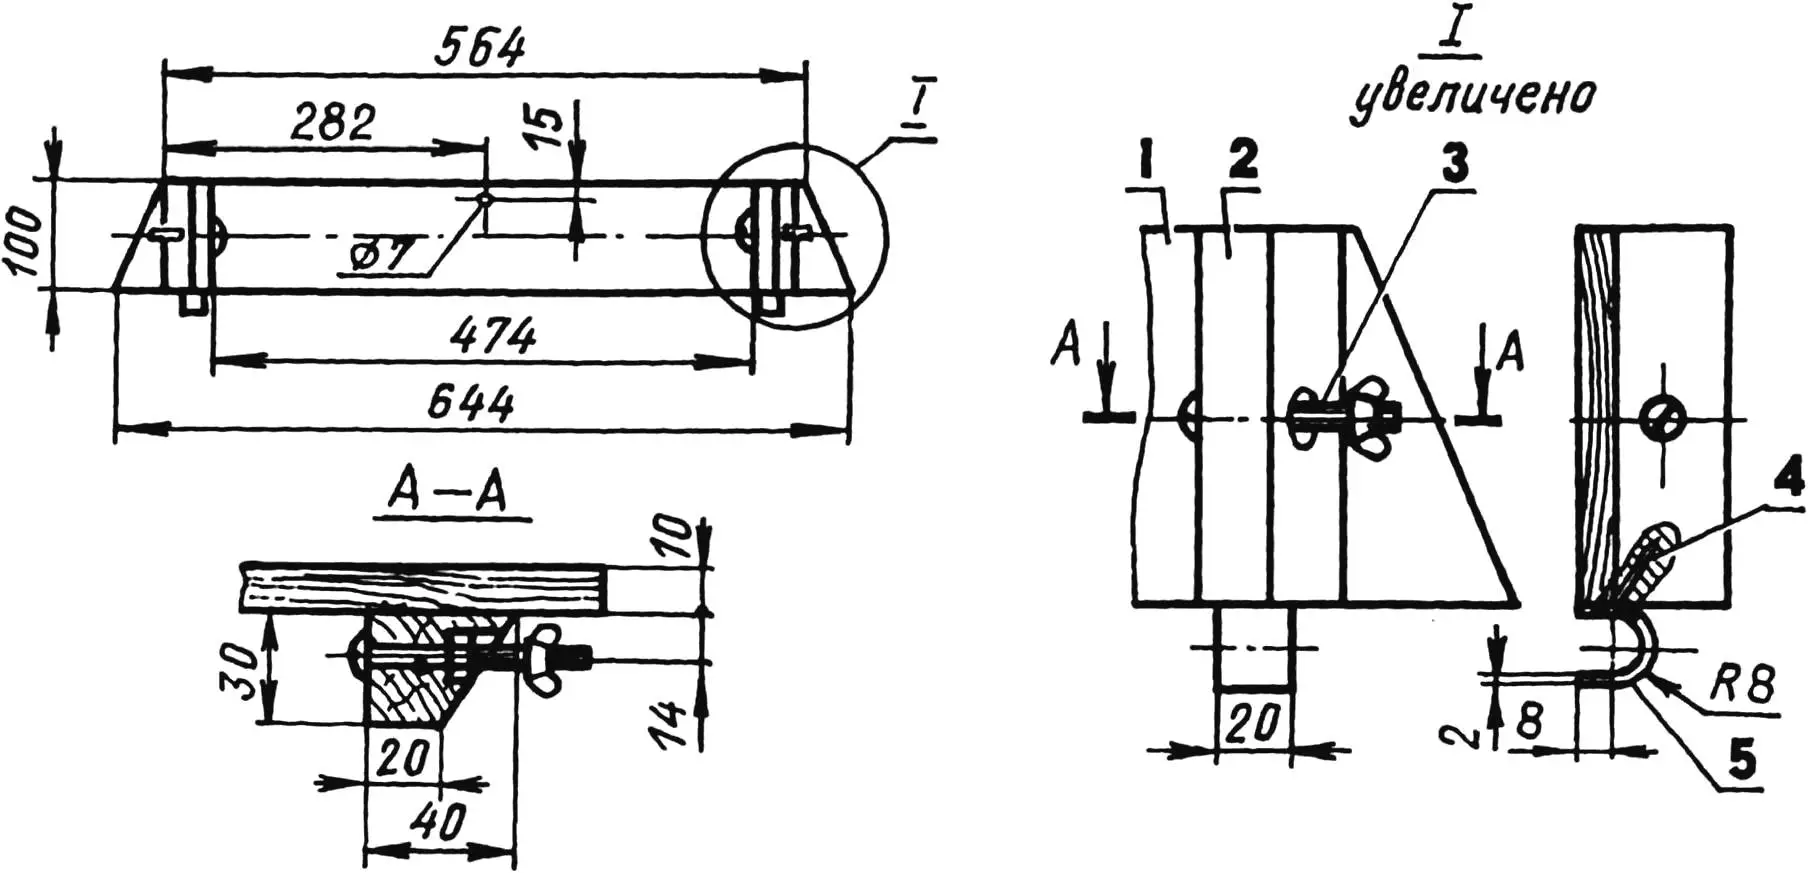
1 — beam; 2 — stop (2 pcs.); 3 — bolt M8 (2 pcs.); 4 — screw 4×20 (2 pcs.); 5 — oar suspension bracket (steel, strip s2, 2 pcs.)
With some skill, assembling the trimaran takes only a few minutes.
I disassemble it in reverse order. When everything is disconnected, I hang the oar halves on the spacer brackets. I fold the flat compartments into a package; I place the seat in the middle (between the compartments), and the spacers on the outside, on the sides, aligning the side holes of the compartments with the holes of the seat and spacers. I fasten the entire package with the central bolt.
1 — package of folded compartments; 2,6 — halves of detachable oar; 3 — bow spacer (stern — on the reverse side of the package); 4 — central bolt with washers and wing nut;
5 — seat (between compartments)
In packaged form, the mass of the boat together with the oars is 18 kg. The package can be carried over short distances using a handle made of duralumin tube attached with screws to the seat edge.
1 — tow bar (steel tube 28x25x1.5); 2 — steel rivet (Ø5, 2 pcs.); 3 — spacer (aluminum tube 22×2); 4 — handle (aluminum tube 18×2)
Over long distances, the package is transported on a homemade collapsible two-wheeled cart. The package is secured on it with two bolts: a central one (through slots in the tubular struts) and a rear one (through an eye of one of the compartments to a loop on the handlebar).
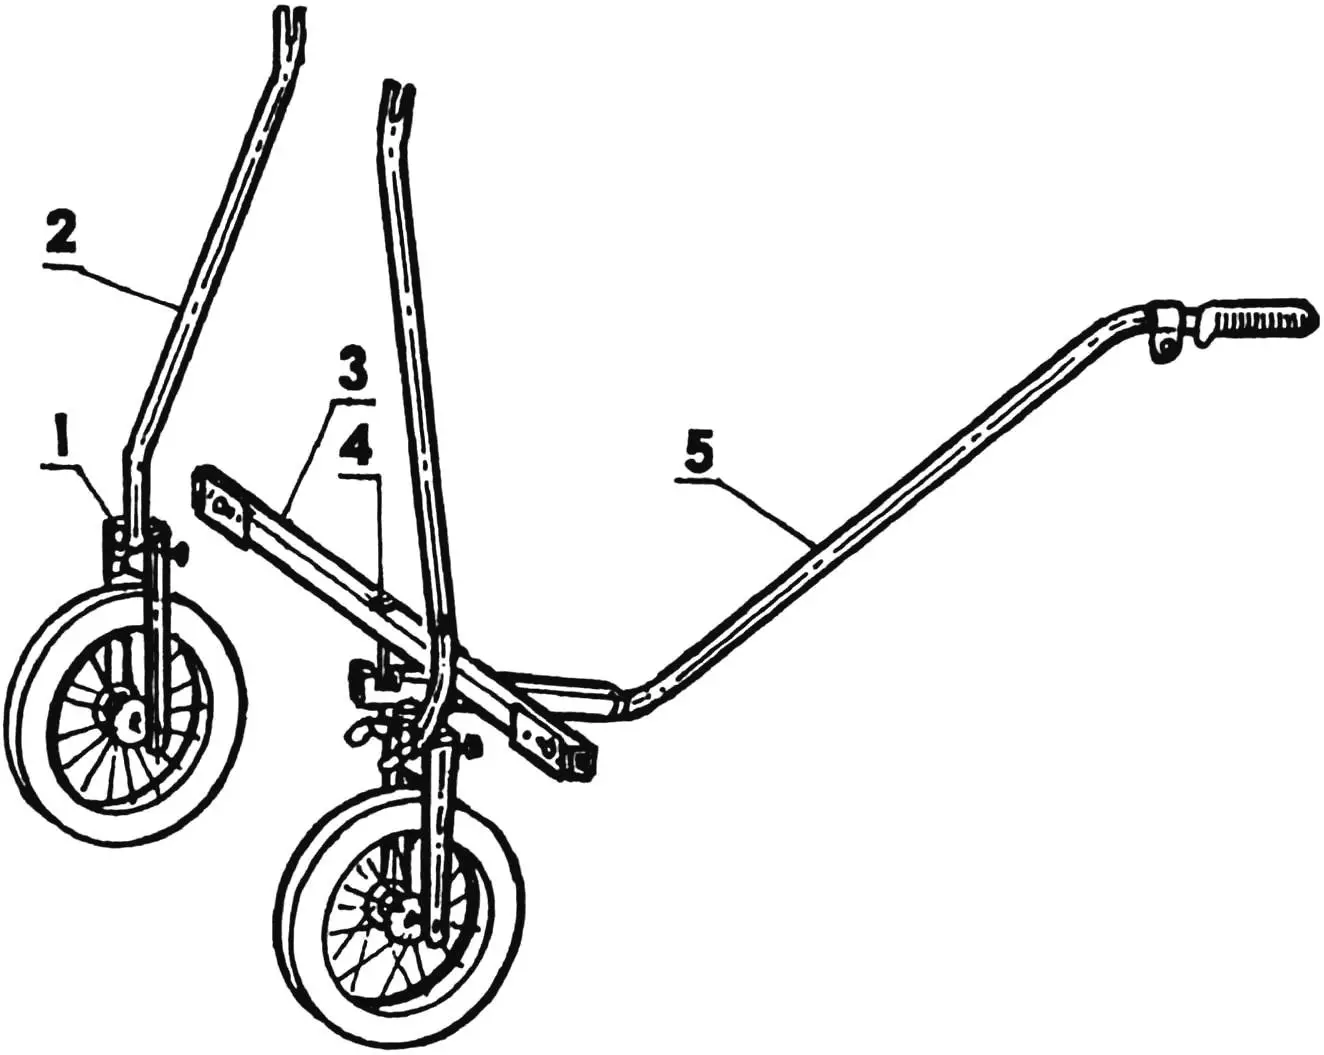
1 — fork; 2 — strut; 3 — cross member; 4 — bolt M6 with wing nut; 5 — handlebar
When making the cart, I used wheels and a handle from a children’s stroller, aluminum leg tubes from a folding bed, and rectangular section steel tubes from a desk frame.
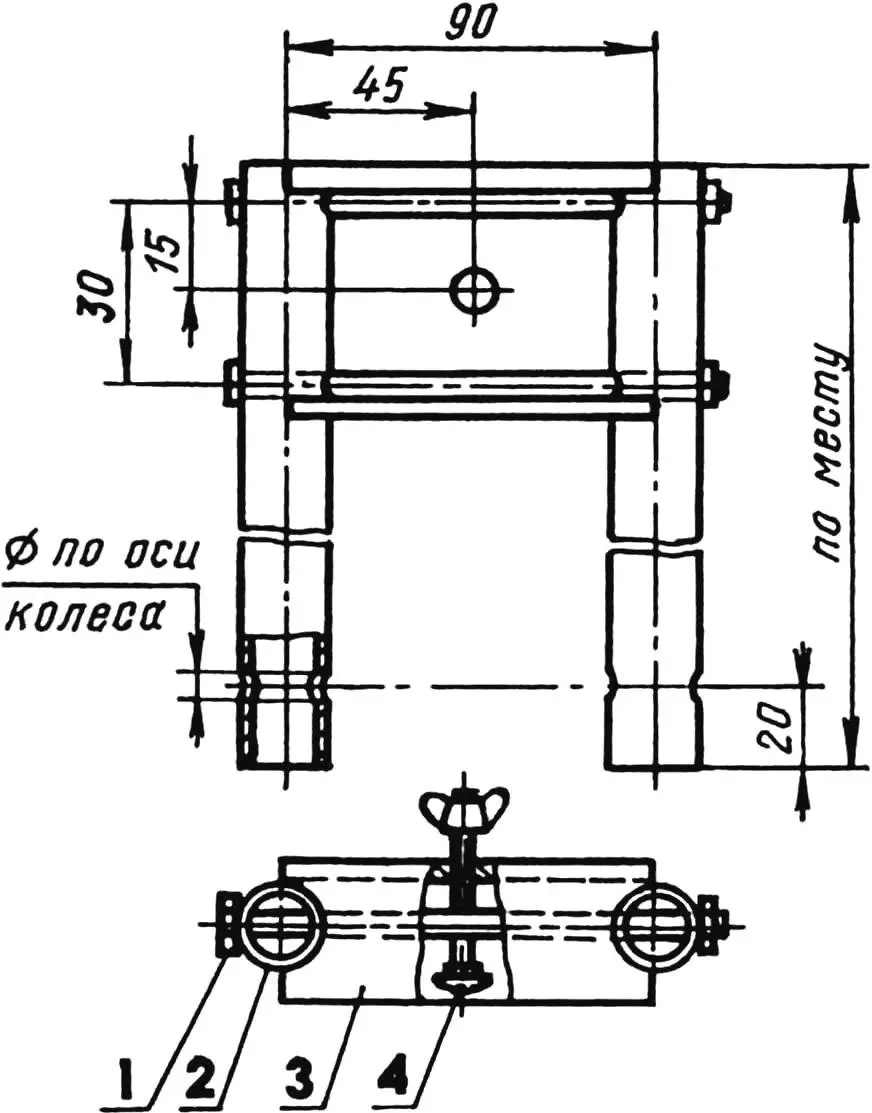
1 — bolt M5 (2 pcs.); 2 — blade (aluminum tube 22×2, 2 pcs.); 3 — body (steel channel No. 5); 4 — bolt M6 (with round head, square washer, and wing nut)
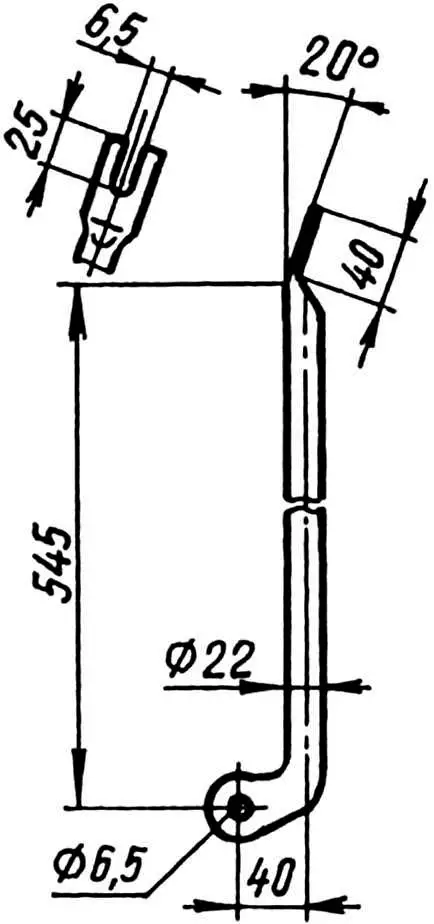
The wheel forks and cart cross member are connected by two horizontal embedded bolts M6 with round heads, square washers, and wing nuts. In turn, the cross member and handlebar tow bar are connected by one vertical bolt M6 with a simple round head.
1 — support platform (D16T, 2 pcs.); 2 — screw M6 (4 pcs.); 3 — beam (steel tube 28x25x1.5); 4 — lock nut M6 (4 pcs.)
The trimaran’s load capacity on water is about 100 kg. Its stern and bow compartments have enough space to accommodate camping gear. In addition, the design allows, if necessary, to assemble it from three compartments, leaving the fourth (say, damaged) on the shore. In this case, the boat’s draft increases not much.
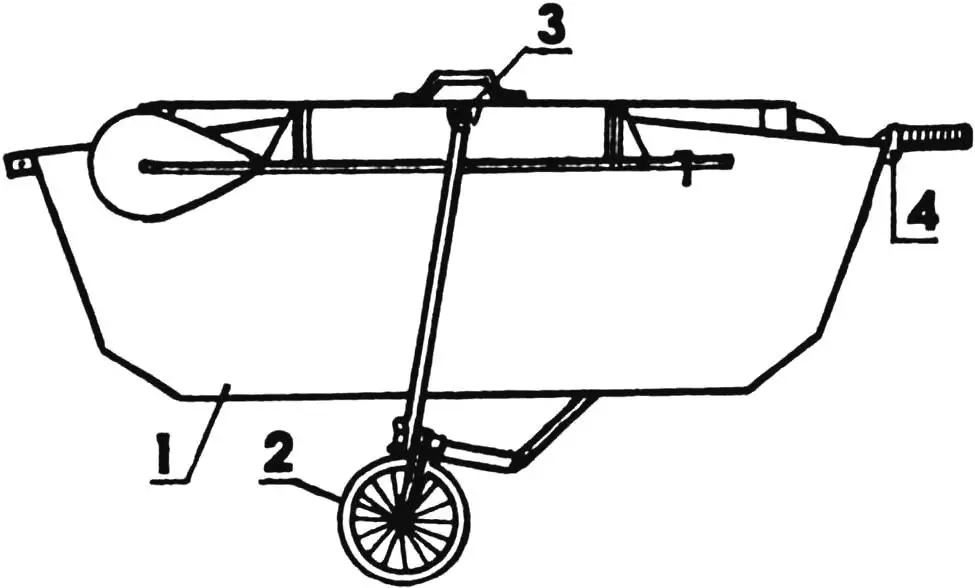
1 — package of folded compartments; 2 — cart; 3 — front attachment point (central bolt M6x110); 4 — rear attachment point (bolt M6x60)
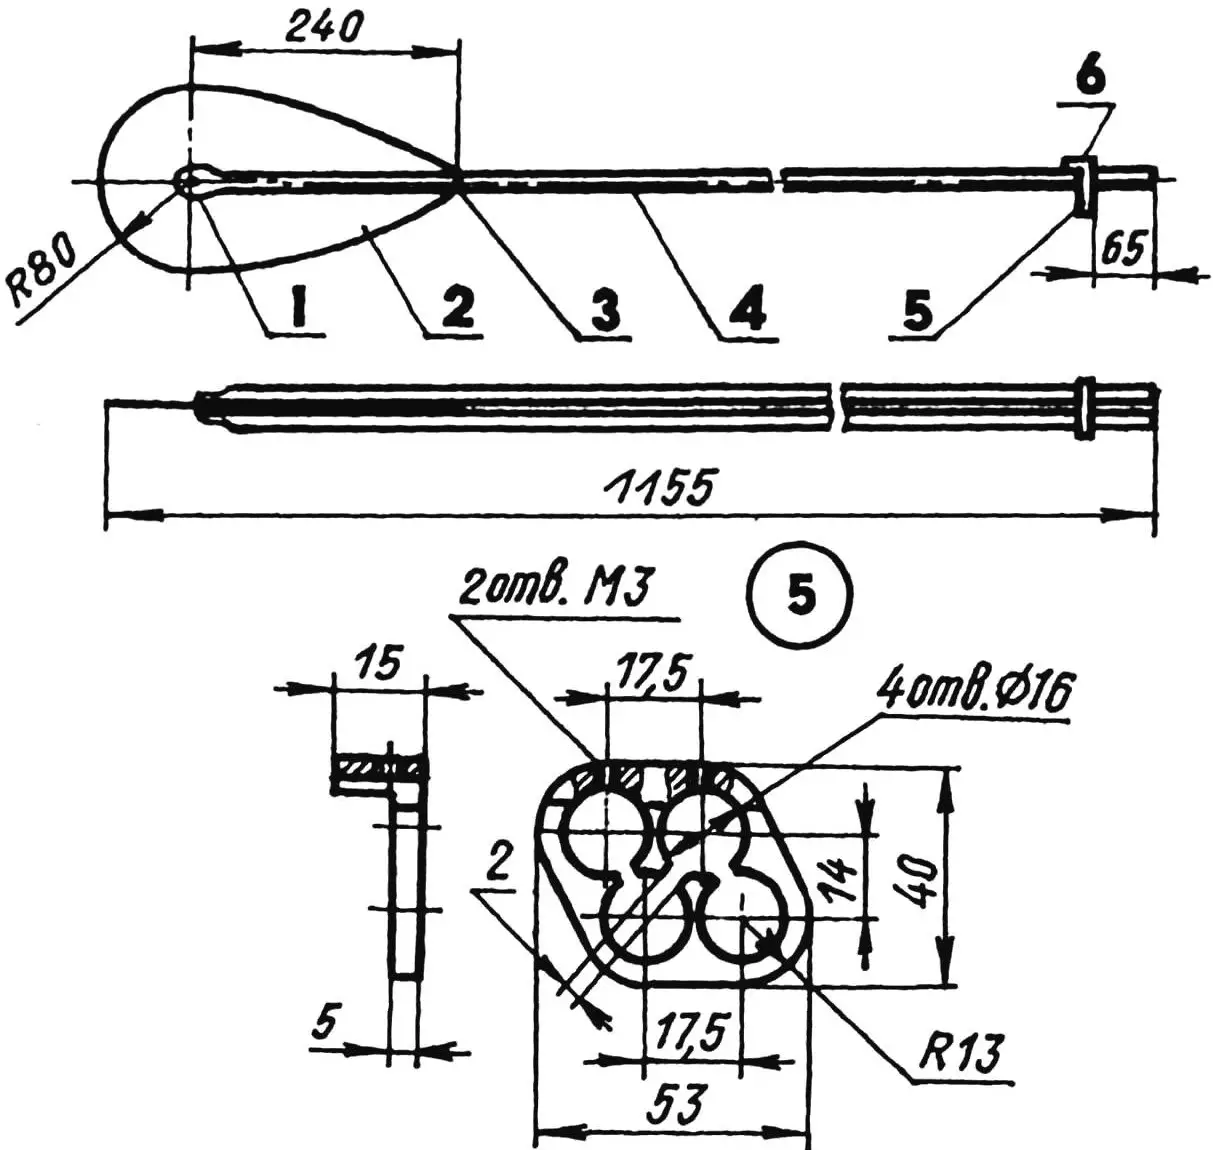
1 — aluminum rivet; 2 — blade (D16T, sheet s1.5); 3 — clamp; 4 — shaft (D16T, tube 16×1.5, 2 pcs.); 5 — coupling (D16T); 6 — screw M3 (2 pcs.).
Left half of oar shown. Right — mirror image
The boat is suitable for recreation, fishing, and hunting on small rivers, lakes, and in the coastal zone of large water bodies. Over the past six years, it has been used on the Volgograd Reservoir in the vicinity of Saratov. The boat easily overcomes waves up to a third of a meter high from boats and ships. Emergency buoyancy reserve on open water is provided by two slightly inflated motorcycle inner tubes. They are placed horizontally in the ends of the boat and are securely held under the spacers without additional fastening.
Main technical data of the folding trimaran boat
Length, mm … 2826
Width, mm … 1184
Side height at midship, mm … 411
Mass with oars, kg … 18
Load capacity at draft 0.2 m, kg … 100
Package dimensions of folded compartments, mm … 1500x550x140
P. USOV
Recommend to read
 With a bicycle — even in the metro
In recent decades, the world has been experiencing a bicycle boom. Today, the bicycle is the number one means of transport on the planet, and even the car yields the palm: for every... NOMAD GREENHOUSE
If you want to have early vegetables on your plot — then you need a greenhouse. Only in it can you create conditions for maintaining constantly high temperature and humidity of soil and...
