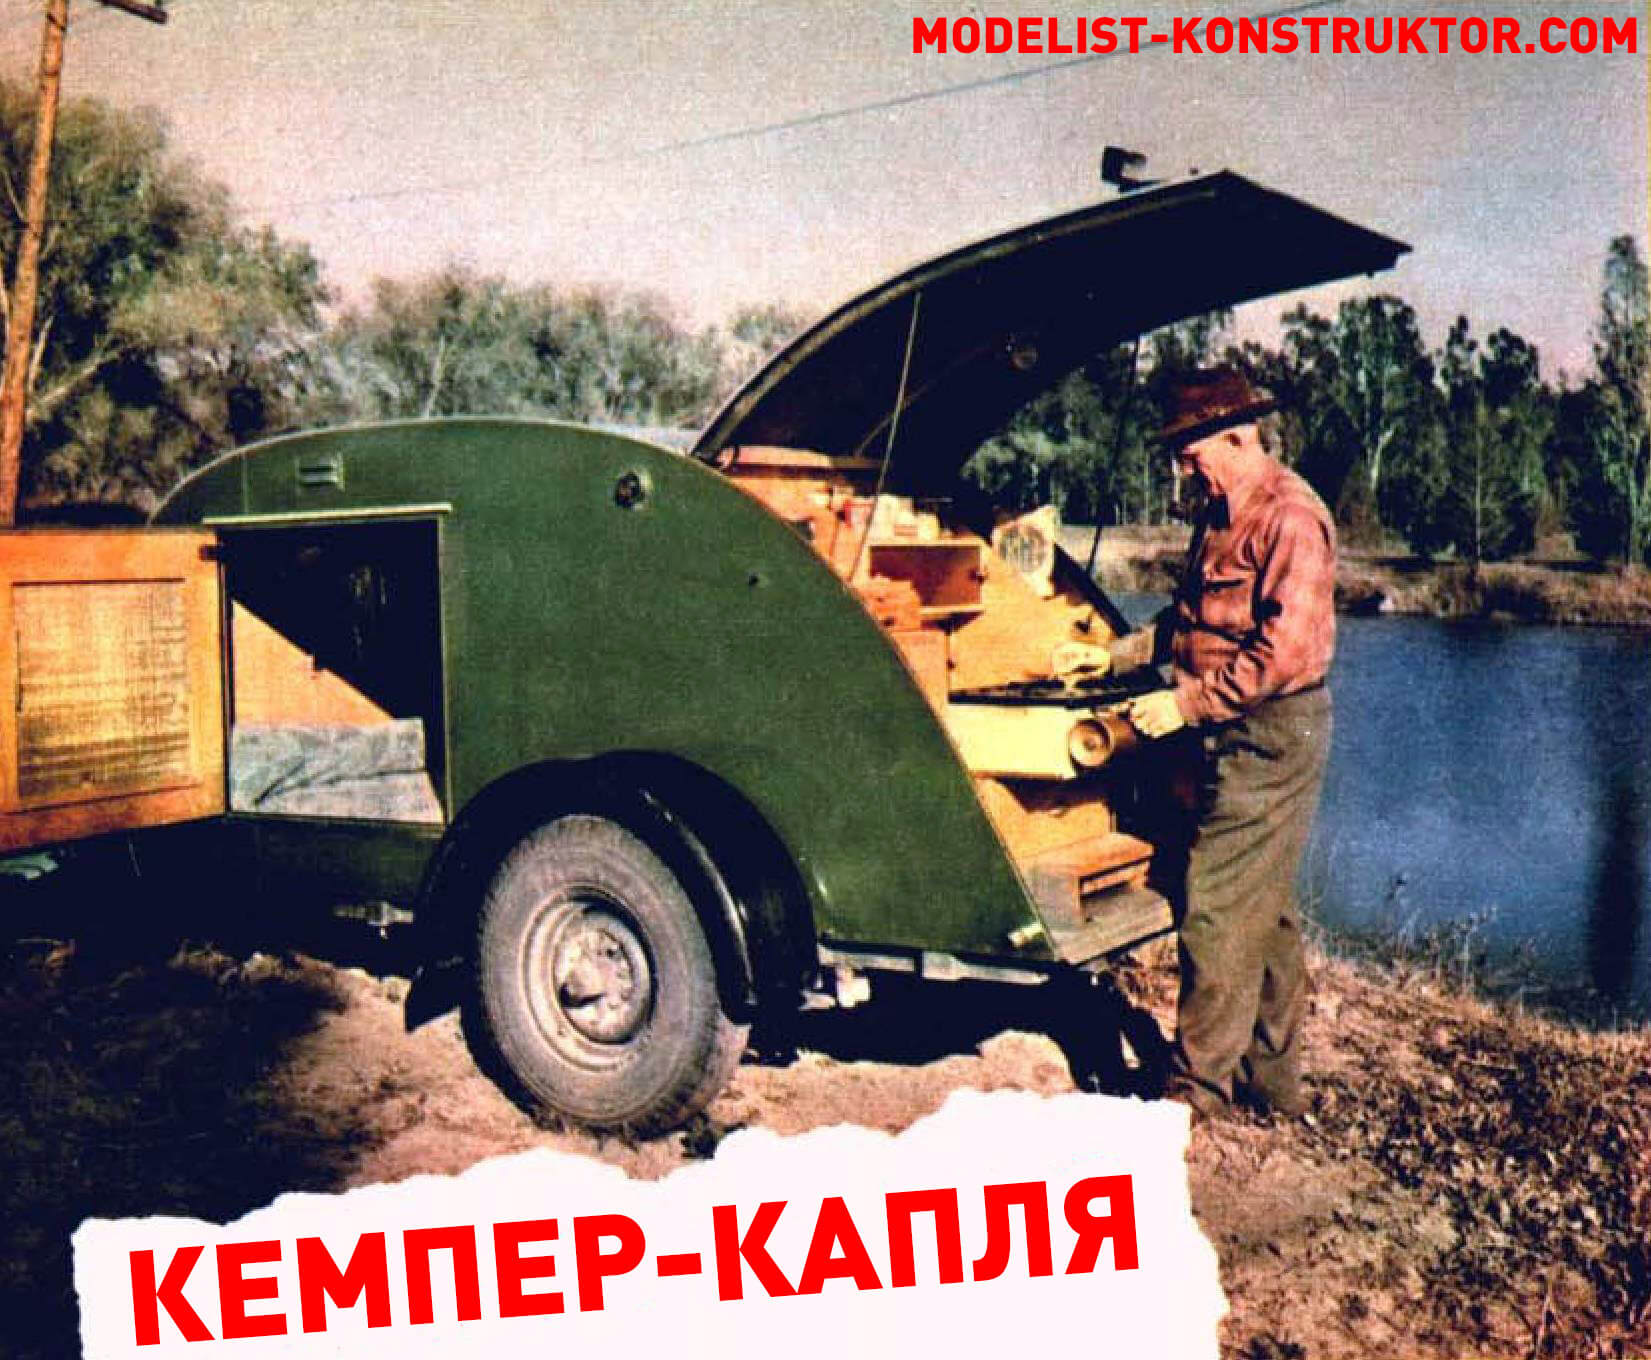
A comfortable motorhome, easy to maneuver and suitable for towing; with a double bed and a fully equipped kitchenette. When plunging into adventure, you don’t have to give up the comfort of home. With this compact trailer, you can take it anywhere as it is smaller and lighter than a full-size trailer. When you find the perfect spot by the lake or river, the kitchen unit lifts up easily and within minutes you’re preparing a delicious meal on the pull-out stove. Underneath this unit are a refrigerator (to store large catches), a water heater, a folding table, and a food cabinet. After dinner, you can open one of the doors where a full-size mattress awaits you when you’re ready for bed. And if you prefer fresh air while you sleep, simply open the mesh panels on the doors.
The interior of the trailer provides ample seating space and there is also a chest of drawers with ample storage space for clothes. There’s even an electric light for reading in bed.
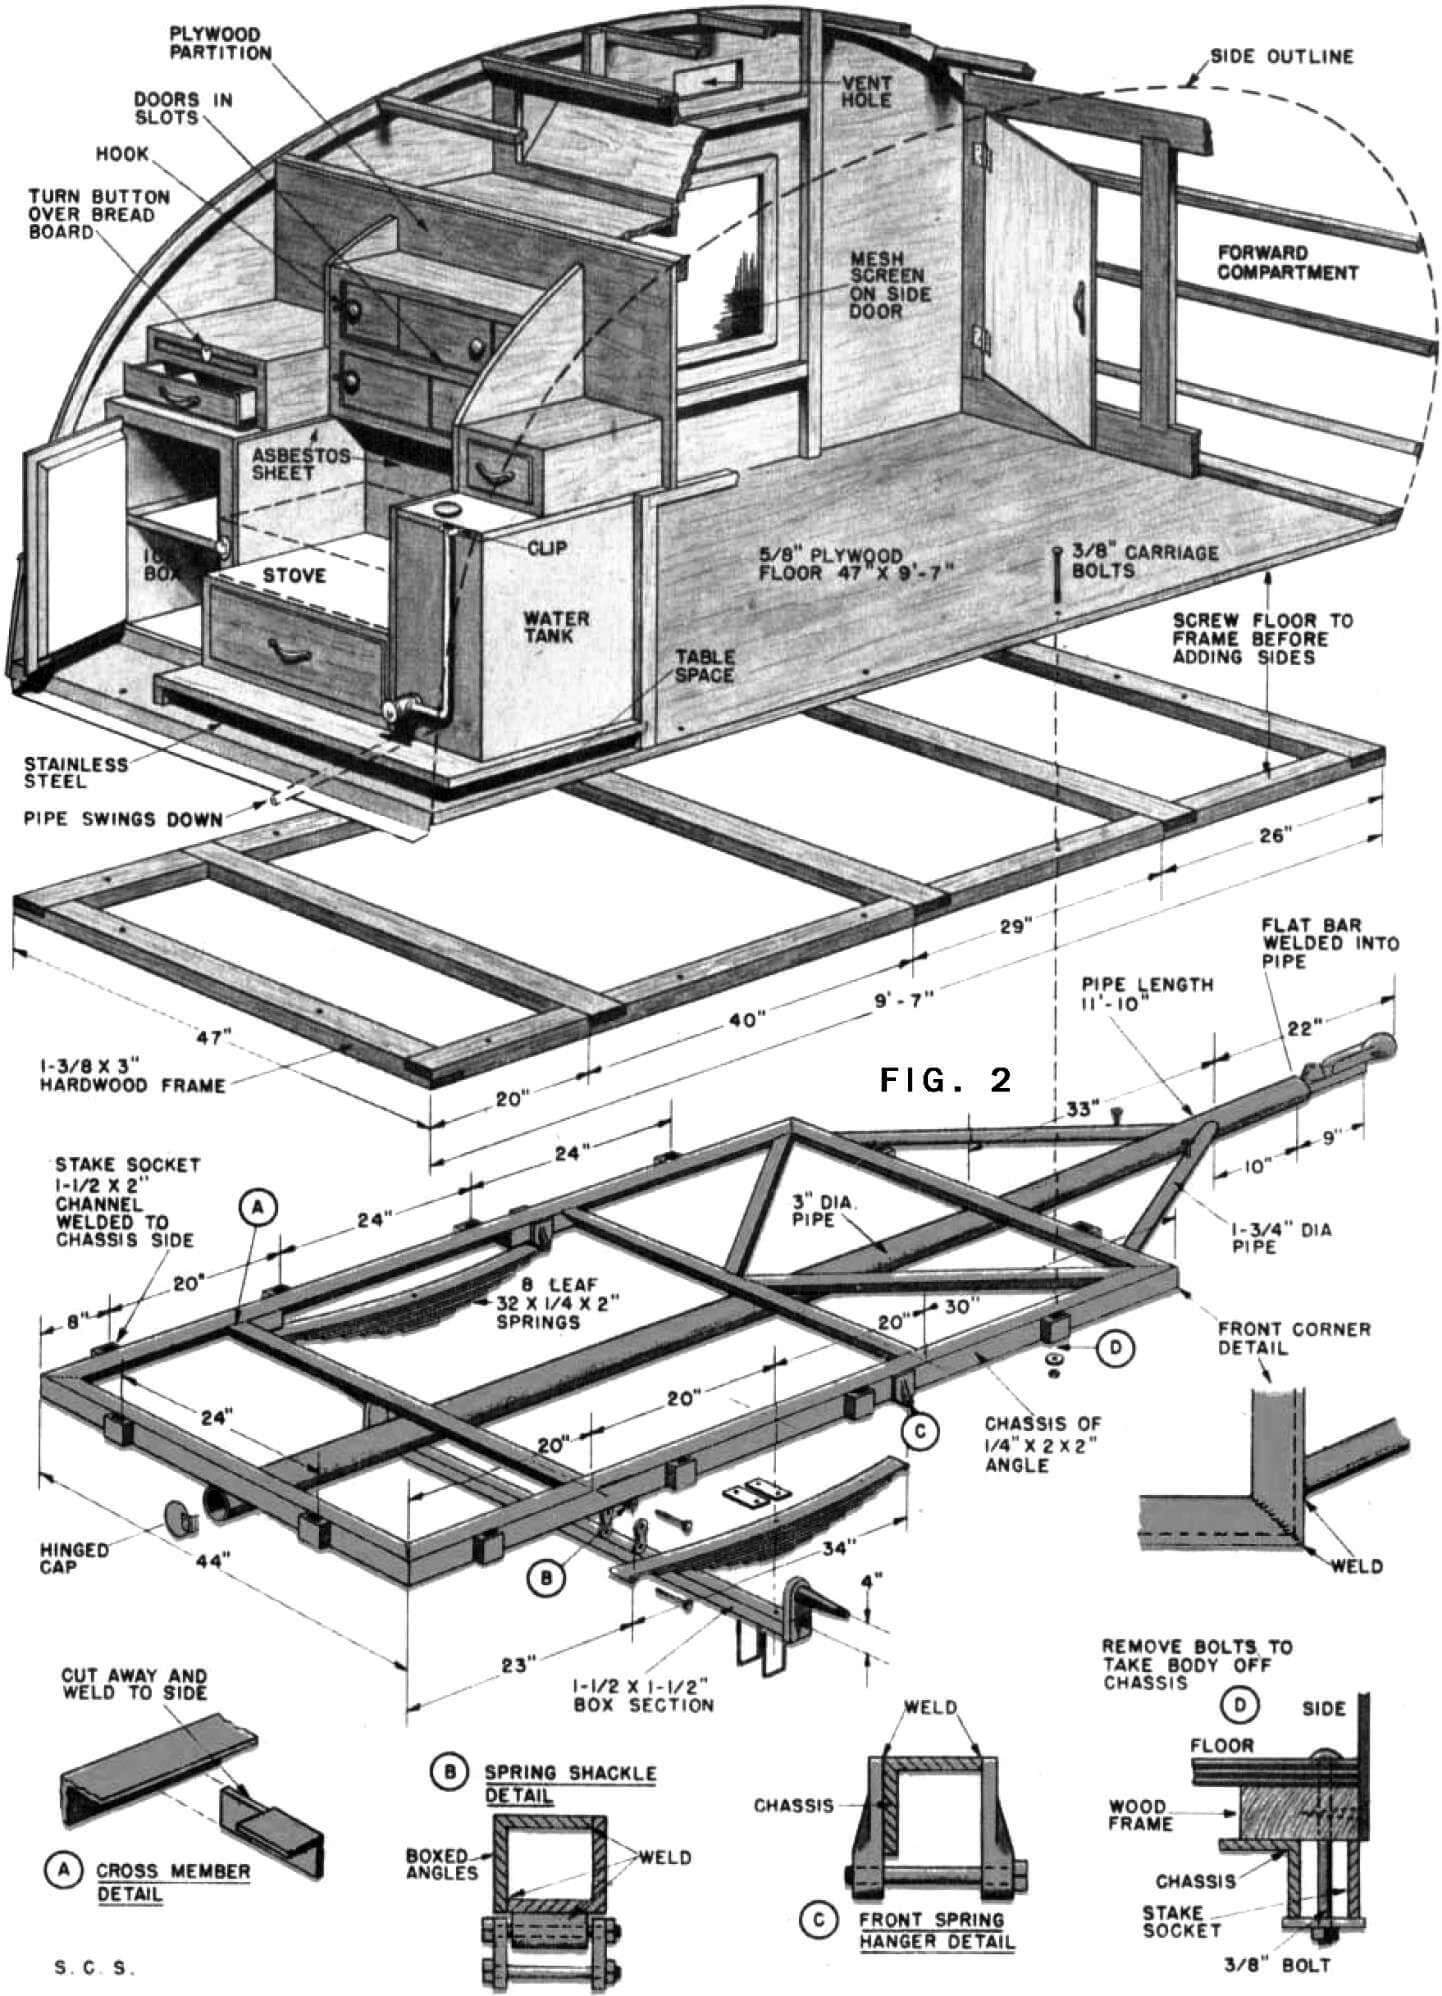
Now let’s look at the drawings in this article and then move on to the actual construction. The trailer has a welded corner frame, which is shown in Fig. 2. It does not extend the entire length of the enclosure, allowing you to remove the camping enclosure and replace it with an open box. If this may lead your wife to consider creating a rock garden, then it is advisable to make the frame the full length of the body and proceed with caution.
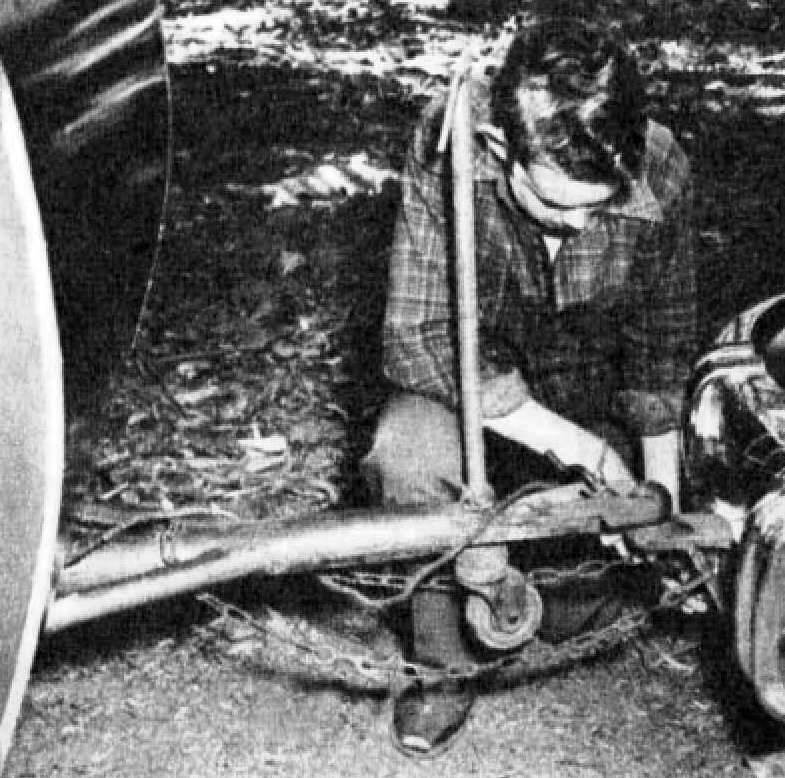
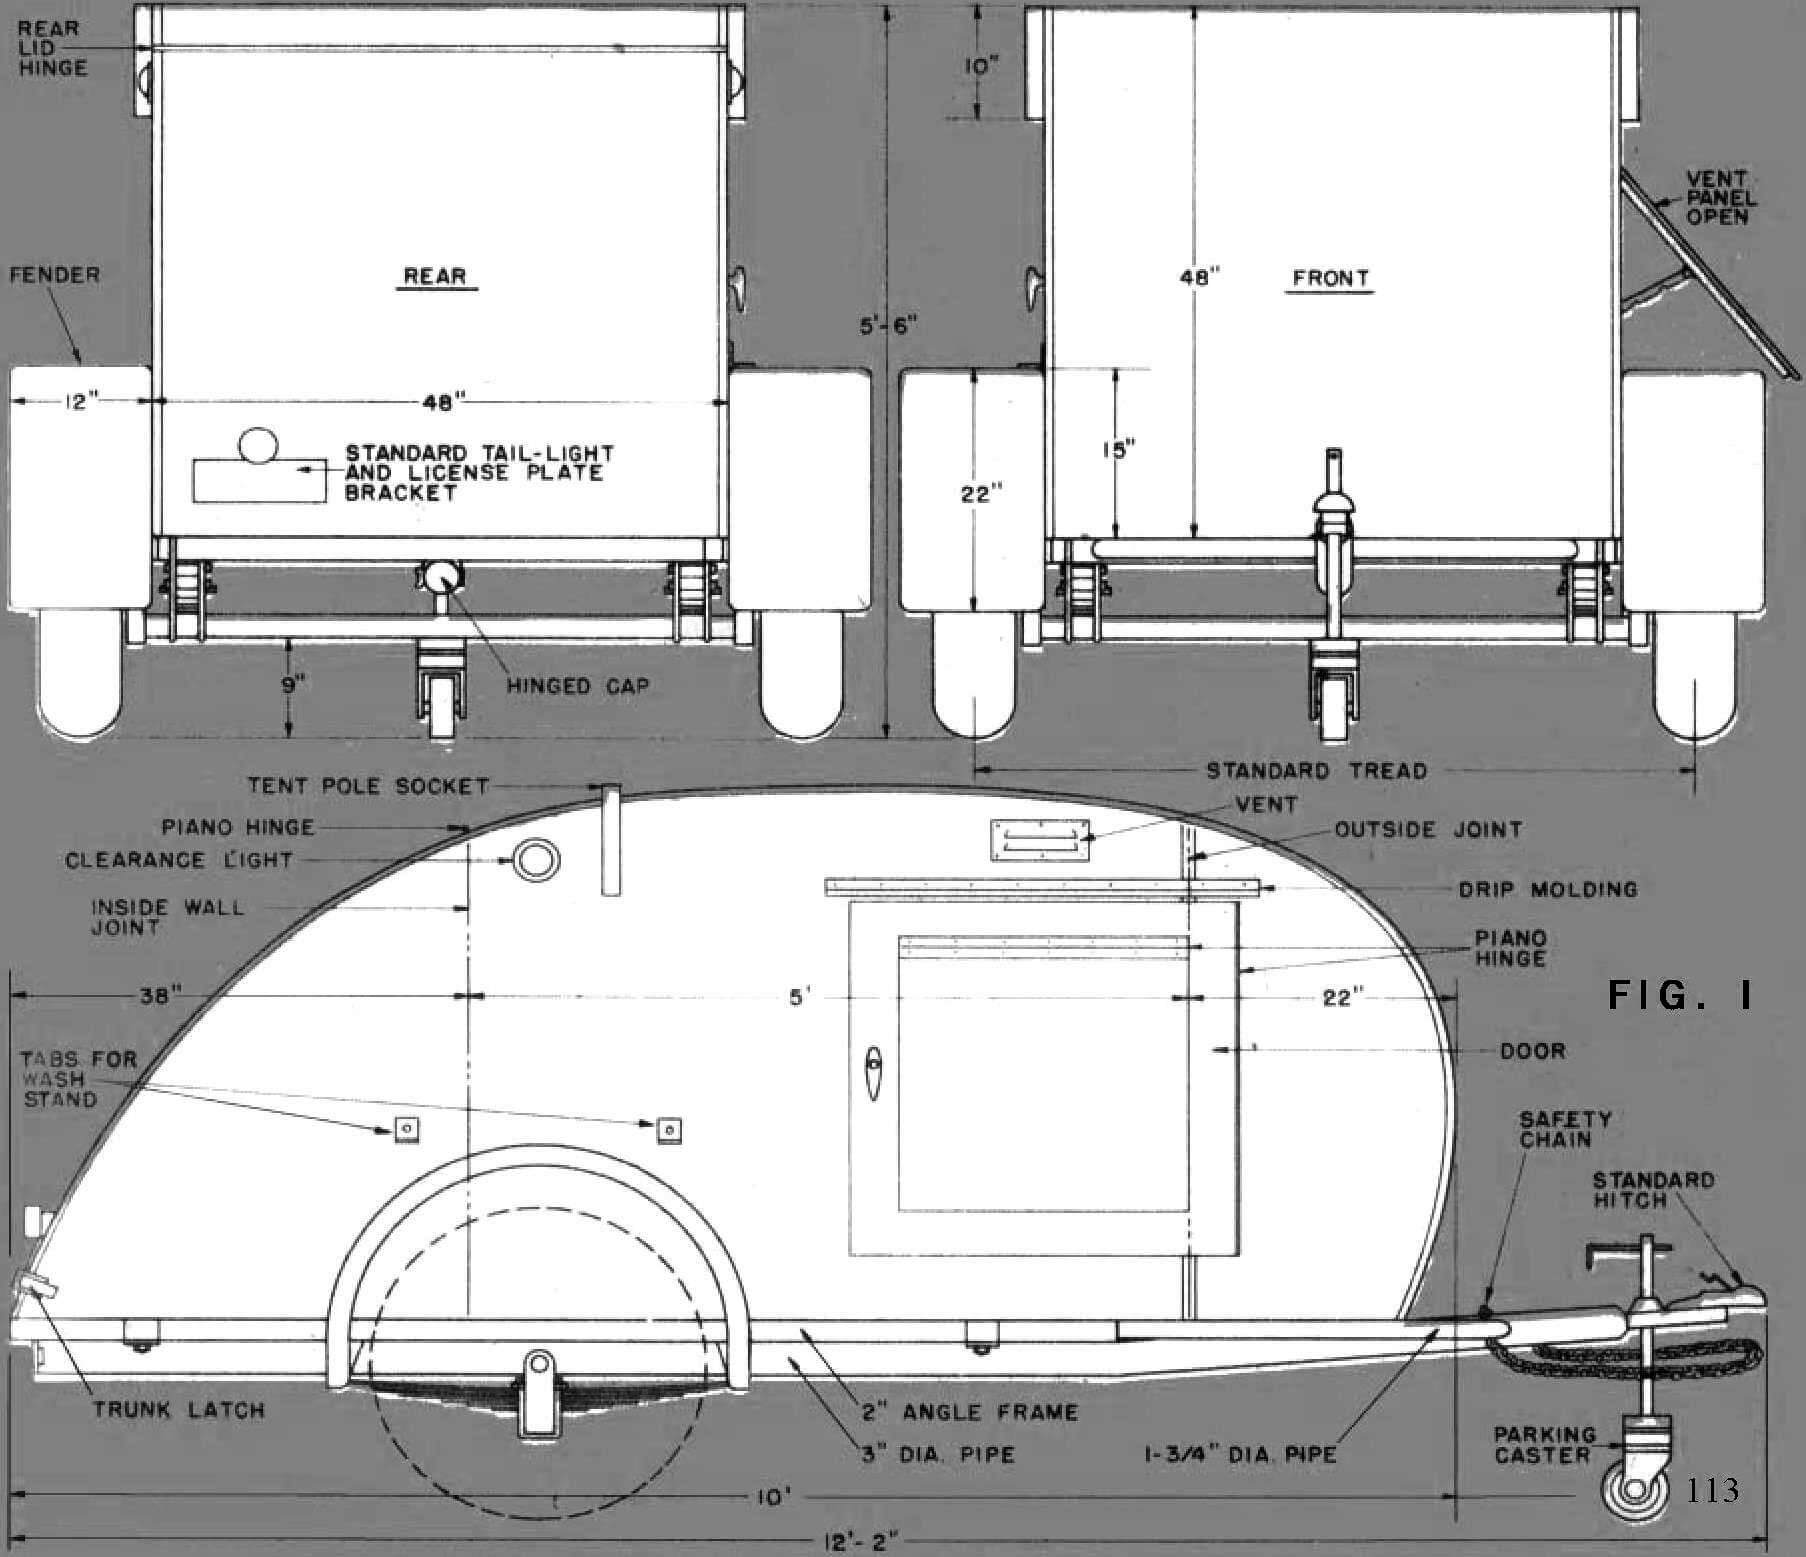
The frame should be made of 1/4″ x 2″ x 2″ angles, miter cut and welded at the corners, with cross members welded to the side frames. Be sure to get rid of all rough areas. If you’re only going to use it for fun, you might want to use a slightly lighter material and save on weight. In the places indicated in Figure 2, weld the front spring hangers to the side frames and the rear spring mounting brackets to the box sections of the frame. The towbar extends the entire length of the frame and should be welded to the cross members, with the front end raised slightly by bending the tube as shown in Fig. 1. The standard hitch must also be welded at the front end. By the way, that sliding lid on the back end of the tube is Mr. Warren’s trick for storing his fishing rods inside it.
Hints indicated in Fig. 2 can be omitted if you do not intend to use the frame for transportation. Two standard 34-inch springs with a welded beam section bolted to them in a U-shape form support the frame and absorb road shock. Overall, the design is a bit bulkier than what would normally be required for a camping trailer alone, but it can really handle the load.
The next step in the program is to create a simple wooden frame that attaches to the side and end pieces (and supplies if you’re using them) of the frame. The front end of the frame is attached to diagonal tubular uprights. Then cut the floor from 5/8-inch plywood and glue and screw it to the frame. Drill holes through the entire structure and secure it to the frame, as shown in Fig. 2.
Your next task is to make the sides of the cabinet using 1/4″ thick plywood panels covered with the same layer of Masonite. Lay the last one face down on a flat floor, apply glue and place the plywood on top. Then open the canvas or tent over the sandwich and cover it with dry sand to press the layers together. If you don’t have 12-foot panels, you’ll have to make a joint near the front edge of the door (see Figure 1). When the glue has dried, cut out the sides following the dimensions in the figure. 1, and the template in Fig. 3, and then cut out the holes for the doors and ventilation. Use the same miter saw grid to cut 1/4-inch thick plywood pieces into the shape. Once they are glued and screwed to the sides (on the inside), make cuts through the lumber and plywood (not through the Masonite covering) for the 1″ by 1 1/4″ lumber that will support the top.
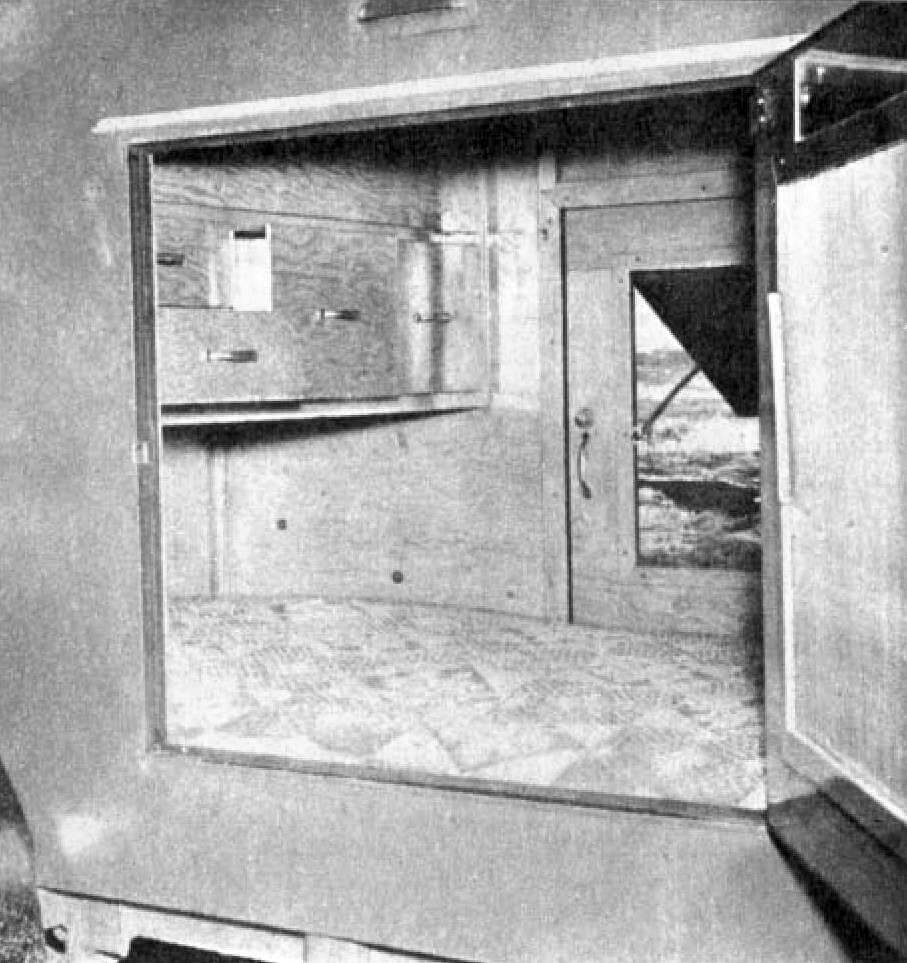
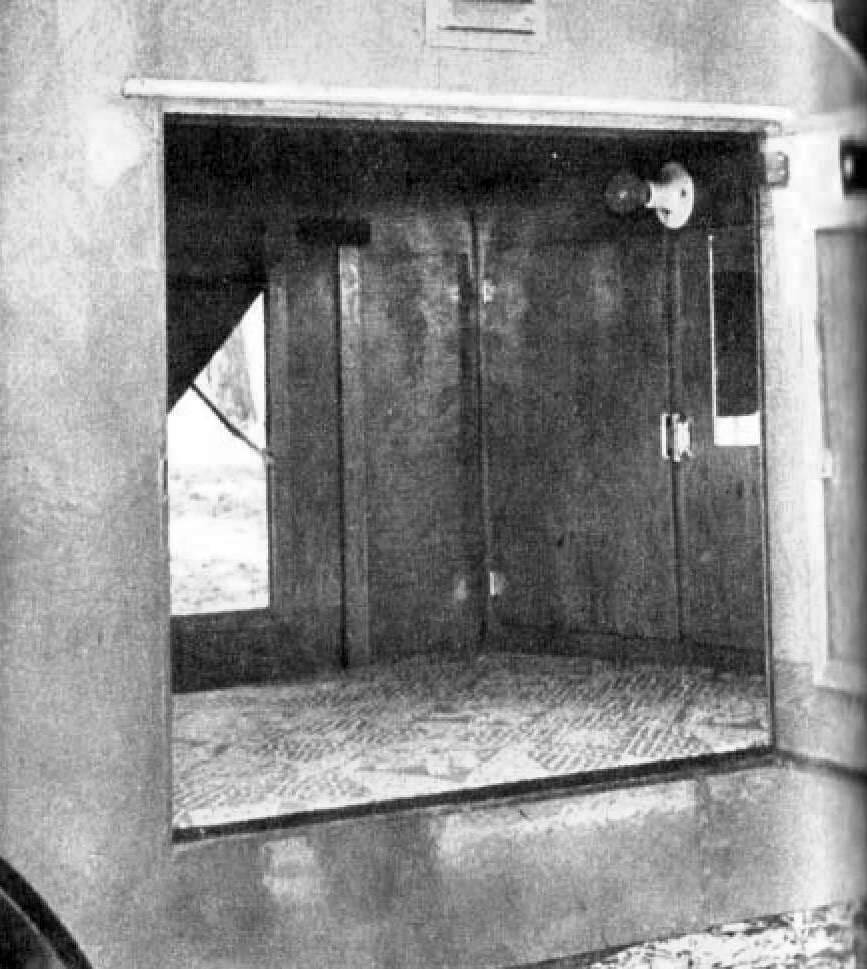
Now you are ready to connect the sides to the floor by screwing them into the frame at the bottom. Then cut the pieces to the correct length and glue them in place using a wood screw in each cutout. Cut a frame for the front and rear partitions from 5/8-inch plywood, with holes in the front for doors leading into the front compartment, and install the partitions. Figures 2 and 3 will give you the location and details of these items. Next, add the frame for the compartment and drawers, including drawer slides, bureau.
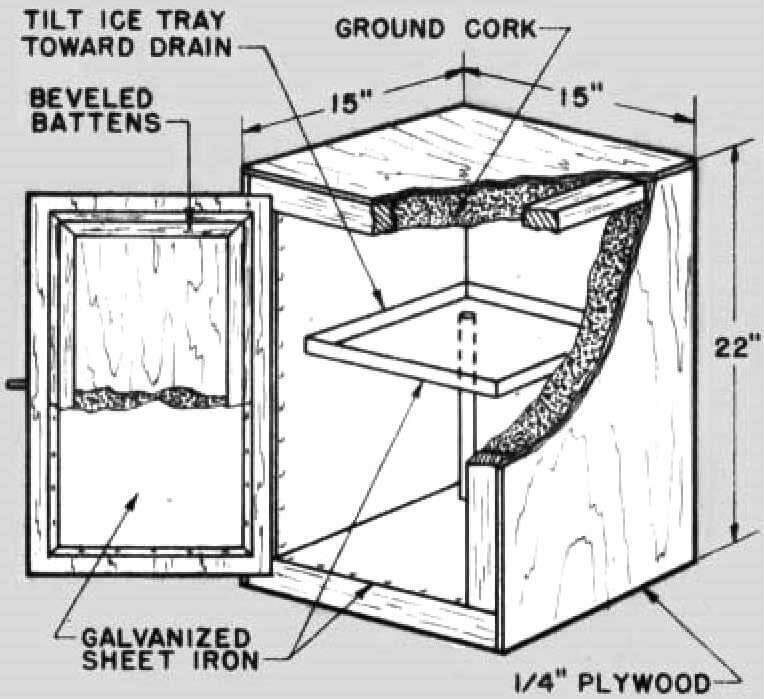
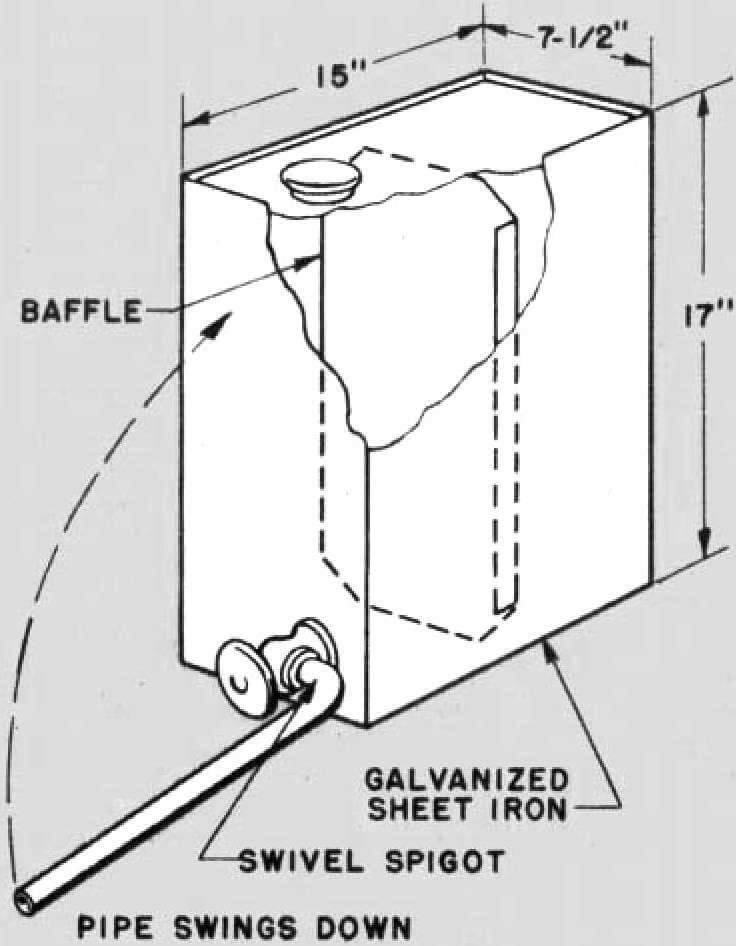
Next comes the kitchen unit, and here the placement will depend on the equipment you plan to use. If you are using a regular two burner camping stove, you can follow most of the dimensions and details in the pic. 2 and the detailed drawing of the kitchen unit on page 117. First make the icebox and water heater following the detailed drawings for them and install them in place. The tank sits on a shelf with space underneath for a regular dinette frame. Once these blocks are in place, add a frame for the utensil compartment, the top of which serves as the base for the stove. Be sure to line this space (and under cabinets too) with a layer of asbestos to reflect heat. The frame for the cabinets, bread drawer and cutlery drawers should then be installed in place. Make all the cabinet doors, bread box, bureau and kitchen unit drawers at the same time, and be sure to make cutouts in the latter so they don’t fall out and spill lingerie or knives and forks all over the place. Cabinet doors, made of 1/4-inch thick masonite that slide into grooves, should have small hooks to keep them closed. When you’re done with all the furniture work, the cabinet should look like Figure 2. Then, while you still have room to work inside, add the wiring for the lights, which will be connected to a standard car electrical outlet. The interior lights, one above the front compartment doors and another on the rear lid, are carried out later and are connected to a separate battery.
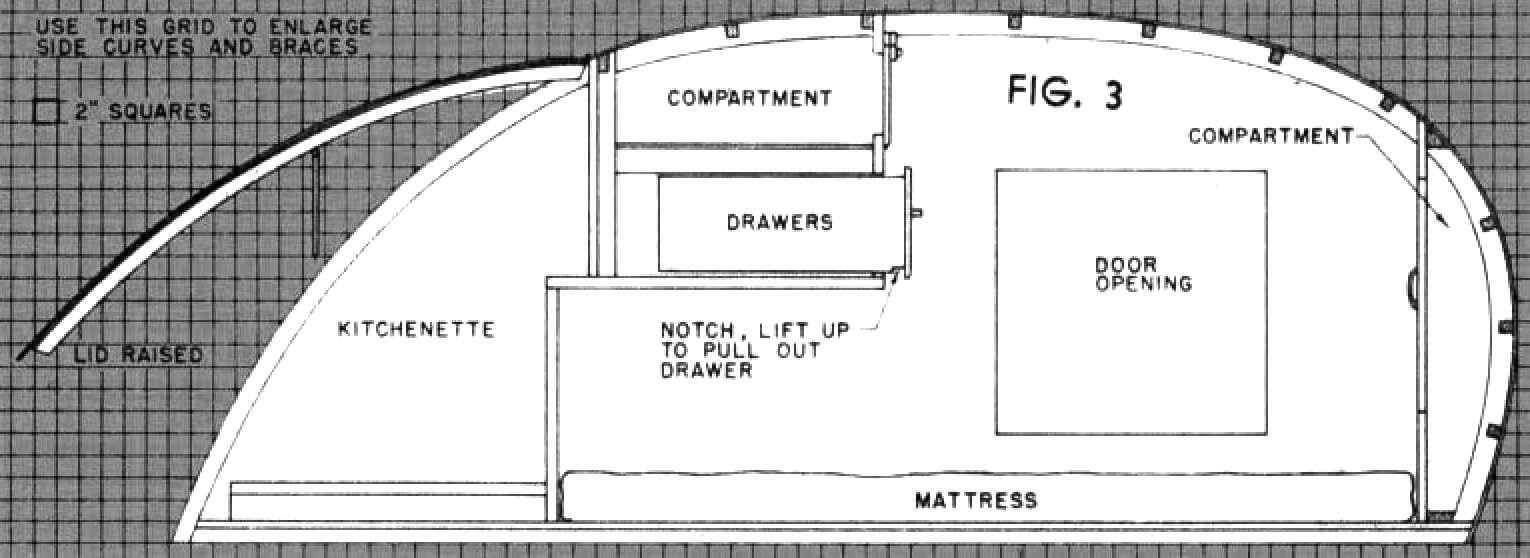
The 1/4″ thick Masonite roof can now be glued and screwed to the side joists and beams, using stainless corner molding to cover the seams on the sides. The kitchen block cover is then made by following the details in the small drawings and the template in fig. 3. The lid is hung from the top using a long piano loop and a 3/8″ stand is installed as shown to hold it in place.
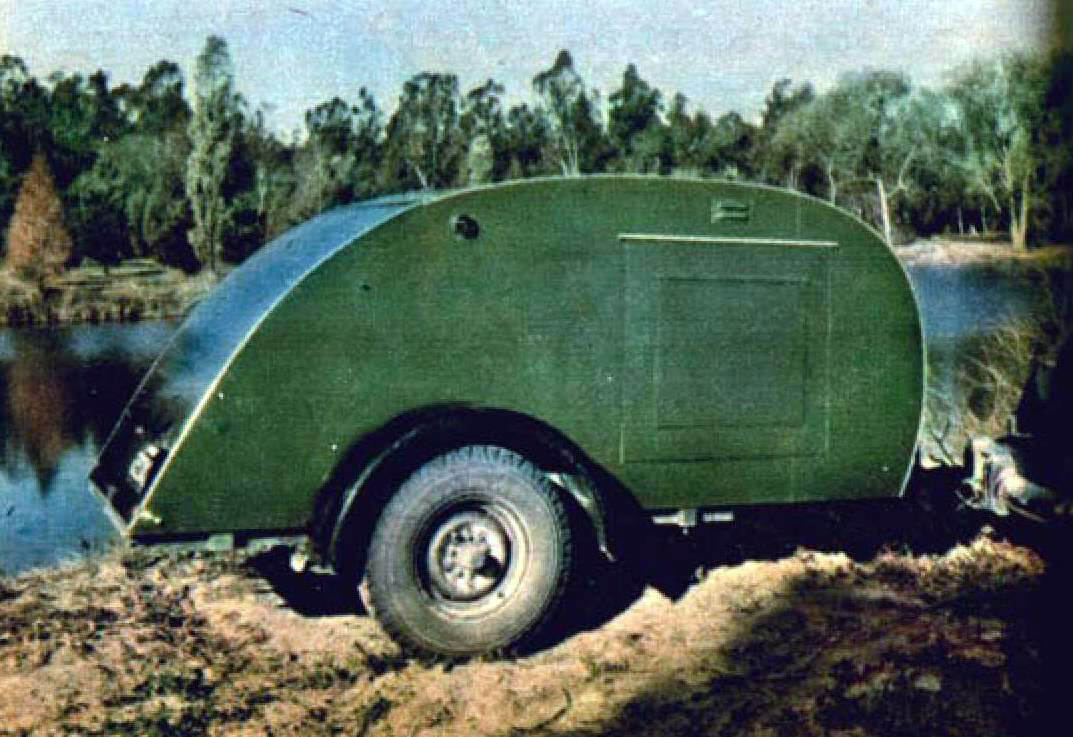
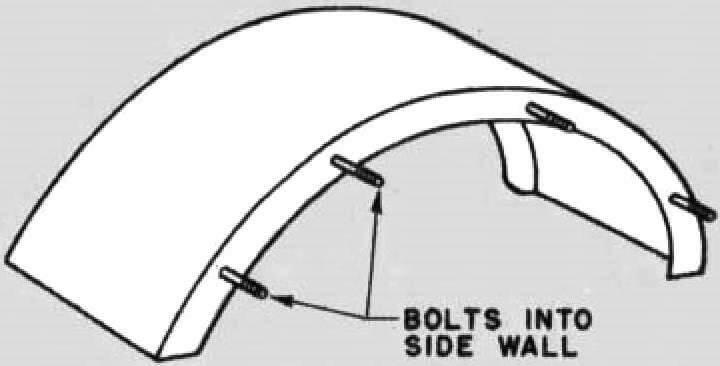
You’re at the finish line and the next task is to make the side doors. They are hung from the sides so that when closed they are flush with the outer walls. An ordinary car door handle and a simple lock inside. Now you can paint the outside of the trailer and varnish the inside. Make wings from heavy sheet metal and screw them to the side walls. The drop camper is ready, all you have to do is map out the route and go on a journey!
Based on materials from Mechanix Illustrated magazine (USA)
Recommend to read
 THE “TRIPOD” FOR FLOWERS
Most people, especially women, like to decorate your home potted flowers. But their placement is used mainly sills. Although for many plant species, this place is not quite suitable. And... AT THE START — MINICAR
In every town and village there is a quiet side street with a slope, where you can organize exciting competitions manicurists. But for this first you need to build the minicar. Here,...
