
 The first development, which we publish, is a universal glider of class “Standard”, called “pennant-4”. Characteristics, it is approaching to widespread machine “Brazil”, but has a number of original nodes, that facilitate and accelerate Assembly and disassembly. The device has been extensively tested in various flight conditions. His flight main advantages: the minimum gliding angle, extended speed range, the ability to execute turns of small radius on all speed range, softness, and ease of management.
Section of hang gliders sports club “Vympel”, Moscow area developed technical documentation for hang gliders purpose:
1. Universal hang glider in the class “Standard” with the increased performance — for both beginners and experienced pilots.
2. The glider of the open class for record flights in the mountains in conditions of high air turbulence.
3. The glider of the open class for record flights (hovering) in updrafts.
“Pennant-4” has a number of operational advantages, the main ones are: transportability, ease and speed of Assembly and disassembly, and therefore, minimum time required to bring to flight readiness; ease of repair-regenerative works in the field.
Added to this is that the glider “pennant-4” recommended by the Council of clubs of Moscow area gliders for initial training.
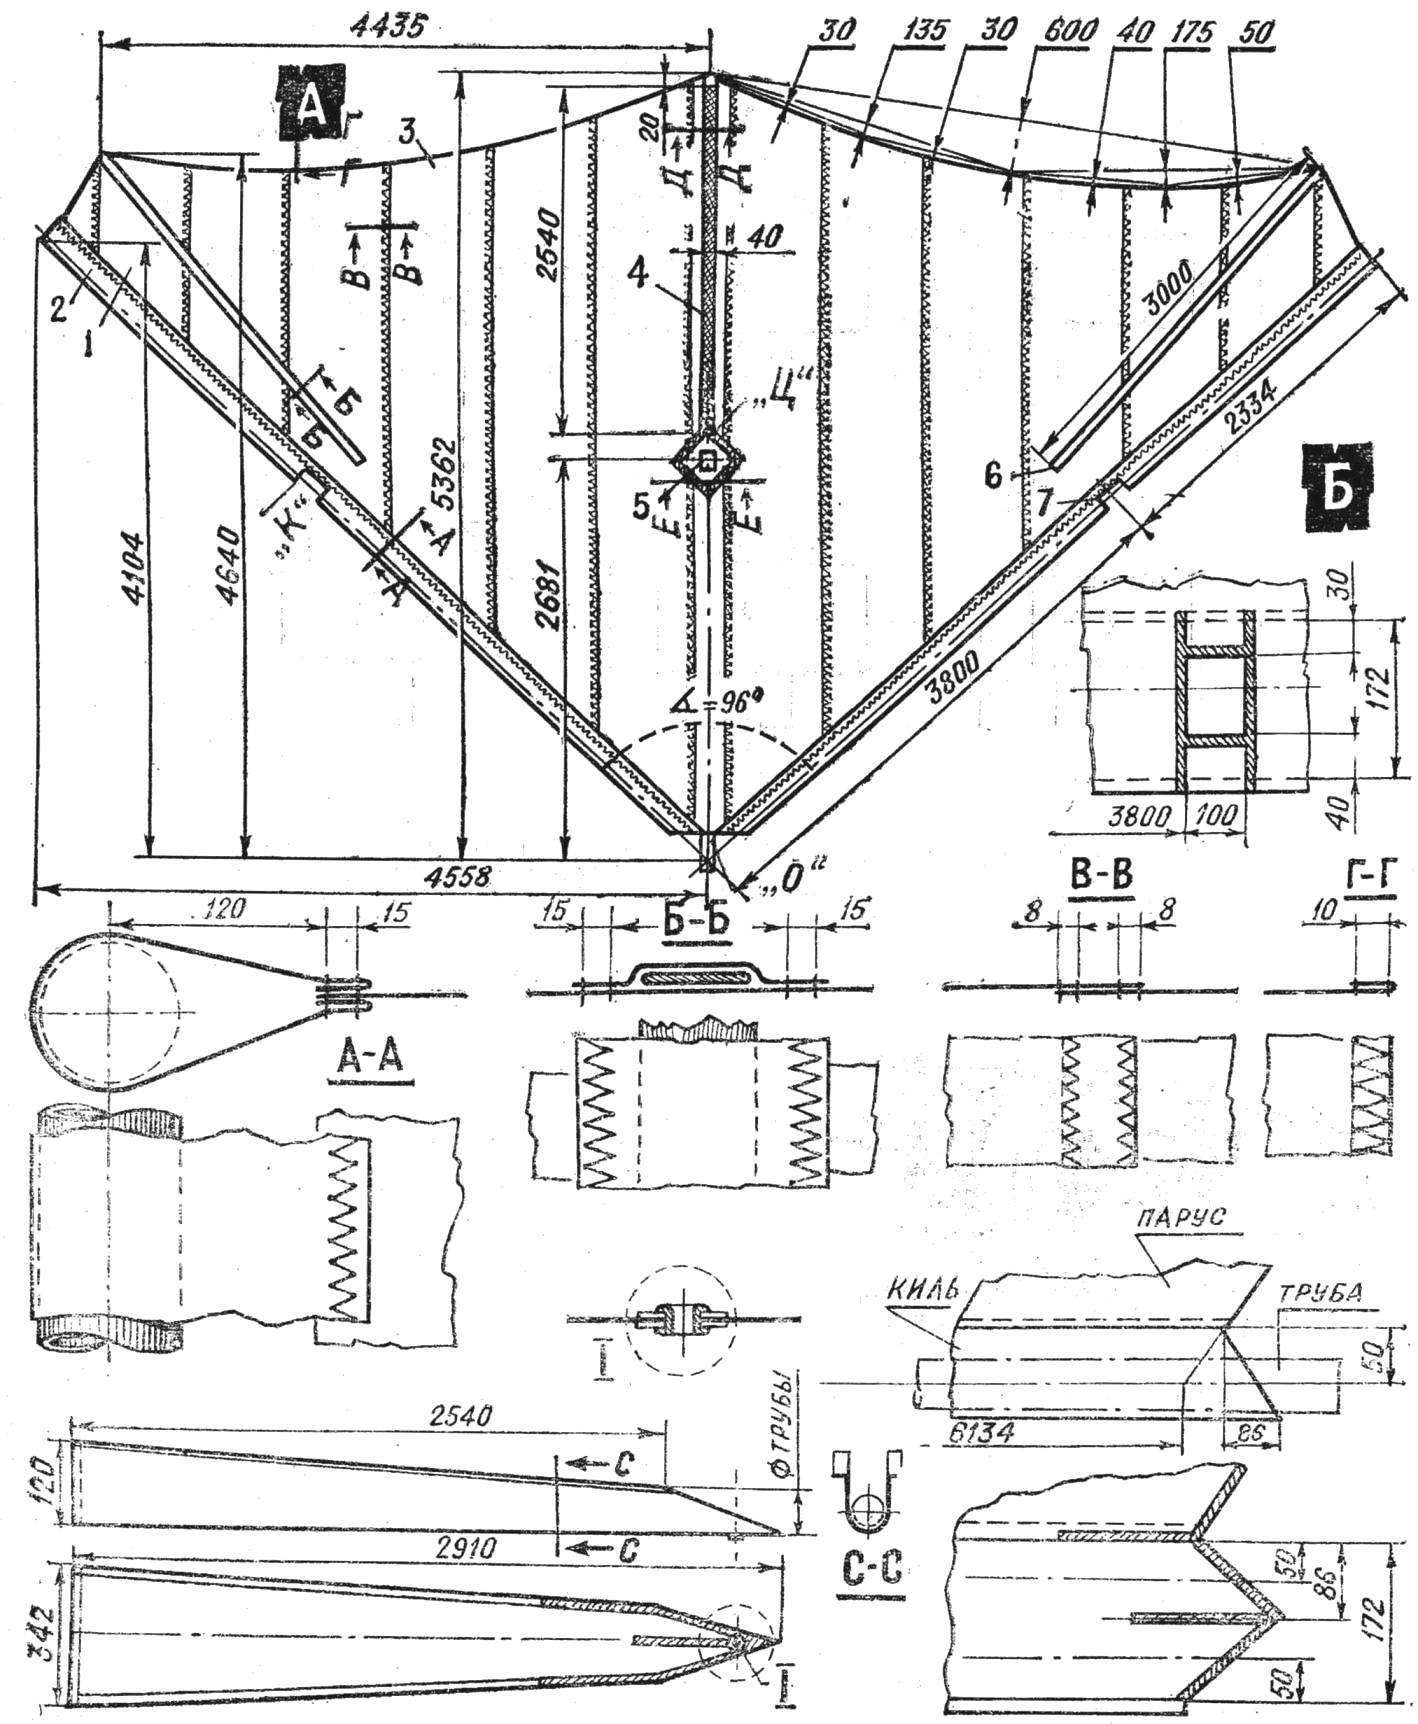
The main features of the hang glider “pennant-4” (Fig. 1.) are as follows: the sail is above the frame allowance equal to 3°, and the angle is 96°. The front part of the mast to not put on the keel tube. The side rear ends of the sail developed ago 600 mm in the direction parallel to the keel, and supported by an elastic armor. The trailing edge between the keel tube and the rear end of the armor is cut at a depth of 600 mm. the shape of the dome and its geometrical dimensions provide different position of the lateral ends of the sail relative to the middle at various speeds. When “the angle of attack of the ends of the sail is changed to a lesser extent due to significant changes in the angle of attack of the middle part of a sail that hinders the disruption of the flow at the ends and ensures stability at low flight speeds and steep turns. Incidentally, the same technical idea is implemented in the best foreign open class gliders of the “Cirrus” and “Phoenix”.
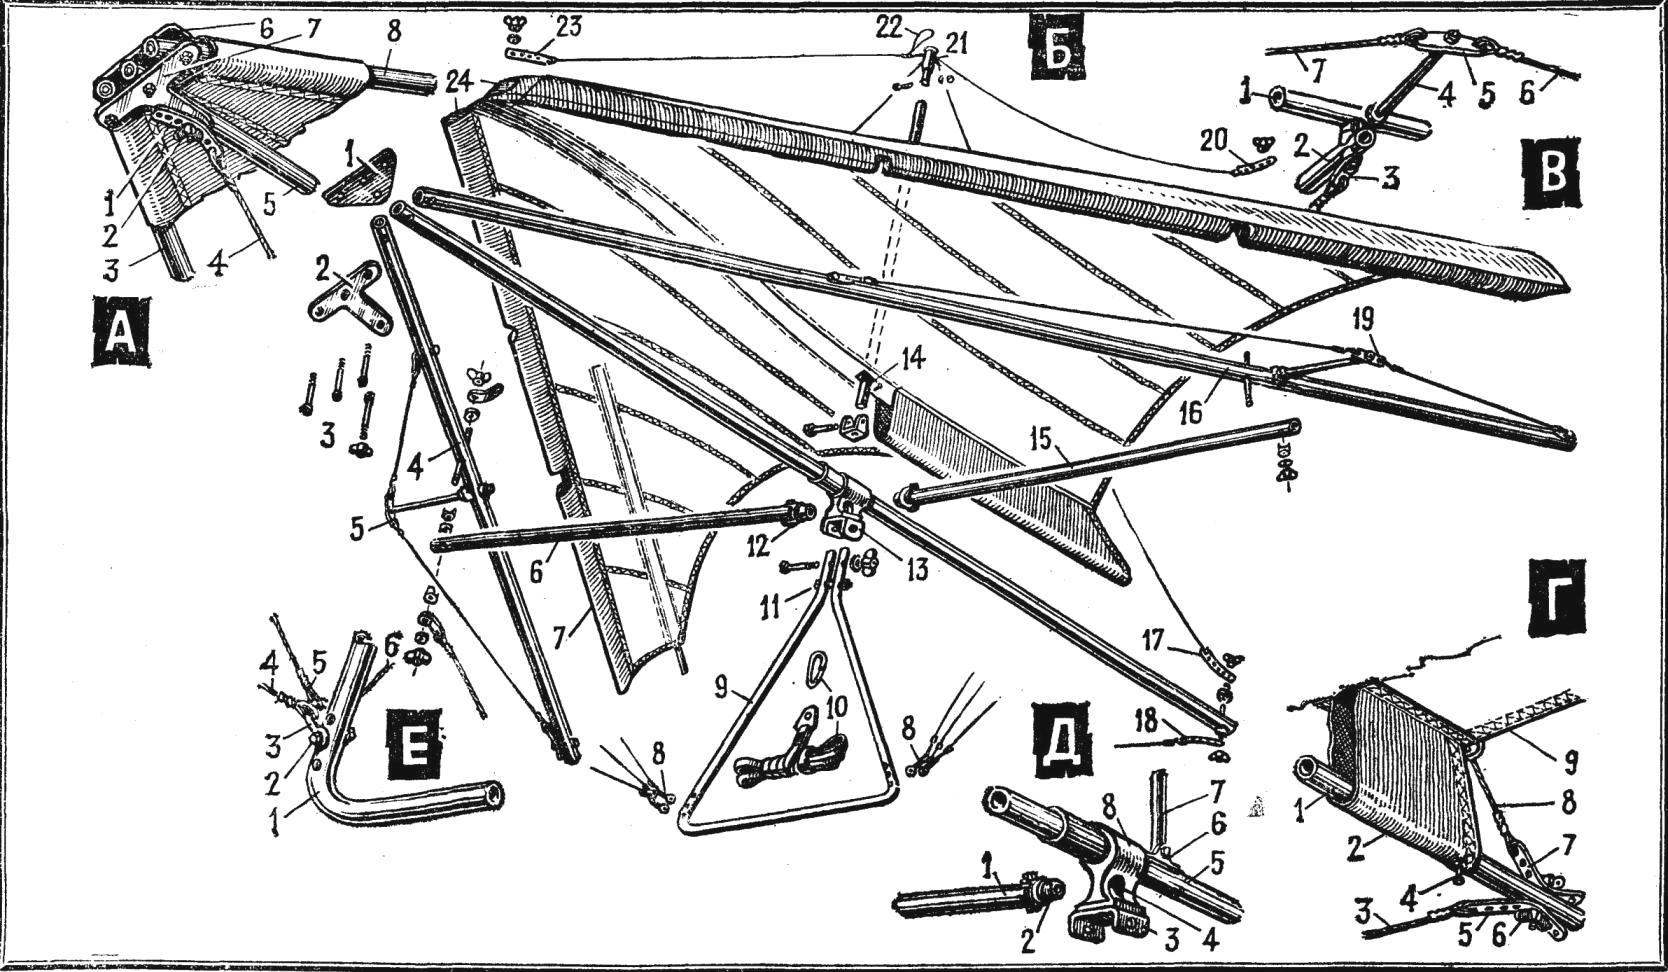
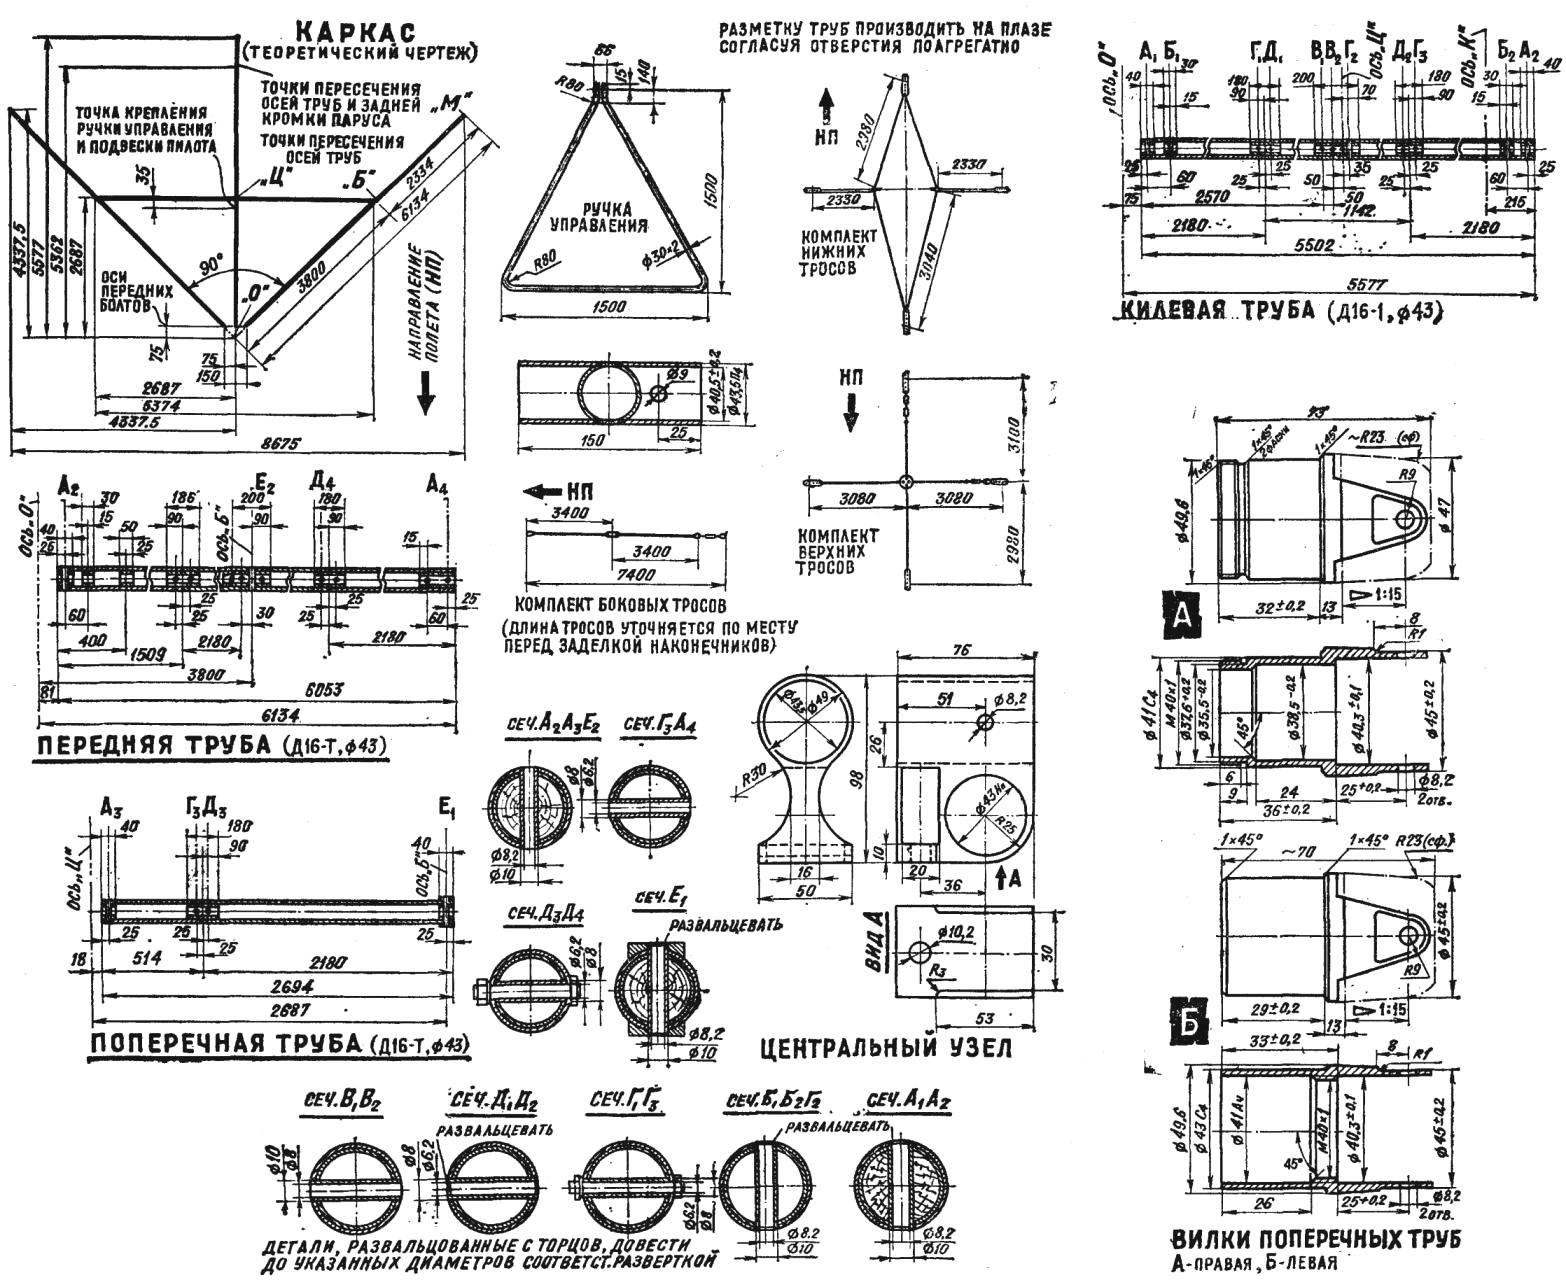
FIG. 1. ARTICULATION OF THE FRAME OF HANG GLIDER “PENNANT-4”, BASIC KNOTS AND DETAILS:
A — front unit: 1 — the adjusting strap of the lower cable, 2 — wing nut, 3 — right front tube, 4 — the cable to the control handle, 5 — Central tube, 6 — upper plate, 7 base plate front end node 8 — left front pipe; B — communities of the frame: 1 — top plate front node 2 — lower plate, 3 — bolts, 4 — right front tube, 5 — rope stretching right front tube, 6 — right half of the transverse pipe, 7 — sail (dome), 8 — clip the cables to the control knob, 9 control knob (trapezoid), 10 — suspension system and a carbine of the pilot, 11 — tensioning bolt, 12 — the right fork tube, 13 is the Central node 14 — base mast, 15 — left half of the transverse pipe 16, the left front tube, 17 — rear adjustment top tether strap, 18 — rear adjustment strap of the lower cable, 19 — gaff rig and tethered stretching of the left front pipe 20 — the adjusting strap of the upper left rope, 21 — head of the mast, 22 — soft loop, 23 — adjusting front strap top tether 24 on the sleeve of the front pipes; the gaff rig and node of the pipe: 1 — left front tube, 2 — cross tube, 3 — earring the bottom side of the rope 4 — the gaff rig, 5 — ring, 6 — cable; D — rear wall of the Central tube: 1 — Central tube, 2 — keel sleeve, 3 — rear lower cable, 4 — bolt mounting sleeves, 5 — the bottom adjustment bracket, 6 — wing nut, 7 — top adjustment strap, 8 — upper cable, 9 — rear edge of the sail; D — the Central node: 1 — the right half of the transverse pipe 2 — fork, 3 — bracket, 4 — hole plug, 5 — Central tube, 6 — mounting bracket of the mast 7 mast, 8 — body; E — mount cables to the control handle: 1 — handle, 2 — bolt, 3 — clip, 4 — front wire, b — side cable 6 back cable.
The main objective in the design of the sail is to determine the right relationship between the coordinates of the wingtips, the shape of the rear edge in plan and a stiffness of the lat, providing the described effect. When testing our glider one of the sails had increased in height in the Central part of 100 mm pocket keel tube that formed a kind of keel plane. The latter provided the device is very important property is fast turning into the wind without driveability (the”feathered effect”). This property becomes one of the main when teaching beginners, currently, is mandatory because it provides additional safety of the flight.
The technical division of the glider, a General view of the individual components and the main parts are shown in figure 1. The other drawings are partially depend on pipe diameter and wall thickness. Therefore, the construction of the apparatus it is necessary to start only after acquiring all the necessary materials. Placed on pages 28 and 29 of the sketches for that is enough. In the following article, you will learn about the features of designing and sewing the sails.
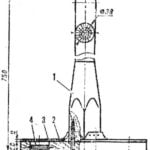
In No. 11 of the journal in 1977 we introduced readers to the design And the main components of the frame glider “Vympel”, created by the activists of the Moscow area under the guidance of the design engineer V. E. Bugrov. Today gives some additional details about the framework and provides a description of cutting and sewing sails, which differs significantly from the sails to the widely used glider type “Slavutich”. But first about the frame. Its main feature is unification of all pipes, having a length of 2180 mm, which gives the possibility of repair of any pipe in the field by replacing standardized parts. In addition, the frame can be transformed using all of the basic details by changing only the length of the inserts. For unloading of the front pipes installed additional lateral stretching of the spacer (gaff rig). From wooden tubes (plugs) the frame had to be abandoned because they do not perform their functions (shrink, burst, etc.). In places the necessary reinforcements under the bolts to put the tube and inside the tube is a short metal sleeve of appropriate diameter. Transverse tube consists of two halves connected by the Central node. The Central hub together with the inner ends of the transverse pipes and the mounting location of the upper end of the control handle can slide along the keel towards the bow of the glider. While the front of the pipe, entrained cross tube moved towards the rear of the keel, varying the front angle. Mast length of 1500 mm has the ability to slide along the rear top tether after release with a soft loop. These features frame make this glider ready for flight from the retracted position for 15-20 seconds and just as quickly disassemble it, not rastekanija any bolted connection) This is especially valuable for hang-gliders, training in steep, difficult climb” mi, in the wind, in cold or in high altitude conditions when you have to deliver the glider to launch on the ski lift or automobile.
The design of the sail and its parts:
A theoretical drawing: 1 — body of the sail, 2 — sleeve front pipe, 3 — rear flange, 4 — keel pocket, 5 — hole Central node, 6 — laderman, 7 — cutout for crispity sleeve side pipes B — design of individual elements and of the joints And a — arm connection front pipe with the body of the sail; B — B — overlay laderman; In — connection of individual panels; g — G — seal the rear edge Before stitching on the machine zigzag all seams should be lightly glue adhesive 88. Lower left — keel pocket; right — rear end of the sleeve keel tube; at the top — scan window crispity (“K”) in the sleeve front tube.
Variants of constructive solutions moving Central node can be many. One of them is quite well tested — shown on our drawings.
Schematic cable of stretch marks, shown in the figures (see “M-K” № 11, 1977), have the following features: lower side cables are made of double (because the cross tube is split), and lateral longitudinal — quick-fit on hooks or locks of the type “frog”, with a gross length adjustment of the rail with holes, and accurate — the turnbuckles.
The sail is manufactured in accordance with the scheme (Fig. 1) made of synthetic fabric or film having a weight in the range of 300-350 g/m2. Of domestic fabrics best for sewing the sails are calendered lasani production Tbilisi and Kaunas factories (the item’s fabric is called “Sail”). As substitutes you can use technical fabric of AZT, but at the very least Bologna or bladeway fabric brand AP 32-80.
When cutting you need to make a drawing of sail in life-size (on the floor of the gym or level asphalt pad) and impose on him the cloth parallel to the keel, securing them temporarily with small nails. Usually tailoring the practice of separate pieces of material before sewing them on the machine smachivaetsya on hand. But the sewing of the sails of the glider, this method is not best, especially in the case of the Dacron: it is labor intensive, does not provide the required accuracy, and the tissues are left holes from the needle. So much better before stitching all seams are glue glue 88 and have a good press on a flat surface. Before applying one edge of the cloth to another, you should mark with a pencil the width of the seam.
The sequence of technological operations in the sewing of sails is as follows:
1 — cutting (in the drawing in scale 1:1); 2 — proshivka keel sleeve to the back of the keel panels; 3 — gluing of the keel panels with the panels of the right and left halves of the sail; 4 — line bonded seams on the machine zigzag; 5 — trimming the outside edges of the sail in accordance with the theoretical drawing; 6 — manufacture of sleeves for the front pipes of the Cape-tent fabric; 7 — connecting the sails with a side of hand* you, the sealing of corners, holes and eyelets; 8 — proshivka laderman; 9 — overcast edges the correction of the defects.
After all these operations will be performed, you can put the sail on the frame and do the final fit and adjustment. This work will be much easier if the room allows you to hang the glider to the ceiling. First of all verified by the geometric symmetry of the device by measurement with a metal tape measure or a ruler; then cross balancing (the difference in weight right and left halves should be no more than 10-15 g); all the seams should lie smoothly — wrinkling, bubbles and sagging are unacceptable. After finishing the preparatory work, you can proceed to flight tests of the glider was built.
Selected geometrical dimensions of our glider correspond to the area of the sail, equal to 21.6 m2. This area limit opportunities for pilot weight 75 kg. we Should remember that the selection of areas is a very important point for the novice glider pilot. The device with a small area of the sail dangerous, as in light winds and on steep slopes, it requires a high speed run at the start. Wrong actions of a novice in such conditions often lead to injuries. As for the glider with a big square sails, he’s dangerous, on the contrary, in strong winds and in conditions of high air turbulence (e.g. in the mountains). If we consider that the construction of the glider at home is rather complex and expensive process and that of a large glider to do a little easier than from a small — large, can be recommended to novice gliders to build machines with a load of about 4.7 — 4.8 kg/m2 (the ratio of the weight of the pilot plus machine to the area of the projection of the sail). It is necessary to observe the following rules: the initial acquaintance with the hang glider is best done in a strong wind (7-8 m/s) on a slope of average steepness of obstacles in the form of pillars, bushes, barbed wire, etc. the Athlete must pick up his three assistants, two of whom are to hold the glider over the side cables, and the third for the end of the keel tube at the rear. They all start to run, and the glider quickly gaining lift. Assistants their actions should enable the novice to feel like flying and try to control the apparatus in the longitudinal and transverse directions.
Prior to first solo Free flight slope is very useful to run with the glider in hand on level ground, not buckling to it with a carabiner suspension system. Sensing the occurrence of a lifting force, it is necessary nudge to let go of the glider in solo flight. It verifies the absence of twisting, turning, stalling on the wing, kupirovaniya. Well made glider needs exactly and far to fly one. Just don’t let him go in gusty wind or on a steep slope.
The glider “pennant-4” was verified in conditions of the Moscow area, as well as Elbrus and mount name Klementyev in Crimea, showing good performance, and recommended by the Council of clubs gliding of the USSR as a generic device class Standard, suitable for competitions and for training beginners.
V. BUGROV, design engineer
Recommend to read
 WASHING MACHINE IN THE BACKPACK
This object shaped much like a conventional stationery printing, can become an addition to a household washing machine, replacing it in the stowed or country conditions, and also in... GARAGE LIFT
Serious repair of the engine of a car is now expensive. So many motorists, having the necessary knowledge and experience, ready to take on it yourself. But do not presume that since...
