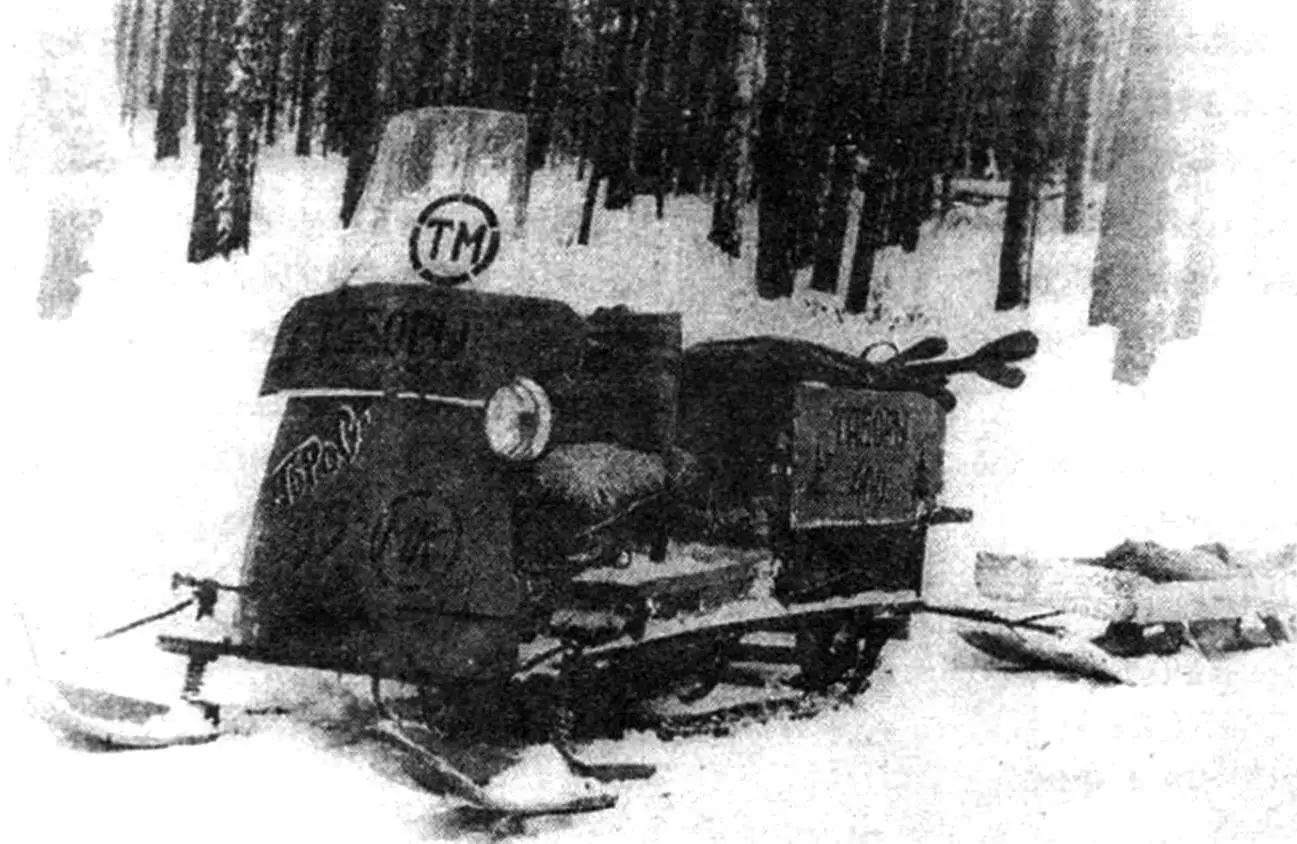
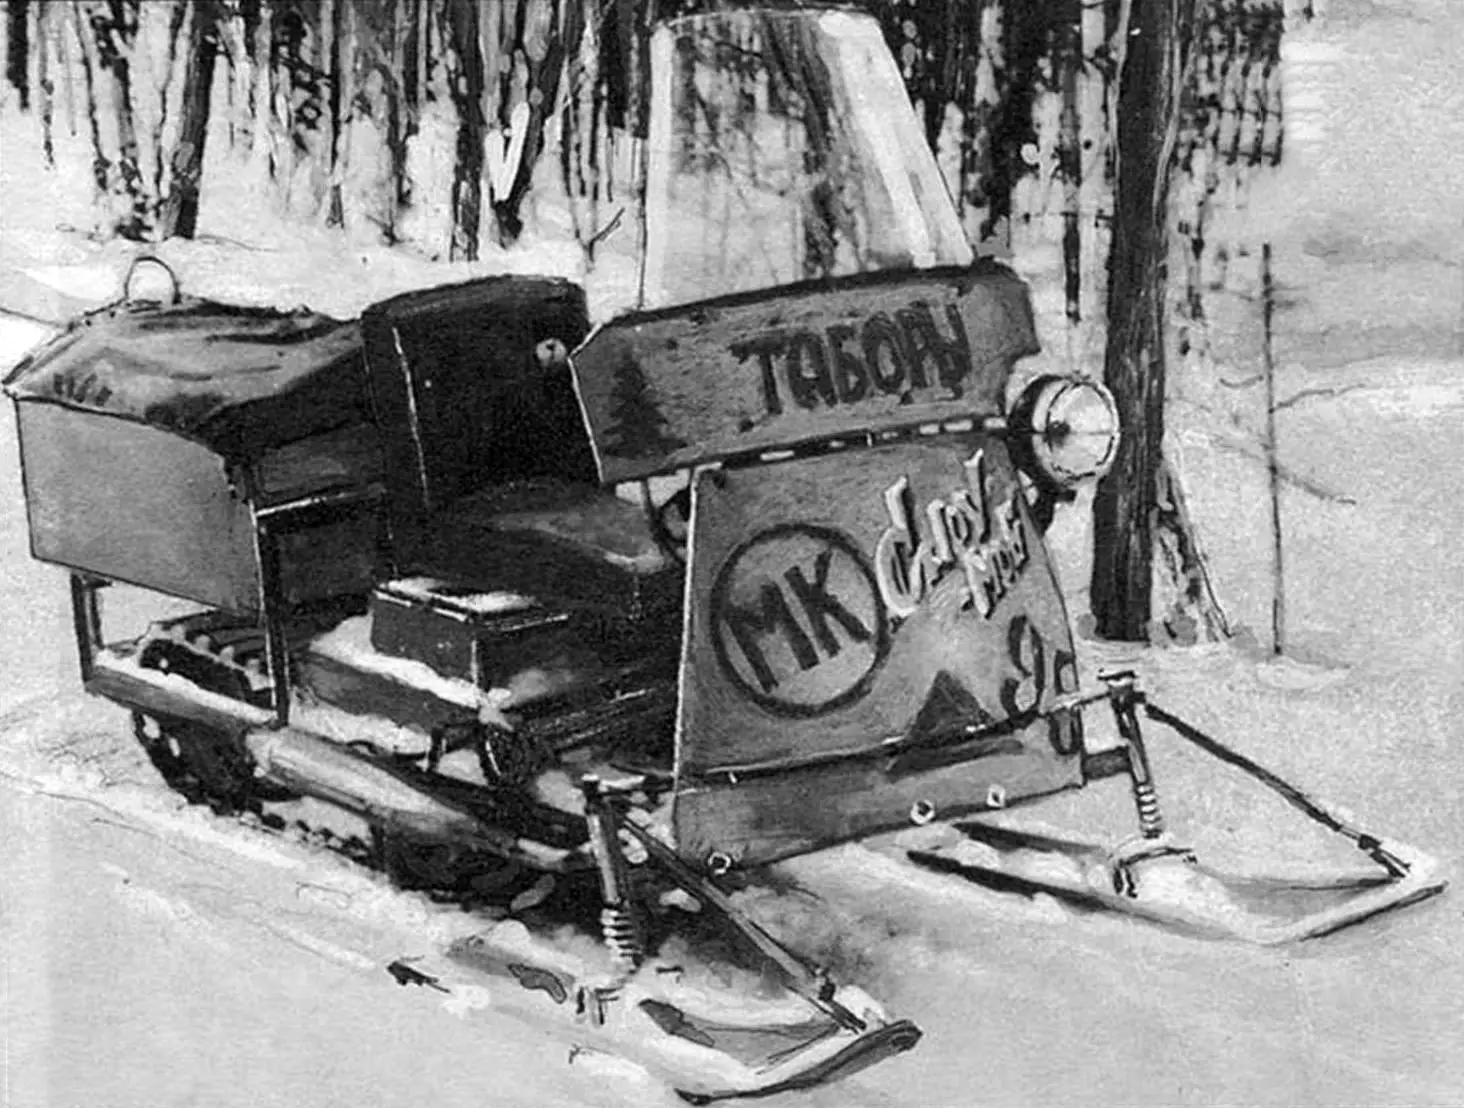
This tracked snowmobile is somewhat familiar to our readers. Its photograph was published in No. 3’99 of our magazine under the heading “Photo Panorama from Readers’ Letters.”
It was made by Valery Aleksandrovich Bogdanovsky from the village of Tabory, Sverdlovsk Region — a senior coach of a children’s and youth physical training club, an enthusiastic and passionate person. He loves his work — he even refused to apply for disability benefits for it. He is also an avid fisherman and hunter. Another passion of his is snowmobile machines, and ones made with his own hands. He built several aerosleds with good performance characteristics, and a photograph of one of these machines was published in “Modelist-Konstruktor” No. 1’89. Then came pneumosleds — wheeled, wheel-ski types (see No. 10’92 of our magazine), both open and semi-enclosed types, and now — a tracked snowmobile.
The aerosleds and pneumosleds I built did not always suit me when moving through snow-covered forests or bushes, frozen swamps overgrown with hummocks. Then I decided to make a tracked snowmobile according to the drawings and blueprints in the “Modelist-Konstruktor” magazine No. 11’91 in a publication about the snowmobile machine “Mysl-2”, designed by the Matveychuk brothers from the city of Zavodoukovsk, Tyumen Region.
I built the machine during the summer in the yard of the house using the most common tools: an electric drill, a metal jigsaw, a grinder, a file, a hammer, and a chisel, since, besides electric welding, I have no other machine base. In the workshop, I only ordered bearing housings and shaft ends.
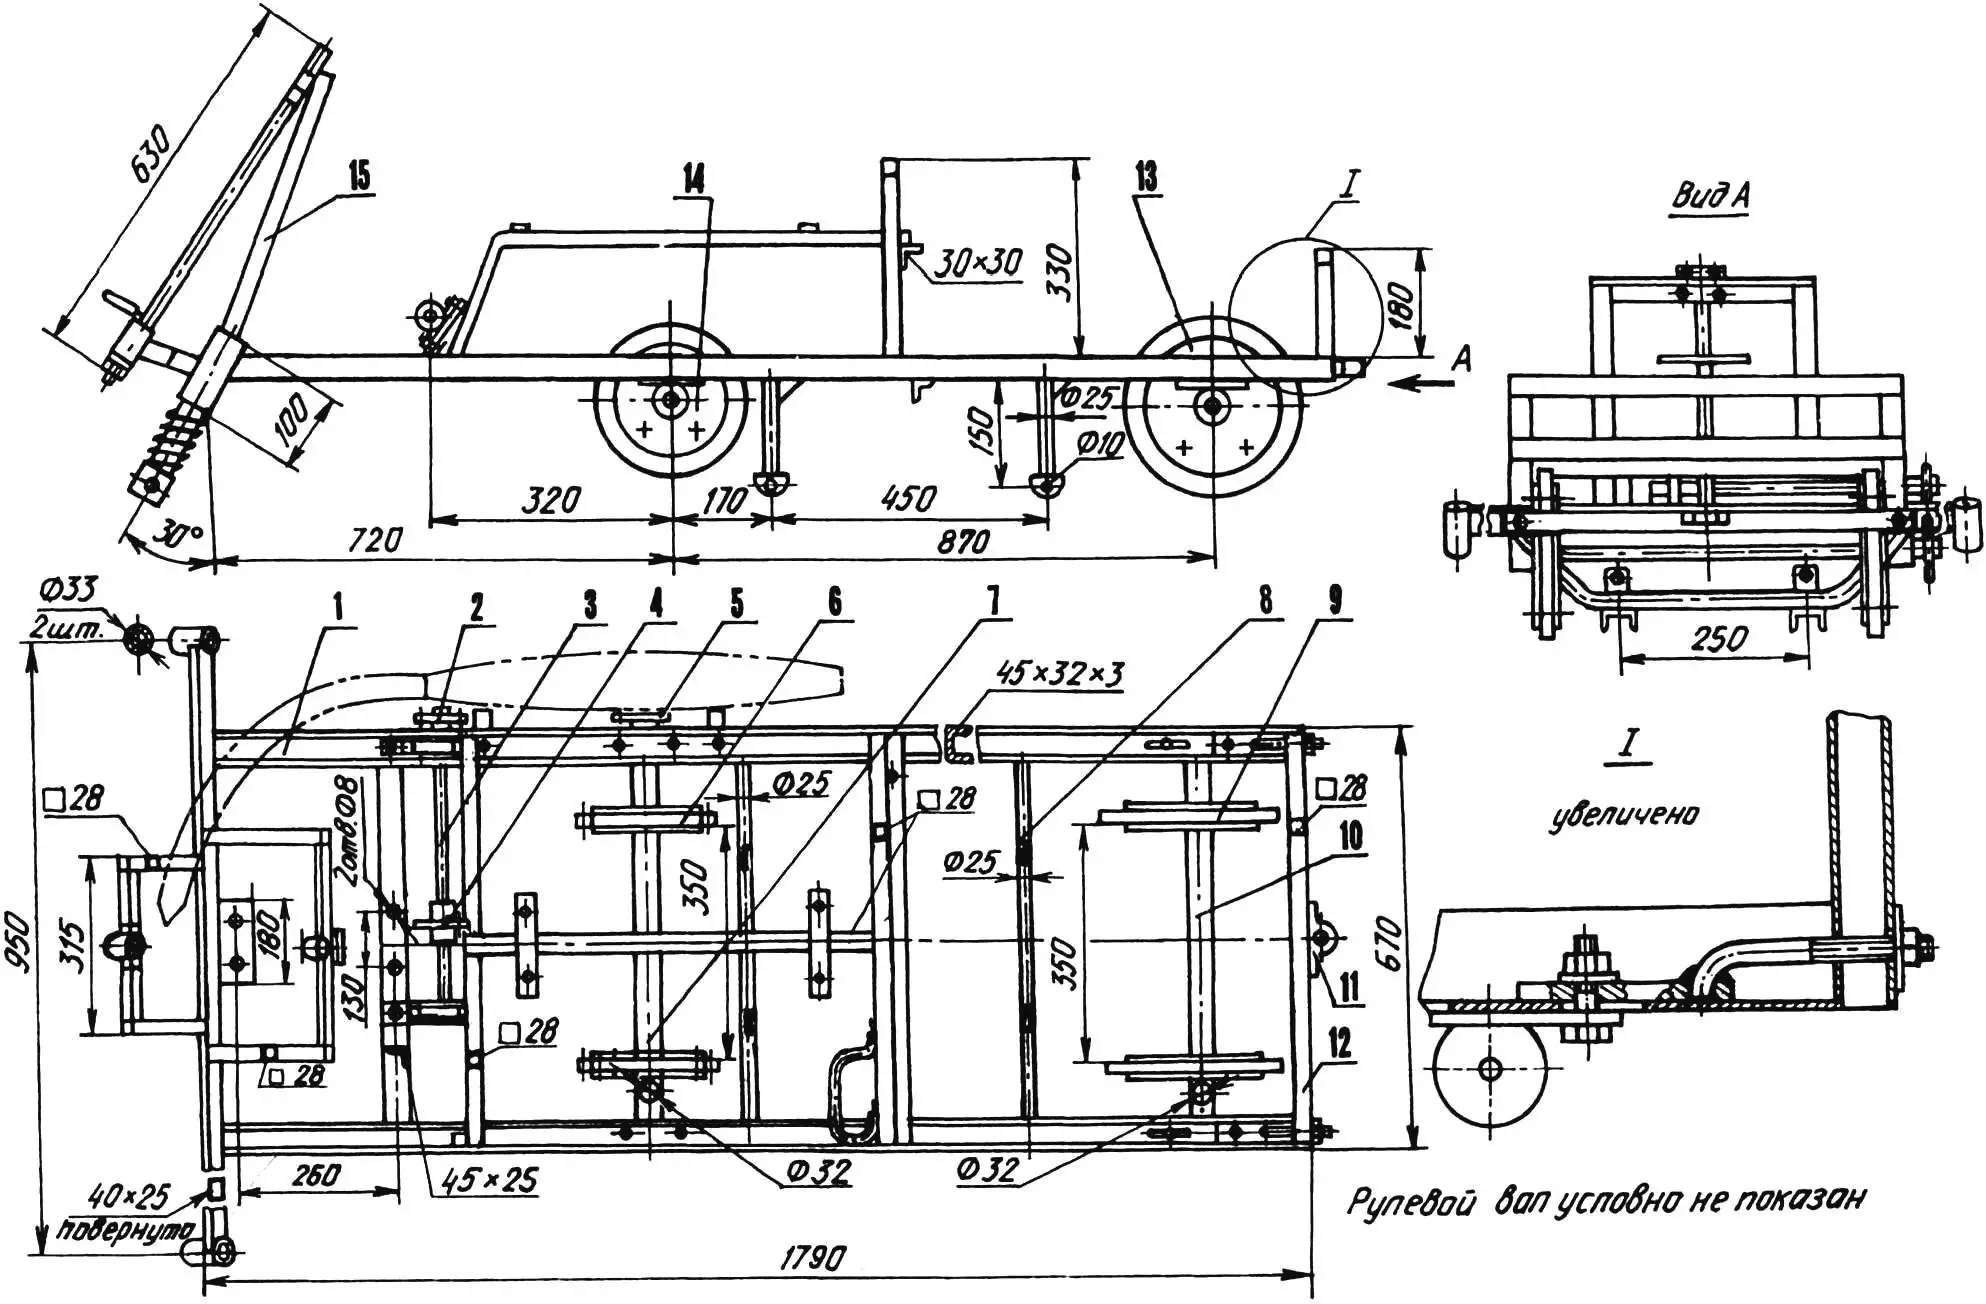
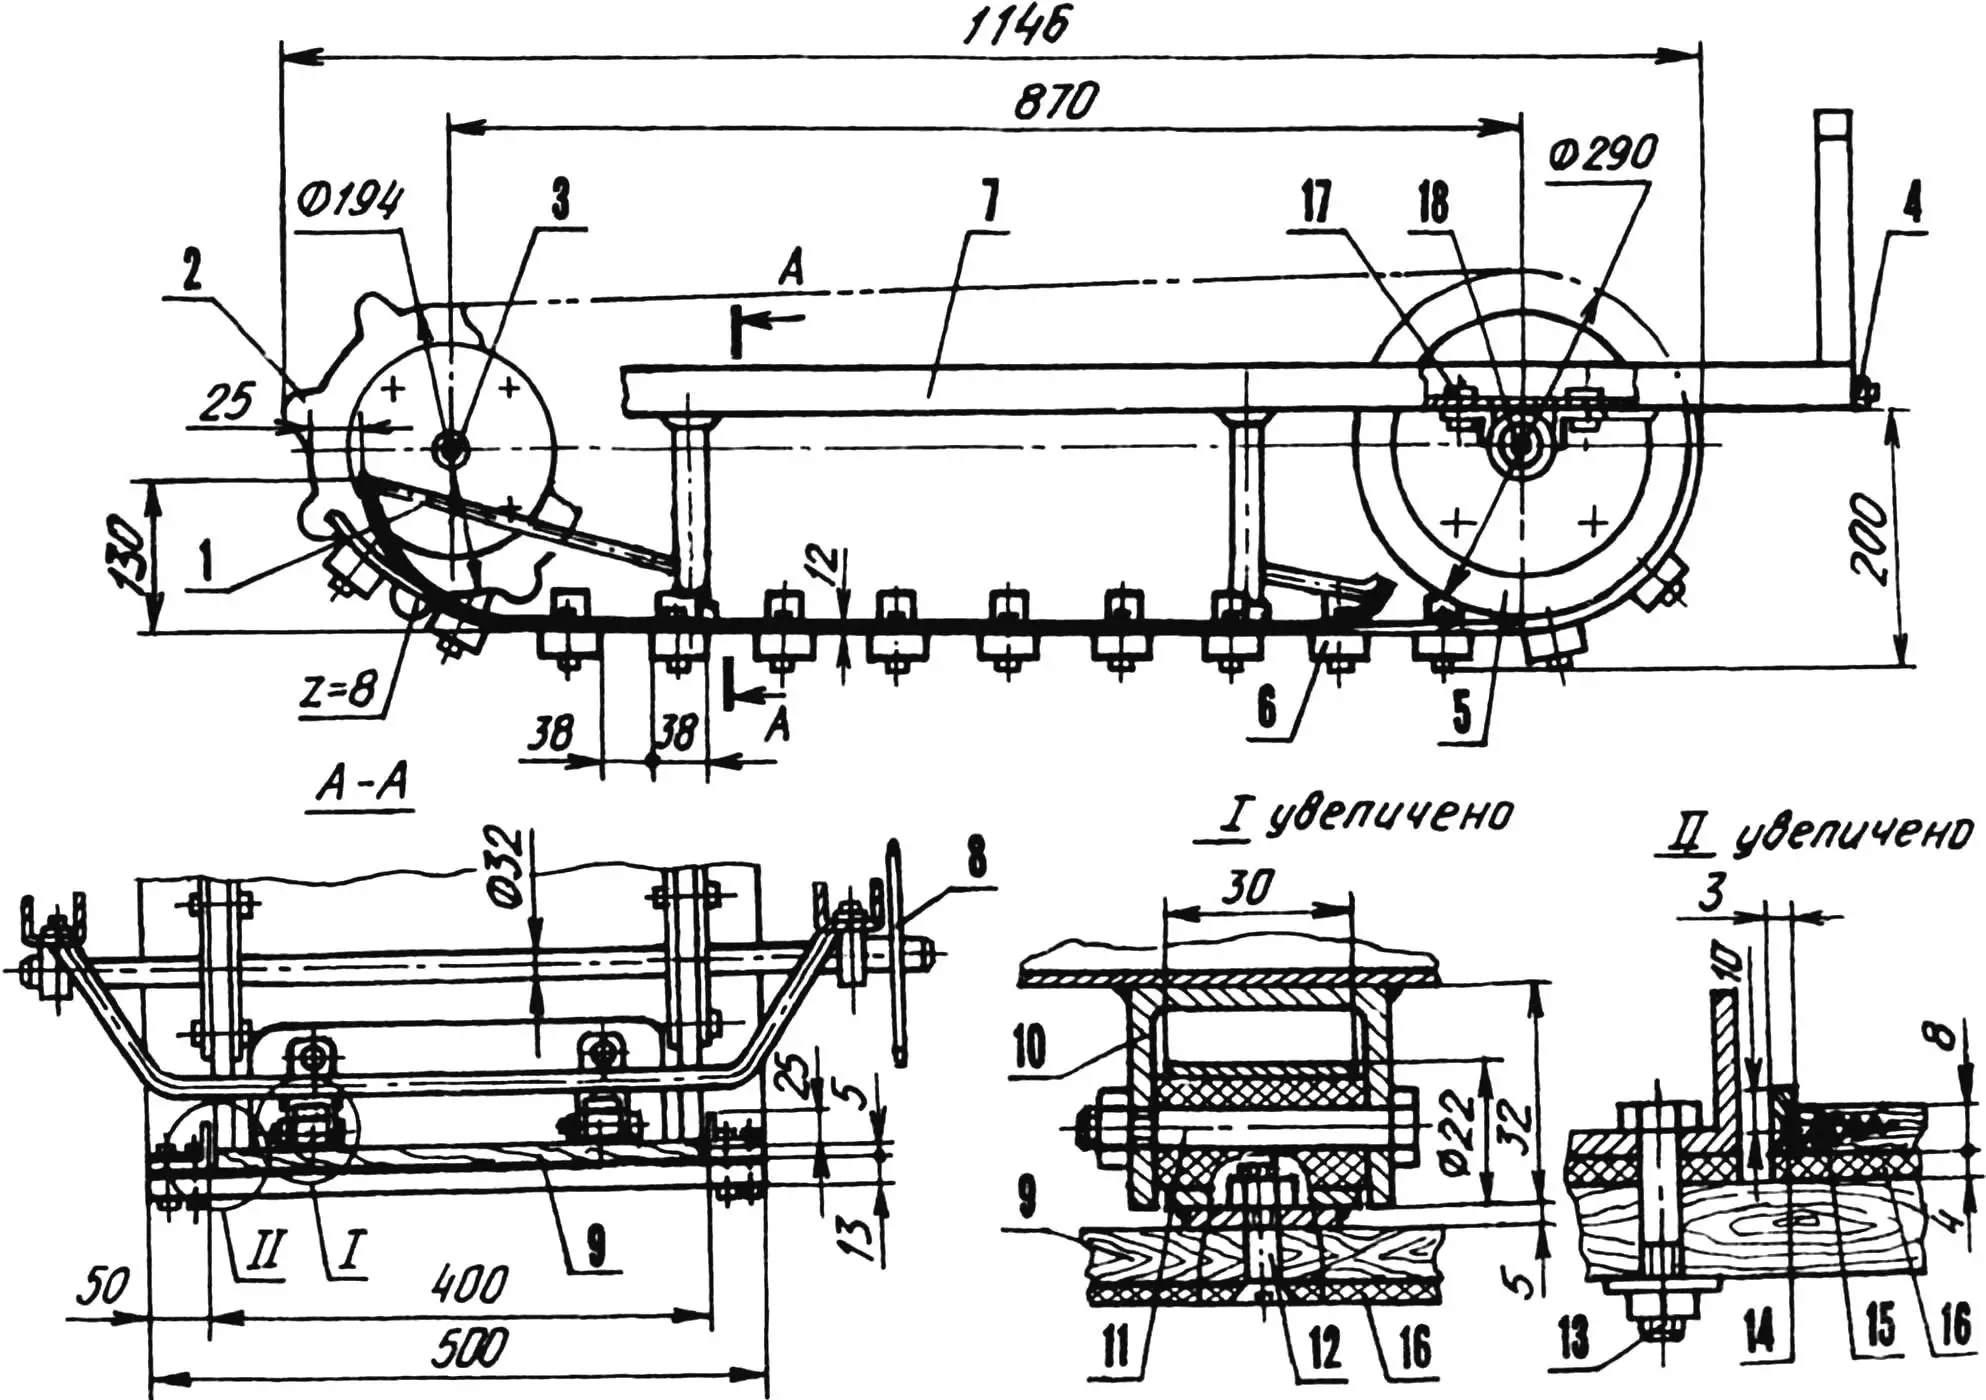
1 — frame; 2 — intermediate shaft sprocket No. 2 (z = 17, from Izh motorcycle); 3 — intermediate shaft; 4 — intermediate shaft sprocket No. 1 (z = 21, from SZD motorized wheelchair); 5 — track drive shaft driven sprocket (z = 37); 6 — track drive sprocket with flanges (z = 8, plywood s20, 2 pcs.); 7 — track drive shaft; 8 — arc — support ski post (steel tube 25×3.2, 2 pcs.); 9 — track tension roller (Ø290, plywood s20, 2 pcs.); 10 — tension roller axle (steel, tube 32×4); 11 — trailer hitch; 12 — tensioning device; 13 — drum flange (steel, sheet s1.5, 4 pcs.); 14 — track drive sprocket flange (steel, sheet s1.5, 4 pcs.); 15 — steering post
I used available materials. I welded the frame from stamped channels from an old store counter and square tubes from a kitchen table. All shafts are made from round water and gas pipes. I used an engine from a “Voskhod” motorcycle, placing it in front on the right side, as on the “Mysl-2” machine.
The snowmobile turned out somewhat rough in appearance, but winter tests showed its good performance characteristics: cross-country ability, speed; it was compact and light, economical in fuel consumption. The asymmetric engine placement, of course, has its advantages: ease of access for maintenance, convenience of starting and shifting gears, the ability to direct the chain drive directly to the track drive shaft. However, on loose snow during turns, the machine often tipped over. This circumstance determined my decision to move the engine to the middle of the front part of the snowmobile. I had to refine the design, primarily the front part of the frame, as well as the installation of an intermediate shaft in the machine’s drive to transmit rotational torque from the engine to the track. There were other modifications that I made during the snowmobile’s modernization, which improved its performance characteristics, reliability, and comfort (if one can say that about this utilitarian machine), and about them — in the course of the story.
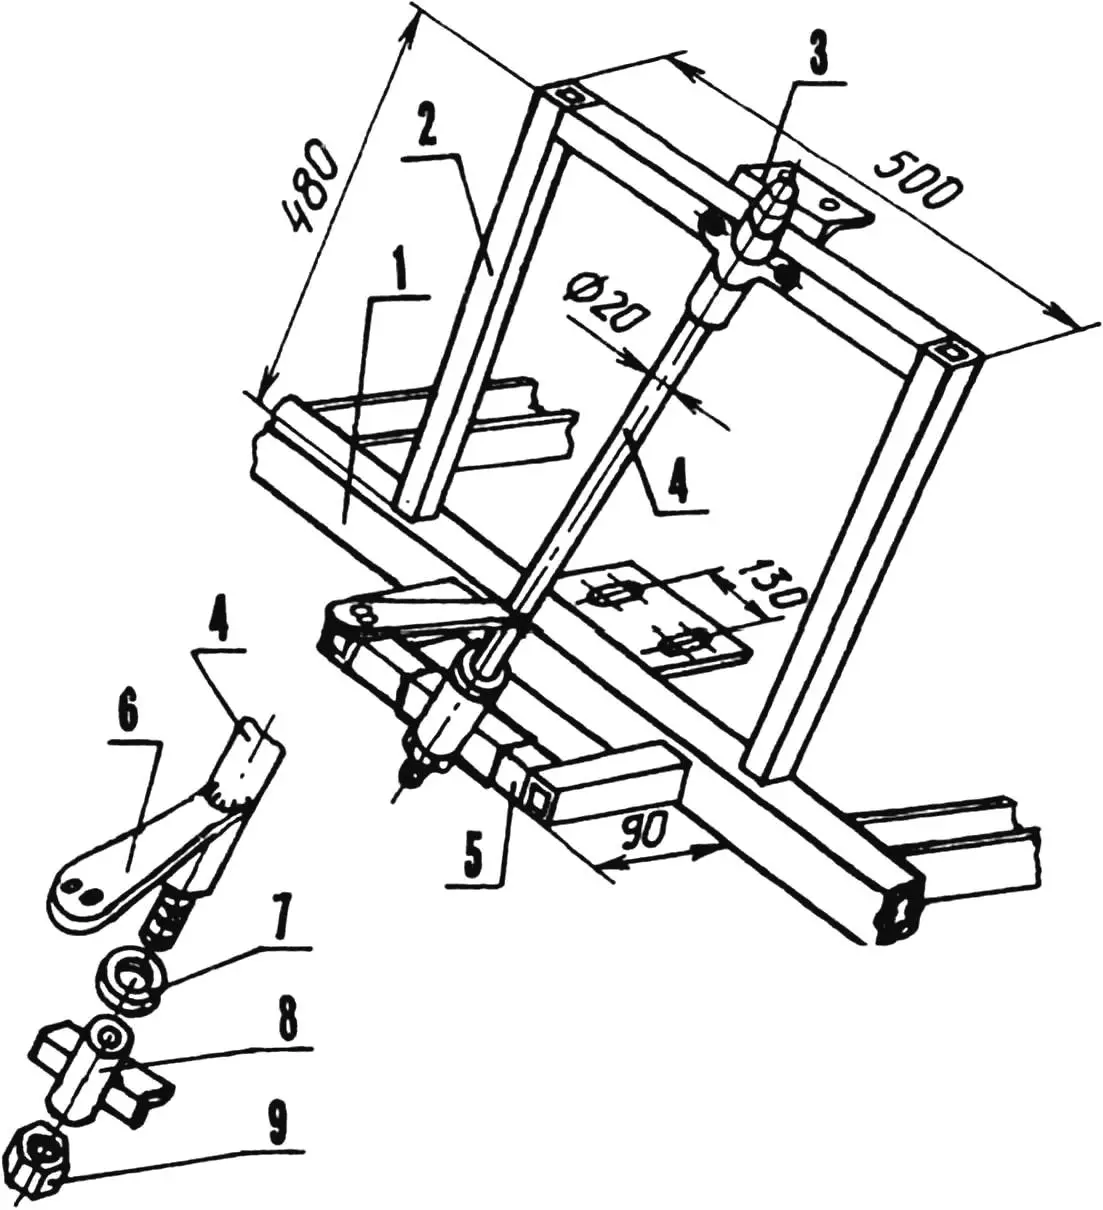
1 — front frame cross member; 2 — post (steel, tube 28×28); 3 — steering support (angle 25×25); 4 — steering shaft (steel, tube 20); 5 — crossbar (steel, tube 28×28); 6 — pitman arm; 7 — washer (bronze); 8 — support bushing with angle; 9 — M10 nut
To install the engine with subframe in the middle of the machine, I welded a platform to the front cross member of the frame, making appropriate holes in it for the subframe “feet.” I also made the same holes in the next cross member. I converted the holes in the subframe “feet” into longitudinal slots for tensioning the drive chain by moving the engine forward. I also had to modify the seat frame, shifting it slightly backward. The engine now starts using a homemade handle, not a kickstarter, and gear shifting is like on a regular motorcycle.
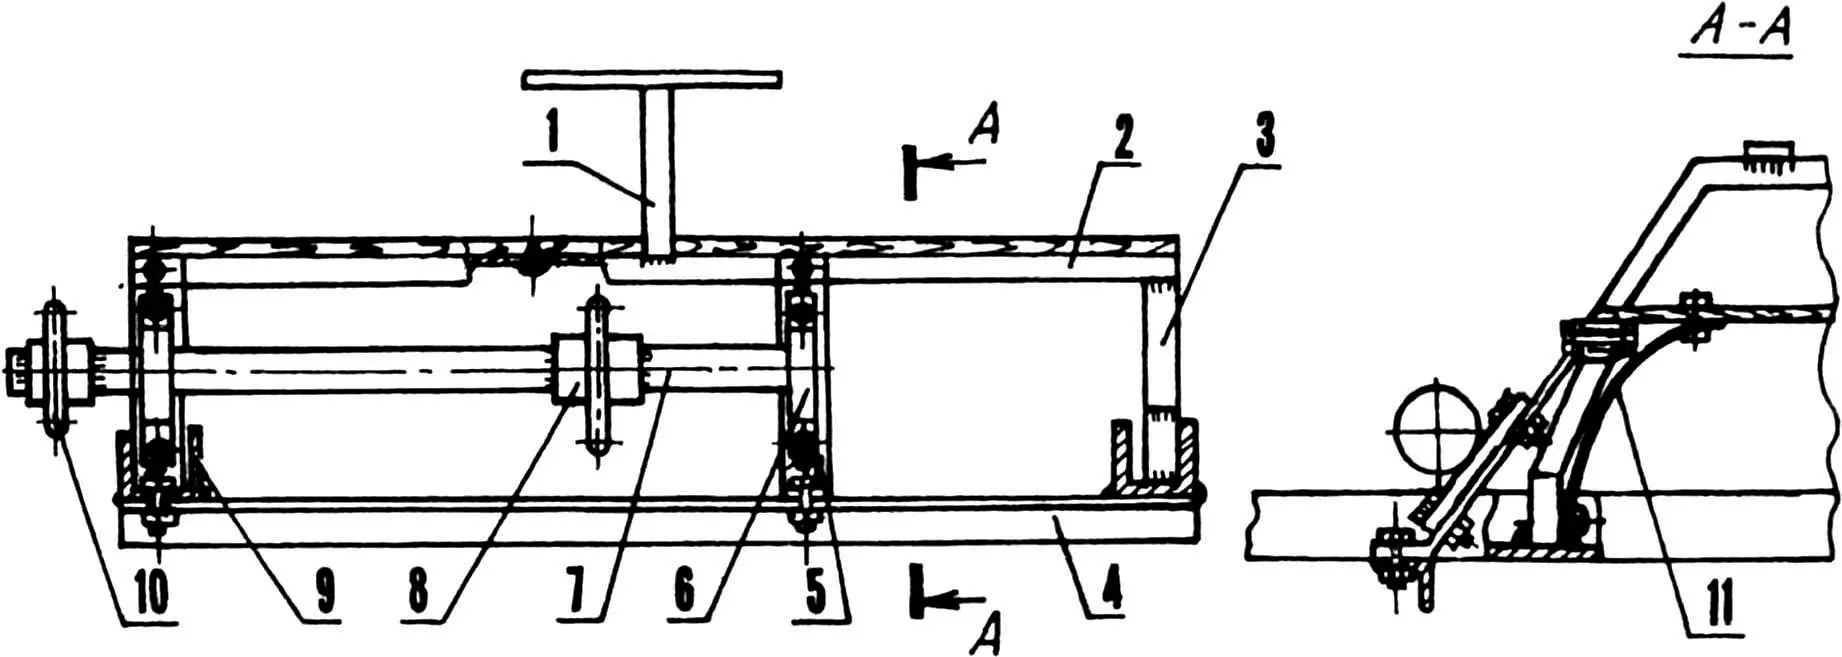
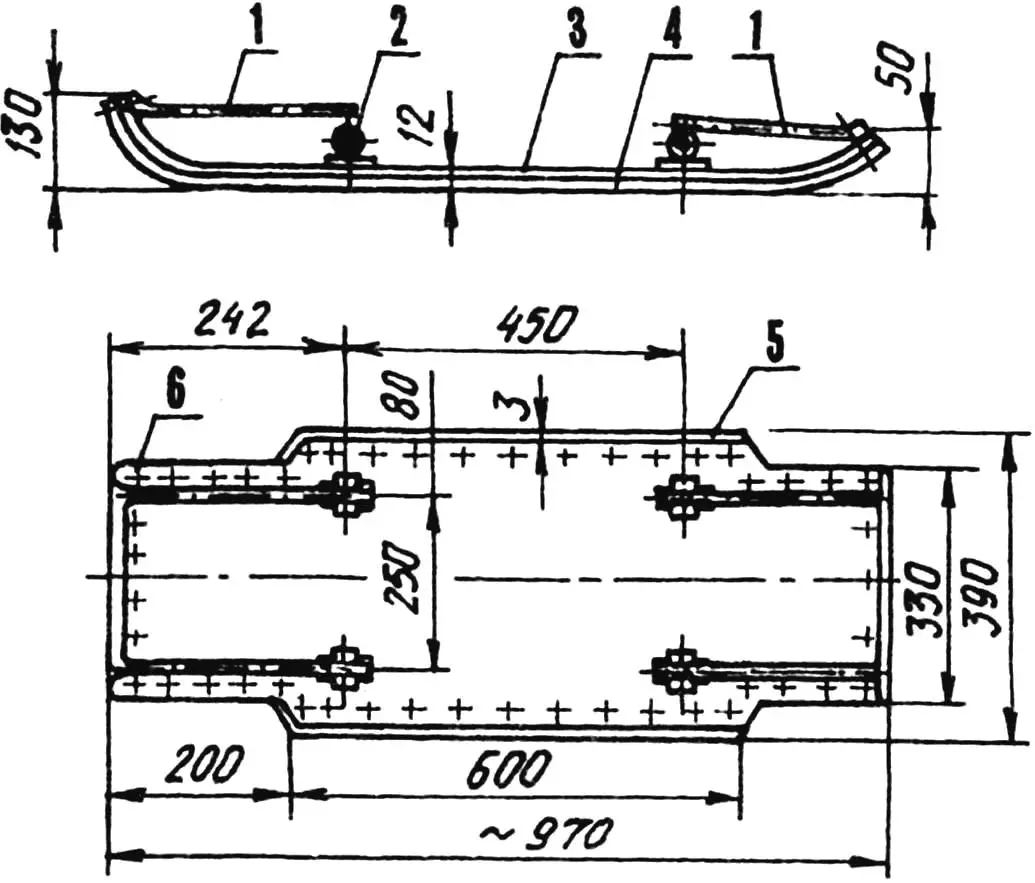
1 — seat support (steel, tube 28×28); 2 — frame cross member (steel, tube 28×28); 3 — post (steel, tube 18×18); 4 — cross member (angle 45×25); 5 — brace (steel, plate 40×5, 2 pcs.); 6 — bearing 204 in housing (2 pcs.); 7 — intermediate shaft (steel, tube 27×3); 8 — sprocket No. 1 (z = 21); 9 — frame side member; 10 — sprocket No. 2 (z = 17); 11 — housing (rubber)
Before modernization, with side placement, the engine had no forced cooling. After moving it to the middle, I had to install a fan with a turbine and “snail” from a ZIL-157 heater under the front shield. I soldered the air duct from tinned sheet metal. I directed part of the exhaust (heated by engine cooling) air to the carburetor. I moved the fuel tank to the body and installed it there in a corner on posts, so that gasoline to the carburetor through a long hose is still supplied by gravity.
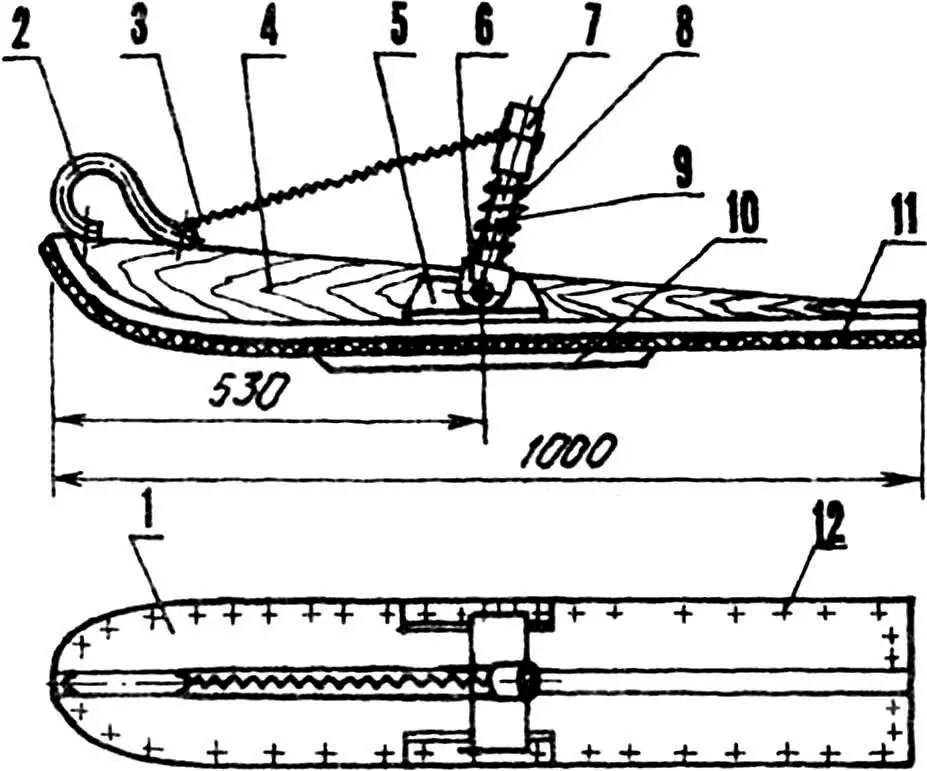
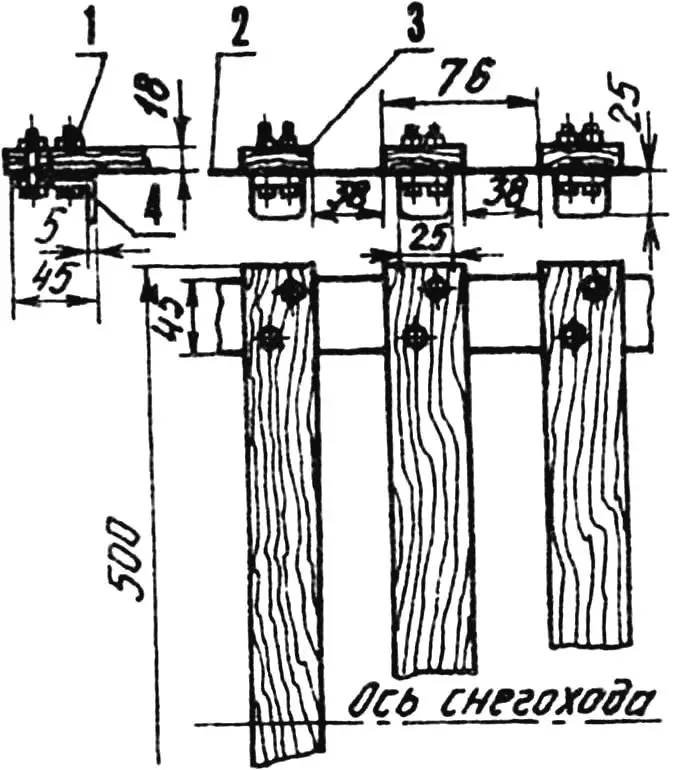
1 — tie with M8 nut (steel, rod 08, 2 pcs.); 2 — track block drive sprocket; 3 — track drive shaft; 4 — tensioning device; 5 — tension roller; 6 — track (rail 500x38x18); 7 — frame side member; 8 — track shaft driven sprocket; 9 — support ski; 10 — support ski suspension bracket (channel 45x32x3); 11 — M8 bolt; 12, 13 — M6 bolts; 14 — guide (brass); 15 — screw; 16 — support ski sole (polyethylene); 17 — bearing housing mount; 18 — tension roller axle
Moving the engine to the middle significantly increased the machine’s stability, which allowed reducing the steering ski track from 1100 to 950 mm, and this, in turn, improved the snowmobile’s maneuverability, which is especially important when riding through forests.
1 — ski (plywood s8); 2 — handle (steel, tube 10×2); 3 — front spring (from UAZ car seat); 4 — side member (board s25); 5 — support bracket (angle 25×25, 2 pcs.); 6 — fork (steel, strip s5); 7 — steering column (steel, tube 33×3); 8 — post (steel, tube 27×3); 9 — rear spring (from Minsk motorcycle shock absorber); 10 — edge (angle 25×25, L450, 2 pcs.); 11 — sole (polyethylene s4); 12 — rivet (aluminum, 40 pcs.)
1 — ties (steel, rod Ø8); 2 — suspension bushing; 3 — ski; 4 — sole (polyethylene s4); 5 — guide (brass); 6 — rivet (aluminum, 46 pcs.)
The intermediate shaft not only transmits rotation from the engine to the track drive shaft but also reduces angular velocity, increasing torque, since its first sprocket (z = 21) is from the SZD motorized wheelchair main drive reducer, and the second (z = 17) is from an Izh motorcycle, and the drive chains are also from it. The driven sprocket on the track shaft has 37 teeth. The snowmobile’s speed decreased slightly, but the traction characteristics increased significantly. Now the machine can carry two riders, cargo in the trunk, and also pull light homemade sleds with cargo behind it. The sled runners’ width fits within the track’s track. I shift gears less often — the engine pulls better even in higher gears. This was also helped by replacing the track drive sprockets with multi-layer plywood sprockets with the same number of teeth (eight), but a smaller diameter.
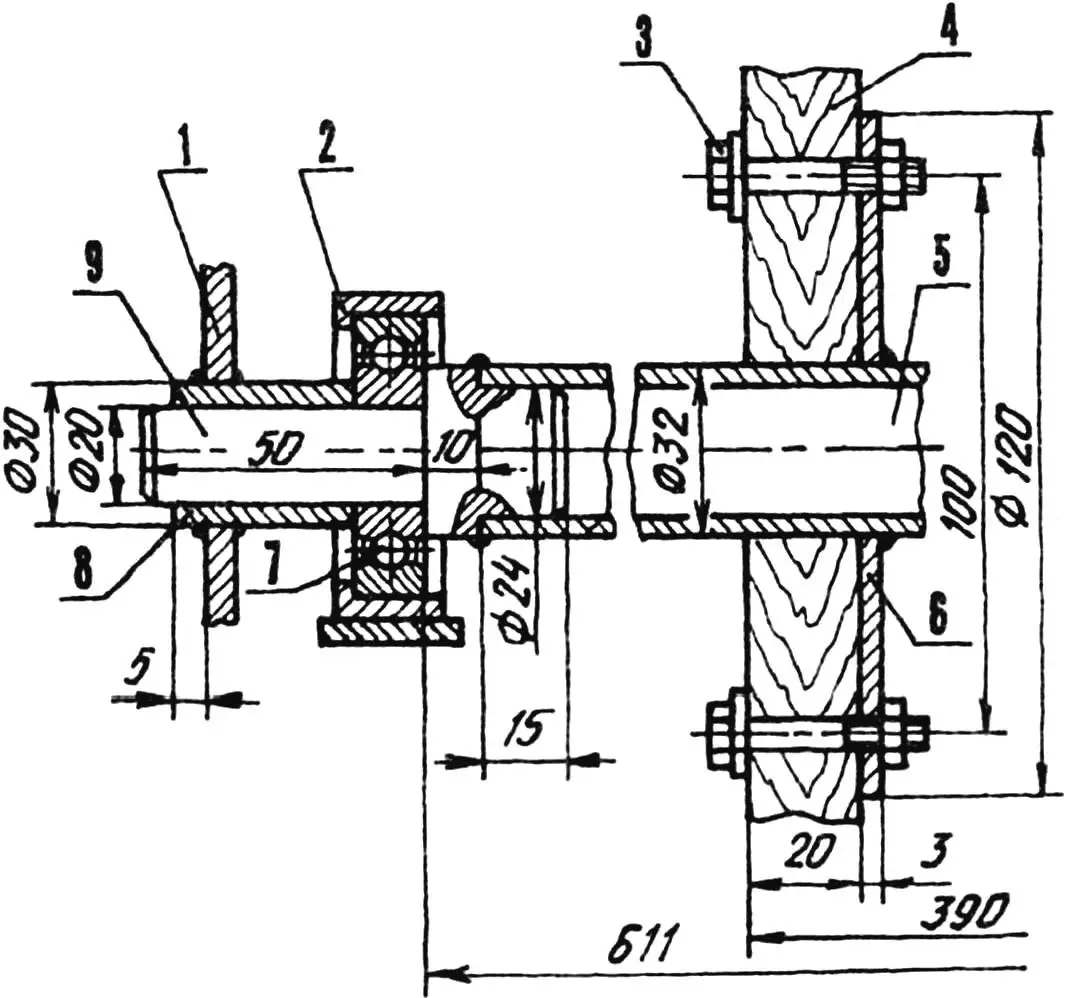
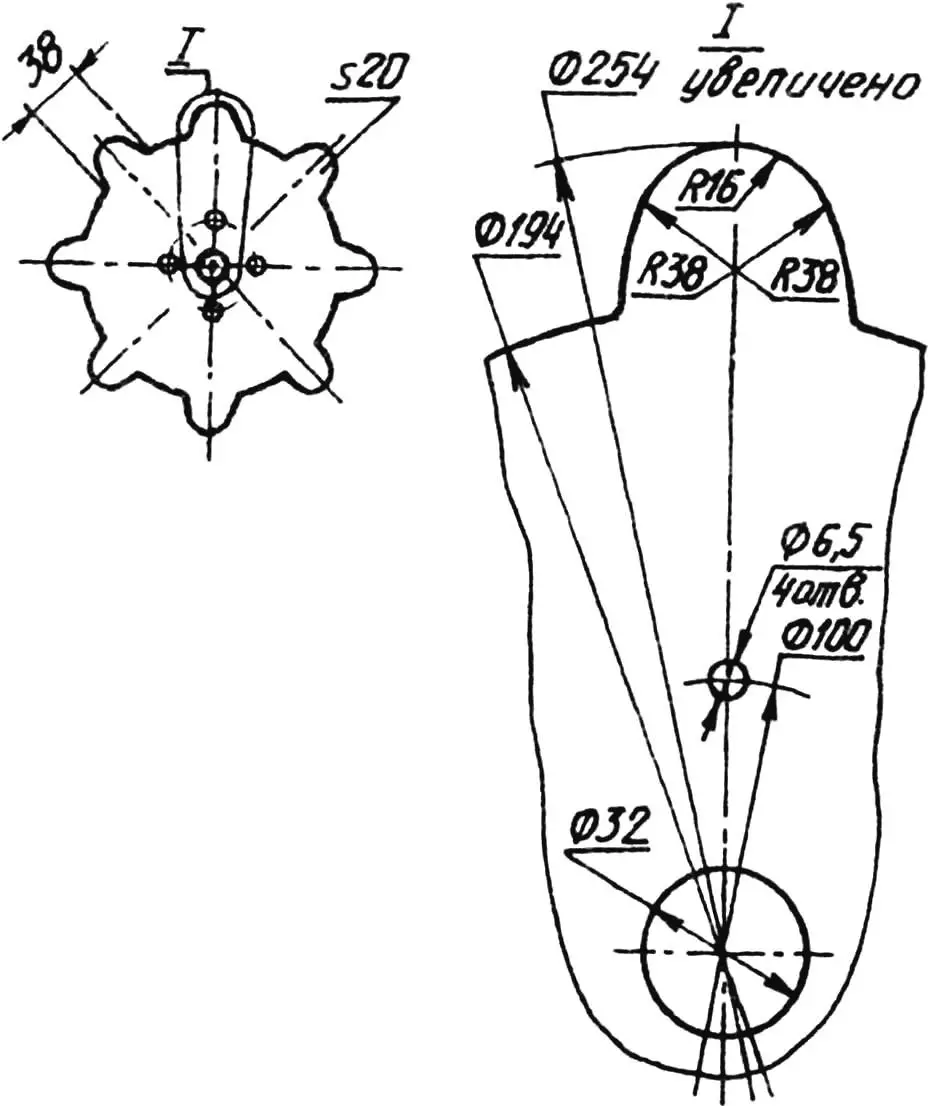
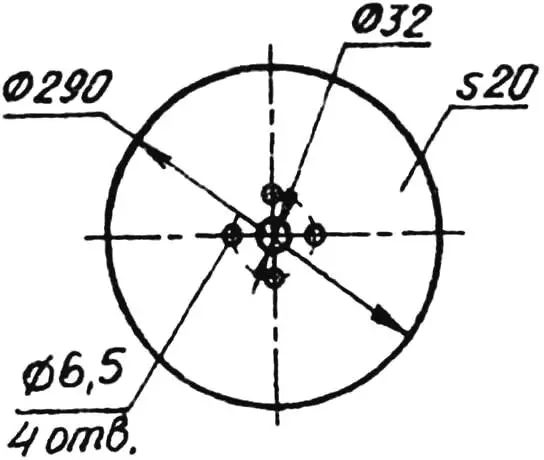
1 — driven sprocket (z = 37, homemade); 2 — bearing housing; 3 — M6 bolt (4 pcs.); 4 — track sprocket (plywood s20, 2 pcs.); 5 — drive axle shaft (steel, tube 32×4); 6 — track sprocket flange; 7 — bearing 204; 8 — chain sprocket bushing; 9 — insert (steel round)
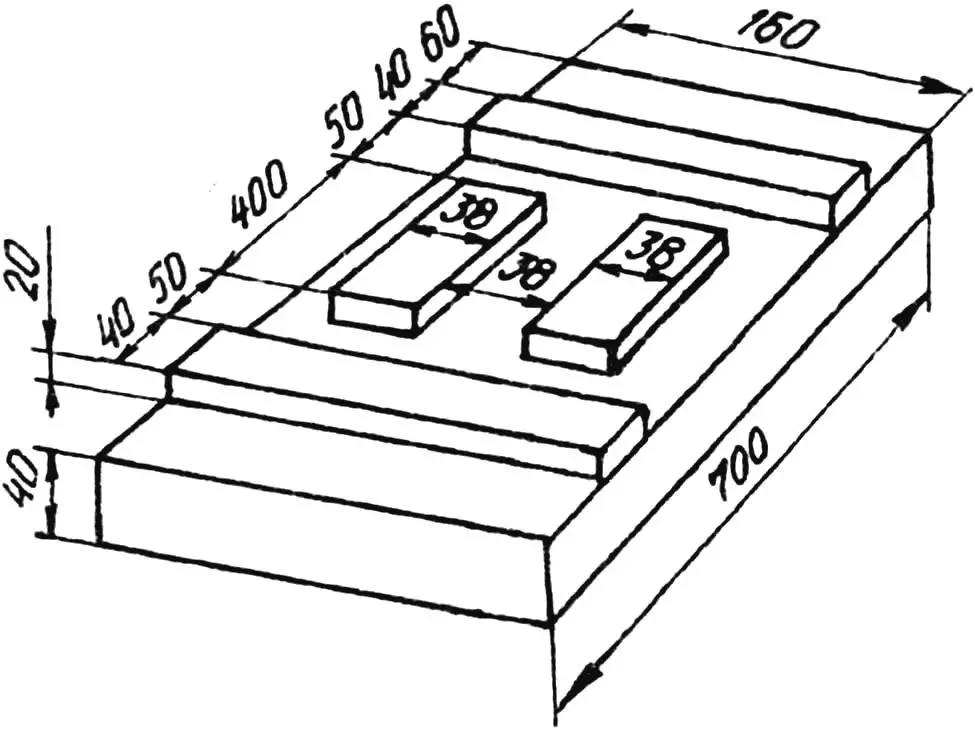
1 — bolts, nuts and washers; 2 — conveyor rubber-fabric belt; 3 — track (birch block); 4 — guide angle
This small improvement also improved the machine’s cross-country ability — the sprocket rose a bit more above the support ski plane, which not only eliminated its contact with the road but also allowed the track to more easily reach the upper layers of snow and more confidently overcome obstacles — sastrugi, hummocks, etc.
Operation of the snowmobile before modernization showed that on the track tension shaft, the sprocket teeth quite often jumped onto the wooden track. And I made rollers out of them by cutting off all the teeth. On the support ski, covered with rigid polyethylene, I also bent the rear end. Now the track comes off the ski onto the rollers smoothly, without cracking and almost silently. I also improved the tensioning mechanism, making it screw-type.
I also redesigned the track. By reducing the distance between tracks from 45 to 38 mm, I increased their number to 33 pieces. I made tracks measuring 500x38x18 mm from birch boards without knots and other defects, twice impregnating them with hot natural linseed oil. For track assembly, I made a template-jig, which ensured not only convenience in work but also accuracy of mounting tracks on the belt without the slightest misalignment.
I also modernized the front steering plywood skis. First, I reinforced them from above with side members made of spruce board. Second, I replaced the duralumin “sole” with a polyethylene one, making it the same as on the support ski. Third, I introduced springs into the ski suspension, and now the machine rides smoothly even on snow crust. Thanks to this, the “durability” increased not only of the skis themselves but also of the frame. Fourth, I attached handles made of steel tubes to the bent noses of the skis — it’s more convenient to pull out a stuck machine by them (this happens somewhere in snow-covered ravines). For the same purpose, I also secured a similar handle on the body post.
To protect the steering rods from damage when hitting stumps and other snow-covered obstacles, I installed a bumper made of multi-layer plywood in front under the rods.
In addition to these improvements, I also performed a number of smaller ones: attached a headlight and rear marker lights, mounted a fairing with a windshield, and equipped a seat from a “Vyatka” motor scooter with a removable backrest — now the back doesn’t get as tired and the lower back doesn’t freeze.
“Modelist-Konstruktor” No. 1’2002, V. BOGDANOVSKY
Recommend to read
 The Yak-11
In 1946, first flew double an educational-training plane Yak-11, created on the basis of the Yak-3, but with motor air-cooling, ASH-21. Its armament consisted of a synchronous UBS... MAPS AND METAMORPHOSIS
What started karting? In the 30-ies very popular among American boys was competition for non-motorised trolleys moving along slant paths. Some Joker aptly called them "racing soap...
