
For those who live near water, a boat is as necessary as a motorcycle or car is for others. Of course, experienced amateur shipbuilders are unlikely to settle for the little craft we want to offer your attention, but for beginners in boatbuilding this boat design is just the thing. It is simple, technologically straightforward, and also makes it possible to build both a rowing boat and a sailboat on the basis of one hull.
Before starting to build the hull, you should lay out the mold on a large sheet of plywood — at least draw the theoretical sections of the hull.
Hull construction begins with making and assembling frames from pine battens 100×25 mm in cross-section and plywood 6—8 mm thick. Frame joints are made as overlaps, using epoxy or casein glue. The joints are secured with galvanized steel or brass screws. Temporary transverse members are also set on the frames as overlaps and are attached to them with nails only.
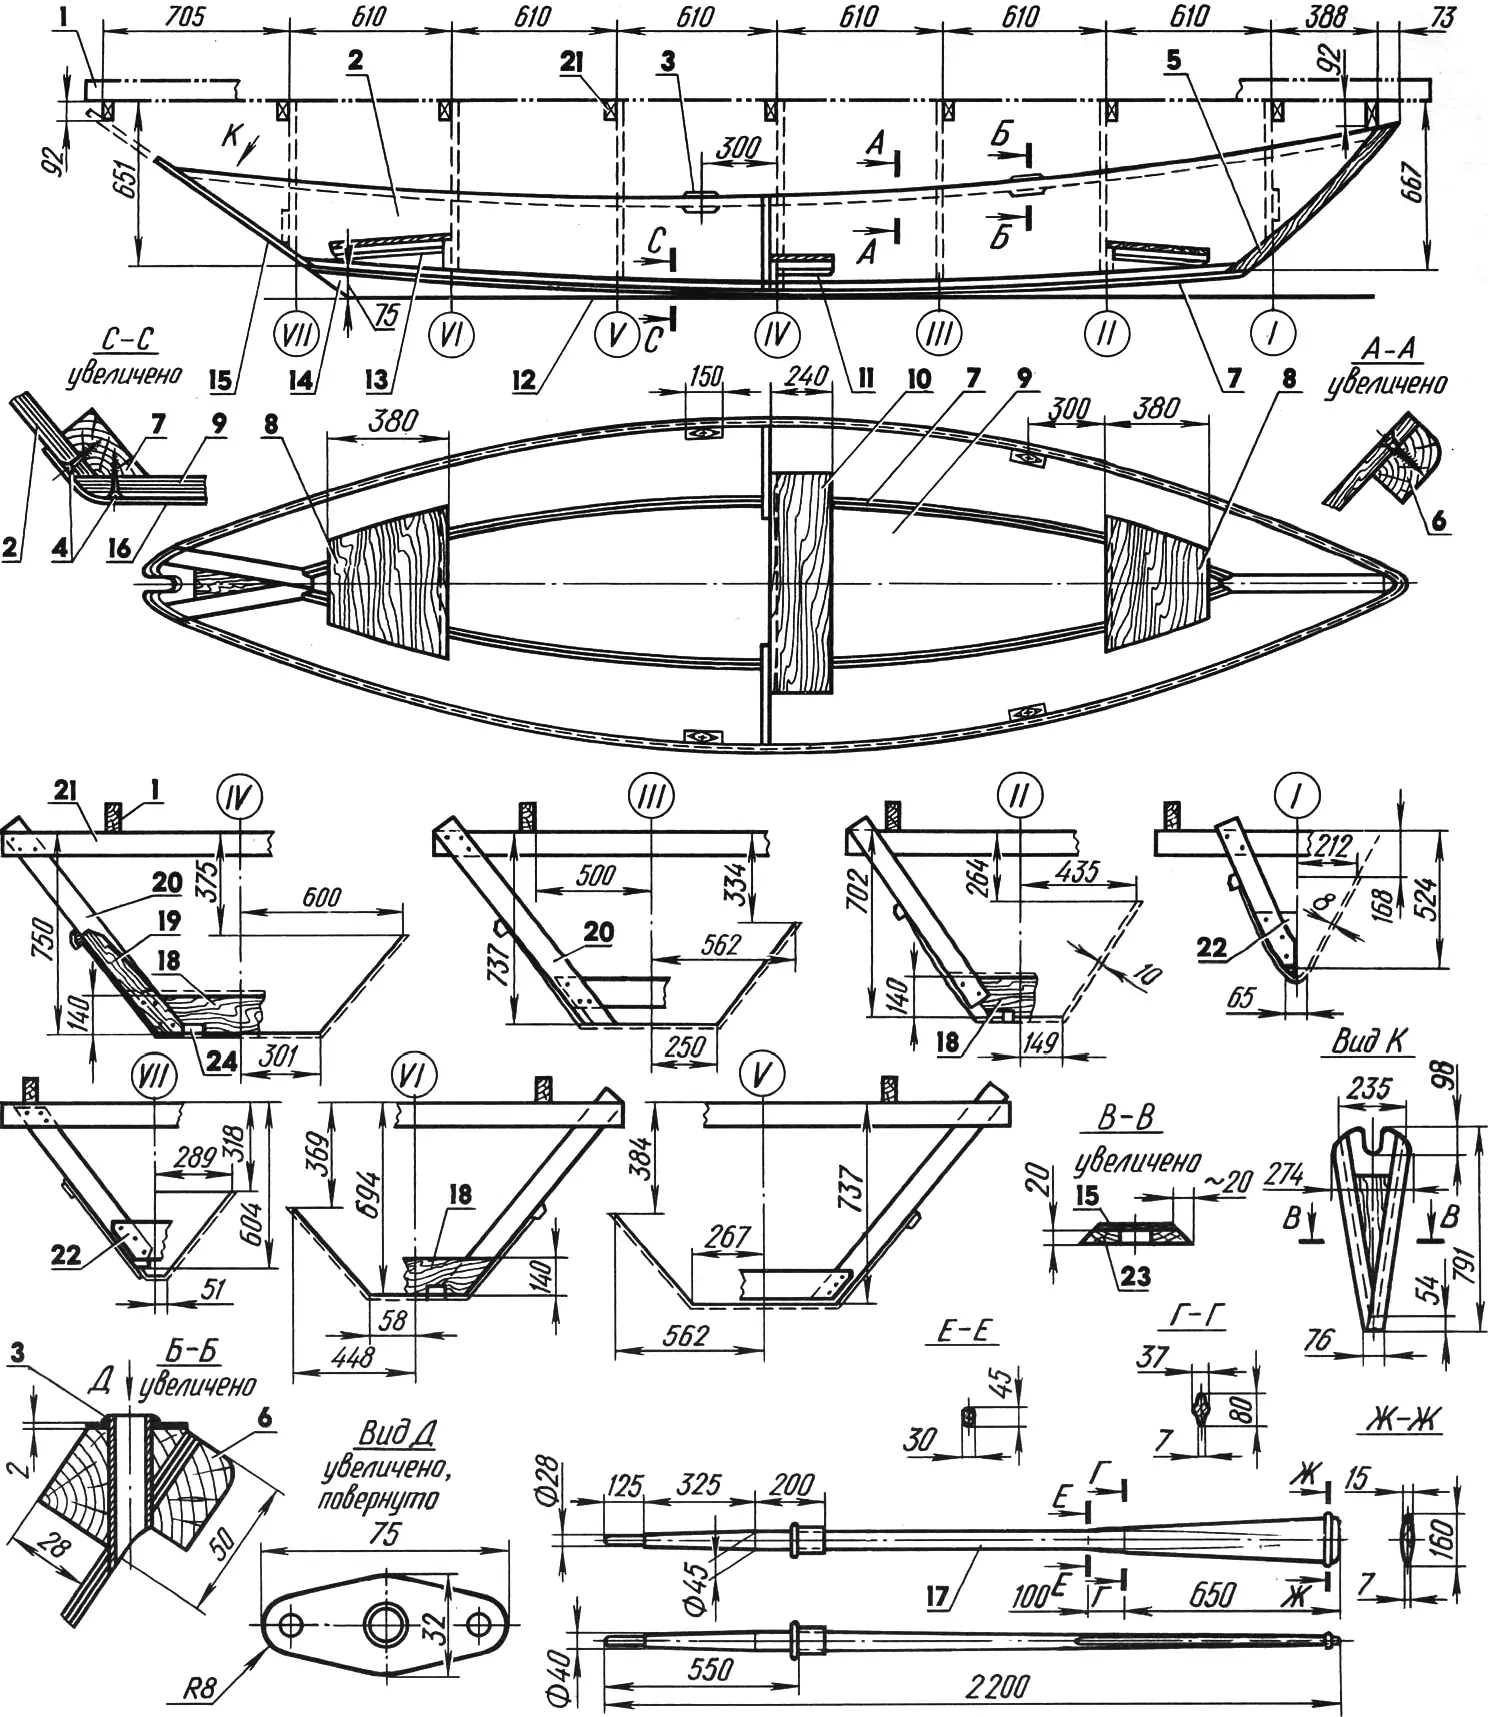
1 — longitudinal keel blocks (pine, board 100×50); 2 — side planking (plywood s5); 3 — thole pin; 4 — screws; 5 — stem (pine batten 90×65); 6 — rubbing strake (pine batten 40×20); 7 — longitudinal framing members (pine batten 40×20); 8 — bow thwart (plywood s10 — 12); 9 — bottom planking (plywood s6 — 8); 10 — center thwart (plywood s10 — 12); 11 — center thwart support (pine batten 40×20); 12 — false keel sheathing (steel strip s2); 13 — stern thwart support (pine batten 40×20); 14 — false keel (pine batten 75×30); 15 — transom planking (plywood 8 — 10); 16 — joint reinforcement (fiberglass cloth); 17 — oar; 18 — lower frame member (pine batten 40×20); 19 — side frame member (pine batten 65×20, L550); 20 — side frame member blank; 21 — temporary frame transom (wooden batten 100×50); 22 — reinforcing gusset (plywood s6…8); 23 — transom frame (pine battens 65×20); 24 — coaming trim (aluminum tube).
Frame assembly begins with making the strongback — a rectangular frame of wooden battens 100×50 mm in cross-section. To ensure that the boat frame is strictly symmetrical, a nylon line is stretched along the strongback axis to help align the symmetry axes of the frames with the diametral plane of the future hull. The frames are secured to the strongback with nails and additionally fixed with a brace batten that ensures the frame plane is perpendicular to the strongback plane.
Hull assembly begins with mounting the longitudinal members — stringers — on the frames. First, the sheer stringers are installed with screws and epoxy glue (grooves are cut in the frames for them beforehand). Then blanks for the side planking are cut from plywood about 5 mm thick (the shape of the blanks is refined using a sheet of heavy paper or cardboard laid on the section to be planked) and secured to the frames with epoxy or casein glue, reinforced with galvanized screws. The side stringers (also rubbing strakes) are fixed on the frame over the planking. Finally, the bottom planking cut from plywood 6—8 mm thick is installed. At this point, preliminary hull assembly is complete.
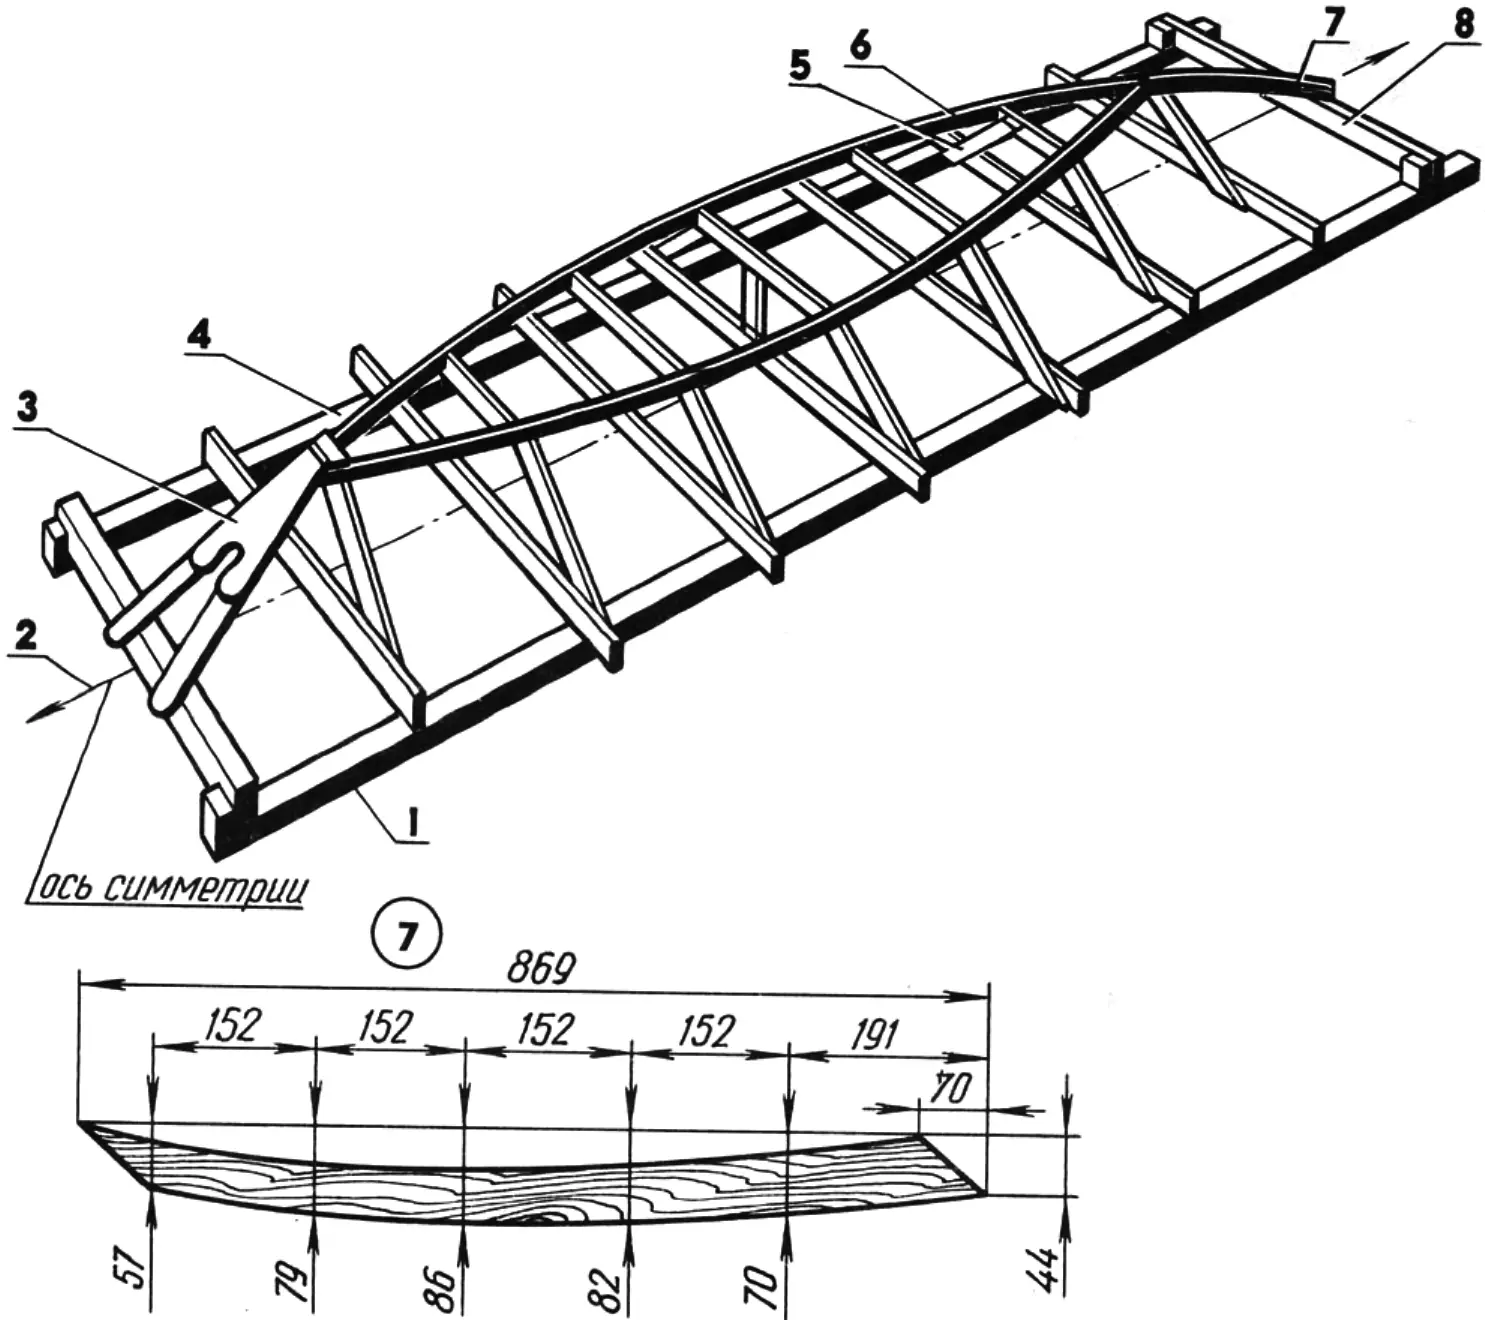
1,4 — longitudinal strongback battens; 2 — hull plane, diametral; 3 — transom frame; 5 — side frame member; 6 — longitudinal frame member; 7 — stem; 8 — temporary transom.
After that, the temporary parts of the frames are trimmed along the side stringers, and the frames themselves are finished as shown in the drawings.
Now you should decide what type of craft you need — a sailboat or a rowing boat? The second option is, of course, simpler. You only need to make three thwarts-benches, oars, and thole pins. Building a sailboat on the basis of this hull is somewhat more complicated. But a sailboat is more versatile: it can easily be turned into a rowing boat — you only need to remove the mast and pull the retractable centerboard out of the centerboard trunk.
So we choose the sailboat. The first thing to build is the aforementioned centerboard trunk. It is assembled from pine battens 30×30 mm in cross-section and plywood 6 mm thick. Assembly is done with epoxy glue and screws. Special attention should be paid to mounting the centerboard trunk in the hull: the joint must be absolutely watertight and strong. Two transverse members are installed on the bottom to reinforce the joint.
The centerboard is cut from plywood 12—15 mm thick. On centerboard boats the centerboard profile usually resembles an aircraft wing, but on our sailboat the centerboard has a simplified section — an elongated hexagon with rounded leading and trailing edges. After shaping, the centerboard is sanded, coated with hot linseed oil, puttied, sanded again, and painted with enamel — preferably alkyd.
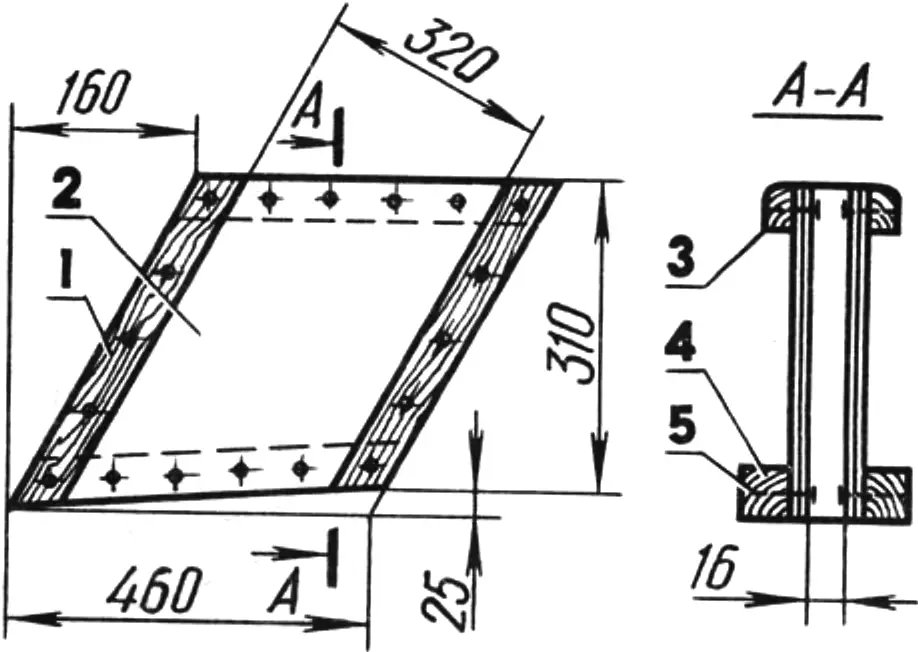
1 — centerboard trunk guide (2 pcs.); 2 — centerboard trunk wall (2 pcs.); 3 — top edge trim of centerboard trunk (2 pcs.); 4 — centerboard trunk base (2 pcs.); 5 — screw 5×30.
Another sailboat fitting is the false keel, for which you will need a board about 30 mm thick.
If the boat will be used mainly as a sailboat, it makes sense to deck the forward part of the hull (up to the third frame) and install a spray hood, as shown in the drawings. In this case, the deck covering is cut from 4—5 mm plywood, and the first, second, and third frames are closed with a convex batten 50×25 mm in cross-section.
The sailboat steering gear consists of a tiller, rudder blade, and tiller extension. The tiller extension and tiller are best made from oak battens, the rudder blade from 10 mm plywood. It is better to make homemade detachable hinges that allow the steering gear to be easily hung on the sailboat transom. After assembly, the steering gear is soaked in hot linseed oil and coated with two layers of oil varnish.
The boat’s sail rig is gaff-rigged. Its advantage is that even with a relatively low mast, the sail area is quite large. In any case, to obtain a sail of the same area with Bermuda rigging, you would need a mast almost twice as long.
The sailboat mast is wooden, shaped from a pine batten 50×50 mm in cross-section. During shaping, the blank is given the form of a truncated cone with a larger base diameter of 48 mm and a smaller one of 30 mm. In the lower part of the mast, a seating area is shaped — another cone that allows the mast to be fixed in the holes provided for it in the bow thwart and transom. Bear in mind that the sailboat mast is rotating, so it should turn easily in its step.
The gaff is a round batten 24 mm in diameter, also shaped from pine. The boom is also made of pine, at least its cylindrical part. The cheek piece by which the boom rests on the mast is cut from 12 mm plywood.
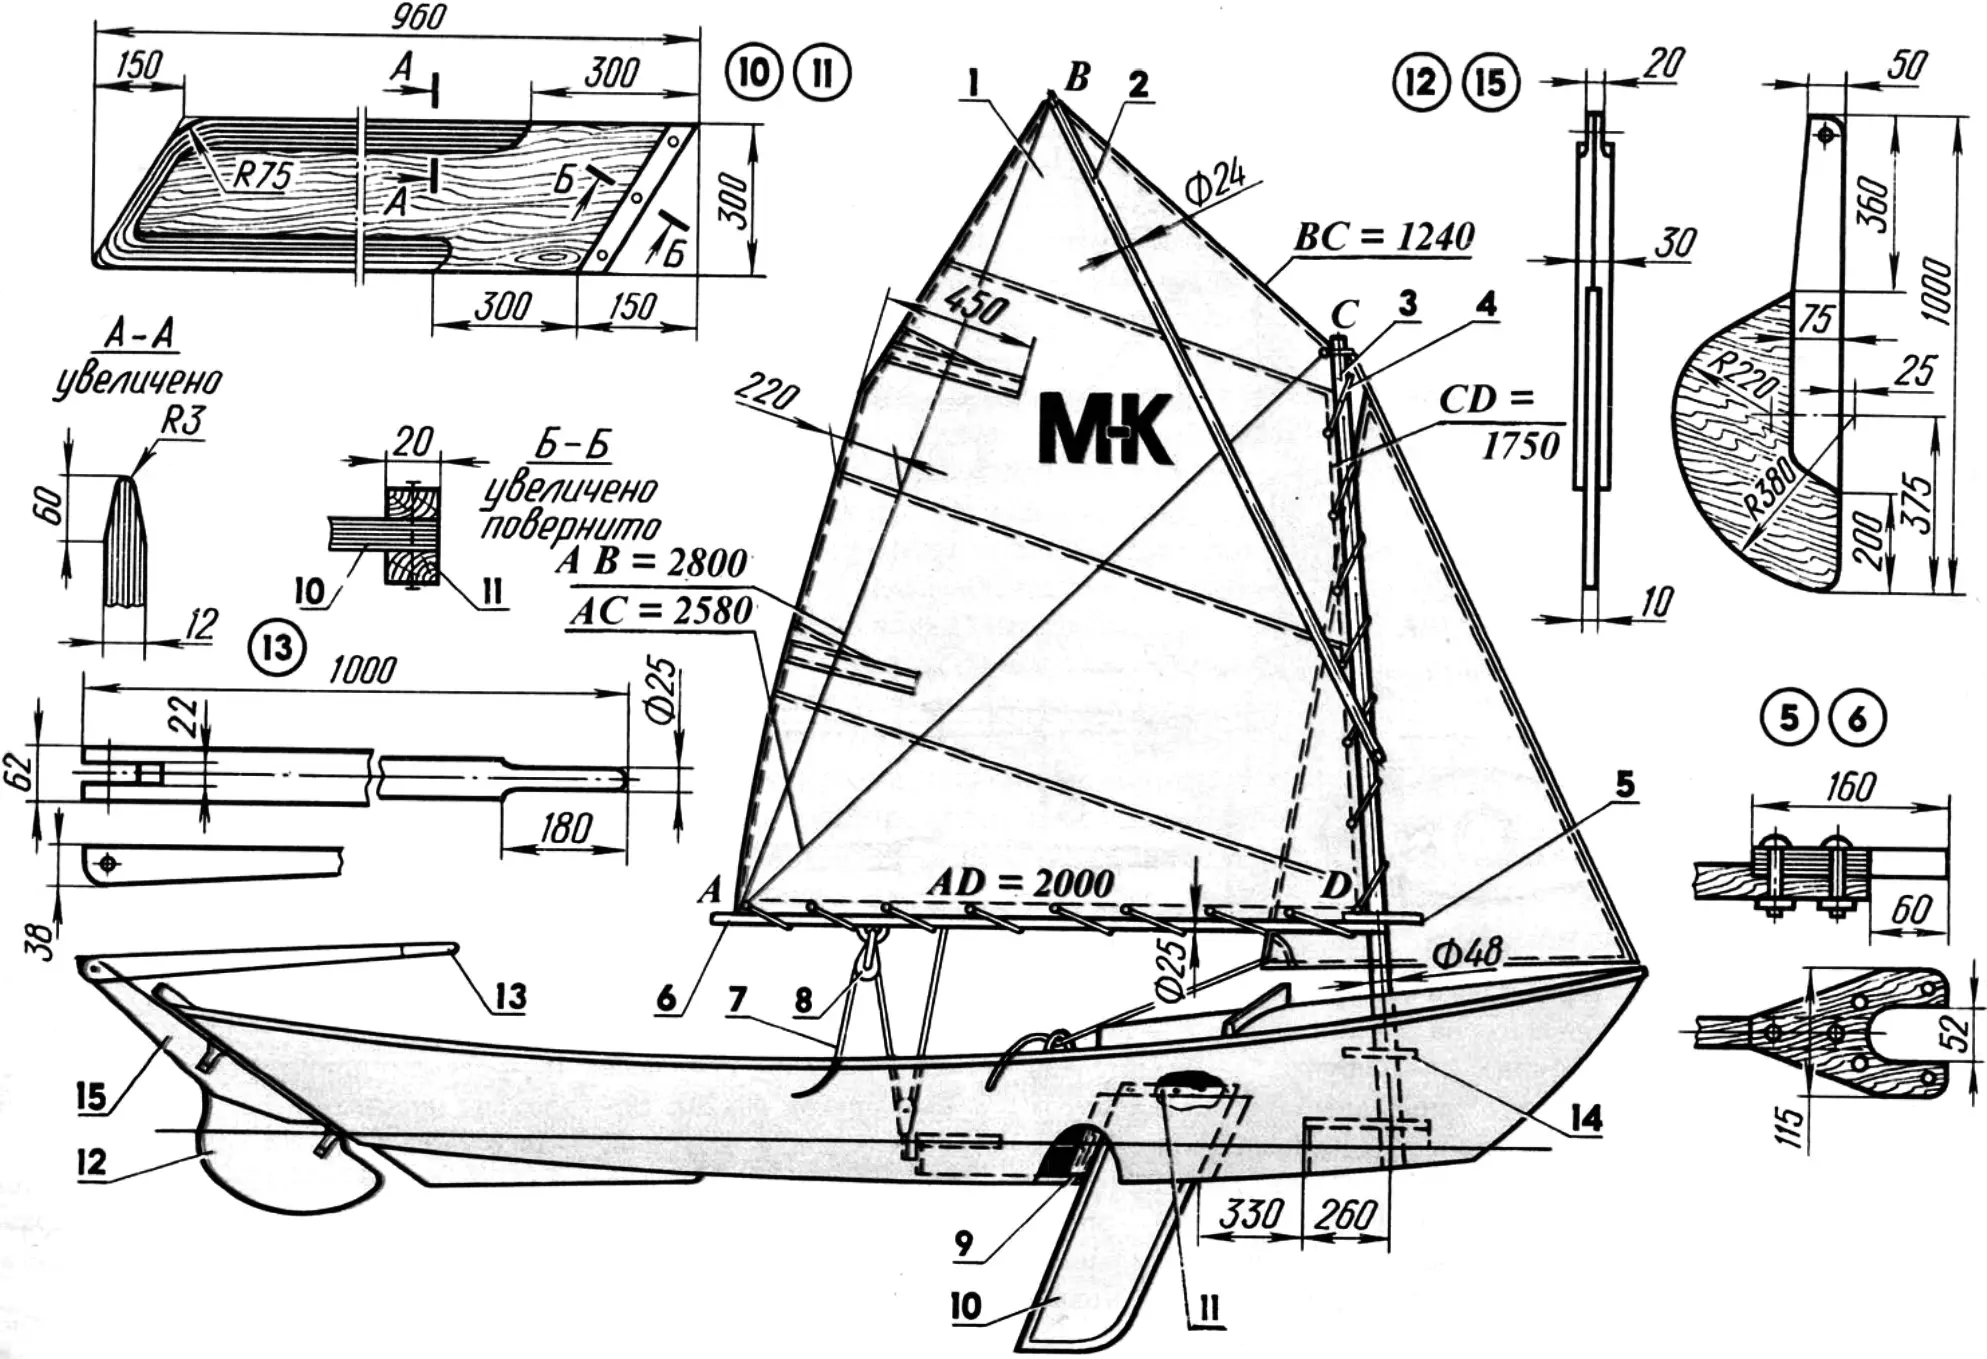
1 — mainsail; 2 — gaff; 3 — mast; 4 — forestay; 5 — boom cheek; 6 — boom; 7 — mainsheet; 8 — block; 9 — centerboard trunk; 10 — centerboard; 11 — centerboard stop; 12 — rudder blade; 13 — tiller extension;
14 — transom; 15 — rudder tiller.
The sail is sewn from cushion ticking (the drawing shows a sail made from cloths 750 mm wide). All edges of the sail are bound with nylon or cotton tape. Along the luff and foot, grommets — brass eyelets with holes for attaching the sail to the mast and boom — are secured every 200 mm. If grommets are unavailable, metal rings can be sewn onto the sail with nylon thread and holes cut inside them.
The sail has a pair of batten pockets into which wooden slats 4—5 mm thick — battens — are inserted to shape the leech.
To control the sail you will need a nylon or other strong rope 8—10 mm in diameter — the mainsheet — as well as two blocks — a movable one on the boom and a fixed one secured with a swivel on the sailboat keel.
If you want to improve the sailboat’s performance, equip it with another sail — a jib. The sailboat will become faster and will be able to sail somewhat closer to the wind, which is important when tacking, that is, sailing against the wind.
It is also a good idea to make a pair of oars for the boat — they will be needed not only for the rowing version, but will also prove invaluable in calm or, conversely, stormy weather. For this you will need a board 45 mm thick. Oars can also be made composite — from a round batten 45 mm in diameter, with blades from plywood 8—10 mm thick. In both cases, the finished oars are soaked in hot linseed oil and coated with two layers of oil varnish or enamel paint.
«Modelist-Konstruktor» No. 8’99, based on materials from the magazine «Ezermester hobbi» (Hungary)
Recommend to read
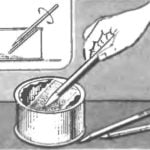 AND GRAPHITIZE
In one of the rooms of your magazine for the last years drew attention to the Council graphitize — a convenient box with a piece of lace for sharpening a slate pencil. I propose to use... Cow manger
Many rural residents who previously did not keep cows on their farm are forced to get them now. After all, the cow has always helped a person survive difficult times by providing milk. But...
