In rural life there are many labor-intensive jobs that nevertheless need to be done quickly, for example: in the spring – sowing, in the summer – haymaking, harvesting – in the fall and, finally, snow – in the winter. When performing them, if there are no numerous assistants, you cannot do without means of mechanization. A hard-working tractor would be a great help on the farm, but can you really “buy” it? So farmstead owners who know technology are trying to buy some broken down tractor inexpensively and restore it. But there aren’t enough of them for everyone who wants them, and therefore those who are more hands-on try to make a tractor themselves from the units and components of various machines thrown into scrap metal.
I followed the path of the latter when in 2001 I rented two hectares of land.
I had experience in homemade equipment design. Since 1976, I have subscribed to the “Modelist-Konstruktor” magazine, keep subscriptions and, guided by its publications, back in 1985 I made a light moped for my growing sons Oleg and Maxim. In 1989, he manufactured a four-wheeled pneumatic drive of his own design. In 1993, Ural used forced air cooling on the engine of a cargo motorcycle, included a two-stage reduction gearbox in the transmission, and equipped this motorcycle with a hay mower. Having picked up suitable units and mechanisms from various types of machines in various places – from familiar home-made workers, in scrap metal, at equipment “cemeteries”, I began to assemble a tractor from them in December.
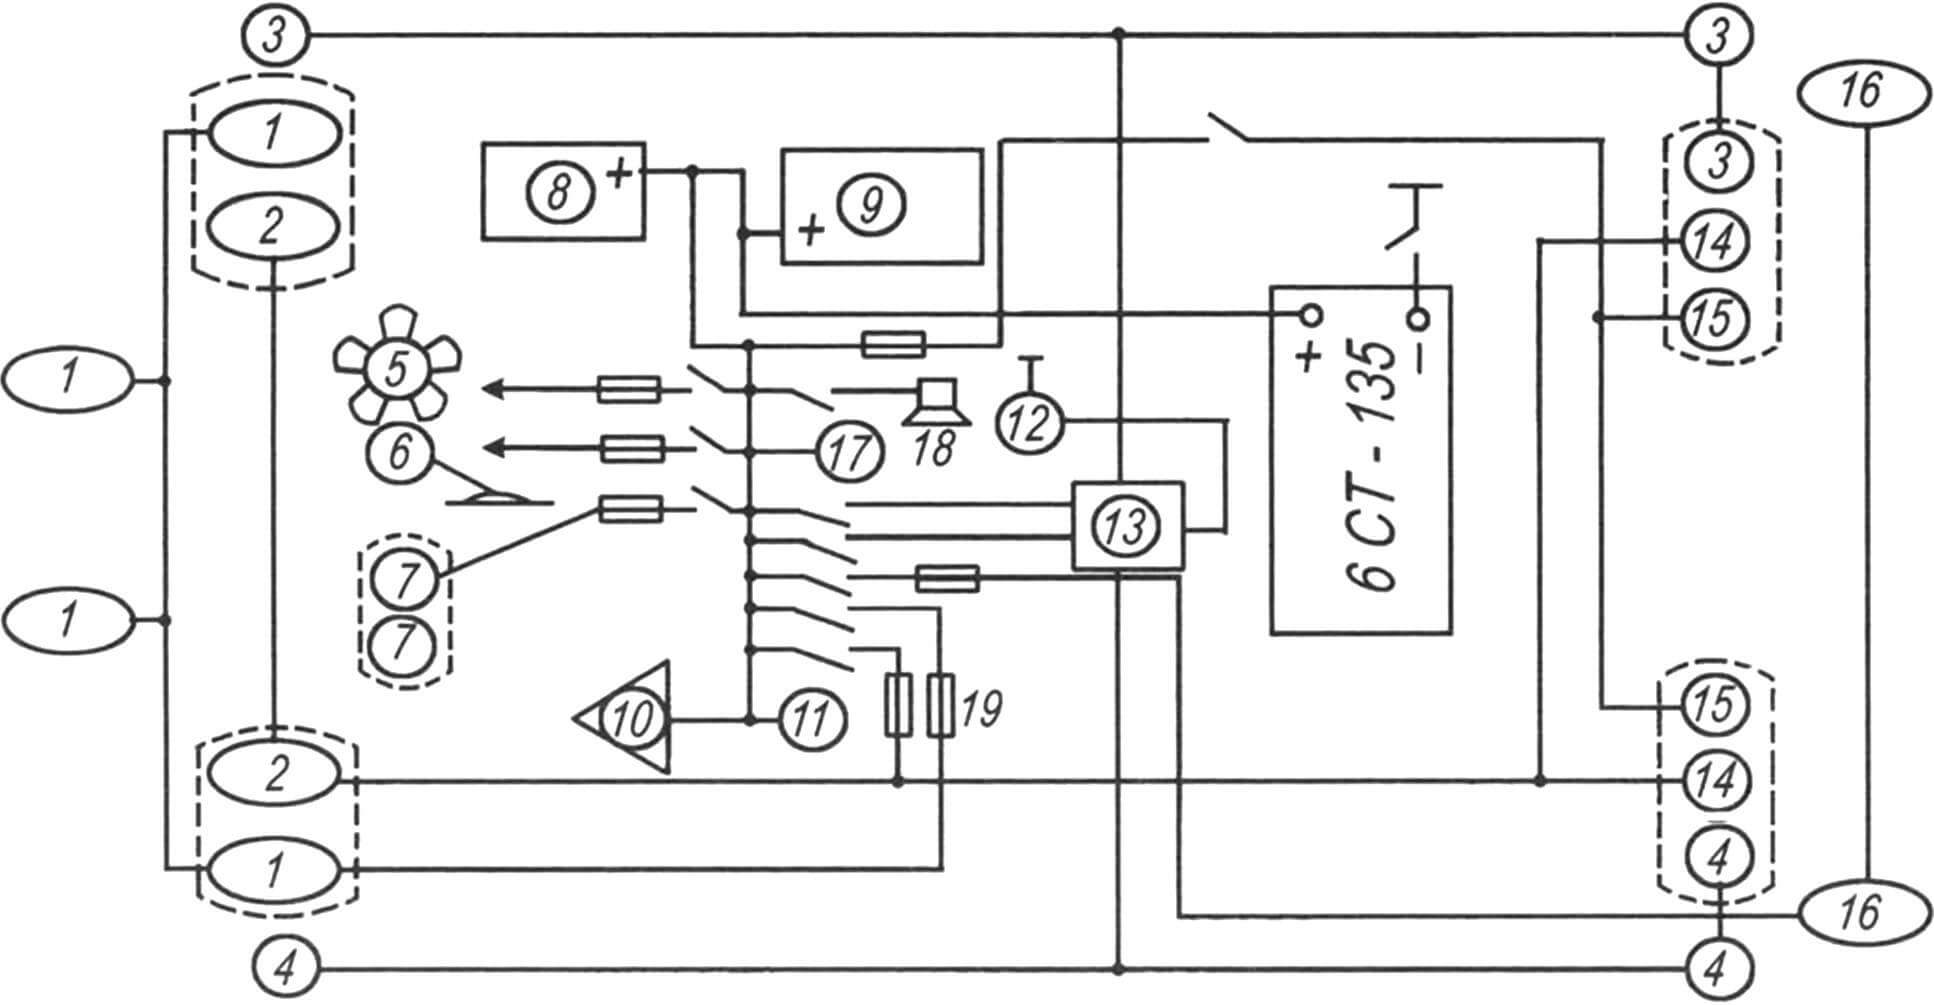
1 — high beam lamps; 2 — low beam lamps; 3 — right turn indicators; 4 — left turn indicators; 5 — interior fan; 6 — windshield wiper motor; 7 — interior lighting; 8 – generator; 9 — starter; 10 — oil pressure sensor; 11 — oil pressure indicator; 12 — indicator lamp for direction indicators; 13 — turn relay; 14 — rear marker lights; 15 — brake light lamps; 16 — rear lights; 17 — cigarette lighter, socket; 18 — sound signal; 19 – fuse (6 pcs.)
Starting the story about the tractor, I would like to note that I built it in stages. In the first winter I made a chassis with only rear wheel drive.
The chassis is assembled on a shortened frame from a GAZ-52 car. A power unit is installed on the frame – a three-cylinder liquid-cooled diesel engine with a power of 28 kW (35 hp) at a crankshaft speed of 2200 per minute from a Czechoslovakian loader. A basket with a clutch mechanism from a UAZ-452 van is attached to the engine through an adapter ring. A four-speed gearbox (gearbox) from a GAZ-51 truck is attached to the basket, also through an adapter. The gearbox is equipped with a power take-off shaft (PTO). The cardan transmission going from the gearbox to the rear drive axle is a two-stage open type. The bridge is from a ZIL-157 off-road truck, but shortened. It is rigidly suspended from the frame using four stepladders. The rear wheels are from a GAZ-66 car.
The front axle is used from a UAZ-469 car. It, like the rear one, is driven in design (with main gear and differential). But this quality was not used in the original version and the front wheels measuring 6×15 remained only as guides. The front axle is suspended on the frame on semi-elliptical springs without shock absorbers. The steering mechanism is from a GAZ-51 car.
The brakes were mechanical and acted only on the rear wheels, although there was also a parking brake.
Electrical equipment – 12-volt. But at the first stage I installed only what was absolutely necessary – a generator and a starter. The battery was temporarily borrowed from a Zhiguli car.
On this chassis (I still don’t dare call this initial version a tractor), in the spring of 2002 I went “out of the gate” and carried out field sowing work – carried out, so to speak, tests in action.
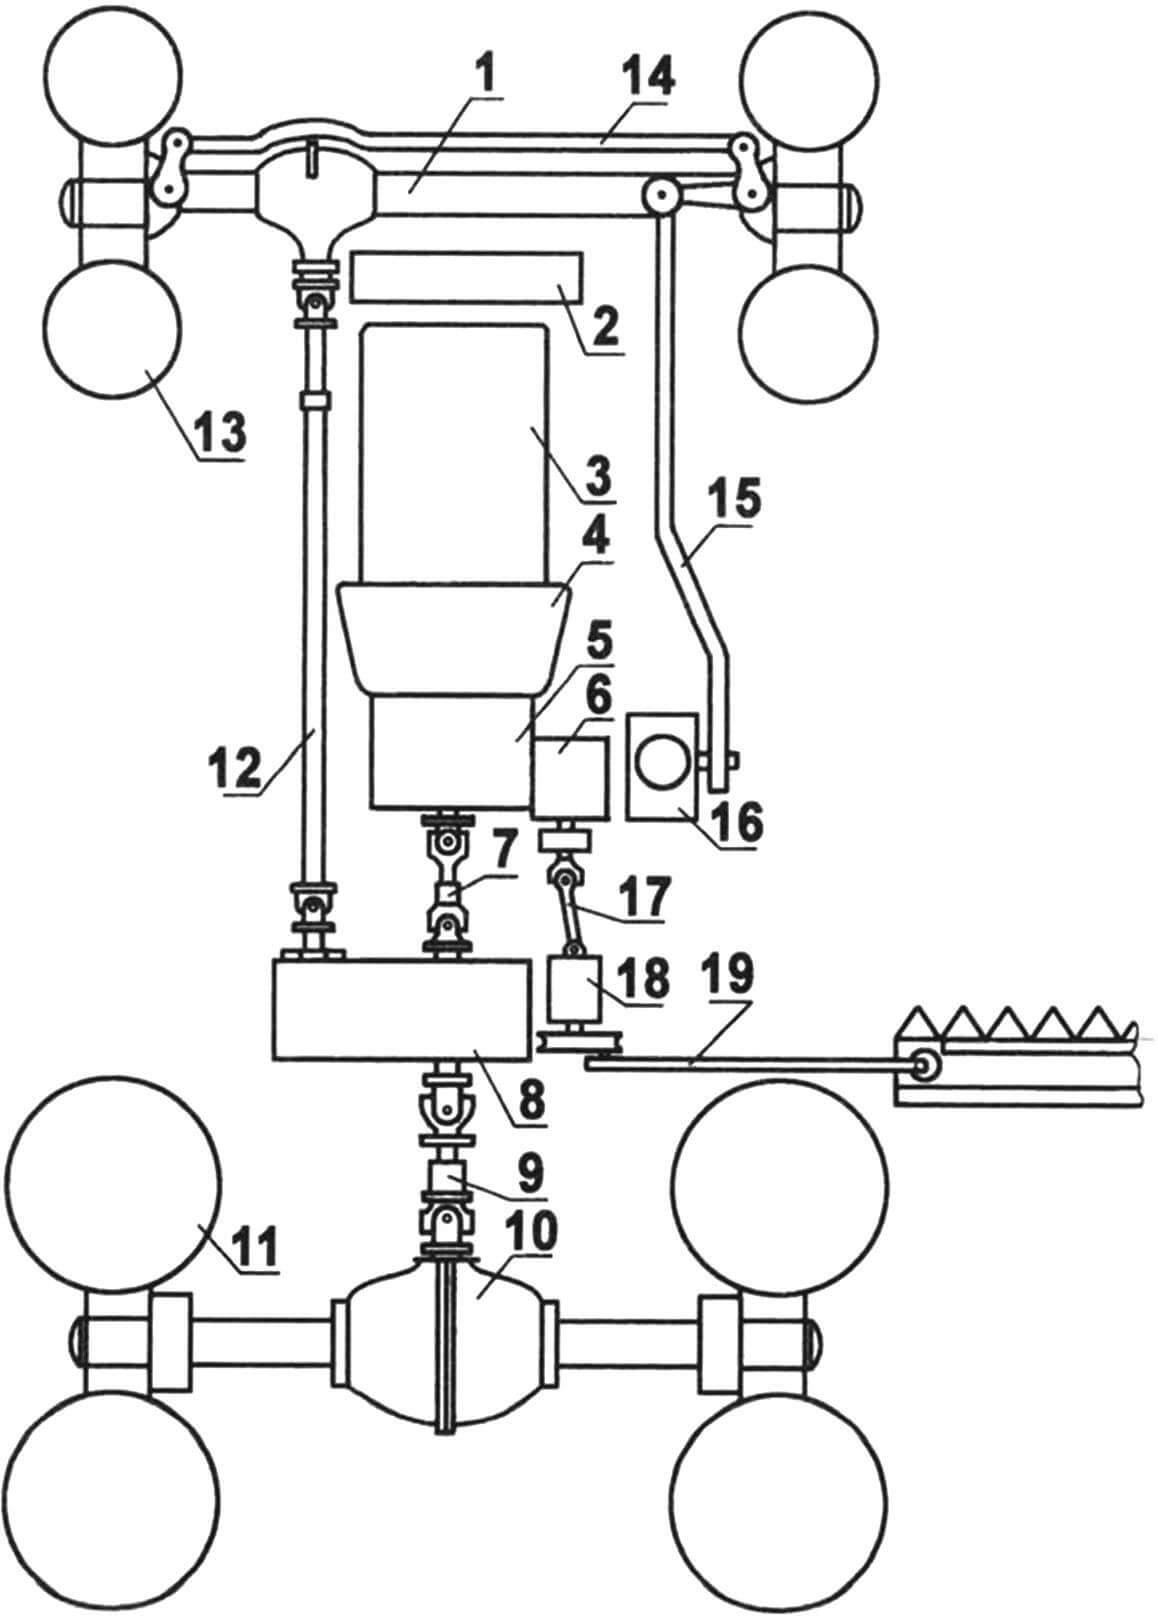
1 — front axle (from GAZ-69); 2 — radiator (from Moskvich-412); 3 — engine (diesel, 35 hp from a Czechoslovakian loader); 4 — clutch mechanism (from UAZ-469); 5 — gearbox (from GAZ-51); 6 — power take-off shaft mechanism (from GAZ-51); 7 — intermediate cardan shaft; 8 — transfer case; 9 — rear driveshaft; 10 — rear axle (from ZIL-157); 11 — rear wheel (from GAZ-66, 2 pcs.); 12 — front driveshaft; 13 — front wheel (from UAZ-469, 2 pcs.); 14 — transverse steering rod (from UAZ-469); 15 — longitudinal steering rod; 16 — steering gearbox (from GAZ-51); 17 — additional cardan shaft; 18 — bearing housing; 19 — mower mechanism
After that, I mounted a horse-drawn mower driven by a power take-off shaft on the chassis and attached a (also horse-drawn) rake. I spent time with them harvesting hay.
By the fall, at the time of harvesting, I adapted a hydraulic attachment for a two-bladed plow to the chassis and, with its help, raised plowed land on the field. All season, if necessary, I used the chassis as a tractor for a two-axle trailer cart: I transported hay, firewood, and crops on it.
In the next “off-season” (late autumn, winter and early spring) he continued building the tractor: he carried out work to improve the chassis transmission and improve comfort.
First of all, I made the chassis all-wheel drive: I supplemented the transmission with a two-speed transfer case from a GAZ-66 truck. The driveshaft was divided into two: intermediate and rear. The front driveshaft was made again. The “stockings” (front axle axle housings) had to be rearranged (switched places) so that the main gear housing, together with its drive shaft, was located to the left of the engine. The idler wheels were also equipped with brakes, but unlike the rear wheels, they were hydraulically driven.
I also equipped the tractor with a stacker driven by a hydraulic system with a gear oil pump. During the haymaking season, the stacker successfully replaces the haystack thrower (its lifting height is about four meters), and in exceptional cases, when the load cannot be lifted by hand, it can also be used as a crane. By winter, I’m thinking of equipping the tractor with a device like a bulldozer blade or grader blade to clear the paths of snow.
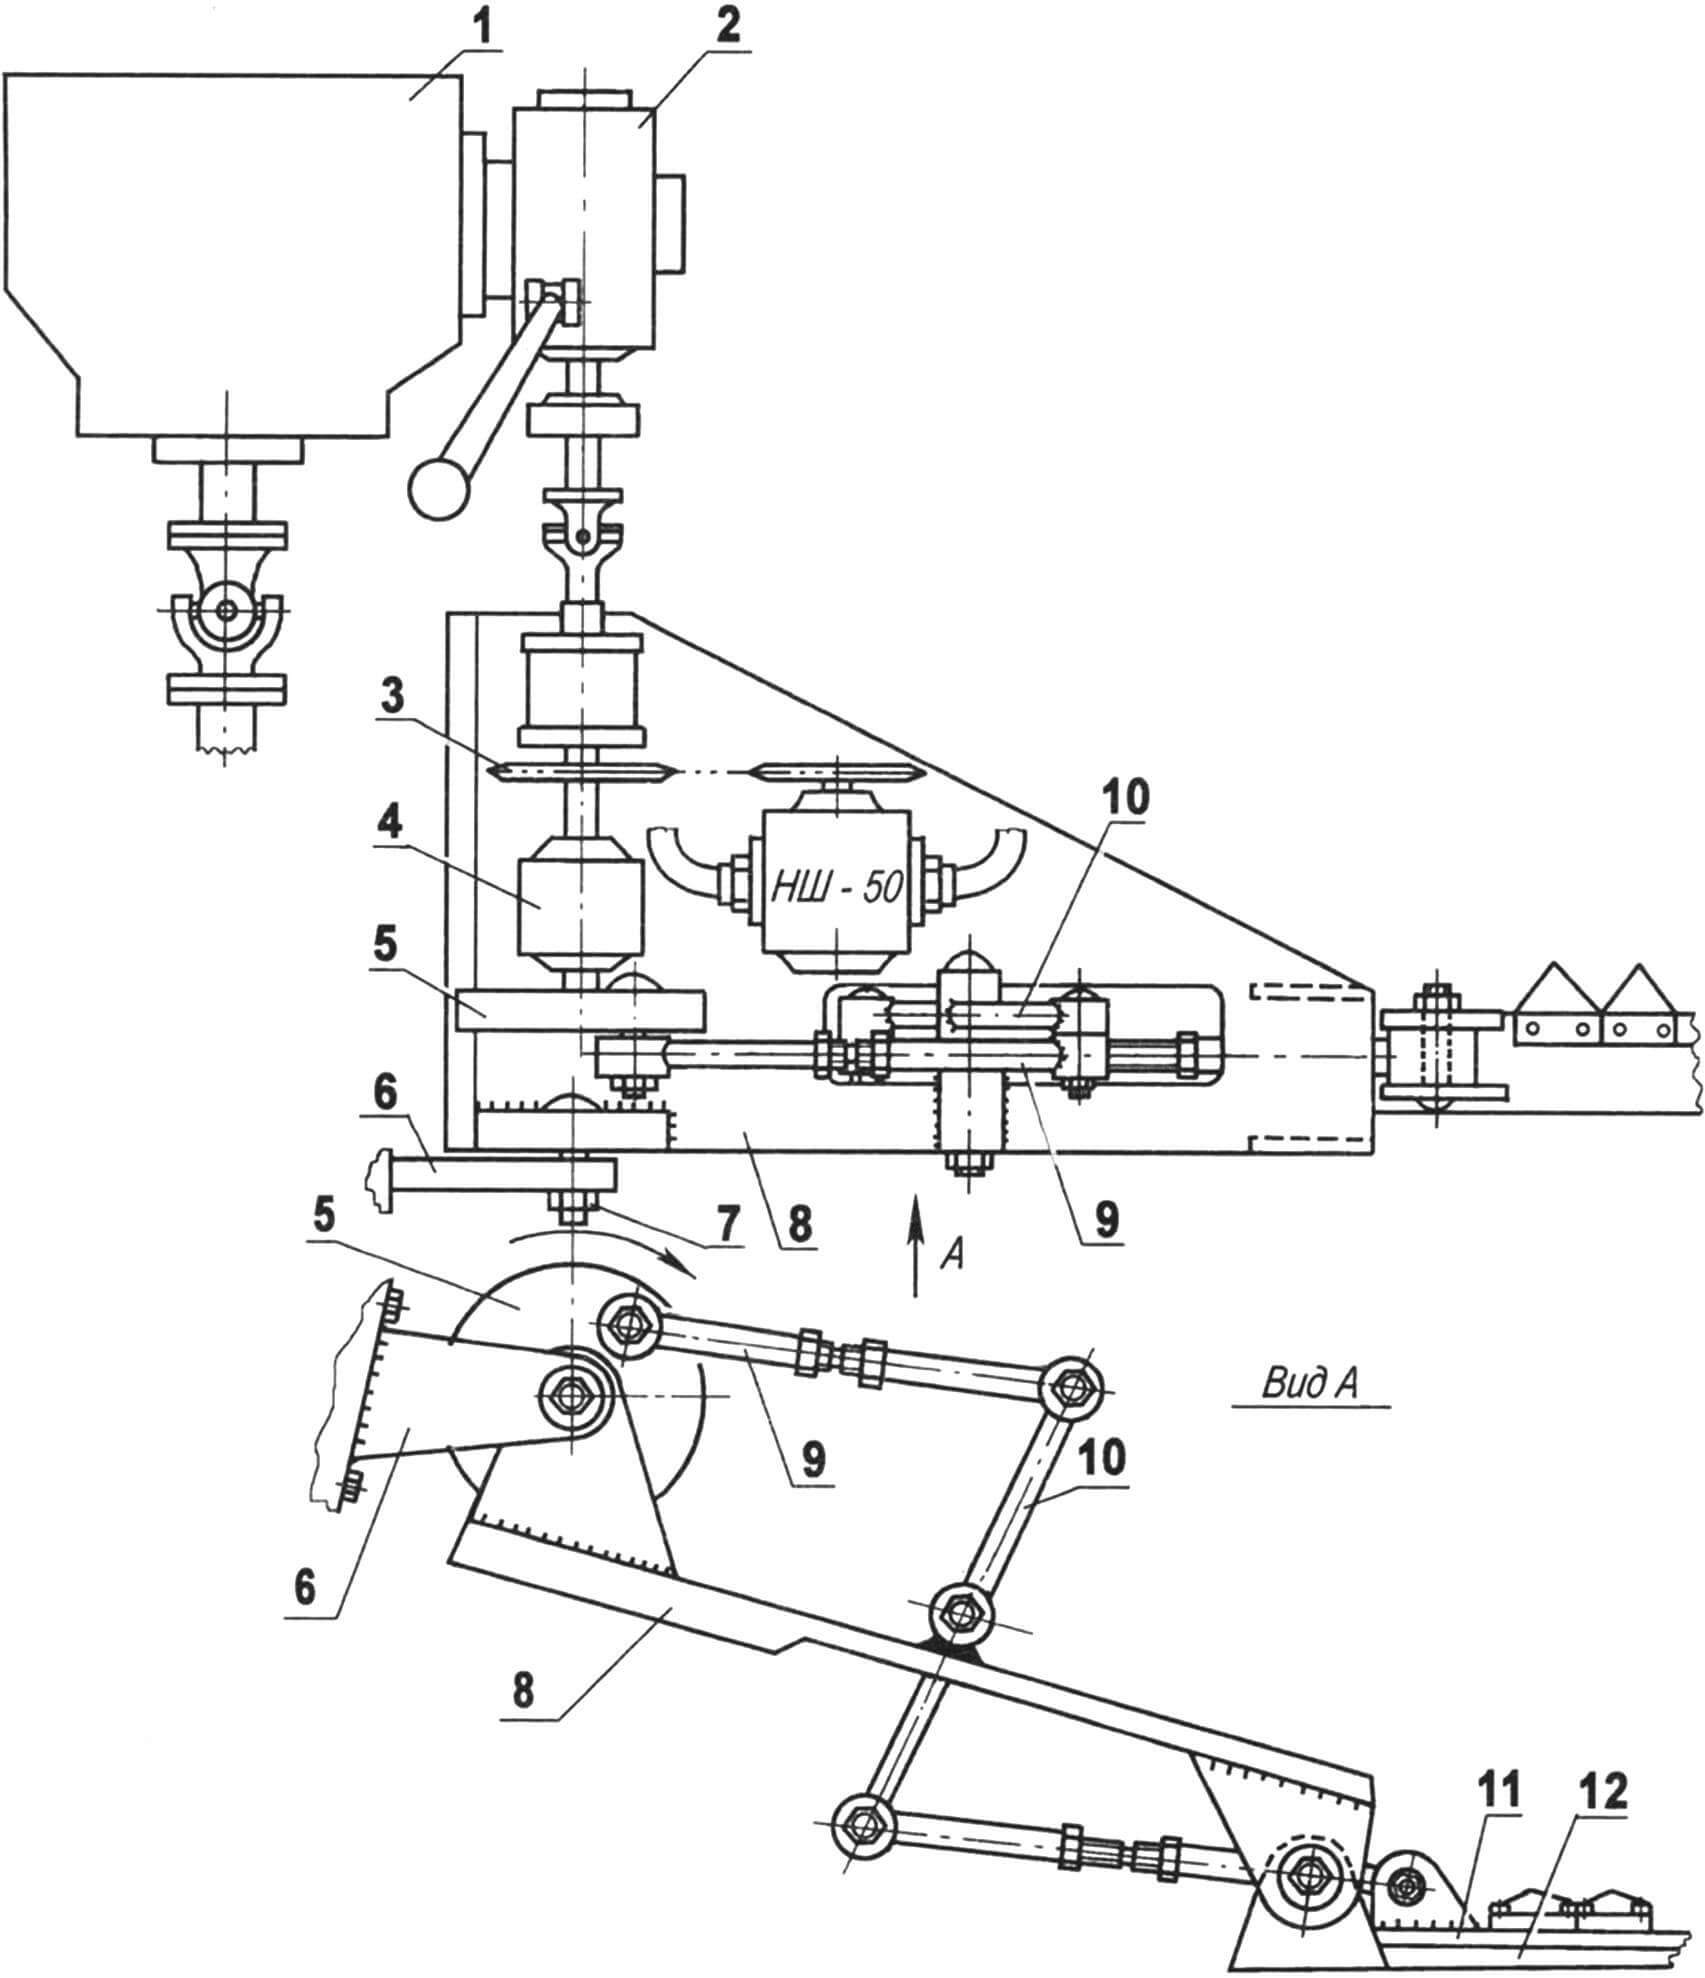
1 — gearbox; 2 — power take-off gearbox; 3 — chain drive of the gear oil pump drive; 4 — bearing housing; 5 – eccentric; 6 — support bracket; 7 — hinge axis; 8 — support platform for the lever that drives the upper blade of the mower; 9 — lever connecting rod (2 pcs.); 10 – lever; 11 — upper (moving) blade of the mower; 12 – lower (stationary) blade of the mower
A separate conversation about the cabin. I made it somewhat unusual – with three doors: two side and one back. I installed side niches in the cabin, and this made it noticeably more spacious. Now three more passengers can easily fit in it together with the driver (two in the niches and one on the seat next to him), without disturbing him at all. I installed all the necessary lighting devices on the tractor: headlights, turn signals, brake lights, as well as a washer and wipers.
I also tried to improve the interior of the cabin as much as possible – I made trim, placed lampshades and a fan. But the main thing is that I installed a good radio here and now I have the opportunity to work to music and listen to songs, including those performed by the amateur ensemble “Kalinka”, of which I am a soloist and artistic director.
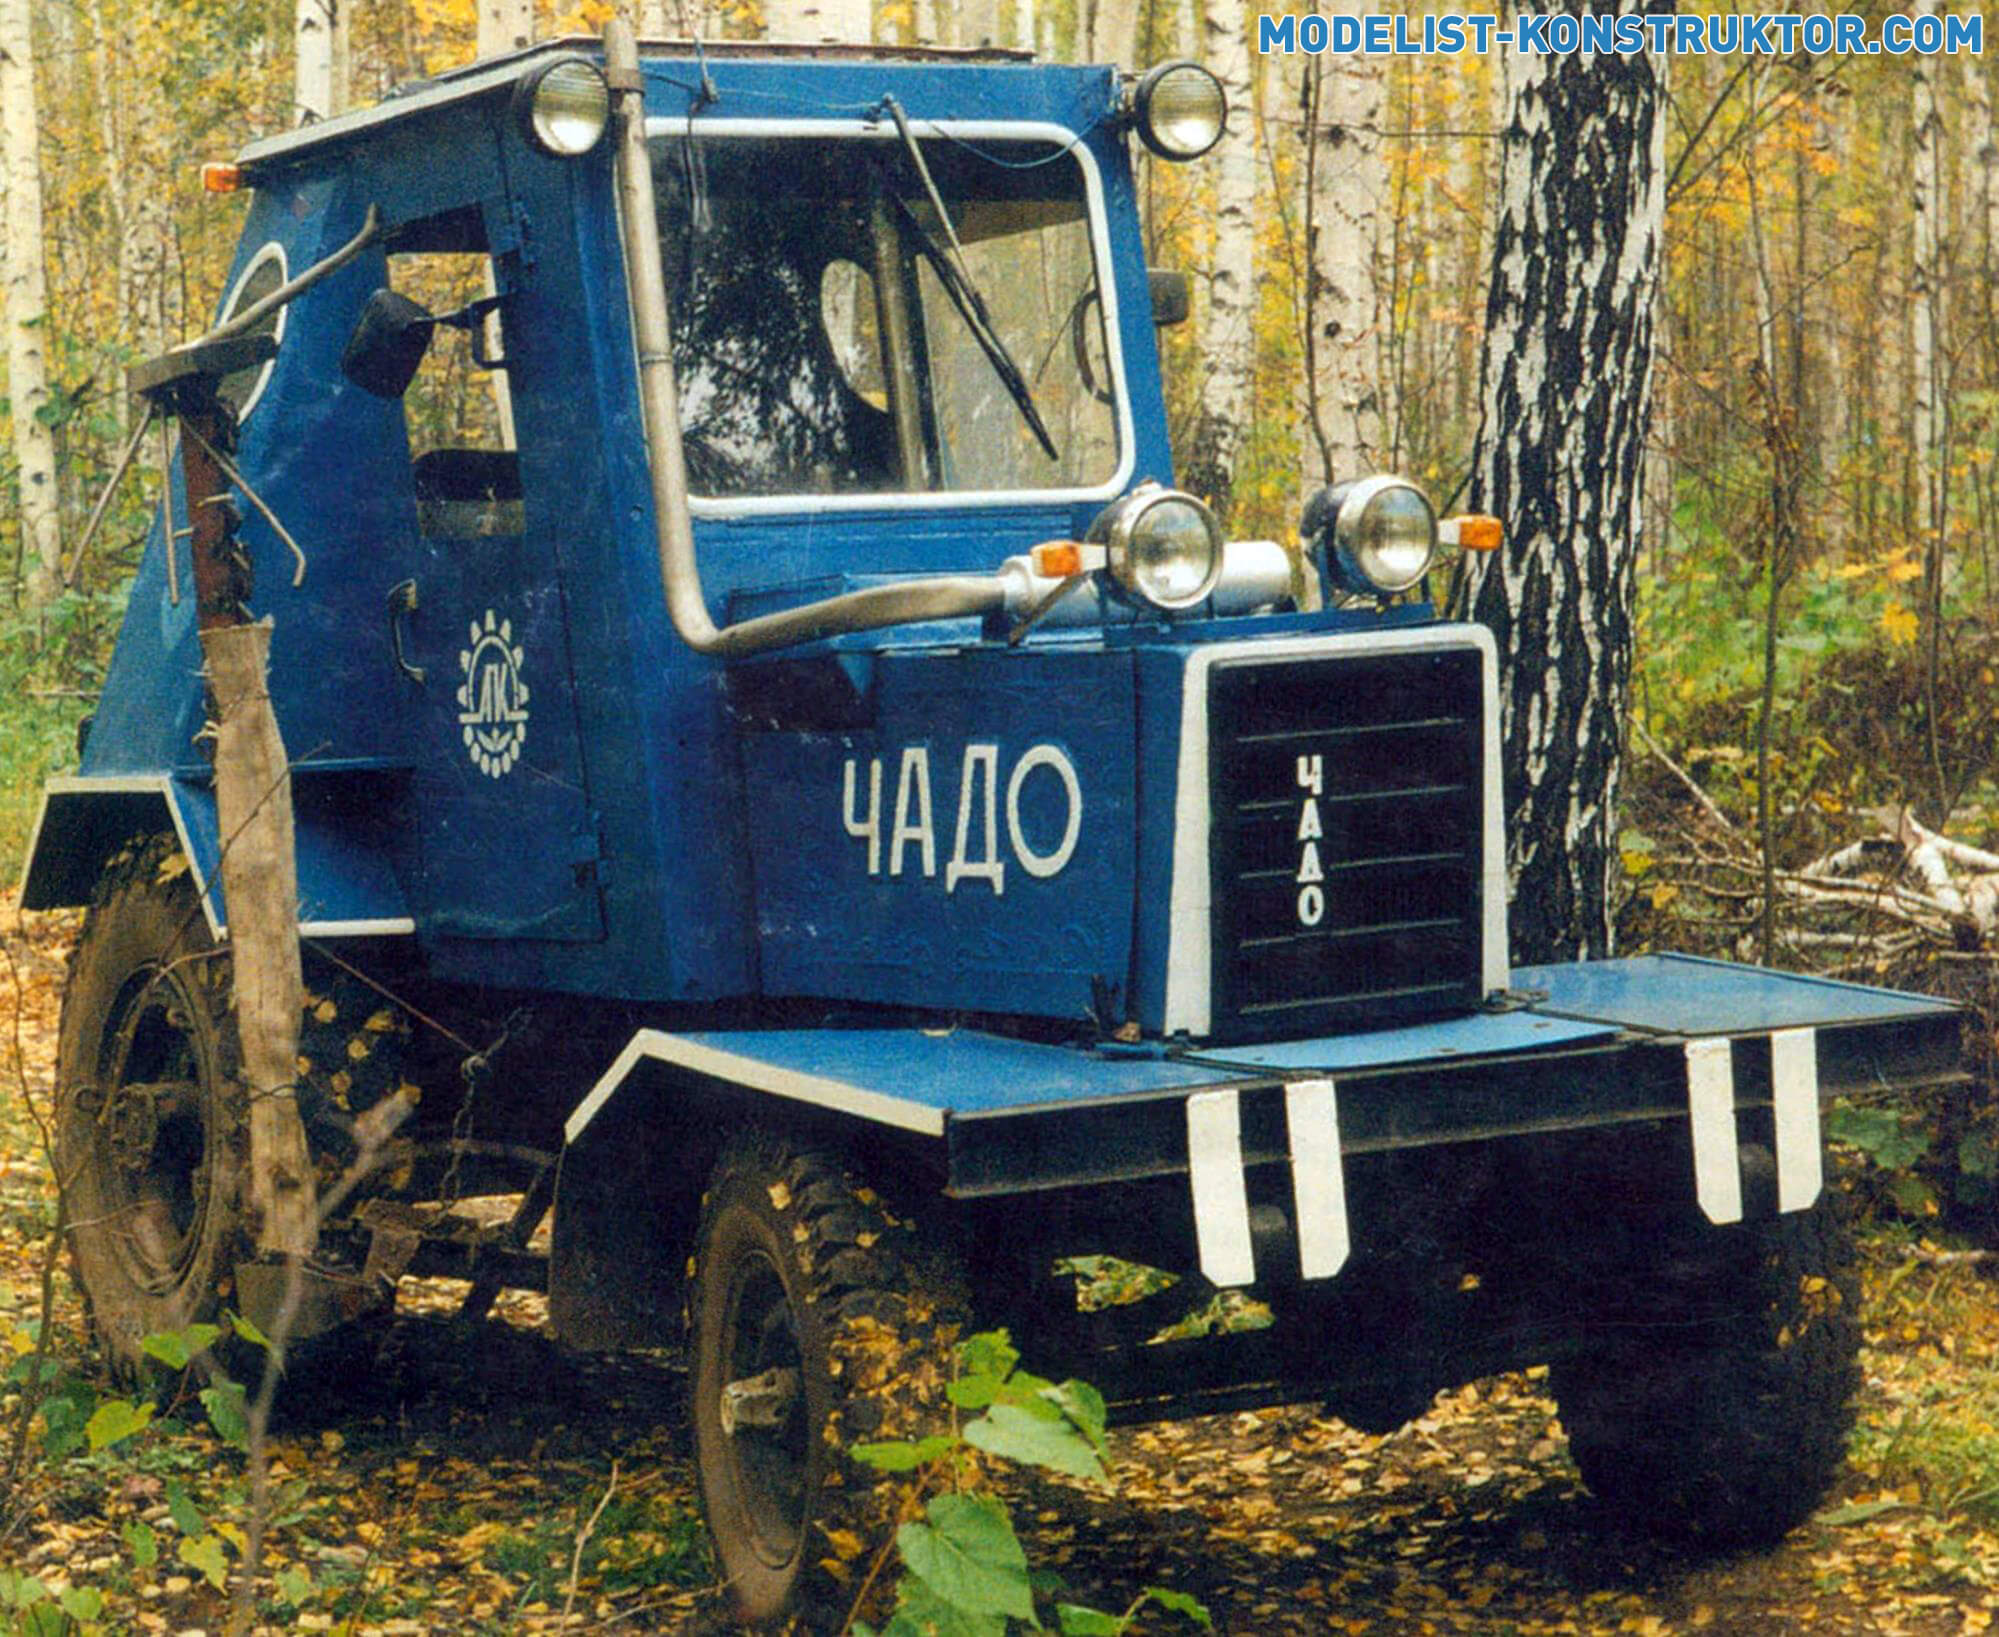
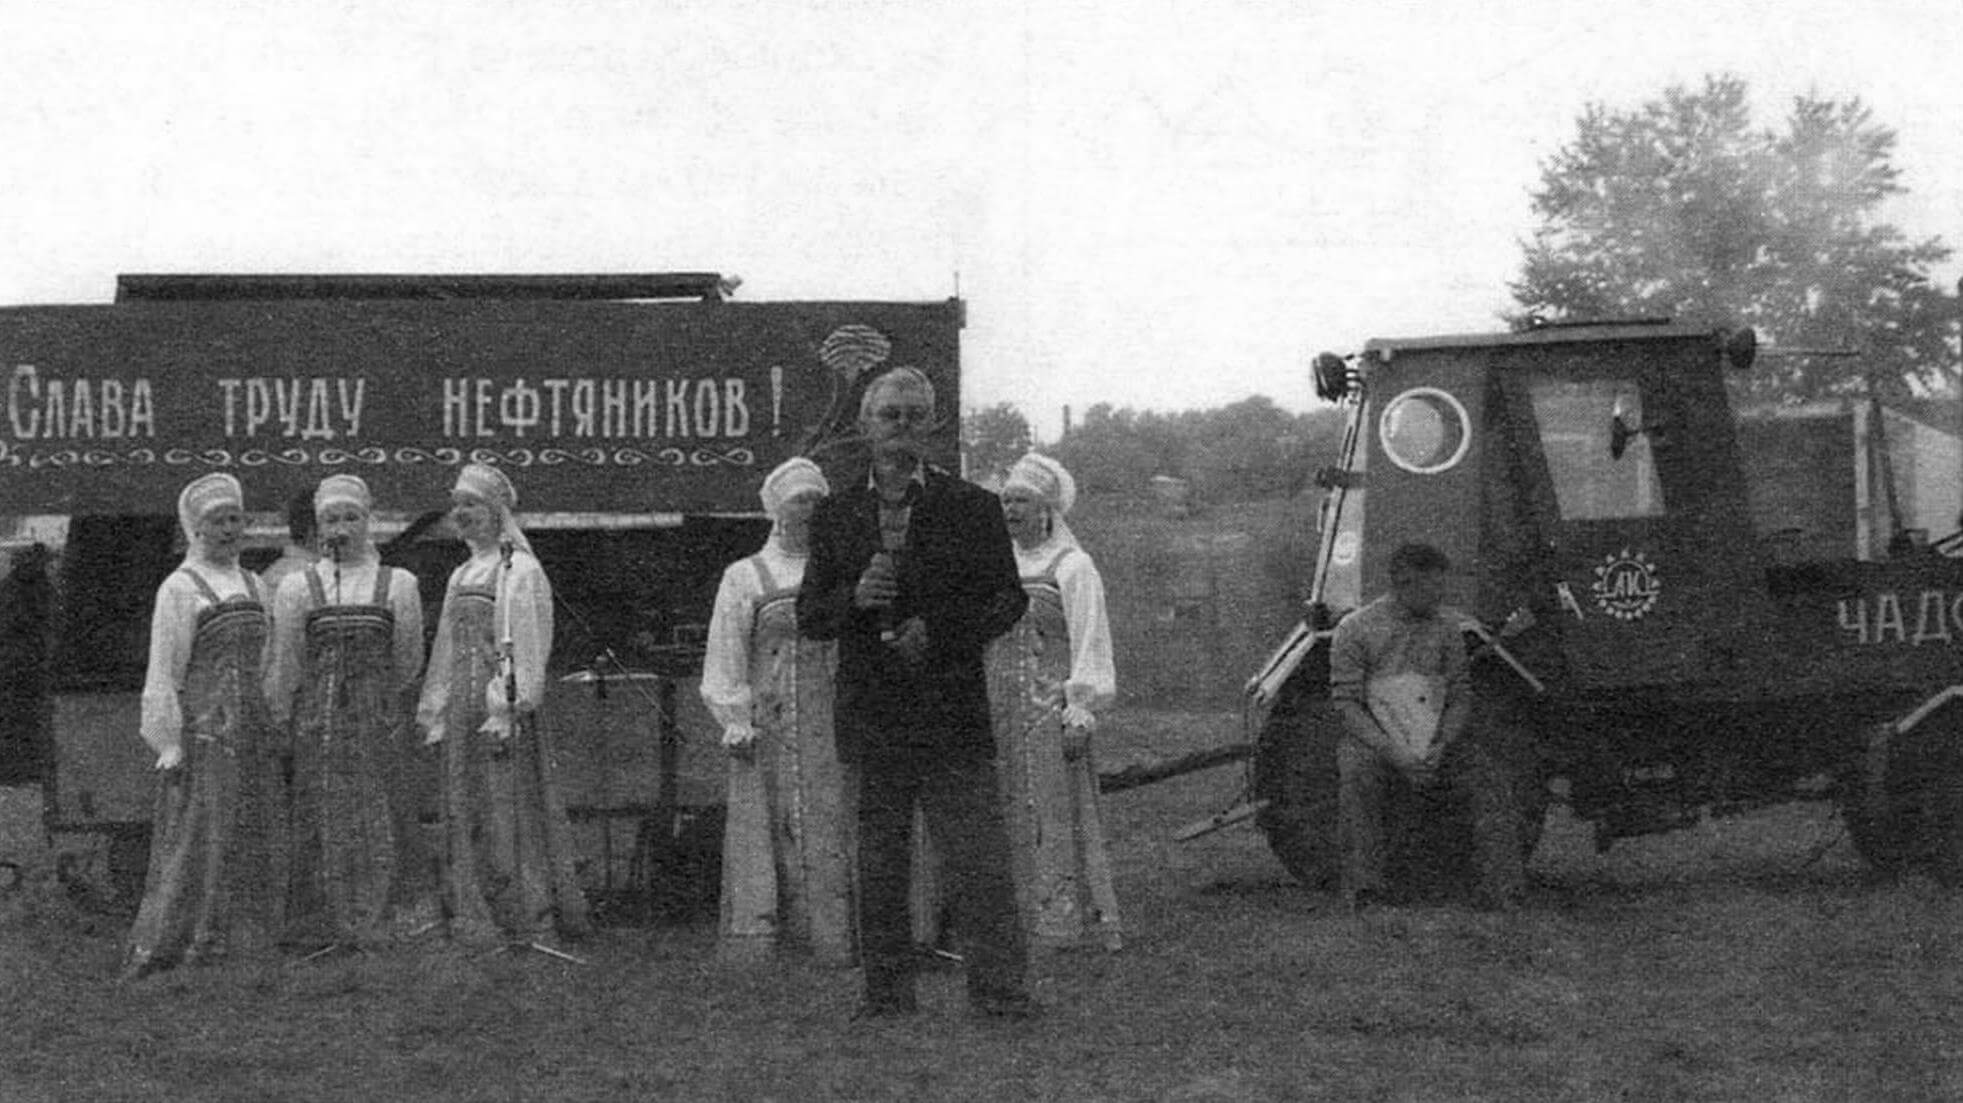
The tractor was named “CHIDO” – in honor of his beloved grandson: “Man Armenianov Demid Olegovich”, who never misses the opportunity to ride on his grandfather’s lap. In addition, children were called this affectionately in the old days in Rus’.
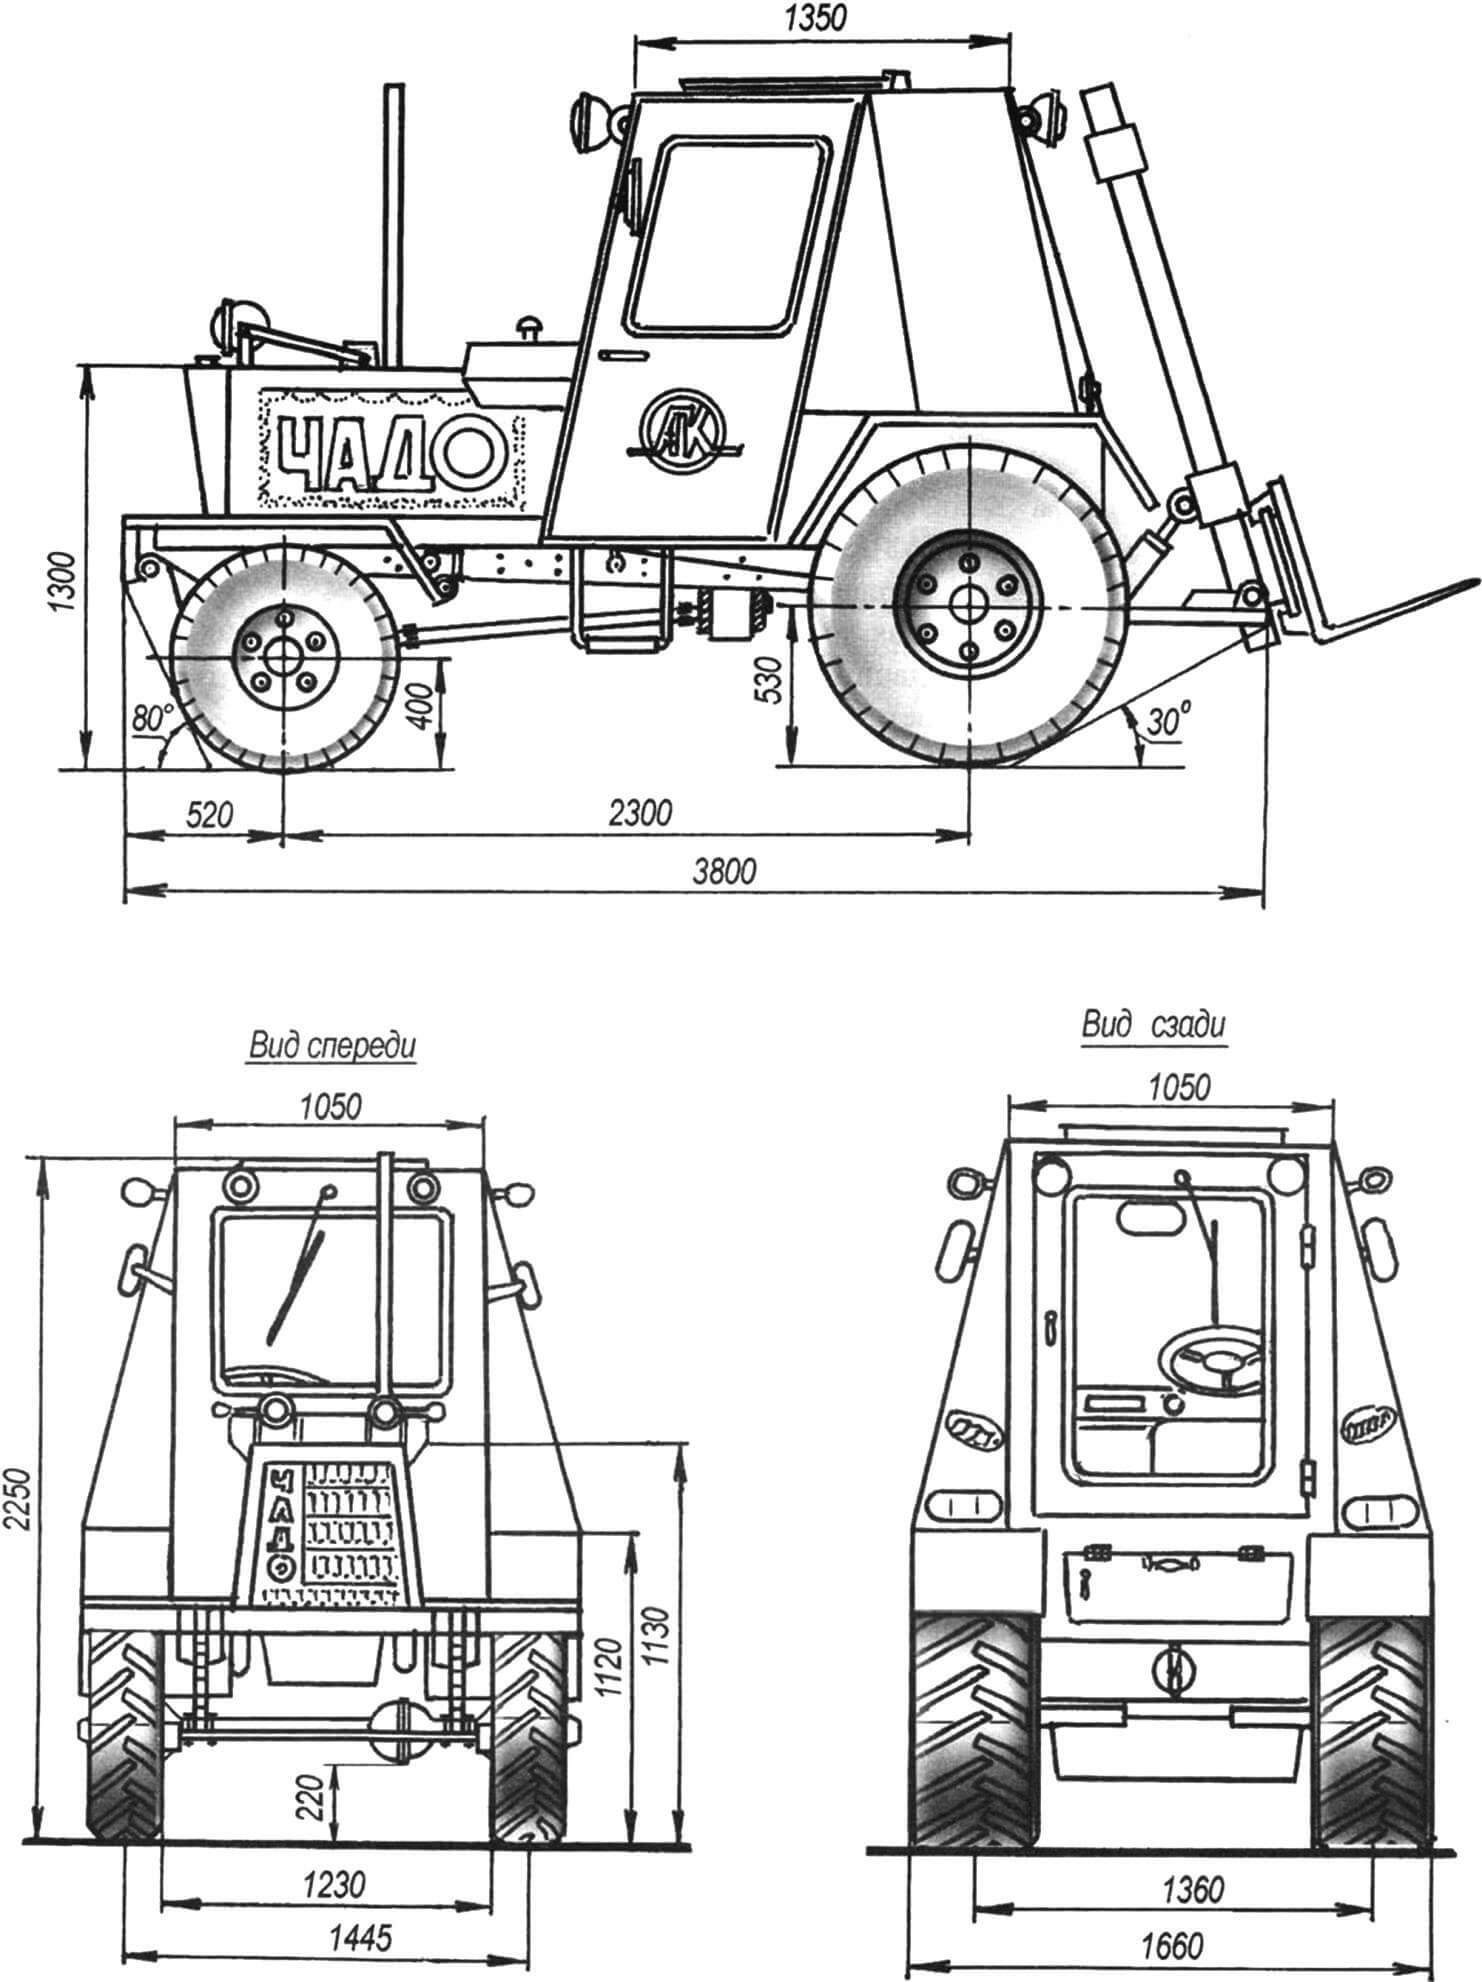
The technical characteristics of the tractor completely satisfy me. Even the relatively large mass (about 2.2 tons) works for success – it provides good wheel grip when plowing and on slippery roads. The fuel tank capacity is 25 liters – it is enough for more than 150 km. Speed from 3 to 60 km/h. And although the car was not created for racing, such a high maximum speed is still needed when performing transport work.
I already mentioned the trailed cargo dolly. By the way, I also made it myself. In addition to transporting goods, I use it as a mobile stage, control room and dressing room for outdoor concerts by amateur artists of the local Oil Workers’ House of Culture, of which I am also the director (my main job is as a firefighter).
P. ARMYANINOV, Kuteret village, Bashkortostan
Recommend to read
 CHANDELIER CHIZHEVSKOGO — TV
There are electric circuits of high voltage sources for aeroionizatora, which are collected on the basis of the automotive ignition coil. They are all quite simple and easily repeatable.... WIRING IS HERE!
There are various electronic devices to locate hidden wiring. However, at home the need for them arises relatively rarely, when, for example, produce the repair of the apartment or...
